- English
- Other Products
- FAQ
- [Windows 11/10] Troubleshooting - Sound (Speakers/...
- Subscribe to RSS Feed
- Mark as New
- Mark as Read
- Bookmark
- Subscribe
- Printer Friendly Page
- Report Inappropriate Content
- Article History
- Subscribe to RSS Feed
- Mark as New
- Mark as Read
- Bookmark
- Subscribe
- Printer Friendly Page
- Report Inappropriate Content
on
01-29-2024
01:40 AM
- edited
2 weeks ago
by
![]() ZenBot
ZenBot
[Windows 11/10] Troubleshooting - Sound (Speakers/Microphones) problems
Applicable Products: Notebook, Desktop, All-in-One PC, Gaming handheld, MiniPC, NUC
If you experience the sound problems of ASUS products, such as Speakers/Microphones are not working, no sound, sound is muffled, intermittent, or crackling/popping, etc. Or, Speakers/Microphones problems occur in a virtual meeting or online learning, such as Microsoft Teams, Skype, Google Meet, Google Classroom, Zoom, or other communication apps. Please refer to the following solutions. (For communication apps, please check the input/output device settings are correct as well.)
Note: If you experience that the sound is so loud, soft, or no sound when using a specific application, please refer to the Q1 in Q & A chapter.
Note: For notebook products, your computer may enable the AI Noise-Canceling Speaker feature. This feature filters out all sounds except human voices from the laptop speaker. If you wish to disable the AI Noise-Canceling Speaker, please refer to this article: Why is the sound from my speaker abnormal? Speakers no sound, sound is intermittent or no audio, or ...
To provide you more detailed instruction, you can also click ASUS YouTube video link below to know more about How to fix the Sound (Speakers/Microphone) problems
ttps://www.youtube.com/watch?v=fMJSO6FTkcI
Before troubleshooting, please make sure proper connection of External Speaker, Microphone, or Earphone if used.
Note: If you encounter audio issues when connecting external speakers or microphones to your ASUS product, it is recommended to first try connecting different external devices to your ASUS product to ensure that the audio functions correctly. Additionally, it is advisable to consult the installation documentation provided by the manufacturer of the external device to ensure proper connection and installation of drivers or software.
Notebook and AIO PC comes with two types of Earphone/Microphone jacks design
One of the designs has the Earphone and External Microphone made as two separate jacks. (The green marked is Earphone jack, and the red marked is External Microphone jack.)
The Earphone jack supports regular Earphone plug, or the ones commonly used on the smartphones called headsets (or earsets). However, plugging the Earphone plug into Microphone jack does not work.

The other design is to have the Earphone/Microphone combined into a single hybrid jack.
The jack supports regular earphone plug, or the ones commonly used on the smartphones called headsets (or earsets).

The types of Earphone/Microphone jacks design may be different based on different models, please refer to the User Manuals.
Desktop rear panel
If you use an external microphone, please connect it to MIC IN port (usually is pink). If you use an external speakers, please connect it to LINE OUT port (usually is green).
![]()
![]()
The types of Microsoft/Speakers design may be different based on different models, please refer to the User Manuals.
Gaming Handheld combo audio jack
The audio combo jack can connect to headphones/headsets/microphones.

The audio jack design may be different based on different models, please refer to the User Manuals.
Please go to the corresponding instruction based on the current Windows operating system on your device:
Windows 11 operating system
Speaker function is abnormal
Restore BIOS settings
- Access the BIOS setup screen on the device.
When the device is not powered on, press and hold the [F2] key on the keyboard, then press the power button to turn on the device. Keep holding the [F2] key until the BIOS setup screen appears, then release the [F2] key. Learn more about How to enter the BIOS setup screen.
Note: For some older desktop models, you may need to press and hold the [Del] key during startup to access the BIOS configuration screen.
Note: For gaming handhelds, press and hold the [Volume Down] button and then press the power button. - Once in the BIOS setup screen, please refer to the article: How to restore BIOS settings.
- If the problem persists, please continue the next troubleshooting step.
Update and confirm BIOS / Windows packages / drivers with the latest version in your device
Regularly updating BIOS, Windows, and drivers can enhance system stability and performance. Ensure that your device is using the latest versions. Learn more about updating BIOS:
How to update the BIOS version in Windows system
How to use EZ Flash to update the BIOS version
(For desktop products, please refer to ASUS Motherboard EZ Flash 3 Introduction.)
Learn more about updating Windows and drivers:
How to update drivers via System Update in MyASUS
If the problem persists after you have updated BIOS/Windows packages/drivers to the date, please continue to the next chapter for troubleshooting.
Check the settings of output device
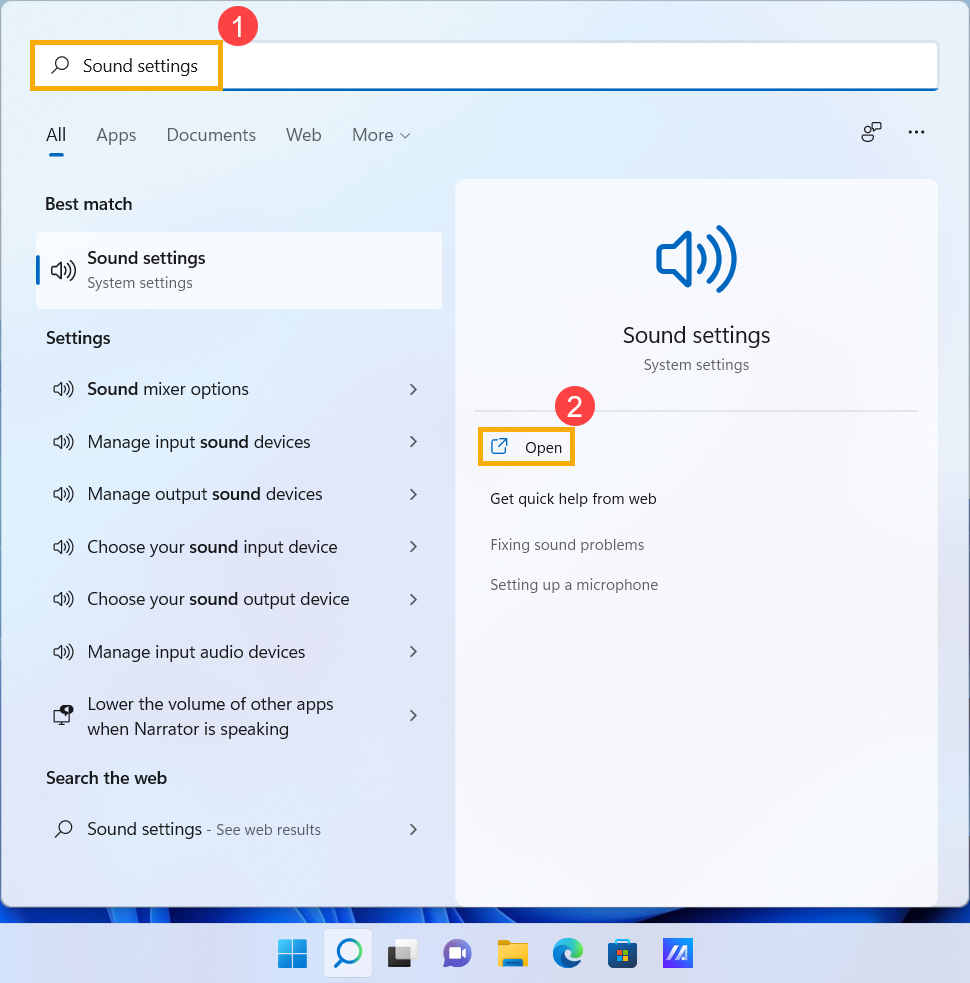
- Type and search [Sound settings] in the Windows search bar①, then click [Open]②.
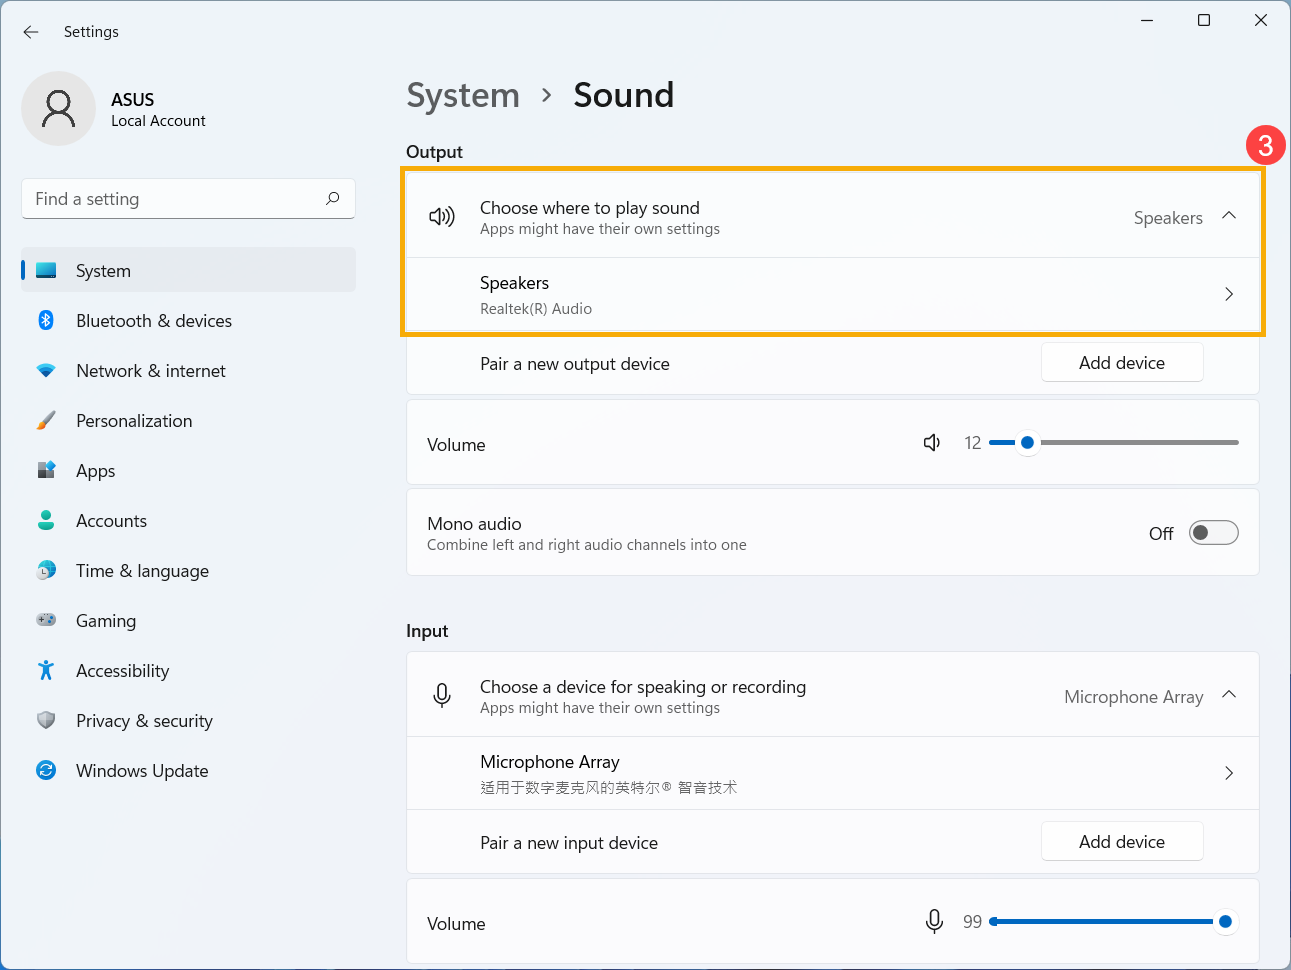
- Select the correct speaker device in the section of [Choose where to play sound]③.
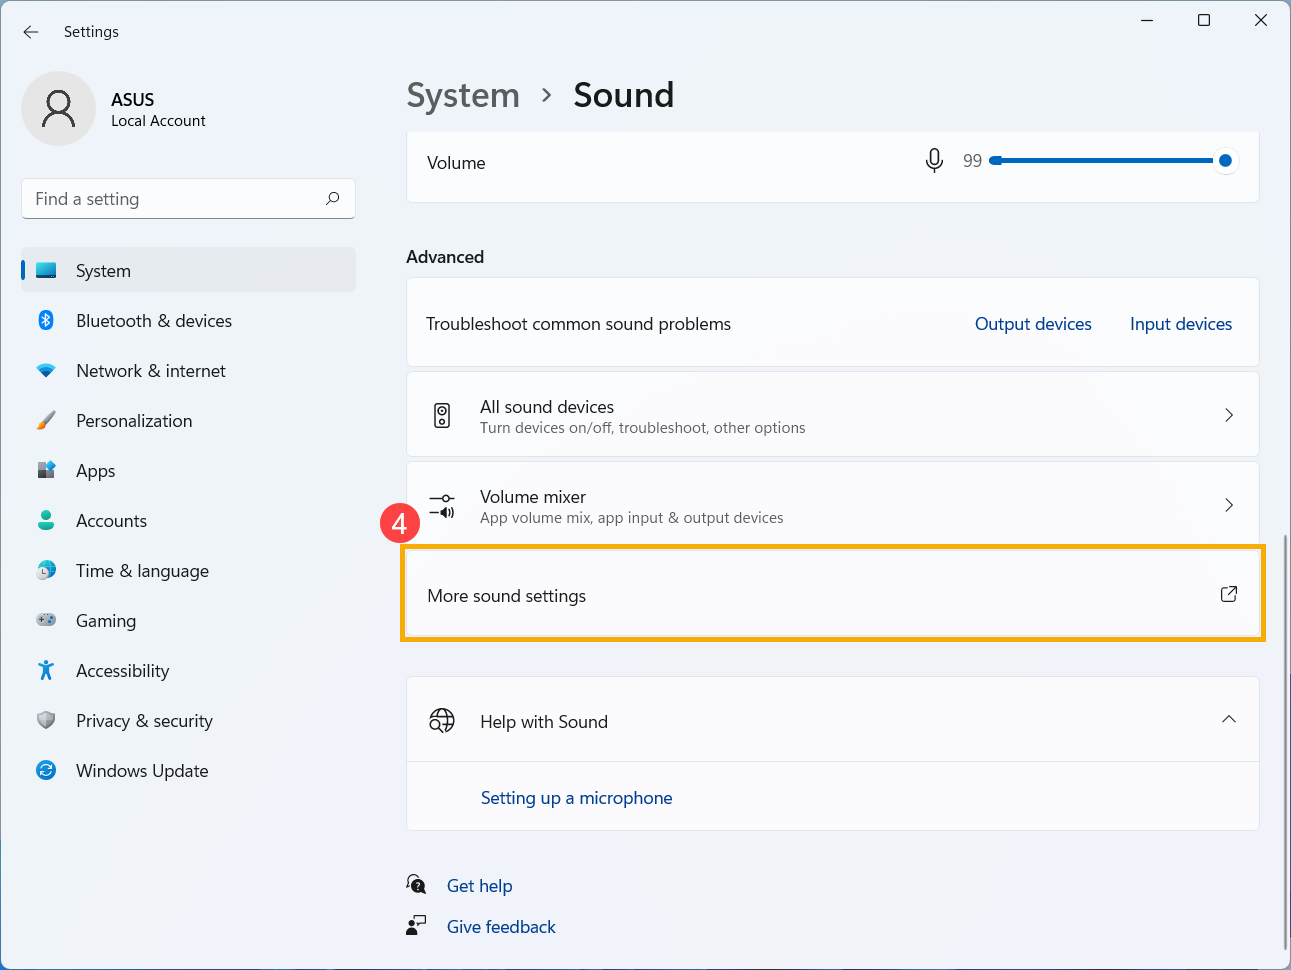
- Check if the speaker volume set to mute mode. Scroll the page to the bottom, and then click [More sound settings]④.
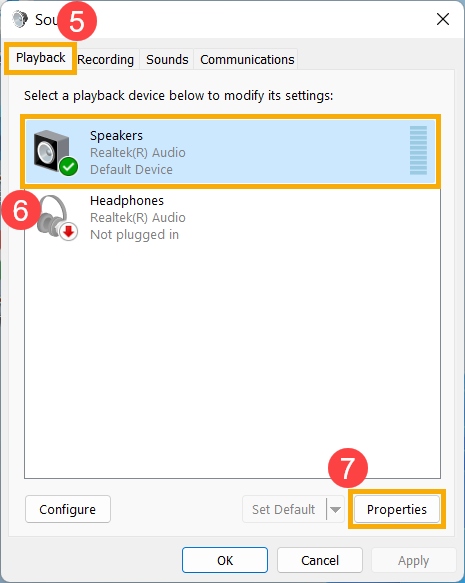
- Select [Playback] tab⑤, then select [your speaker device]⑥ and click [Properties]⑦.
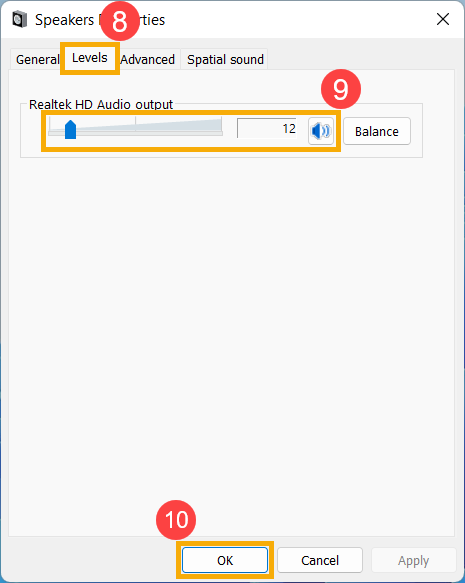
- Select [Levels] tab⑧, use the slider bar to adjust volume level and check if it [does not set to mute mode]⑨, then click on [OK]⑩ to save. (Mute mode:
 )
) 
- If the problem persists, please continue the next troubleshooting step.
Enable and reinstall the driver in Device Manager
- Type and search [Device Manager] in the Windows search bar①, then click [Open]②.
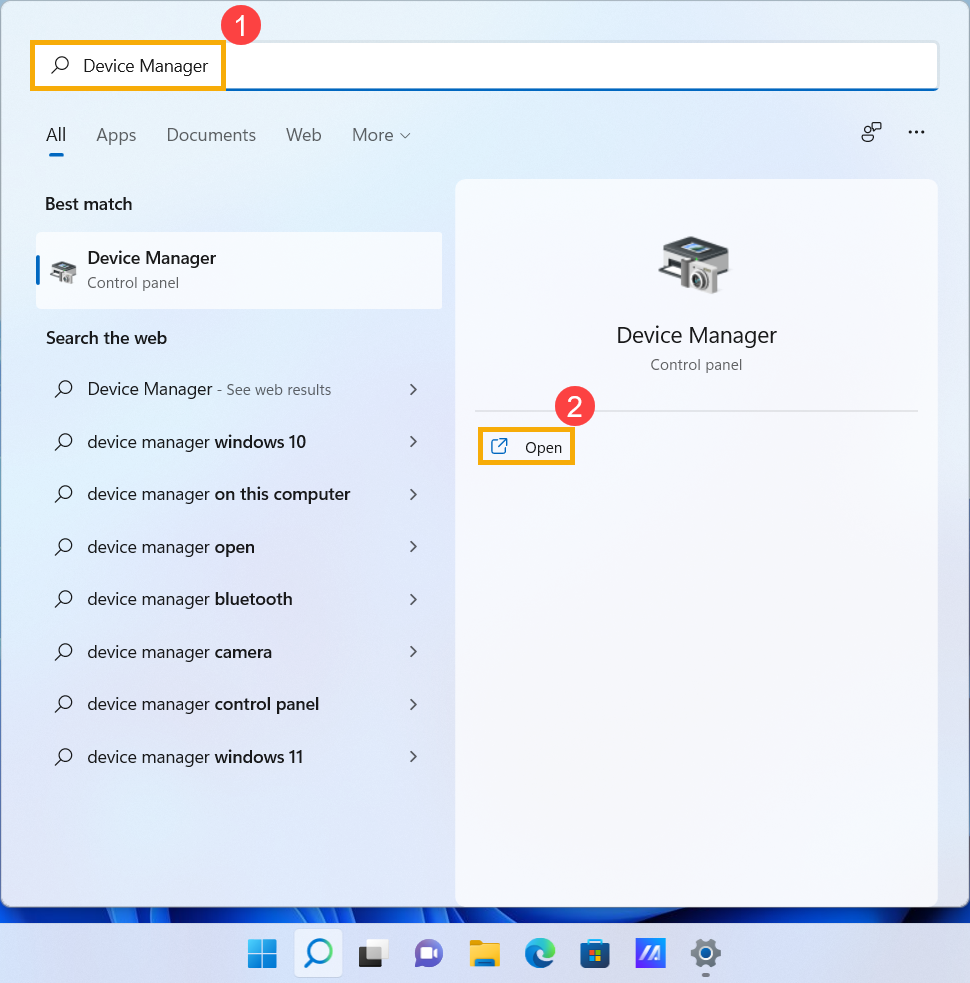
- Check the arrow next to [Audio inputs and outputs]③, then right-click [your speaker device]④ and select [Enable device]⑤.
If the [Enable device] option does not display that is meant the speaker function is enabled already, please continue to the next step.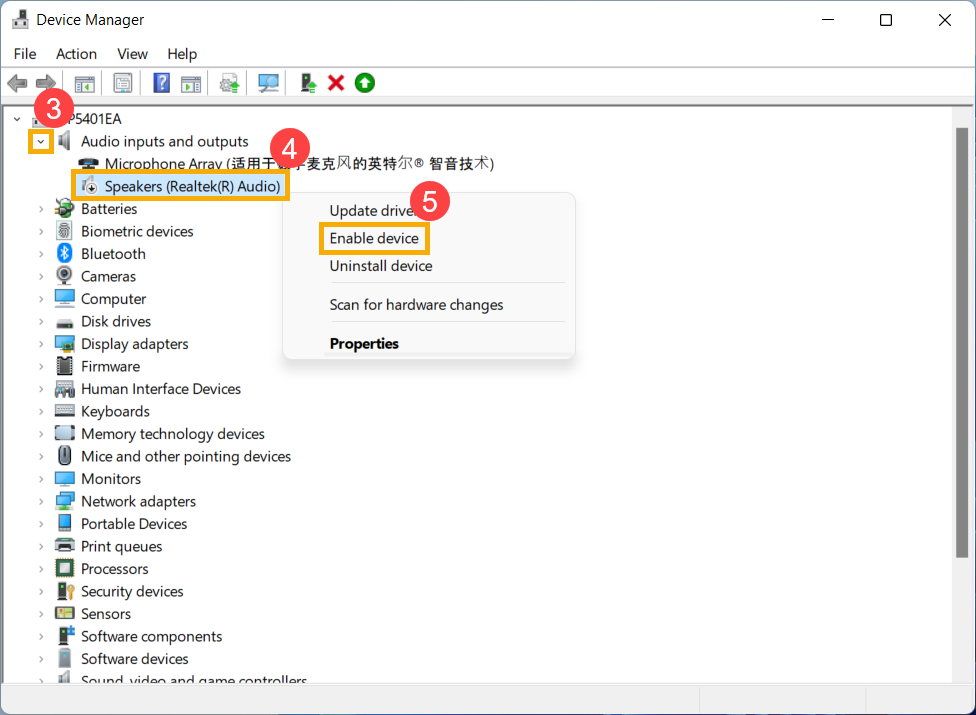
- Right-click [your speaker device]⑥, then select [Uninstall device]⑦.
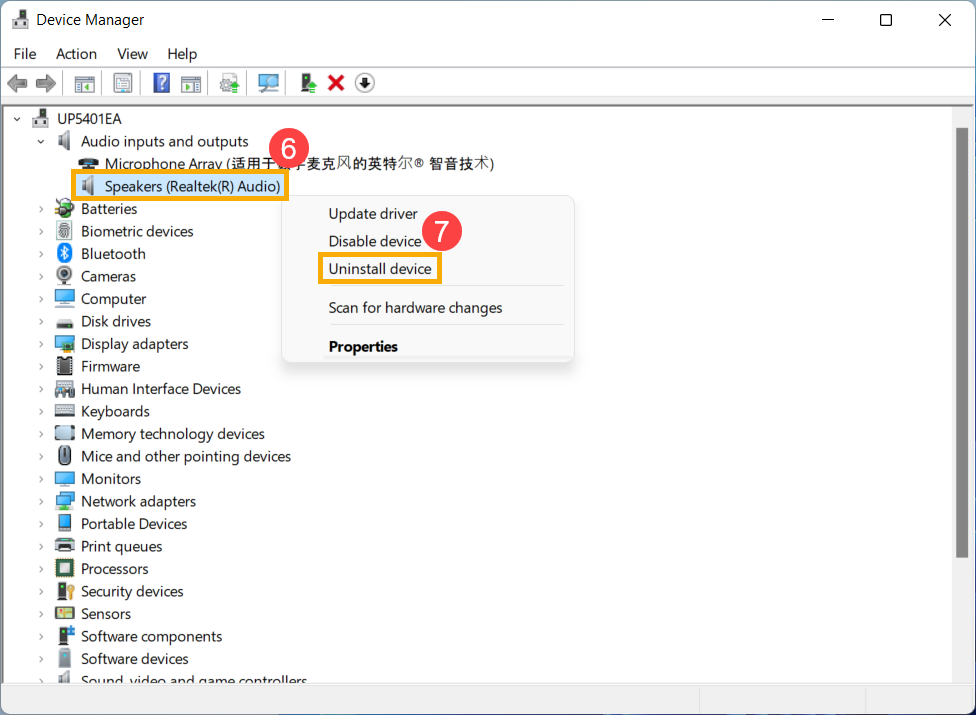
- Click [Uninstall]⑧.
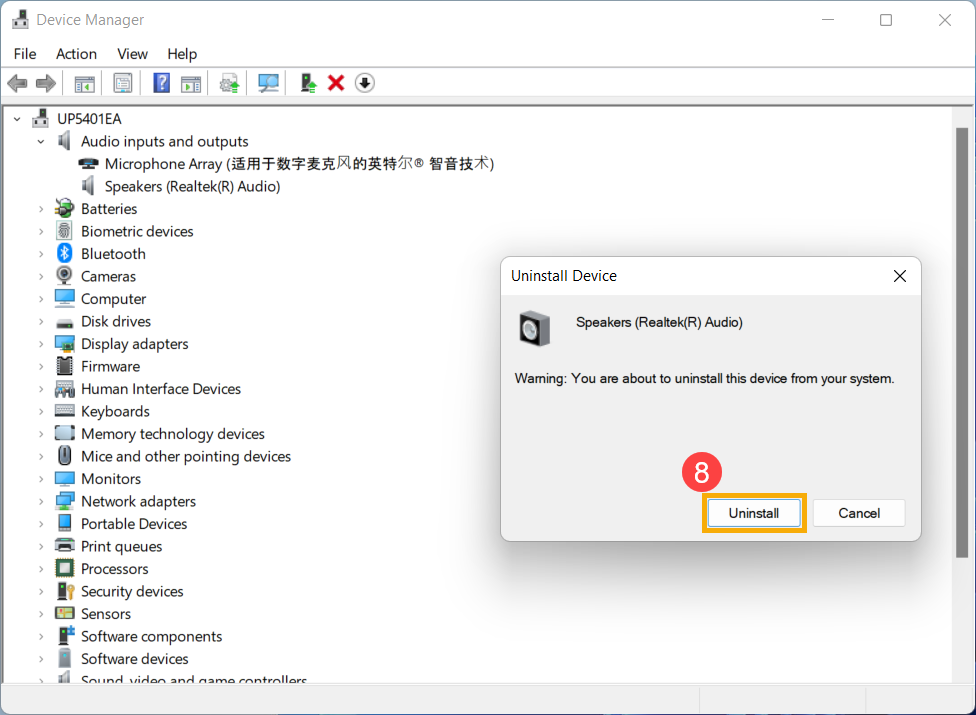
- After uninstalling the speakers, please click [Action]⑨ and select [Scan for hardware changes]⑩.
The system will reinstall the speakers, and the device will display in the Audio inputs and outputs category.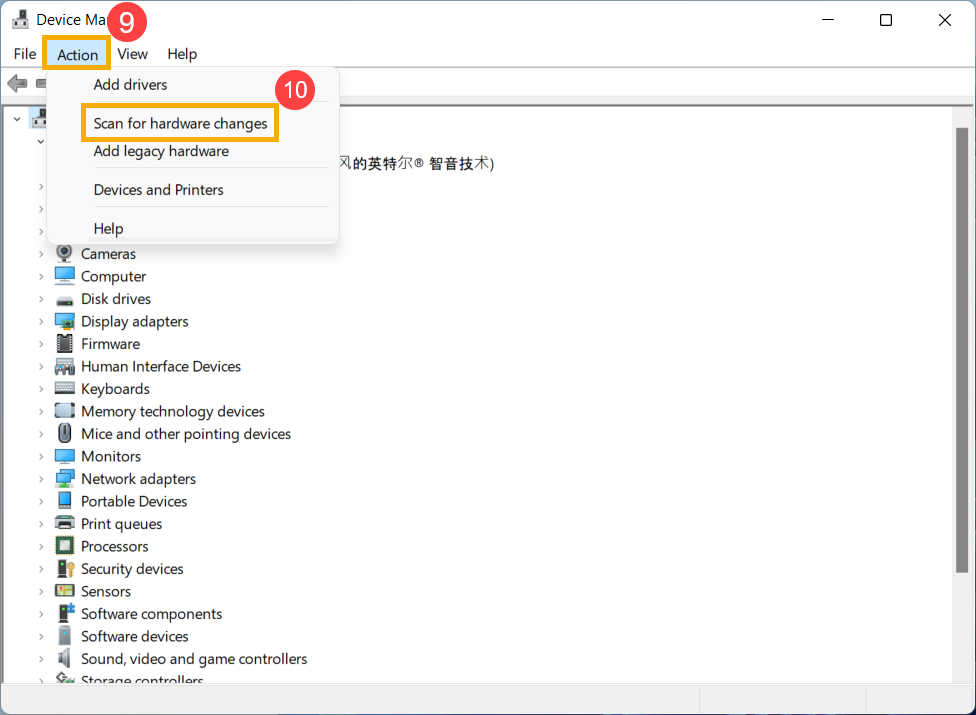
- If you fail to update speaker driver in device manager, please go to the ASUS Support Site to download and install the [Audio] driver, here you can learn more about How to search and download drivers.
Note: The following pictures are the current version as a reference, please download the latest version from the ASUS Support Site.)
- If the problem persists, please continue the next troubleshooting step.
Use Troubleshooting tool in Windows
- Type and search [Sound settings] in the Windows search bar①, then click [Open]②.
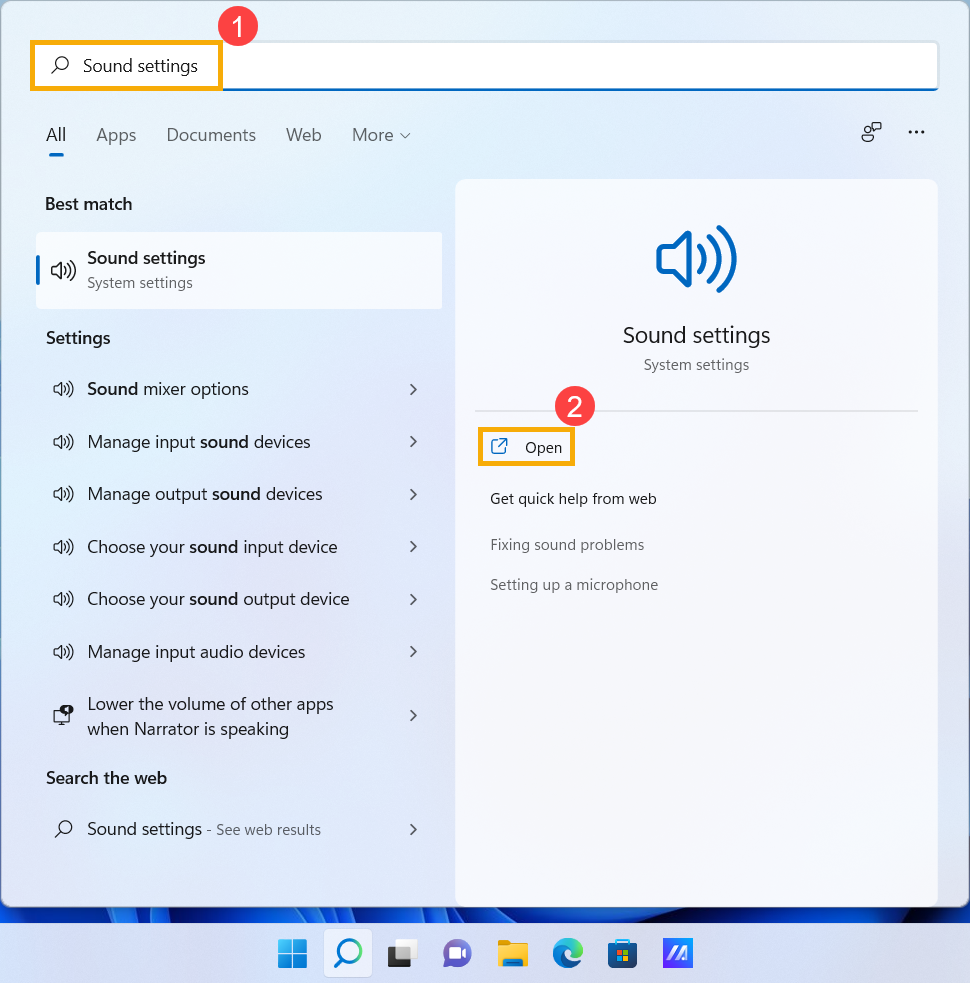
- Scroll the page to the bottom, and then select [Output devices] in the Troubleshoot common sound problems section③.
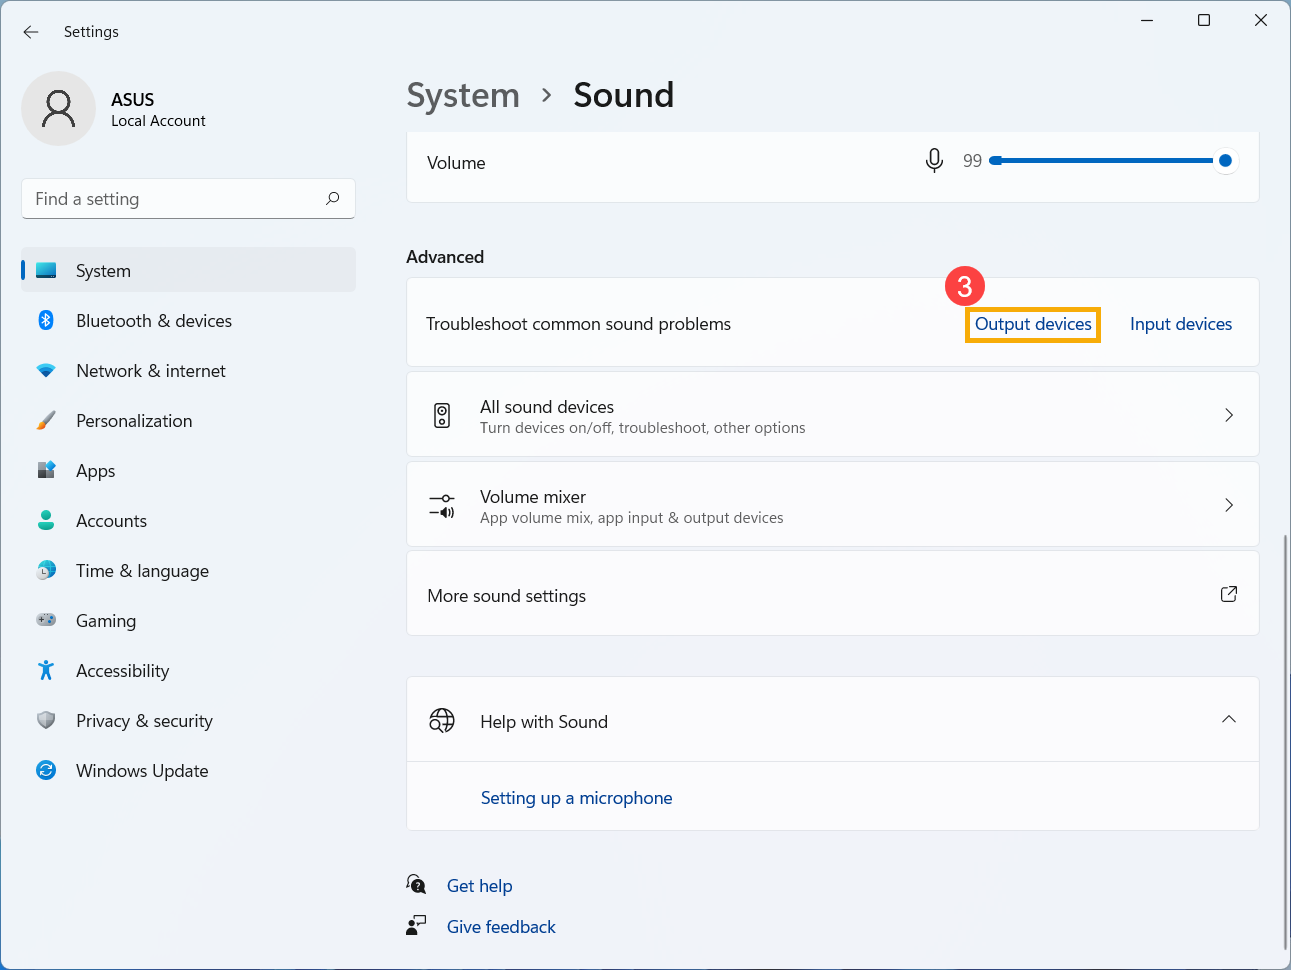
- Follow the on-screen instructions to complete the troubleshooting process. If the problem persists, please continue the next troubleshooting step.
Restore the system from restore point
If the speakers problem happens recently, and if you have ever created a restore point or there is an automatic system restore existed, try to restore the device to a point before the problem began to resolve the problem. Here you can learn more about How to use restore point to restore the system. If the problem persists, please continue the next troubleshooting step.
Reset the system
If the problem persists after all troubleshooting steps are completed. Please backup your personal files, then reset the system to back to its original configuration. Here you can learn more about How to reset the system.
Microphone function is abnormal
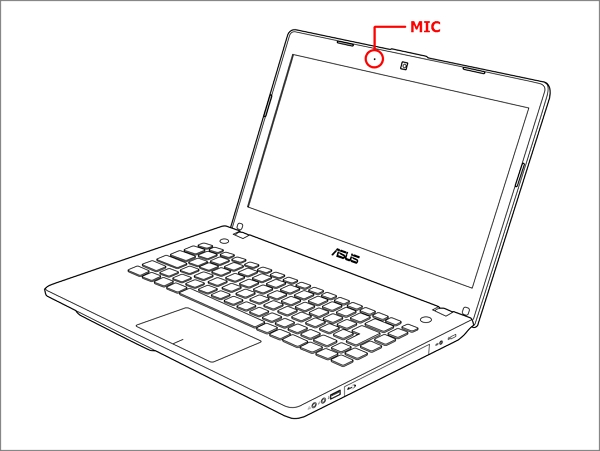
If you use the internal microphone, check it is not covered by anything
Normally, the Microphone is located on either side of the camera. The position of the microphone may vary slightly depending on the model. Please refer to the User Manual for detailed information.
Restore BIOS settings
- Access the BIOS setup screen on the device.
When the device is not powered on, press and hold the [F2] key on the keyboard, then press the power button to turn on the device. Keep holding the [F2] key until the BIOS setup screen appears, then release the [F2] key. Learn more about How to enter the BIOS setup screen.
Note: For some older desktop models, you may need to press and hold the [Del] key during startup to access the BIOS configuration screen.
Note: For gaming handhelds, press and hold the [Volume Down] button and then press the power button. - Once in the BIOS setup screen, please refer to the article: How to restore BIOS settings.
- If the problem persists, please continue the next troubleshooting step.
Update and confirm BIOS / Windows packages / drivers with the latest version in your device
Regularly updating BIOS, Windows, and drivers can enhance system stability and performance. Ensure that your device is using the latest versions. Learn more about updating BIOS:
How to update the BIOS version in Windows system
How to use EZ Flash to update the BIOS version
(For desktop products, please refer to ASUS Motherboard EZ Flash 3 Introduction.)
Learn more about updating Windows and drivers:
How to update drivers via System Update in MyASUS
If the problem persists after you have updated BIOS/Windows packages/drivers to the date, please continue to the next chapter for troubleshooting.
Check the settings of input device
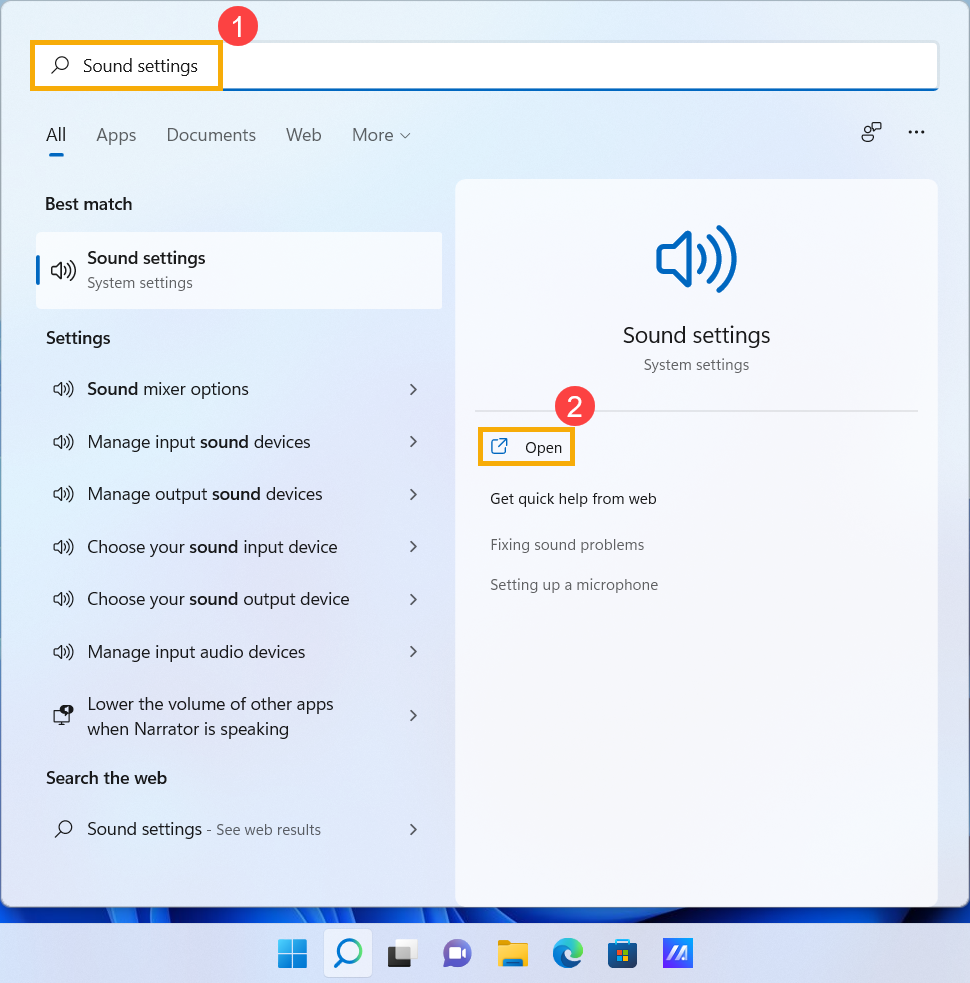
- Type and search [Sound settings] in the Windows search bar①, then click [Open]②.
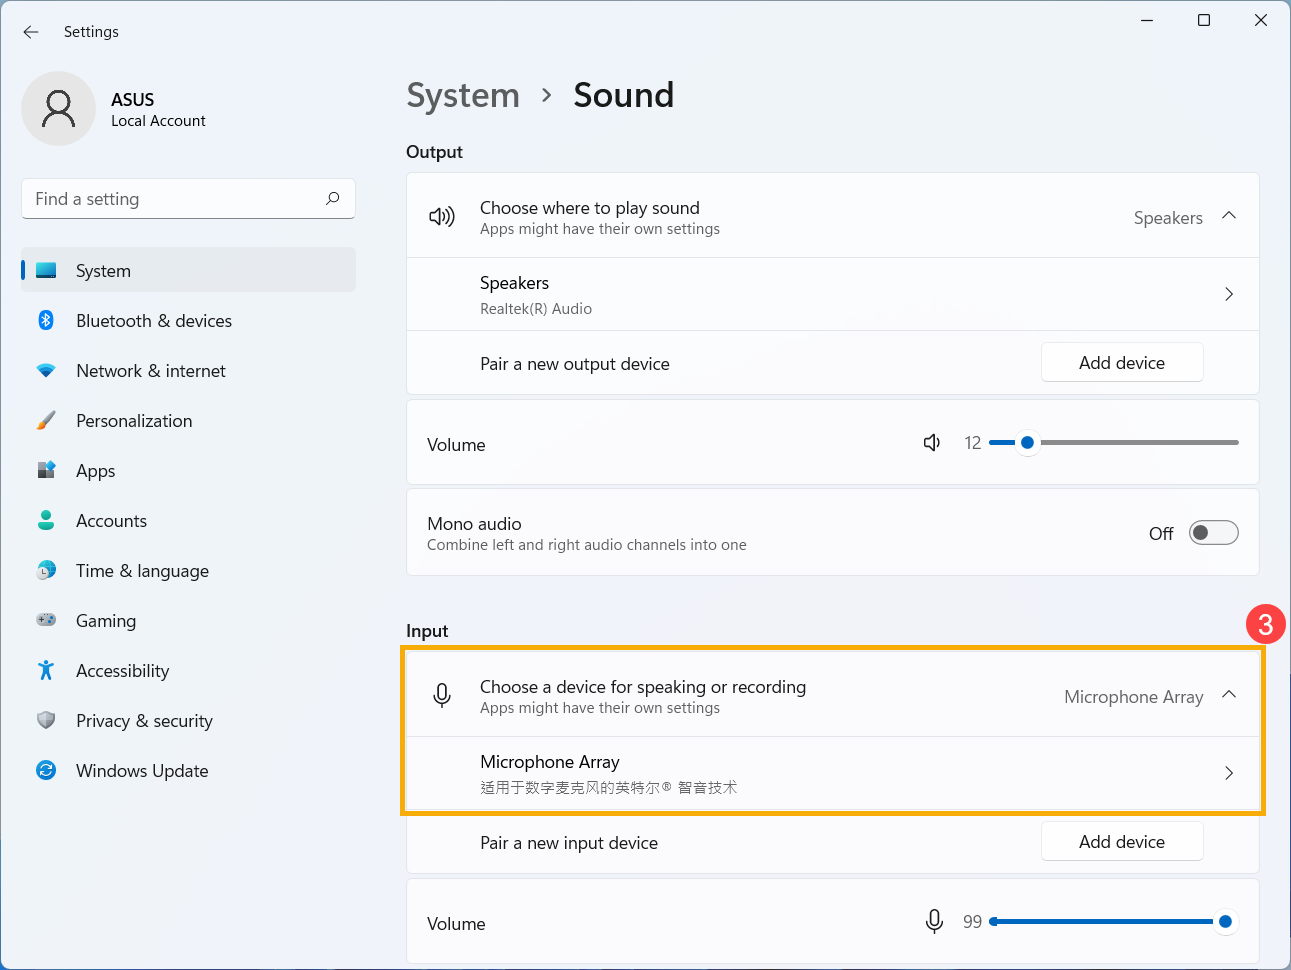
- Select the correct microphone device in the section of [Choose a device for speaking or recording]③.
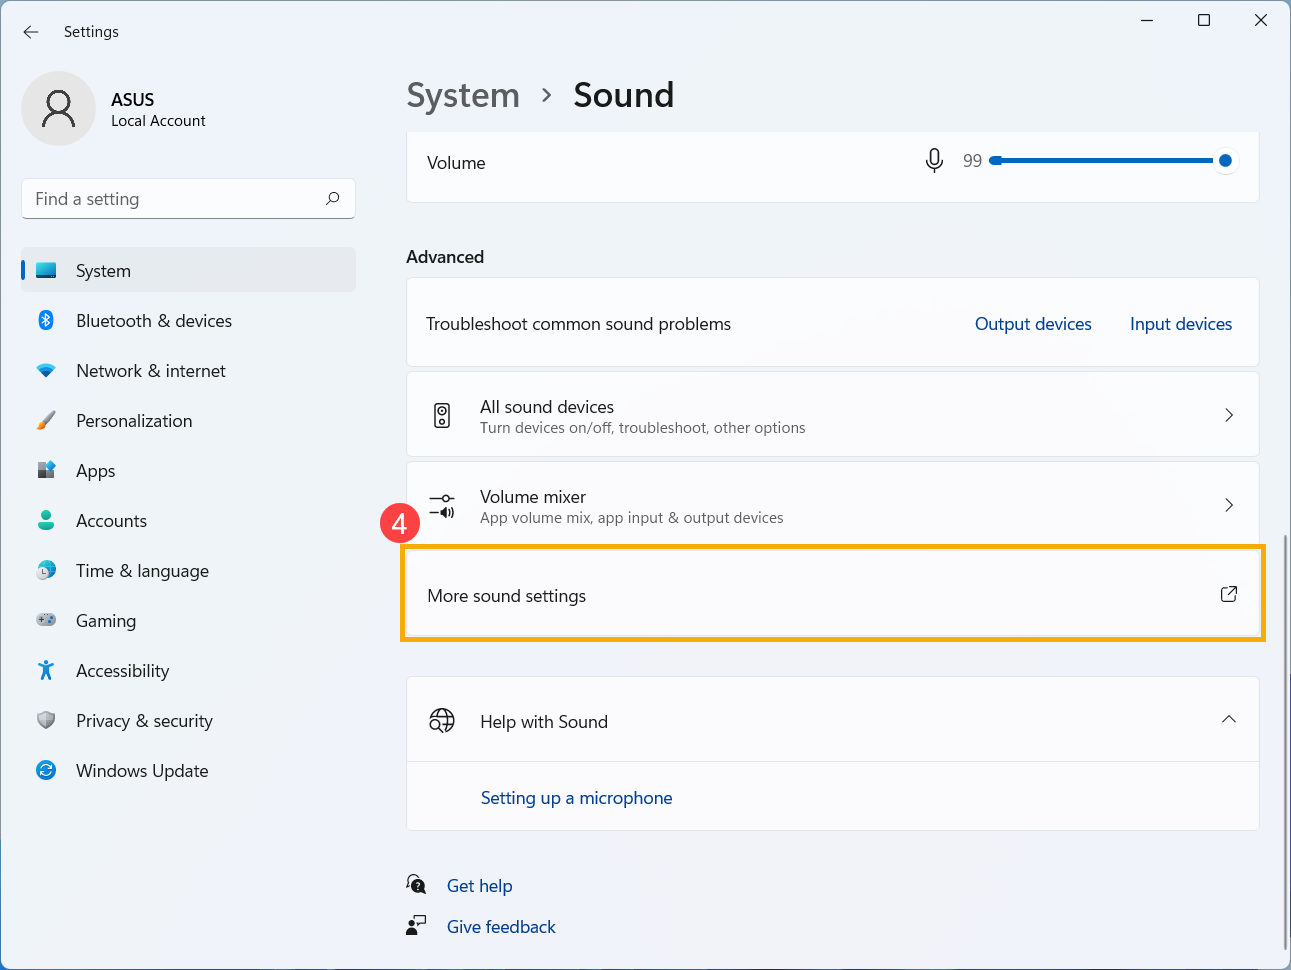
- Check if the microphone volume set to mute mode. Scroll the page to the bottom, and then click [More sound settings]④.
- Select [Recording] tab⑤, then select [your microphone device]⑥ and click [Properties]⑦.
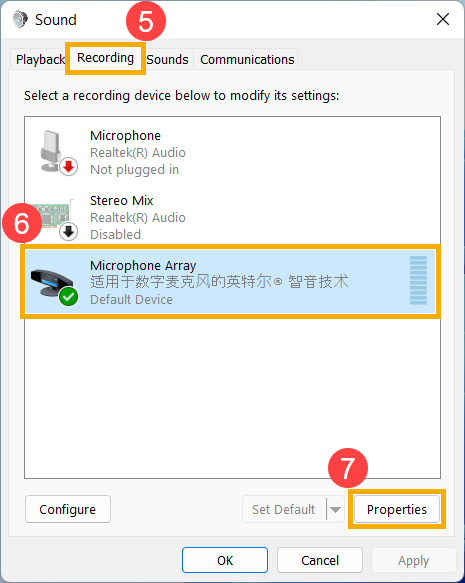
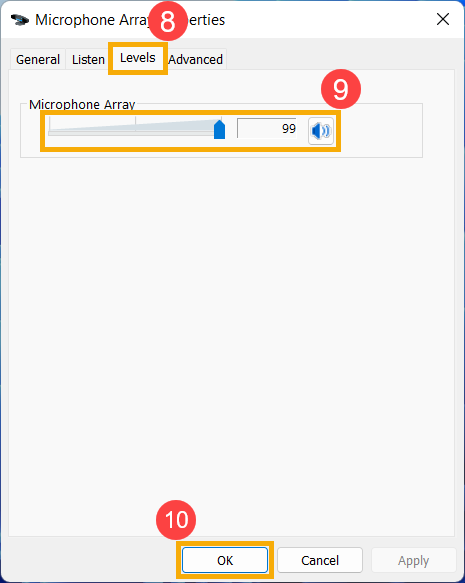
- Select [Levels] tab⑧, use the slider bar to adjust volume level and check if it [does not set to mute mode]⑨, then click [OK]⑩ to save. (Mute mode:
 )
) 
- If the problem persists, please continue the next troubleshooting step.
Enable and reinstall the driver in Device Manager
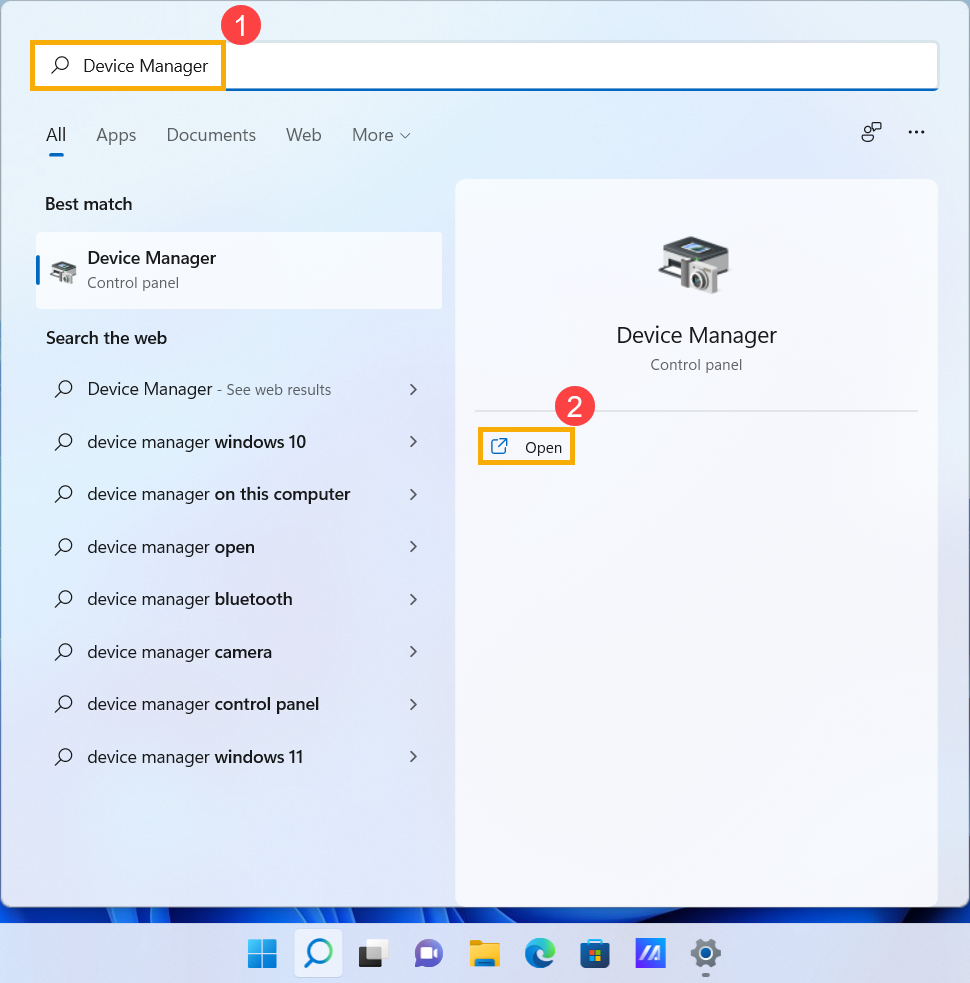
- Type and search [Device Manager] in the Windows search bar①, then click [Open]②.
- Check the arrow next to [Audio inputs and outputs]③, then right-click [your microphone device]④ and select [Enable device]⑤.
If the [Enable device] option does not display that is meant the microphone function is enabled already, please continue to the next step.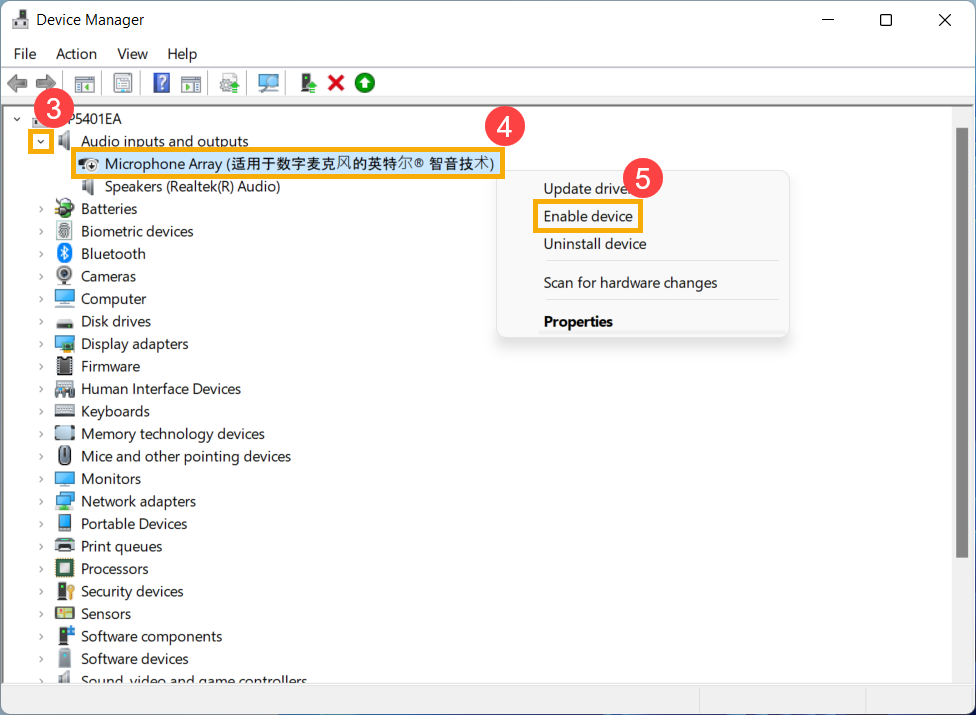
- Right-click [your microphone device]⑥, then select [Uninstall device]⑦.
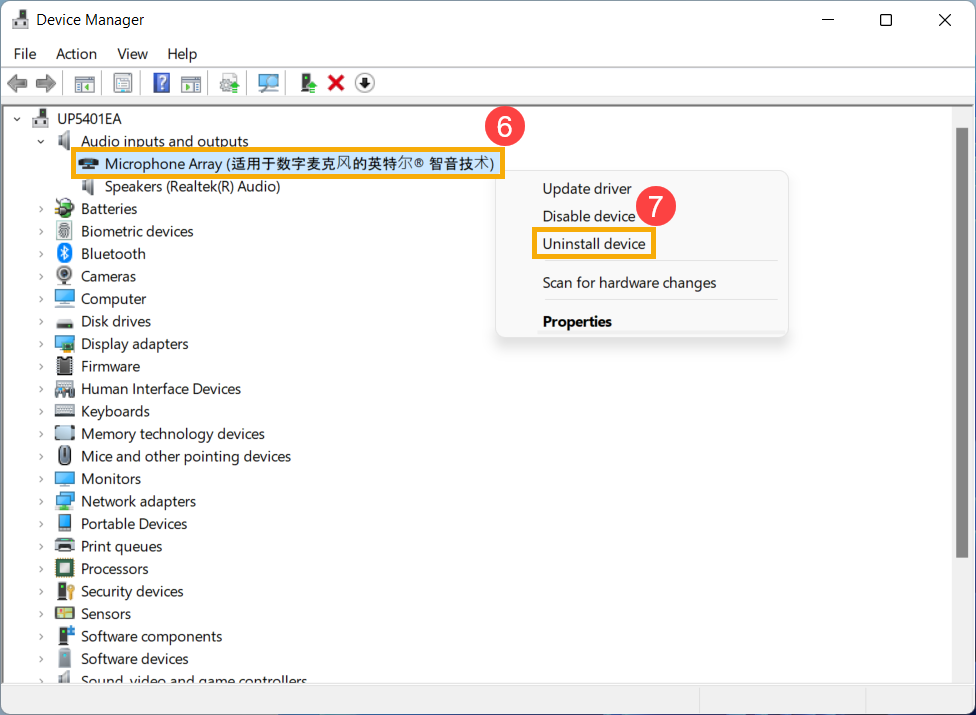
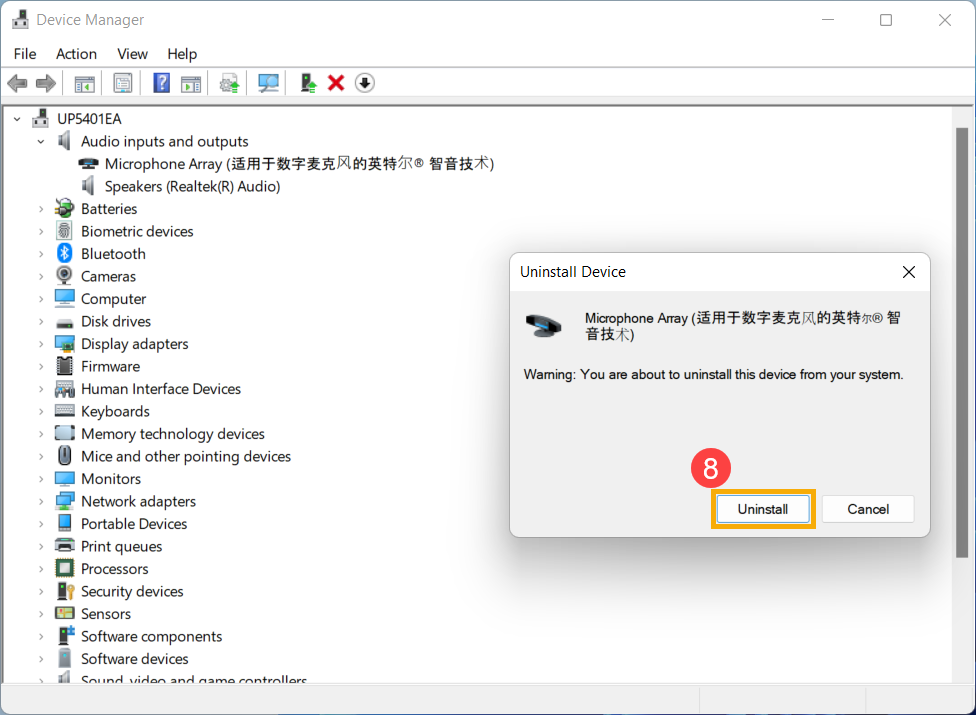
- Click [Uninstall]⑧.
- After uninstalling the microphone, please click [Action]⑨ and select [Scan for hardware changes]⑩.
The system will reinstall the microphone, and the device will display in the Audio inputs and outputs category.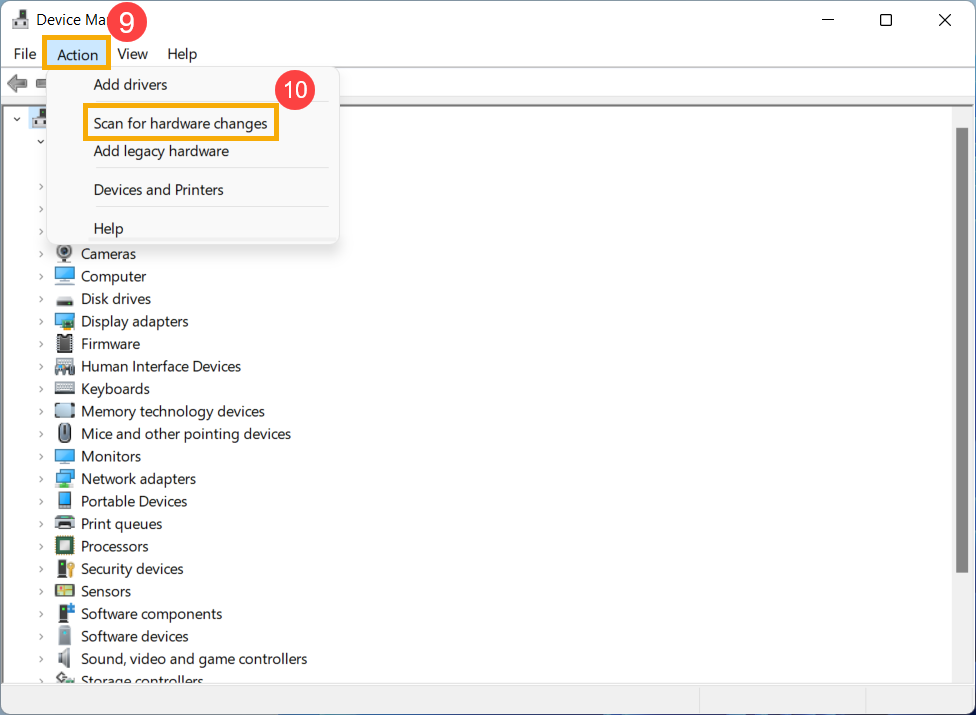
- If you fail to update speaker driver in device manager, please go to the ASUS Support Site to download and install the driver, here you can learn more about How to search and download drivers.
If you use the internal microphone, please download and install the [Camera] driver because the Internal Microphone is integrated with Camera.
If you use the external microphone, please download and install the [Audio] driver.
Note: The following pictures are the current version as a reference, please download the latest version from the ASUS Support Site.

- If the problem persists, please continue the next troubleshooting step.
Use Troubleshooting tool in Windows
- Type and search [Sound settings] in the Windows search bar①, then click [Open]②.
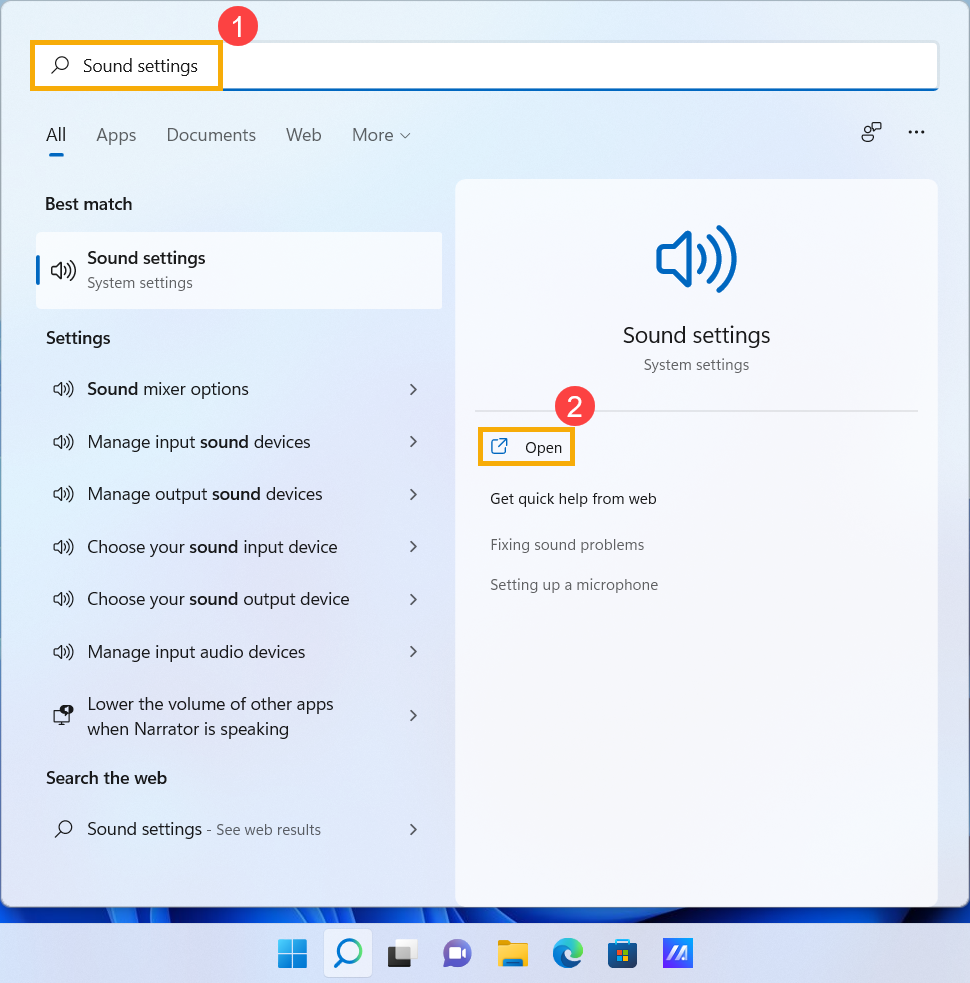
- Scroll the page to the bottom, and then select [Input devices] in the Troubleshoot common sound problems section③.
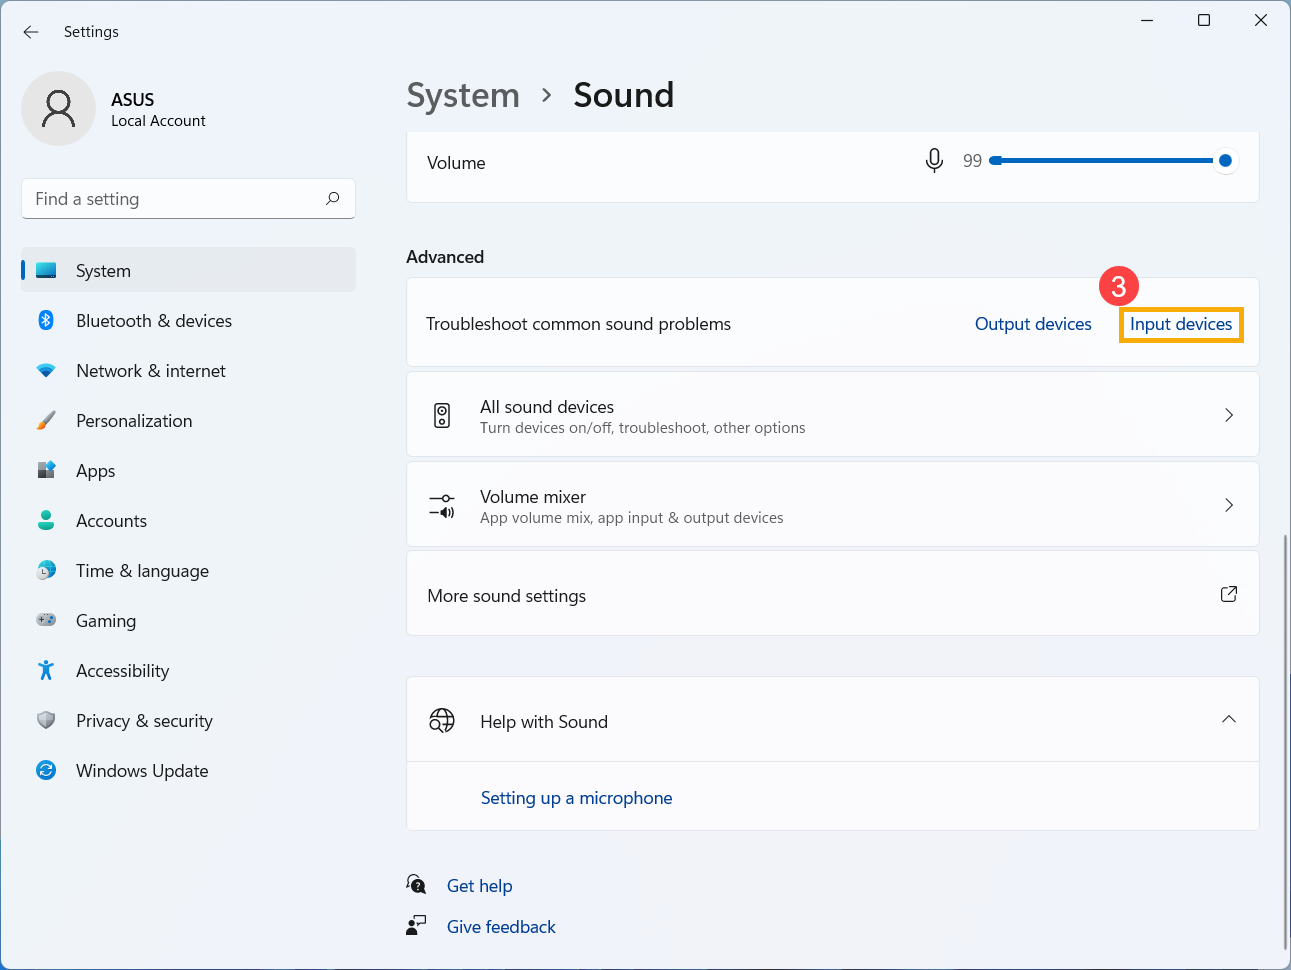
- Follow the on-screen instructions to complete the troubleshooting process. If the problem persists, please continue the next troubleshooting step.
Restore the system from restore point
If the microphone problem happens recently, and if you have ever created a restore point or there is an automatic system restore existed, try to restore the device to a point before the problem began to resolve the problem. Here you can learn more about How to use restore point to restore the system. If the problem persists, please continue the next troubleshooting step.
Reset the system
If the problem persists after all troubleshooting steps are completed. Please backup your personal files, then reset the system to back to its original configuration. Here you can learn more about How to reset the system.
Q & A
Q1: Why the sound is so loud, soft, or no sound when I use a specific application?
A1: You can use Volume mixer to adjust the suitable volume for each application.
Right-click on the [Speaker icon]① which is located at the taskbar, then select [Open volume mixer]②.
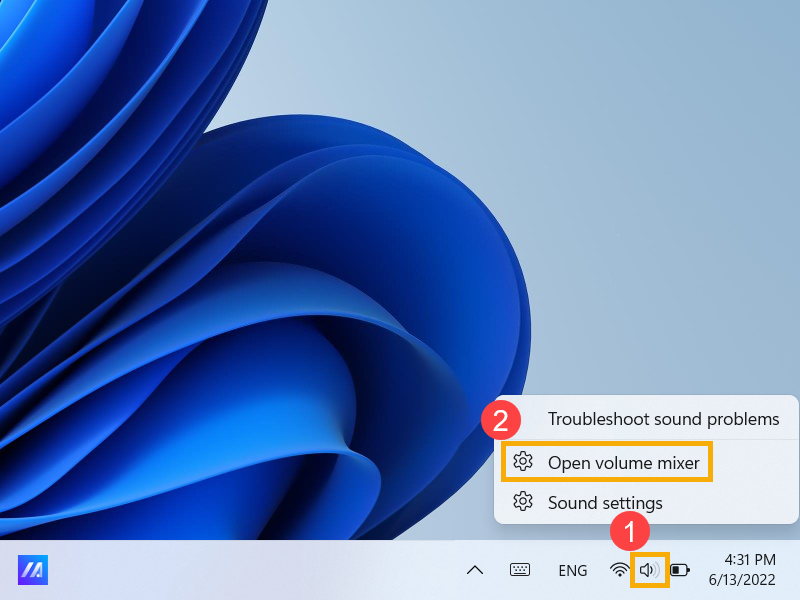
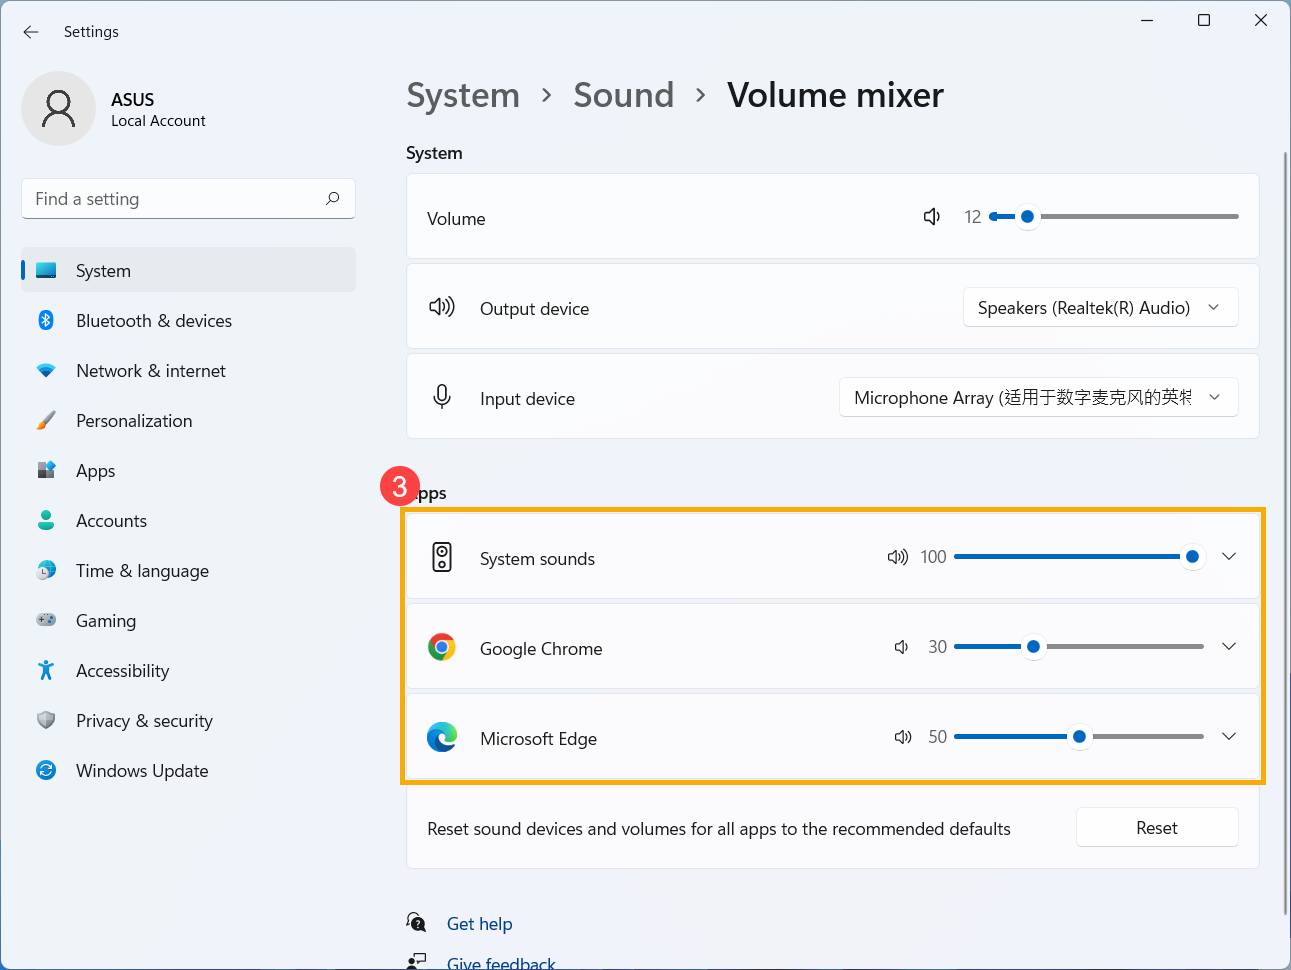
Use the slide bar to adjust the volume to increase or decrease for each application③.
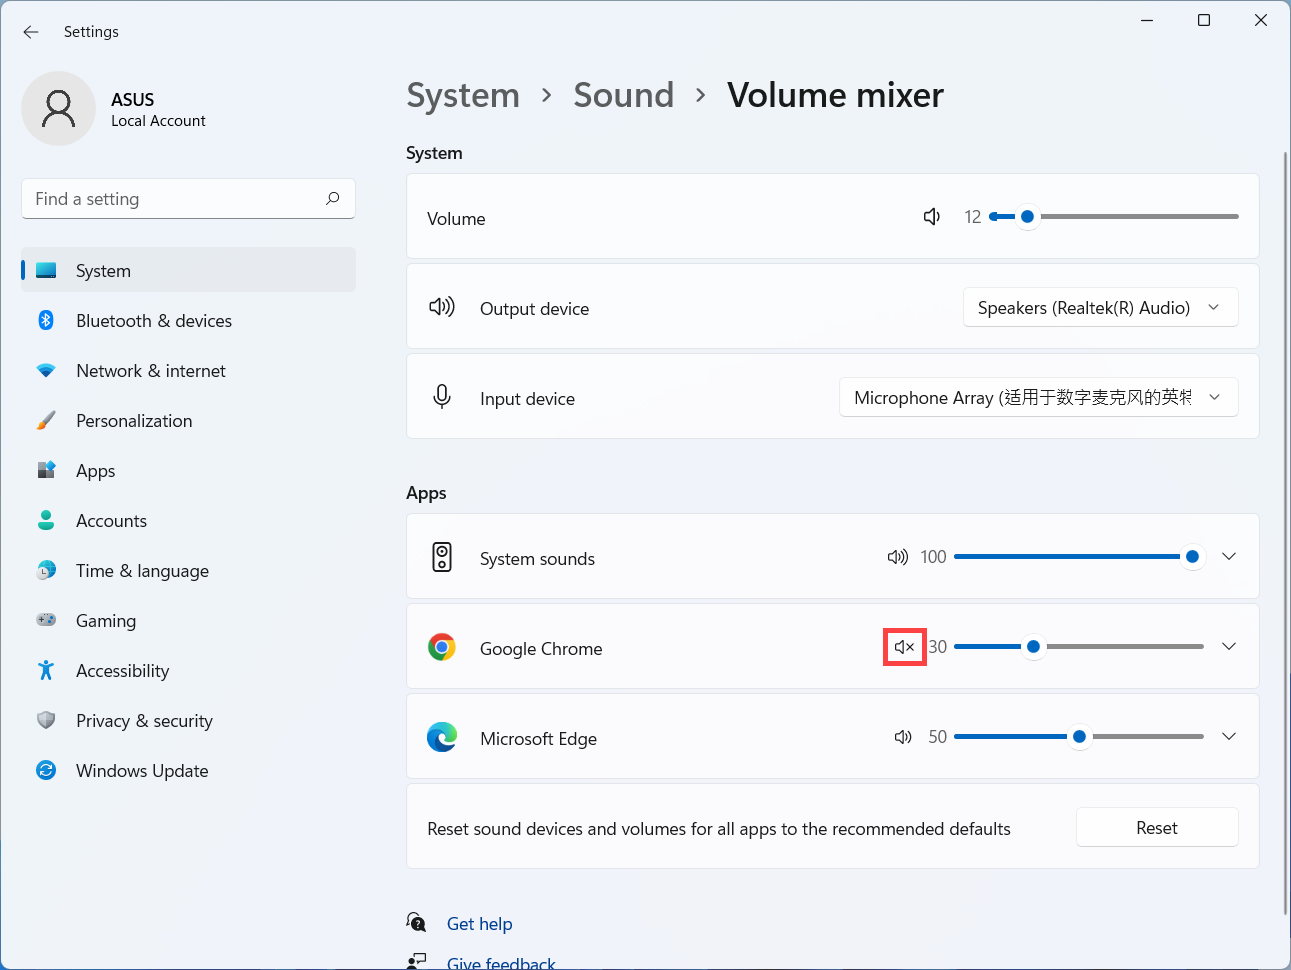
If the application’s volume icon is  , it means that is in mute mode currently. Click the mute icon again to turn on the volume.
Q2: How to amplify or enhance the audio sound/effects?
A2: For the standard ASUS Notebook, most models have a built-in ICE Audio Wizard application and you can use it to enhance the audio. Here you can learn more about ICE Audio Wizard (ICE Sound) - Introduction.
For the Gaming Notebook, because the audio application may various, you can refer to the following application introduction based on which one is installed on your computer:
Q3: Why the external microphone cannot be used after plugged into the audio combo jack?
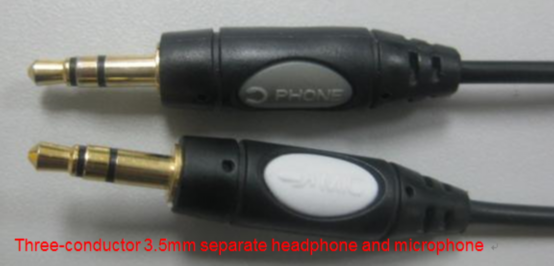
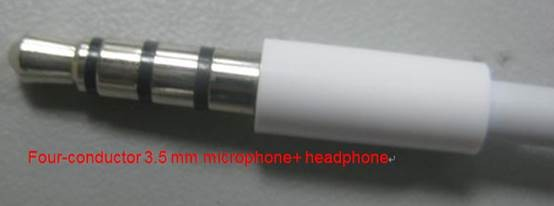
A3: There are two kinds of Headphones/microphone connector in the market.
- Three-conductor 3.5 mm separate microphone and Headphone.
- Four-conductor 3.5 mm headphone with microphone.
If you want to use the external headphone function, you can use both devices.
But if you want to use the external microphone function, the three-conductor 3.5 mm microphone will not work after plug into the audio combo jack.
Suggest to use a four-conductor 3.5 mm headphone with microphone device, the microphone and headphone function can be used at the same time.
Q4: Why does the sound not meet expectations even when the speaker volume is adjusted to the maximum...
A4: If your device has built-in speakers and you still find the sound not meeting expectations after following the troubleshooting methods provided in this article, the main reason may lie in considerations of the built-in speaker's design, including hardware limitations, power management, and sound quality, among other factors.
If you desire a louder sound experience, you may consider using external speakers.
Windows 10 operating system
Speaker function is abnormal
Restore BIOS settings
- Access the BIOS setup screen on the device.
When the device is not powered on, press and hold the [F2] key on the keyboard, then press the power button to turn on the device. Keep holding the [F2] key until the BIOS setup screen appears, then release the [F2] key. Learn more about How to enter the BIOS setup screen.
Note: For some older desktop models, you may need to press and hold the [Del] key during startup to access the BIOS configuration screen.
Note: For gaming handhelds, press and hold the [Volume Down] button and then press the power button. - Once in the BIOS setup screen, please refer to the article: How to restore BIOS settings.
- If the problem persists, please continue the next troubleshooting step.
Update and confirm BIOS / Windows packages / drivers with the latest version in your device
Regularly updating BIOS, Windows, and drivers can enhance system stability and performance. Ensure that your device is using the latest versions. Learn more about updating BIOS:
How to update the BIOS version in Windows system
How to use EZ Flash to update the BIOS version
(For desktop products, please refer to ASUS Motherboard EZ Flash 3 Introduction.)
Learn more about updating Windows and drivers:
How to update drivers via System Update in MyASUS
If the problem persists after you have updated BIOS/Windows packages/drivers to the date, please continue to the next chapter for troubleshooting.
Check the settings of output device
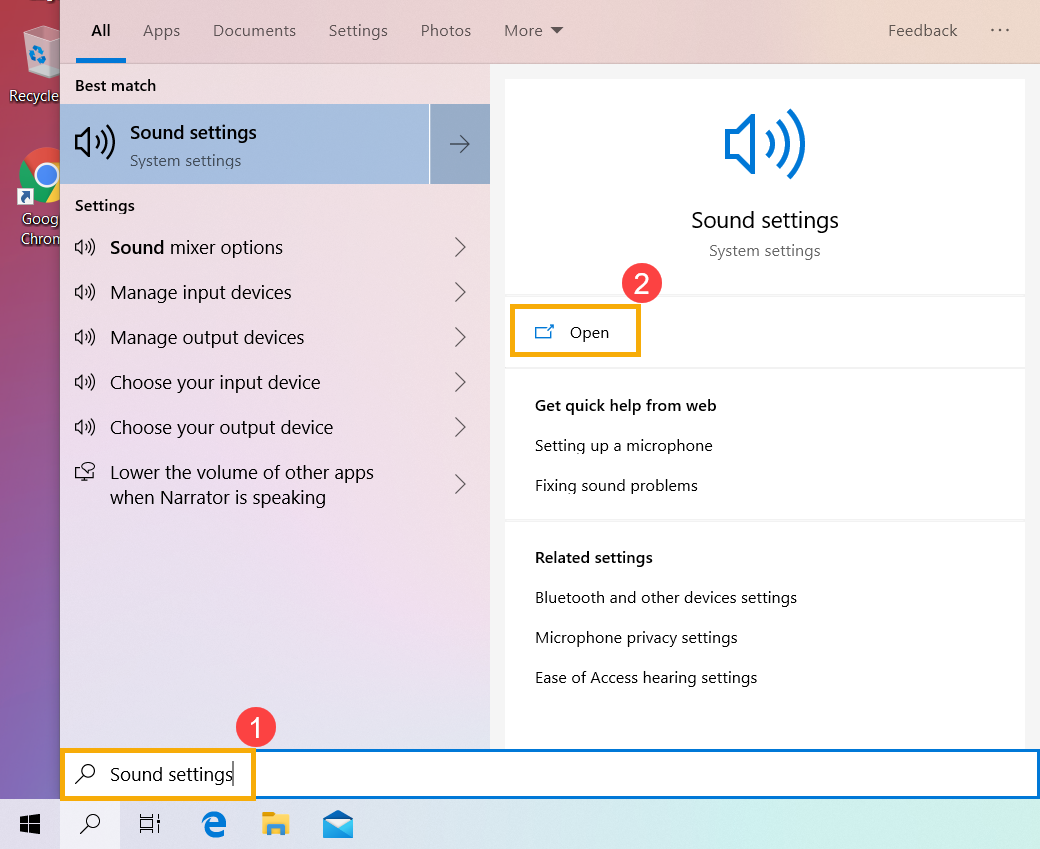
- Type and search [Sound settings] in the Windows search bar①, then click [Open]②.
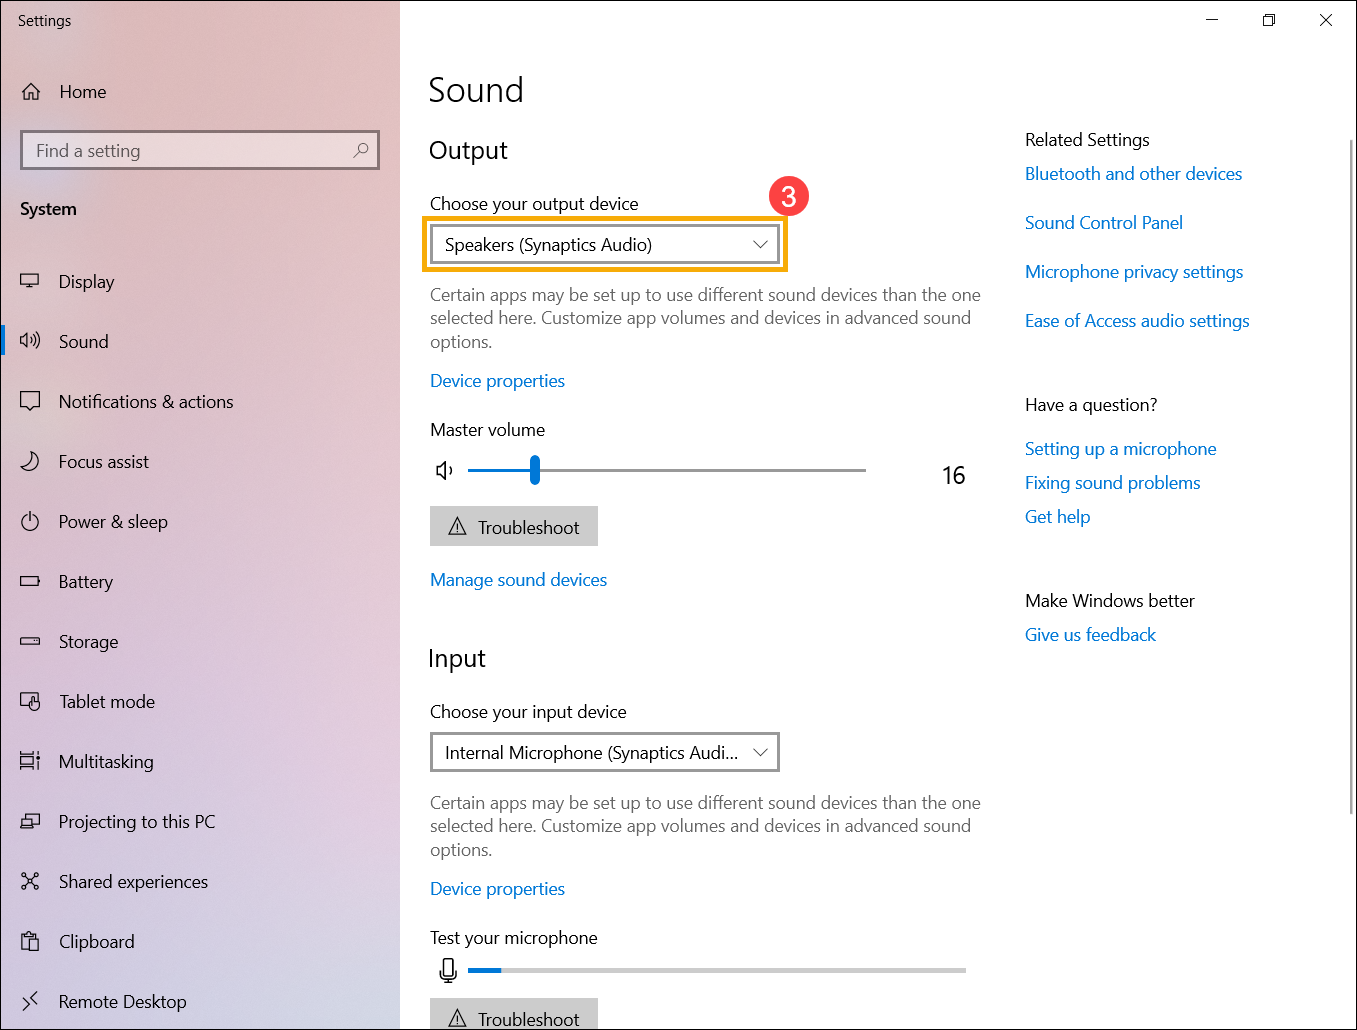
- Select the correct speaker device in the section of [Choose your output device]③.
- Check if the speaker volume set to mute mode. Click [Sound Control Panel]④ in the sound settings.
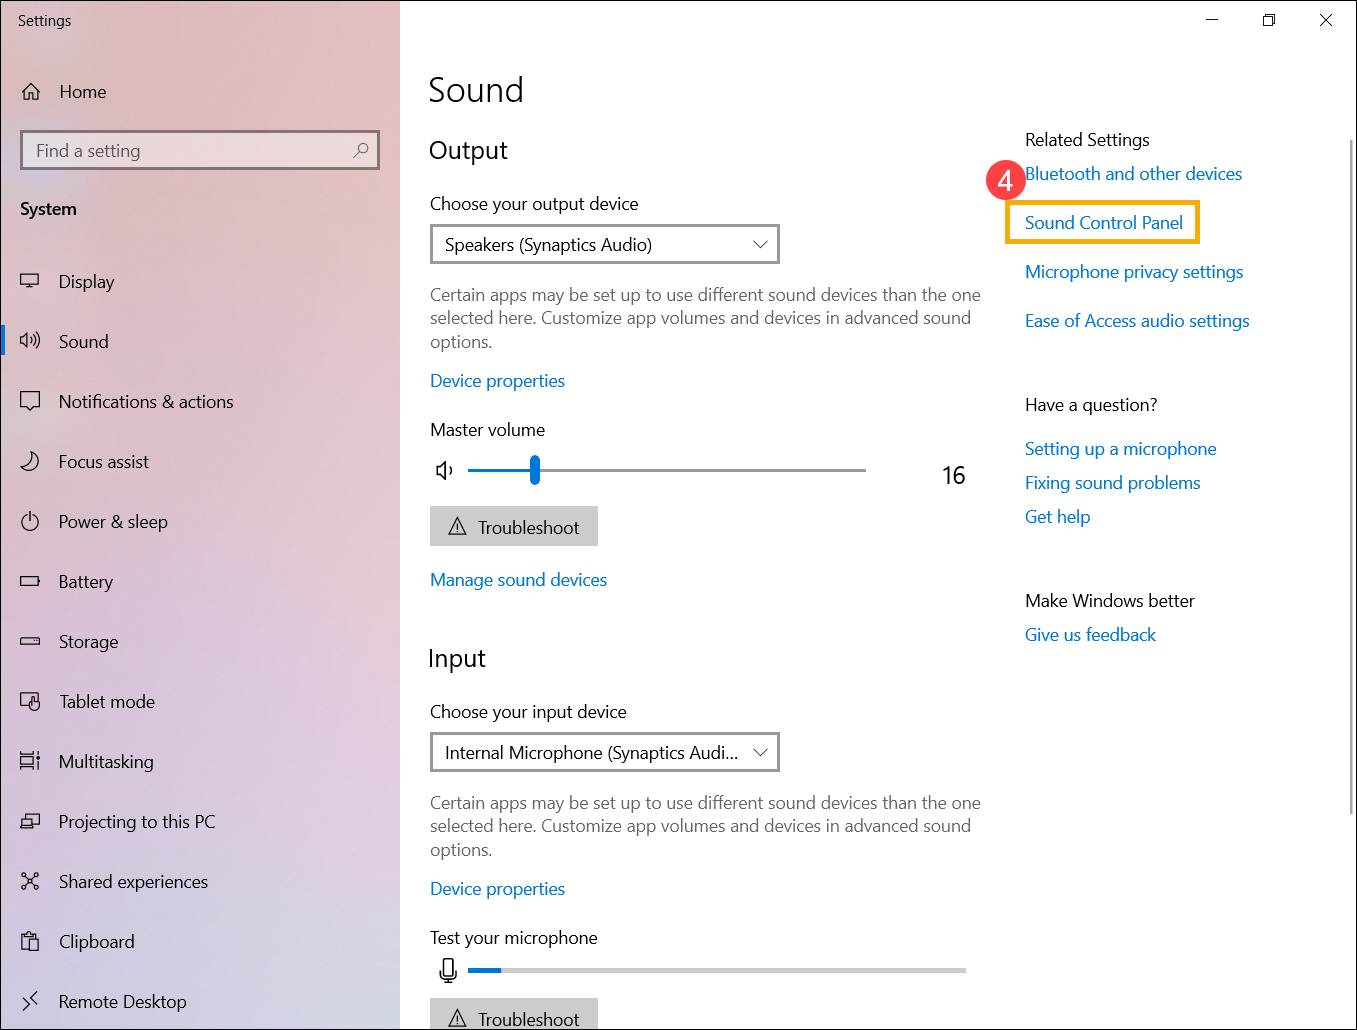
- Select [Playback] tab⑤, then select [your speaker device]⑥ and click [Properties]⑦.
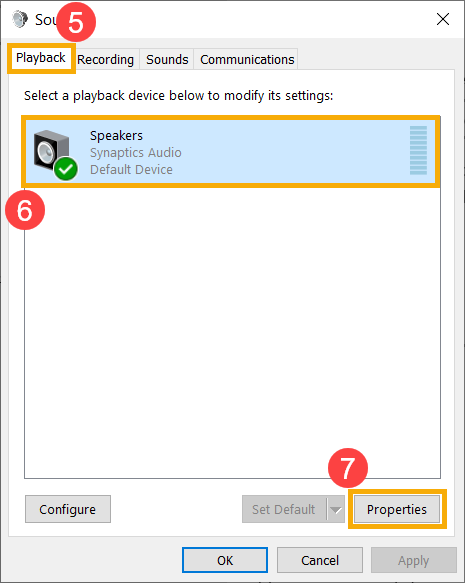
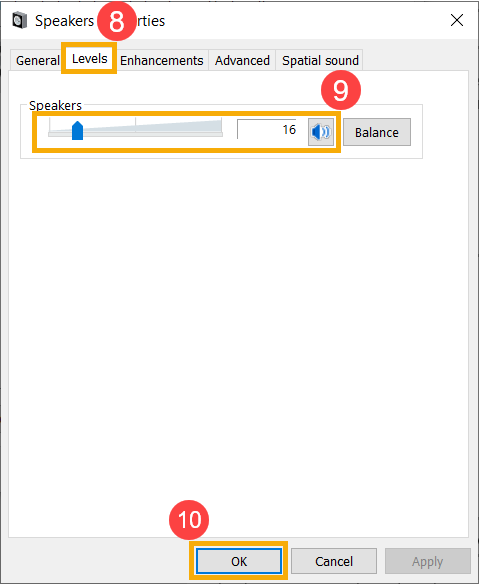
- Select [Levels] tab⑧, use the slider bar to adjust volume level and check if it [does not set to mute mode]⑨, then click on [OK]⑩ to save. (Mute mode:
 )
) 
- If the problem persists, please continue the next troubleshooting step.
Enable and reinstall the driver in Device Manager
- Type and search [Device Manager] in the Windows search bar①, then click [Open]②.
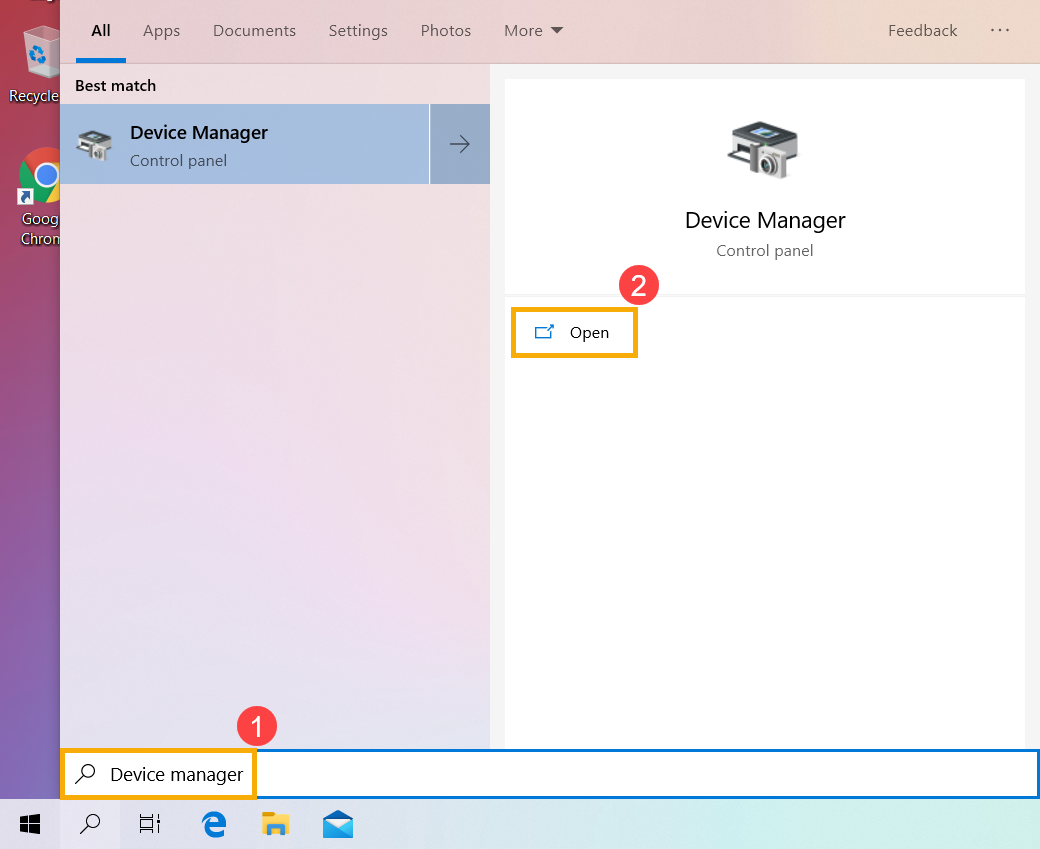
- Check the arrow next to [Audio inputs and outputs]③, then right-click [your speaker device]④ and select [Enable device]⑤.
If the [Enable device] option does not display that is meant the speaker function is enabled already, please continue to the next step.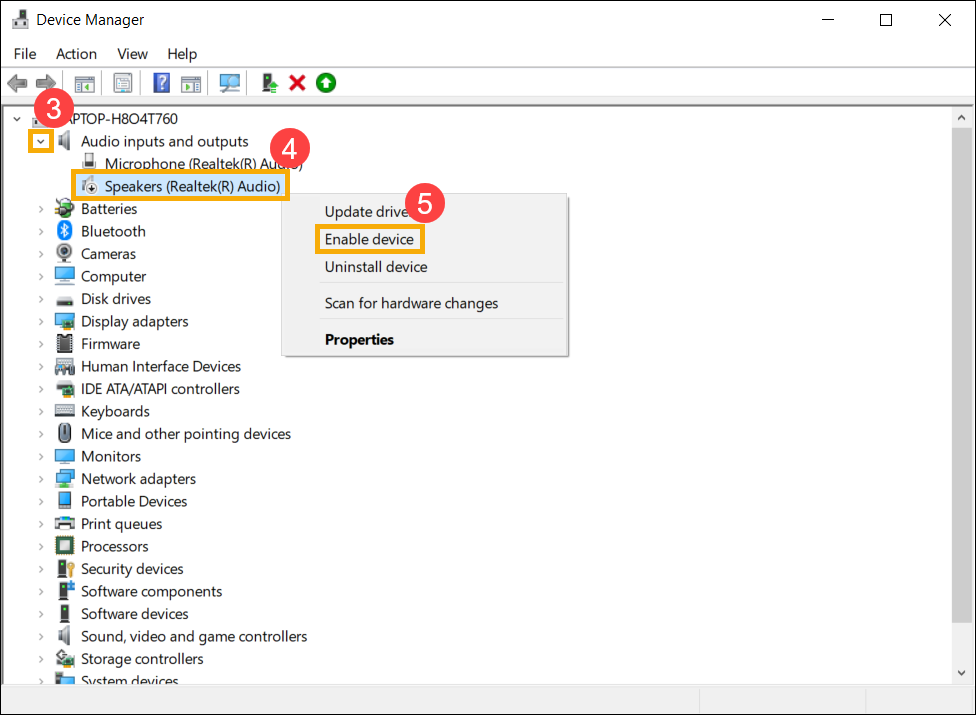
- Right-click [your speaker device]⑥, then select [Uninstall device]⑦.
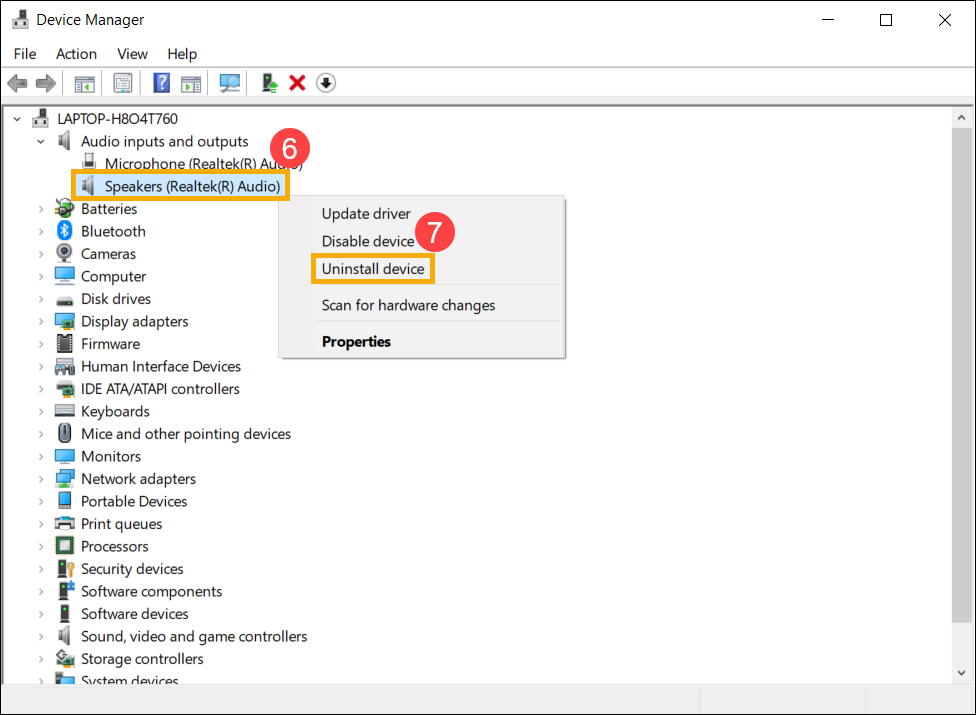
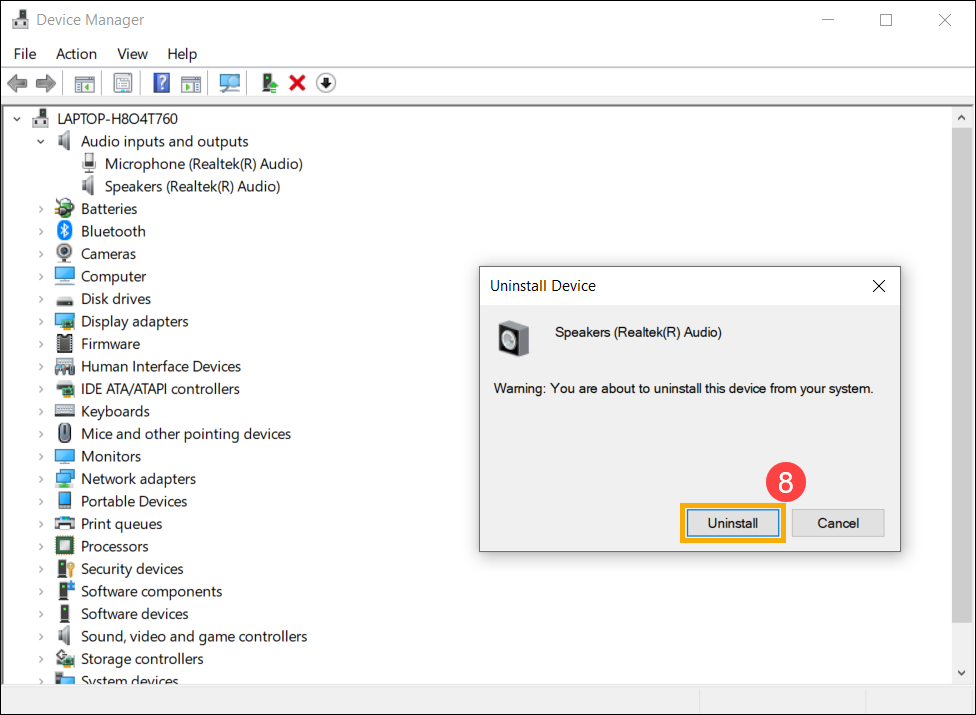
- Click [Uninstall]⑧.
- After uninstalling the speakers, please click [Action]⑨ and select [Scan for hardware changes]⑩.
The system will reinstall the speakers, and the device will display in the Audio inputs and outputs category.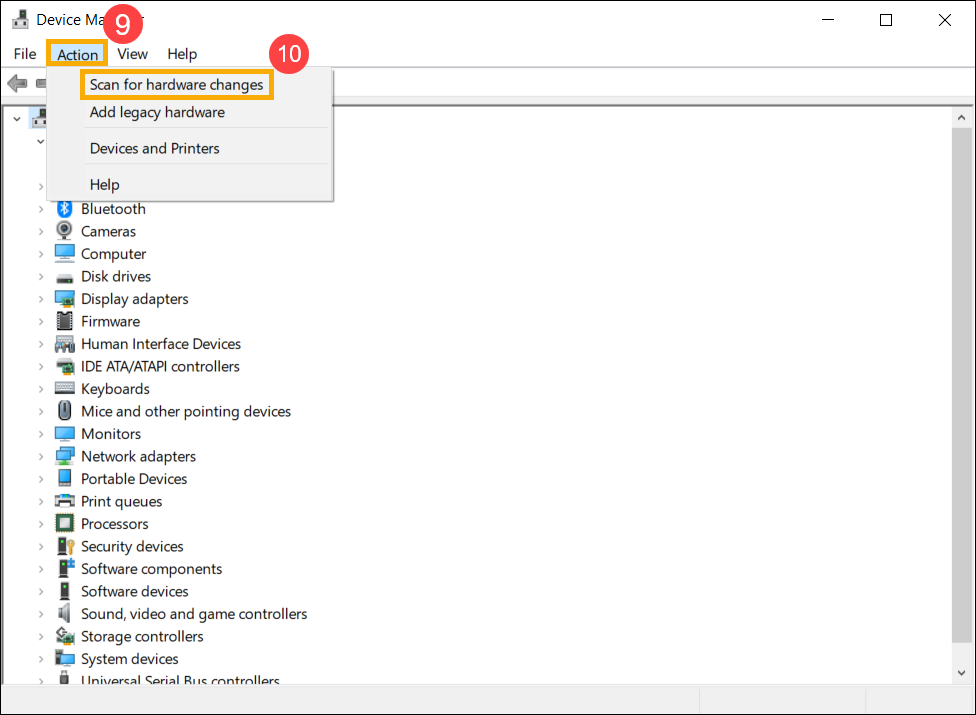
- If you fail to update speaker driver in device manager, please go to the ASUS Support Site to download and install the [Audio] driver, here you can learn more about How to search and download drivers.
Note: The following pictures are the current version as a reference, please download the latest version from the ASUS Support Site.)
- If the problem persists, please continue the next troubleshooting step.
Use Troubleshooting tool in Windows
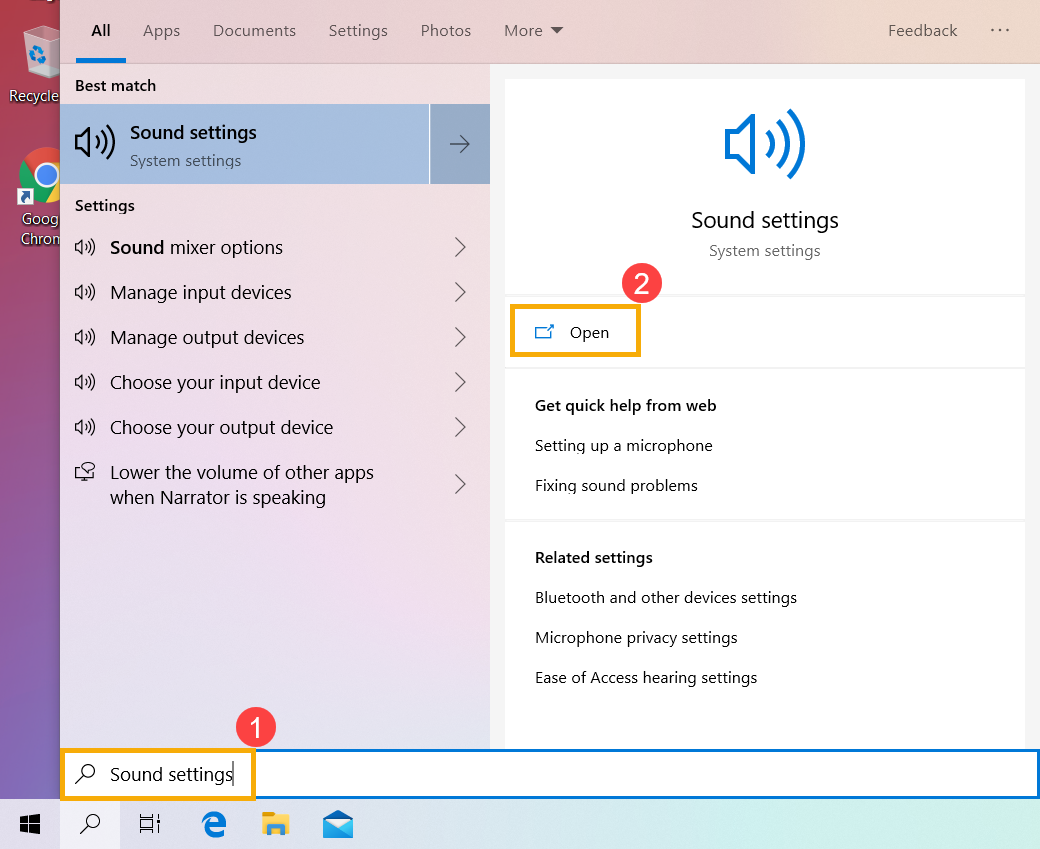
- Type and search [Sound settings] in the Windows search bar①, then click [Open]②.
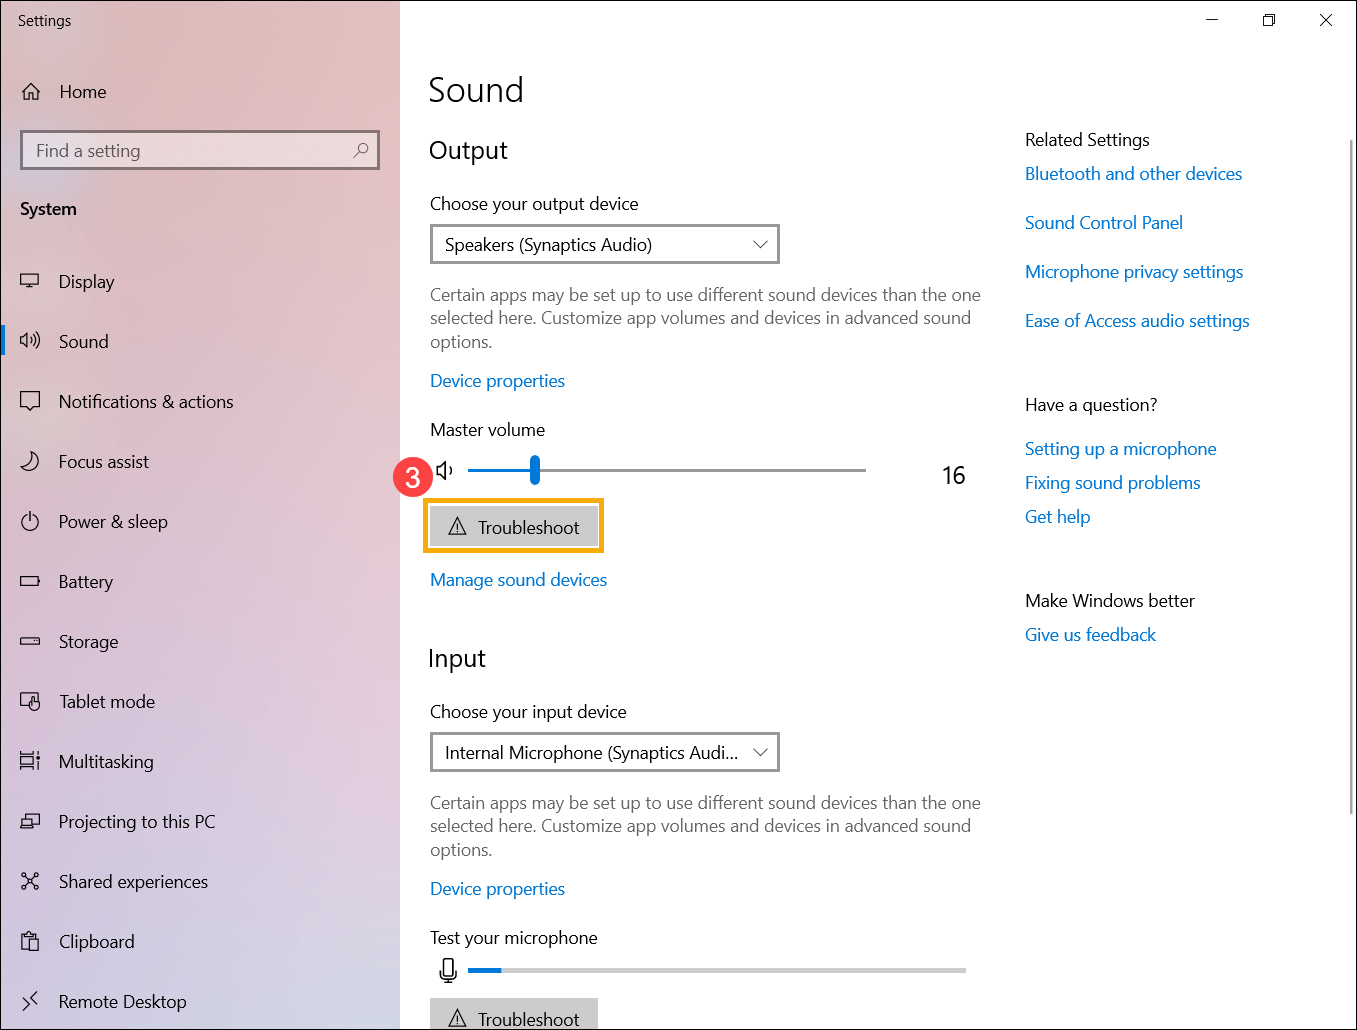
- Click on [Troubleshoot] in Output section③.
- Follow the on-screen instructions to complete the troubleshooting process. If the problem persists, please continue the next troubleshooting step.
Restore the system from restore point
If the speakers problem happens recently, and if you have ever created a restore point or there is an automatic system restore existed, try to restore the device to a point before the problem began to resolve the problem. Here you can learn more about How to use restore point to restore the system. If the problem persists, please continue the next troubleshooting step.
Reset the system
If the problem persists after all troubleshooting steps are completed. Please backup your personal files, then reset the system to back to its original configuration. Here you can learn more about How to reset the system.
Microphone function is abnormal
If you use the internal microphone, check it is not covered by anything
Normally, the Microphone is located on either side of the camera. The position of the microphone may vary slightly depending on the model. Please refer to the User Manual for detailed information.

Restore BIOS settings
- Access the BIOS setup screen on the device.
When the device is not powered on, press and hold the [F2] key on the keyboard, then press the power button to turn on the device. Keep holding the [F2] key until the BIOS setup screen appears, then release the [F2] key. Learn more about How to enter the BIOS setup screen.
Note: For some older desktop models, you may need to press and hold the [Del] key during startup to access the BIOS configuration screen.
Note: For gaming handhelds, press and hold the [Volume Down] button and then press the power button. - Once in the BIOS setup screen, please refer to the article: How to restore BIOS settings.
- If the problem persists, please continue the next troubleshooting step.
Update and confirm BIOS / Windows packages / drivers with the latest version in your device
Regularly updating BIOS, Windows, and drivers can enhance system stability and performance. Ensure that your device is using the latest versions. Learn more about updating BIOS:
How to update the BIOS version in Windows system
How to use EZ Flash to update the BIOS version
(For desktop products, please refer to ASUS Motherboard EZ Flash 3 Introduction.)
Learn more about updating Windows and drivers:
How to update drivers via System Update in MyASUS
If the problem persists after you have updated BIOS/Windows packages/drivers to the date, please continue to the next chapter for troubleshooting.
Check the settings of input device
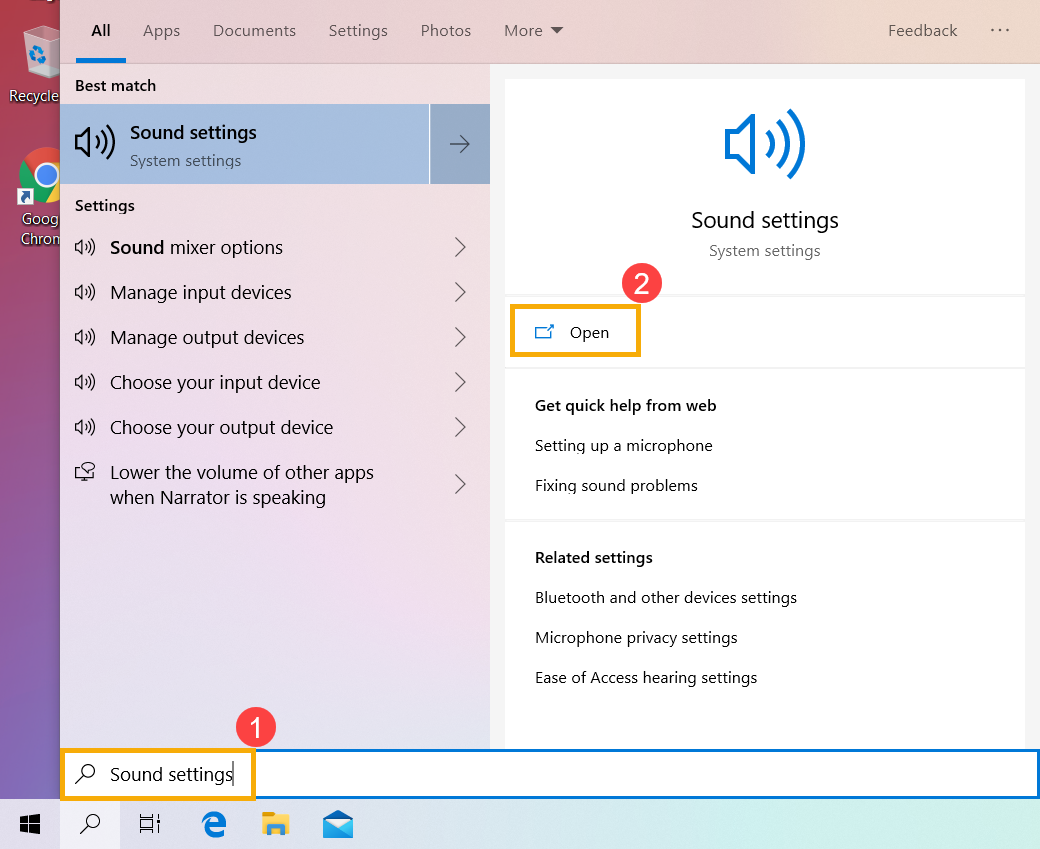
- Type and search [Sound settings] in the Windows search bar①, then click [Open]②.
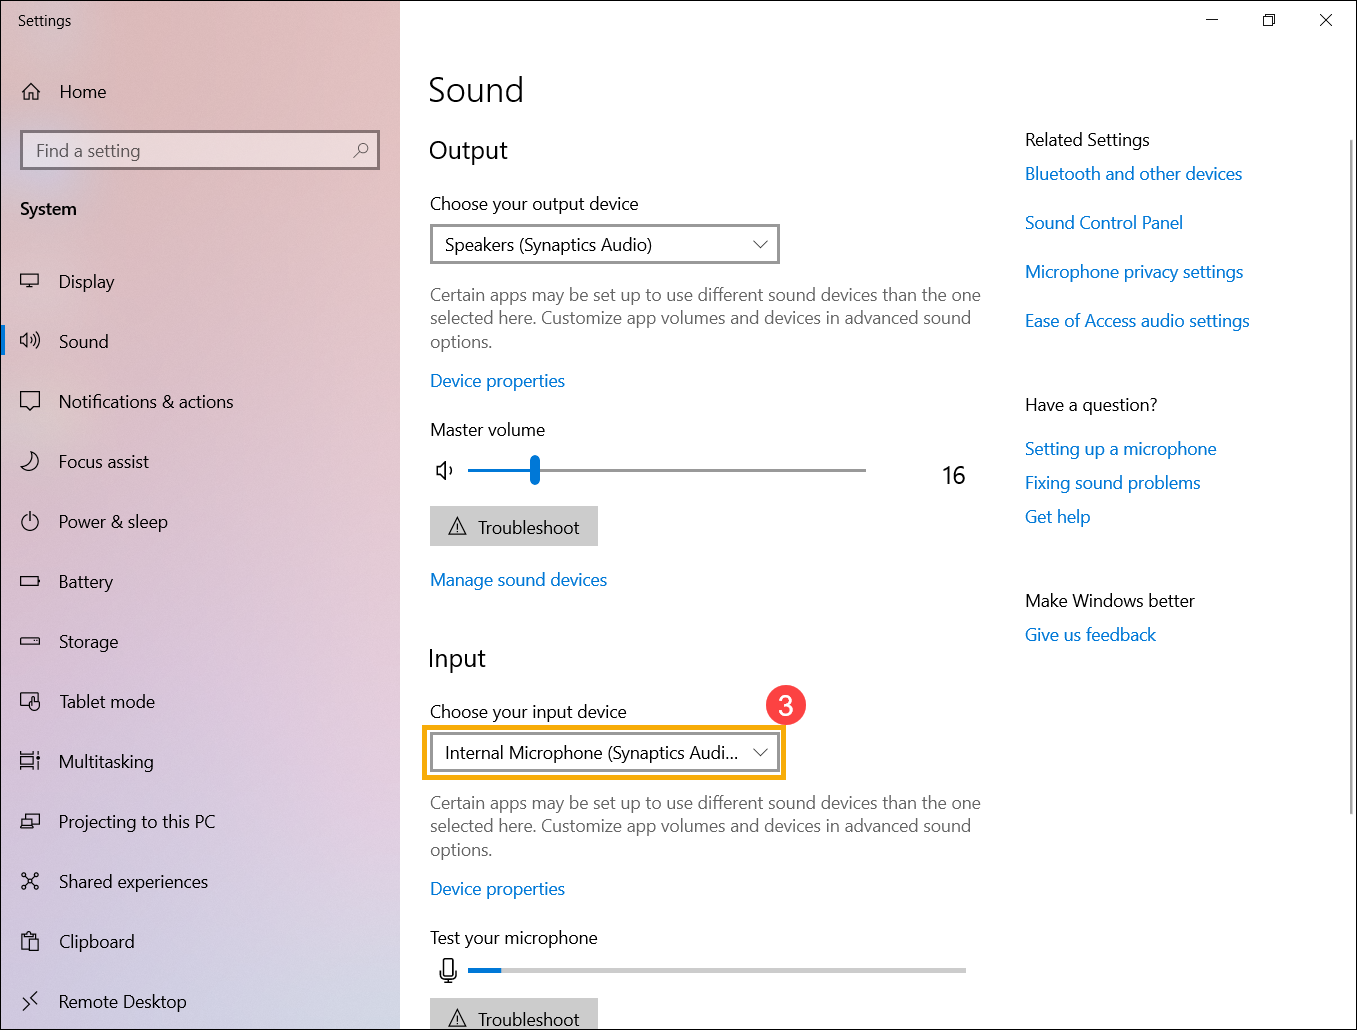
- Select the correct microphone device in the section of [Choose your input device]③.
- Check if the microphone volume set to mute mode. Click [Sound Control Panel]④ in the sound settings.
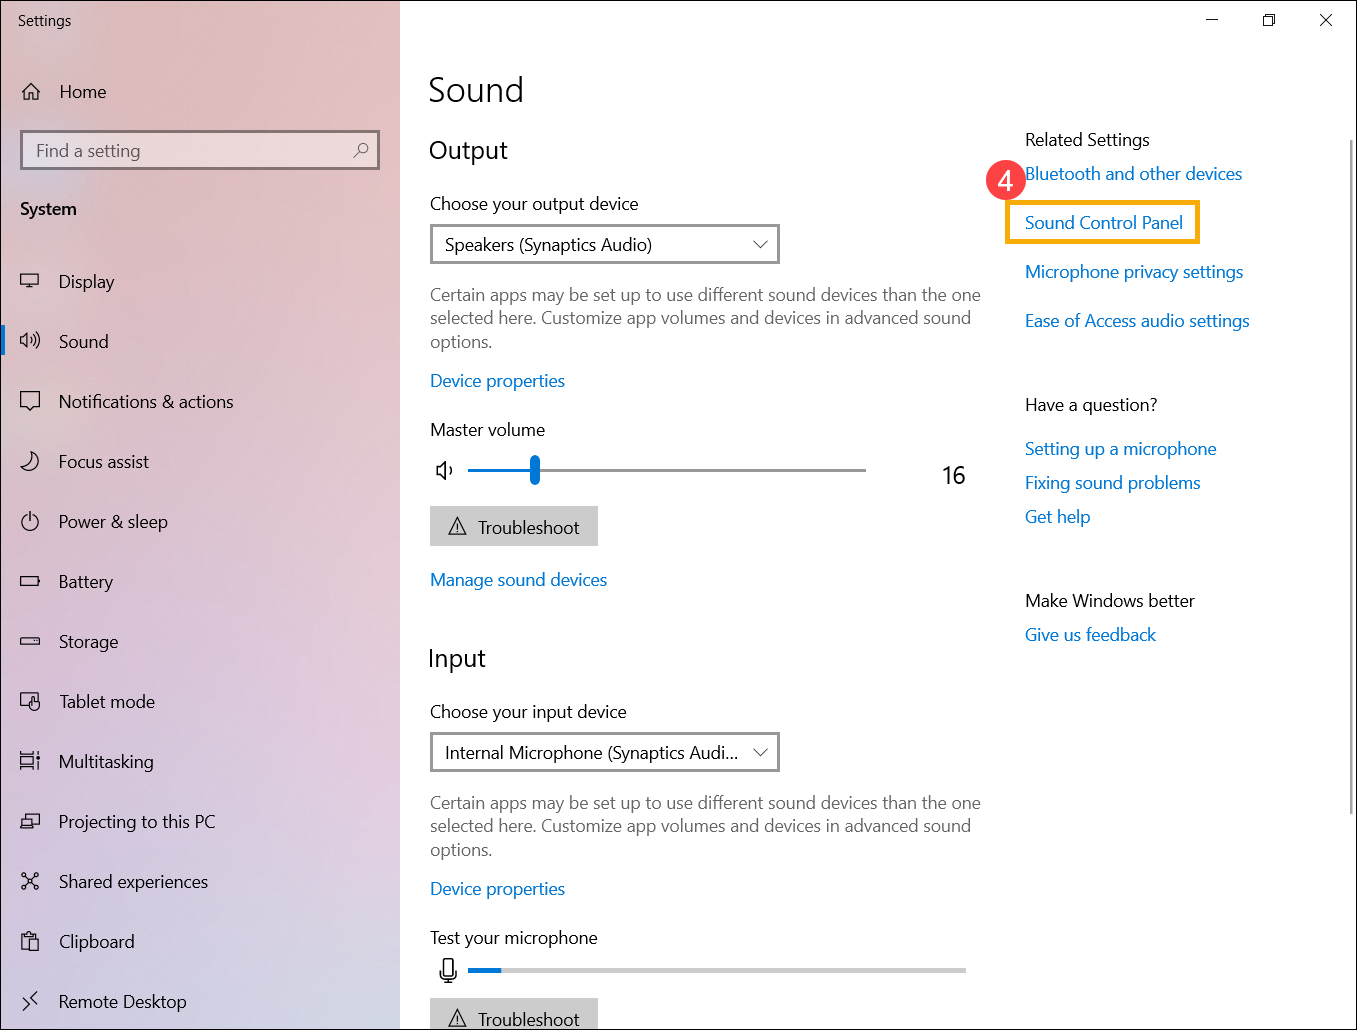
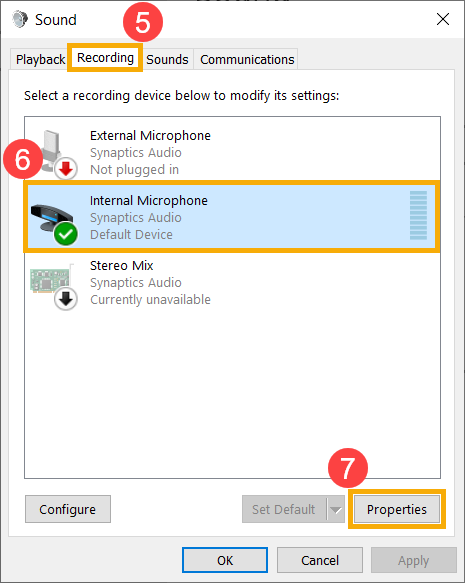
- Select [Recording] tab⑤, then select [your microphone device]⑥ and click [Properties]⑦.
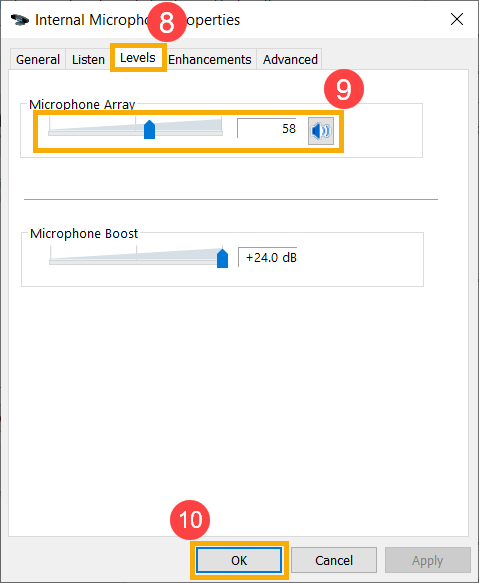
- Select [Levels] tab⑧, use the slider bar to adjust volume level and check if it [does not set to mute mode]⑨, then click [OK]⑩ to save. (Mute mode:
 )
) 
- If the problem persists, please continue the next troubleshooting step.
Enable and reinstall the driver in Device Manager
- Type and search [Device Manager] in the Windows search bar①, then click [Open]②.
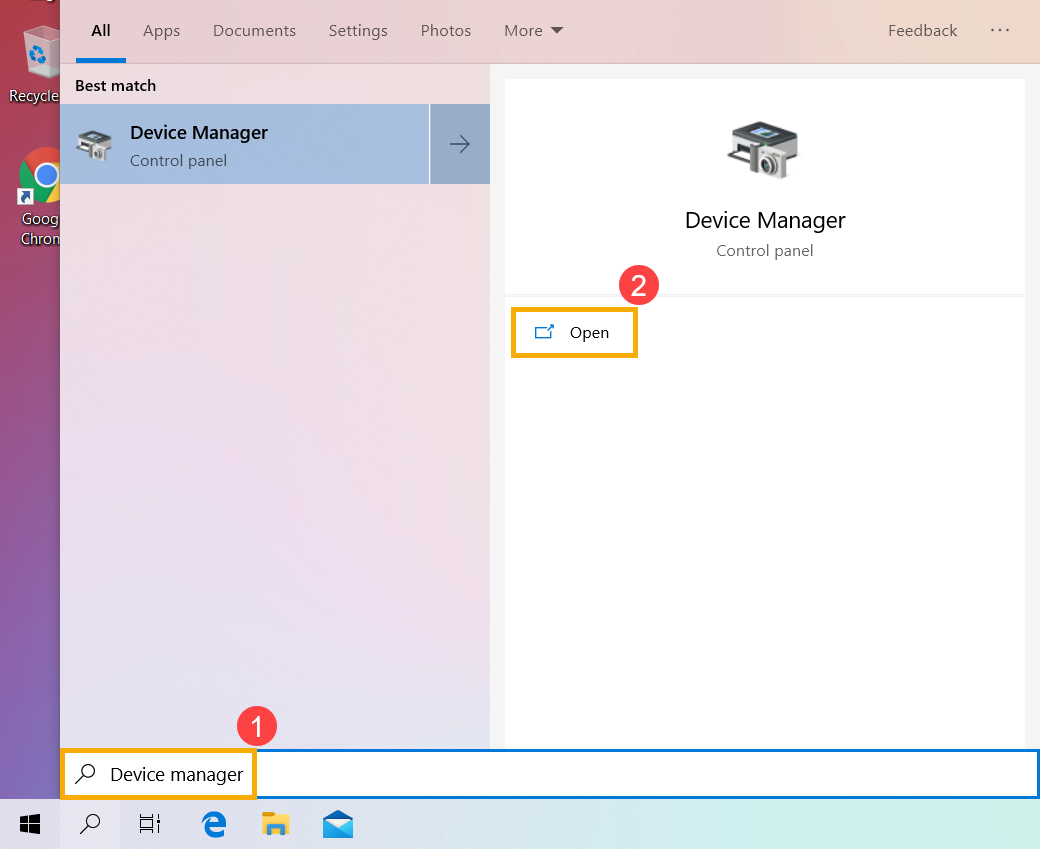
- Check the arrow next to [Audio inputs and outputs]③, then right-click [your microphone device]④ and select [Enable device]⑤.
If the [Enable device] option does not display that is meant the microphone function is enabled already, please continue to the next step.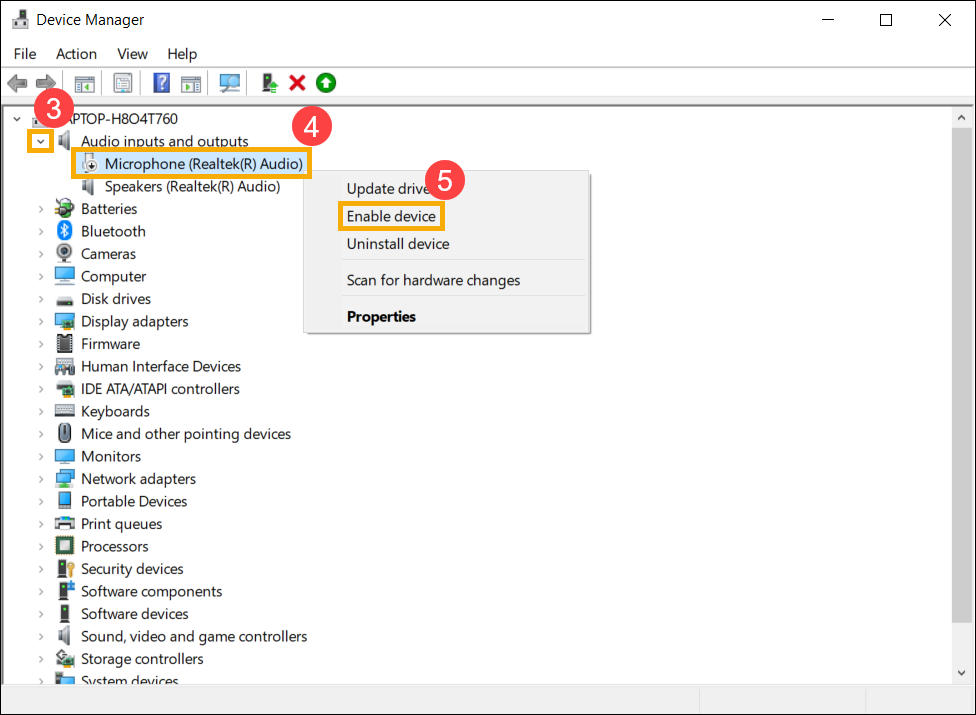
- Right-click [your microphone device]⑥, then select [Uninstall device]⑦.
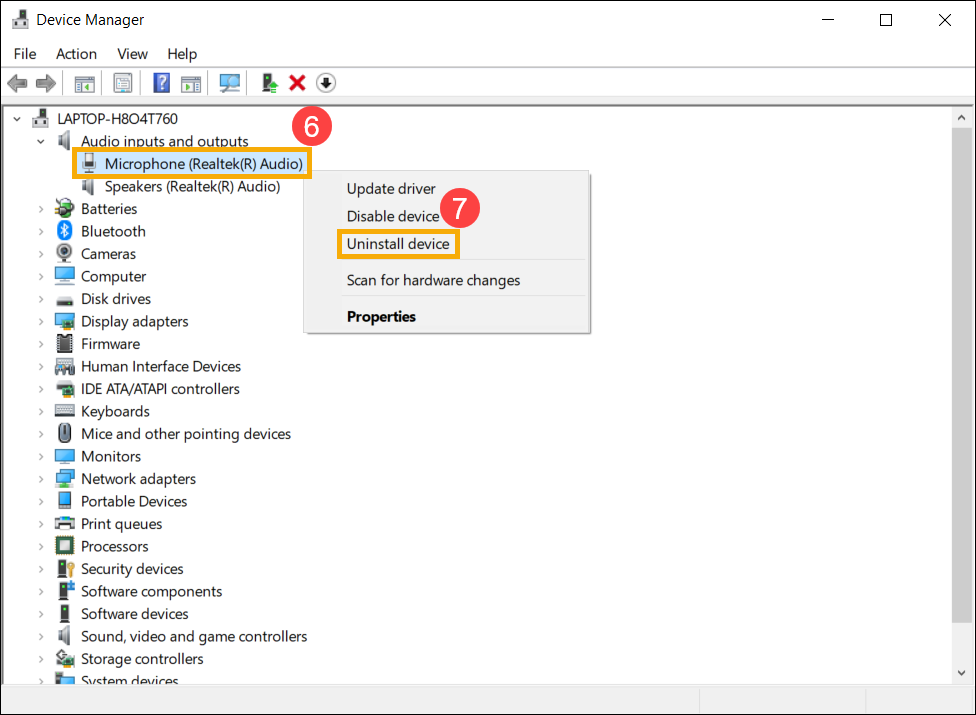
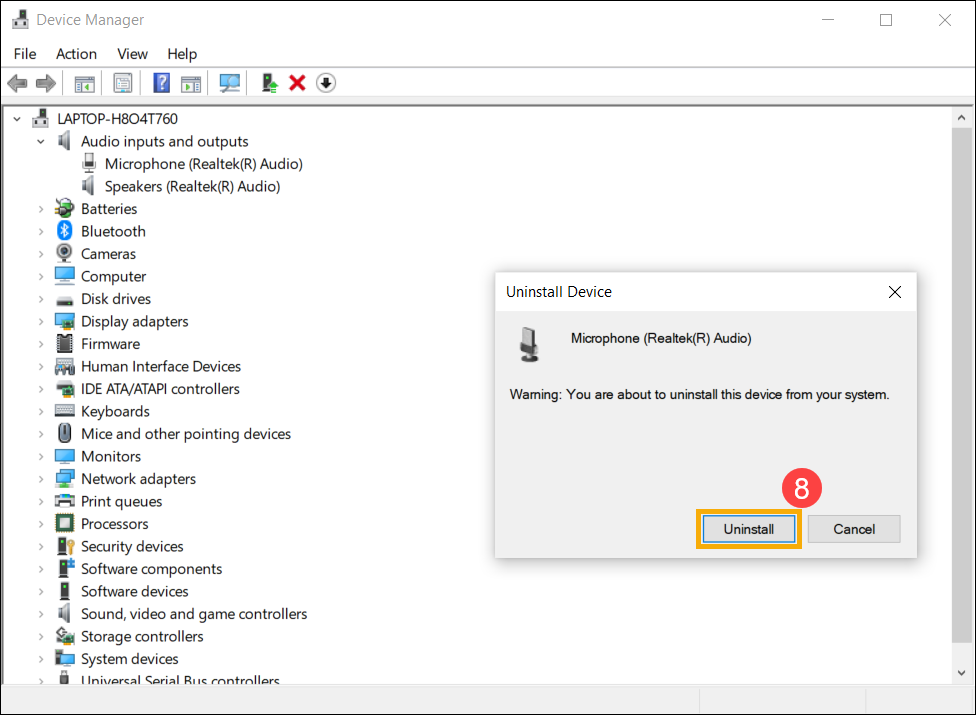
- Click [Uninstall]⑧.
- After uninstalling the microphone, please click [Action]⑨ and select [Scan for hardware changes]⑩.
The system will reinstall the microphone, and the device will display in the Audio inputs and outputs category.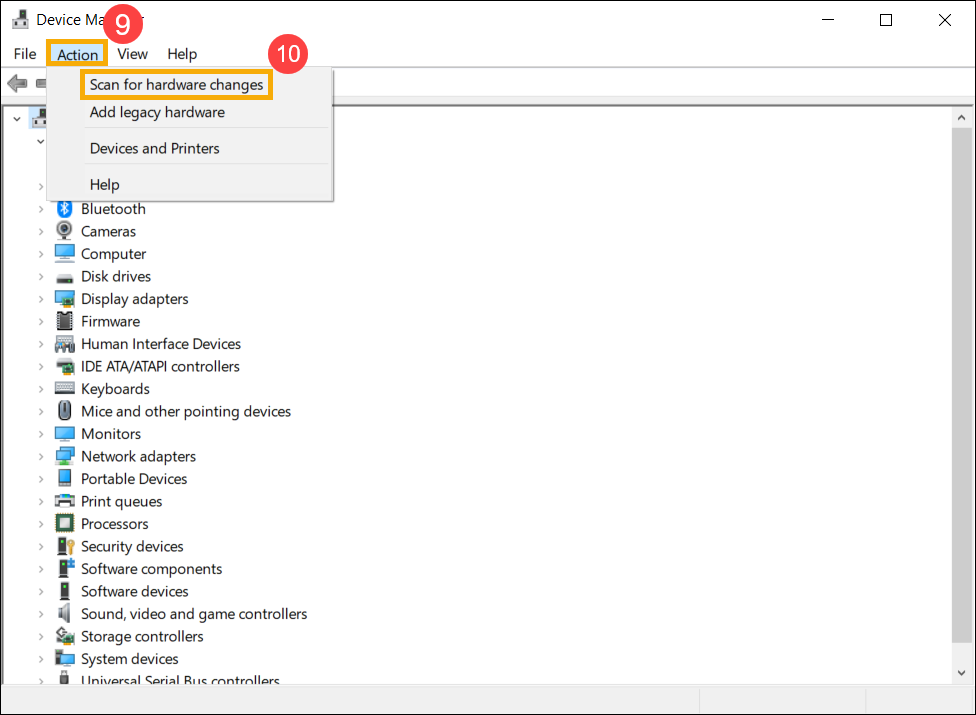
- If you fail to update speaker driver in device manager, please go to the ASUS Support Site to download and install the driver, here you can learn more about How to search and download drivers.
If you use the internal microphone, please download and install the [Camera] driver because the Internal Microphone is integrated with Camera.
If you use the external microphone, please download and install the [Audio] driver.
Note: The following pictures are the current version as a reference, please download the latest version from the ASUS Support Site.

- If the problem persists, please continue the next troubleshooting step.
Use Troubleshooting tool in Windows
- Type and search [Sound settings] in the Windows search bar①, then click [Open]②.
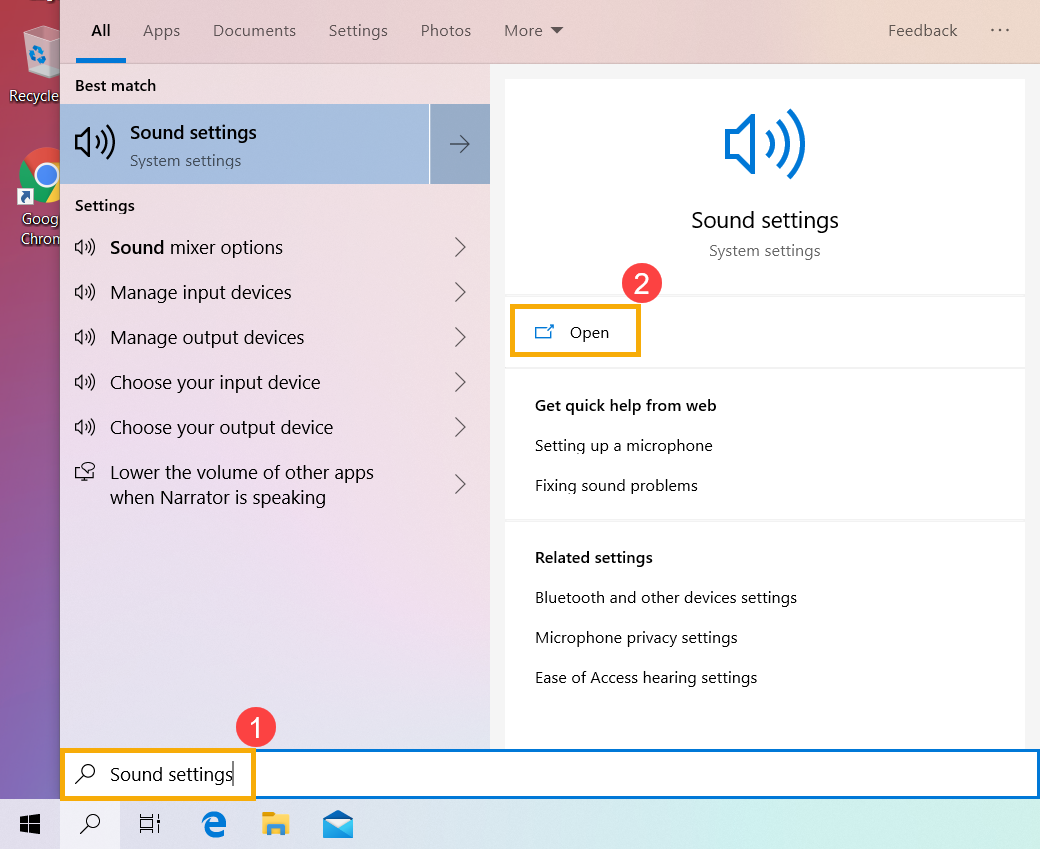
- Click on [Troubleshoot] in Output section③.
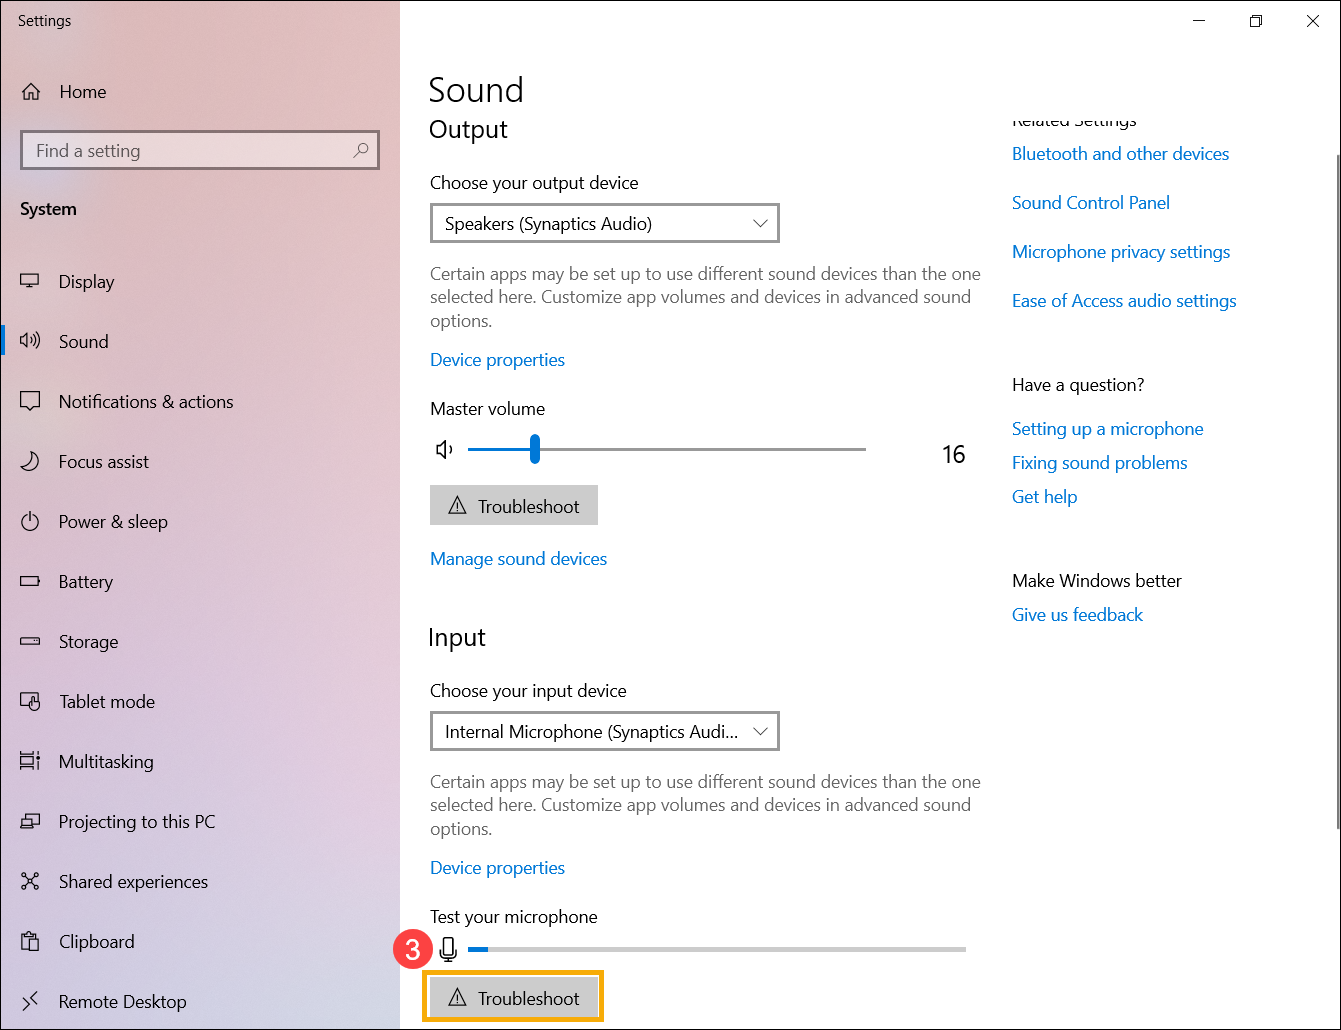
- Follow the on-screen instructions to complete the troubleshooting process. If the problem persists, please continue the next troubleshooting step.
Restore the system from restore point
If the microphone problem happens recently, and if you have ever created a restore point or there is an automatic system restore existed, try to restore the device to a point before the problem began to resolve the problem. Here you can learn more about How to use restore point to restore the system. If the problem persists, please continue the next troubleshooting step.
Reset the system
If the problem persists after all troubleshooting steps are completed. Please backup your personal files, then reset the system to back to its original configuration. Here you can learn more about How to reset the system.
Q & A
Q1: Why the sound is so loud, soft, or no sound when I use a specific application?
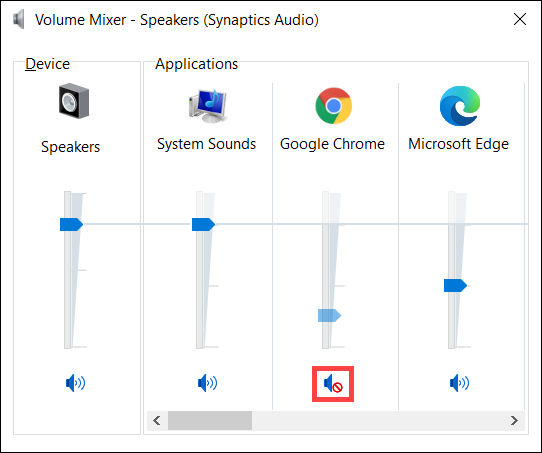
A1: You can use Volume mixer to adjust the suitable volume for each application.
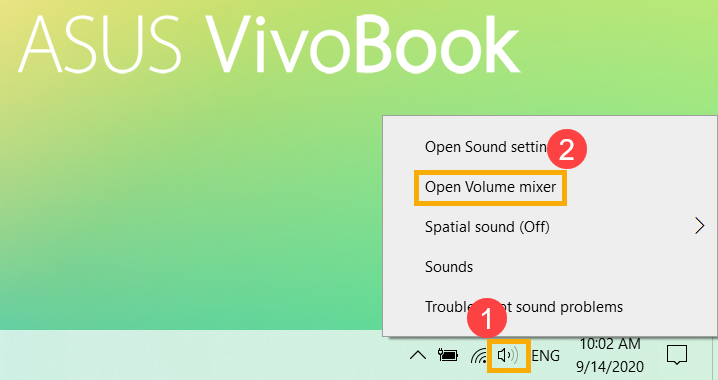
Right-click on the [Speaker icon]① which is located at the taskbar, then select [Open Volume mixer]②.
Use the slide bar to adjust the volume to increase or decrease for each application③.
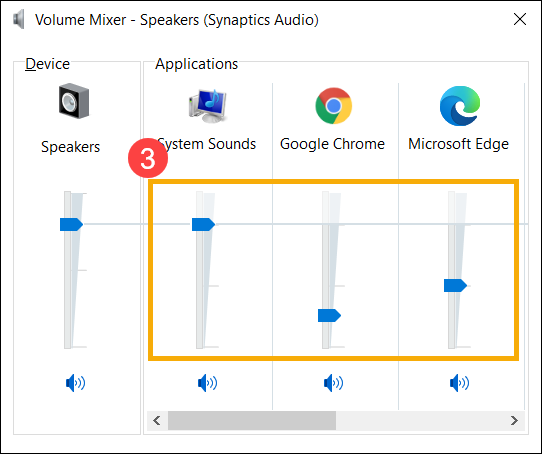
If the application’s volume icon is  , it means that is in mute mode currently. Click the mute icon again to turn on the volume.
Q2: How to amplify or enhance the audio sound/effects?
A2: For the standard ASUS Notebook, most models have a built-in ICE Audio Wizard application and you can use it to enhance the audio. Here you can learn more about ICE Audio Wizard (ICE Sound) - Introduction.
For the Gaming Notebook, because the audio application may various, you can refer to the following application introduction based on which one is installed on your computer:
Q3: Why the external microphone cannot be used after plugged into the audio combo jack?
A3: There are two kinds of Headphones/microphone connector in the market.
- Three-conductor 3.5 mm separate microphone and Headphone.

- Four-conductor 3.5 mm headphone with microphone.

If you want to use the external headphone function, you can use both devices.
But if you want to use the external microphone function, the three-conductor 3.5 mm microphone will not work after plug into the audio combo jack.
Suggest to use a four-conductor 3.5 mm headphone with microphone device, the microphone and headphone function can be used at the same time.
Q4: Why does the sound not meet expectations even when the speaker volume is adjusted to the maximum...
A4: If your device has built-in speakers and you still find the sound not meeting expectations after following the troubleshooting methods provided in this article, the main reason may lie in considerations of the built-in speaker's design, including hardware limitations, power management, and sound quality, among other factors.
If you desire a louder sound experience, you may consider using external speakers.
If your problem remains unresolved, please contact ASUS customer support for further assistance.
