- English
- Other Products
- FAQ
- [Projectors] AirVision M1 Introduction to Wearable...
- Subscribe to RSS Feed
- Mark as New
- Mark as Read
- Bookmark
- Subscribe
- Printer Friendly Page
- Report Inappropriate Content
- Article History
- Subscribe to RSS Feed
- Mark as New
- Mark as Read
- Bookmark
- Subscribe
- Printer Friendly Page
- Report Inappropriate Content
on
12-01-2024
12:45 AM
- edited on
12-01-2024
12:45 AM
by
![]() ZenBot
ZenBot
[Projectors] AirVision M1 Introduction to Wearable Display
To provide you with clearer operating instructions, you can also click on the YouTube video link below to watch the (ASUS AirVision M1 User Guide) video.
ASUS AirVision M1 User Guide | ASUS SUPPORT
The ASUS AirVision M1 wearable display is a smart glasses device that offers visual transparency and an immersive experience. Utilizing screen projection technology, these smart glasses provide not only transparency and a wide field of view but also the ability to set up multiple virtual screens simultaneously, meeting both productivity and entertainment needs.
Table of Contents:
A.Which devices are compatible with AirVision M1 glasses
B.How to Install ASUS AirVision Software and Configure Its Features
C.What safety precautions and storage methods should be observed when using AirVision M1 glasses
D.Q&A
A.Which devices are compatible with AirVision M1 glasses?
AirVision glasses are compatible with USB-C devices that support audio/video and power output, such as smartphones, handheld gaming devices like the ROG Ally, and many laptops.
| Device type | Connection I/O type | OS required for AirVision app |
| Smartphones | USB Type-C port with DP alt mode | -- |
| Laptops | USB Type-C port with DP alt mode or Thunderbolt™ 4 port | Windows11 64bit (version 24H2 or later) |
| Gaming handhelds | USB Type-C port with DP alt mode | Windows11 64bit (version 24H2 or later) |
*Computer: It is recommended to have a graphics card with AMD Radeon 680M or higher specifications, or Nvidia GTX 1060 (supporting GPU Direct) or higher specifications.
*You need to install the AirVision program to perform complete setup and functionality.
B.How to Install ASUS AirVision Software and Configure Its Features
1).Connect the angled end of the included USB cable to the USB Type-C port on the glasses. 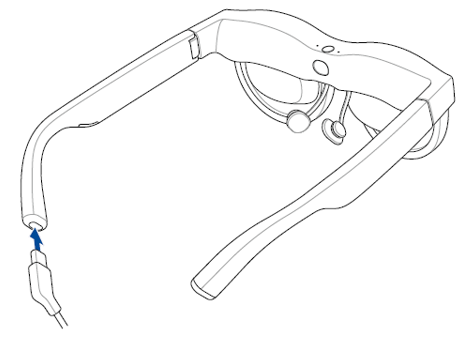
2).Connect the other end of the USB cable to the USB Type-C port on your device. 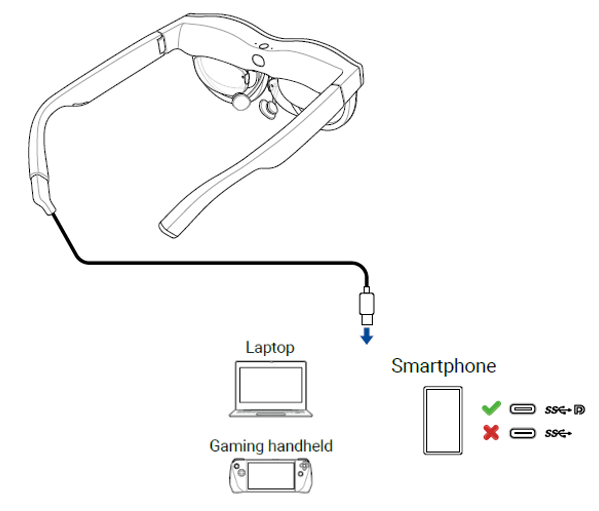
3). When you first connect a laptop or handheld gaming device to the glasses, the ASUS AirVision application should automatically download and install.
4). If the ASUS AirVision application does not automatically download, visit ASUS and search for the ASUS AirVision application to download and install it manually.
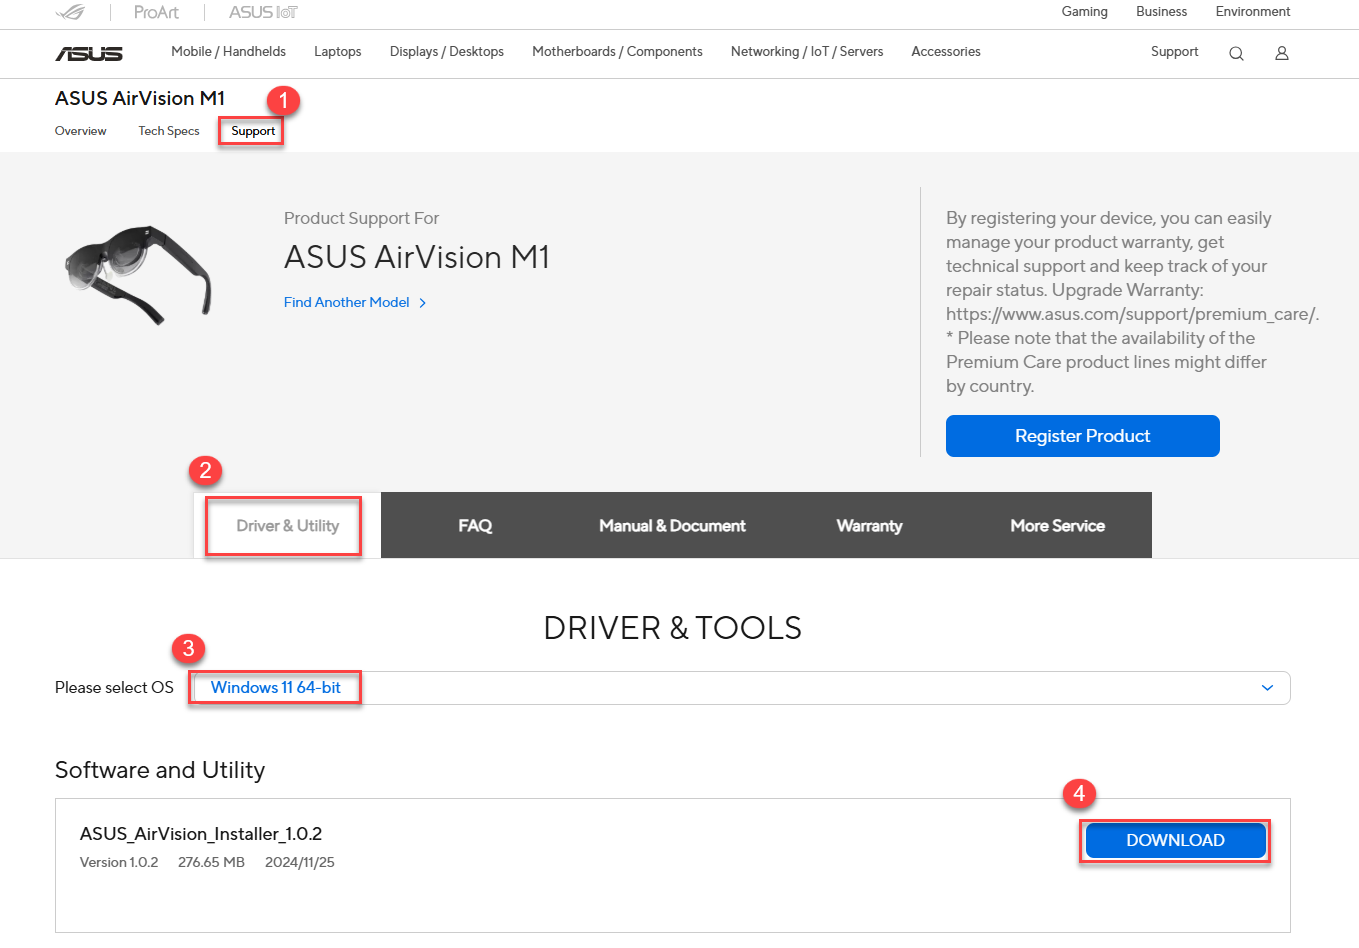
5). Installing the ASUS AirVision application After installing the ASUS AirVision application on your computer, here’s how to open ASUS AirVision:
① From the Start menu on the computer desktop, select All Programs > ASUS_AirVision.
② In the pop-up window, click Yes to load the application.
③ When ASUS AirVision is loaded, you should see the ASUS AirVision floating widget icon  on your desktop. 。
④ Click to open the ASUS AirVision widget  , allowing you to access information and settings related to the glasses.
6).ASUS AirVision Feature Introduction:
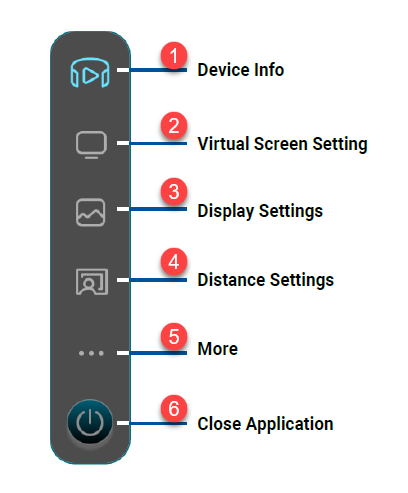
① Device Information
Use this menu to access information about your glasses, including the serial number and the currently installed firmware version, and to update the firmware of the glasses.
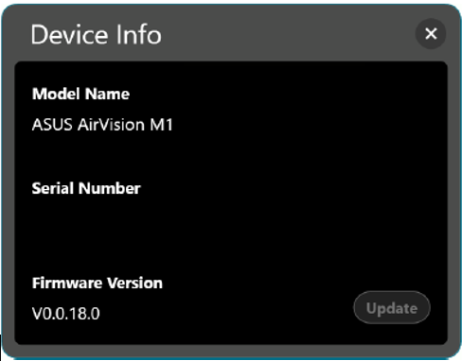
Note: If the latest firmware version is already installed, the update button will be inactive.
② Virtual Screen Settings
Use this menu to select one of the preset display modes to quickly start using the glasses with a multi-screen layout. 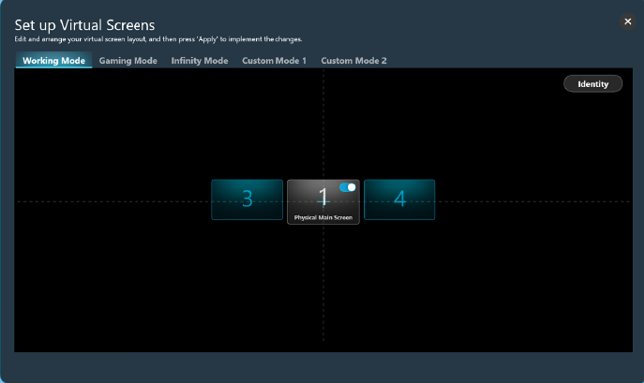
| Working Mode | Select this mode to add two standard virtual screens, one on each side of the main display, while you work. |
| Gaming Mode | Select this mode for gaming as it provides three aspect ratio options – 21:9, 32:9, and 48:9 – to accommodate a wide range of game genres. |
| Infinity Mode | Select this mode when you have need a large digital whiteboard for online collaboration or a spacious canvas for your creative outlet. |
| Custom Mode 1 | Select to create and save a custom layout tailored to your needs. |
| Custom Mode 2 | Select to create and save a second custom layout. |
| Identify | Click this button to display the assigned number for each virtual screen. The assigned number is shown in the lower left corner and corresponds to the number displayed on the layout. |
| Physical Main Screen | Use this switch to show or hide the virtual screen that corresponds to the physical main screen. |
③ Display Settings
Use this menu to set your preferences for the virtual screens. 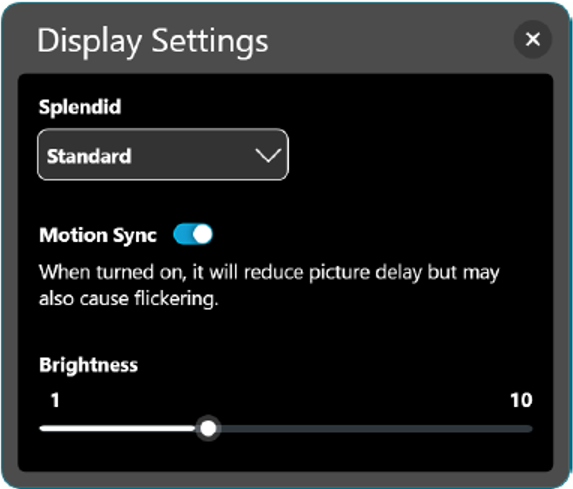
| Splendid | Choose a preset picture mode that optimizes your viewing experience for the current environment and activity. Available options: Standard, Theater, Office, Game, and Eye Care. |
| Motion Sync | Turn on this option for smooth transitions as you navigate your virtual workspace. |
| Brightness | Drag the slider to adjust the brightness of the virtual screen(s). |
| Blue Light Filter (only available in Eye Care mode) | Drag the slider to adjust the blue light filter level. The higher the level, the more blue light emission is reduced. |
④ Distance Settings
Use this menu to digitally adjust your glasses’ interpupillary distance and the virtual screen’s projection distance. 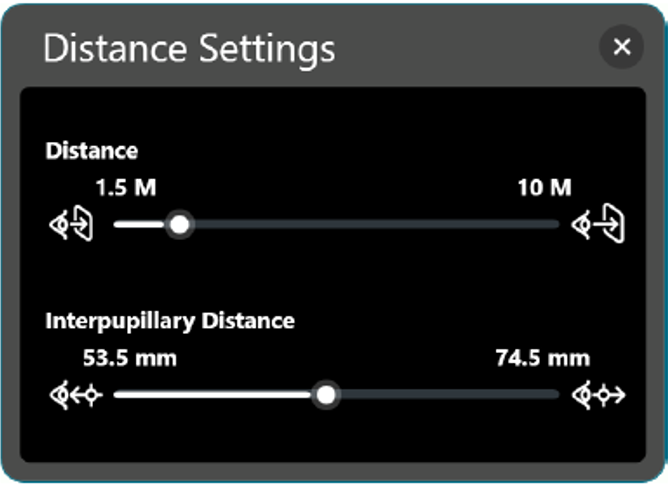
| Distance | Drag the slider to set the distance at which you want the virtual screen(s) to appear in front of you. |
| Interpupillary Distance | Drag the slider to adjust the image alignment for each eye to match your interpupillary distance for best image clarity. |
⑤ More
The More menu allows you to view gesture control settings, customize hotkey settings, as well as set your app preferences. 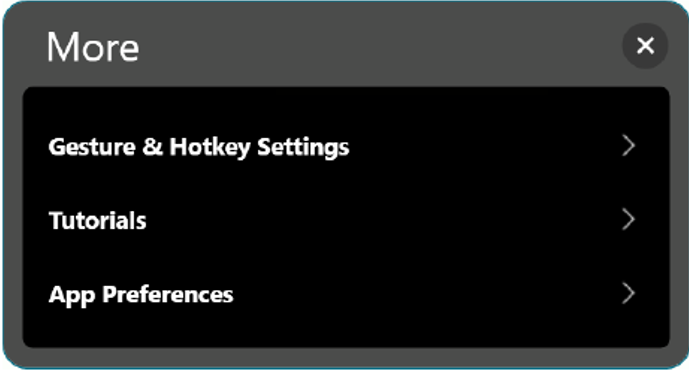
| Gesture & Hotkey Settings | Select this option for a summary of gestures that you can use on the touchpad to control and navigate the virtual screens and also to assign your own hotkeys for certain settings. |
| Tutorials | Click this option to view short tutorials that show you how to use gestures to control the various features of your glasses. |
| App Preferences | Click this option to access a menu that allows you to personalize your app experience. |
* Gesture & Hotkey Settings
This menu summarizes the gestures that you can use on the touchpad to control and navigate the virtual screens and also allows you to assign your own hotkeys for certain settings.
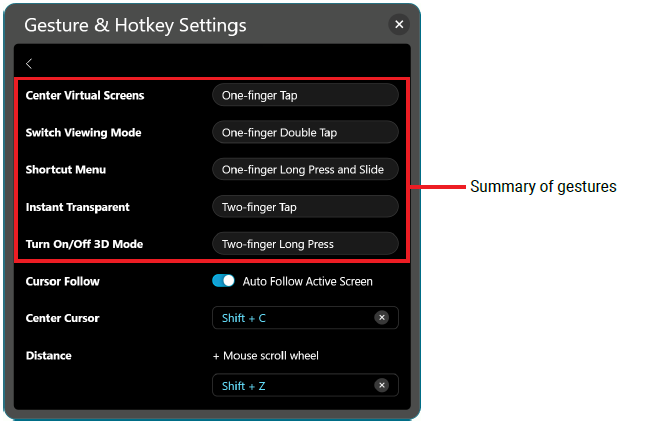
| Cursor Follow | Turn on Auto Follow Active Screen to allow the cursor to automatically follow and appear on the screen that is in your line of sight. *NOTE: You can assign your own keyboard shortcut for thisfeature. The keyboard shortcut must include either the Shift or Alt key combined with a letter key.* |
| Center Cursor | Brings the mouse cursor to the center of the virtual screen that isin your line of sight. |
| Distance | Allows you to assign your own keyboard shortcut to use in conjunction with a mouse scroll wheel for adjusting the distance at which you prefer the virtual screen(s) to appear in front of you. The keyboard shortcut must include either the Shift or Alt key combined with a letter key. |
*App Preferences :Use this menu to customize your app experience. 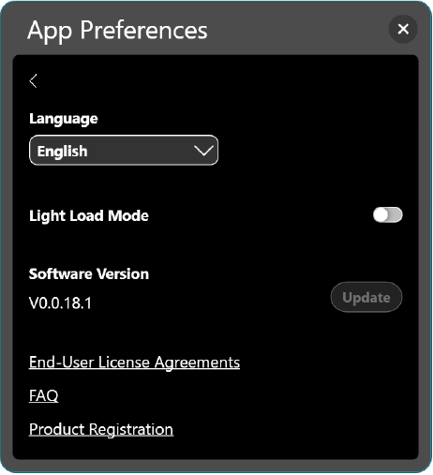
| Language | Select the language to use for the ASUS AirVision app. |
| Light Load Mode | Turn on this option to conserve your host device’s energy consumption. |
| Software Version | Shows the current software version and allows you to update if a newer version is available. |
| End-User License Agreements | Click to bring up the end-user license agreements. Click Understood if you have fully read, understood, and accept the terms and conditions of the End-User License Agreements (EULA). |
| FAQ | Click to open the FAQ page to find answers to frequently asked questions and troubleshoot issues. |
| Product Registration | Click to open the product registration page. |
C.What safety precautions and storage methods should be observed when using AirVision M1 glasses
1.) Here are some safety precautions to follow when using AirVision glasses:
① Do not connect the glasses directly to the power supply of the transformer (portable charging device).
② Avoid exposing the optical components directly to sunlight.
③ Do not use the glasses in rainy or humid environments. If the glasses get wet, stop using them immediately and contact ASUS customer support for assistance.
④ Similar to using a computer or smartphone, it's best to take a few minutes of rest after prolonged use, even if you feel it's unnecessary.Everyone's situation is different, so if you feel discomfort, consider taking more frequent and longer breaks.
2.) How to store the glasses:
① Regular Cleaning: Use a dedicated glasses cleaner and a soft microfiber cloth to clean the lenses. Avoid wiping with clothing or tissues, as these materials can scratch the lenses.
② Avoid High Temperatures and Direct Sunlight: Do not leave the glasses in a car or other high-temperature places, as this can damage the lens coating.
③ Proper Storage: Store the glasses in a case to avoid drops or scratches. When not wearing the glasses, it's best to place them back in the case.
④ Avoid Contact with Chemicals: Keep the glasses away from chemicals like perfume and cleaning agents, which can damage the lens coating
Q1. How do I switch between 2D and 3D mode on AirVision glasses?
A1.
① Ensure the AirVision application is enabled and you are not in light load mode before switching to 3D mode.
② 3D mode is only applicable to videos played in side-by-side 3D (SBS 3D) format and in full-screen mode.
③ Make sure the aspect ratio of your virtual screen matches the 3D video to display the 3D video correctly.
Q2. Why do the left and right eye images differ when connected to a computer, and why does the screen split into two halves when connected to a phone?
A2. This is because 3D mode is activated. To merge the images into one, press and hold the touchpad on the left temple with two fingers for 1.5 seconds.
Q3. What should I do if the display is blurry?
A3.
① Ensure that it is not set to 3D mode.
② Check if your interpupillary distance (IPD) is within the range of 53.5-74.5 mm. If needed, wear the correct prescription glasses or contact lenses and adjust the position of the glasses.
Q4. Why does the game menu keep popping up frequently?
A4. When the game menu keeps popping up, even after closing it, it's because you are in positioning mode and have enabled the auto cursor follow feature. This causes the mouse to frequently jump to non-game windows, and when the game detects that the mouse is not on the game screen, it automatically pops up the menu or pauses the game.
Q5. Can I use Bluetooth headphones with AirVision glasses?
A5. Yes, AirVision acts as an external display for your phone, game console, or computer. As long as your device supports Bluetooth, you can use Bluetooth headphones. For some devices, like the iPhone, you may need to select headphones as the audio output device.
Q6. Why is there a yellow border on my laptop screen?
A6. The yellow border indicates that a window is currently being recorded using the Windows screen recording feature.
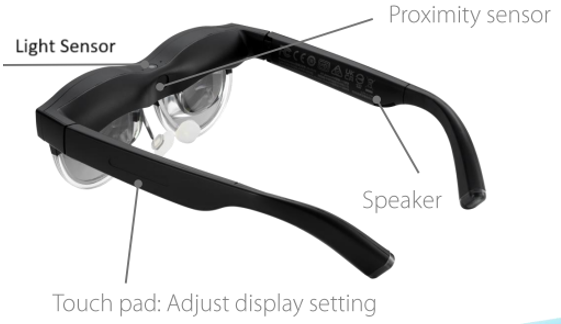
Q7. What should I do if the Promimity sensor malfunctions?
A7. Use a soft microfiber cloth to clean the Sensor.
Q8. Can I use AirVision glasses if I am nearsighted?
A8. Yes, we provide a sample prescription lens in the product packaging. You can get a prescription from your ophthalmologist and take the prescription and sample to an optician. Inform them that these lenses will be used for AR glasses. They will create the lenses accordin to the sample, which you can then install in the AirVision glasses.
Q9. Will prolonged use of AirVision glasses harm my eyes?
A9. AirVision glasses have received low blue light and flicker reduction certification from TÜV Rheinland. Products that meet these standards and receive this certification meet strict requirements, including high-quality display, improved eye health, and providing a comfortable user experience. However, it is still recommended to take regular breaks.
Q10. How can I project the content I see in the AirVision glasses to other devices (like a monitor) so others can see the same content?
A10. Use the shortcut "Ctrl+Alt+E" to bring up the Unity window. The image in this window is what you see through the glasses. If you have already connected to another display via HDMI or wirelessly, you can drag this window to the designated display.
Q11. Do AirVision glasses come in different widths to accommodate large/small head sizes?
A11. At launch, only one size is available, but the temples can bend outward up to 22 degrees, accommodating head widths ranging from140-170 mm.
