This widget could not be displayed.
This widget could not be displayed.
Turn on suggestions
Auto-suggest helps you quickly narrow down your search results by suggesting possible matches as you type.
Showing results for
- English
- Other Products
- FAQ
- [ProArt Motherboard] ProArt Creator Hub -CreationF...
Options
- Subscribe to RSS Feed
- Mark as New
- Mark as Read
- Bookmark
- Subscribe
- Printer Friendly Page
- Report Inappropriate Content
Community Manager
Options
- Article History
- Subscribe to RSS Feed
- Mark as New
- Mark as Read
- Bookmark
- Subscribe
- Printer Friendly Page
- Report Inappropriate Content
on
01-29-2024
06:00 PM
- edited on
10-07-2025
04:20 AM
by
![]() ZenBot
ZenBot
[ProArt Motherboard] ProArt Creator Hub -CreationFirst Introduction
[ProArt Motherboard] CreationFirst - Introduction
[ProArt Motherboard] ProArt Creator Hub - Introduction
[ProArt Motherboard] CreationFirst - Introduction
Description: :CreationFirst network optimization software allows you to prioritize applications to allocate more bandwidth and speed up the processing of important applications and tasks.
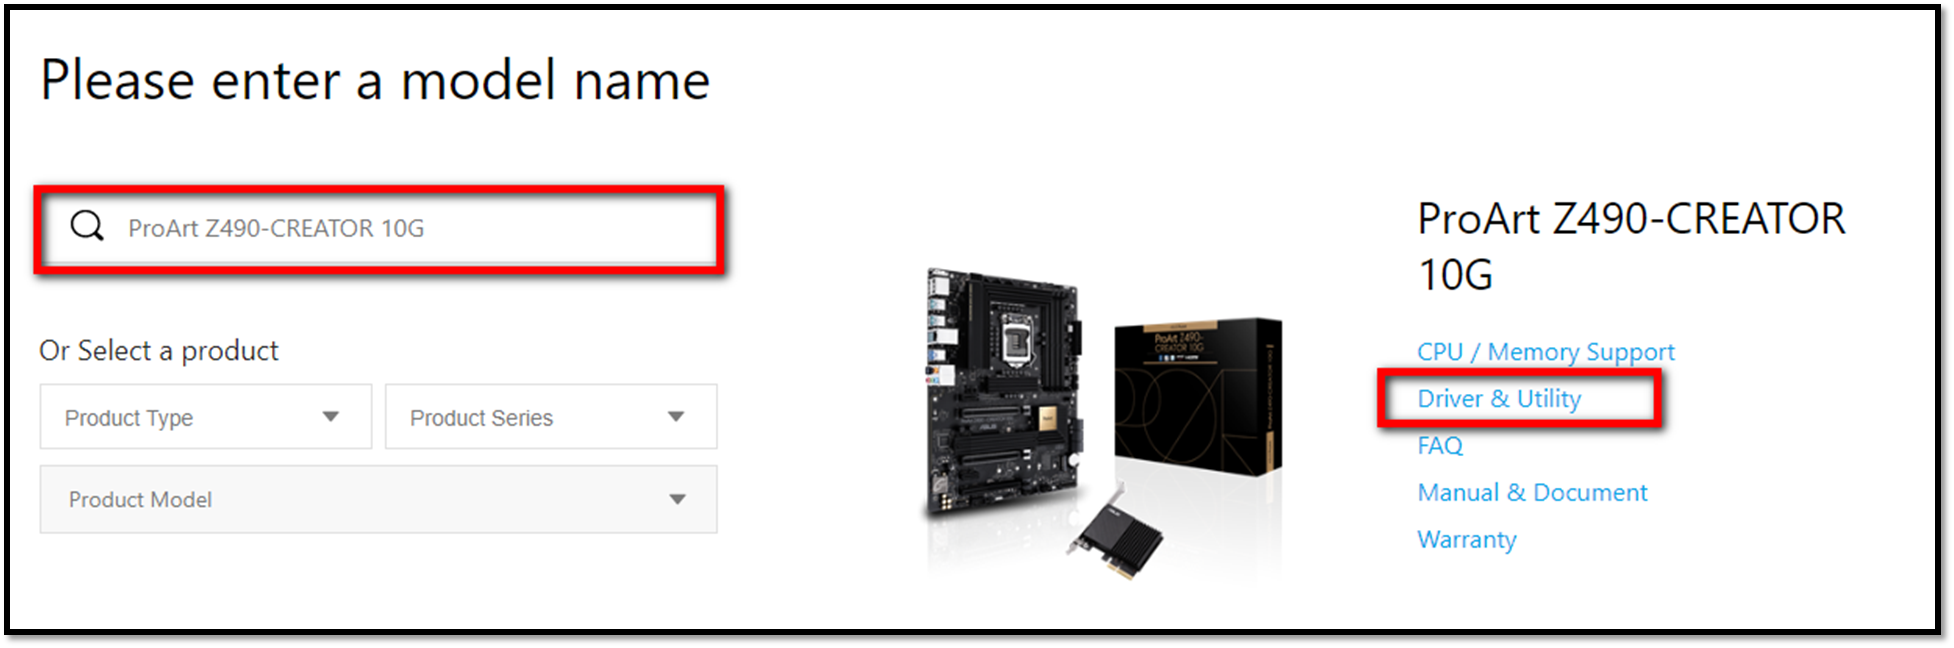
Supported models : ProArt Z490- CREATOR 10G
1. Download CreationFirst software
3. Open CreationFirst and instructions
3.3 Network Internet Information
1. Download CreationFirst software
How to get (CreationFirst)?
You can get the latest software, manuals, drivers and firmware at the ASUS Download Center. ASUS Download Center
If you need more information about ASUS Download Center, please refer to this LINK:
* How to check the product model: https://www.asus.com/support/Article/565/
Operation Method:
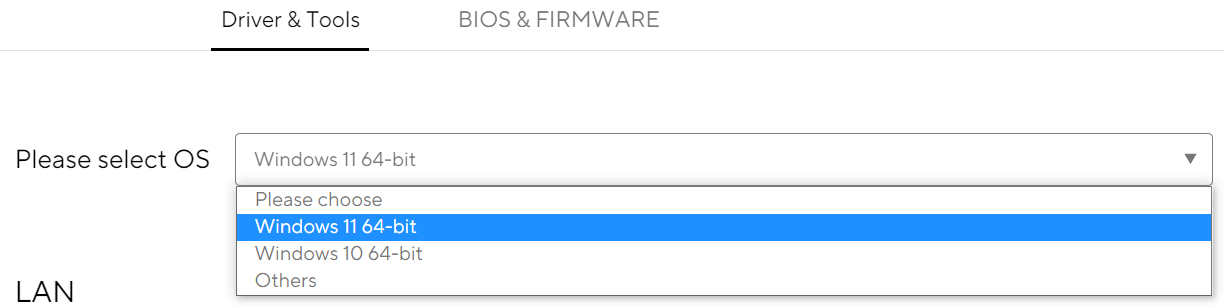
1. Download the latest utility program corresponding to your graphics card model from the ASUS Download Center
Enter the model-> click the driver and utility program. (Ex: ProArt Z490-CREATOR 10G )
2. Click on “Driver& Tools”-> Select Operating System
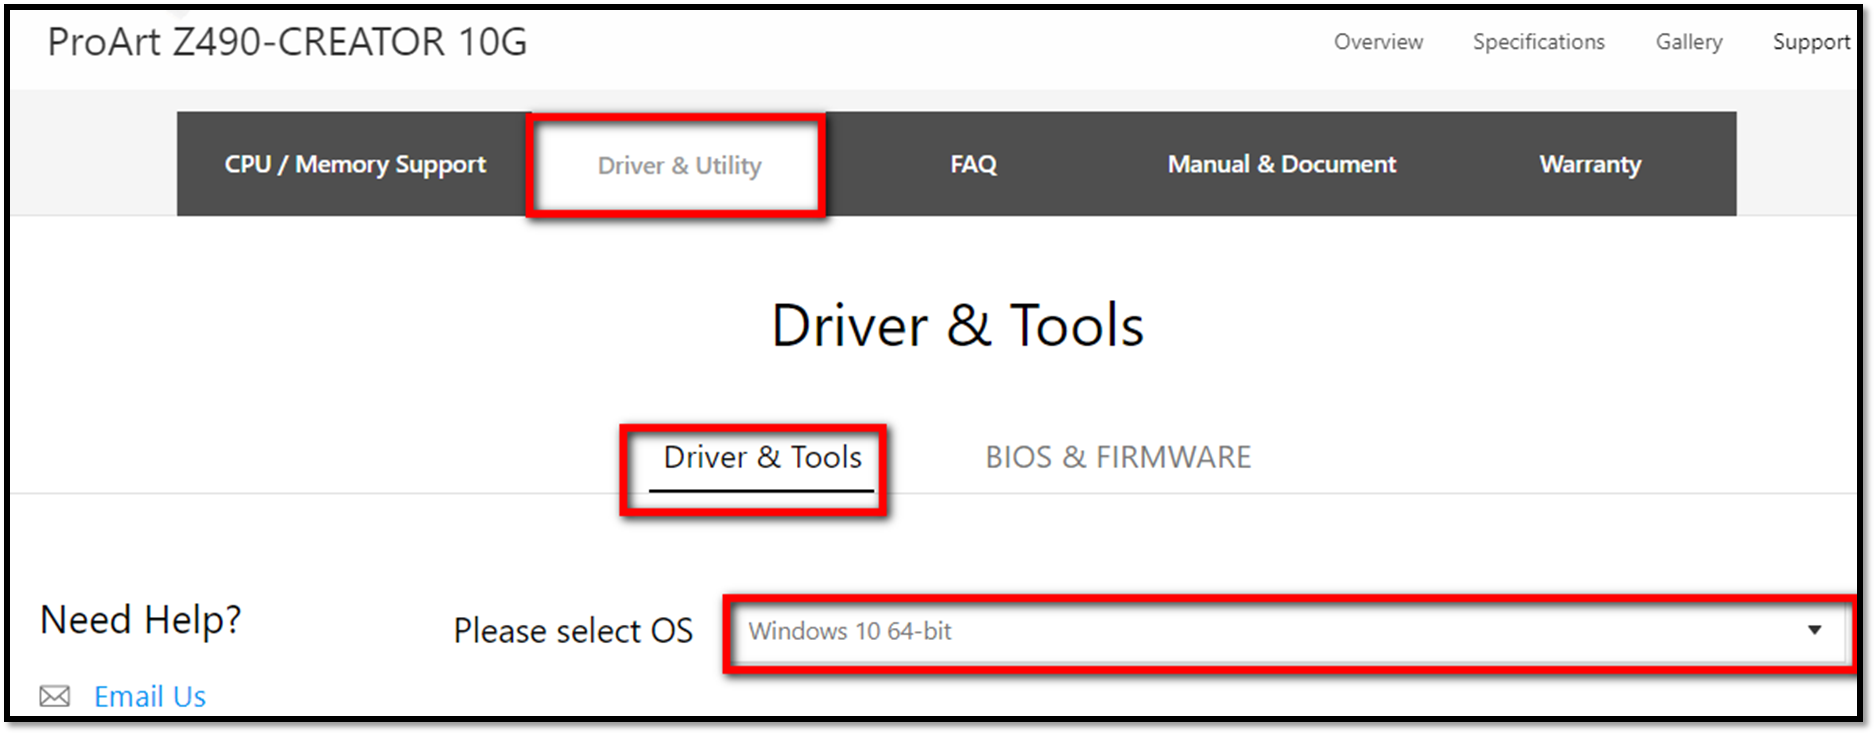
3. Click ”Utilites”->Download

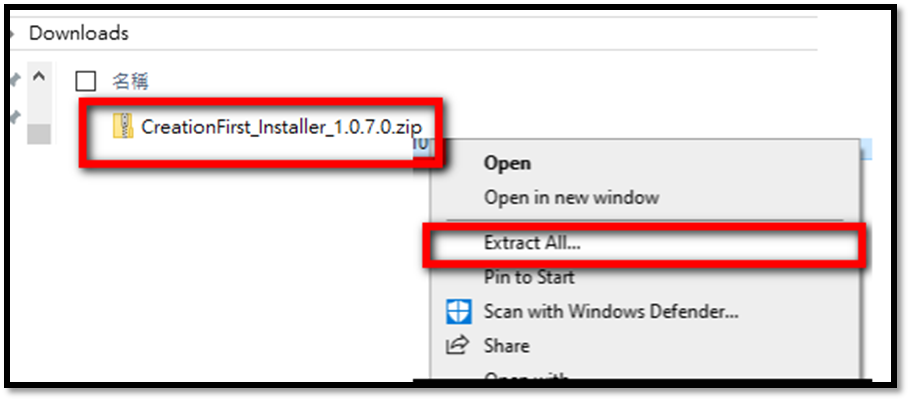
4. Right-click with your mouse and select "Extract All"
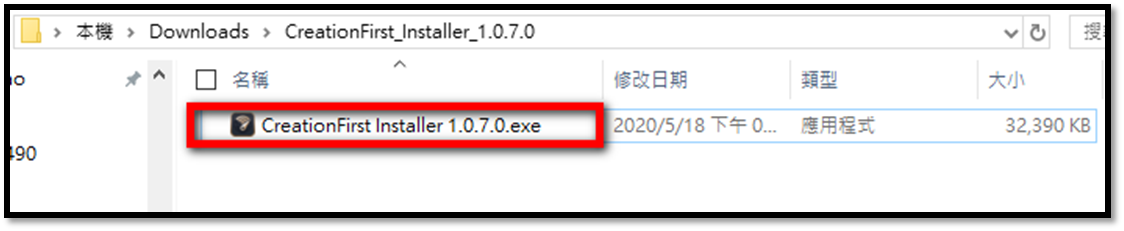
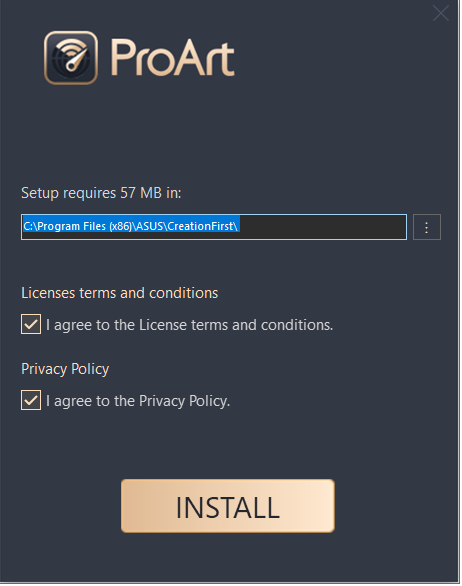
2.1 Double-click
2.2 Check the two terms "License terms and Conditions” And “Privacy Policy" then click Install
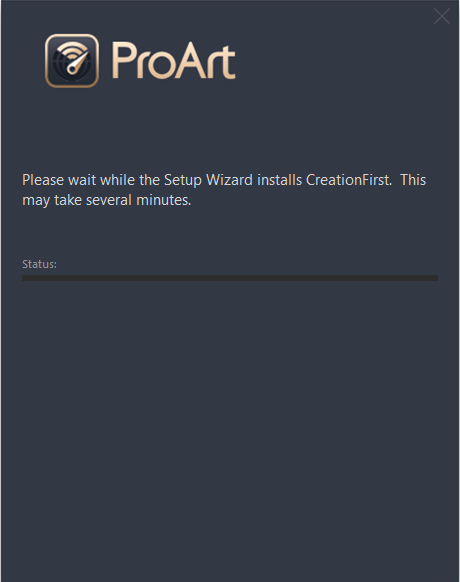
2.3 Pleases wait while the Setup Wizard installs CreationFirst. This may take several minutes.
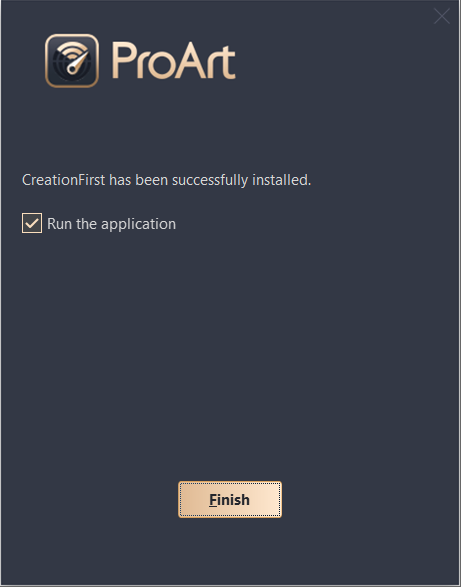
2.4 Click Run the application -> Finish
3. Open CreationFirst and instructions
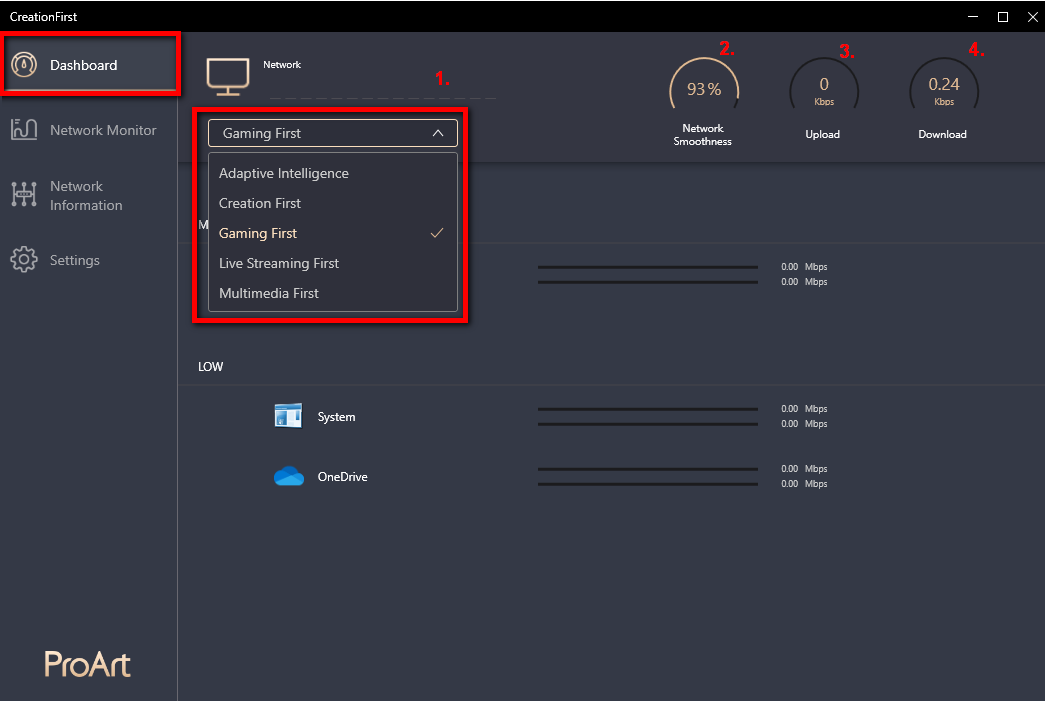
CreationFirst Icon on the desktop, double-click

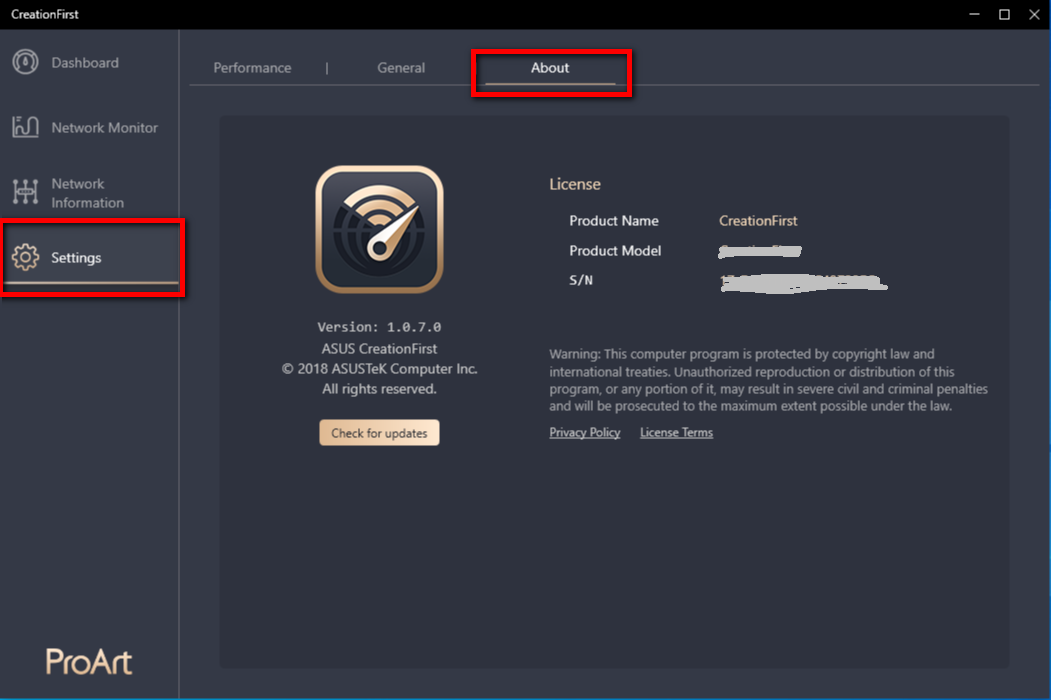
Red: 1.Dashboard , 2.Network Monitor, 3.Network Information, 4.Settings.
Green is the detailed function.
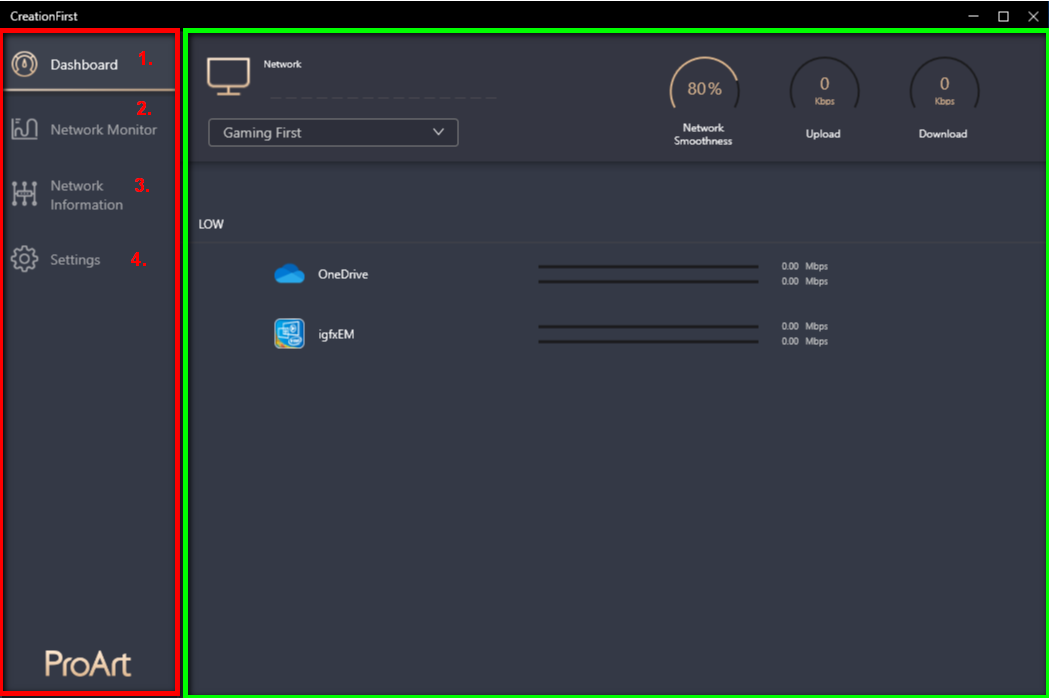
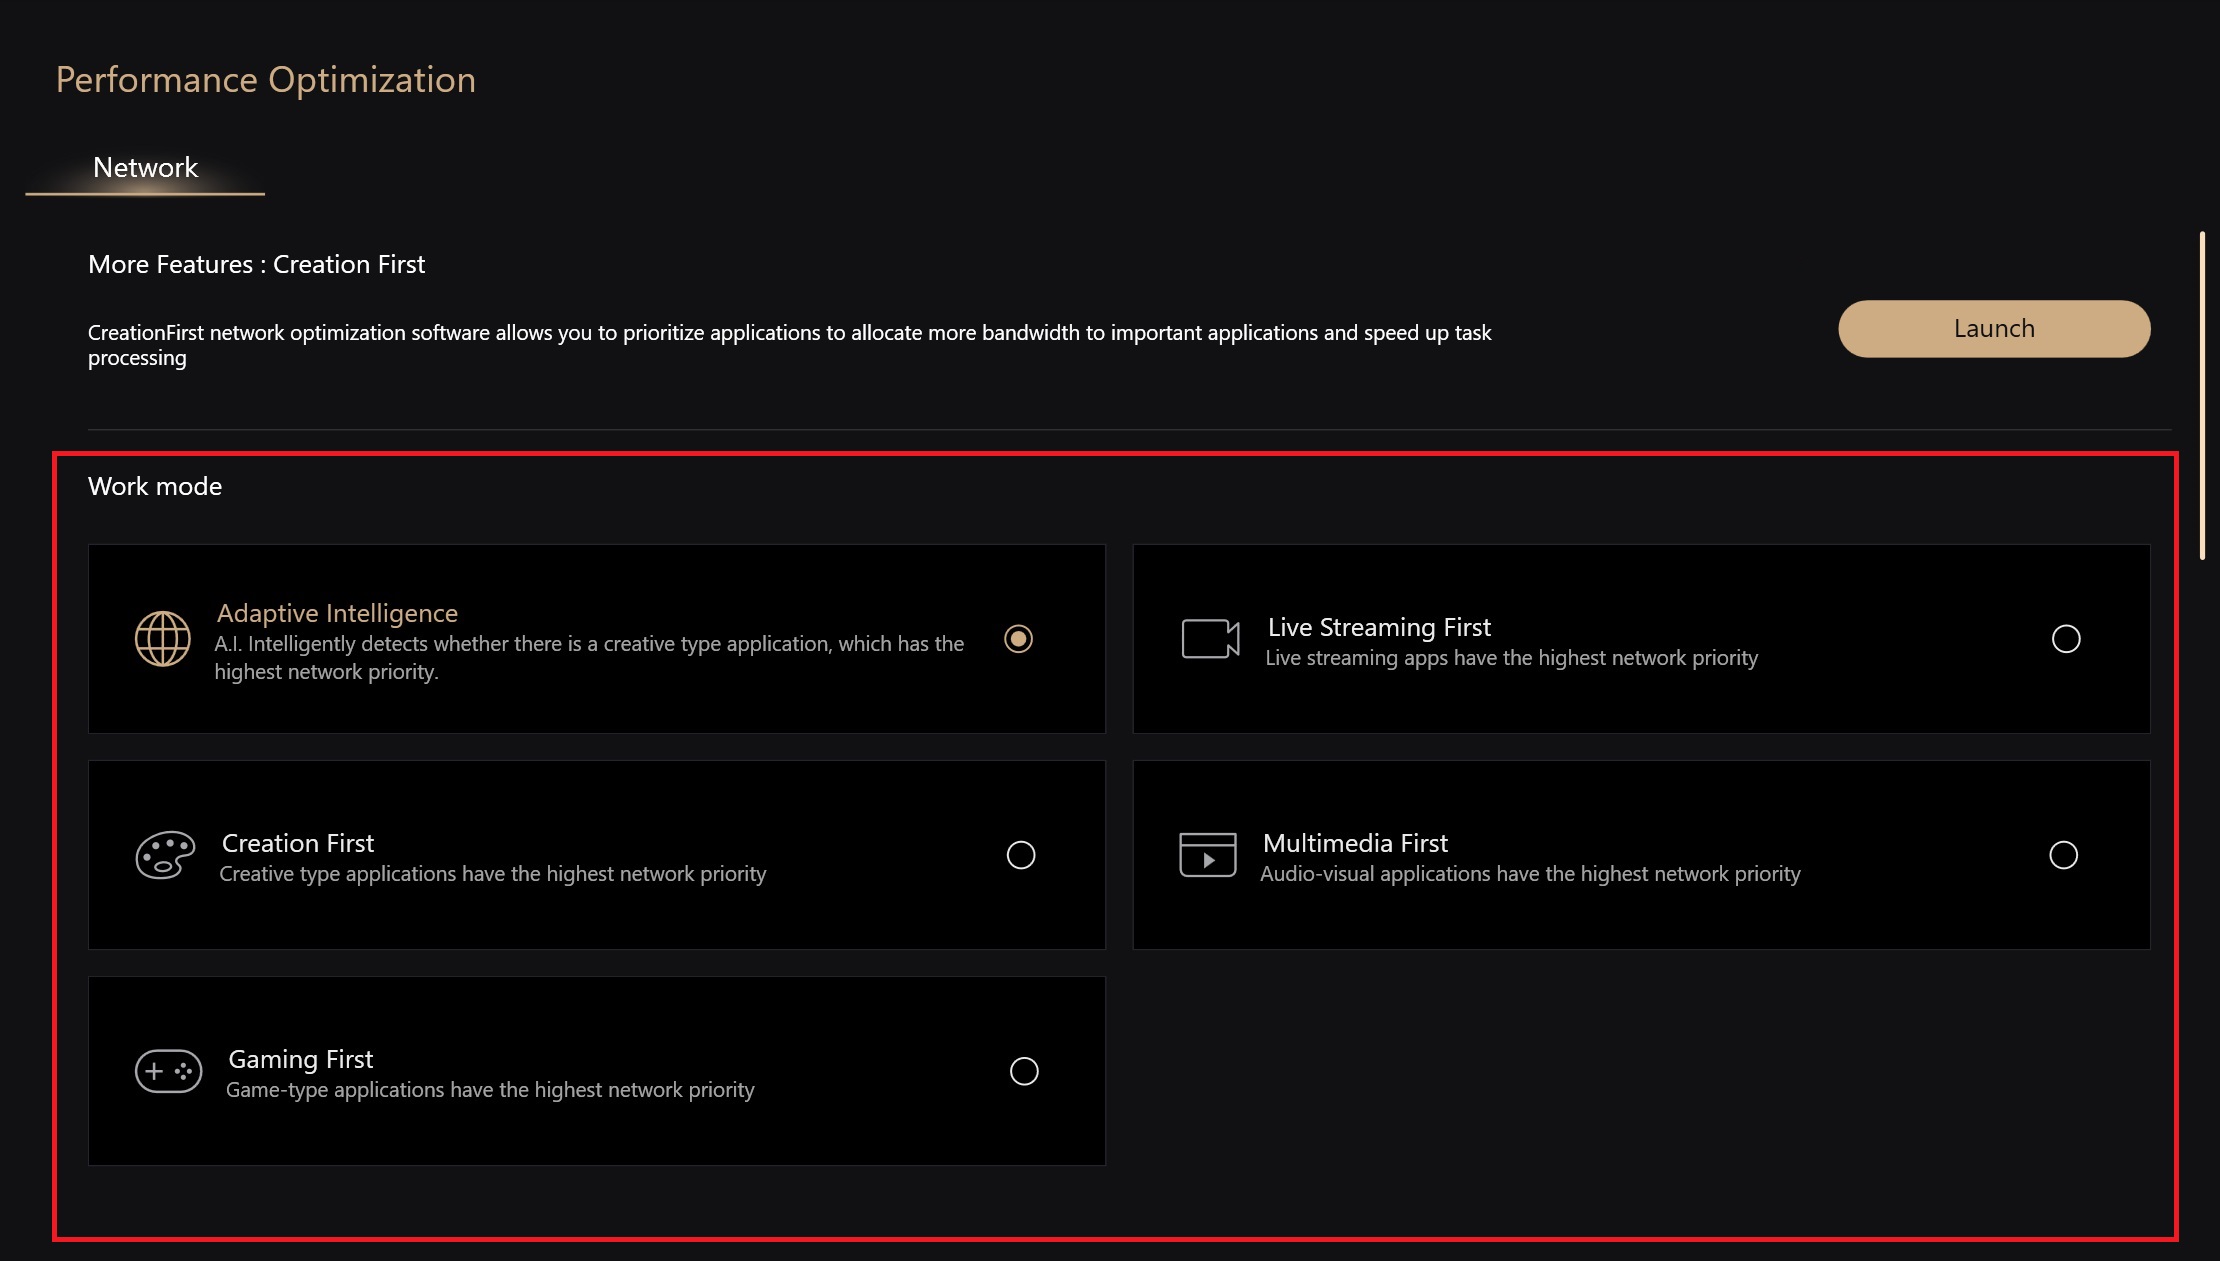
1.Network : Five priority network modes can be selected - Adaptive intelligence, CreationFirst, Gaming First , Live Streaming First, Multimedia First
2.Network Smoothness
3.Show the immediate Upload speed
4.Show the immediate Download speed
3. Use software network settings
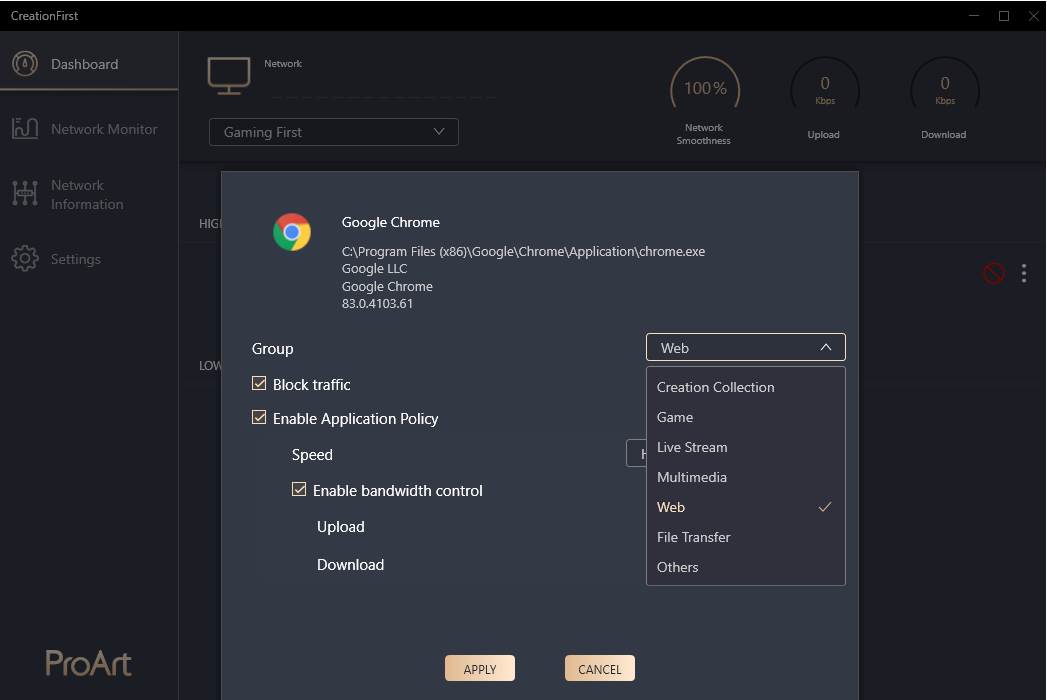
1. You can set the order level of the application to apply the network transmission. (EXTREME/HIGH/MEDIUM/LOW)
2. The software network mode can be customized : Creation Collection, Game, Live Stream,Multimedia,Web, File Transfer, Other
3. The default network can be customized : Default Network, Ethernet
4. Block Traffic network
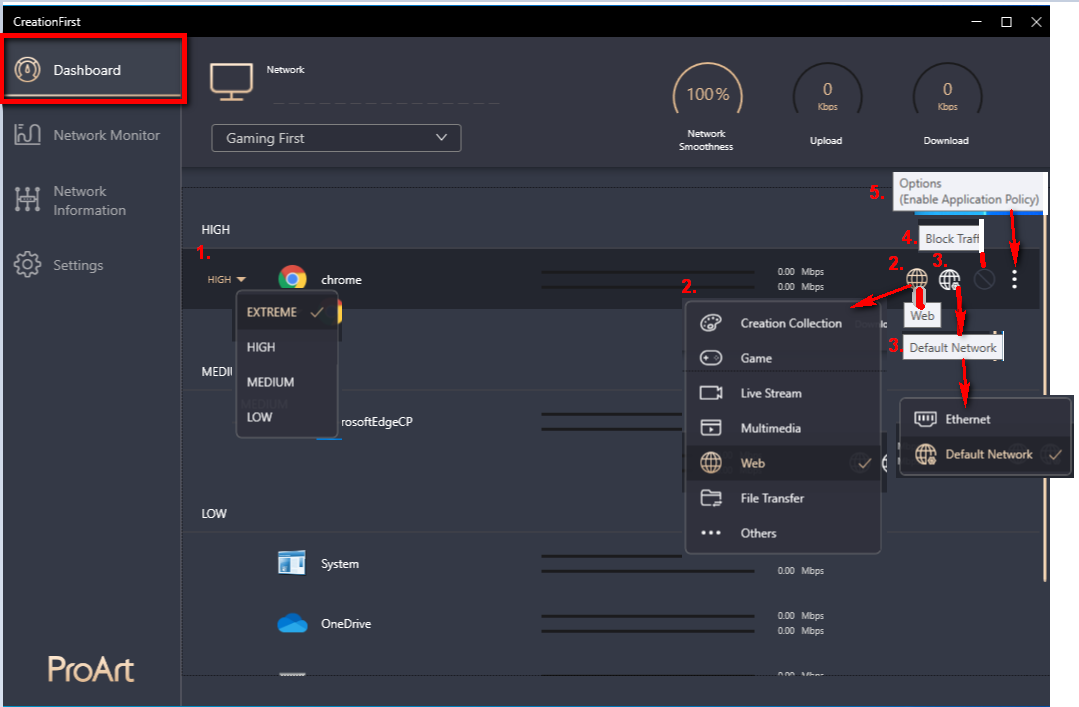
5.Options : Block traffic, Enable Application Policy, Speed ( where you can enable bandwidth control)
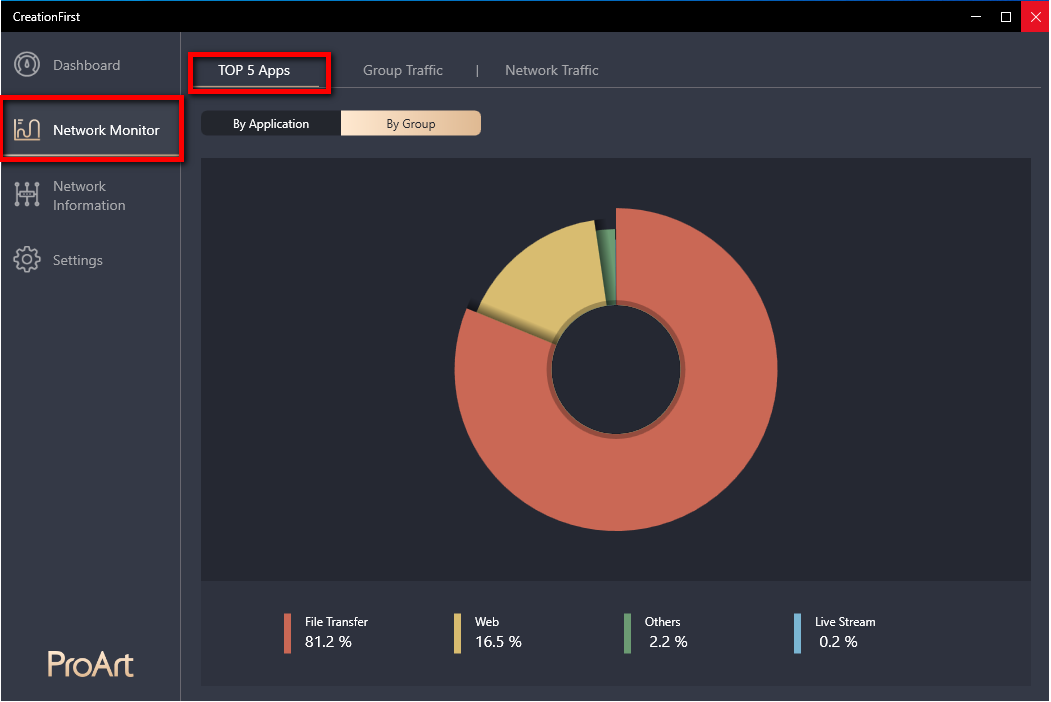
3.2.1.1 Top 5 App -> By Application percentage
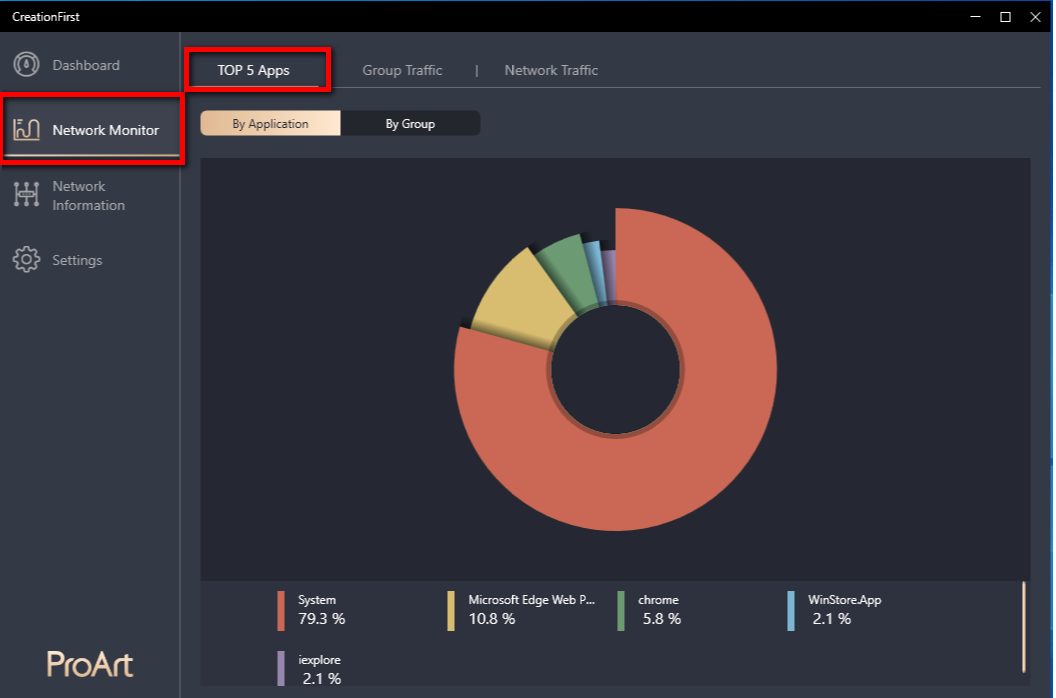
3.2.1.2 Top 5 App -> By Group percentage
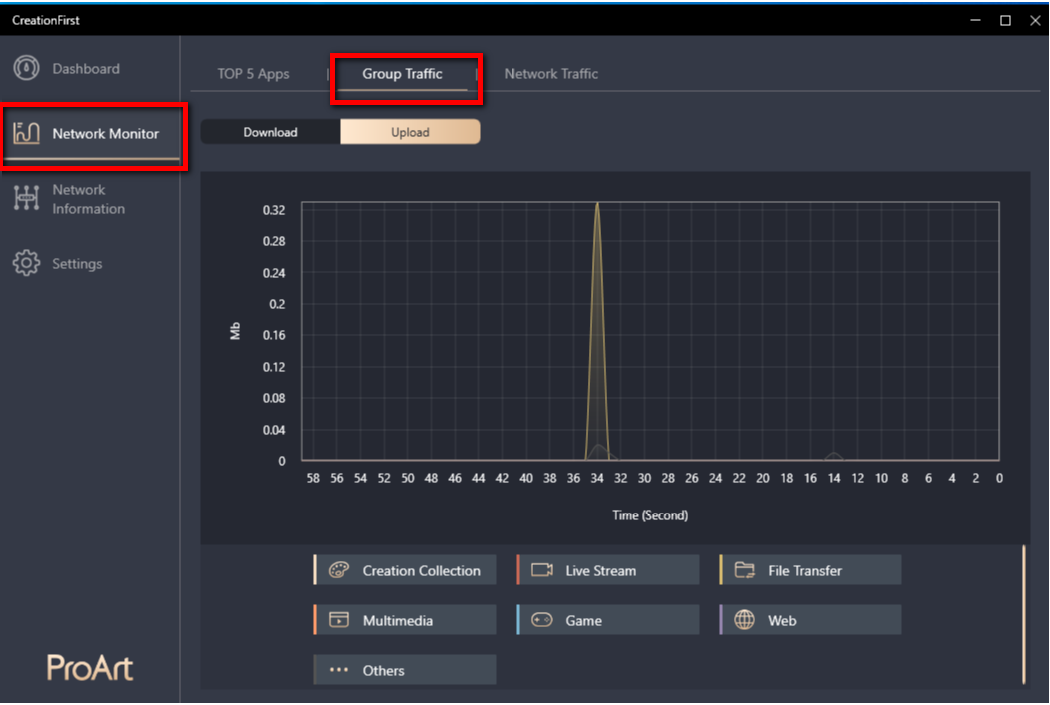
3.2.2.1 Group Traffic -> Download : Use software to classify the total traffic Mb(s)
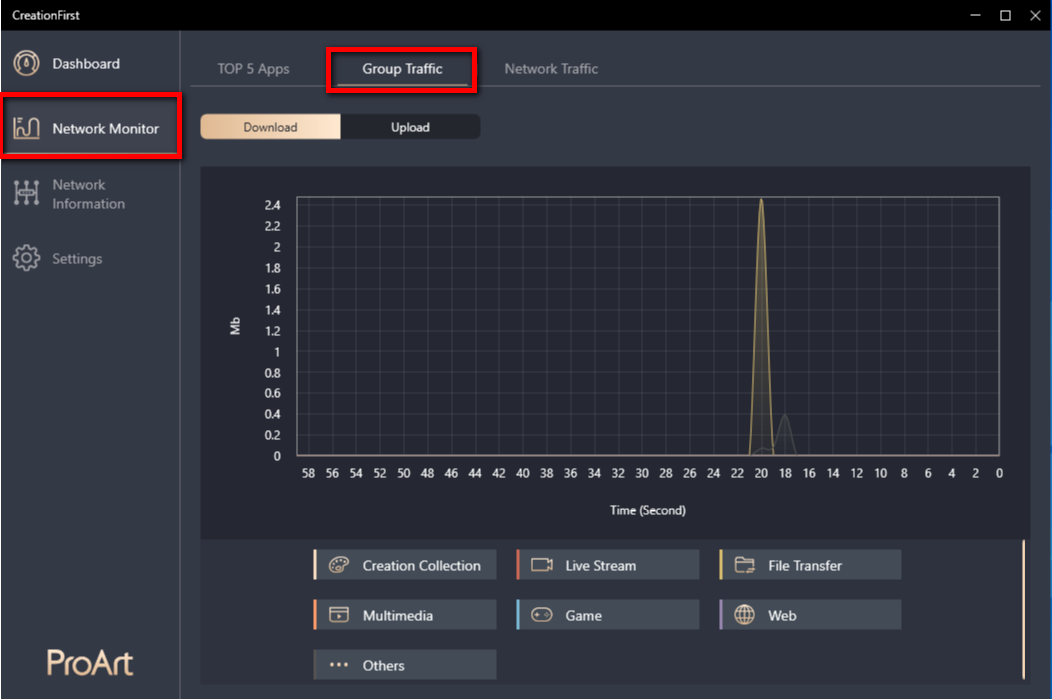
3.2.2.2 Group Traffic -> Upload : Use software to classify the total traffic Mb(s)
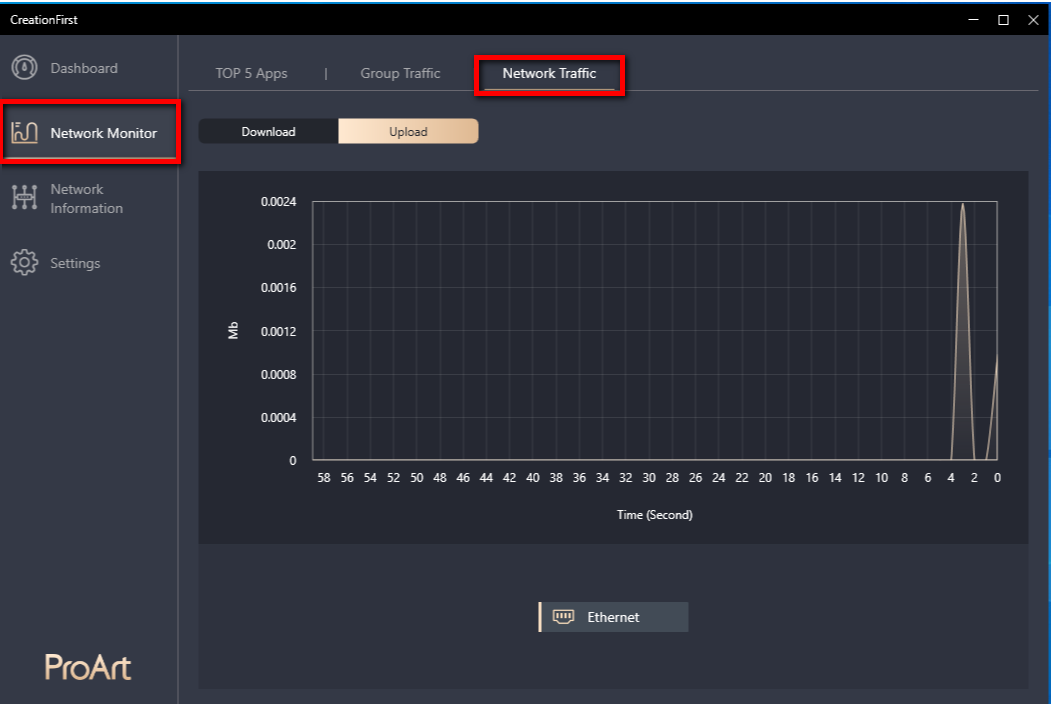
3.2.3.1 Network Traffic : Download - The total traffic of the network port Mb(s)
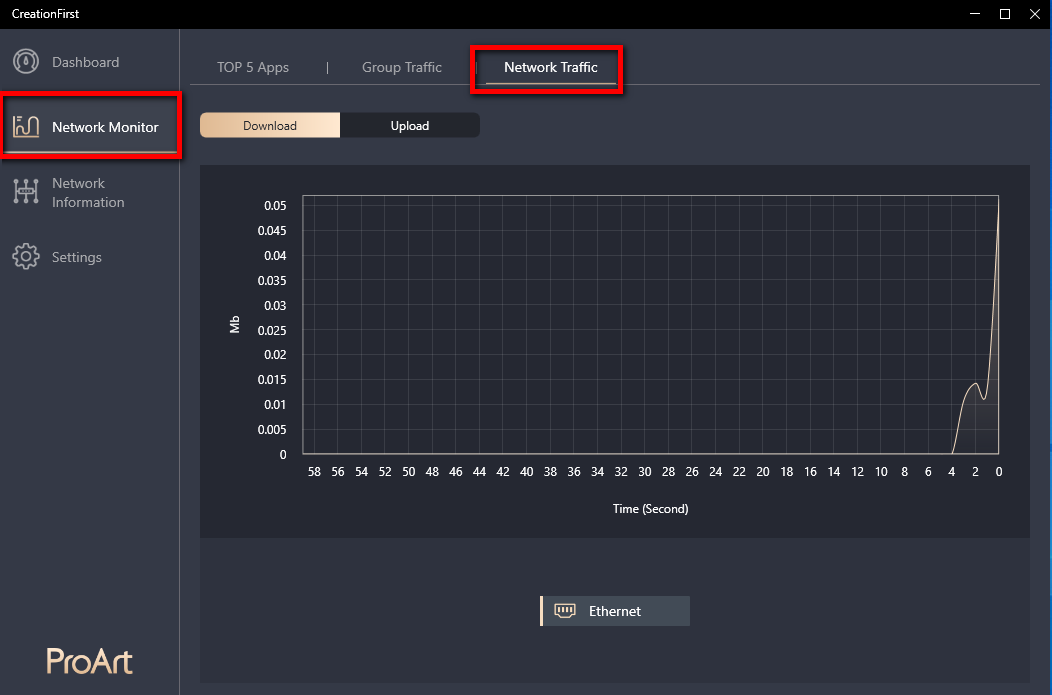
3.2.3.2 Network Traffic : Upload -The total traffic of the network port Mb(s)
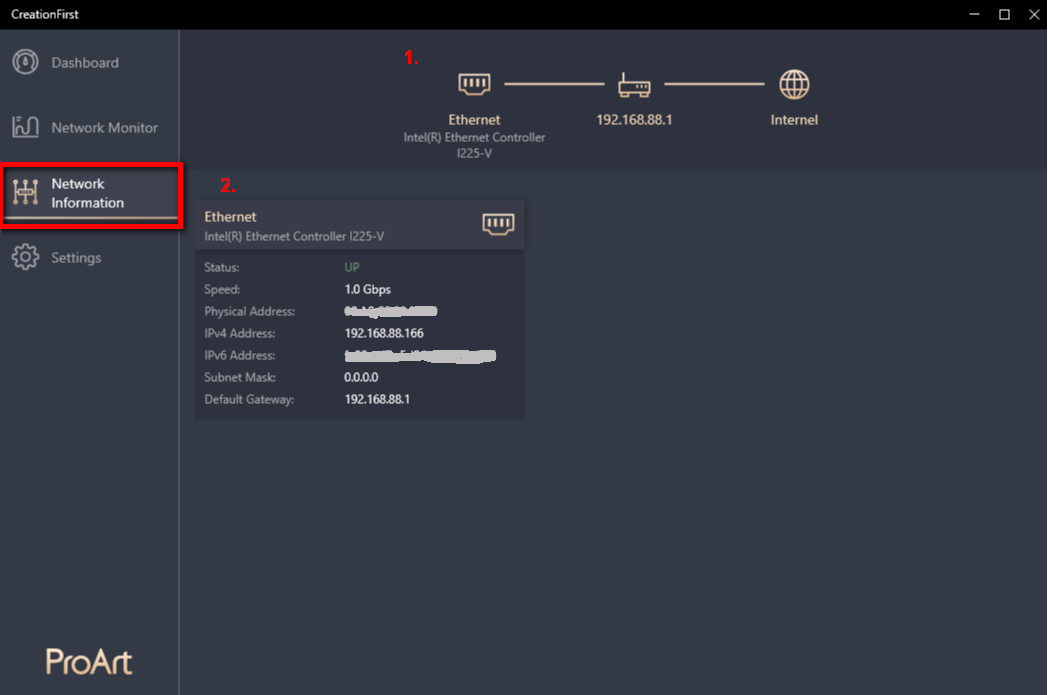
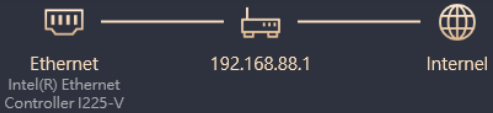
3.3.1: 1. Graphic shows: Internet connection is successful
3.3.2 2. Ethernet related status and network information
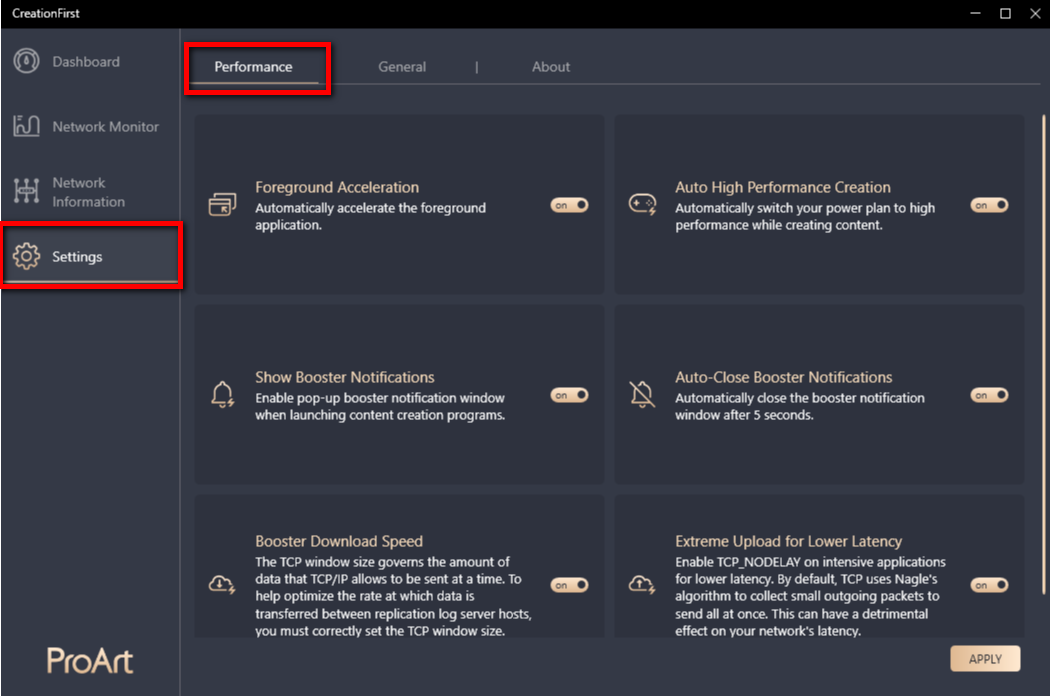
3.4.1 Performance : Foreground Acceleration, Show Booster Notifications , Booster Download Speed, Auto High Performance Creation,
Auto-Close Booster Notifications , Extreme Upload for Lower Latency . The function can be switched off or on.
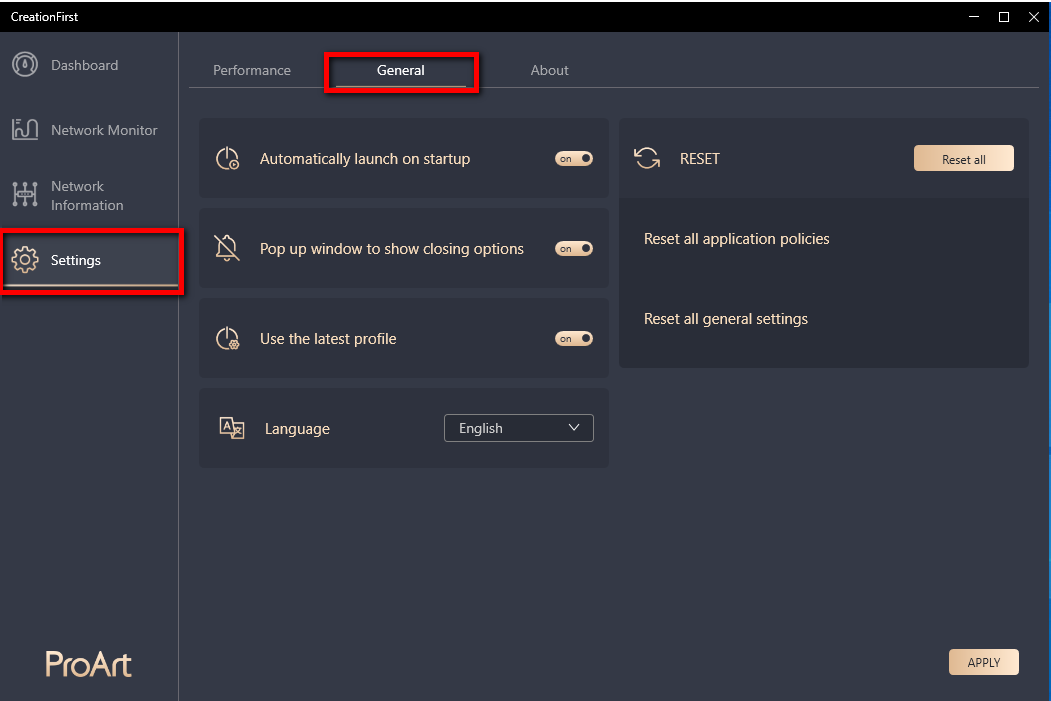
3.4.2 General : Automatically launch on startup , Pop up windows to show closing options, Use the latest profile, Language, Reset all(for General settings), Reset all application policies, Reset all general settings
3.4.3 About : Check software version updates and the product names
Q1: How to confirm the connection status of network device?
A1: The device connection status is as the following:
It has successfully connected to the external network (internet)
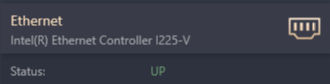
Status:
 Successfully connected to the external network (internet)
 Successfully connected to AP or router, but unable to connect to the internet ; Please check the router (AP) in your home can access the Internet.
 Unable to connect to the router and internet ; Please check the router (AP) in your home can access the Internet and Ethernet cable is connected.
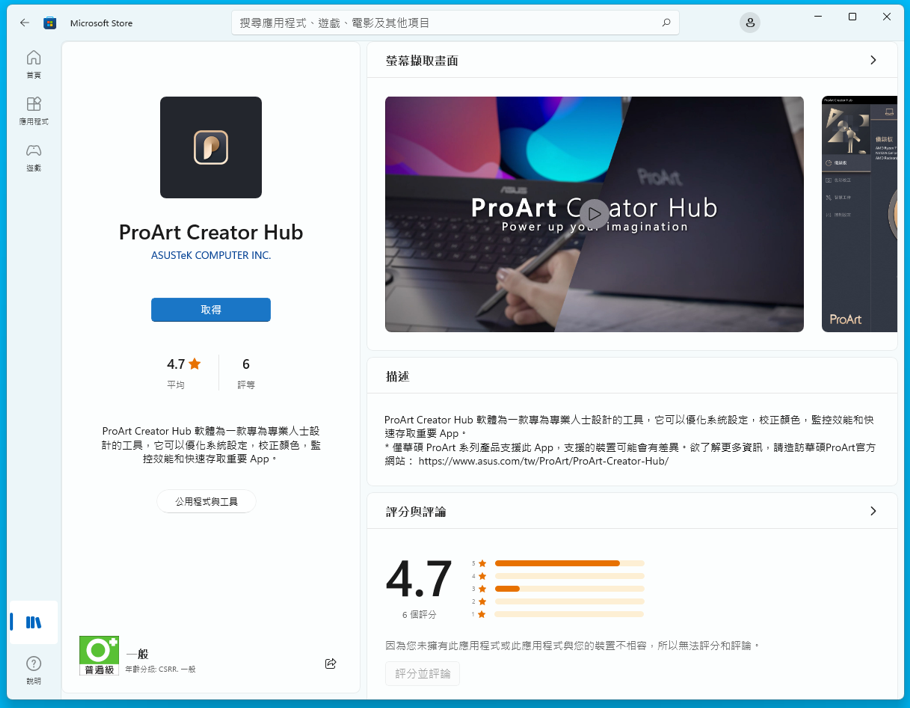
[ProArt Motherboard] ProArt Creator Hub - Introduction
1. Download and install the ProArt Creator Hub software
2. ProArt Creator Hub instructions
1. Download and install the ProArt Creator Hub software
- Go to Driver & Tools of the ProArt Model Support Site to select the OS type (both Windows 10/11).
- Go to Software and Utility to download the drivers and services installation files required by ProArt Creator Hub.
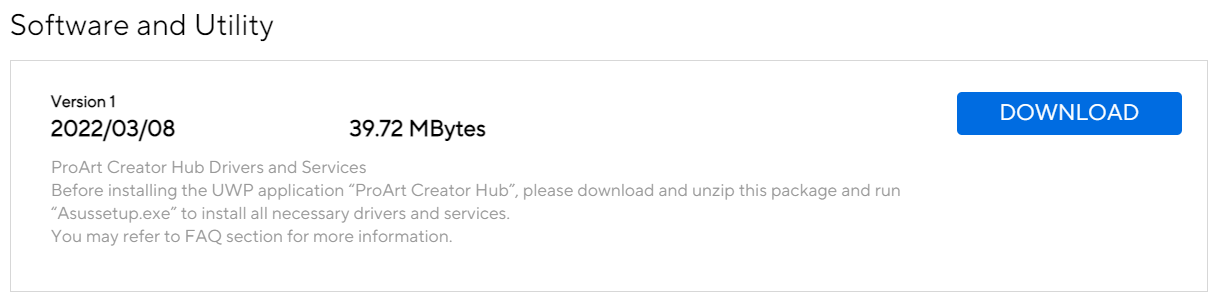
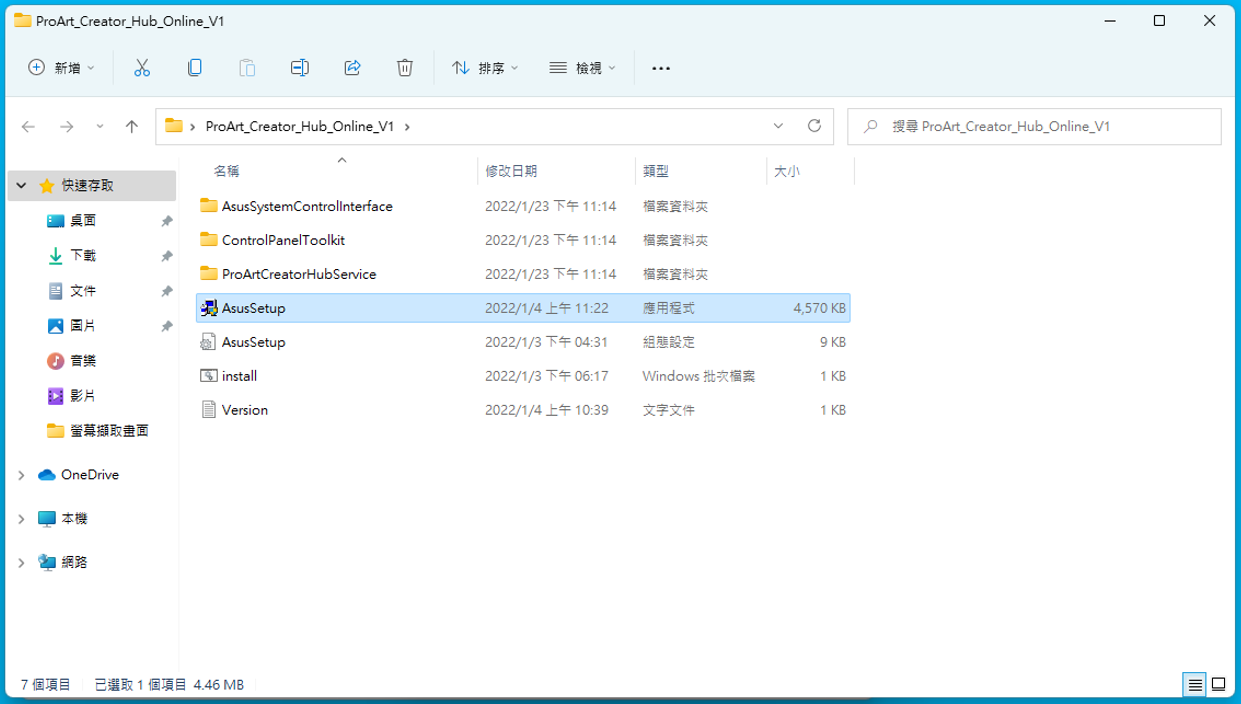
- Unzip the file.
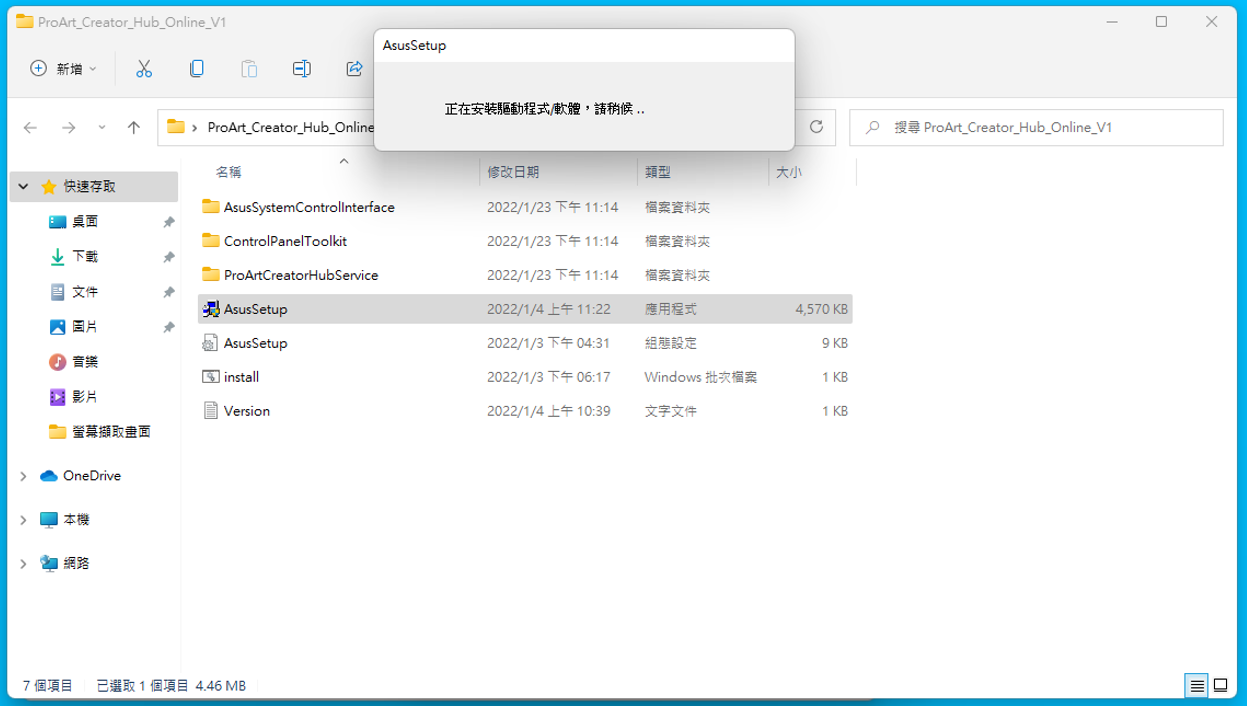
- Click Asussetup.exe .
- Wait for the service and driver to be installed.

- Go to Software and Utility and click the following Microsoft Store link to go to the ProArt Creator Hub installation page
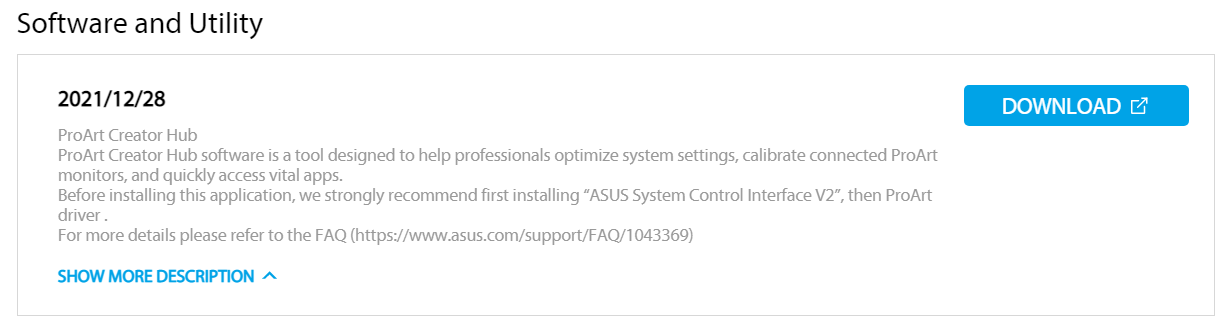
https://www.microsoft.com/p/proart-creator-hub/9nm0hh6wdn7q
- Follow the instructions to install ProArt Creator Hub
- The installation is complete.
Notice:
If the App cannot be used, please modify the settings in the BIOS as follows:
- Go back to the desktop within system and select Start > Restart
- Press F2 or DEL to enter BIOS
- Press F7 to enter Advanced Mode
- Please enter the following path in the main menu
Tool > MyASUS > Download & Install MyASUS service & app
- Please set the option to Enabled, as shown below
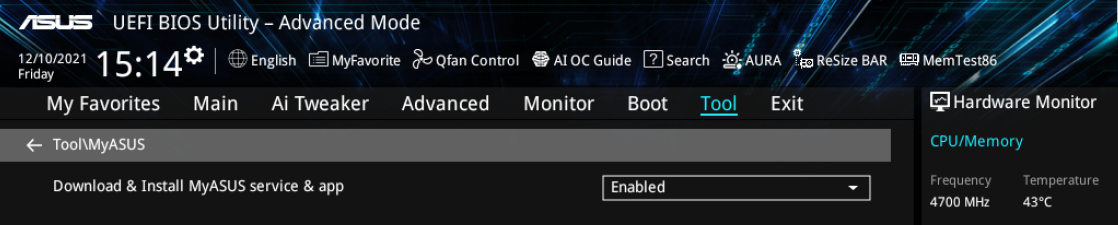
- Press F10, select OK to save the settings and reboot
- After rebooting, go back to the operating system to use ProArt Creator Hub
2. ProArt Creator Hub instructions
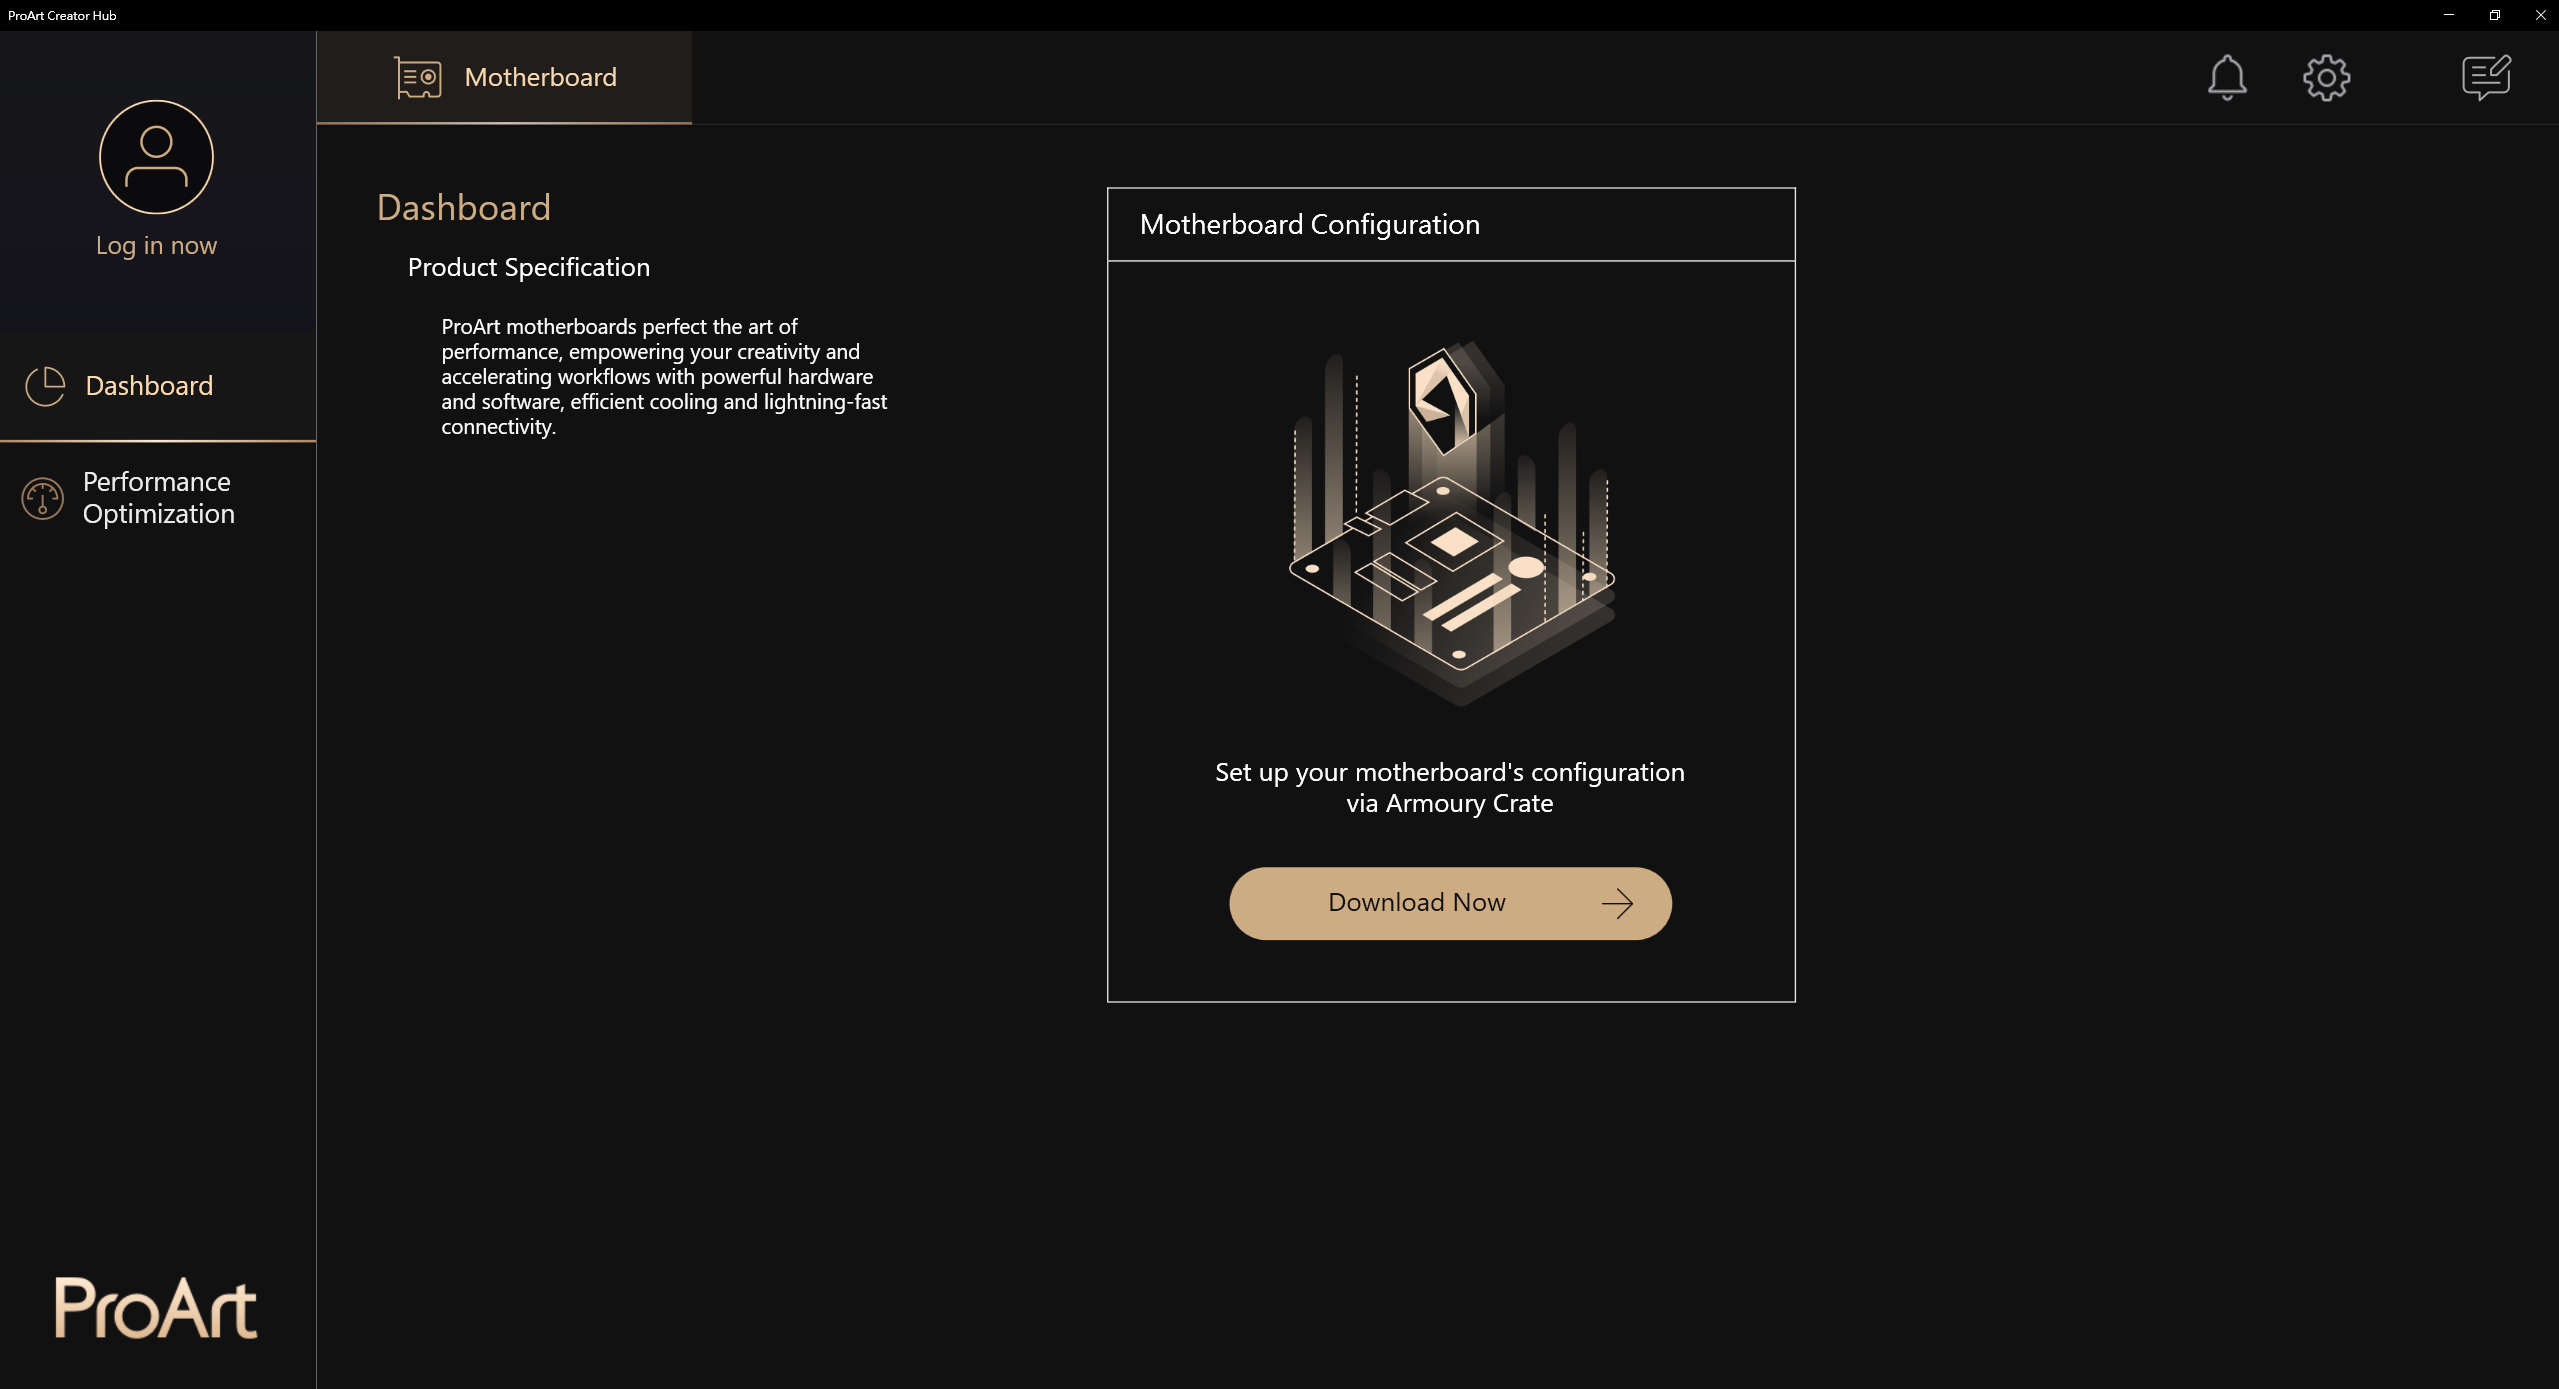
1. Main :
A .Function bar:Show Dashboard and Performance Optimization
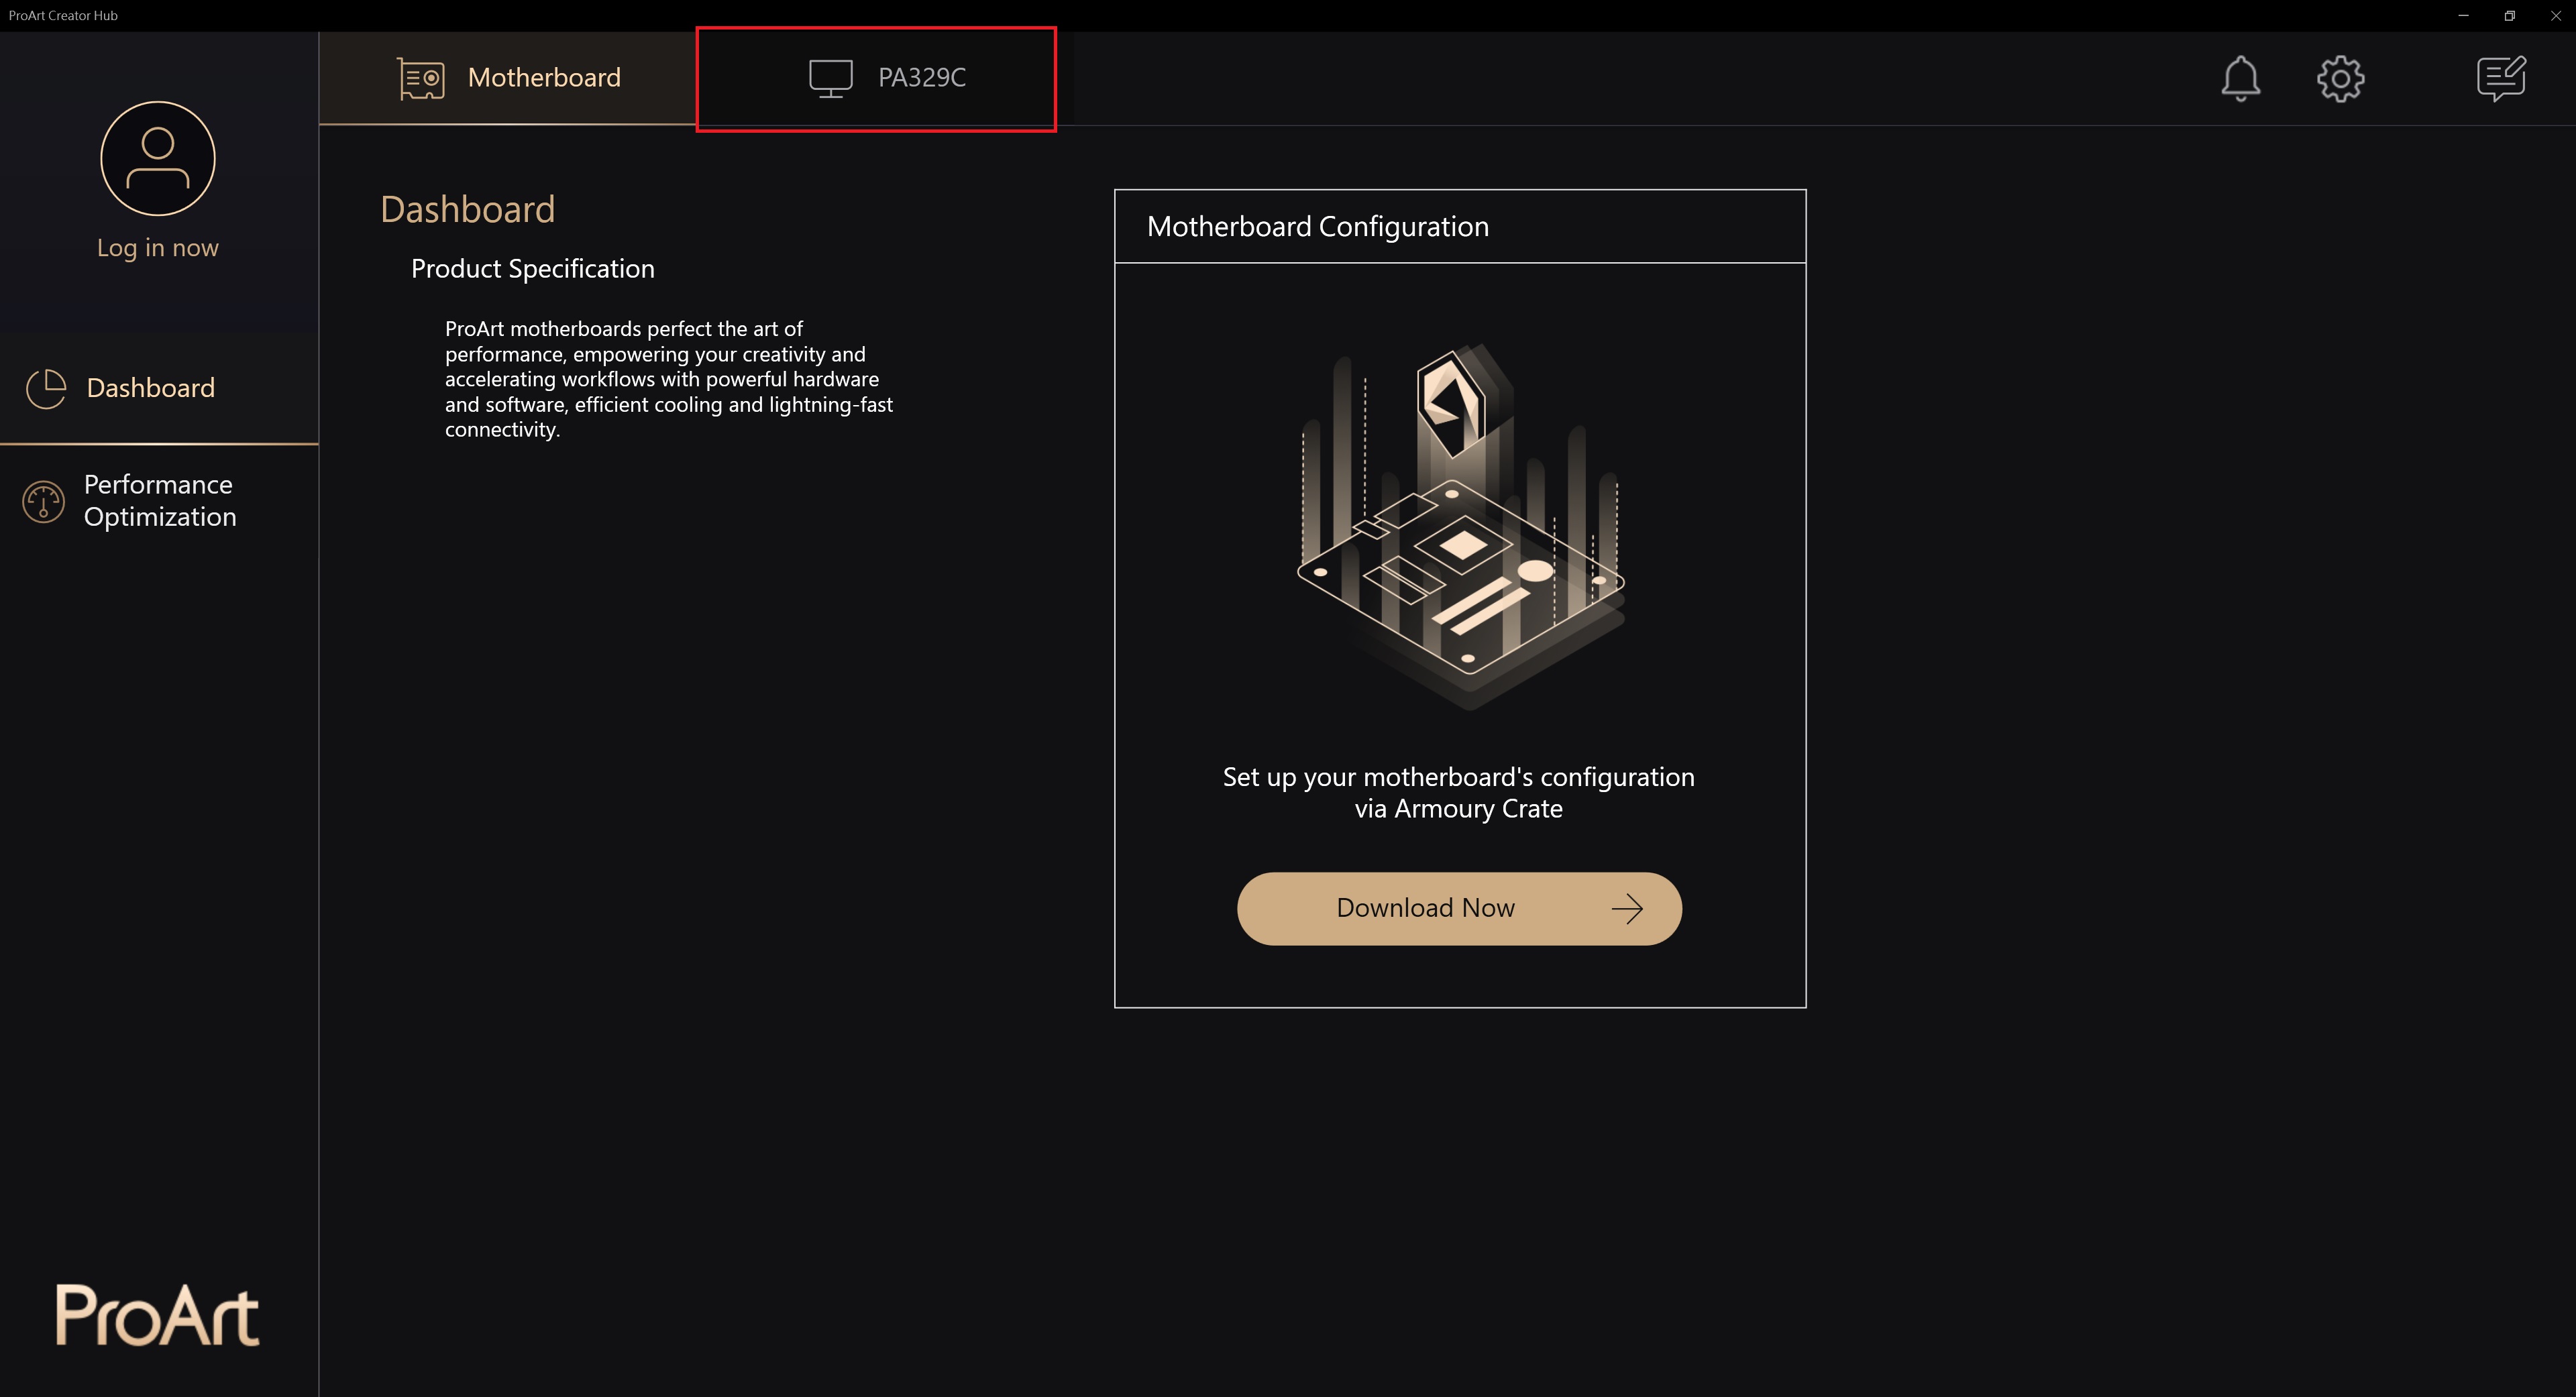
B. Product bar:Show ProArt Motherboard and ProArt Display and ProArt notebook.
C. Setting:Change software language and software version and contact ASUS
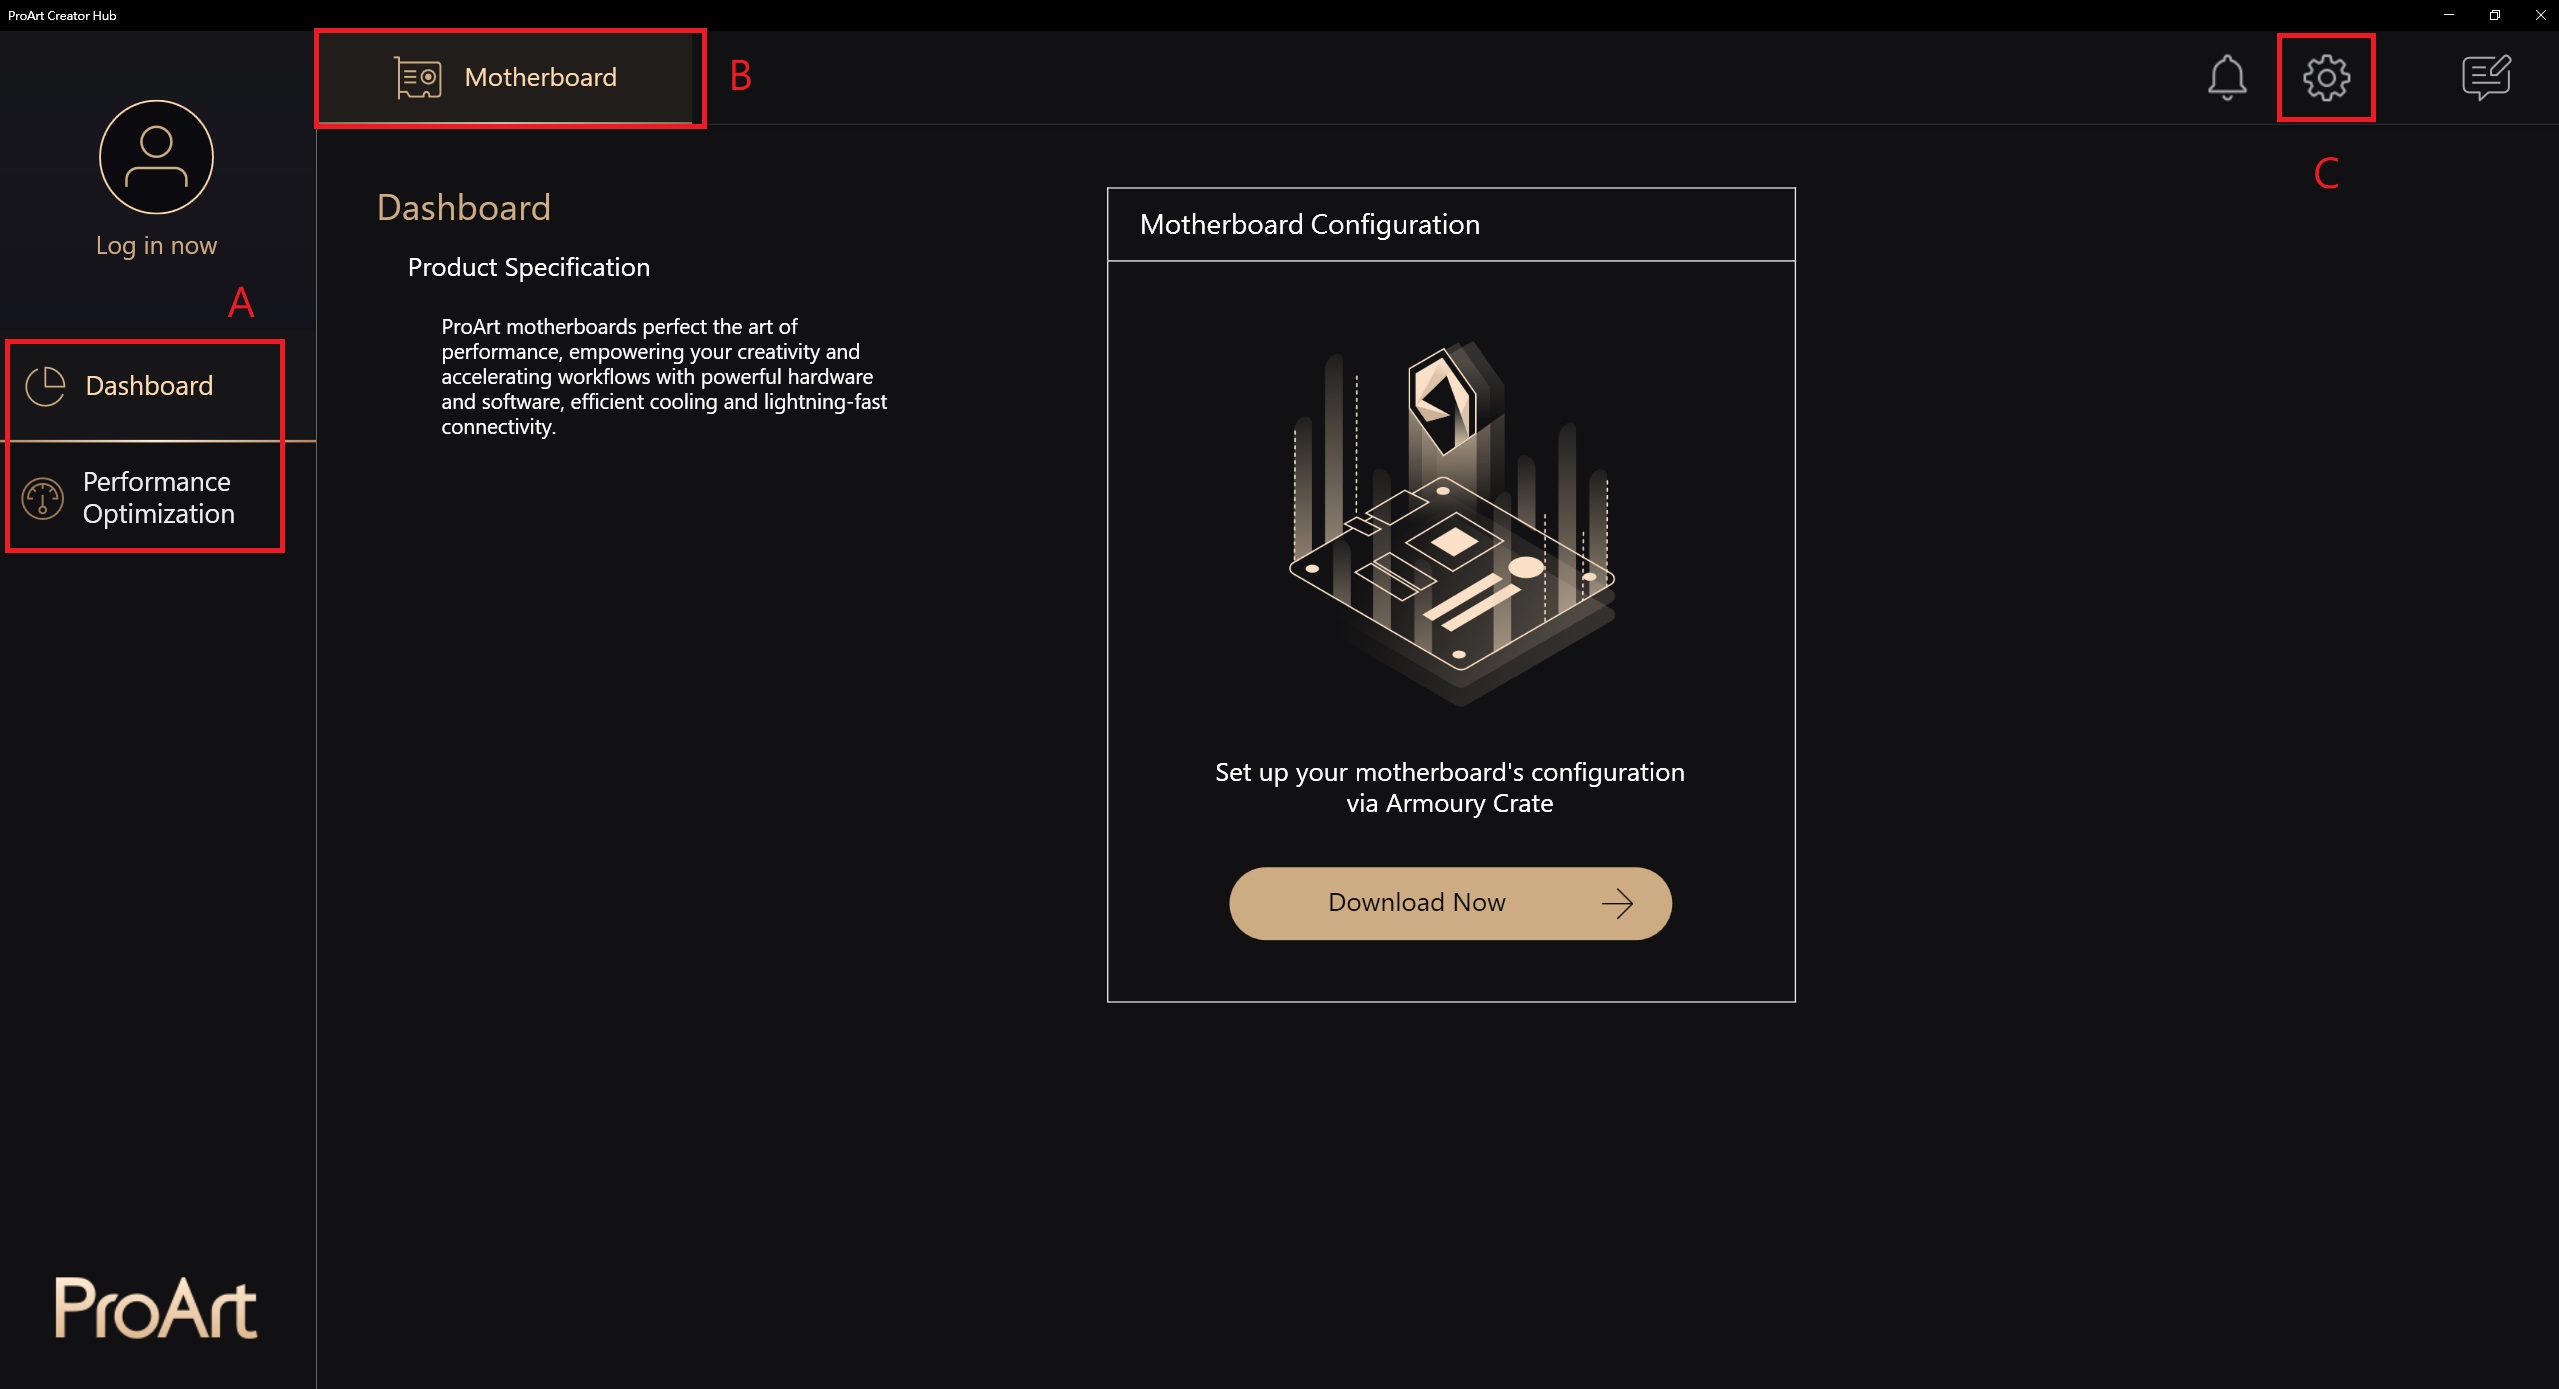
1-1 Function Description: Motherboard -> Dashboard
From version 2.0.0.0 onwards, the Dashboard page will directly lead to Armory Crate for configuration, Armory Crate related introduction: [Motherboard] Armoury Crate - Introduction | Official Support | ASUS Global
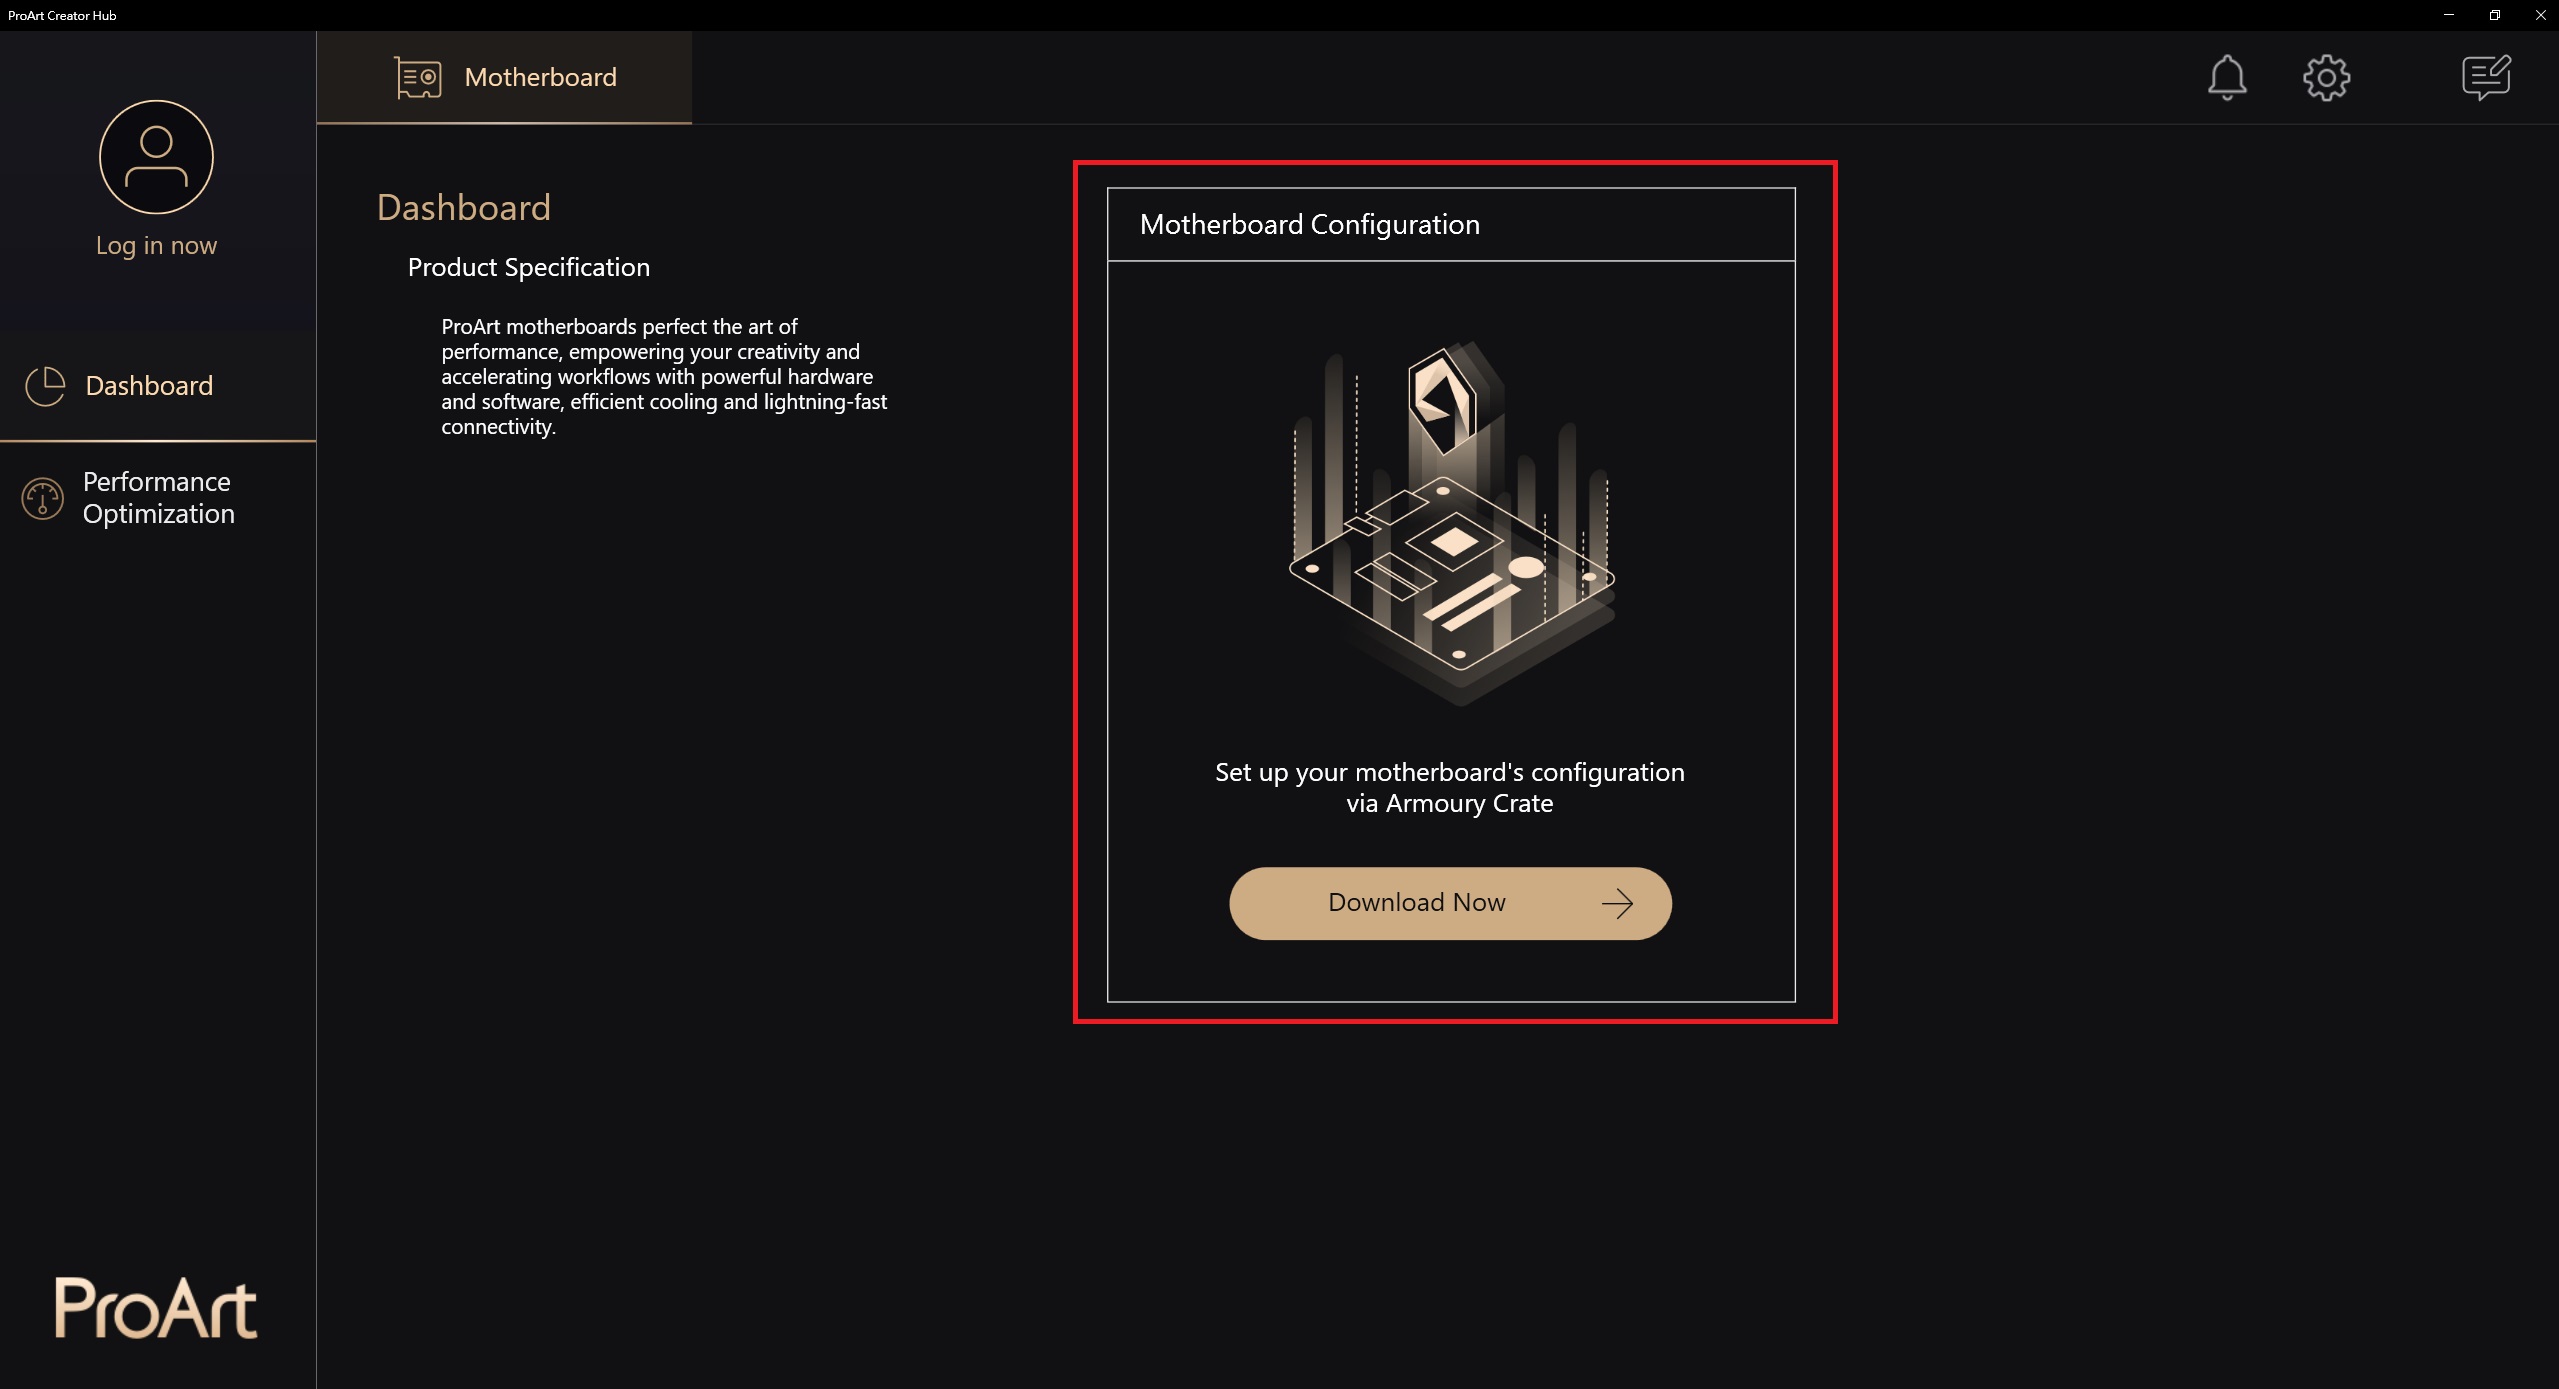
1-2. Function Description: Motherboard -> Performance Optimization -> Network
Network performance can be monitored, or different working modes can be selected
Related functions must be downloaded from CreationFirst to use, CreationFirst related introduction: [ProArt Motherboard] CreationFirst - Introduction | Official Support | ASUS Global
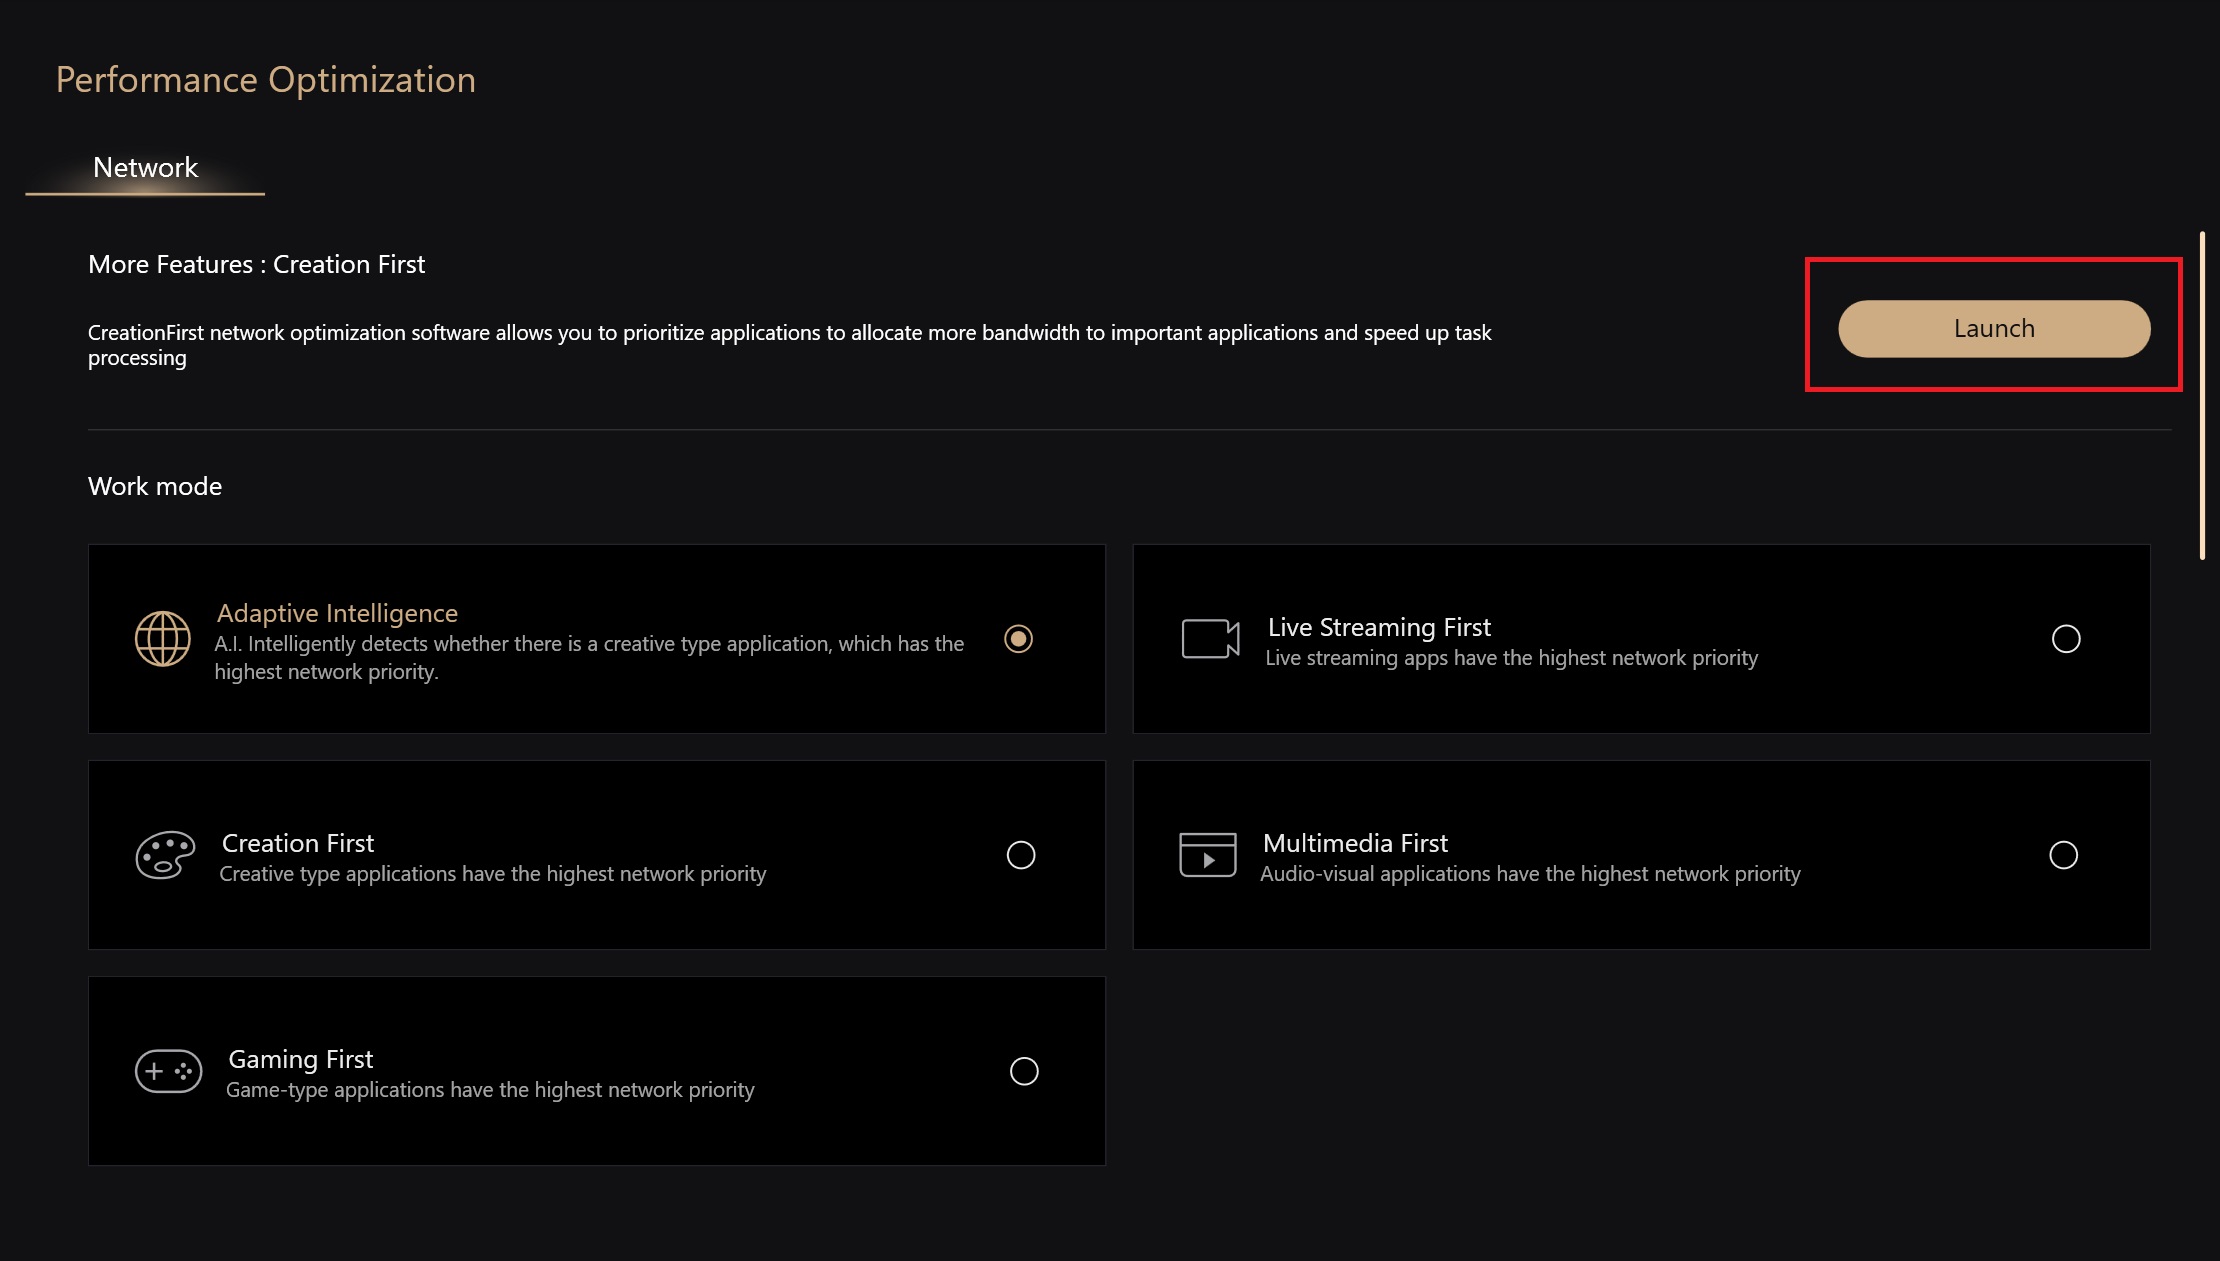
1-2-1. Launch CreationFirst
1-2-2. Select different work mode
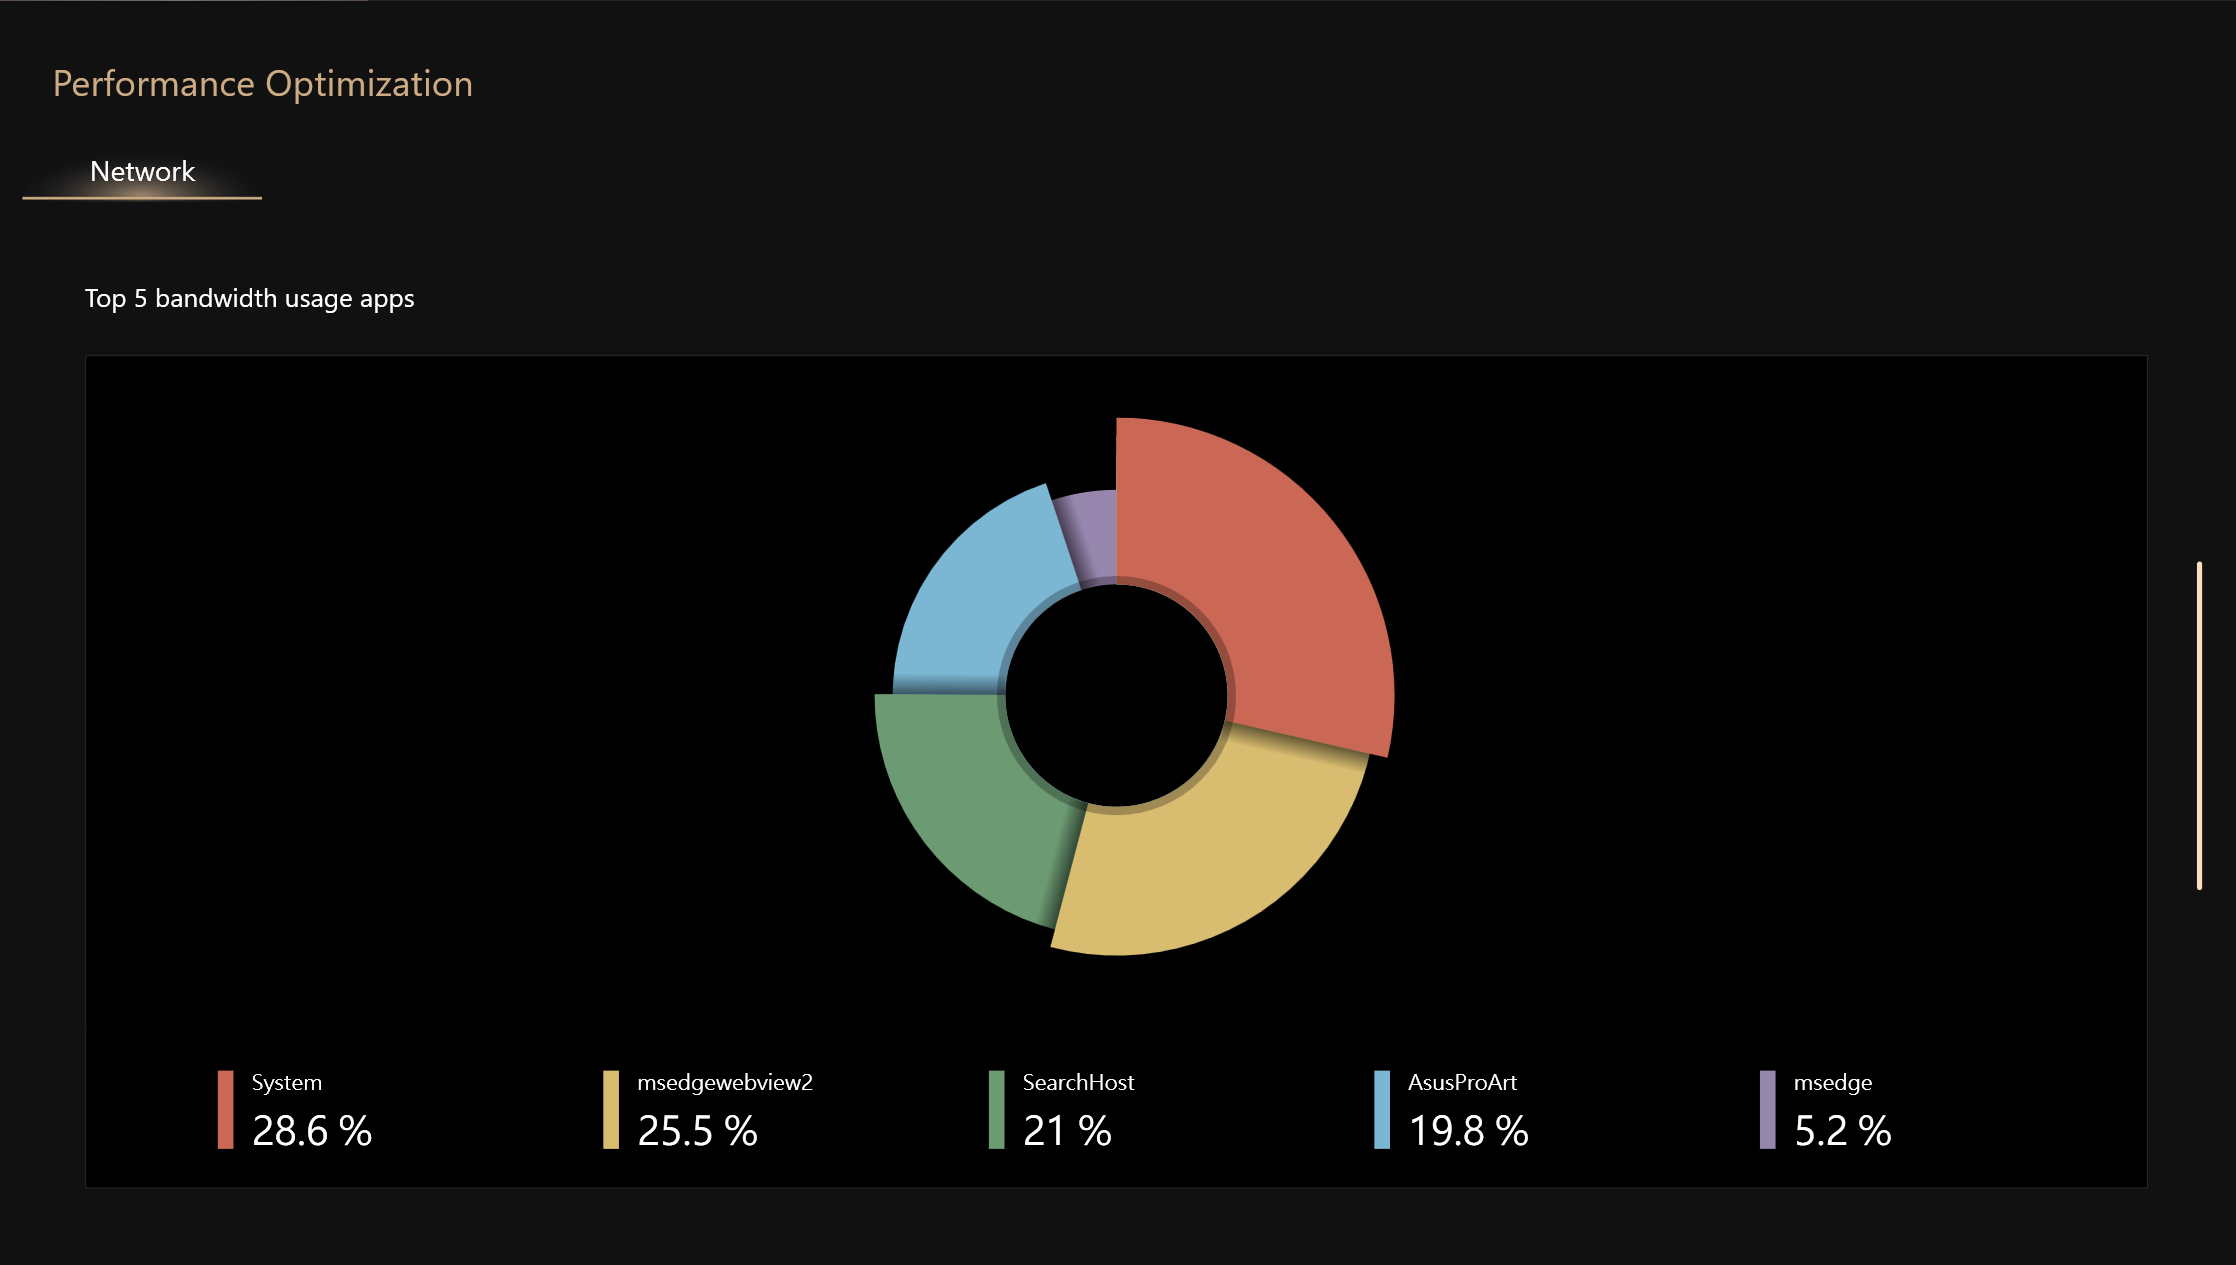
1-2-3. Top 5 bandwidth usage apps
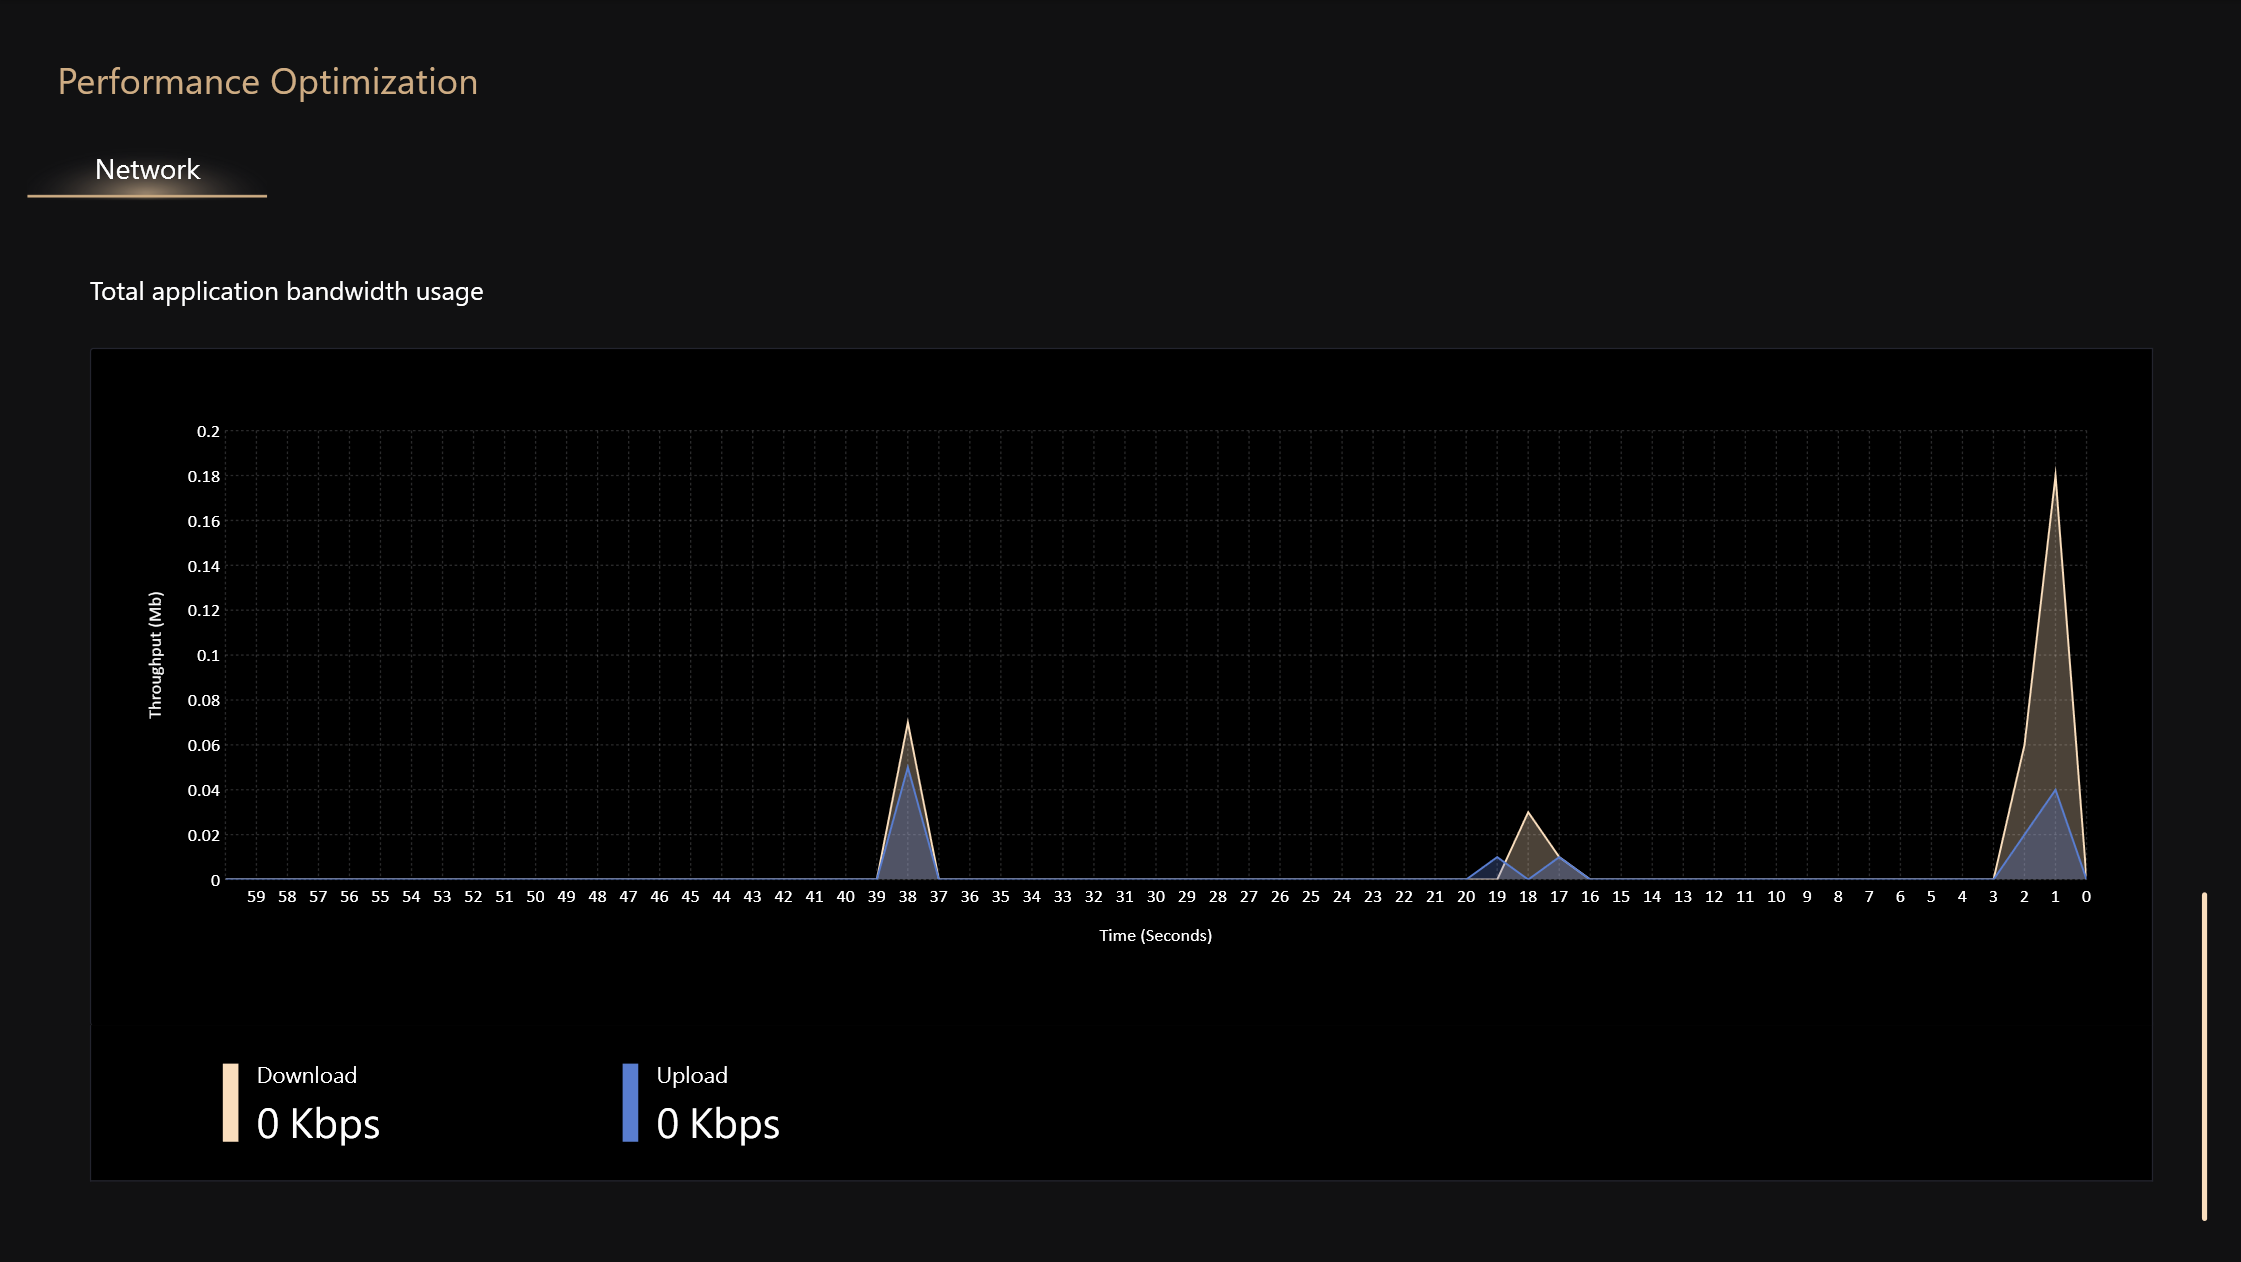
1-2-4. Total Application bandwidth usage
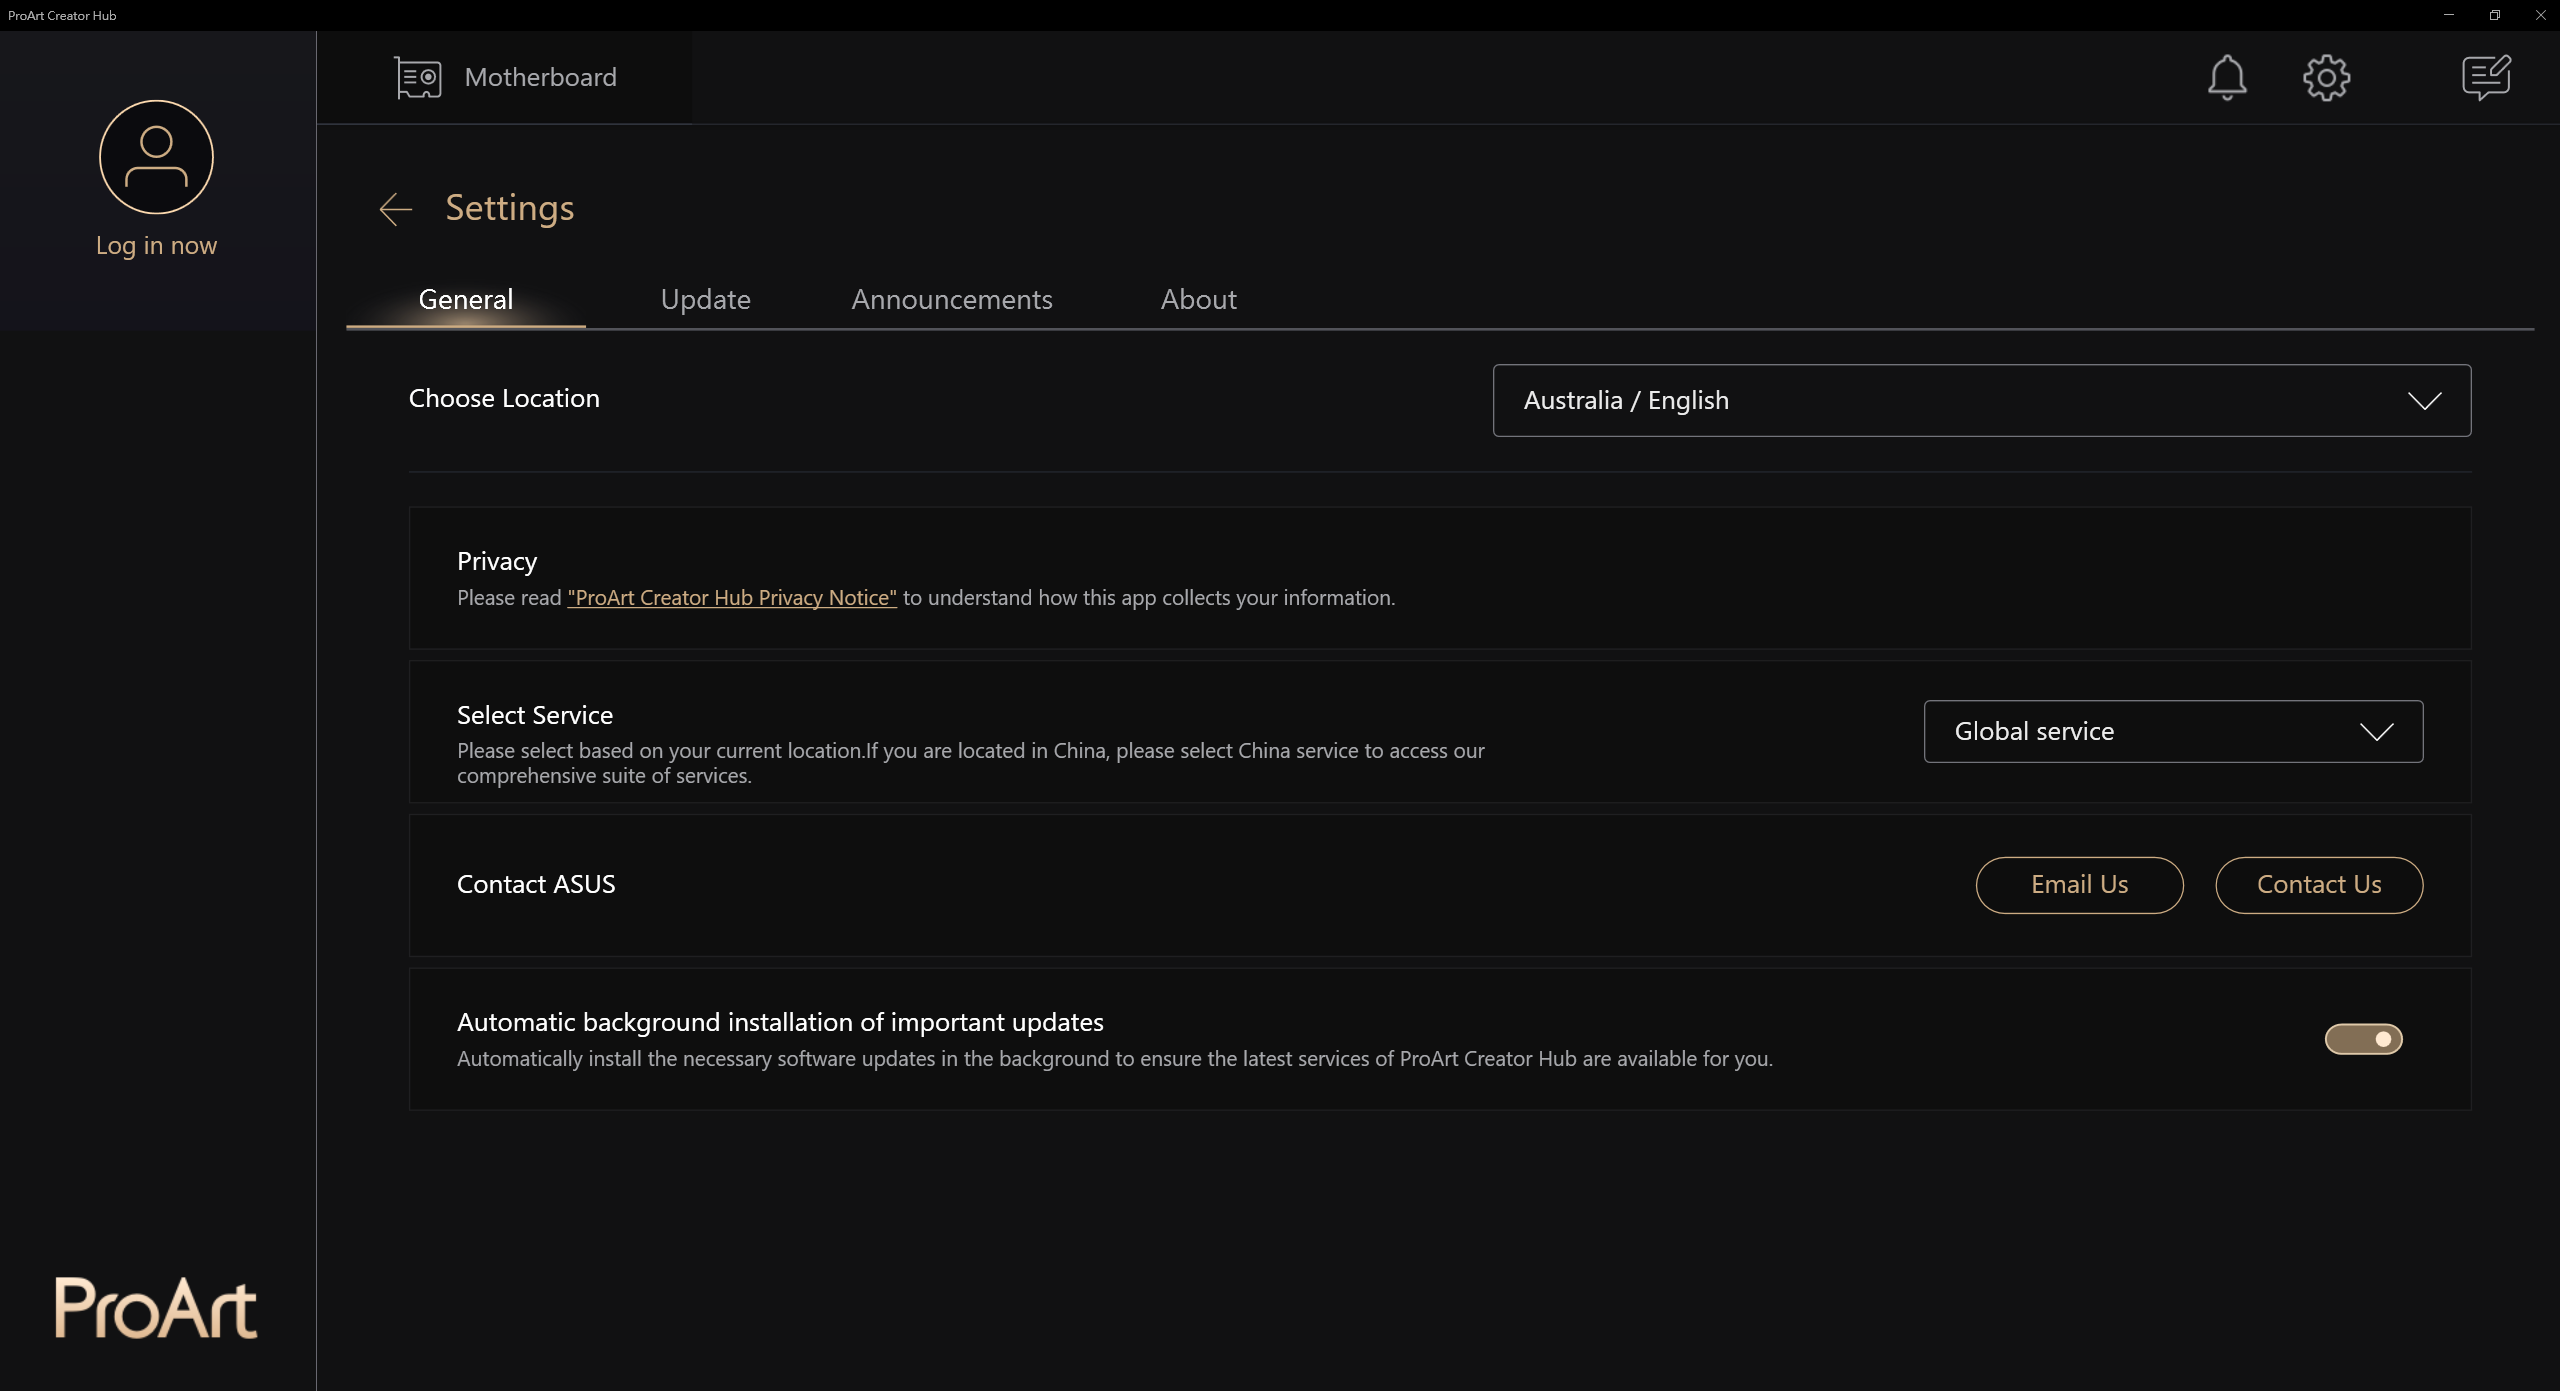
2. Motherboard -> Settings
2-1. General
You can select the regional language and service area, contact ASUS or whether to automatically update the background, etc.
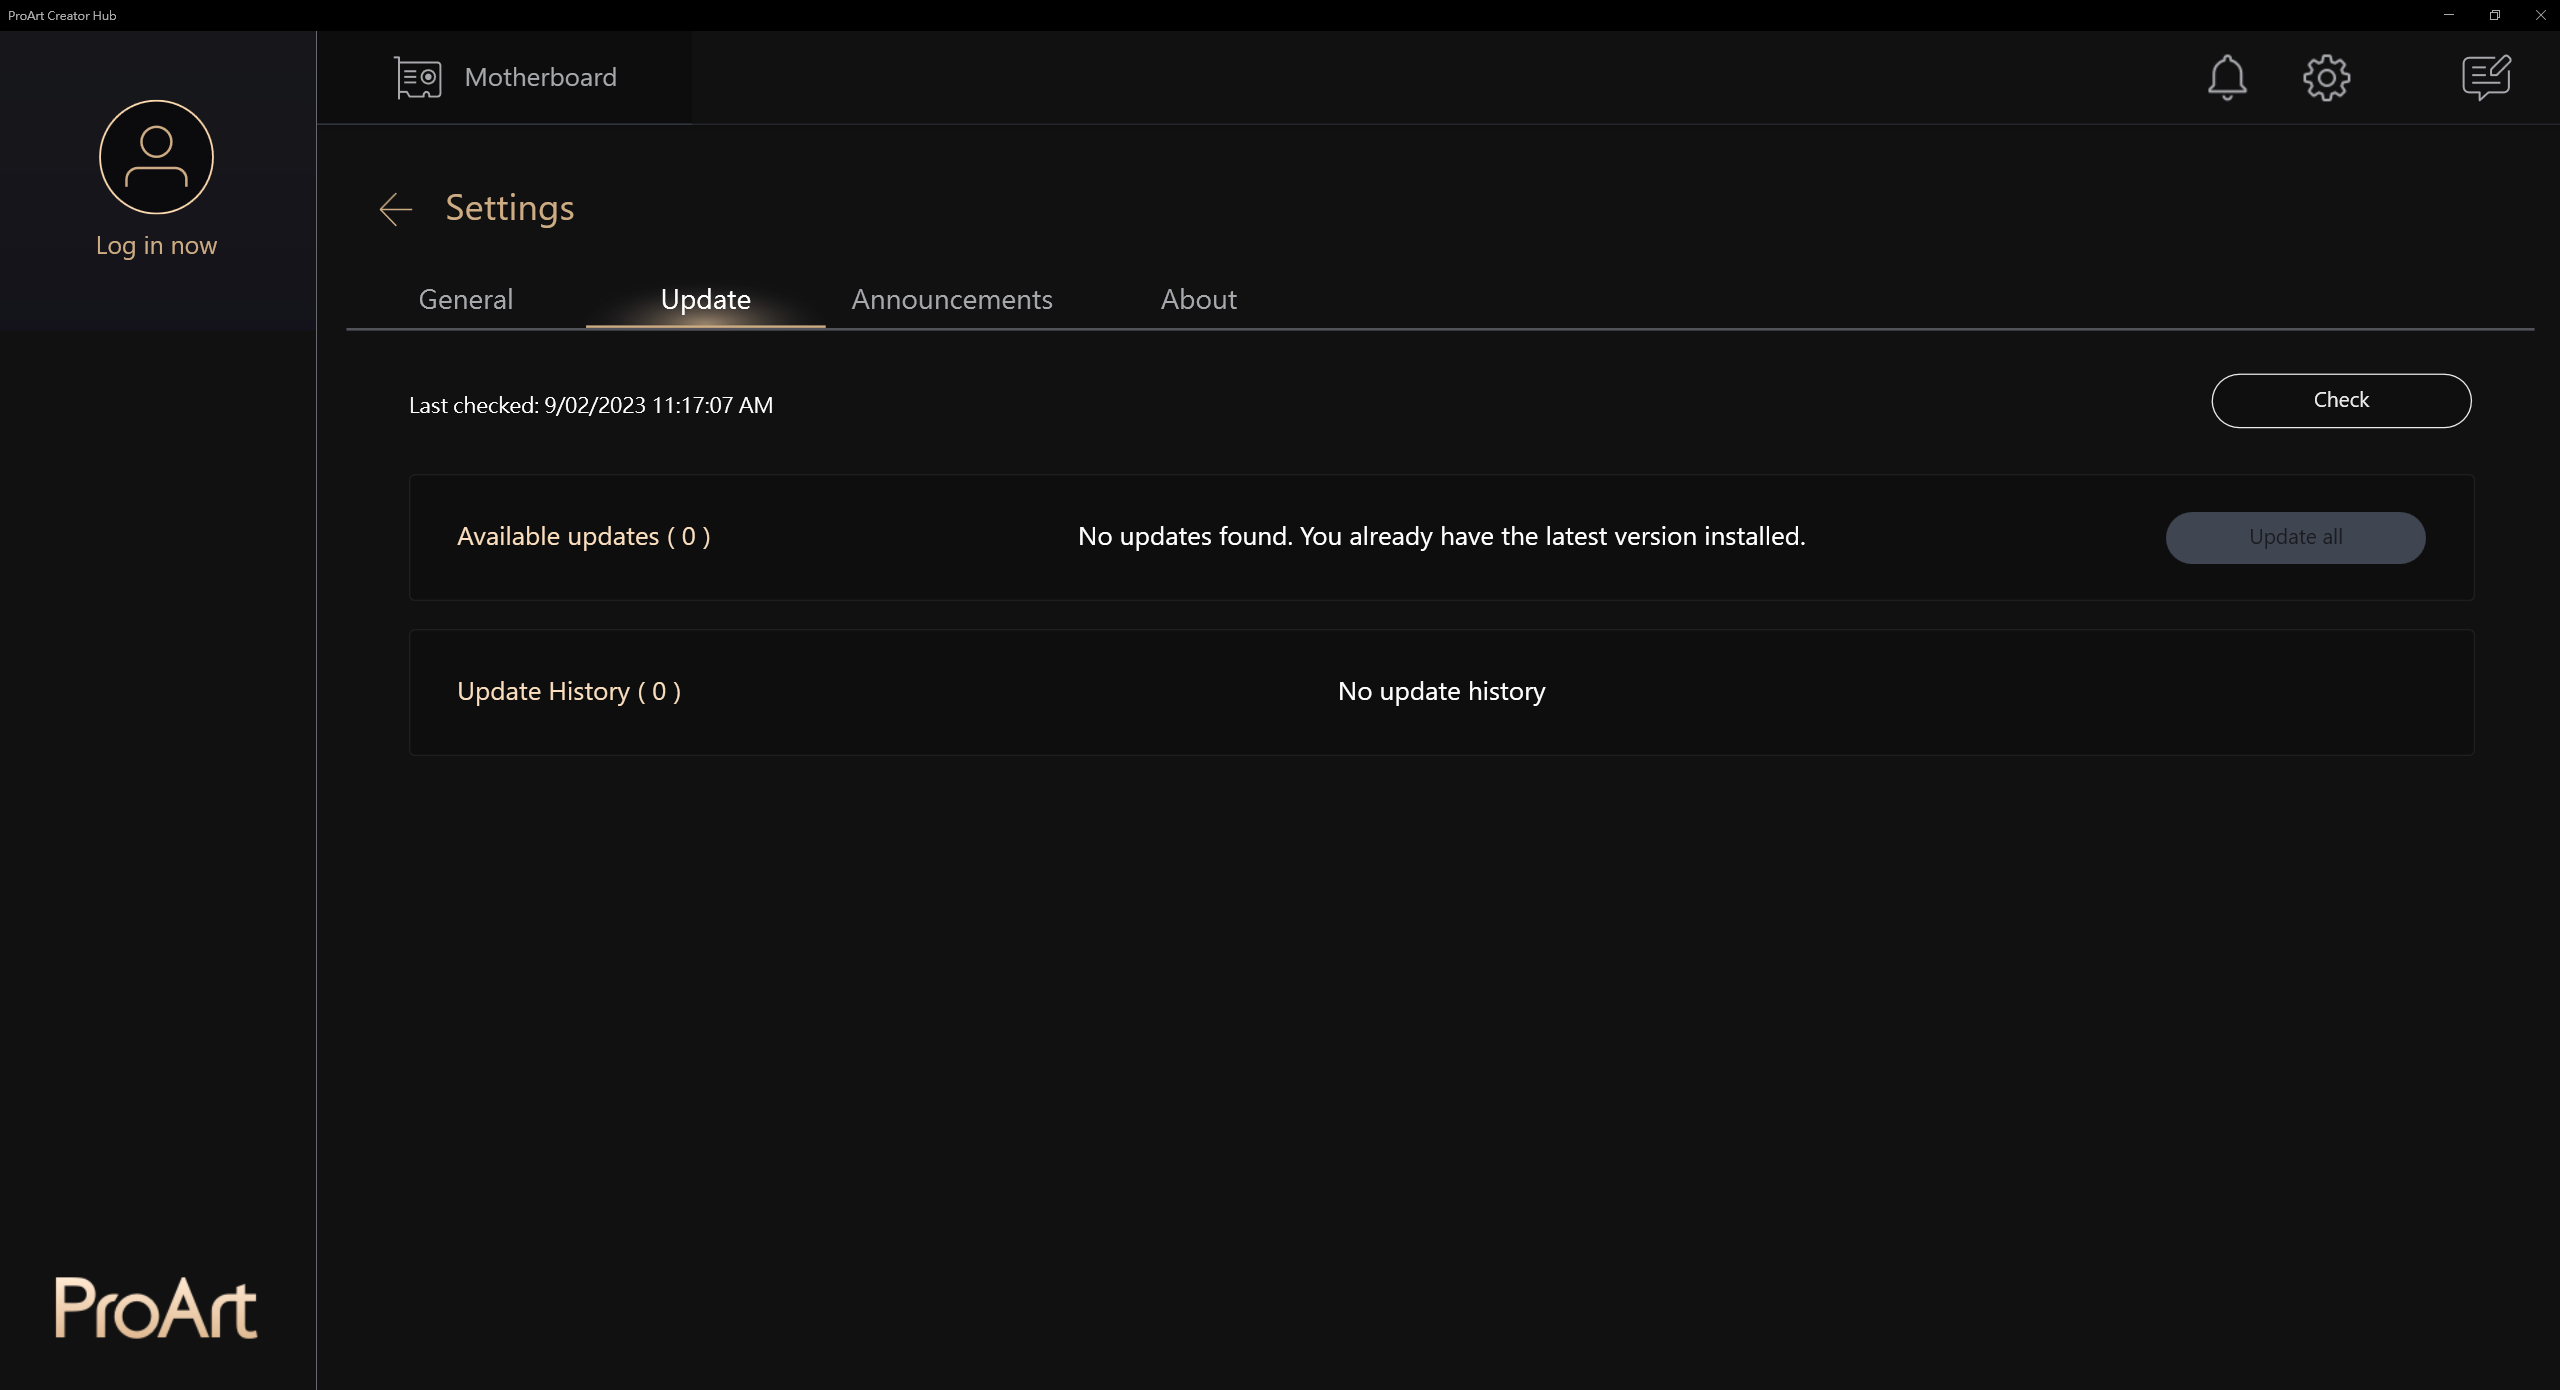
2-2. Update
You can check if an update is required
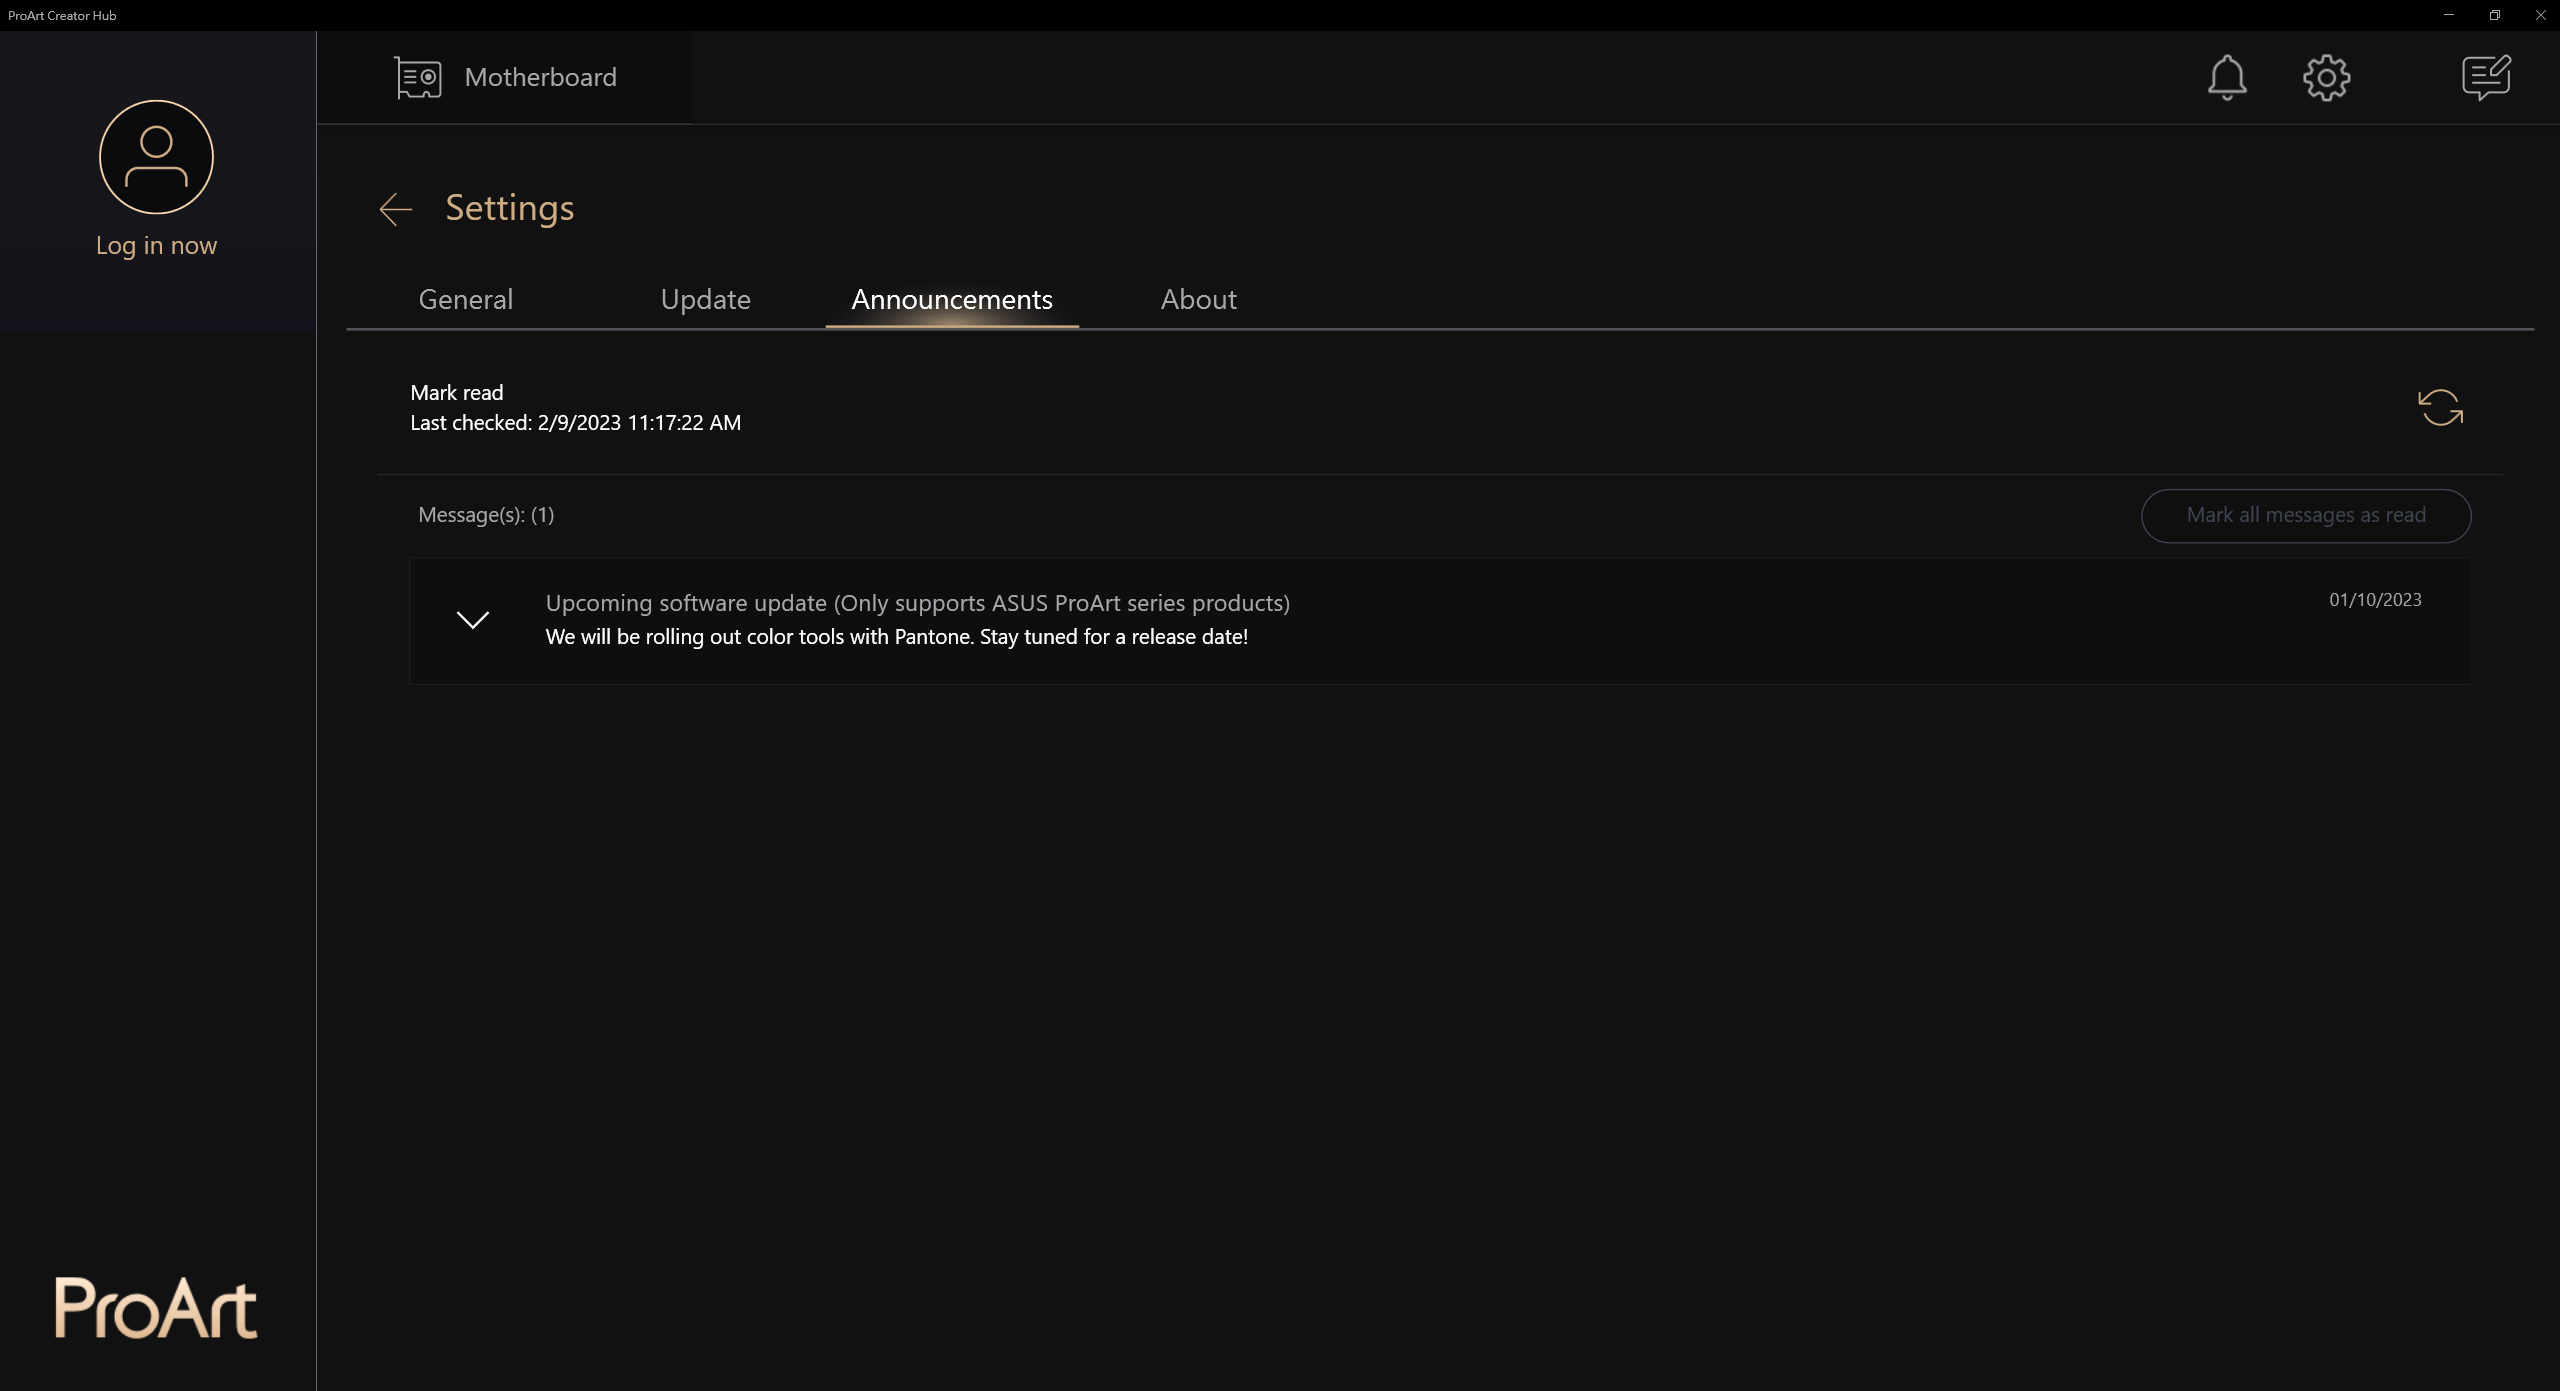
2-3. Announcements
Provide ASUS related product news
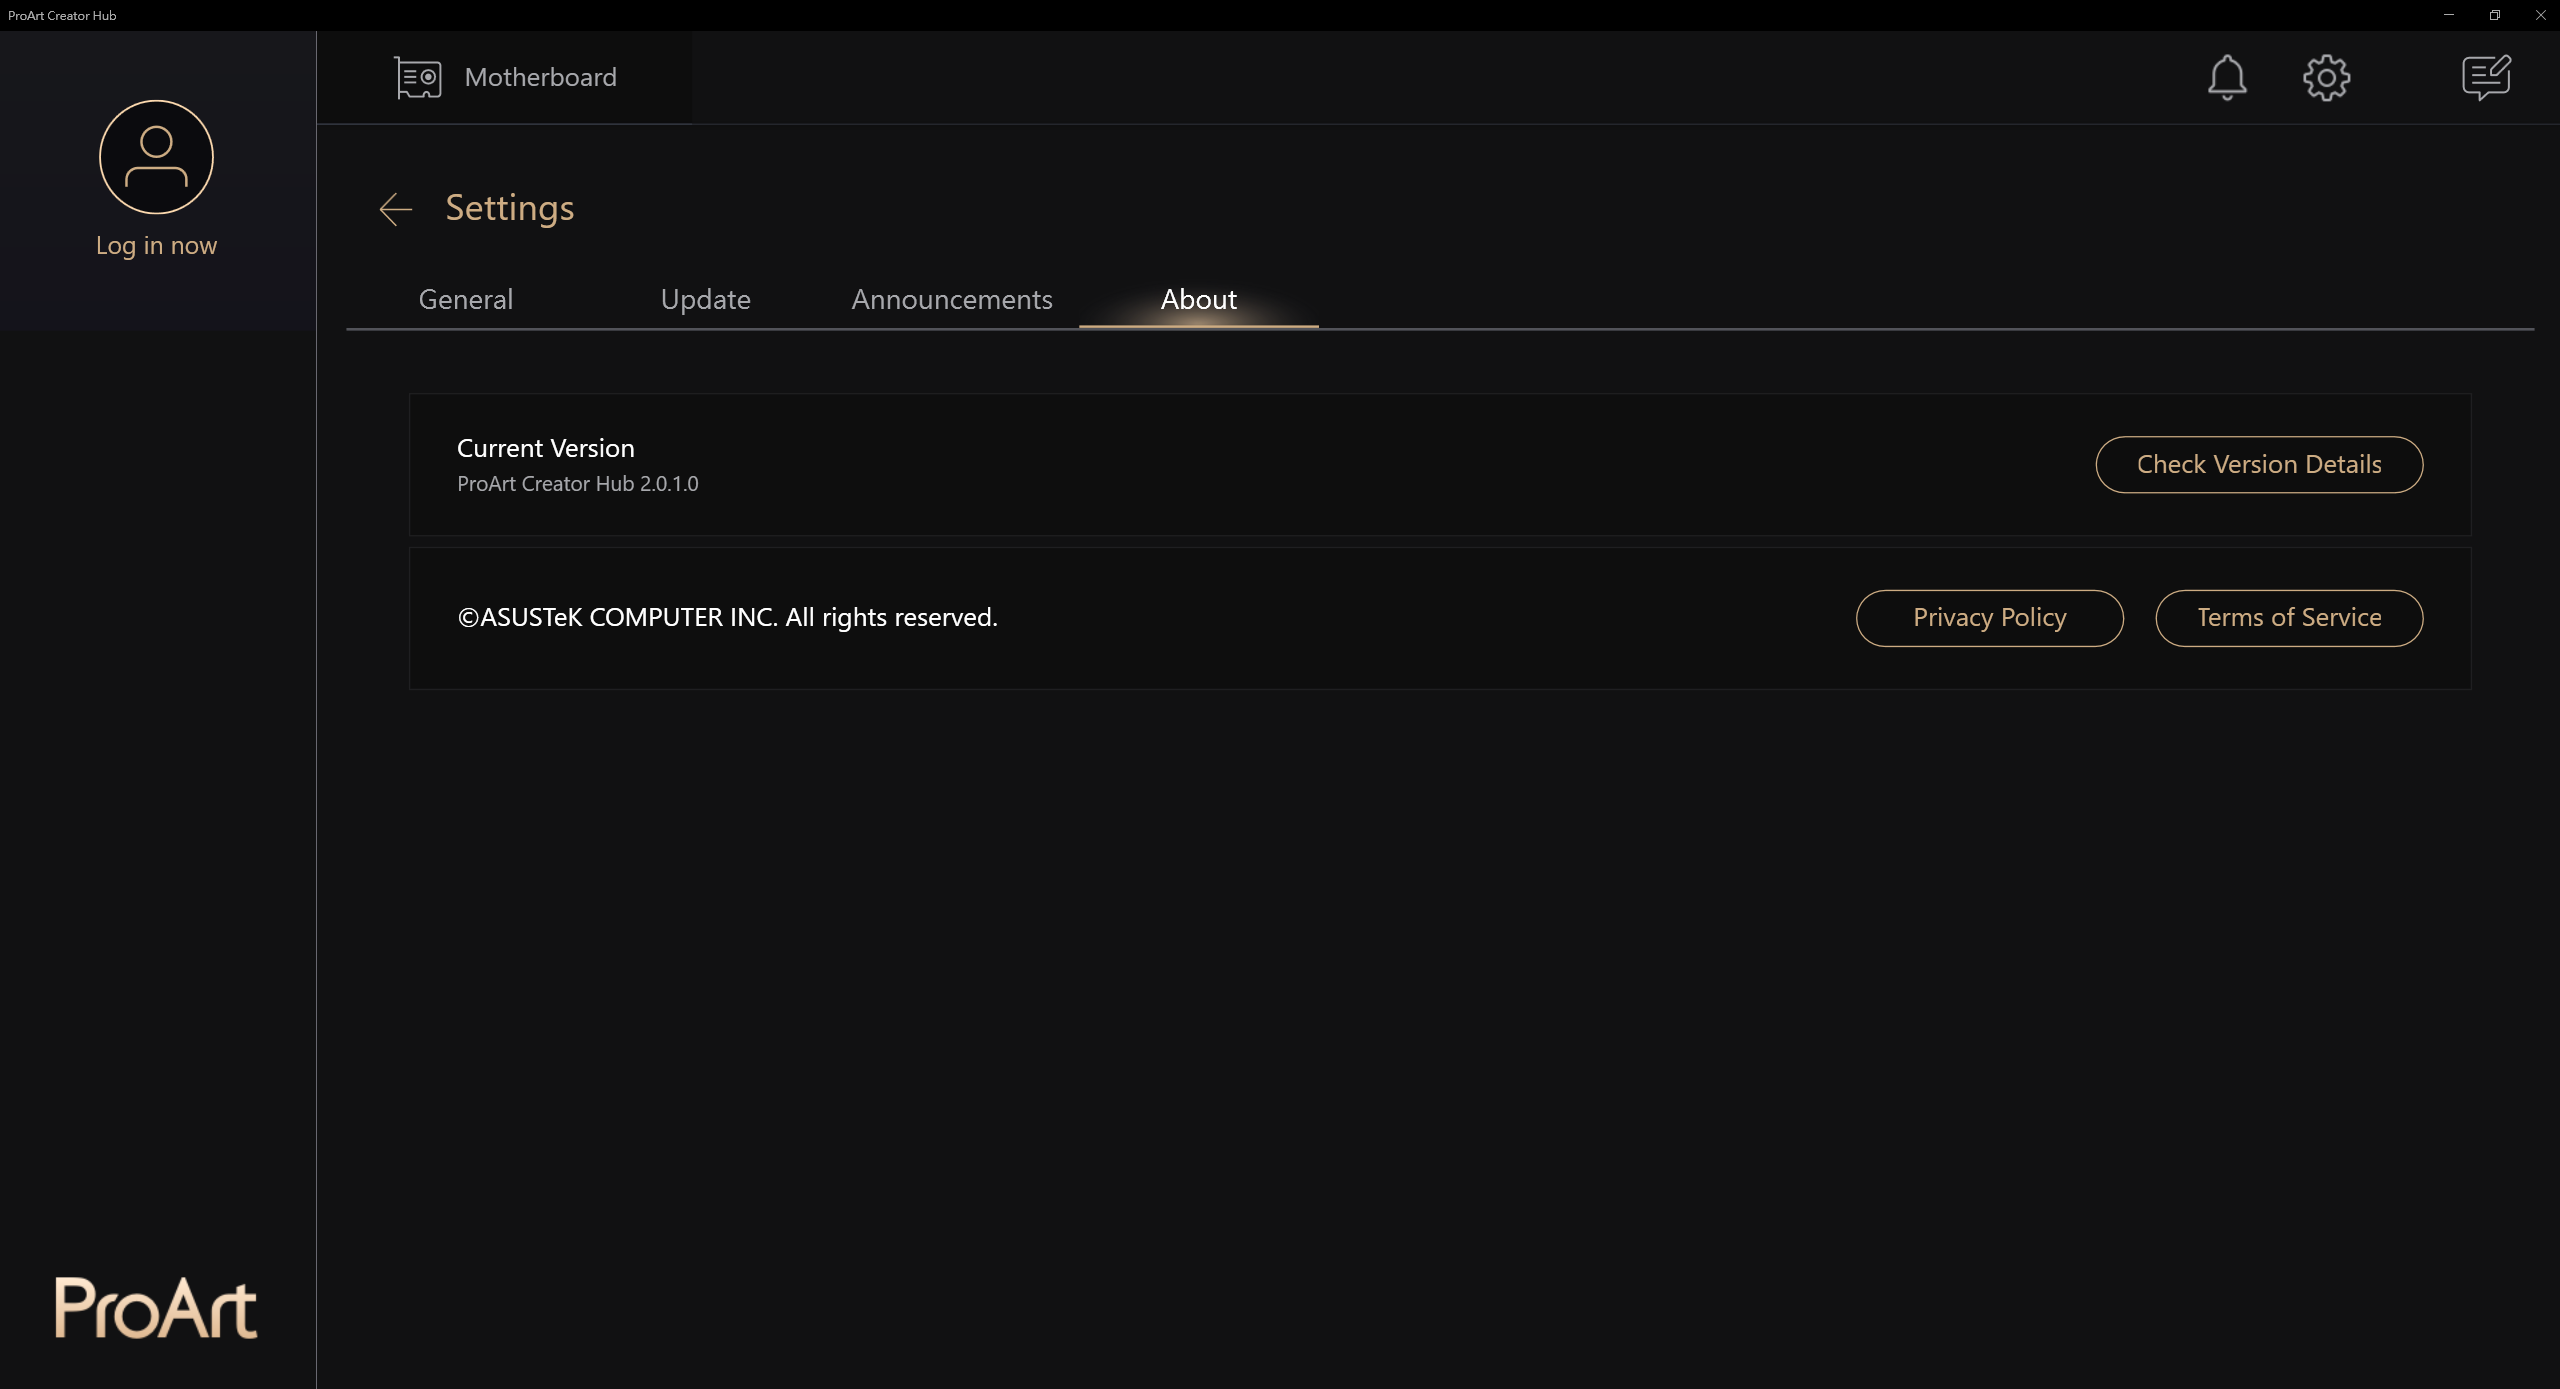
2-4. About
Can view current version, etc.
1. Which ASUS ProArt monitors does the ASUS ProArt motherboard support?
A: PA24AC, PA329C, PA329Q
2. ASUS ProArt motherboard connected to ASUS ProArt monitor, such as Cannot “Display " screen, how to solve it?
A:1. First confirm whether it supports ProArt motherboard models and ProArt displays (PA24AC, PA329C, PA329Q)
2. Connect the ProArt monitor with USB tpye-C Cable to the ProArt motherboard USB port
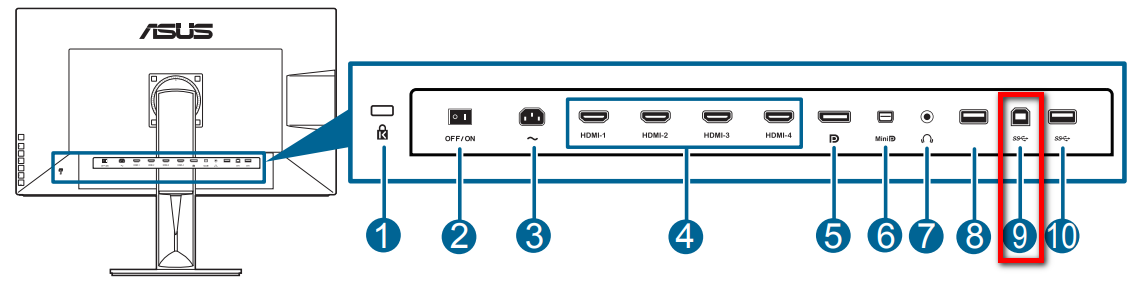
2.1[Example: ProArt PA329C]: USB port needs to be connected to the USB port of the motherboard (USB any port)
https://www.asus.com/Monitors/ProArt-PA329C/HelpDesk_Manual/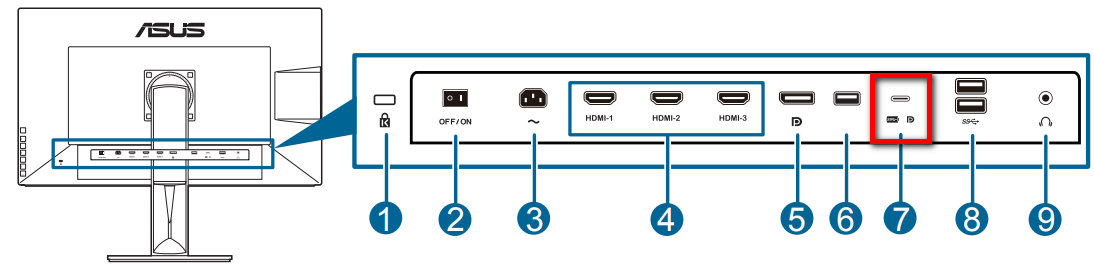
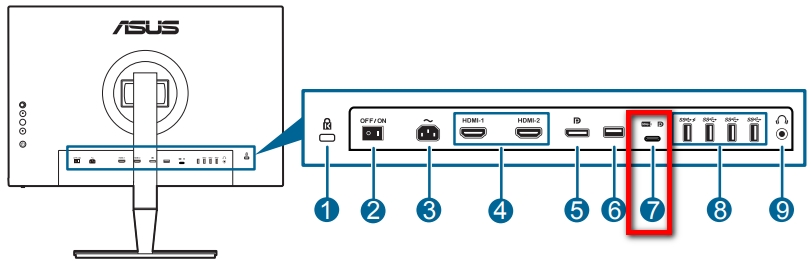
2.2 [Example :ProArt PA329Q]: USB tpye-B port needs to be connected to the USB port of the motherboard (USB any port)
https://www.asus.com/Monitors/ProArt-PA329Q/HelpDesk_Manual/
2.3 [Example :ProArt PA24AC]: USB tpye-C port needs to be connected to the USB port of the motherboard (USB any port)
https://www.asus.com/Monitors/ProArt-PA24AC/HelpDesk_Manual/
3. If you still have problems, you can contact your local ASUS customer service :https://www.asus.com/tw/support/
3. Is there an introduction to the Creator hub of ASUS ProArt monitor?
A: Please refer to the article : https://www.asus.com/tw/support/FAQ/1043368/
4. Is there an introduction to the Creator hub of ASUS ProArt laptops?
A: Please refer to the article: https://www.asus.com/support/FAQ/1045995
