- English
- Other Products
- FAQ
- ProArt Creator Hub Frequently Asked Question (FAQ)
- Subscribe to RSS Feed
- Mark as New
- Mark as Read
- Bookmark
- Subscribe
- Printer Friendly Page
- Report Inappropriate Content
- Article History
- Subscribe to RSS Feed
- Mark as New
- Mark as Read
- Bookmark
- Subscribe
- Printer Friendly Page
- Report Inappropriate Content
on
01-29-2024
05:59 PM
- edited on
10-07-2025
03:44 AM
by
![]() ZenBot
ZenBot
ProArt Creator Hub Frequently Asked Question (FAQ)
ProArt Creator Hub - Introduction
ASUS Control Panel - Introduction
[Notebook] ASUS Dial - Introduction
ProArt Creator Hub - Introduction
Product Applicability: Notebook/Desktop/Motherboard/Display/Mouse
The ProArt Creator Hub will present different interfaces based on the various products you own, integrating information accordingly.
The ProArt Creator Hub stands as a bespoke integration, offering a synthesis of system functionality adjustments and annual recommended hues. It provides a unique color absorption tool, an up-to-date color database, and advanced color calibration technology, ensuring the efficient sharing of professional color configurations across multiple devices. Users can effortlessly access the latest fashionable color references, applying them to their endeavors in professional design. Simultaneously, it oversees performance and optimizes workflow, economizing time and resources. It aspires to craft, for creators, a dedicated and personalized creative control center and process.
Please refer to the video introduction as below:
1. Launching ProArt Creator Hub
6.3 Clean Files - Disk Cleanup
6.4 File Cleanup - File Organizer
10. How to Download and Uninstall ProArt Creator Hub
11. Minimum Specifications for ProArt Creator Hub Support
13. Other Introductions to ProArt Series Products
1. Launching ProArt Creator Hub
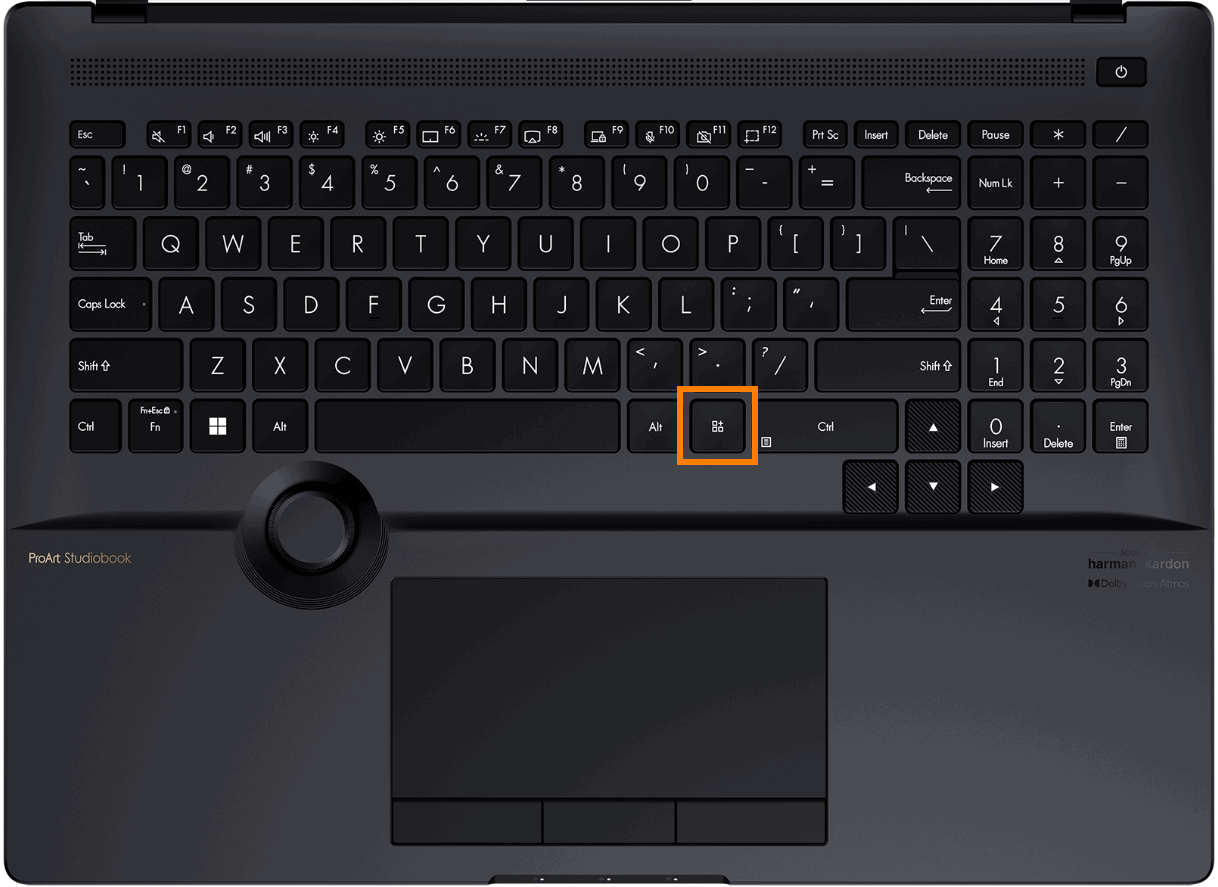
You can press the [ProArt Creator Hub] key on your keyboard to quickly open the ProArt Creator Hub software.
If your computer does not have this button, please find the ProArt Creator Hub software in the Windows start menu and open.
The home page of the ProArt Creator Hub software will bring you a dashboard that provides you with the current monitoring status of your computer system.
※ The dashboard may have a different interface depending on the product you are purchasing.
Information displayed on the dashboard:
Platform Information (CPU/ GPU Model) - CPU usage, CPU temperature, CPU frequency.
Fan Load - CPU fan speed, GPU fan speed
CPU Load - CPU frequency , usage, and other information
GPU Load - GPU frequency , usage, and other information
Task Groups - Quickly open pre-configured
Task Groups Memory/ Storage - Memory usage, disk usage
Color Calibration - Color calibration information (results of the latest calibration)
Operating mode - Select a preferredfan speed and power plan
Memory Allocated to GPU - ajust Shared Memory Size
※ The information cards on the dashboard can be freely dragged and adjusted for display order.
※ Task Groups need to be set up in WorkSmart before they will be displayed in the dashboard.

2.1 Operating mode
Windows Mode - Uses the default Windows settings for your chosen Power Plan. You can change these options in Settings > System > Power & Sleep.
Whisper mode - LimitsCPU and GPU power, but keeps noise levels super quiet, even turning off the fan entirely for 0dB workloads on 2021 models and later. Perfect for presentations, movies, or casual light gaming.
Standard mode - Balances performance,temperature, and acoustics for any scenario.
Performance mode - Maximizes power to the CPU and GPU for high-performance gaming and work, with maximum airflow from fans.
※ Performance mode will not be available when the charger is removed.
You can select the Operating mode according to your needs.

Manual Mode
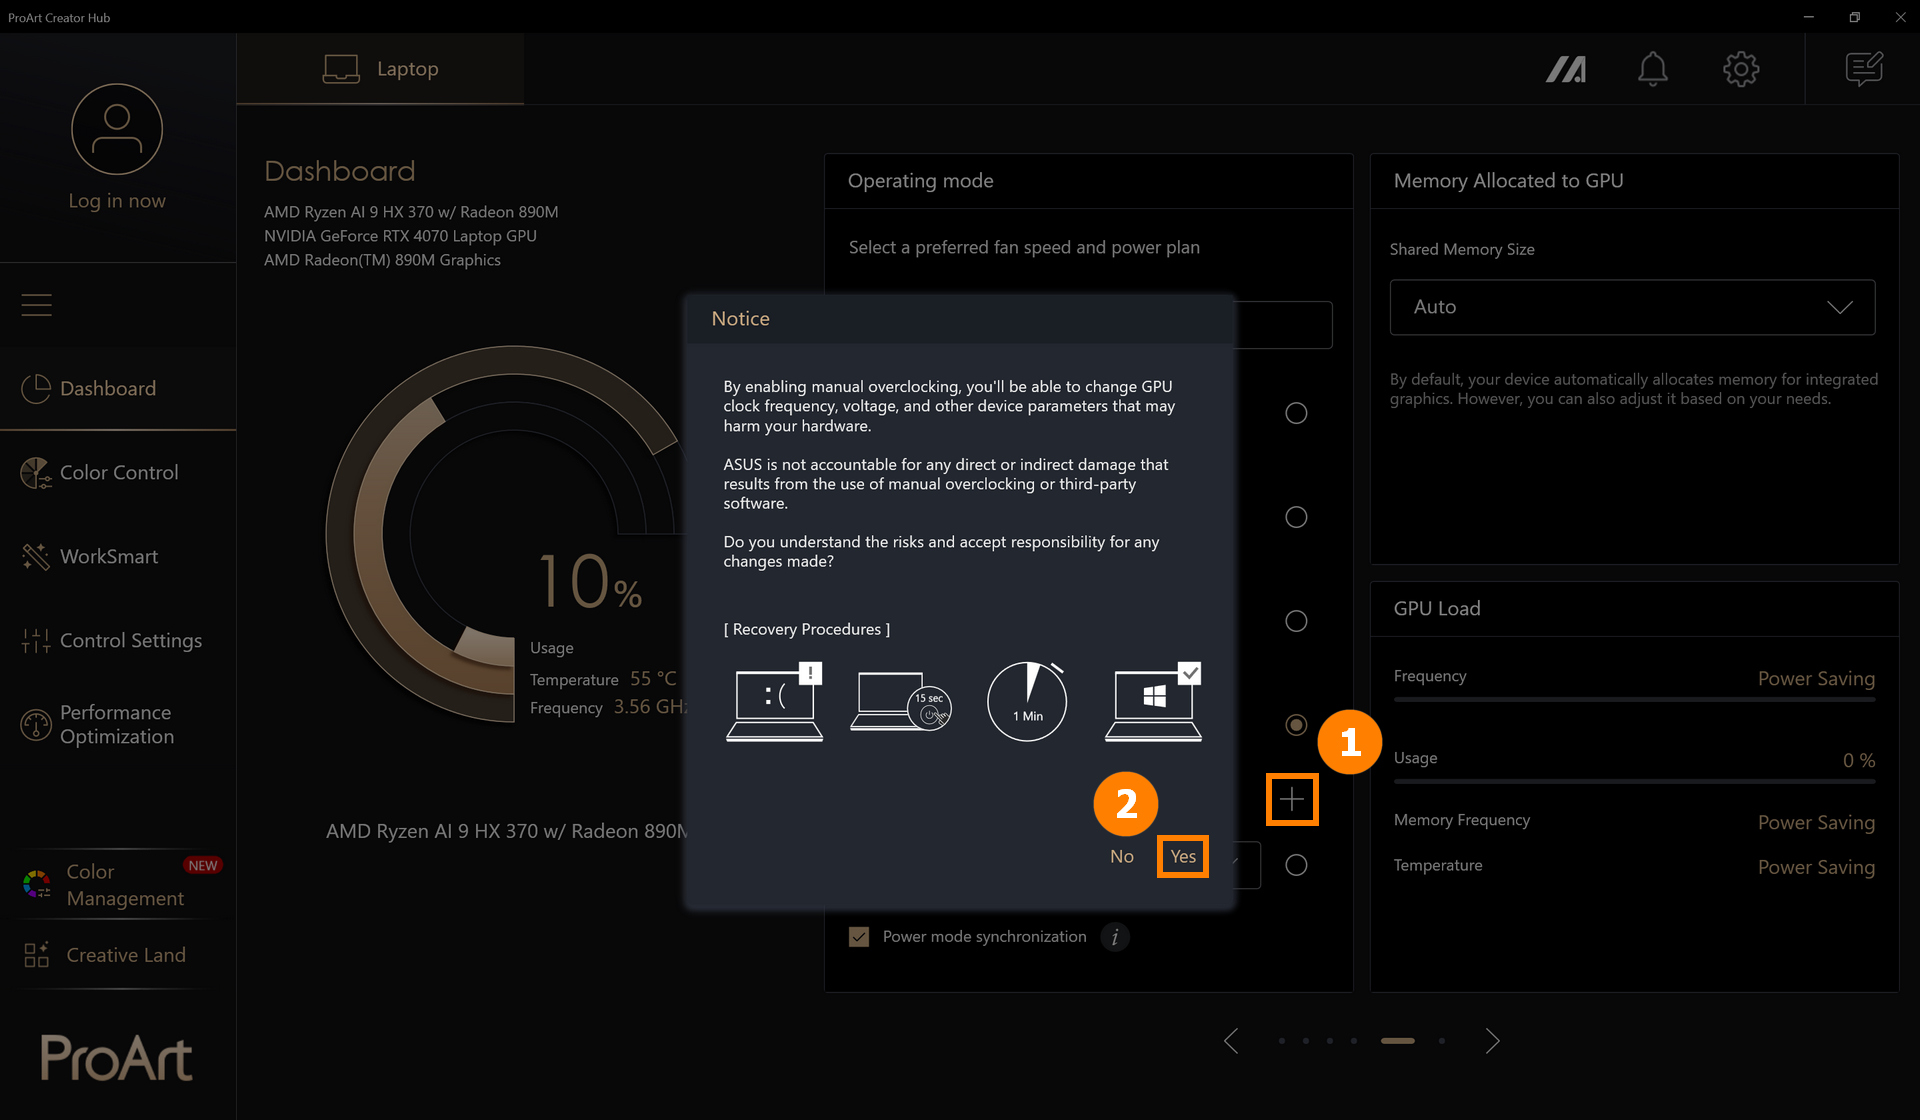
※ Manual mode will unlock CPU and GPU power consumption and other restrictions, which may damage your device. In general, it is recommended that you use Performance mode.
※ If your device has problems after turning on Manual mode, press and hold the power button for 15 seconds, and the computer still cannot boot after waiting for one minute, please contact ASUS Customer Service.
(1) Click ①[+], click ②[Yes].
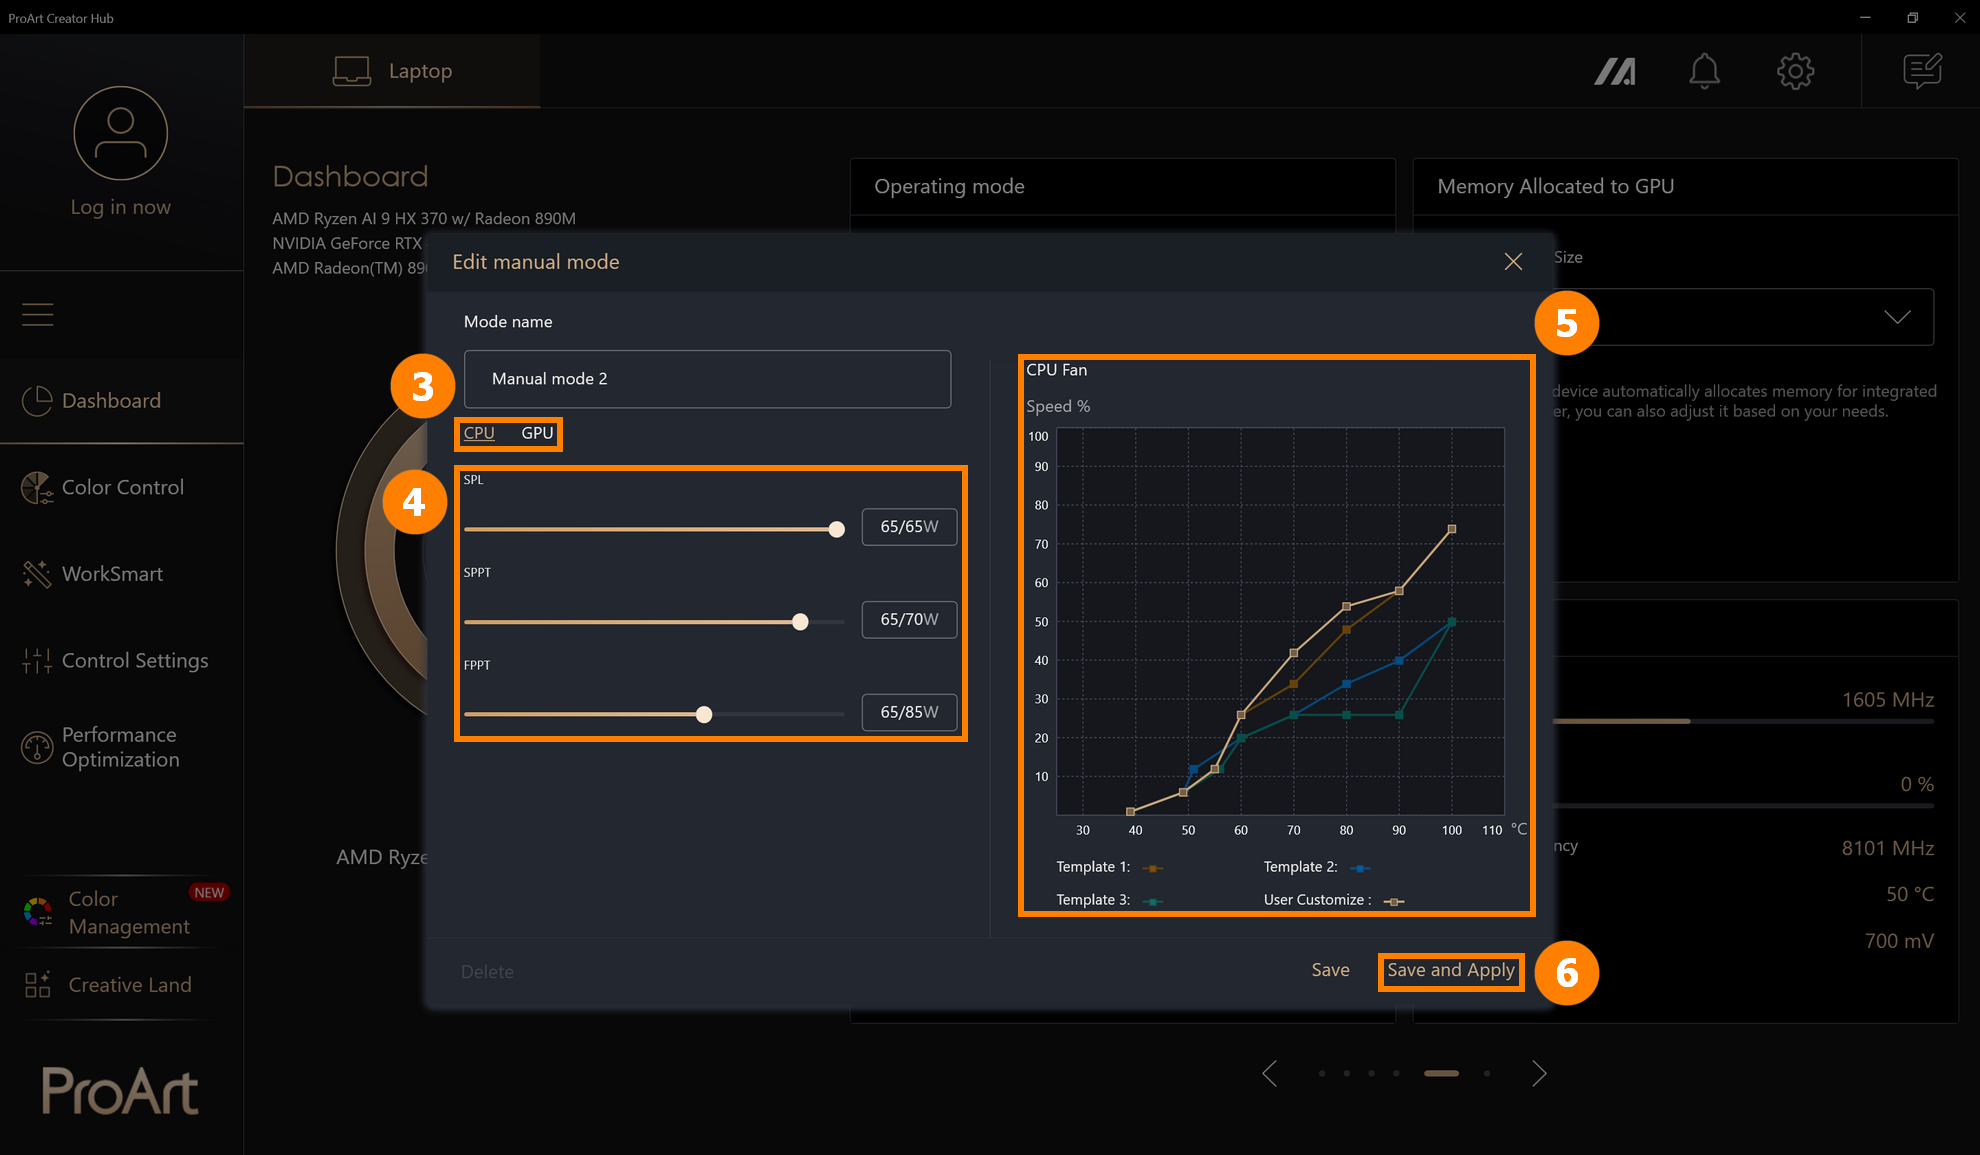
(2) You can select ③[CPU & GPU] to set. Here we take CPU as an example and set your desired ④[Power Consumption].
Adjust the fan ⑤[Speed], the app presets the fan speed under three temperature curves, you can click on any temperature and then manually drag the User Customize curve.
After the modification, click ⑥[Save and Apply].
※ The CPU fan and GPU fan settings are independent. If you want to set the GPU fan speed, please select GPU on the left.
2.2 Memory Allocated to GPU
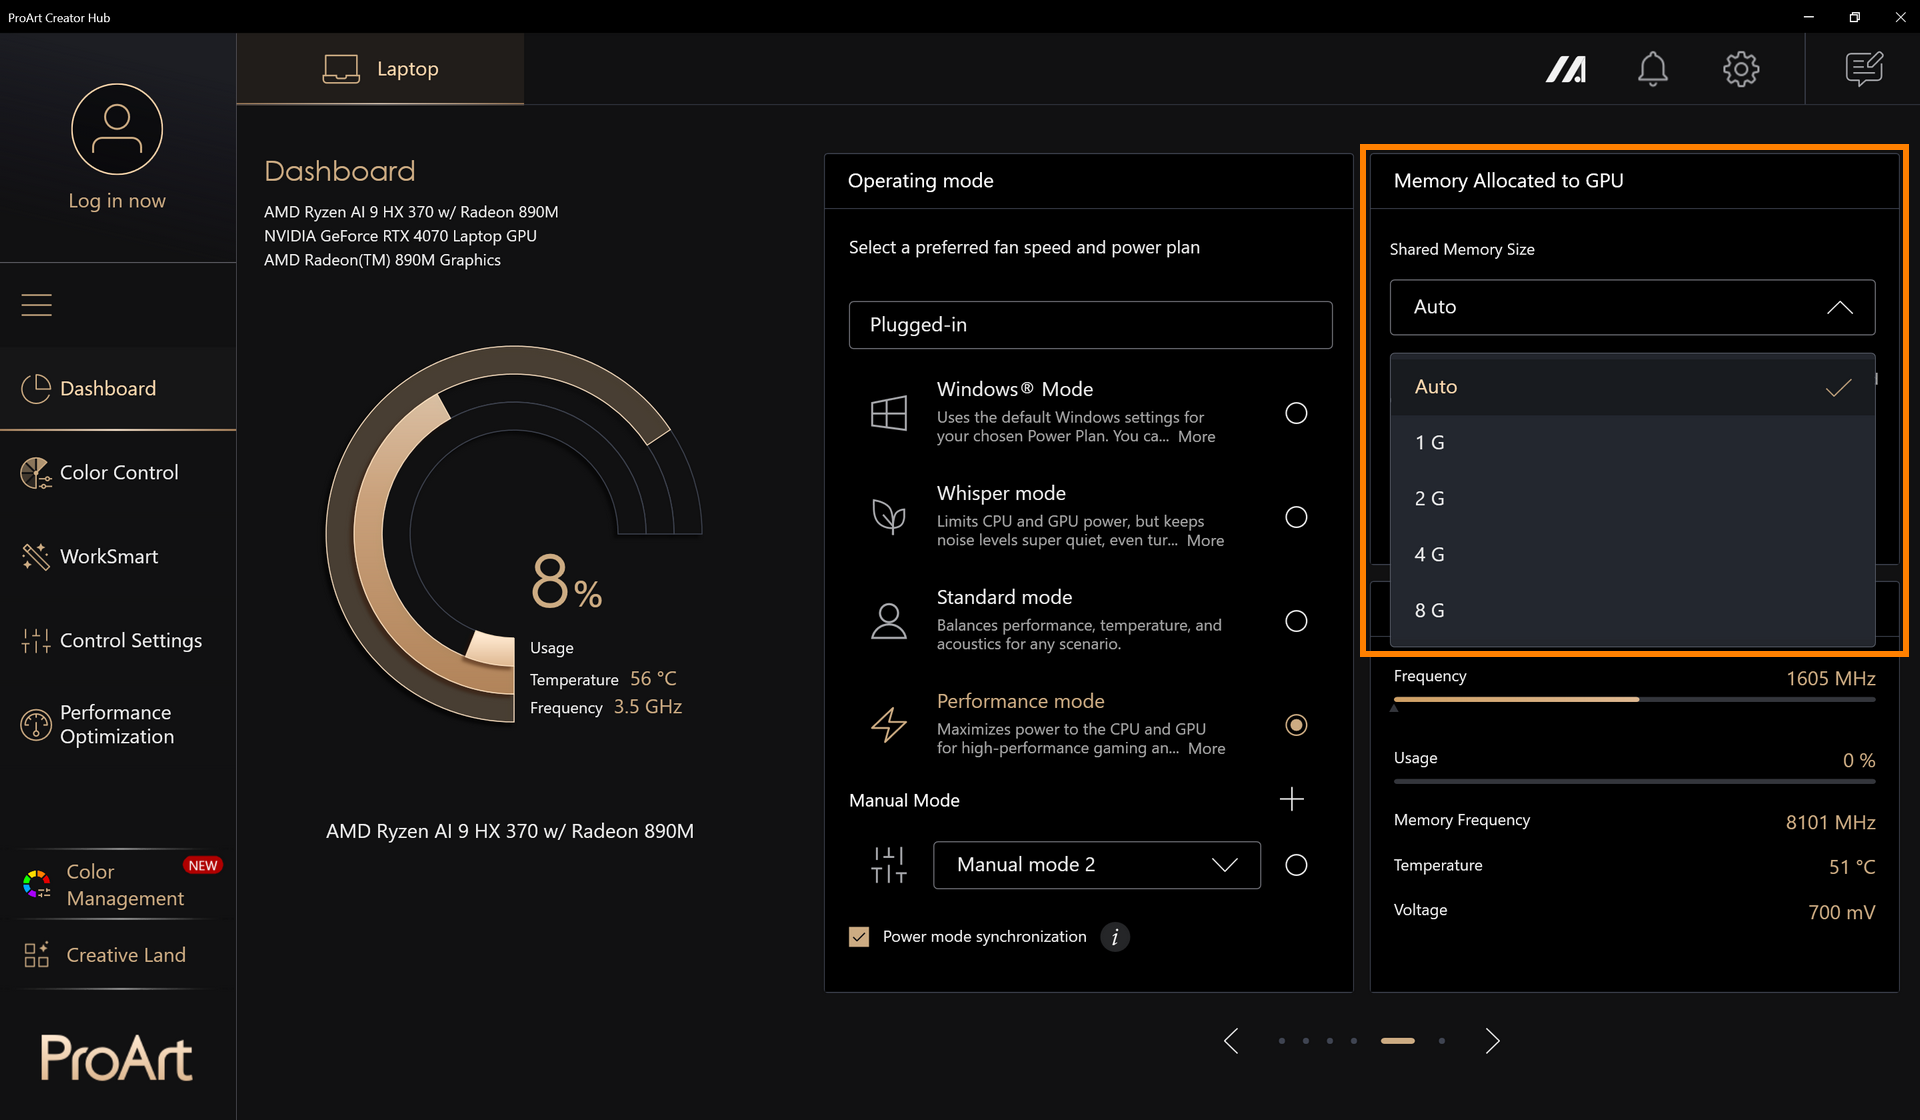
By default, your device automatically allocates memory for integrated graphics. However, you can also adjust it based on you rneeds.
You can manually adjust the Shared Memory Size. For more detailed information, please refer to: How to adjust the Memory Allocation Management of ASUS notebook? | Official Support | ASUS Global
3.1 Splendid & Color Gamut
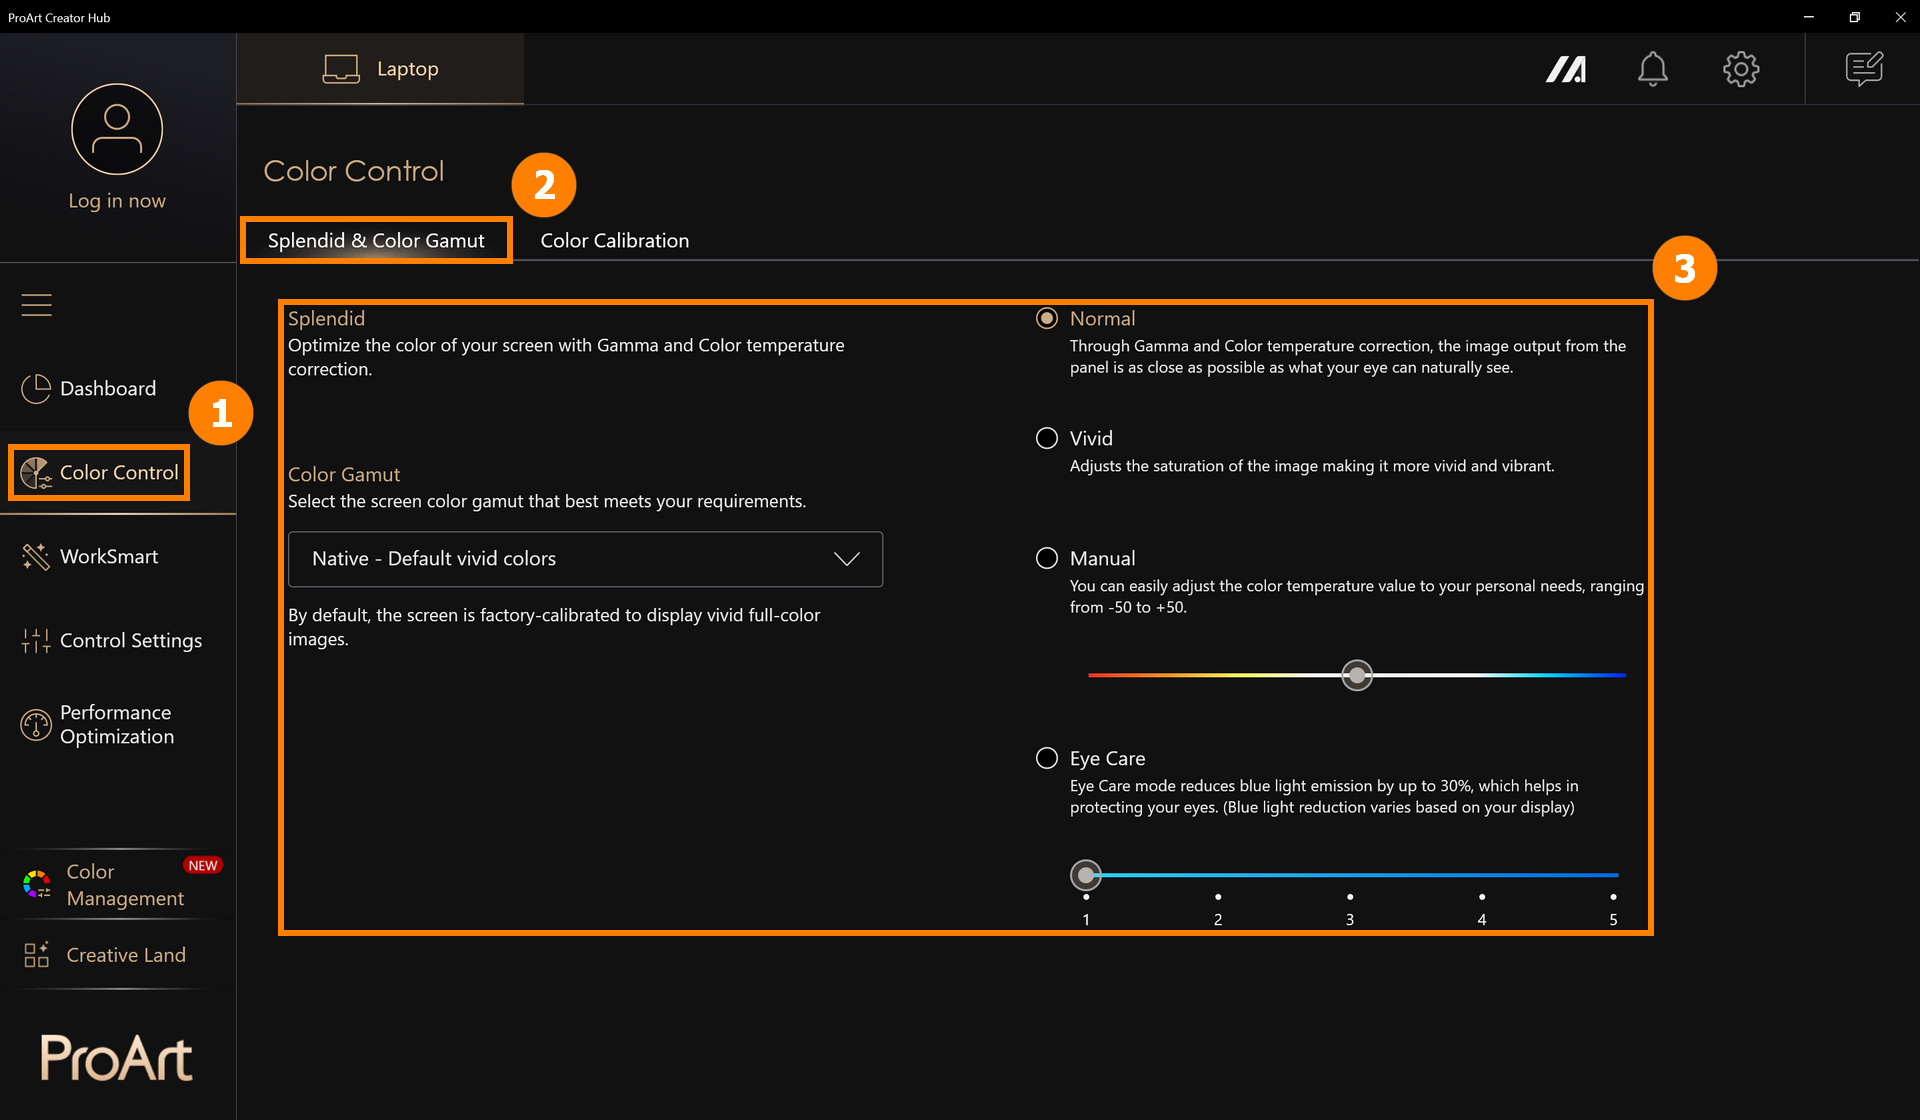
Click ①[Color Control], click ②[Splendid & Color Gamut], and modify the screen display mode in ③[Splendid & Color Gamut].
3.2 Color Calibration
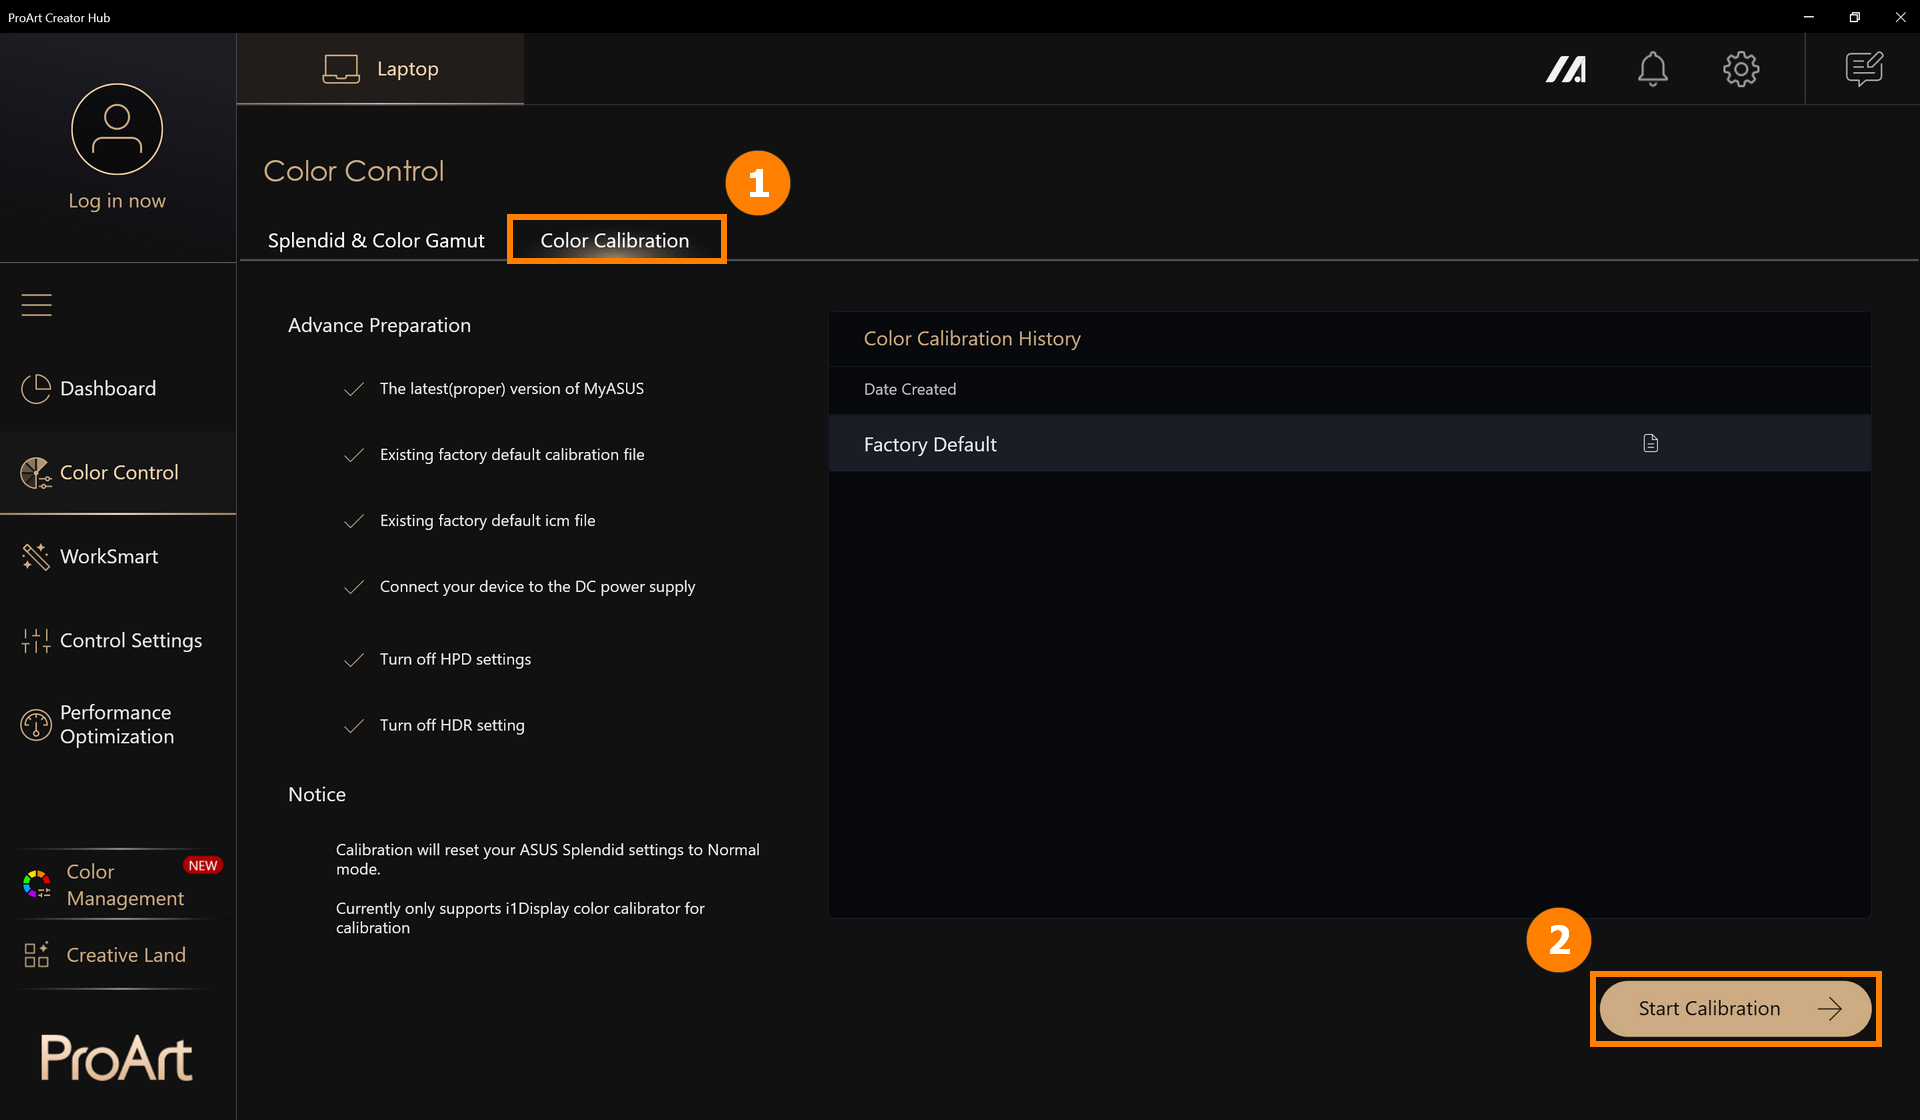
Color Calibration requires preparation: the latest version of MyASUS, built-in factory default calibration files, built-in factory default ICM files, connected power supply, i1Display color calibration device.
※ Correcting will reset your ASUS Splendid settings to standard mode.
(1) Click ①[Color Control], click ②[Start Calibration].
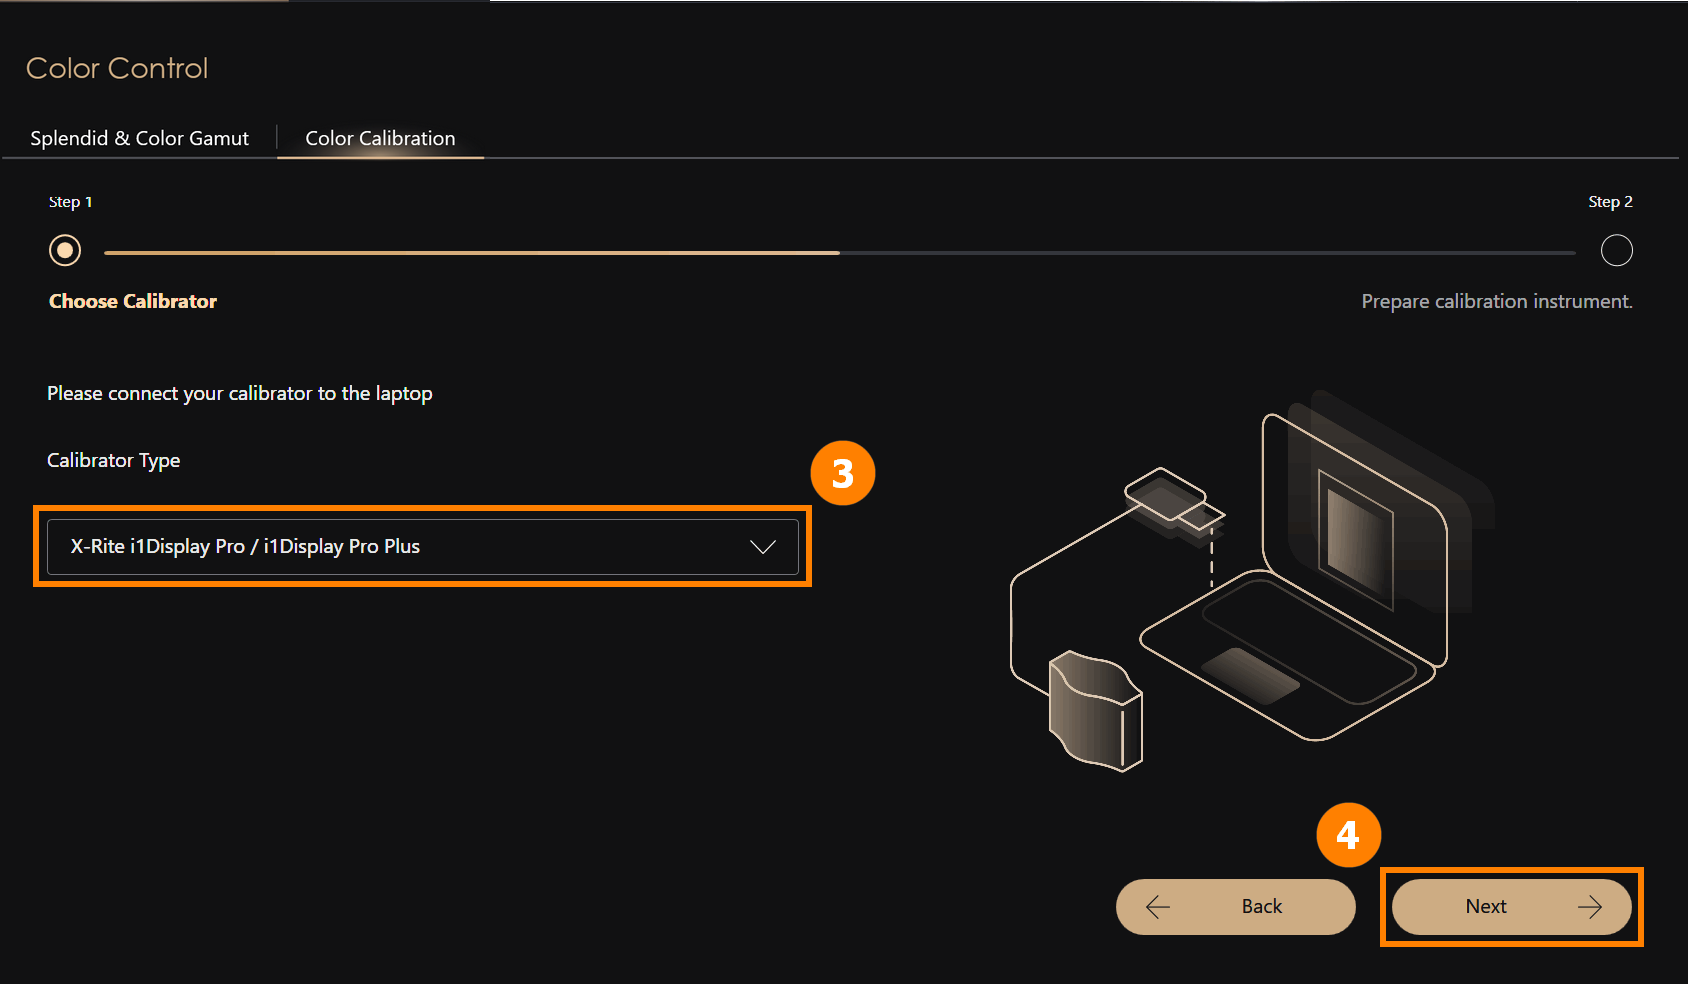
(2) Connect ③[i1Display color calibration] to your computer and place it in the appropriate position, click ④[Next] to start calibration. Begin the color calibration process (the entire calibration process takes about 1 minute and 30 seconds). When completed, the calibration report will be displayed.
※ Currently, only i1Display color calibration is supported for correction.
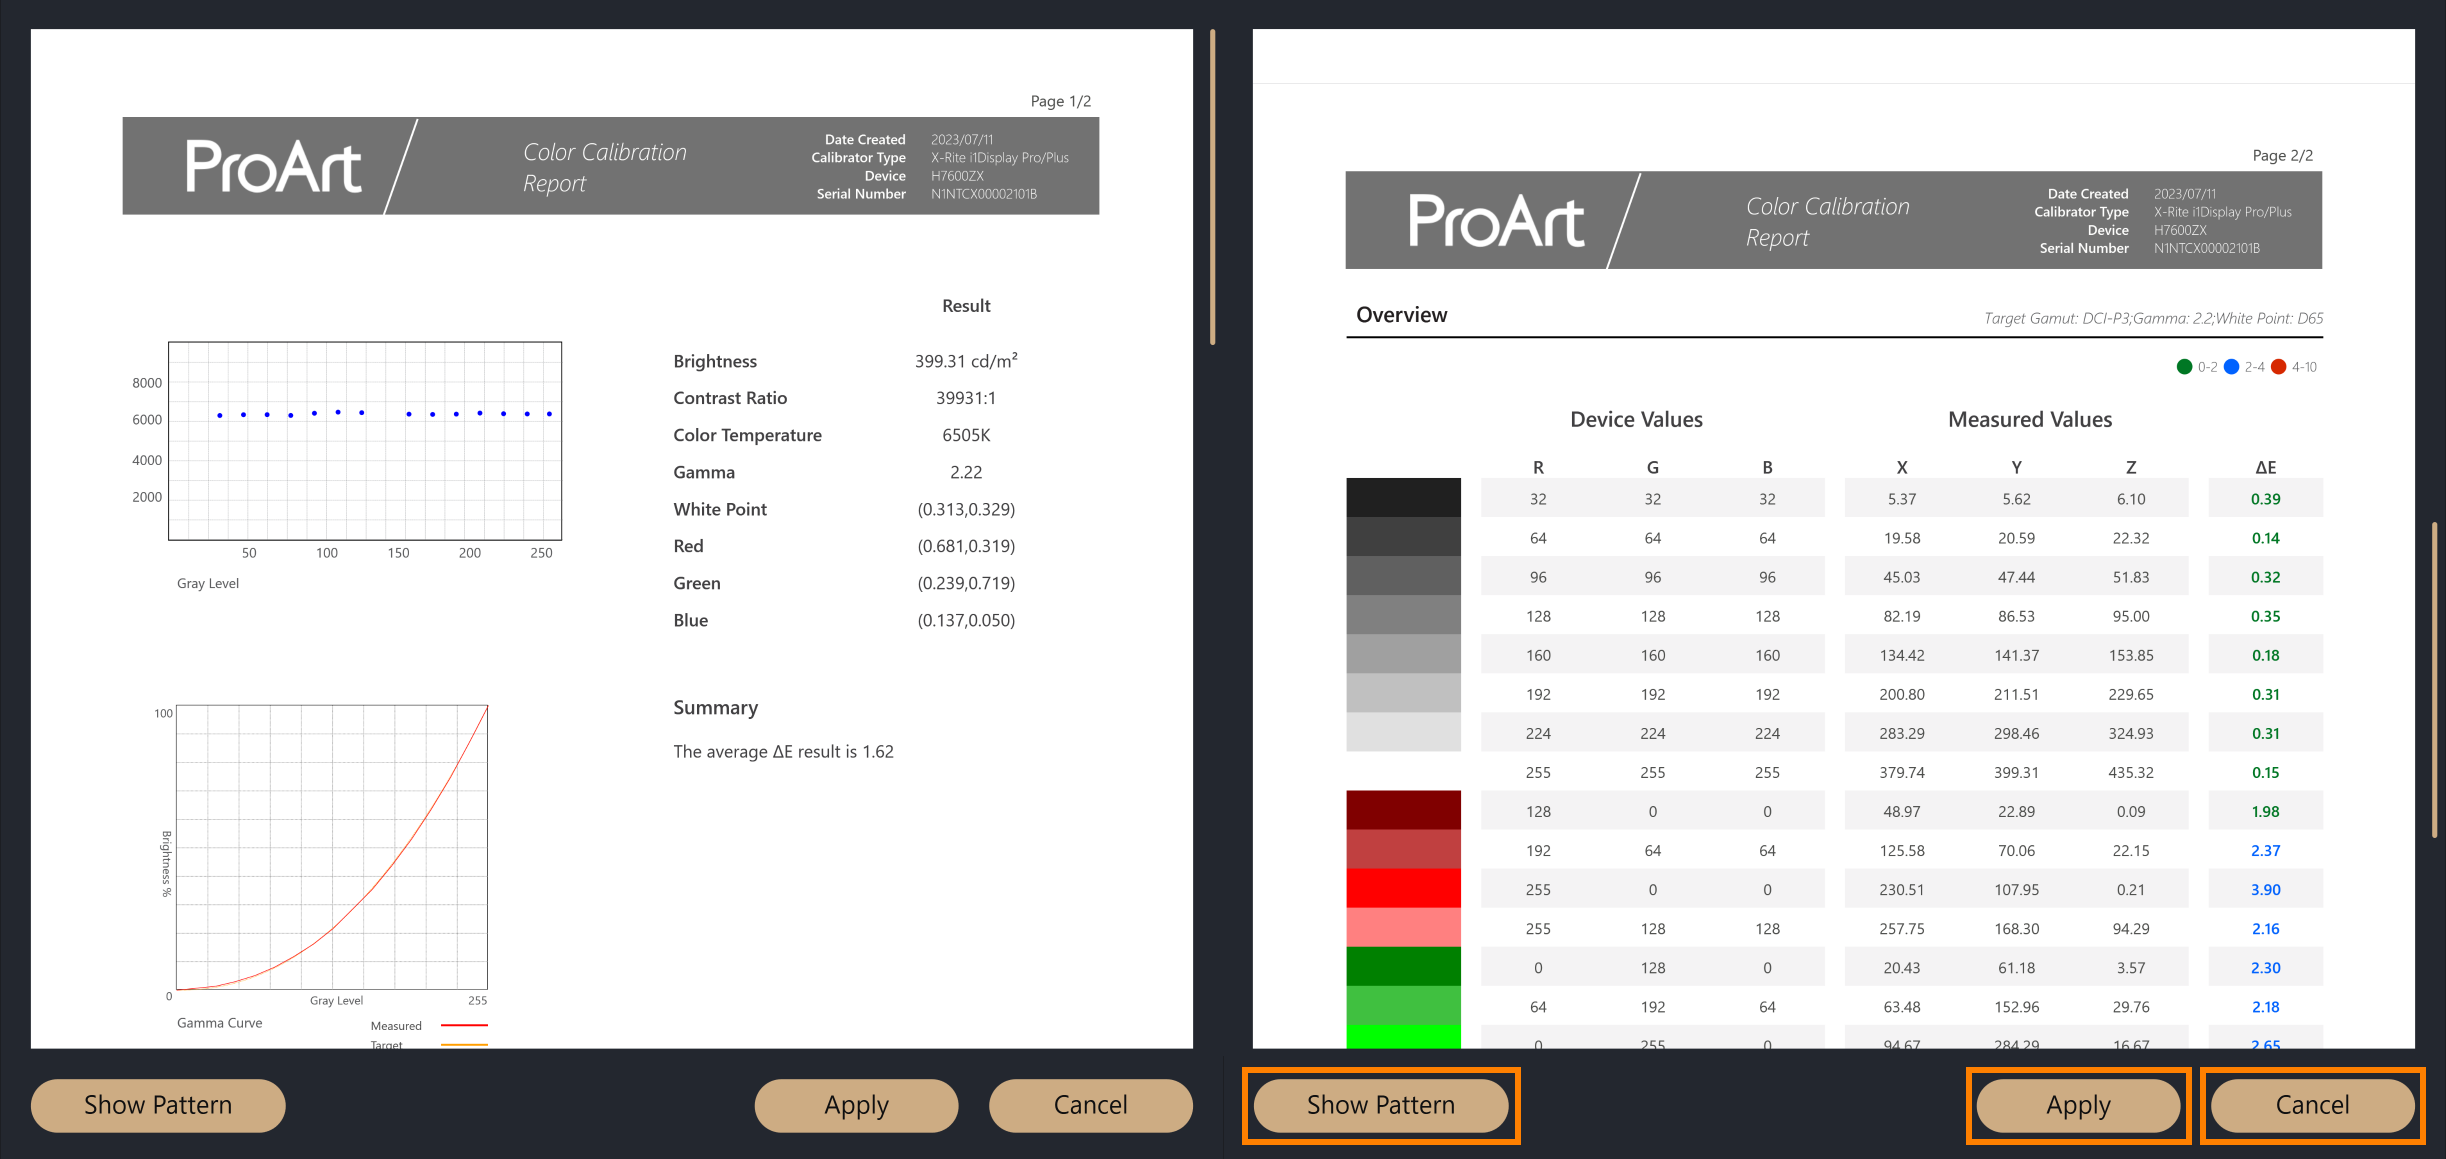
(3) After the color calibration is completed, the color correction report will be displayed, the report is divided into two pages, which will display the calib ration data and results, and there are three options to choose from at the bottom of the report.
·Show Pattern: will display the comparison of pictures before and after color calibration
·Apply: Apply the parameters of this color calibration and overwrite the previous setting parameters
·Close: Close the report
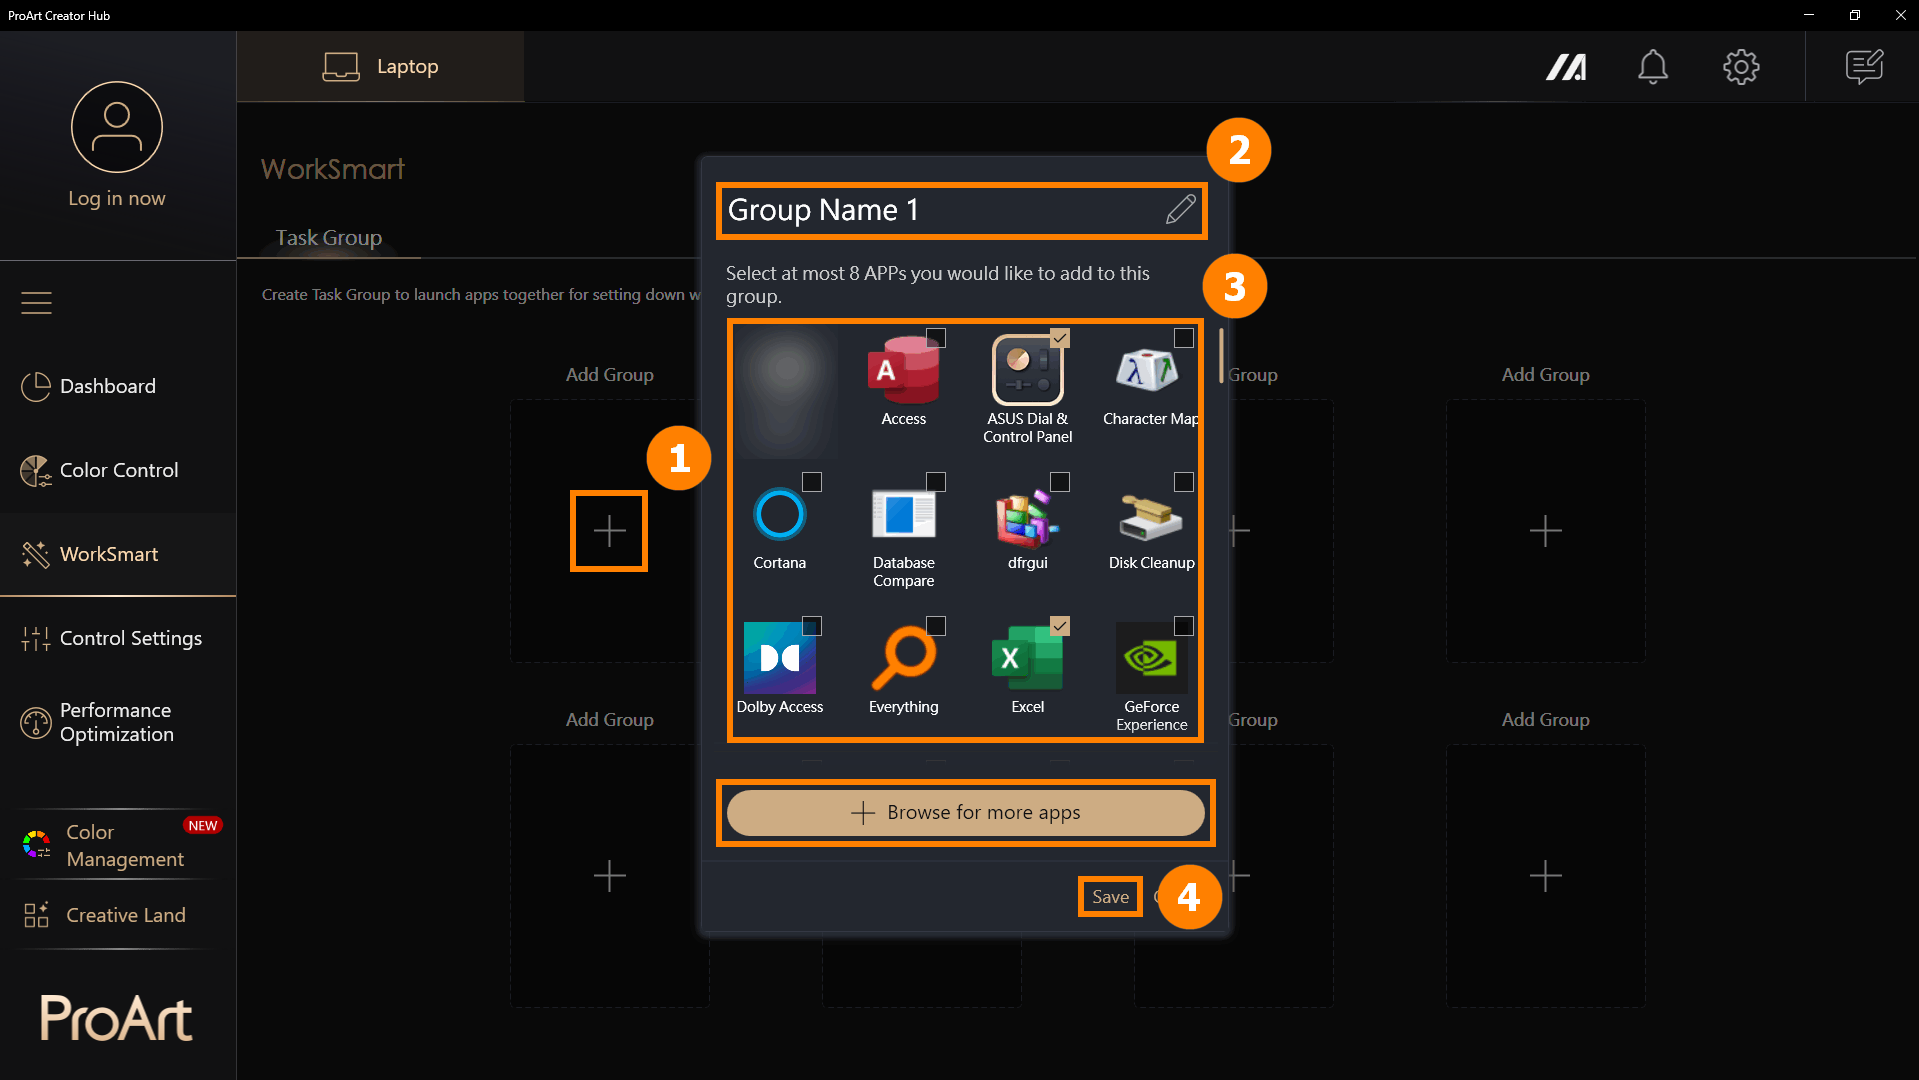
(1) Click [WorkSmart], click ①[+] to add a new group. You can modify ②[Group Name], select ③[Programs] you want to bundle, and click ④[Save] to create a group.
Browse for more apps: If you don't find the app you want to add, you can click [Browse for more apps] to add a program (only apps with the suffix exe)
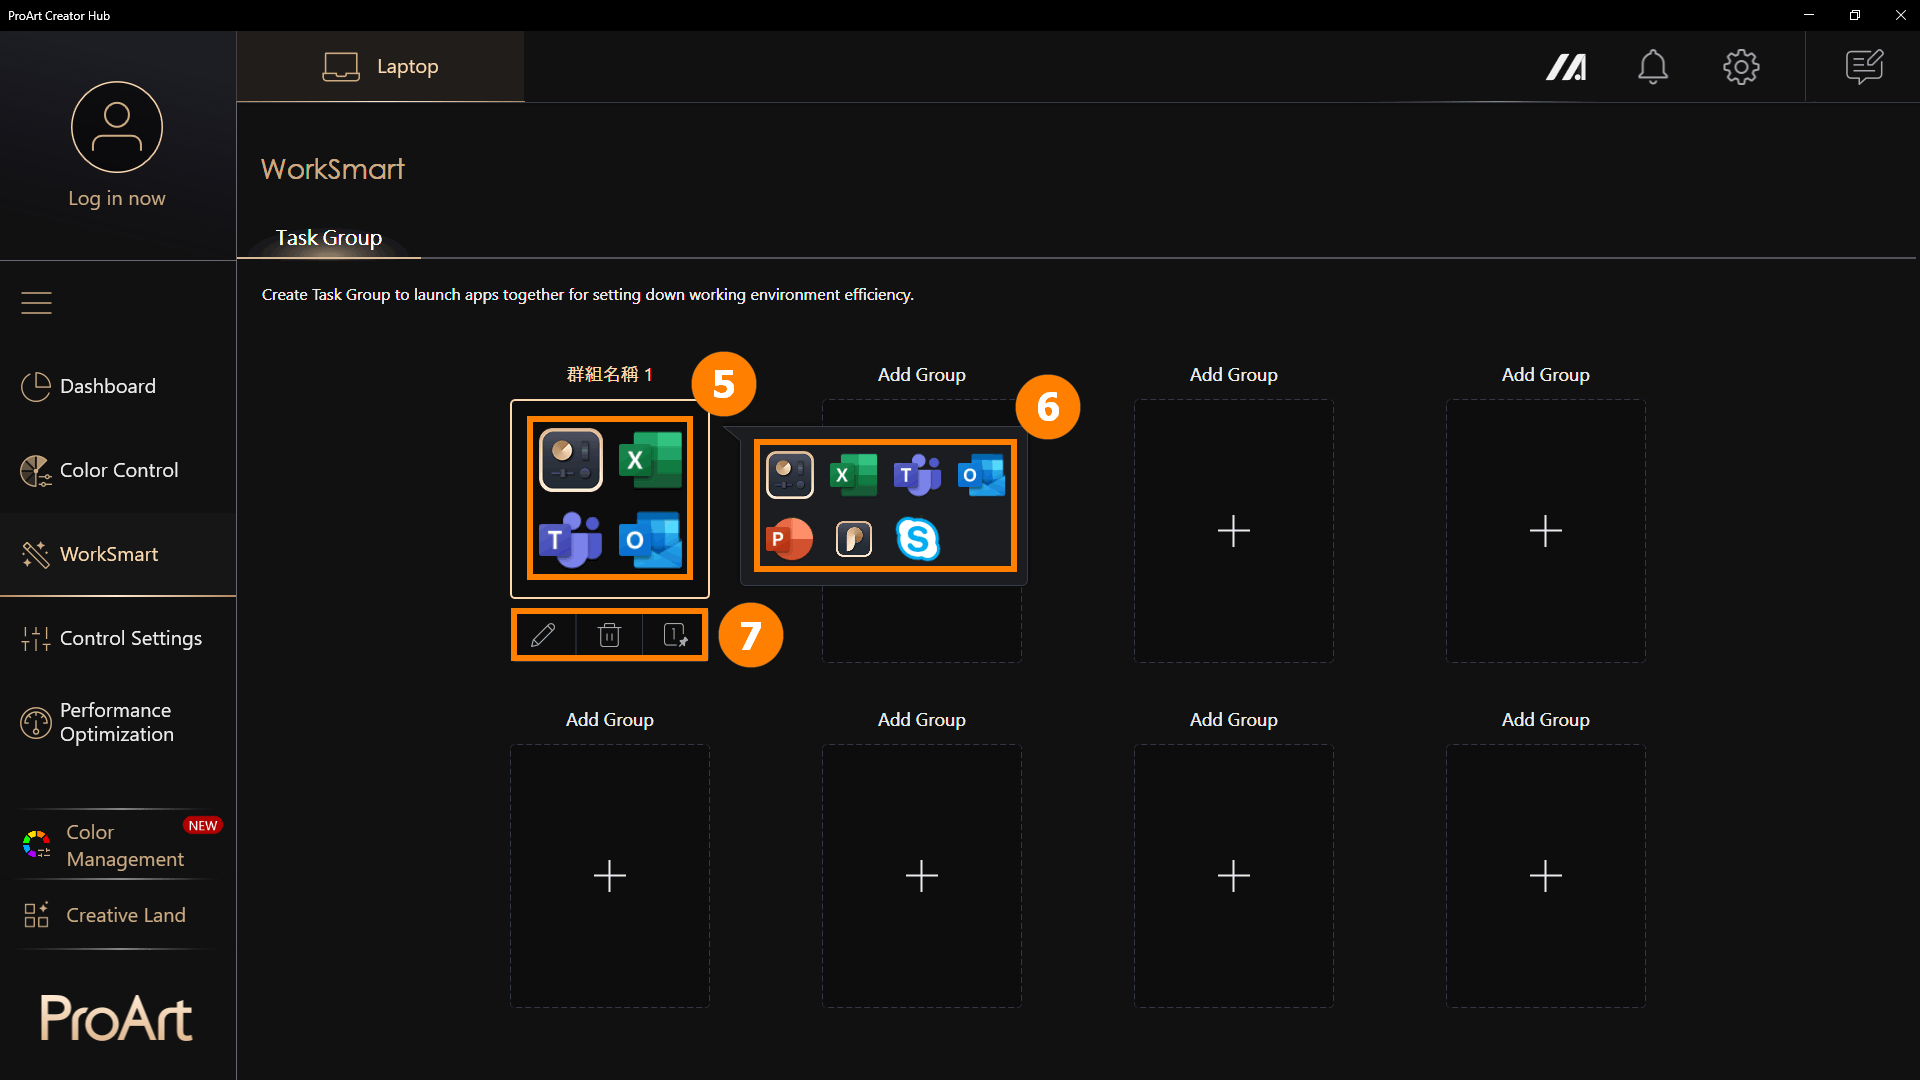
(2) Click ⑤[Group] to open all programs in the group. If you hover over [Group] without clicking, it will display ⑥[Thumbnail Previews] of programs in the group. Task groups support ⑦[Edit Group, Delete Group, Create Shortcut].
※ Create Shortcut: Create a shortcut on your desktop, you just need to click the desktop shortcut to open the application group. For example, when you turn on your computer, you can click on a preset group to open all the programs you need for today's work with one click.
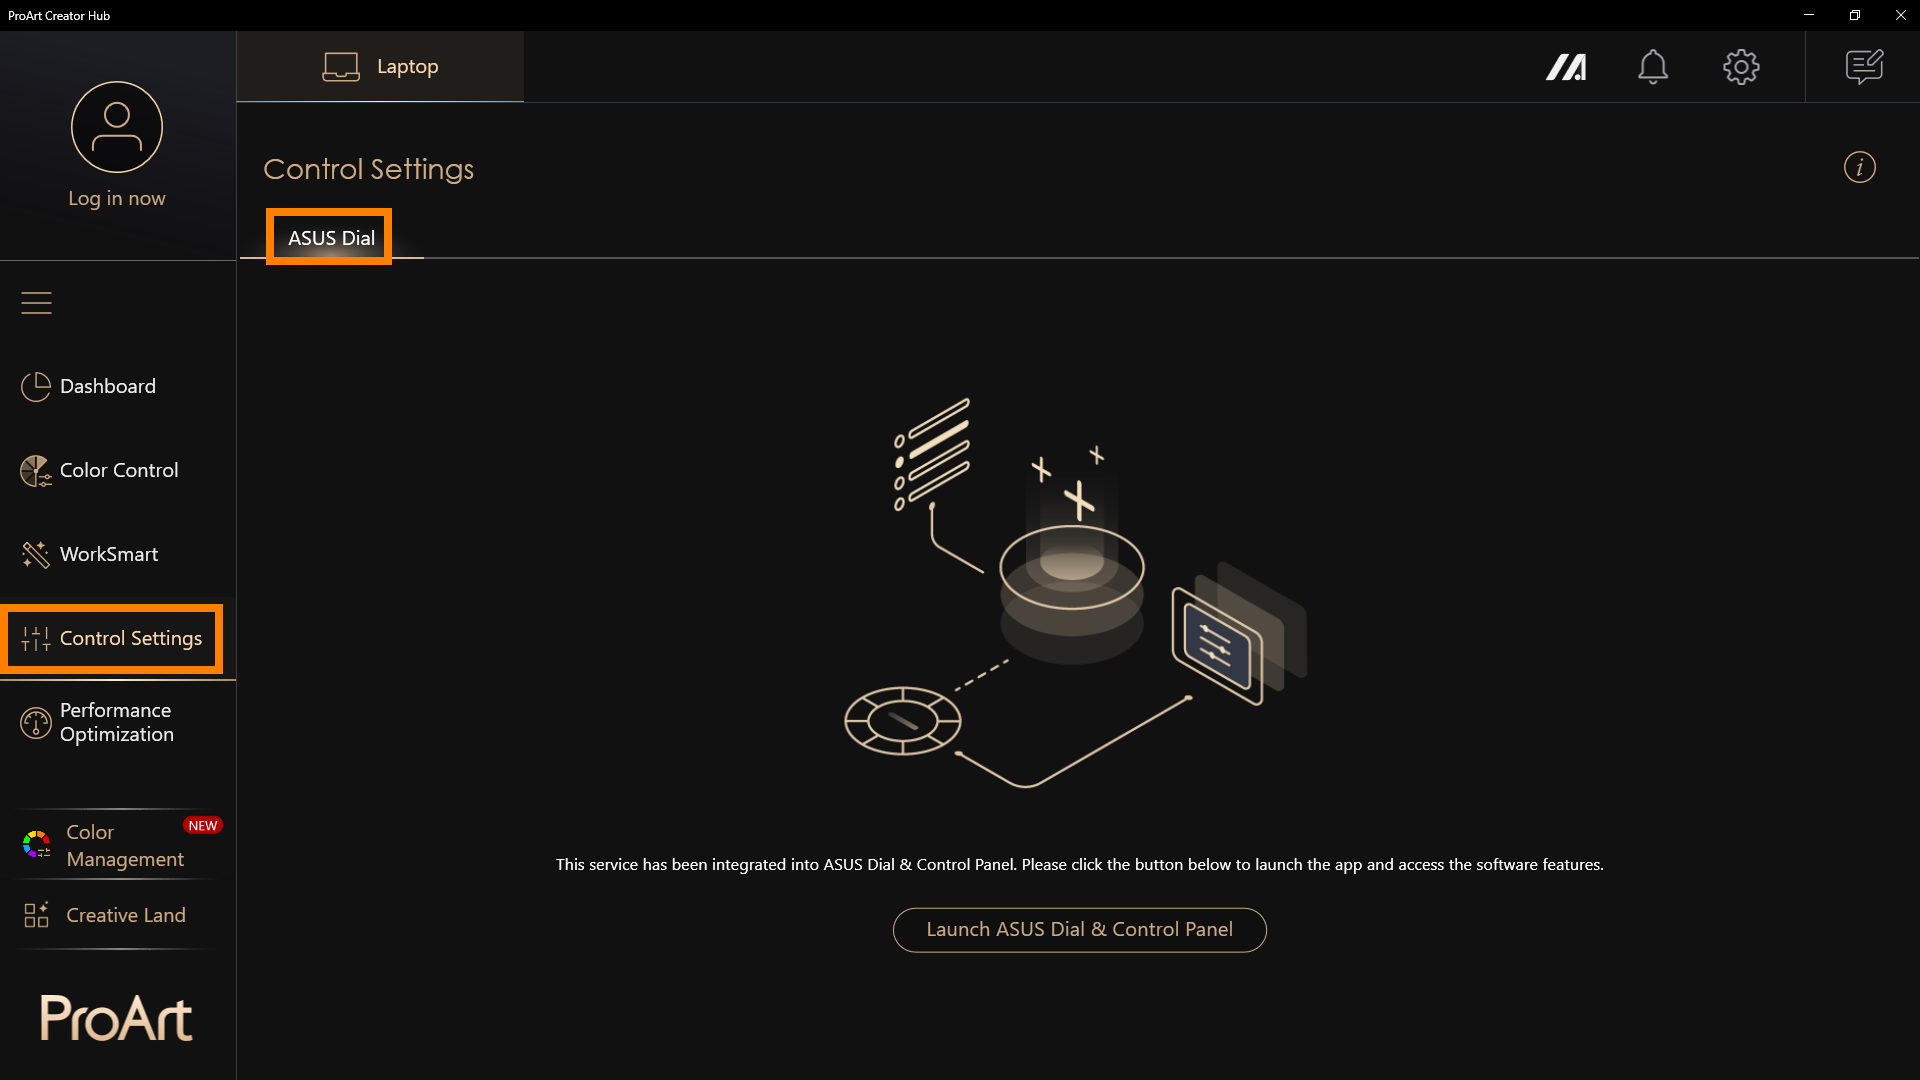
※ ASUS Dial may present different functions depending on the product you purchase.
ASUS Dial has now become an independent program, please refer to: [Notebook] ASUS Dial - Introduction | Official Support | ASUS Global
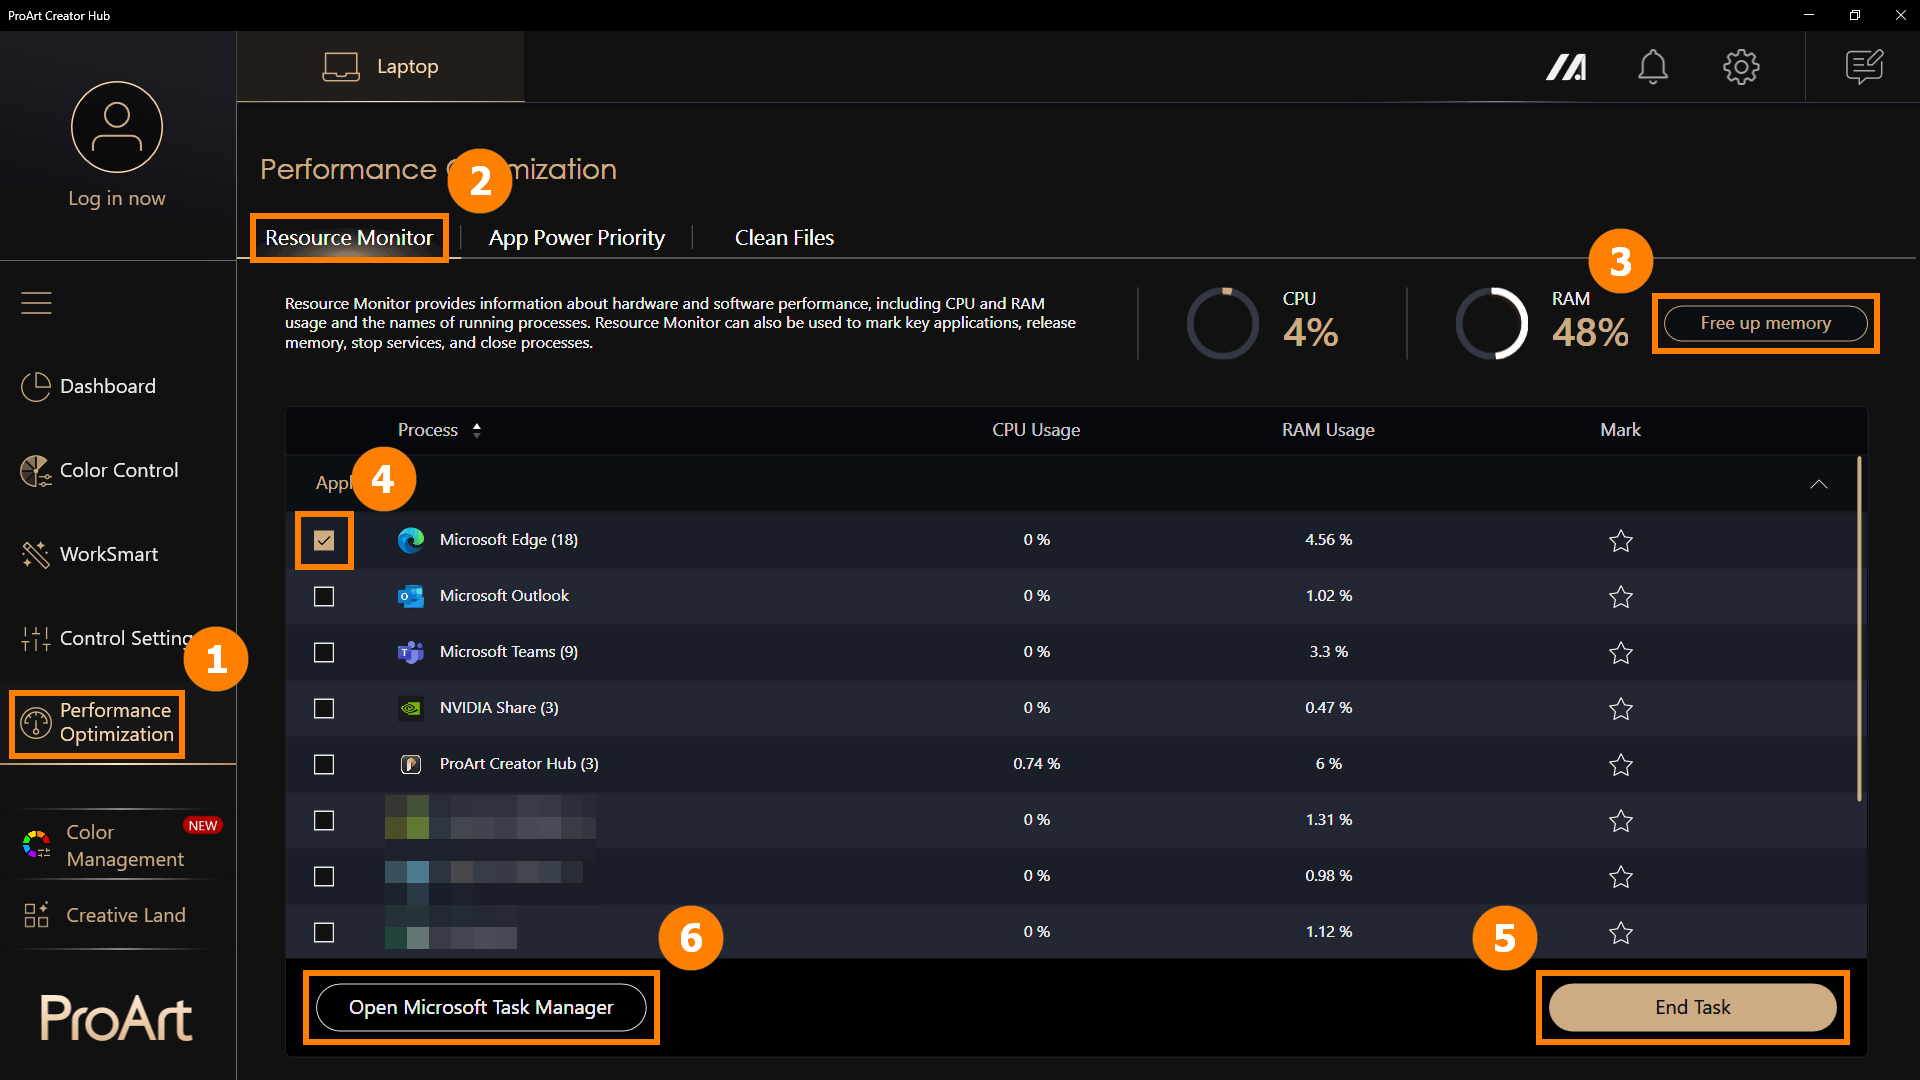
Click ①[Performance Optimization], click ②[Resource Monitor]. Click ③[Free Memory] to clear cached memory. Click ④[Applications], click ⑤[End Task] to close selected applications. You can also click ⑥[Open Microsoft Task Manager] to open the bulit-in Windows Task Manager.
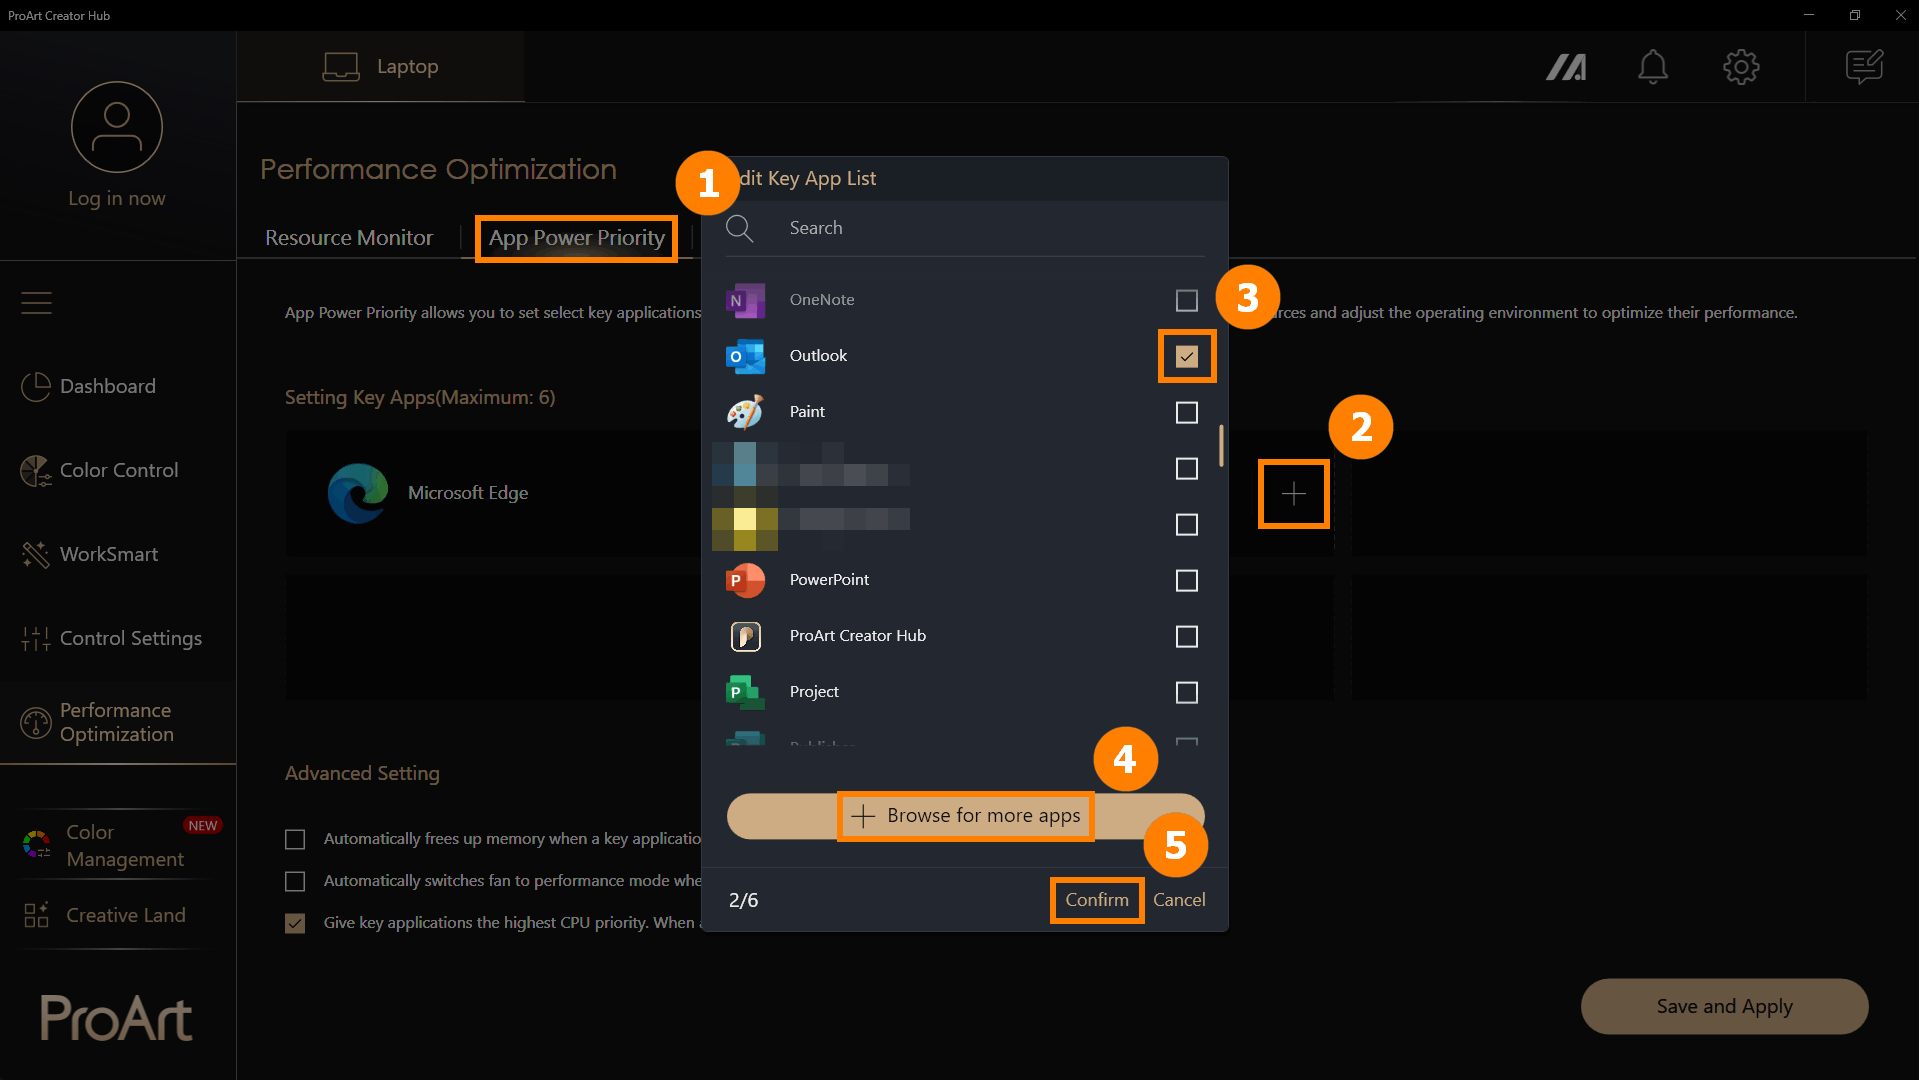
(1) Click ①[App Power Priority], click ②[+] to add a new application. Choose ③[Application] or click ④[Browse for more apps] to add a new apps, click ⑤[Confirm].
※ Browse for more apps: If you don't find the app you want to add, you can click [Browse for more apps] to add a program (only apps with the suffix exe)
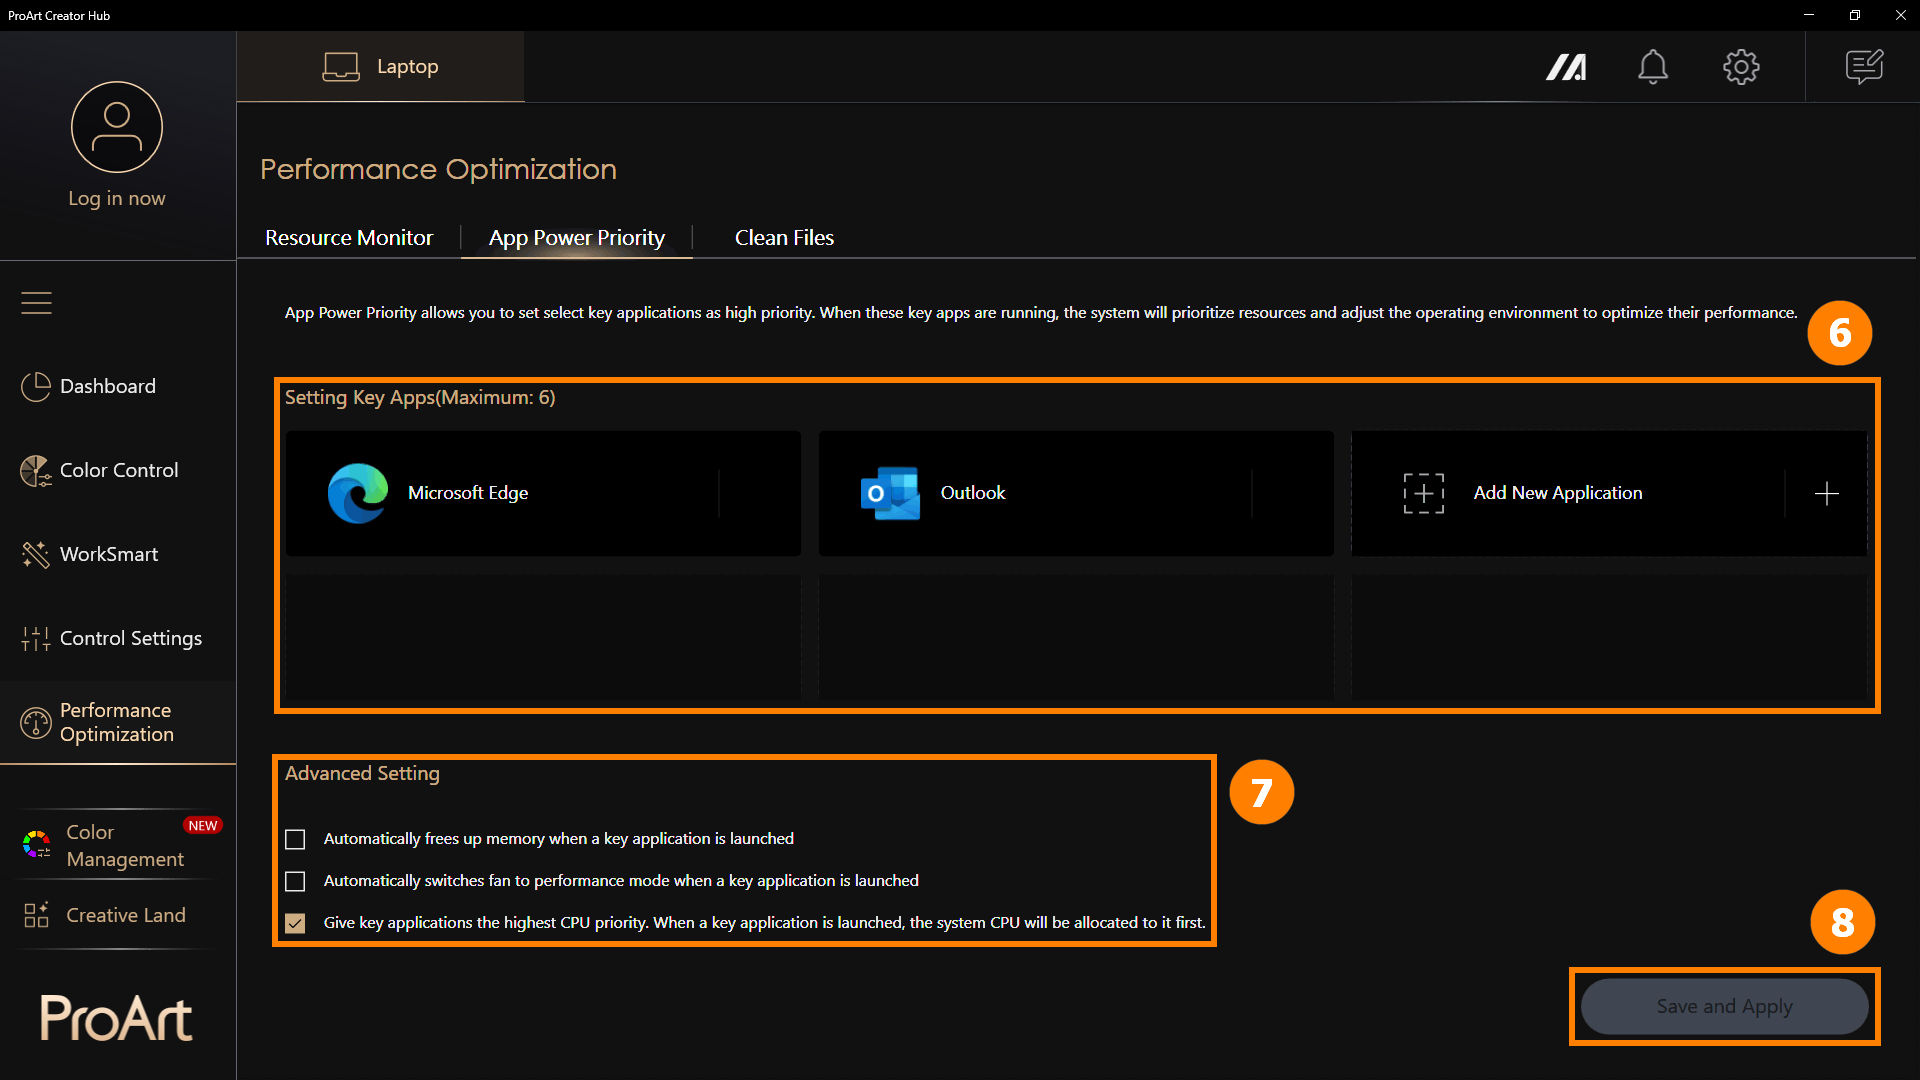
(2) The application is added ⑥[New], and you can click [+] to continue adding new applications. When these applications are running, they will run at high priority. You can manually adjust ⑦[ Advanced Setting] and click ⑧[Save and Apply].
Advanced settings provide three options for you to better adjust the application performance allocation.
·Automatically frees up memory when a key application is launched.
·Automatically switches fan to performance mode when a key application is launched.
·Give key applications the highest CPU priority. When a key application is launched, the system CPU will be allocated to it first.
6.3 Clean Files - Disk Cleanup
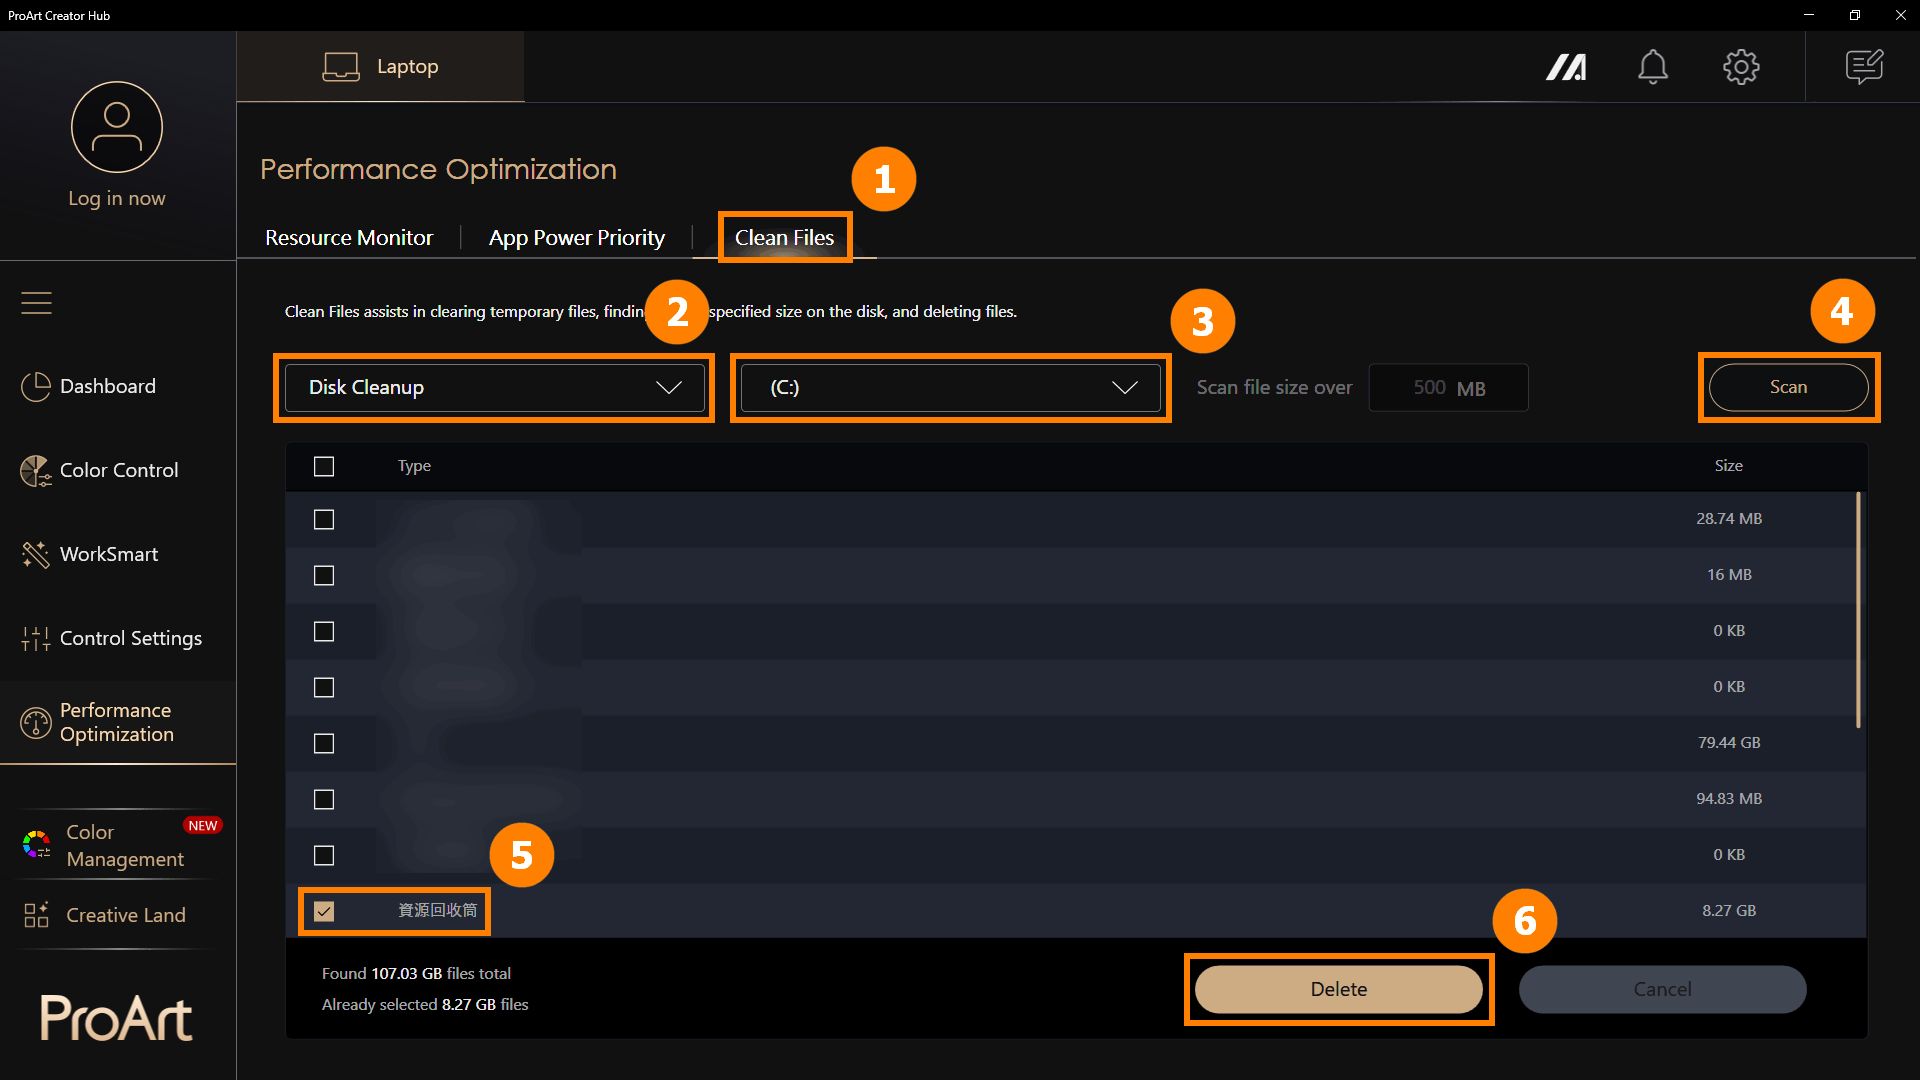
Click ①[Clean Files], select the ②[Disk Cleanup] , click ③[Disk], click ④[Scan], and select the ⑤[Files] click ⑥[Delete] to remove files.
※ Disk Cleanup removes temporary files from the disk. Deleting temporary files may have irreversible effects, so use the Disk Cleanup feature with caution.
6.4 File Cleanup - File Organizer
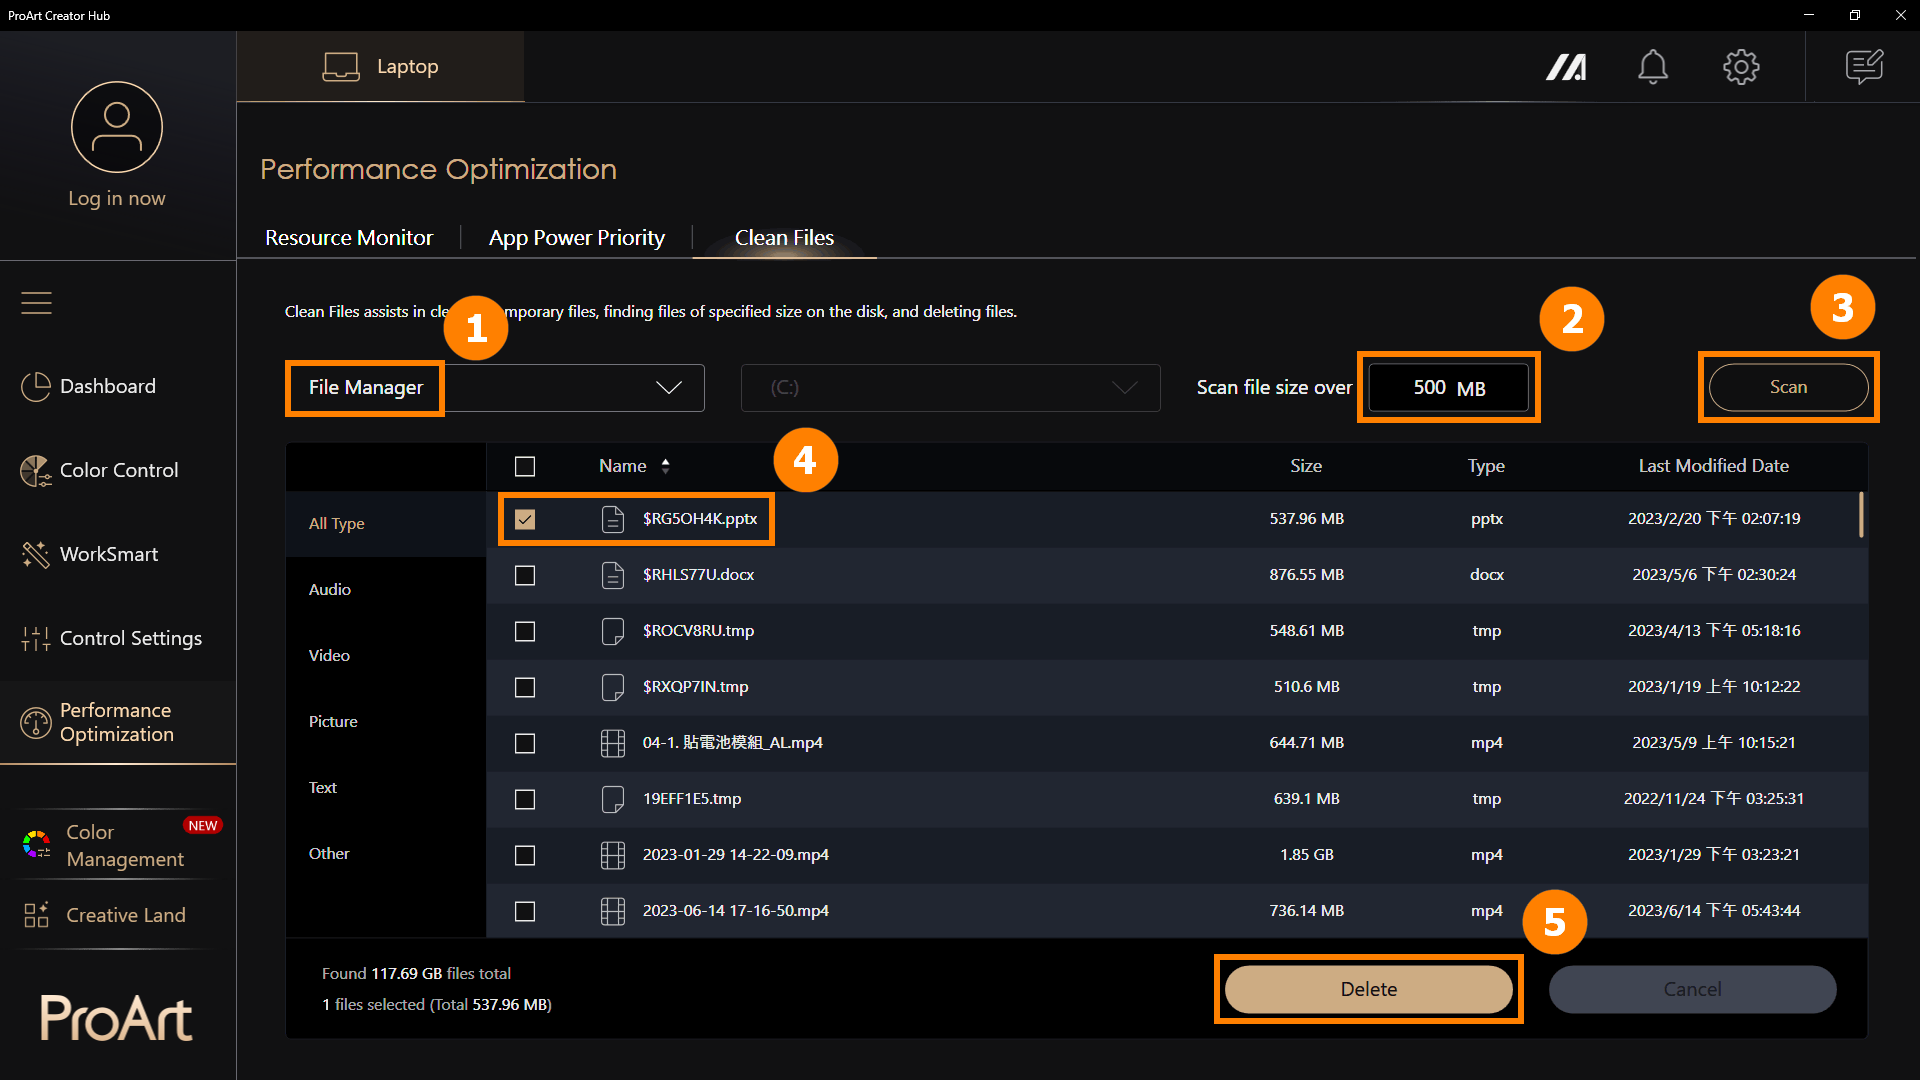
Click ①[File Manager], select the ②[File Size], click ③[Scan]. select ④[Files], and click ⑤[Delete] to remove files.
※ Disk Cleanup removes temporary files from the disk. Deleting temporary files may have irreversible effects, so use the Disk Cleanup feature with caution.
※ One of the most important things for creators is color. At the top right corner is easy access to the Color Management feature. This includes the Screen Color Picker and Image Color Extractor that make it simple to get a detailed color analysis and color information, and you can use the Color Palette to build your personal color preferences. You will also find color trends and color palettes created by the professionals at the ASUS Design Center.
Image Color Extractor - Upload an image, choose a favorite image, and perform color analysis to create a color palette .
Personal Color Palette - Manually select a color on the screen and create a personal color palette.
Explore Colors - View color trends provided by ASUS's color research team to stay updated on the latest trends.
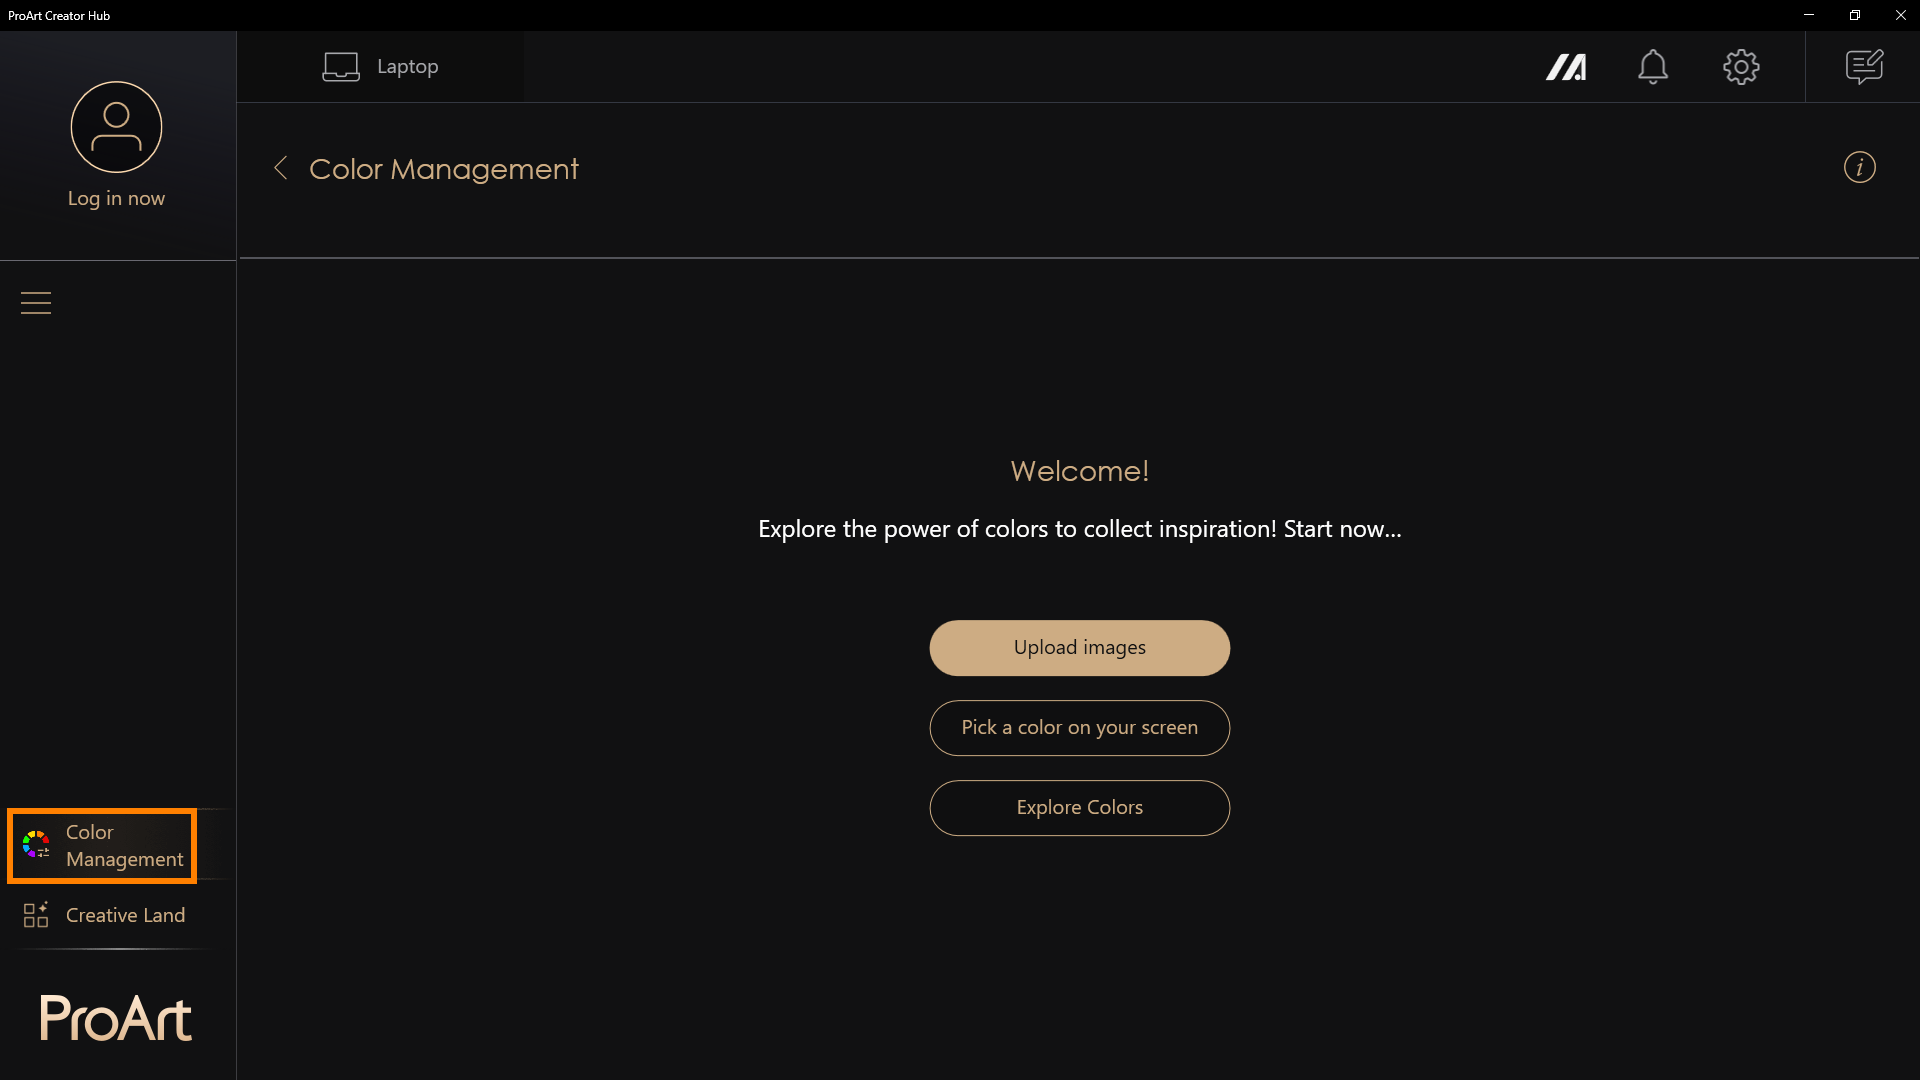
In [Creative Land], there are apps recommended by ASUS. Click them to launch or download them.
Don’t know how to use these apps? Please refer to the following:
MuseTree introduction | Official Support | ASUS Global
[Notebook] StoryCube - Introduction | Official Support | ASUS Global
[Notebook] ASUS Dial - Introduction | Official Support | ASUS Global
ASUS Control Panel - Introduction | Official Support | ASUS Global
9.1 General Settings
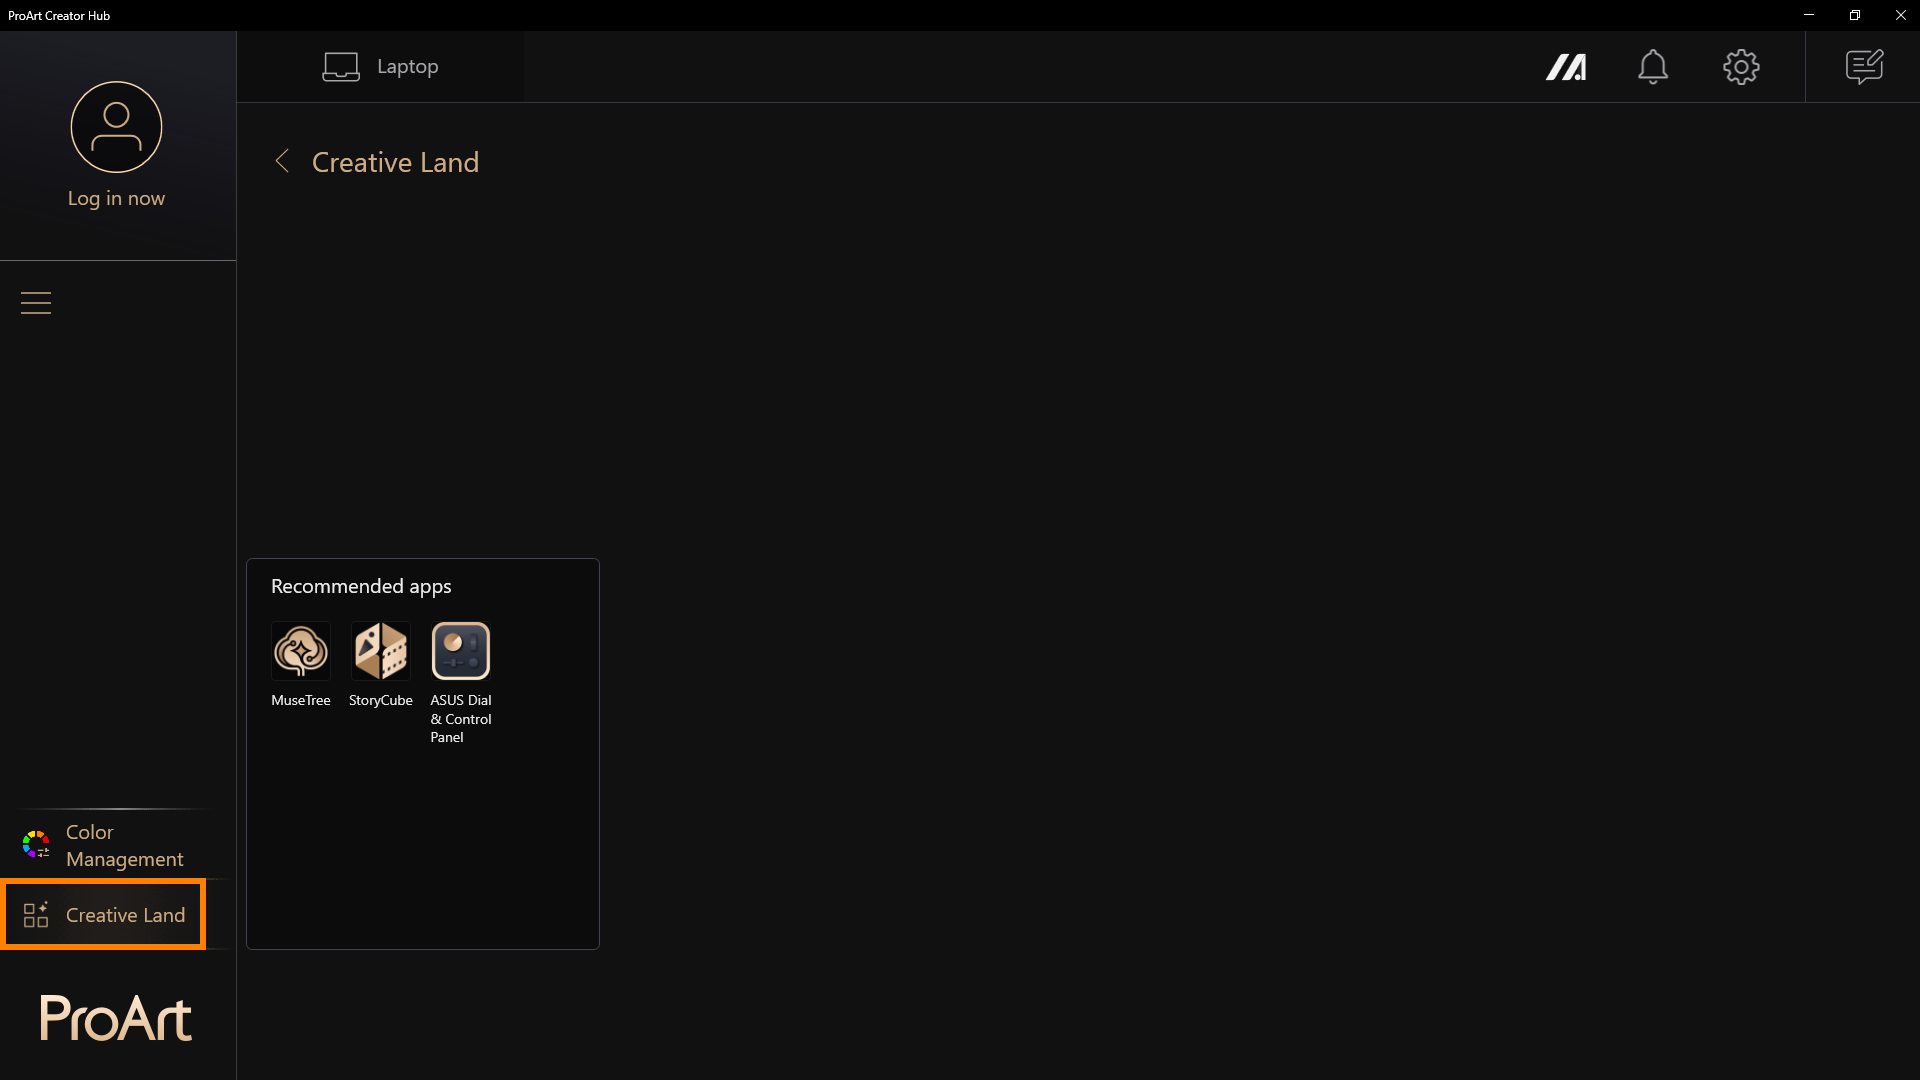
Click ①[Settings], click ②[General Settings]. You can choose ③[Application Language].
9.2 Updates
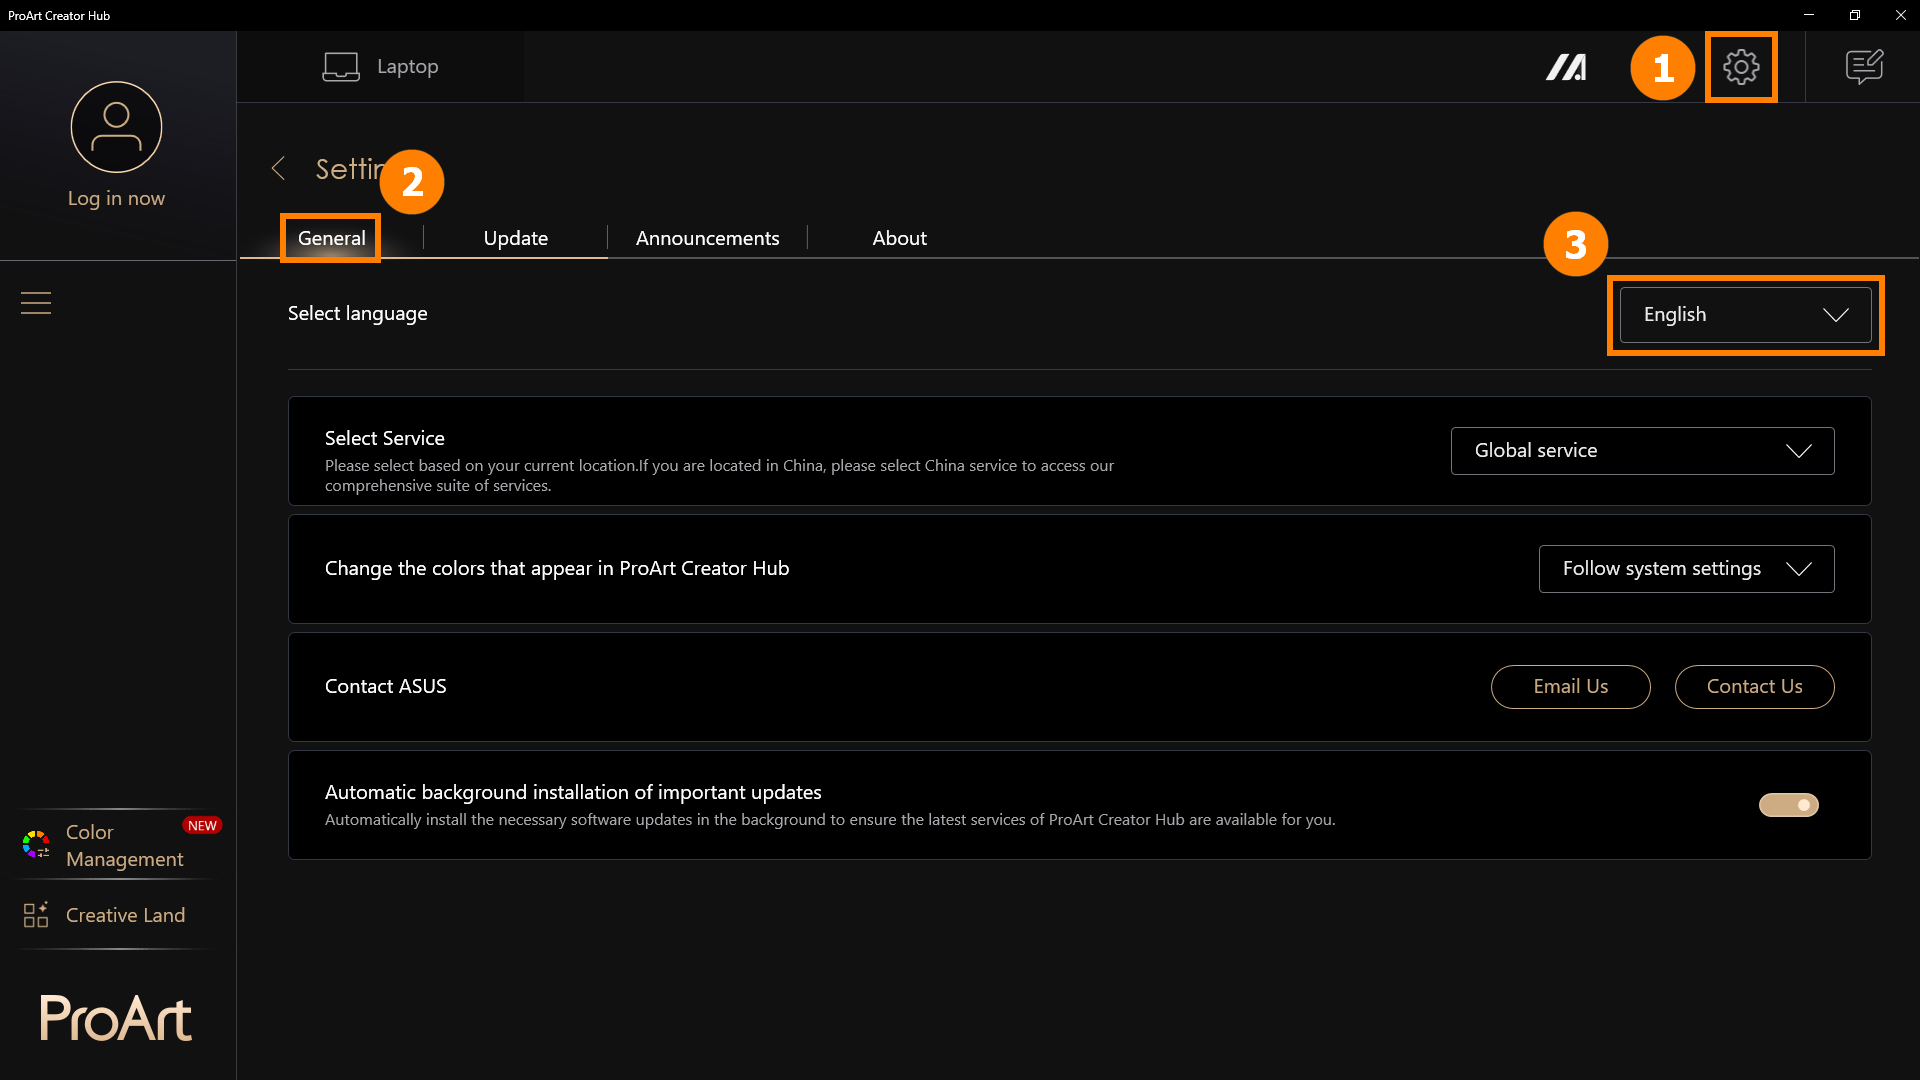
Click ①[Updates], click ②[Check]. You can click ③[Update All] to update the application to the latest version.
10. How to Download and Uninstall ProArt Creator Hub
·ProArt Creator HubDownload ProArt Creator Hub: Download the current latest version of ProArt Creator Hub through the Microsoft Store
·Uninstall ProArt Creator Hub: If you want to remove this application, click: [Windows 11/10] How to uninstall Apps, Windows installed updates, Drivers | Official Support | ASUS ...
Note: ProArt Creator Hub can only be used on ASUS ProArt/Feature By ProArt series products. Click ASUS ProArt Global for more information.
·Operating System: Windows 10 19H2 64-bit (inclusive) and above
·ASUS System Control Interface v2: Version 2.2.2.0 (inclusive) and above
·Adobe Software: 2020 and above
Q1: When using functions such as [Save As] and [Create New Project] in color management, you may encounter issues with these features.
A1: You can click the following link to download and install the .N ET Framework software to resolve the issue
Download .NET Framework 4.8.1 | Free official downloads (microsoft.com)
Q2: How to enlarge the font of ProArt Creator Hub?
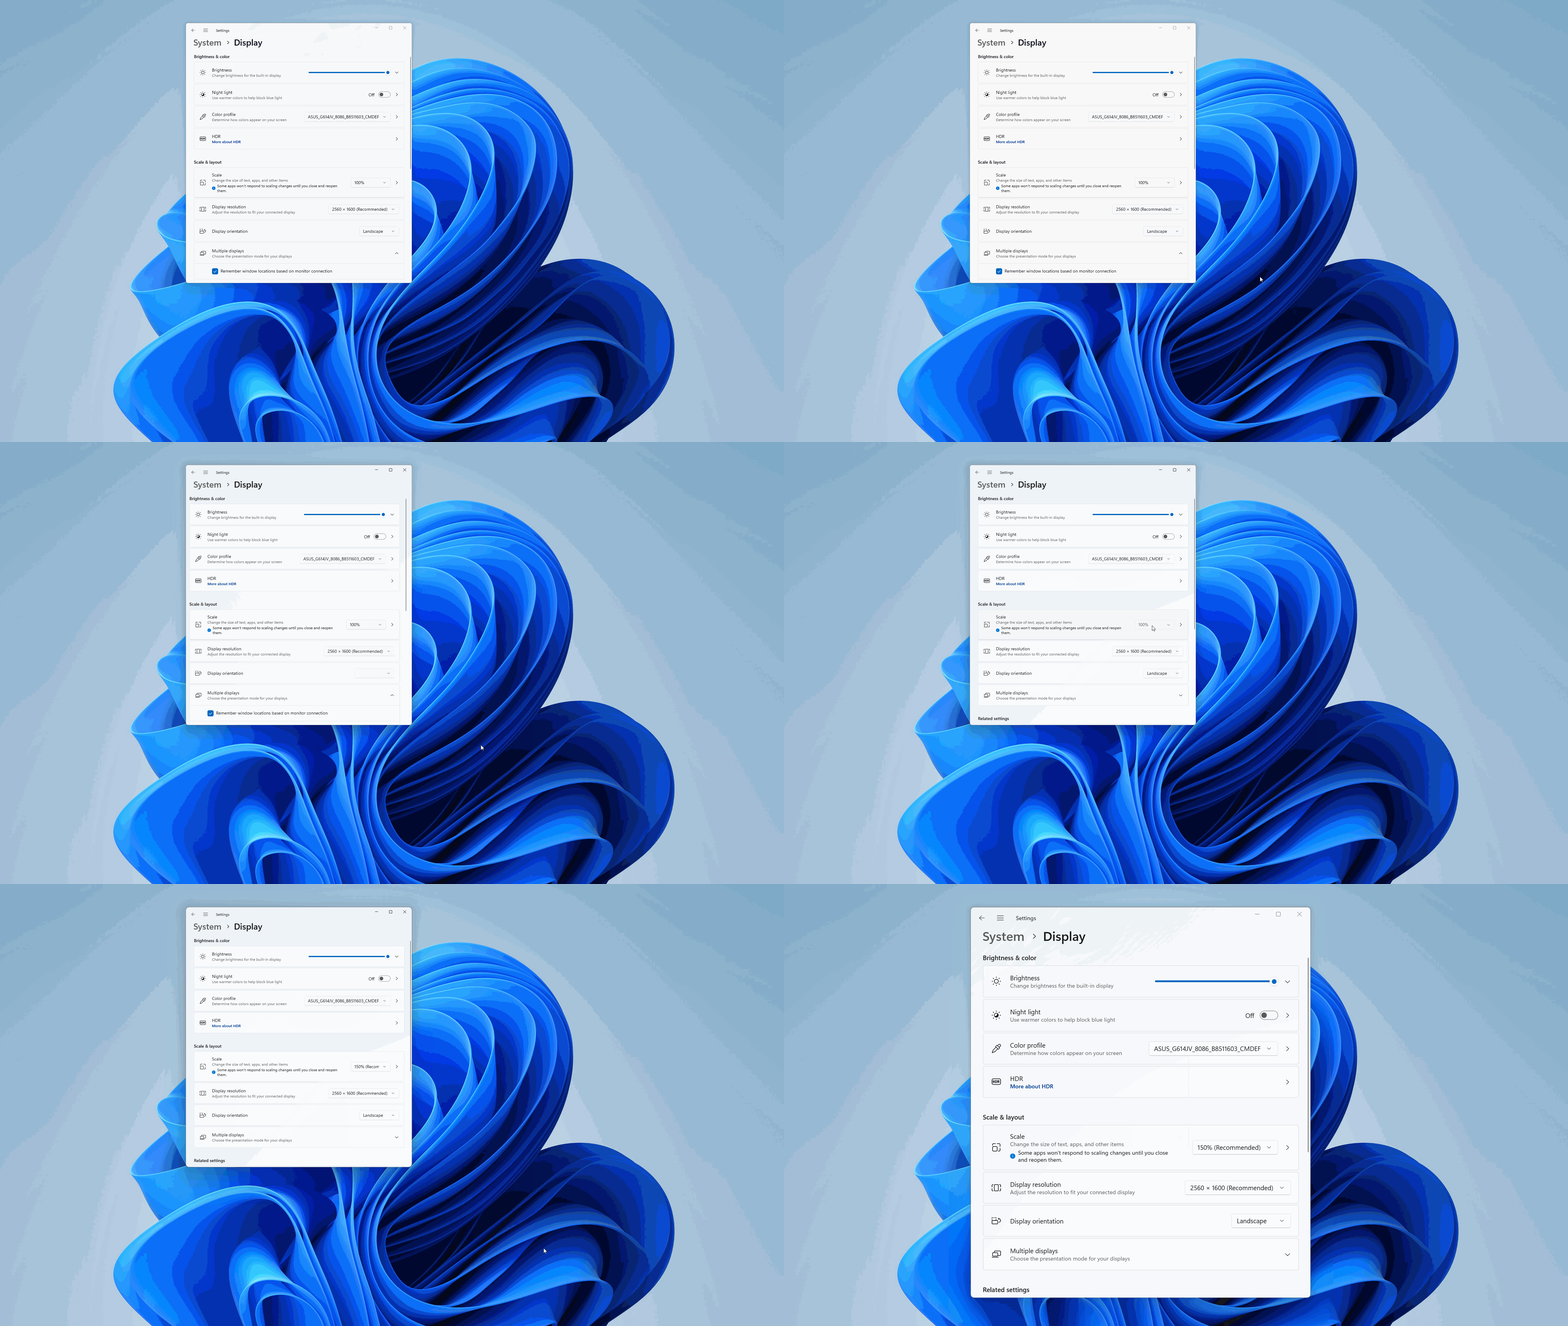
A2: Right-click the computer desktop, left-click [Display settings], and select the size you want in Scale & Layout.
13. Other Introductions to ProArt Series Products
·[Notebook] ASUS Dial - Introduction | Official Support | ASUS Global
·[ProArt Motherboard] ProArt Creator Hub - Introduction | Official Support | ASUS Global
·[ProArt Display] ProArt Creator Hub - Introduction of display function | Official Support | ASUS Glo...
·[Notebook] ASUS Control Panel Introduction | Official Support | ASUS Global
ASUS Control Panel - Introduction
Applicable Products: Notebook, Desktop, All-in-One PC, Gaming Handheld
ASUS Dial & Control Panel provides easy access to Adobe software, Microsoft Office software, entertainment software, browsers and many more applications to optimize user workflows.
You can freely use it with the installed application on the ASUS computer, and a number of customized, personalized functions allow you to build your own Control Panel.
For example, when using Adobe Photoshop on the main interface of a computer, users can use the Control Panel on the second screen to quickly manipulate Adobe Photoshop. When you open Photoshop on the main screen of your computer, the Control Panel on the second screen will simultaneously enable the set functions to assist Photoshop and perform related software functions.
※ The new version of the Control Panel supports the linkage function with the GlideX App, please refer to this article for detailed steps:7. Linked with GlideX App
For how to use GlideX, please refer to: [Notebook/Desktop/AIO] GlideX - Introduction | Official Support | ASUS Global
- Required system environment for Control Panel
- Open ASUS Dial & Control Panel App
- Control Panel function settings
- Add App
- Add Function
- Preference Settings
- Linked with GlideX App
- How to download and remove ASUS Dial & Control Panel
1. Required system environment for Control Panel:
ASUS Dial ASUS Control Panel Toolkit: V2.1.0.0 and above
2. Open ASUS Dial & Control Panel App
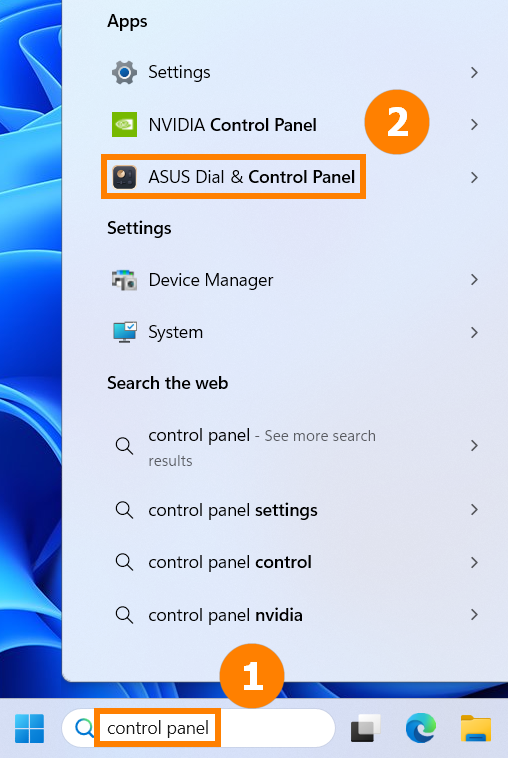
(1) Enter ①[Control Panel] in the Windows search bar, and then click to open the ②[ASUS Dial & Control Panel] App.
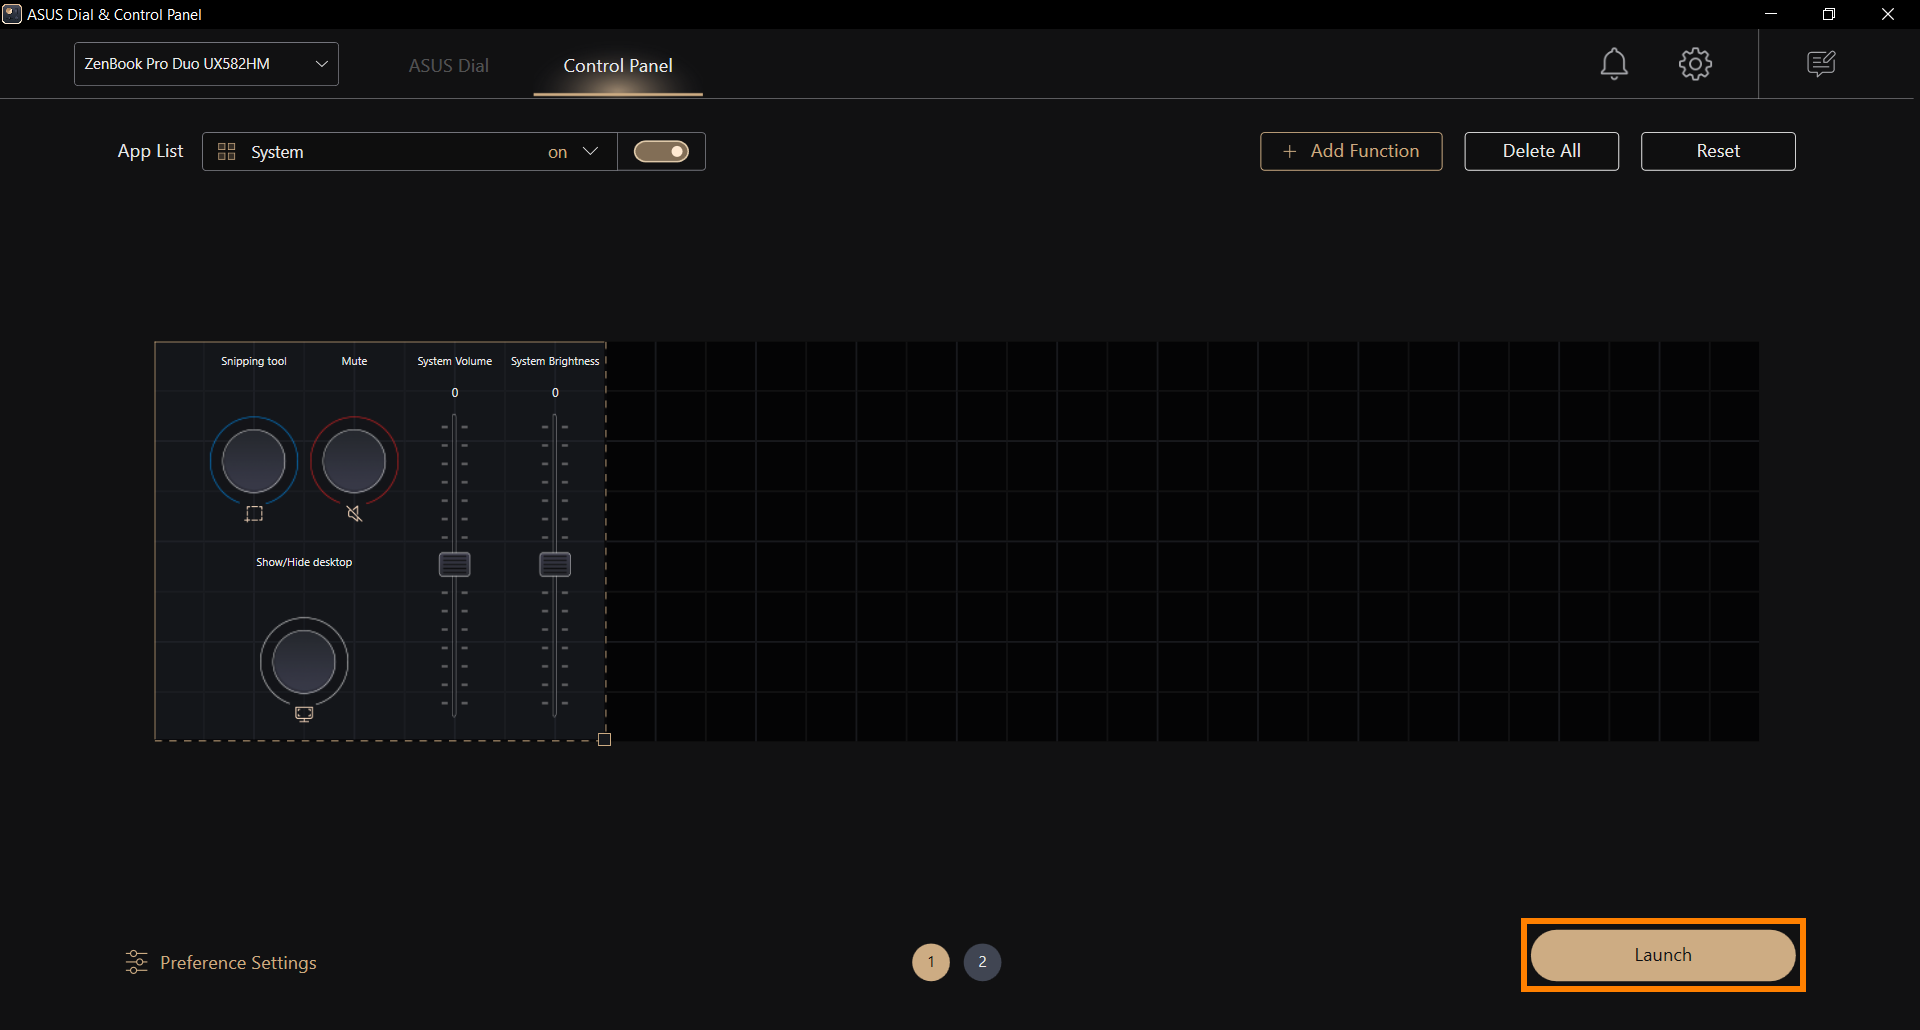
(2) Windows launches the Control Panel setting interface, where you can set the position and function of the icon according to your personal habits. Click [launch] to enable the Control Panel function.
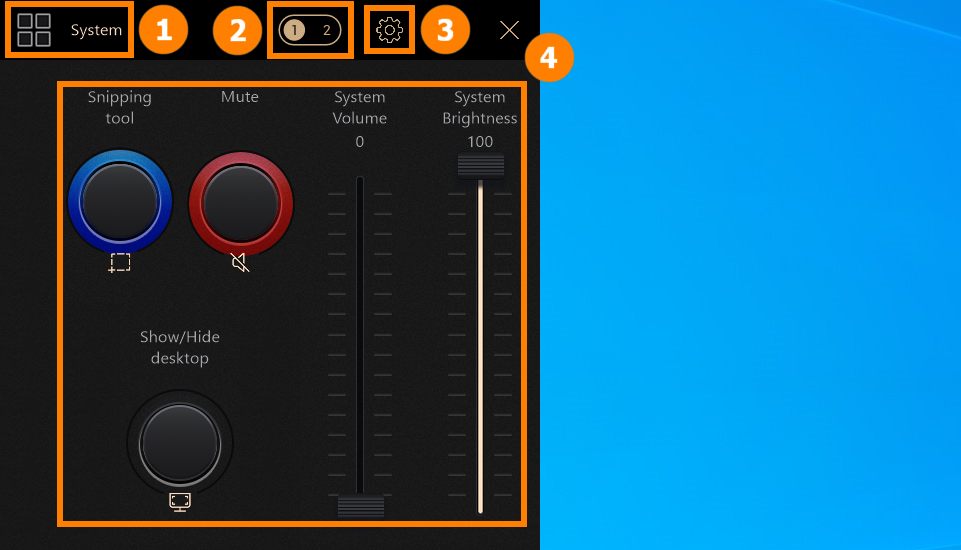
(3) On the Extended screen, the ASUS Dial & Control Panel App is launched. ①[Software] Display the name of the software you are currently using, click ②[Page] to switch to the module page, click ③[Settings] to open ASUS Dial & Control Panel, and ④[Ribbon] to use the Control Panel function.
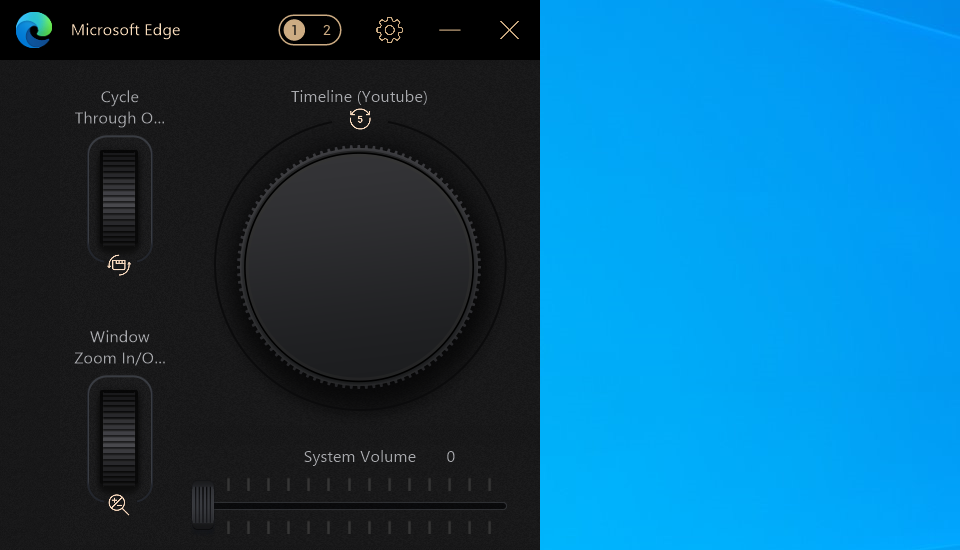
(4) When Microsoft Edge is running on the front end of the system, the Control Panel will also automatically switch to the corresponding function for you to use.
3. Control Panel function settings
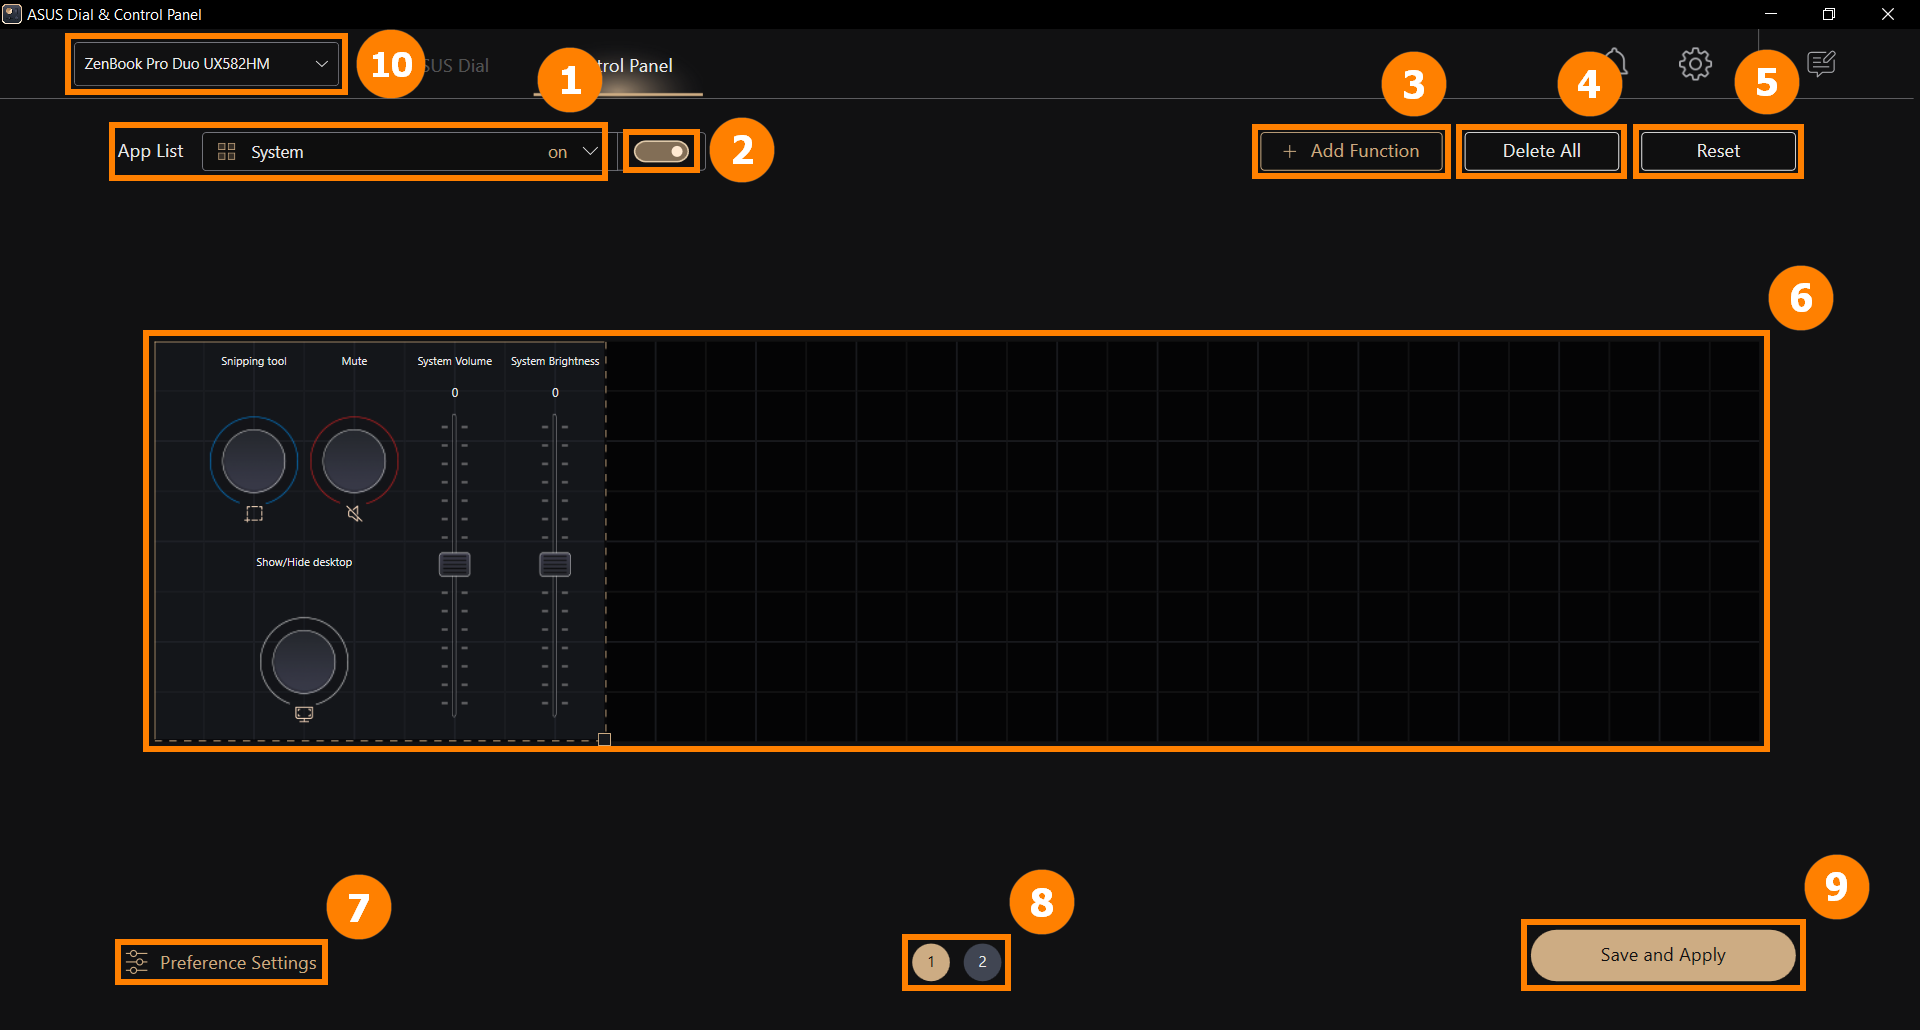
In the main interface of Control Panel, there are ①[Add App], ②[Software Switch], ③[Add Function], ④[Delete All], ⑤[Reset], ⑥[Module Area], ⑦[Preference Settings], ⑧[Page], ⑨[Save and Apply]. ⑩[Device Switch] and other functions.
②[Software Switch], you can independently turn the Control Panel function of the software on or off.
④[Delete All], you can clear all currently configured modules.
⑤[Reset], you can reset and restore the original Control Panel defaults.
⑧[Page], Control Panel supports two-page module function editing.
⑨[Save and Apply], when you are finished editing, click ⑨[Save and Apply].
⑩[Device Switch], when you use the Extend function of GlideX, you can switch to a mobile device and set it. For detailed steps, please refer to this article 7. Linked with GlideX App
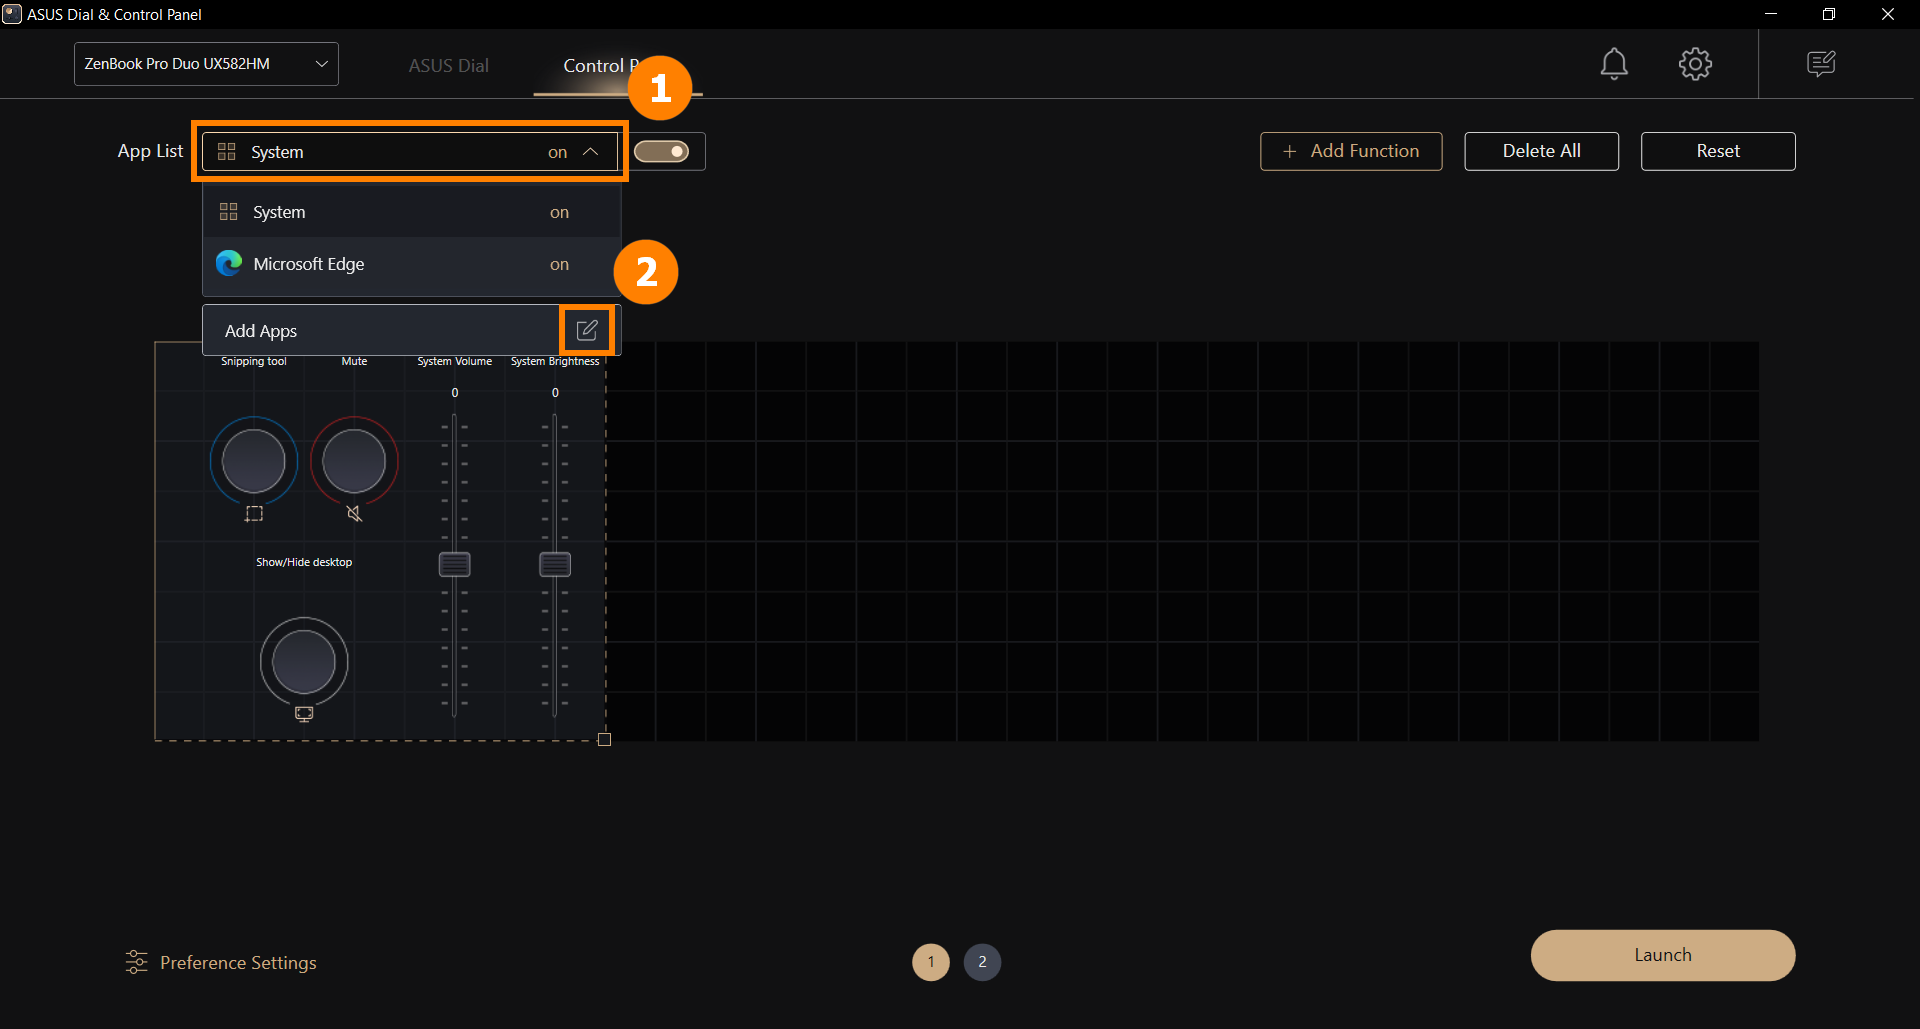
(1) Click ①[Software List], and click ②[Add Application].
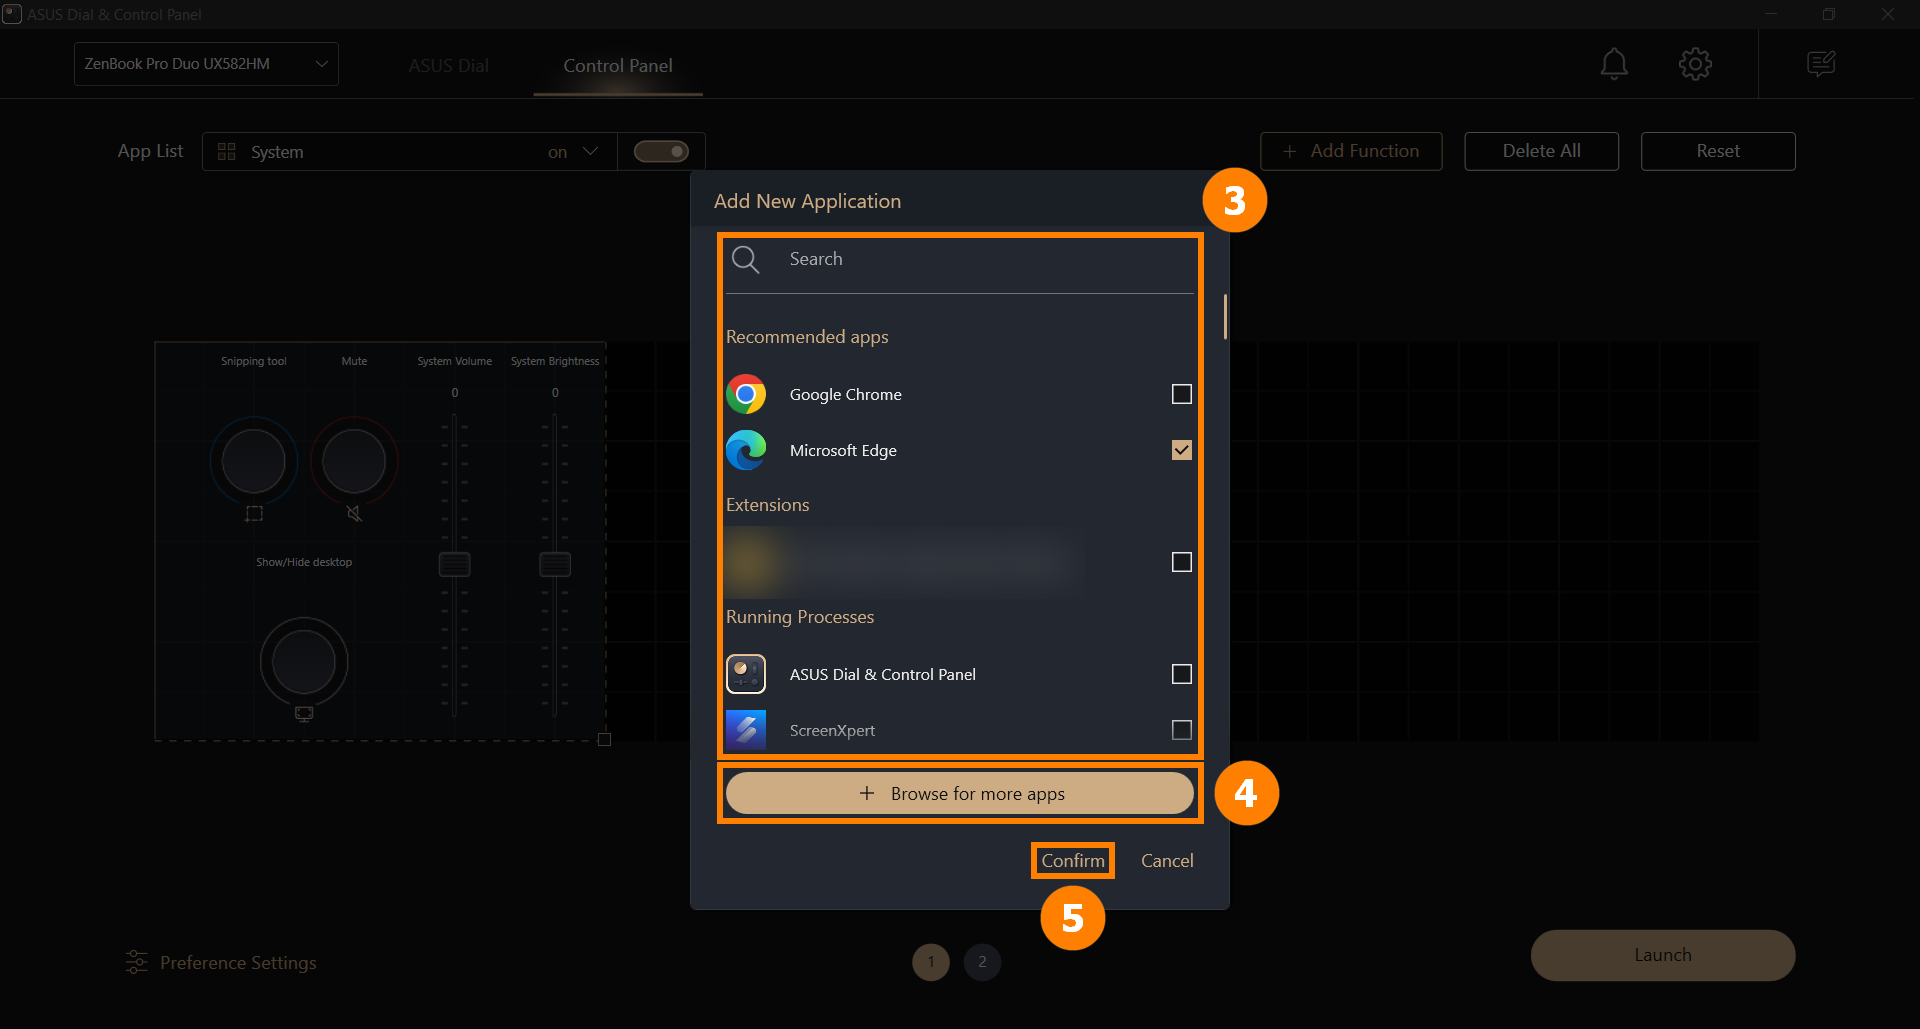
(2) Find the App you want to add, click ③[App], if there is no App you need in the list, you can click ④[Add More Apps] (only programs with the suffix exe), and then click ⑤[Confirm] to complete the addition.
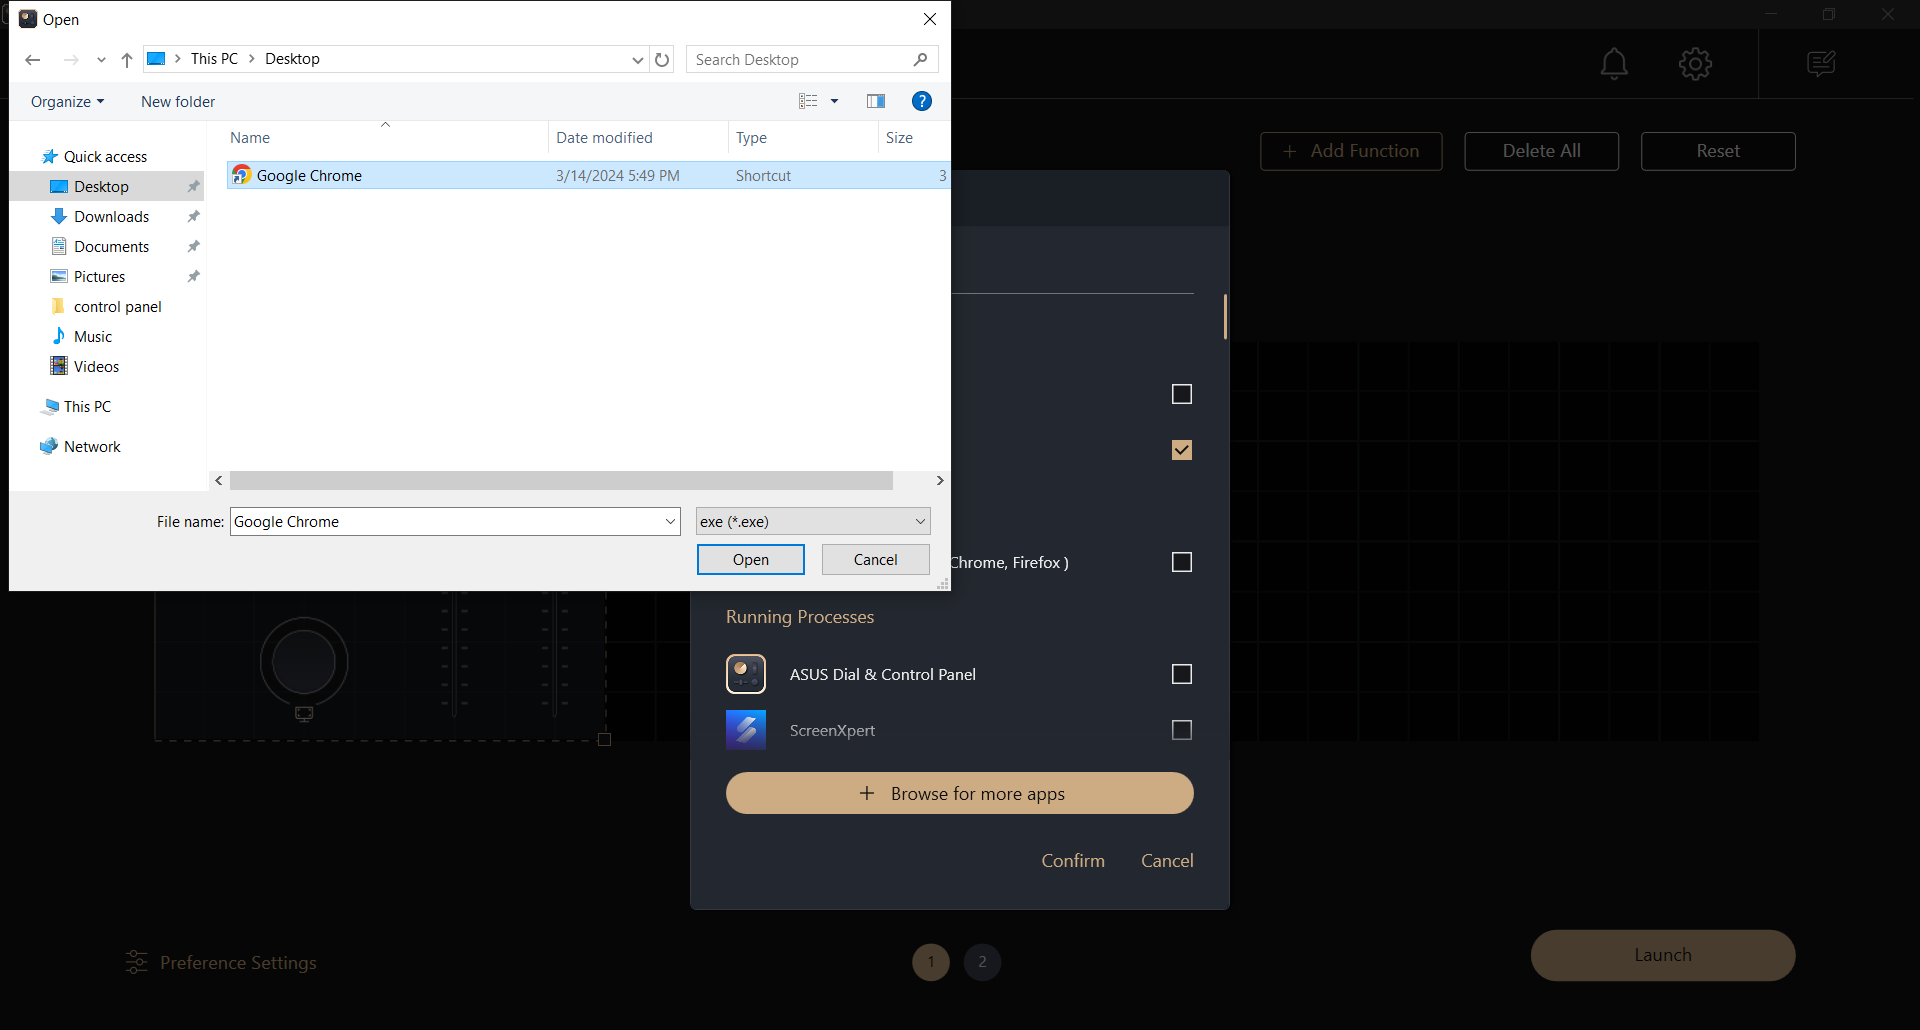
(3) After clicking [Browse for more apps], a pop-up window will pop up, and you can manually add the application with the suffix exe to [Software list].
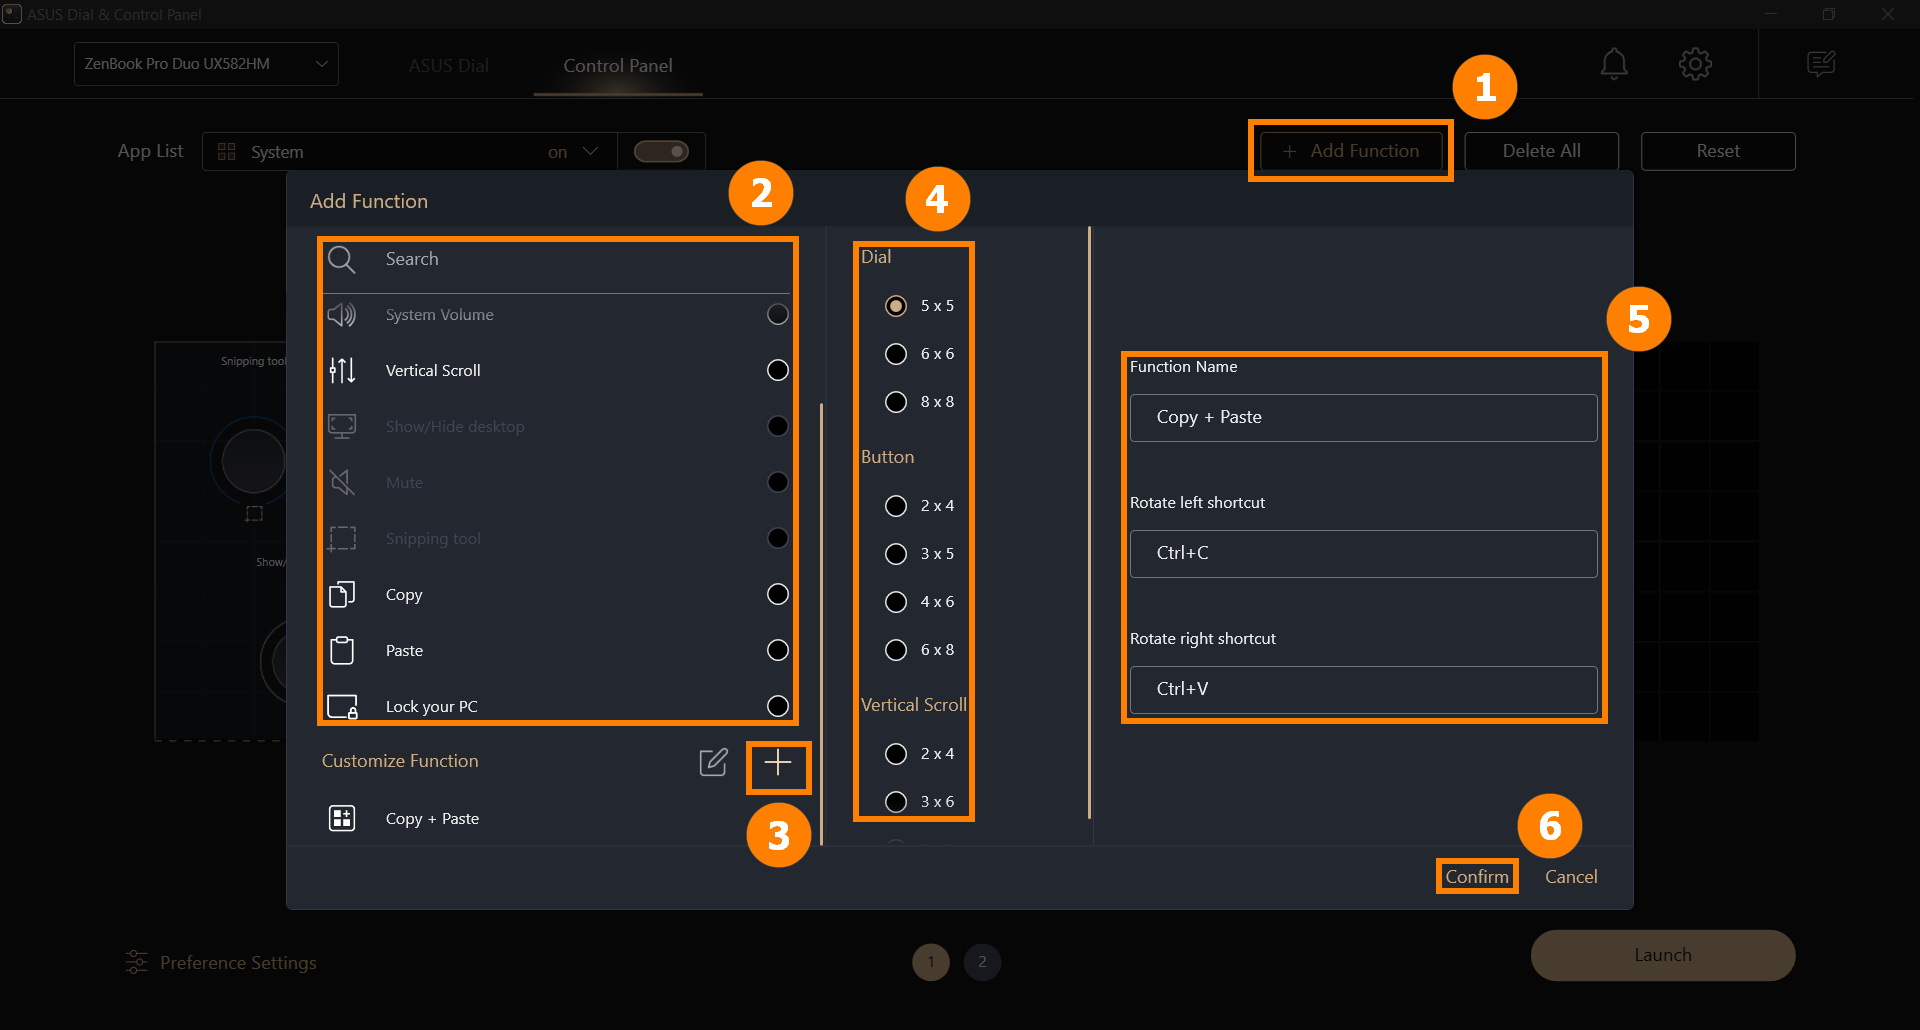
(1) Click ①[Add Function], add a default function in ②[Function List], you can manually add the function you want, click ③[Add]. In the ④[Module] area, select a suitable module for your new function, then edit ⑤[Function], after editing, click ⑥[Confirm].
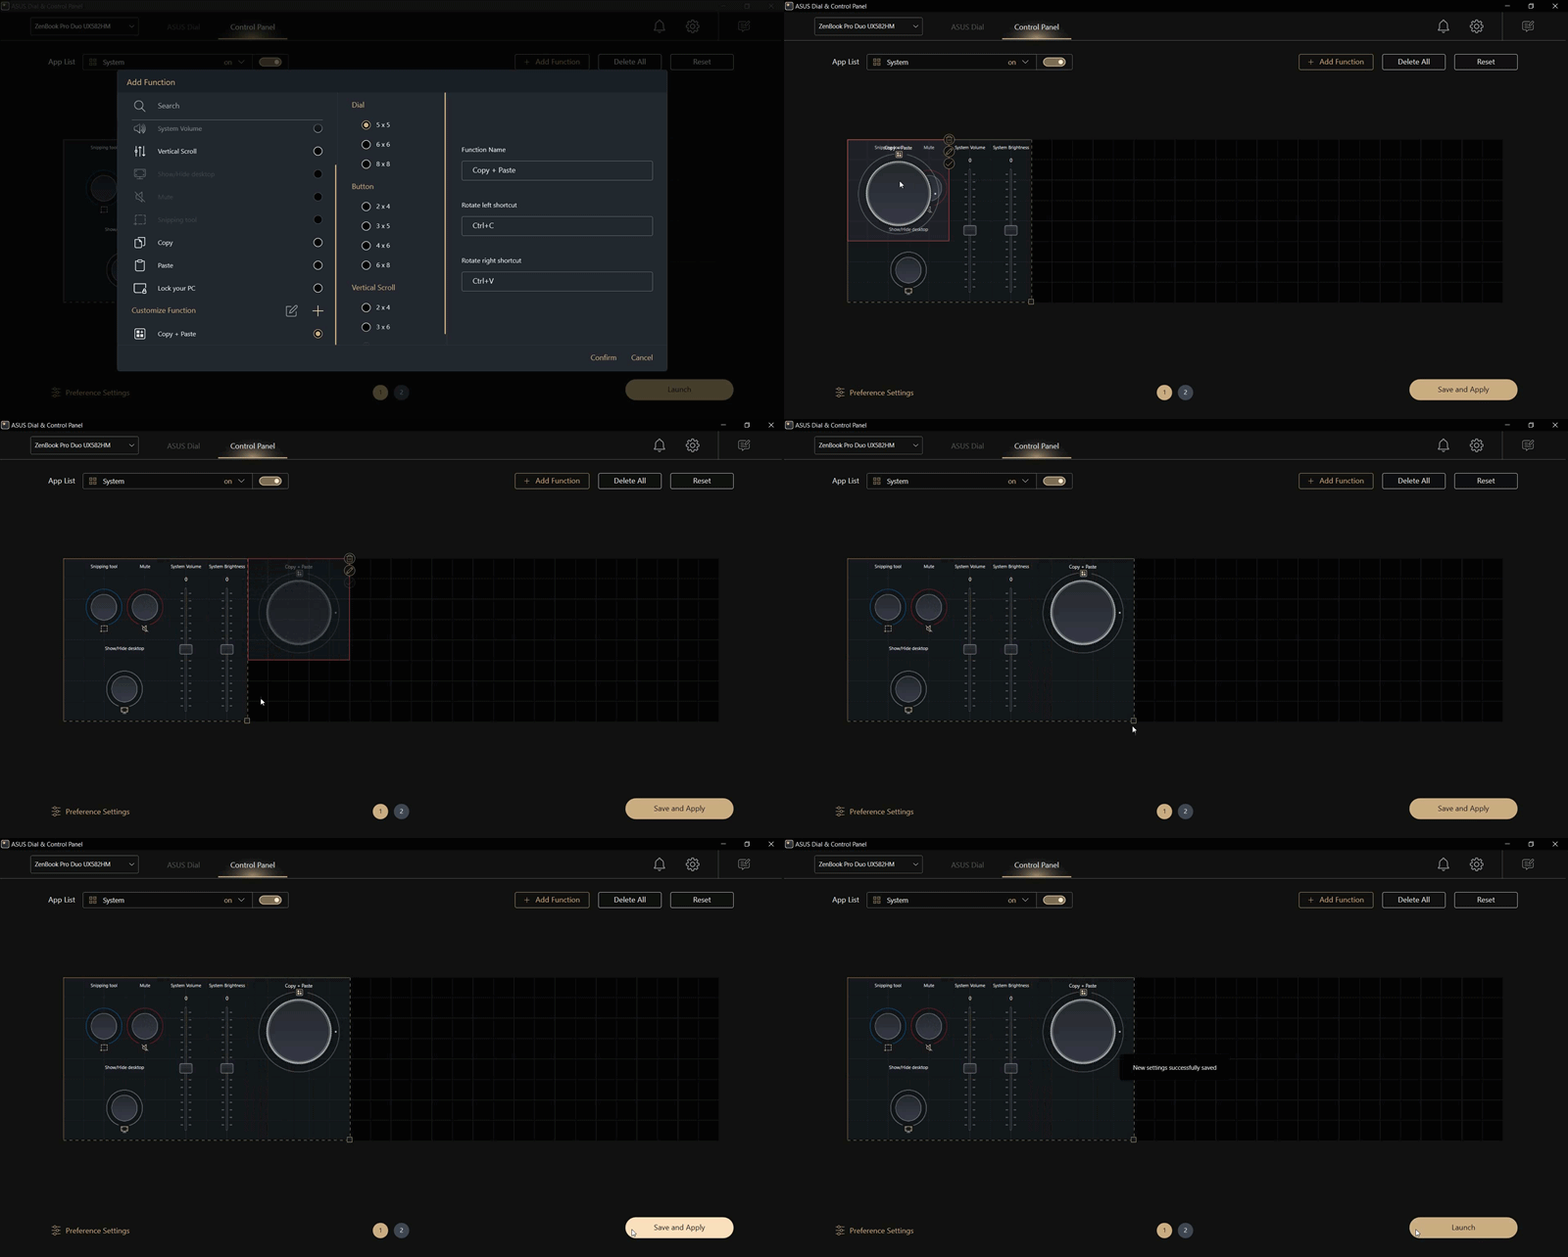
(2) When you click [Confirm], the added function will appear in the module area and be duplicated with other functions. We need to move the new functionality to the empty space and expand the module area before we can use it. Adjust the position of the [Module Area] and click [Save and Apply] to complete the editing.
※ [Custom Function] has been displayed in the module area, you can Edit, Delete, and Move the module.
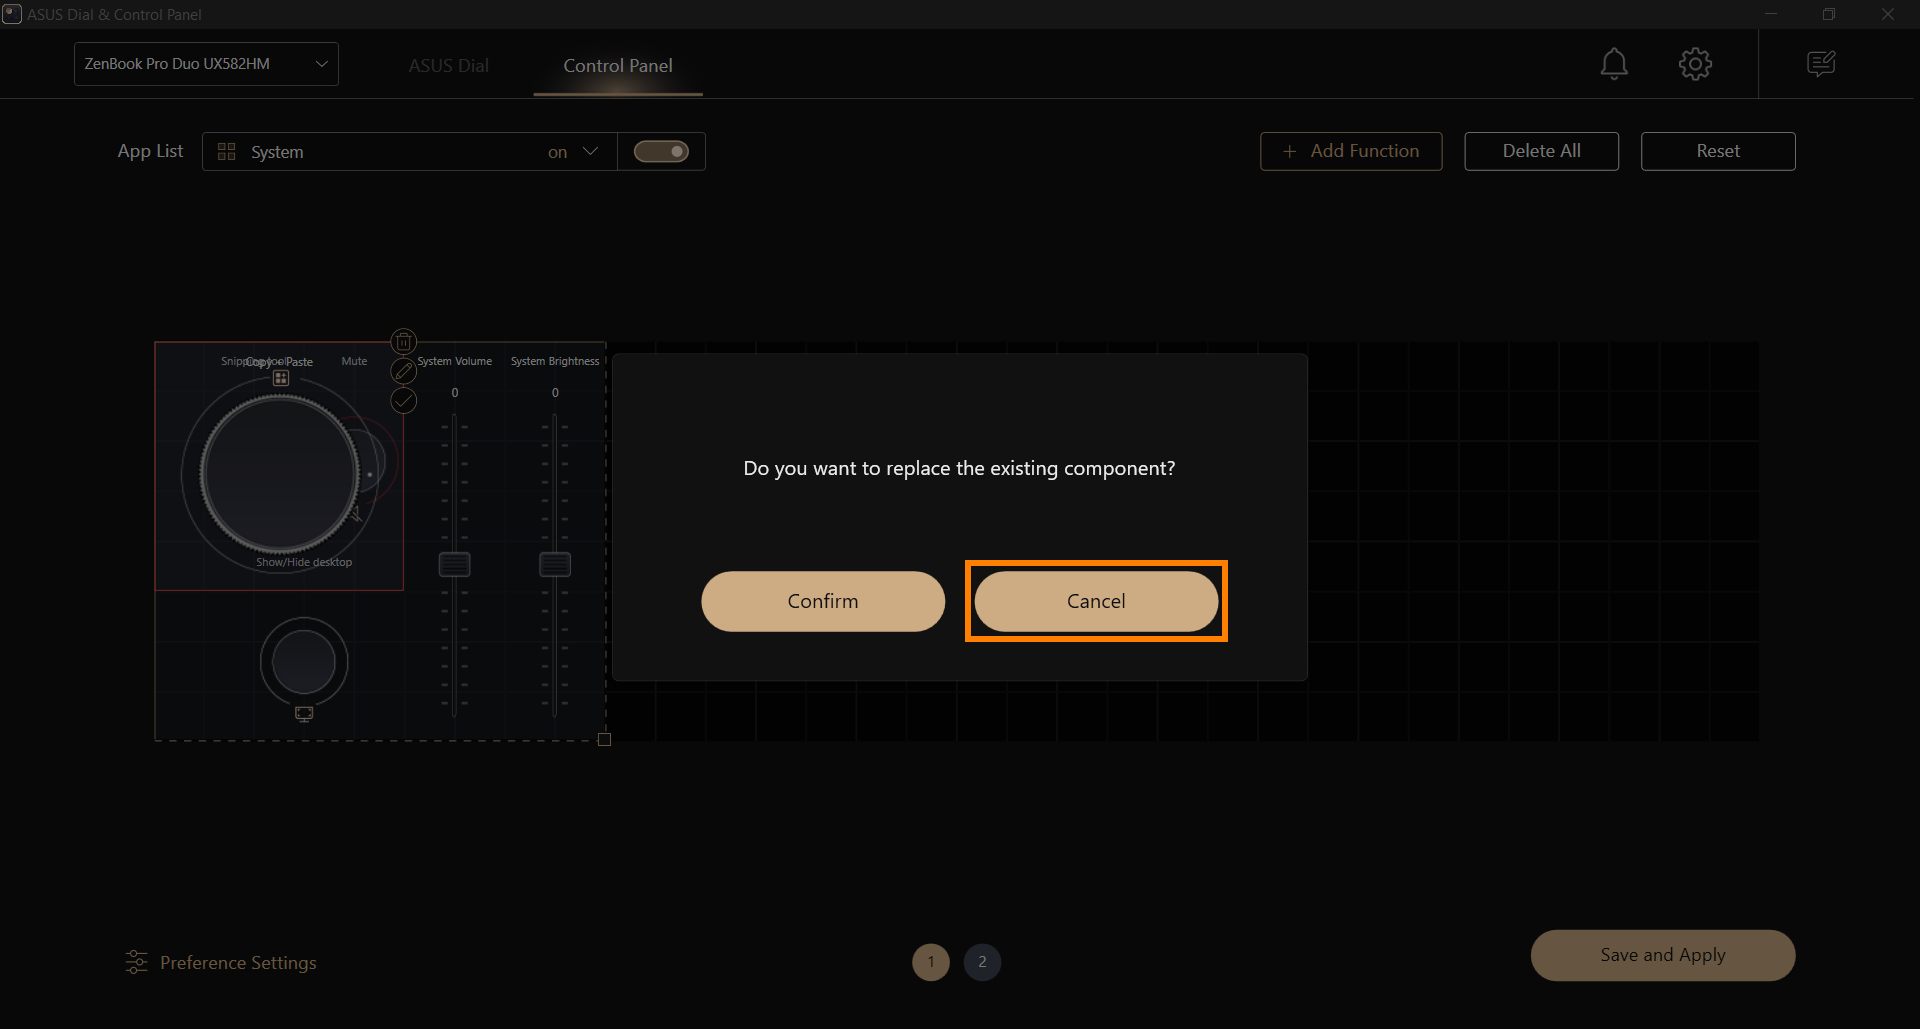
(3) If you are moving a module, the following screen appears. If you do not want to replace the existing module, click [Cancel], and then drag the new module to an empty space.
(4) When we open the Control Panel interface in ScreenPad Plus, we can use the [Copy+Paste] feature that has been added.

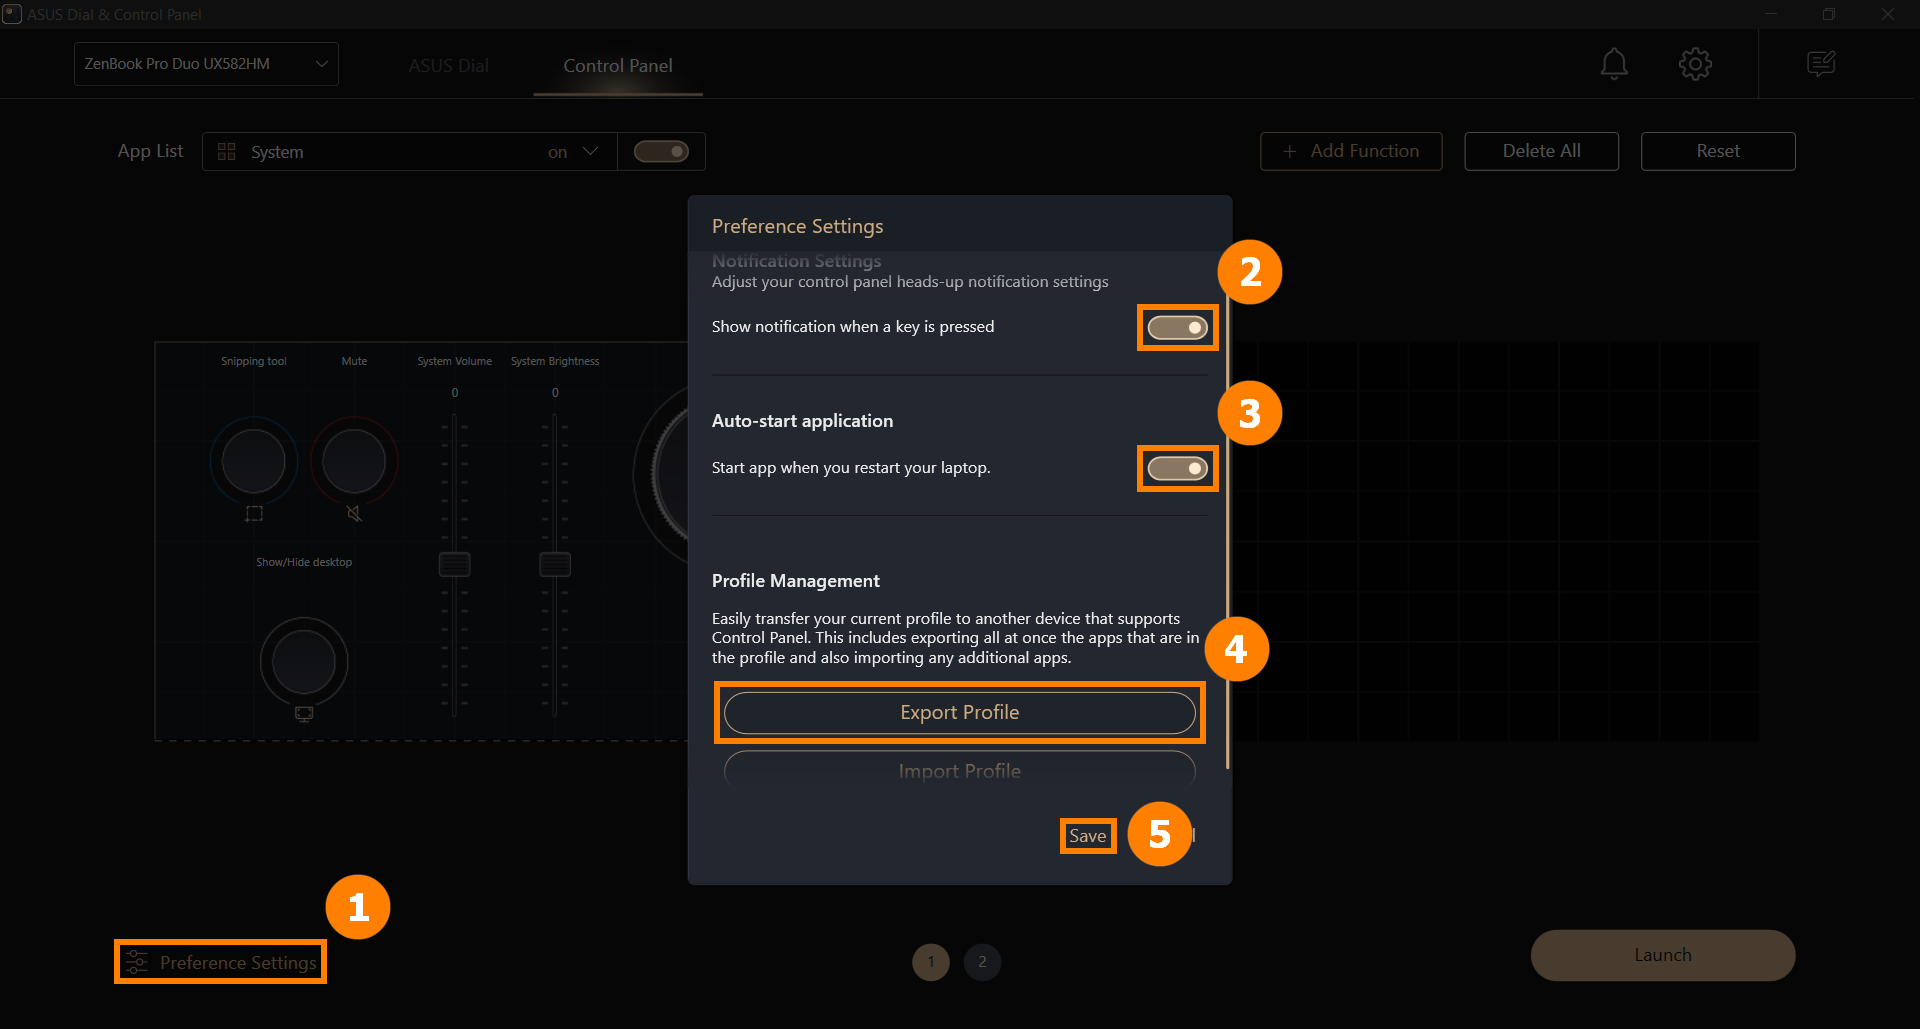
(1) Click ①[Preference Settings], turn on or off ②[Notification Settings] function, enable or disable ③[Auto-start application], tap ④[Export Profile] to save the existing settings, click ⑤[Save] to complete this edit.
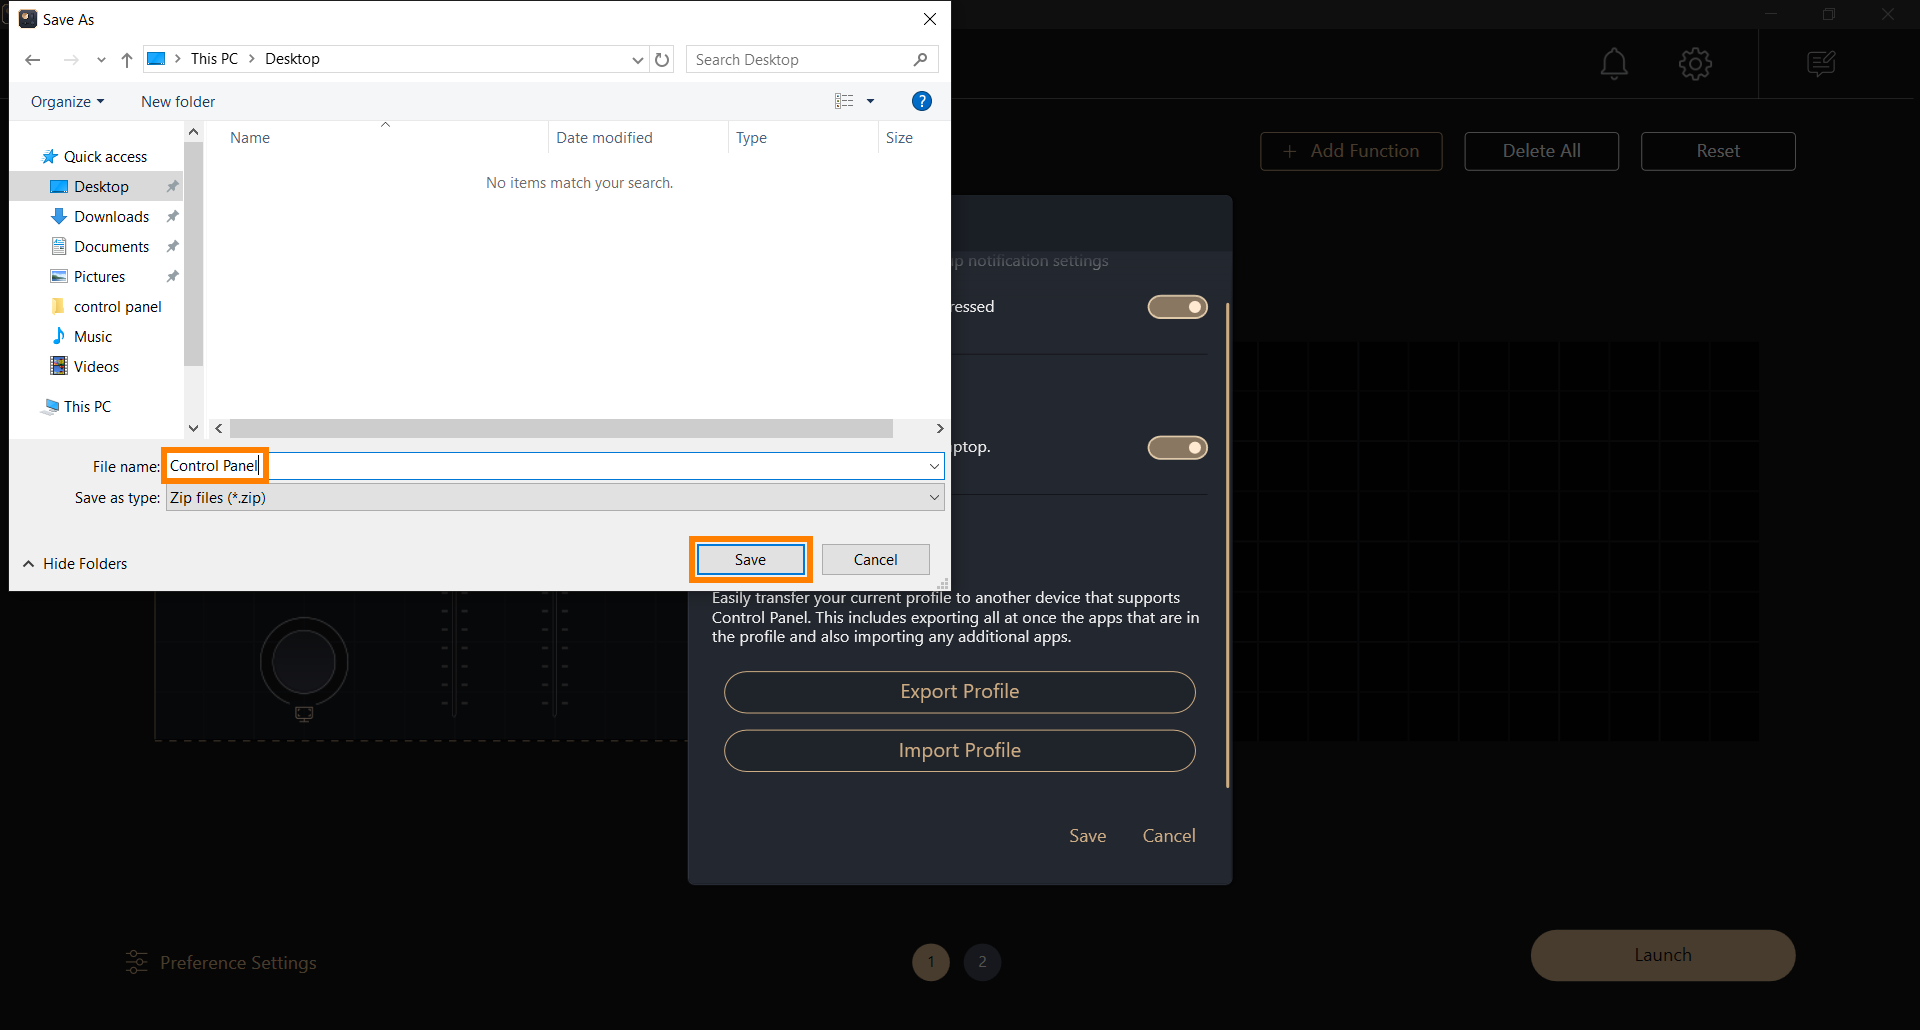
(2) After clicking [Export Profile], a pop-up window will appear, find the folder where your configuration file is saved, enter [file name], click [Save], and save the settings file.
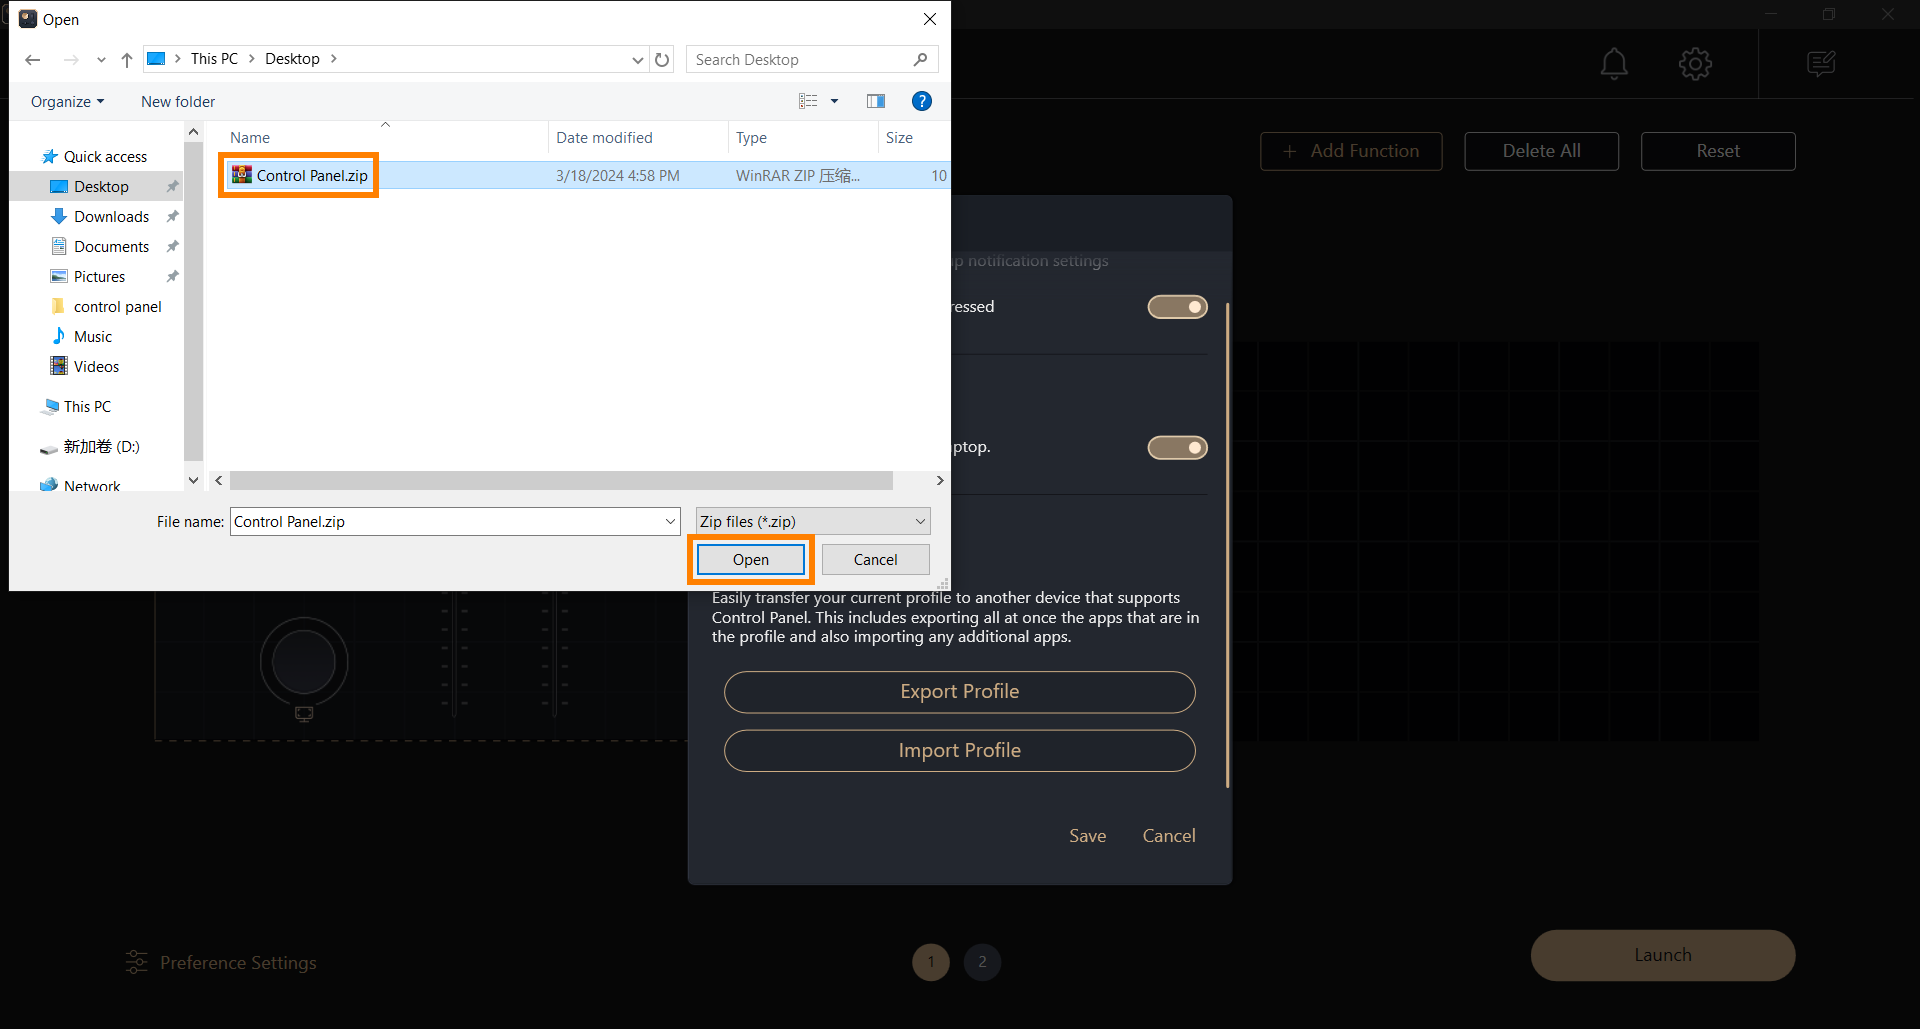
(3) When you have reinstalled the ASUS Dial & Control Panel software, you can click [Import Profile], find and select the configuration file you saved earlier, and click [Open] to restore the software to the desired state.
How to download and use GlideX, please refer to: [Notebook/Desktop/AIO] GlideX - Introduction | Official Support | ASUS Global
(1) When you are using the extended function of GlideX, you can select your [Mobile Device] in the upper left corner of the main interface of the Control Panel, modify the functions to be performed by the [Module], and click [Start].
※ To add software to the Control Panel mobile device to add or modify modules, please read this article 4. Add App, 5. Add Function.
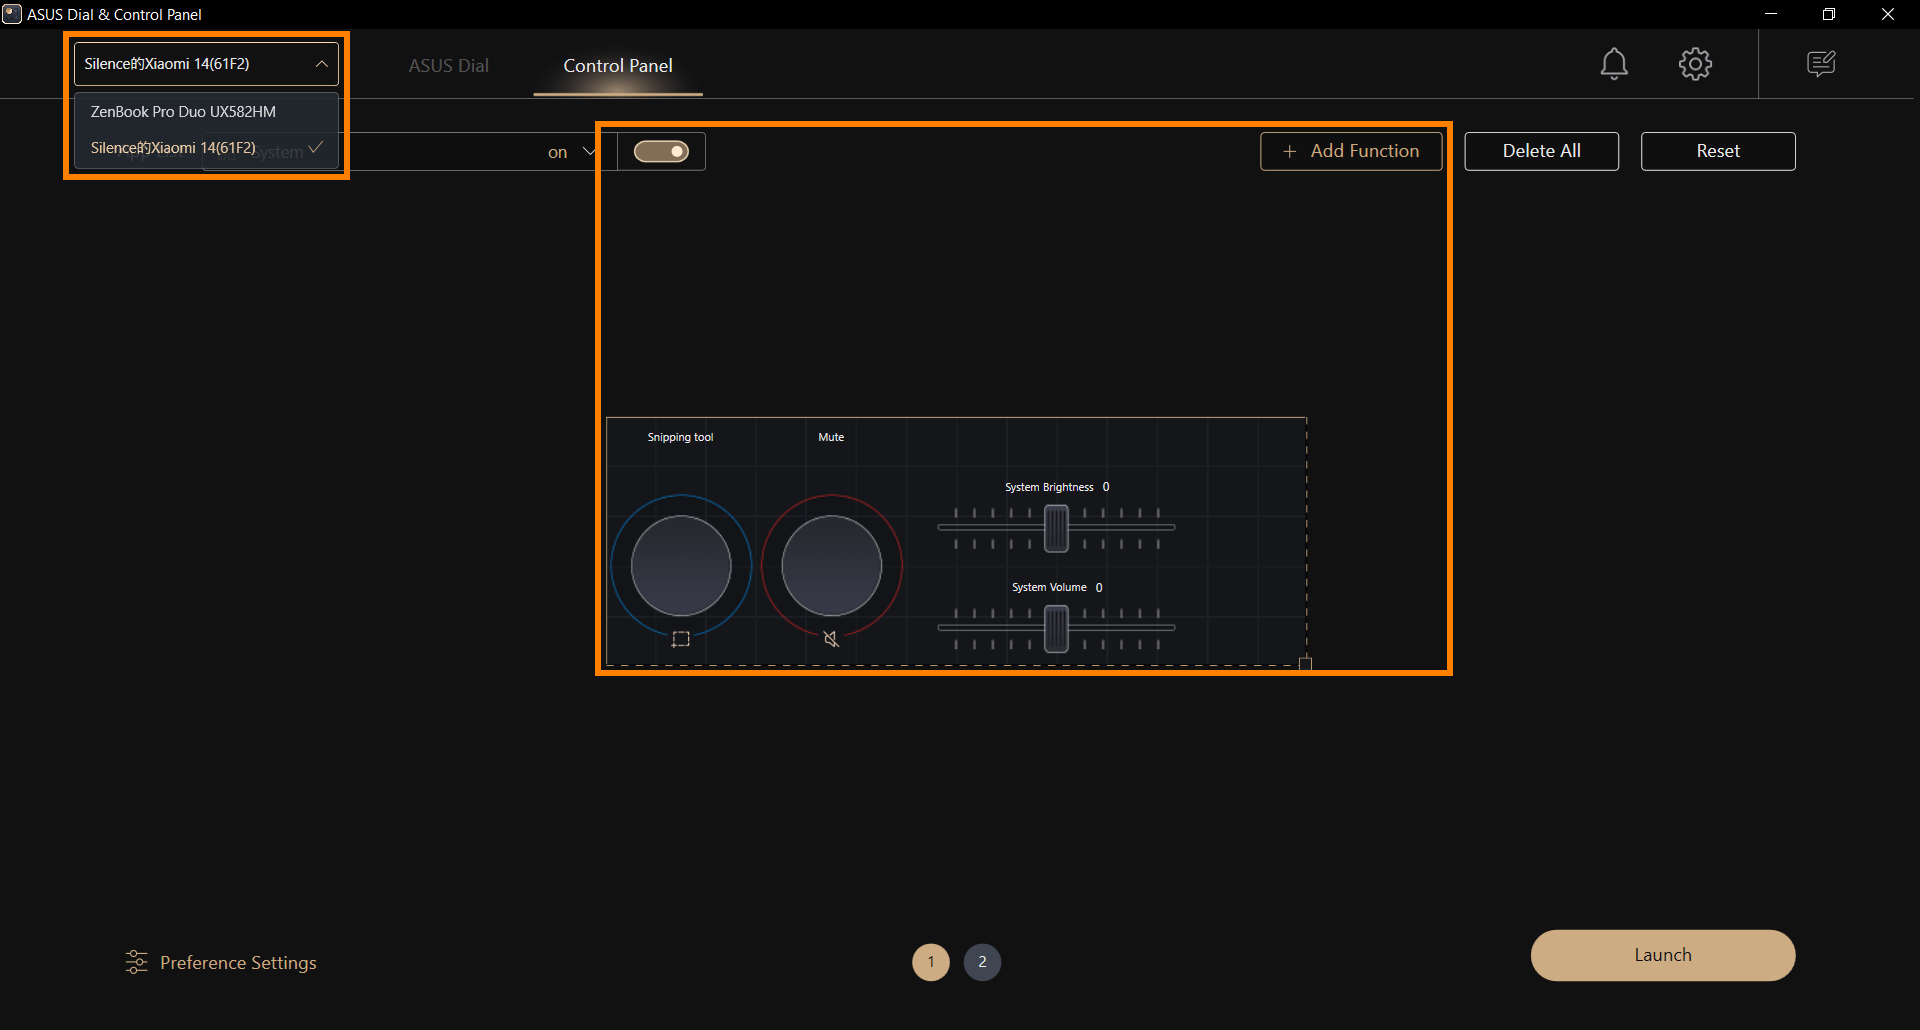
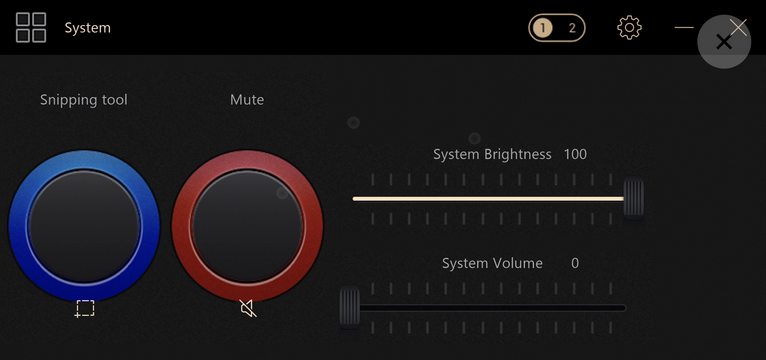
(2) When you click [Launch], the Control Panel function will be displayed on your mobile device, and you can tap the function you want to perform on the screen of your mobile device with your finger.
※ The following screen is displayed in full screen on the mobile device.
8. How to download and remove the ASUS Dial & Control Panel App
8.1 Download the ASUS Dial & Control Panel App
Please go to the Microsoft App Store to download the ASUS Dial & Control Panel App.
8.2 Remove ASUS Dial & Control Panel App
If you want to remove ASUS Dial & Control Panel App, go to System Settings > App > ControlPanelToolkit and ASUS Dial & Control Panel > to uninstall it. Or refer to this link.
[Notebook] ASUS Dial - Introduction
ASUS Dial can be used with any installed application on your computer, and a number of customizable, personalized features allow you to build your own knob application. If you use Adobe software, you can use software compatible with Adobe version 2020 and later (such as Adobe Photoshop, illustrator, Photoshop Lightroom classic, Premiere Pro, and After Effects). With ASUS Dial and Control Panel software on ASUS, you can access customizable shortcuts to zoom in/out and adjust brush size/brightness settings. You can even customize the default interface according to your personal work style. At the same time, turn the ASUS Dial in the Windows operating environment to adjust the volume, adjust the brightness or perform other functions.
1. ASUS Dial supports products
2. How to operate ASUS Dial
2.1 How the physical ASUS Dial operates
2.2 How the virtual ASUS Dial on touchpad operates
3. How to use ASUS Dial within Adobe software
4. Open ASUS Dial function setting software
5. How to set up the functionality of ASUS Dial
6. How to add or edit applications
6.1 Installed applications
6.2 Running applications
7.1 Edit an existing function
7.2 Group
7.3 Add Function
10. Disable ASUS Dial function
12. How to upgrade or download and uninstall the ASUS Dial control software
1. ASUS Dial supports products
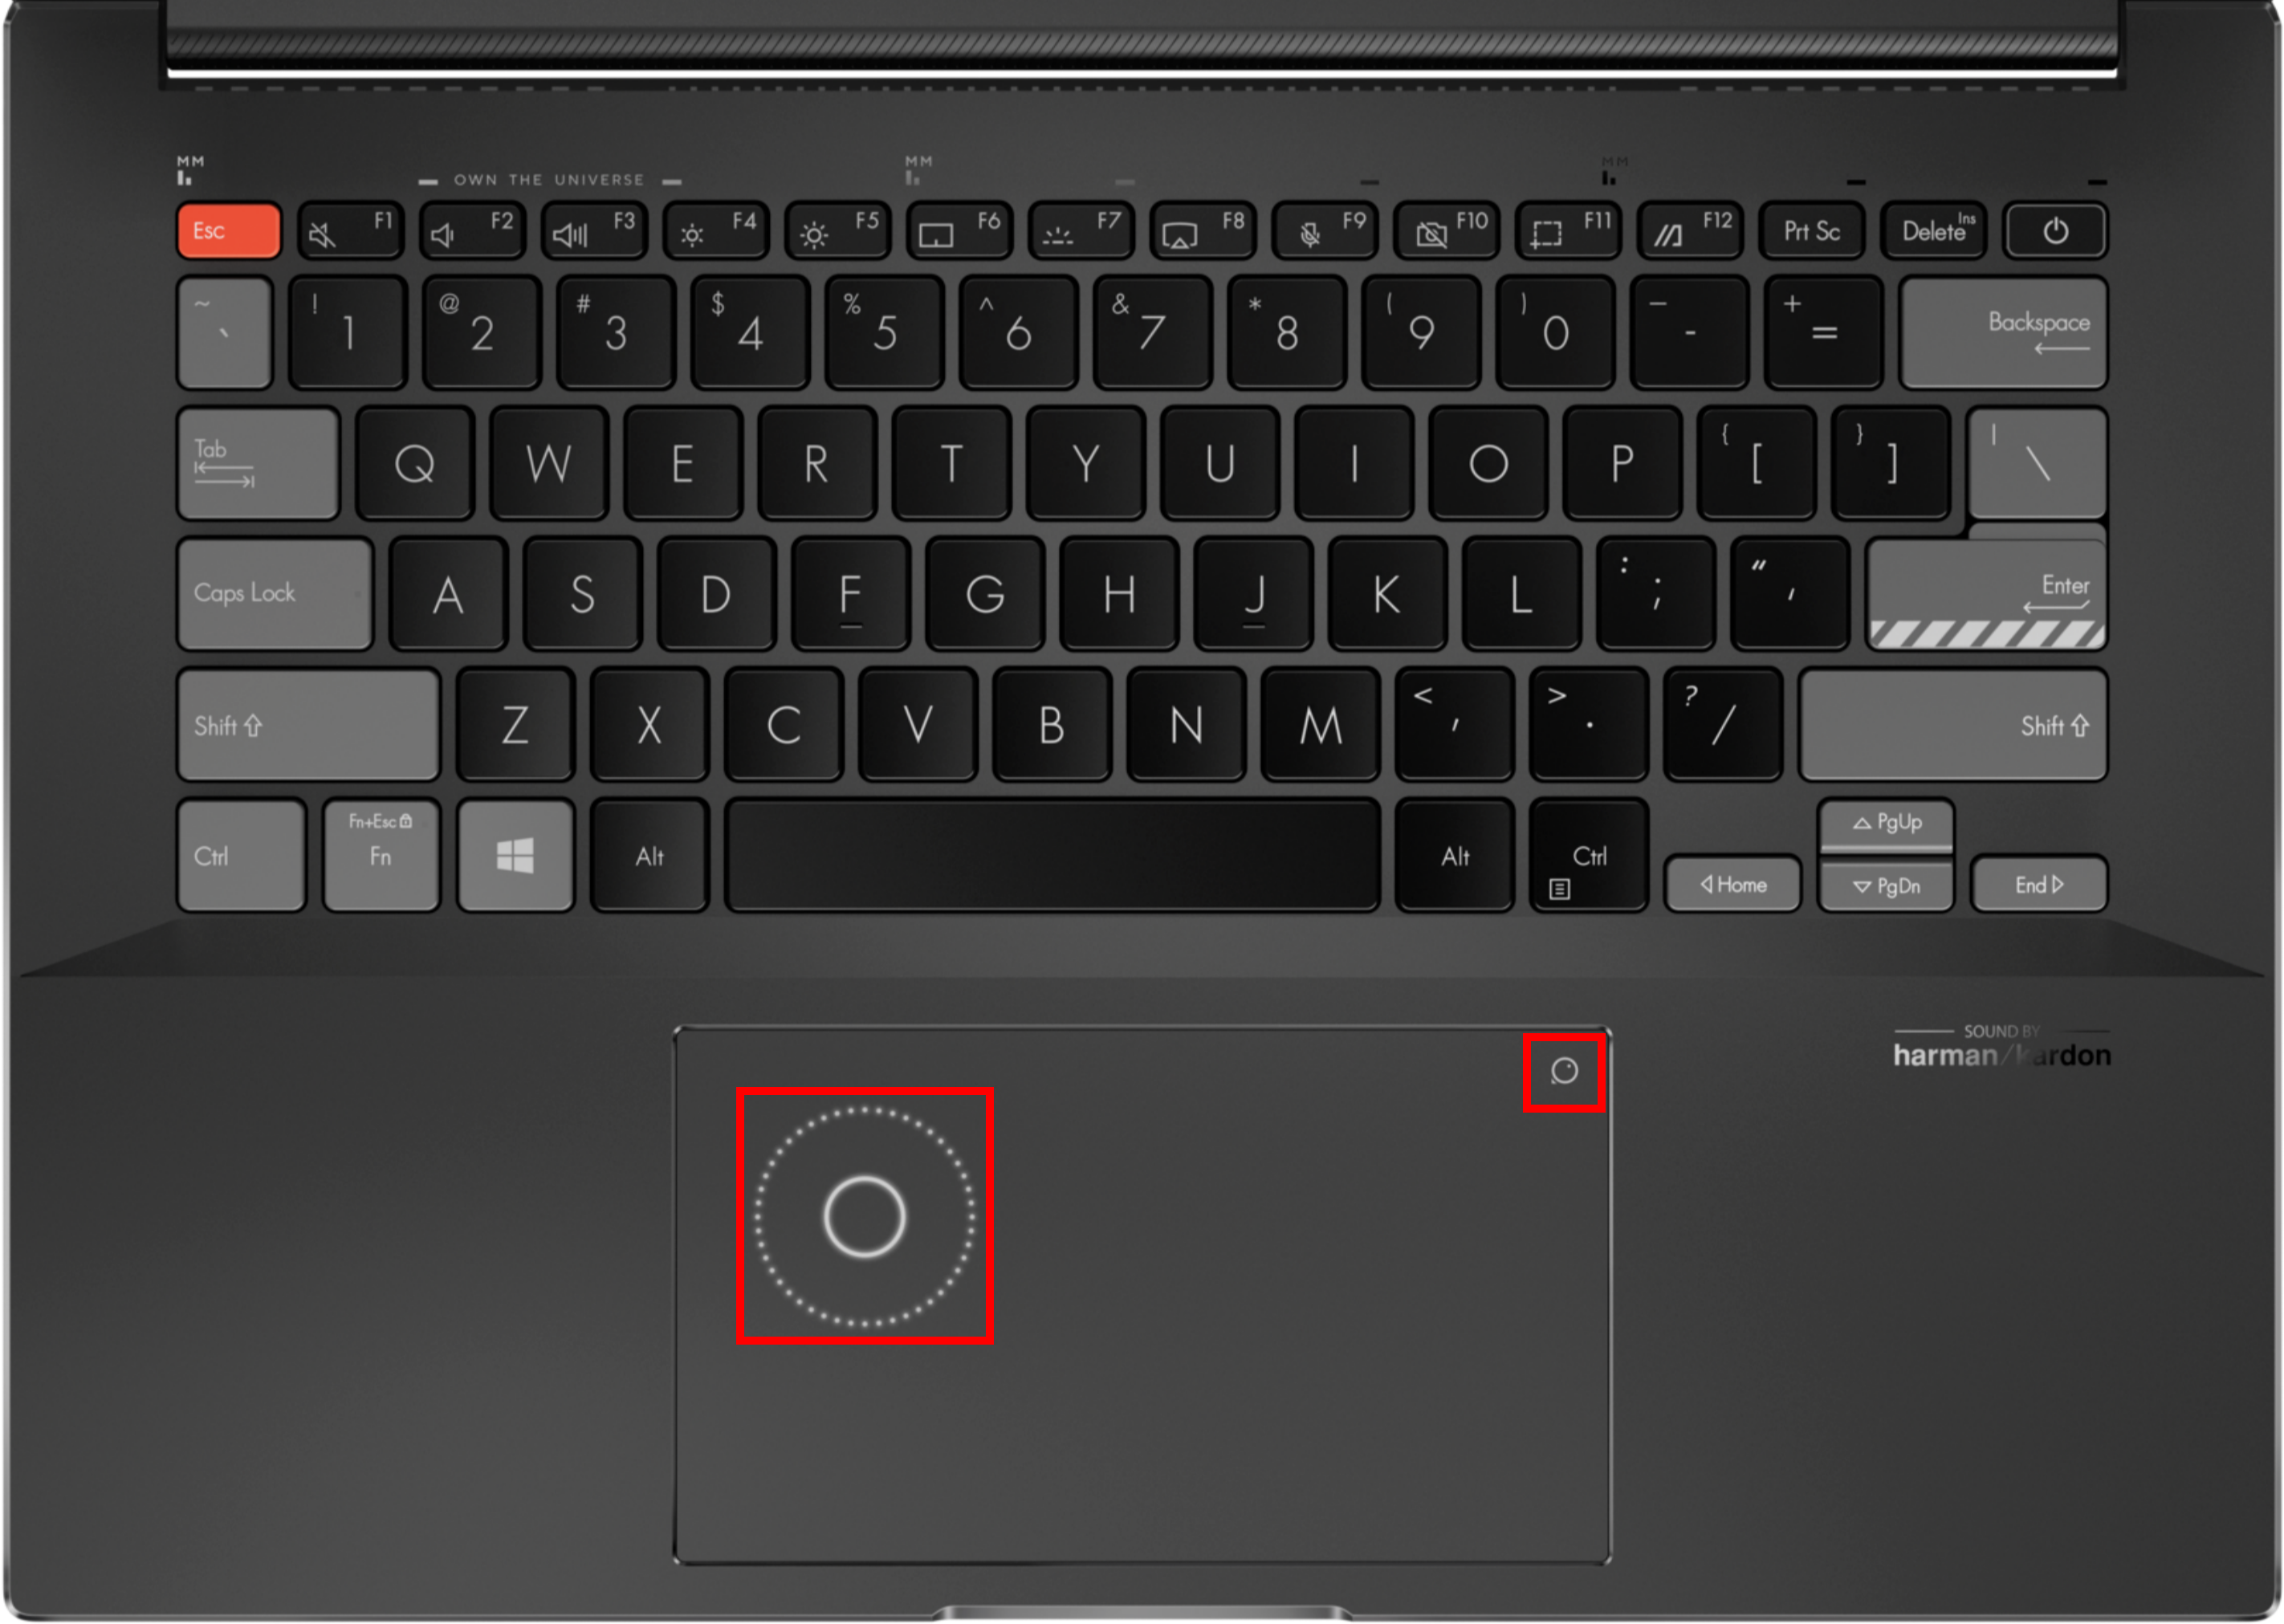
ASUS Dial is available in three versions: physical and virtual.
(1) The computer equipped with a physical knob is shown below:
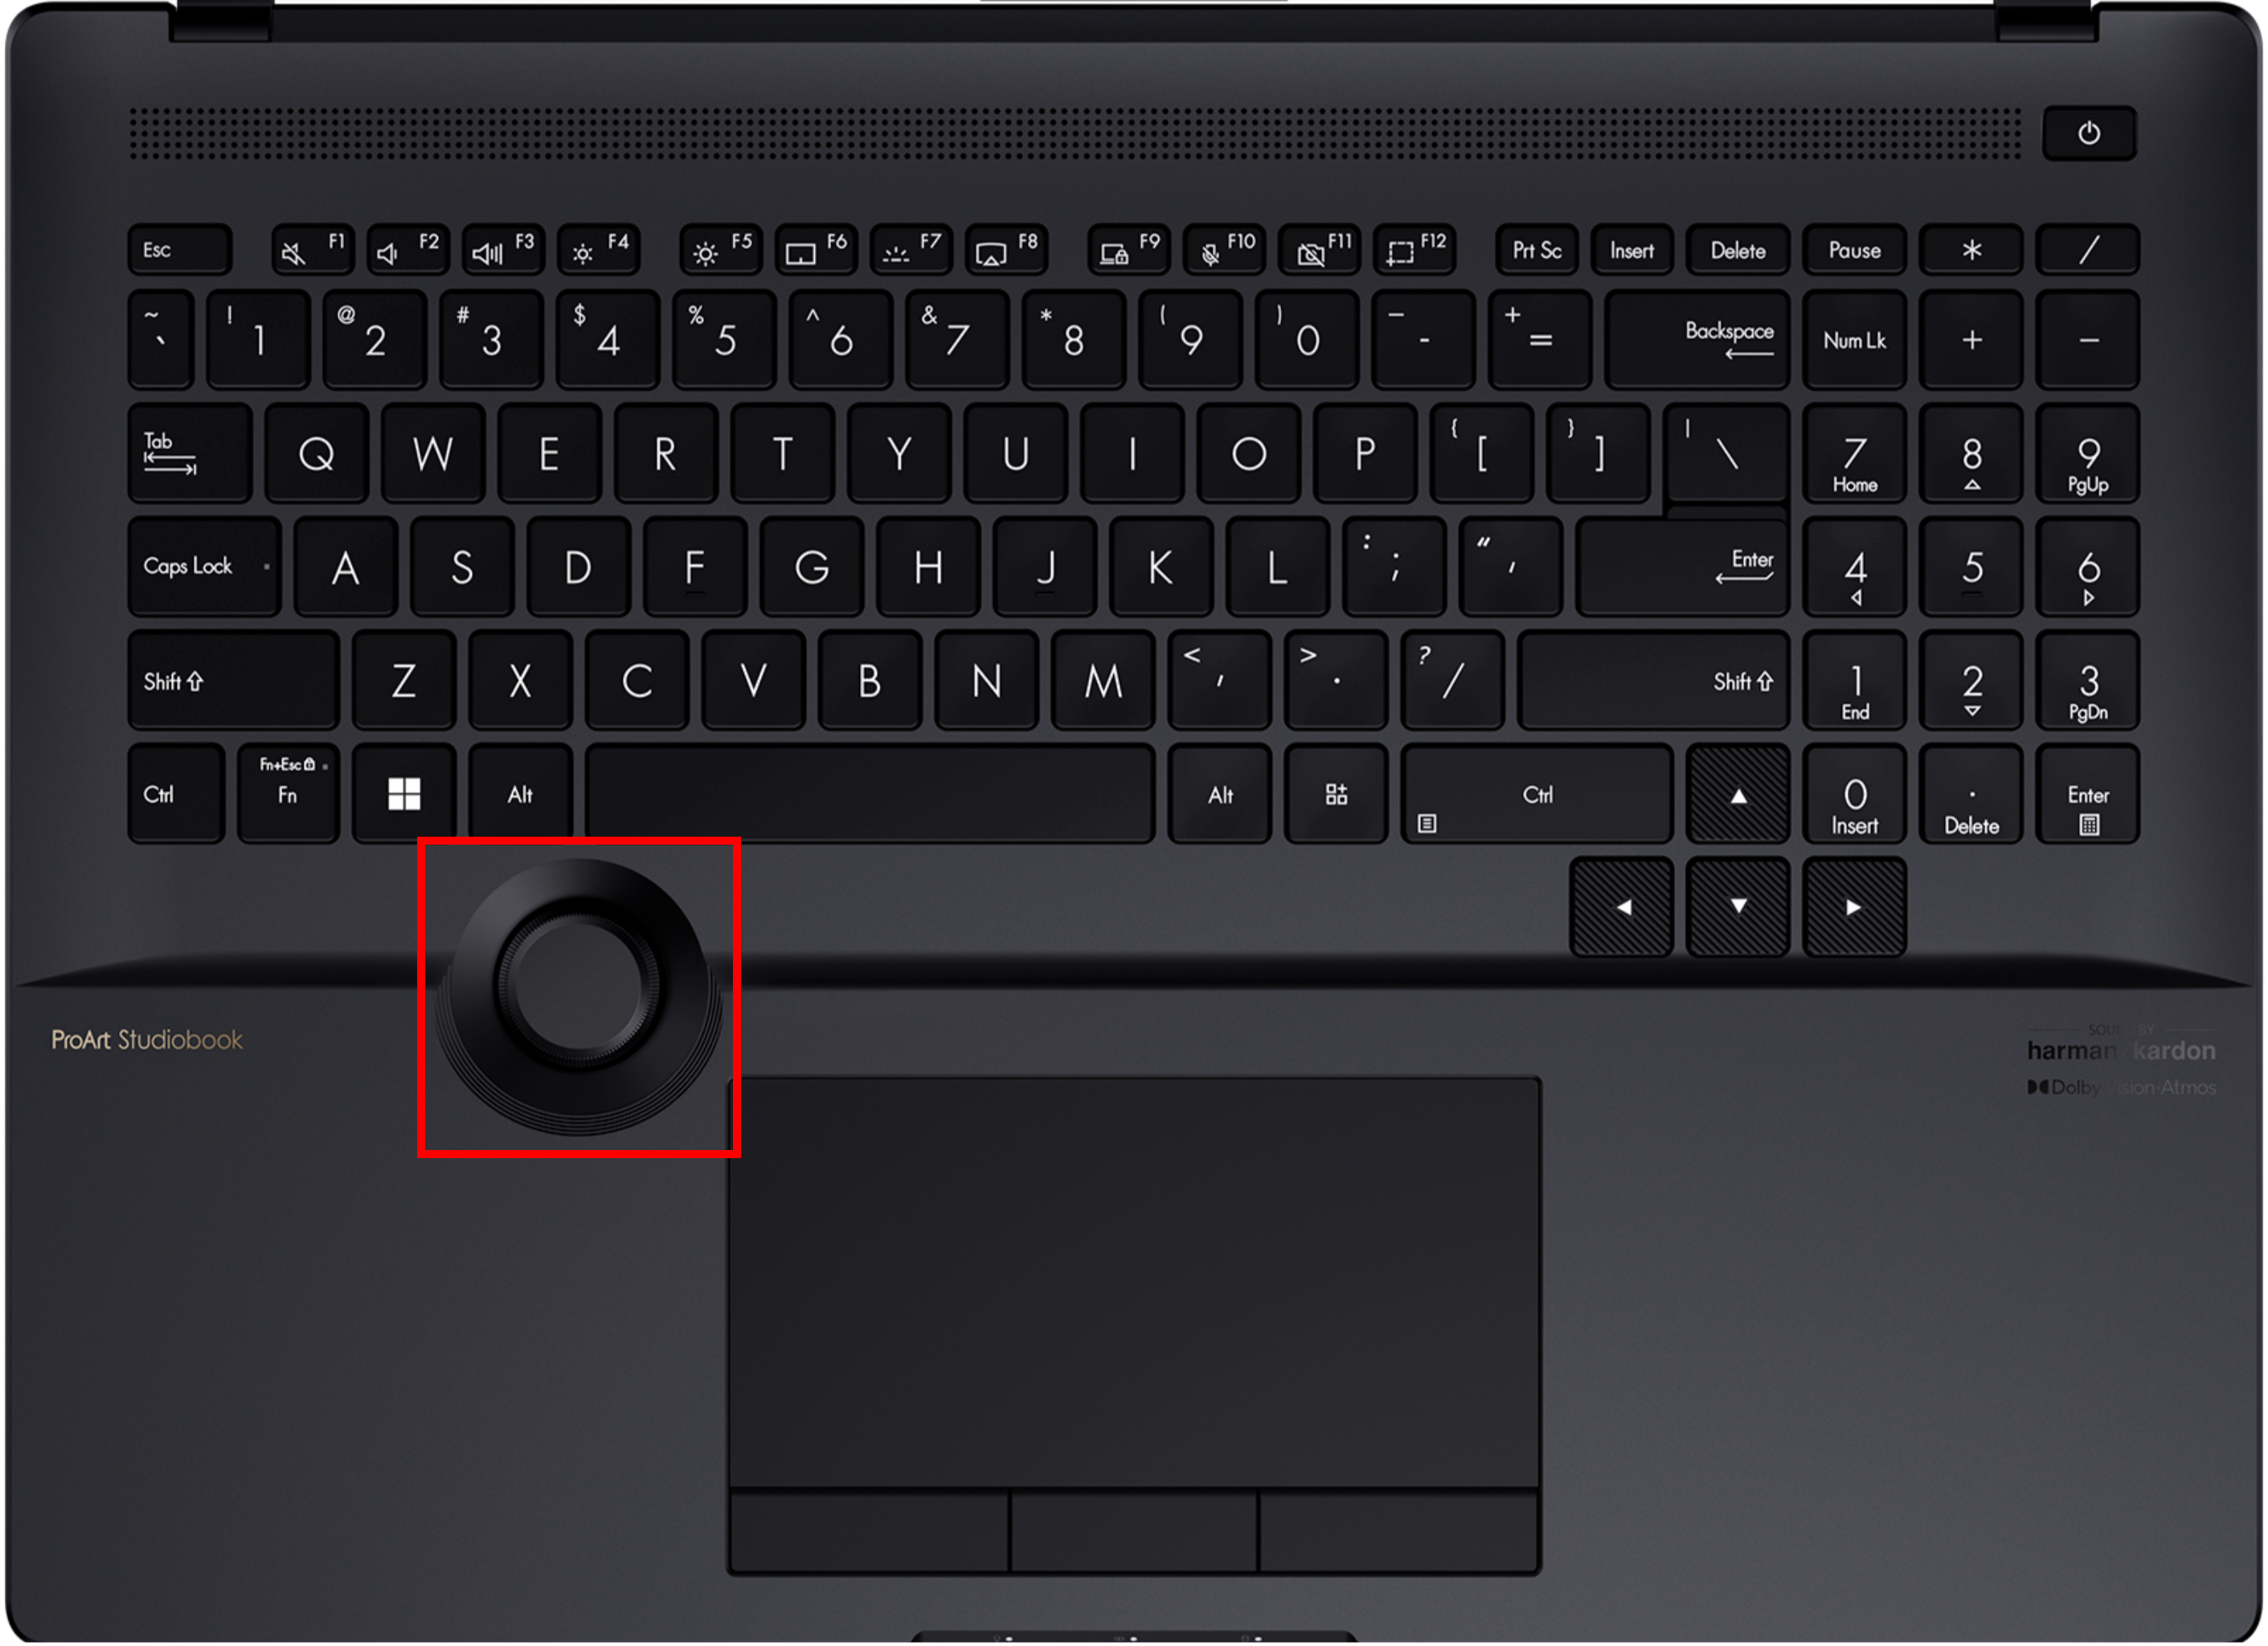
(2) The computer equipped with a physical knob is shown below:

(3) The computer equipped with virtual touchpad knob is shown below:
You can also go to the [Overview] page on the official ASUS website to check if the laptop is equipped with ASUS Dial.
2.1 How the physical ASUS Dial operates:
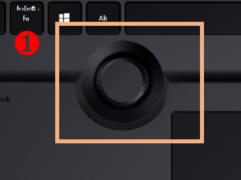
(1) Press with your finger ①[Knob], [ASUS Dial function selection screen] will appear on the computer screen, and when the operation screen appears, the ASUS Dial function selection screen can be dragged and moved by the mouse.
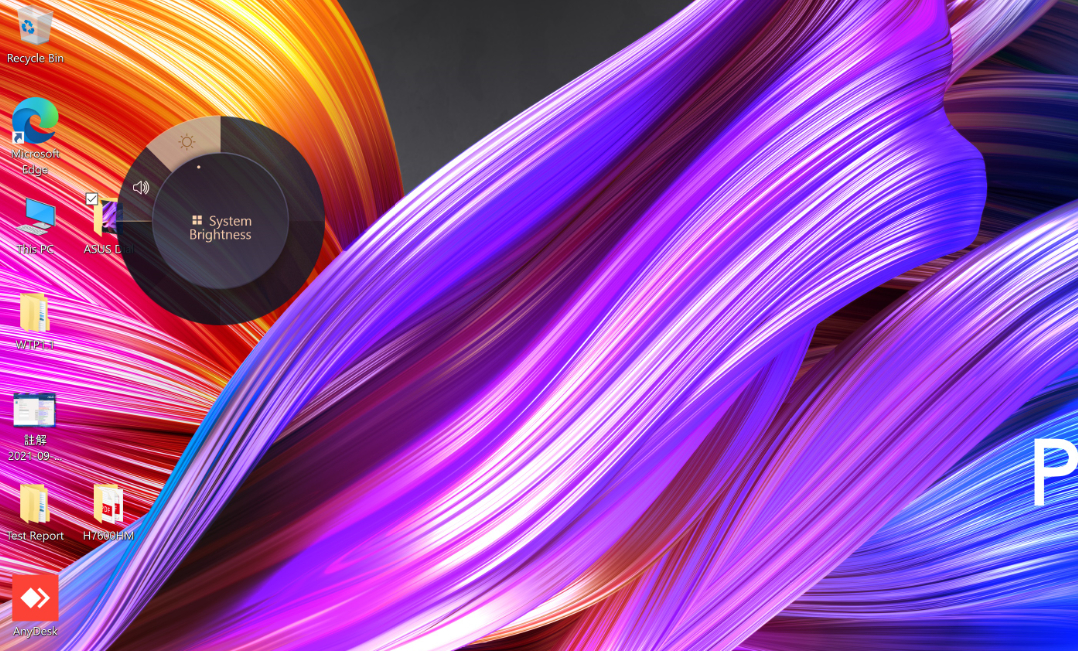
(2) Select the function you need by ②[Turn knob], and select the function again ③[Press knob]. Take the [Adjust brightness] function as an example, adjust the brightness of the screen by turning the knob.
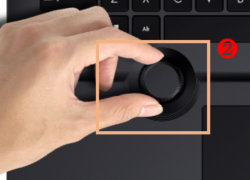
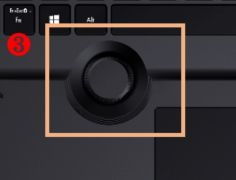
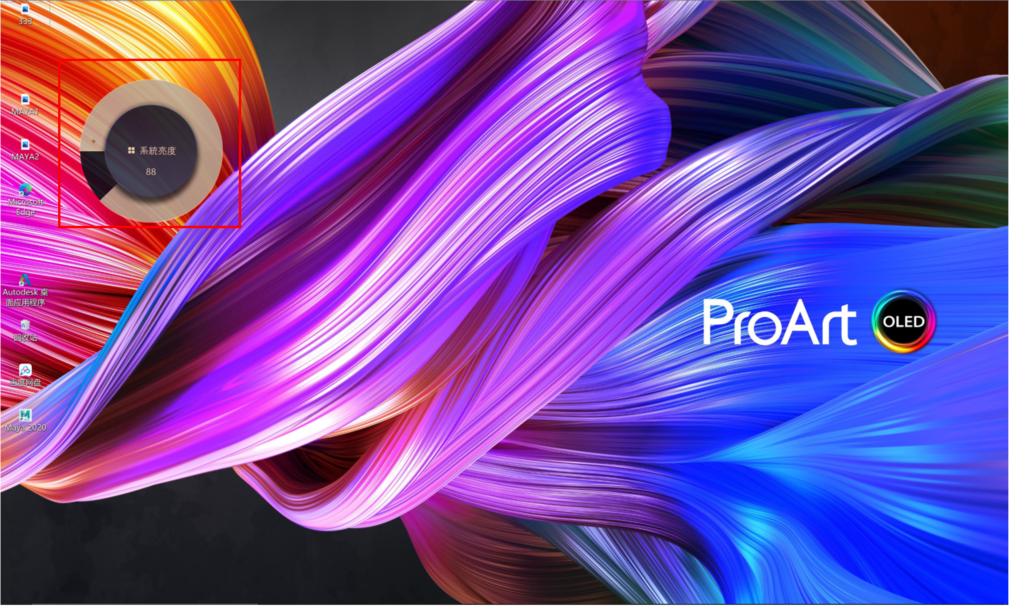
(3) To switch to other knob functions, press the knob again. After not using the knob for a period of time, the display icon of the knob will automatically disappear from the display, and the display icon will appear again when the knob is touched again.
2.2 Virtual ASUS Dial on touchpad operates
(1) Place your finger on ④[touchpad marker].
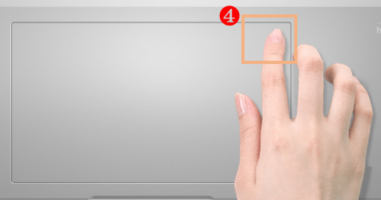
(2) Slide to the bottom left ⑤[Finger], [ASUS Dial virtual touchpad knob] will appear in the upper left corner of the touchpad as shown below.
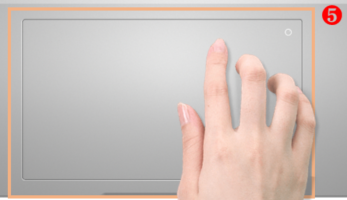
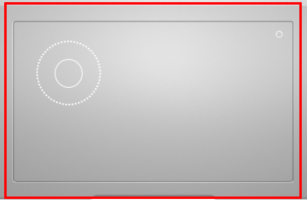
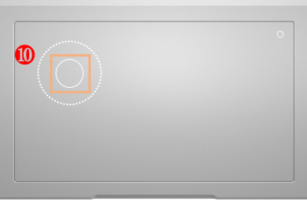
(3) After the virtual touchpad knob appears on the touchpad, press the ⑥[Area] computer screen on the touchpad shown below to appear [ASUS Dial function selection screen].
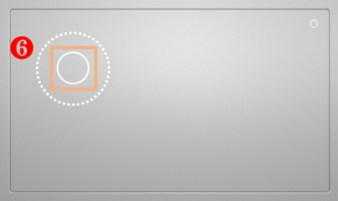

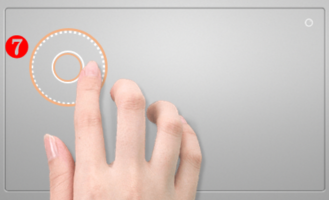
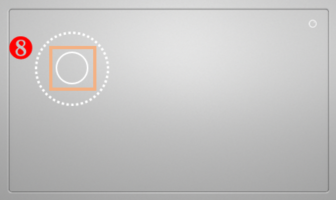
(4) Slide ⑦[Finger] clockwise or counterclockwise in the ring area on the touchpad shown in the figure below to select the function you want, and press ⑧[Area] on the touchpad again to select the function.
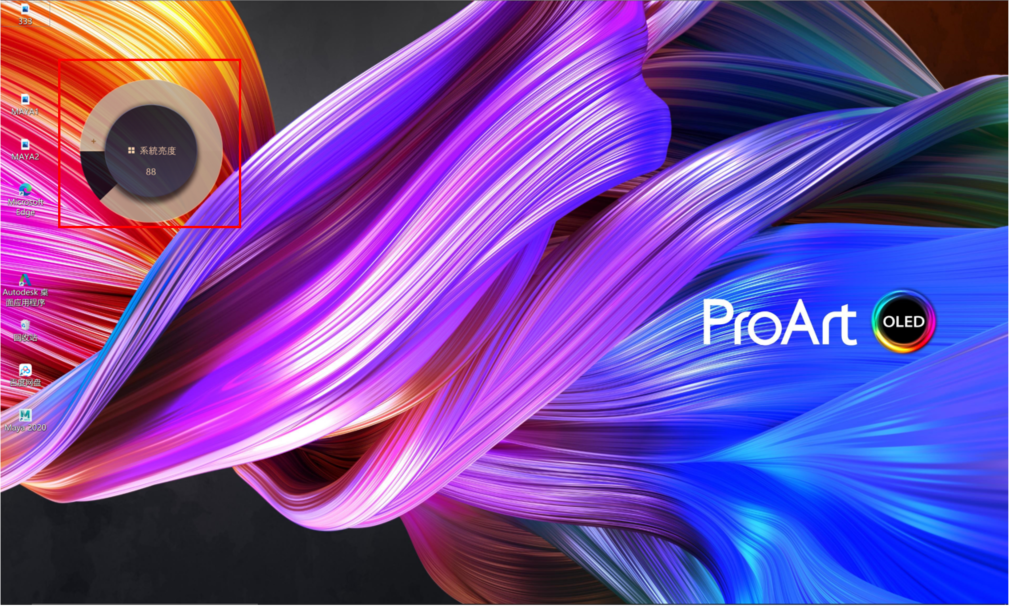
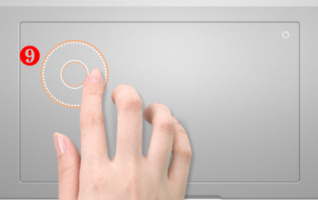
(5) Take the [Adjust brightness] function as an example, adjust the brightness of the screen by sliding your finger clockwise or counterclockwise in ⑨[Ring area].
(6) After not using the knob for a period of time, the display icon of the knob will automatically disappear on the display screen. Slide your finger over the area of the virtual touchpad knob on the touchpad again and the display icon will appear again. To switch between other quick features, press ⑩[Area] on the touchpad again. Turning off the virtual touchpad knob on the touchpad works the same way as bringing up the knob.
3. How to use ASUS Dial within Adobe software
(1) Taking the Photoshop 2020 software as an example, after opening the Photoshop 2020 software and pressing the knob, the function selection interface of ASUS Dial is as follows:
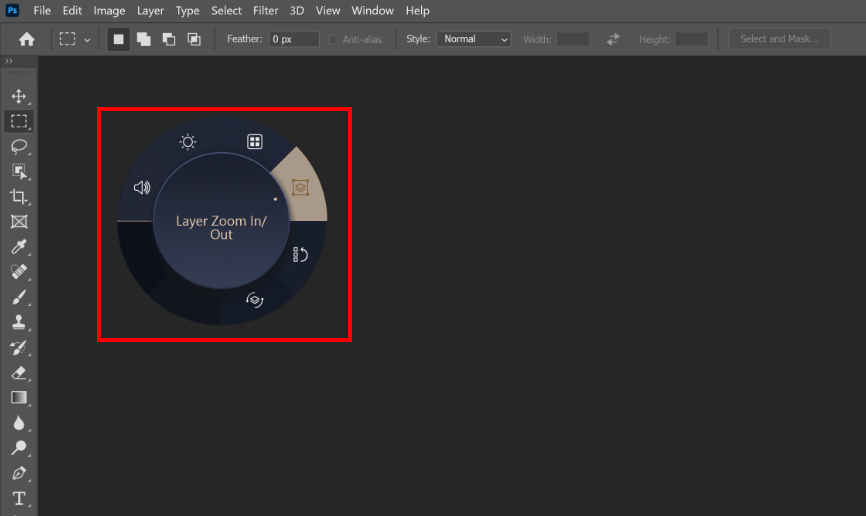
(2) Turn ①[Knob] to select the ASUS Dial's shortcut function according to your needs.

(3) Press again ②[Knob] to select the function.

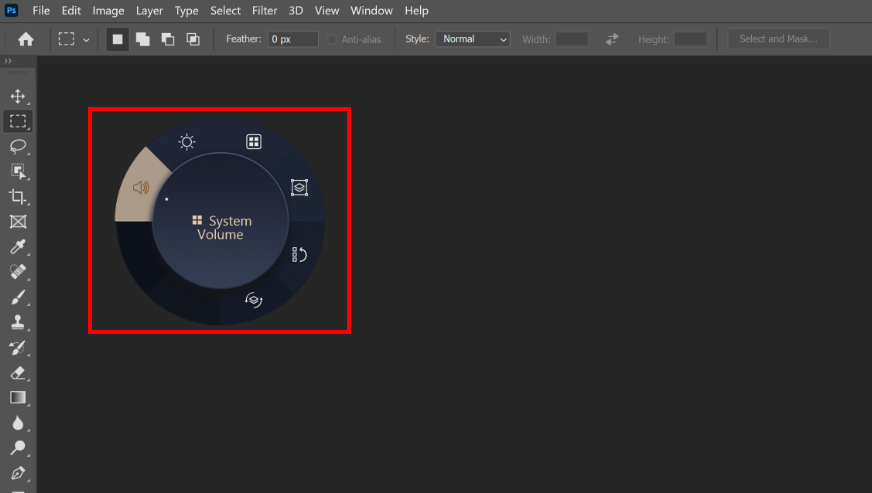
(4) Take the [Brush size] function as an example, you can adjust the size of the brush by turning the knob after selecting this function.
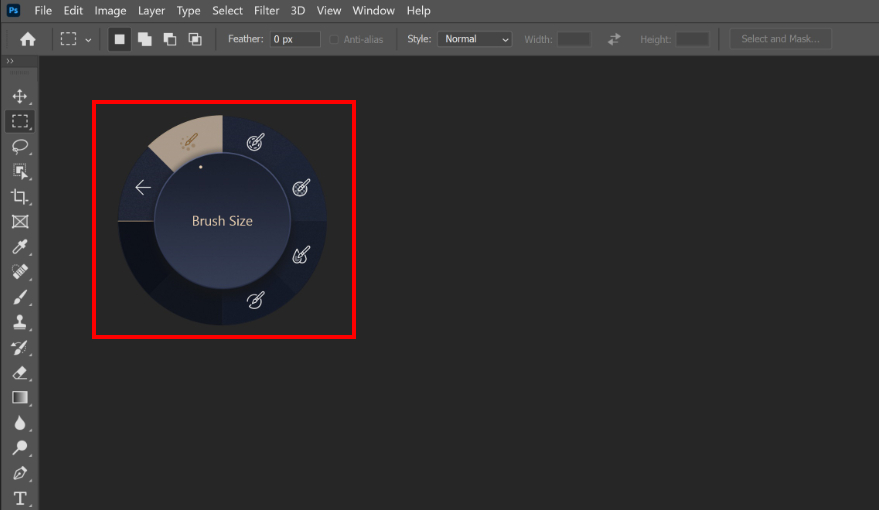
※Because the difference between the virtual touchpad knob and the physical knob is only whether there is a real knob, and their display screen and operation steps in Adobe software are the same, please refer to the physical knob for the operation steps of the virtual touchpad knob.
4. Open ASUS Dial function setting software
You can quickly wake up the ASUS Dial & Control Panel app by pressing and holding the ASUS Dial.

5. How to set up the functionality of ASUS Dial
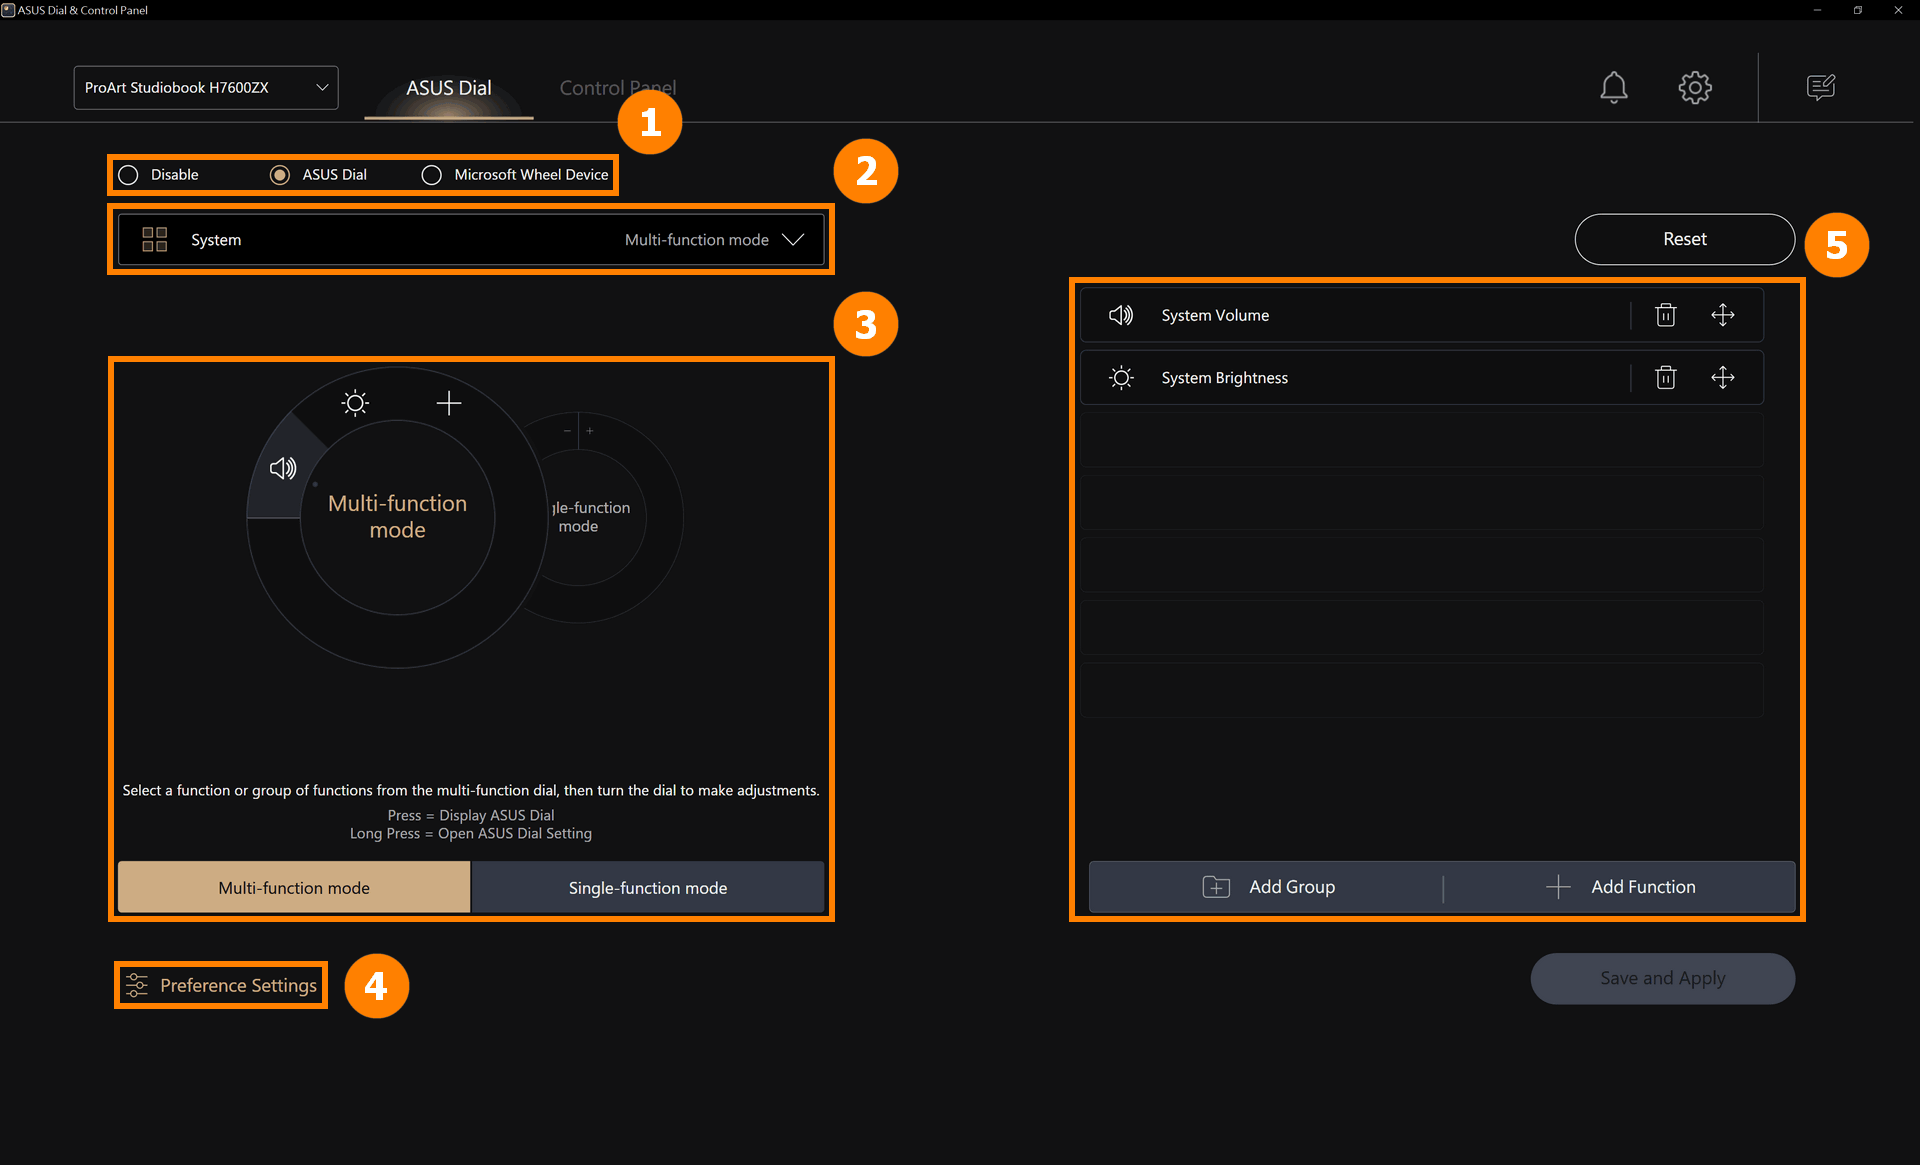
The ProArt Creator Hub control settings page contains five important sections: ①[Knob mode switching], ②[Editing to application], ③[ASUS Dial function mode switching], ④[Preference Settings], and ⑤[Function editing].
6. How to add or edit applications
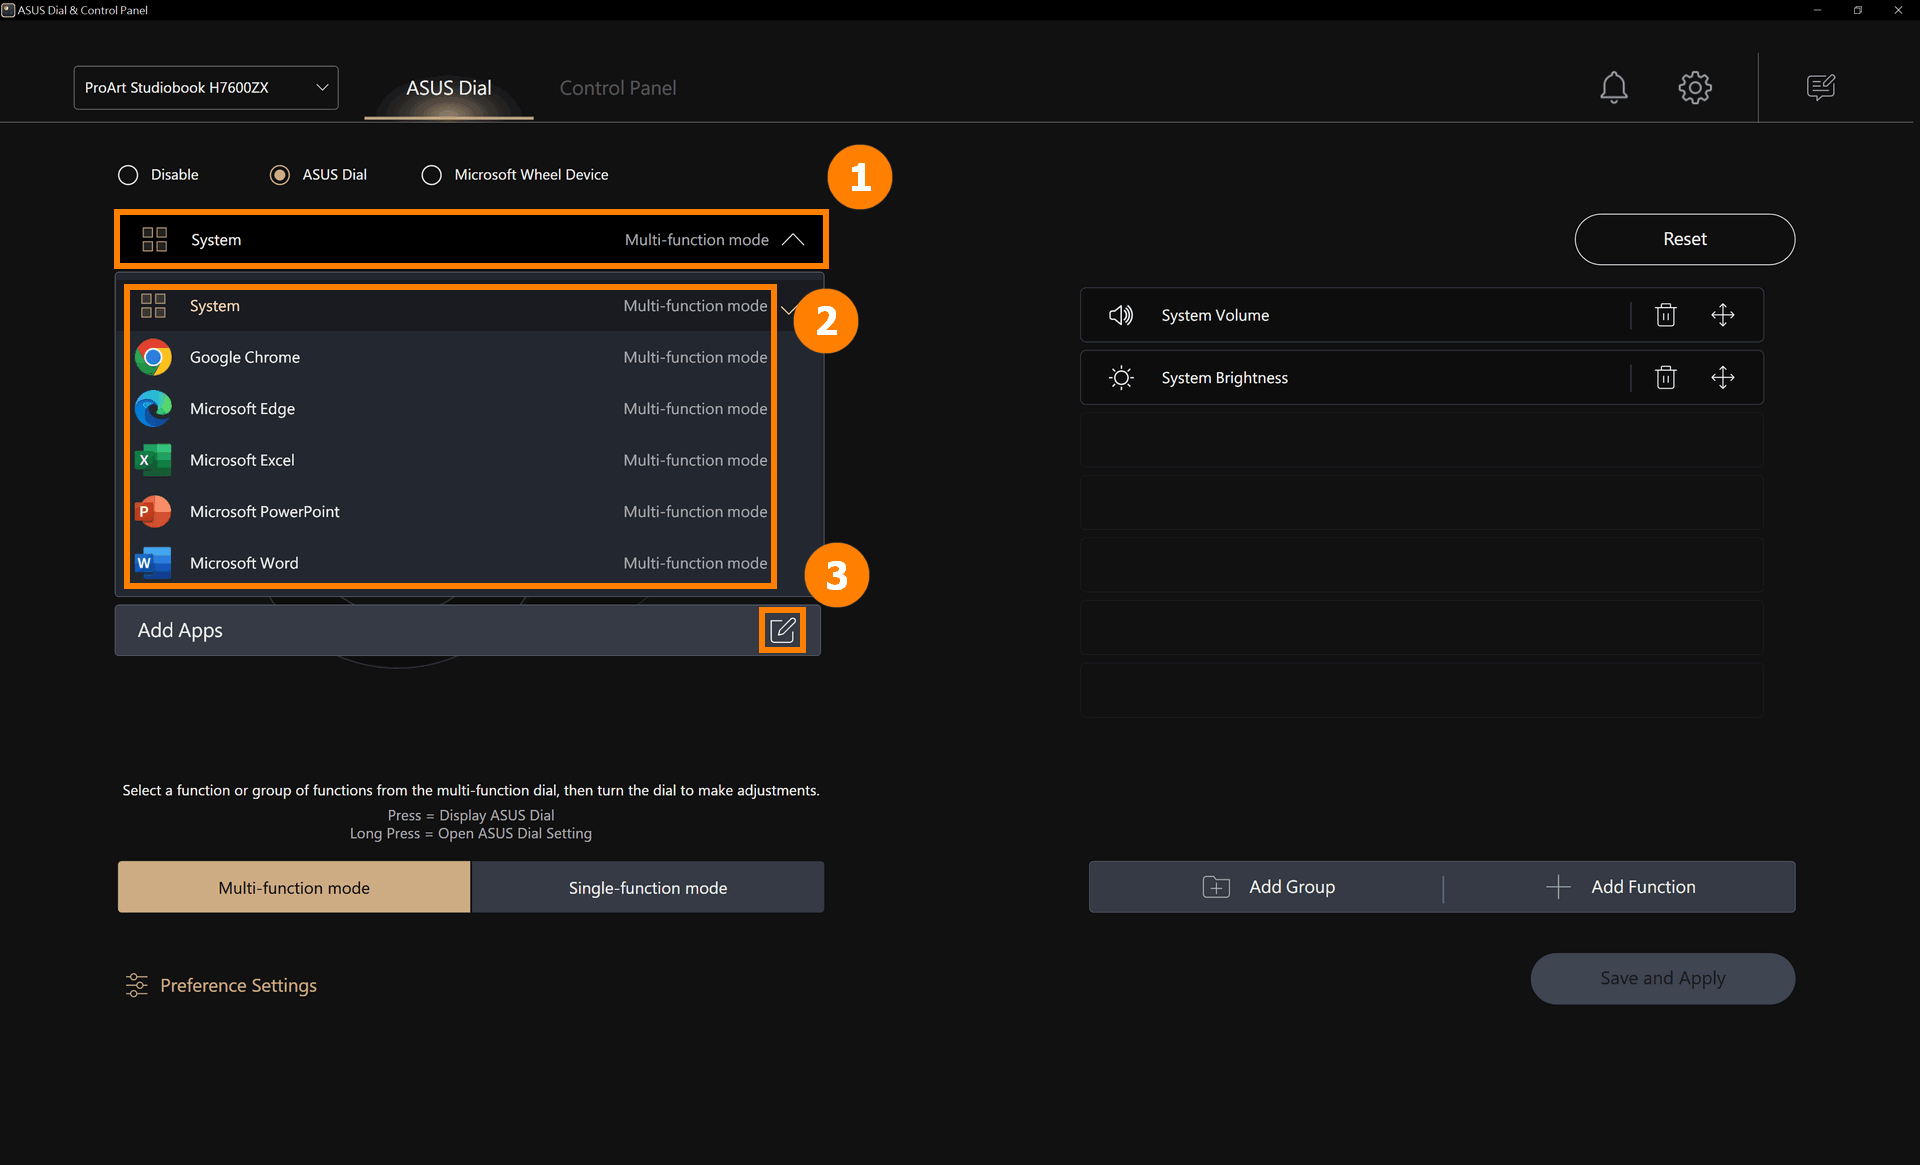
(1) Click ①[Application Edit], ②[Default Application] is the software supported by ASUS Dial, you can click ③[Edit] to add another application.
The significance of independent editing for different applications is that when you use an application that has edited ASUS Dial, such as Microsoft Edge, you can perform the function you edited by turning the ASUS Dial.
If you have not edited the ASUS Dial feature of Microsoft Edge, when you open Microsoft Edge and rotate the ASUS Dial, the ASUS Dial will use the function set by System.
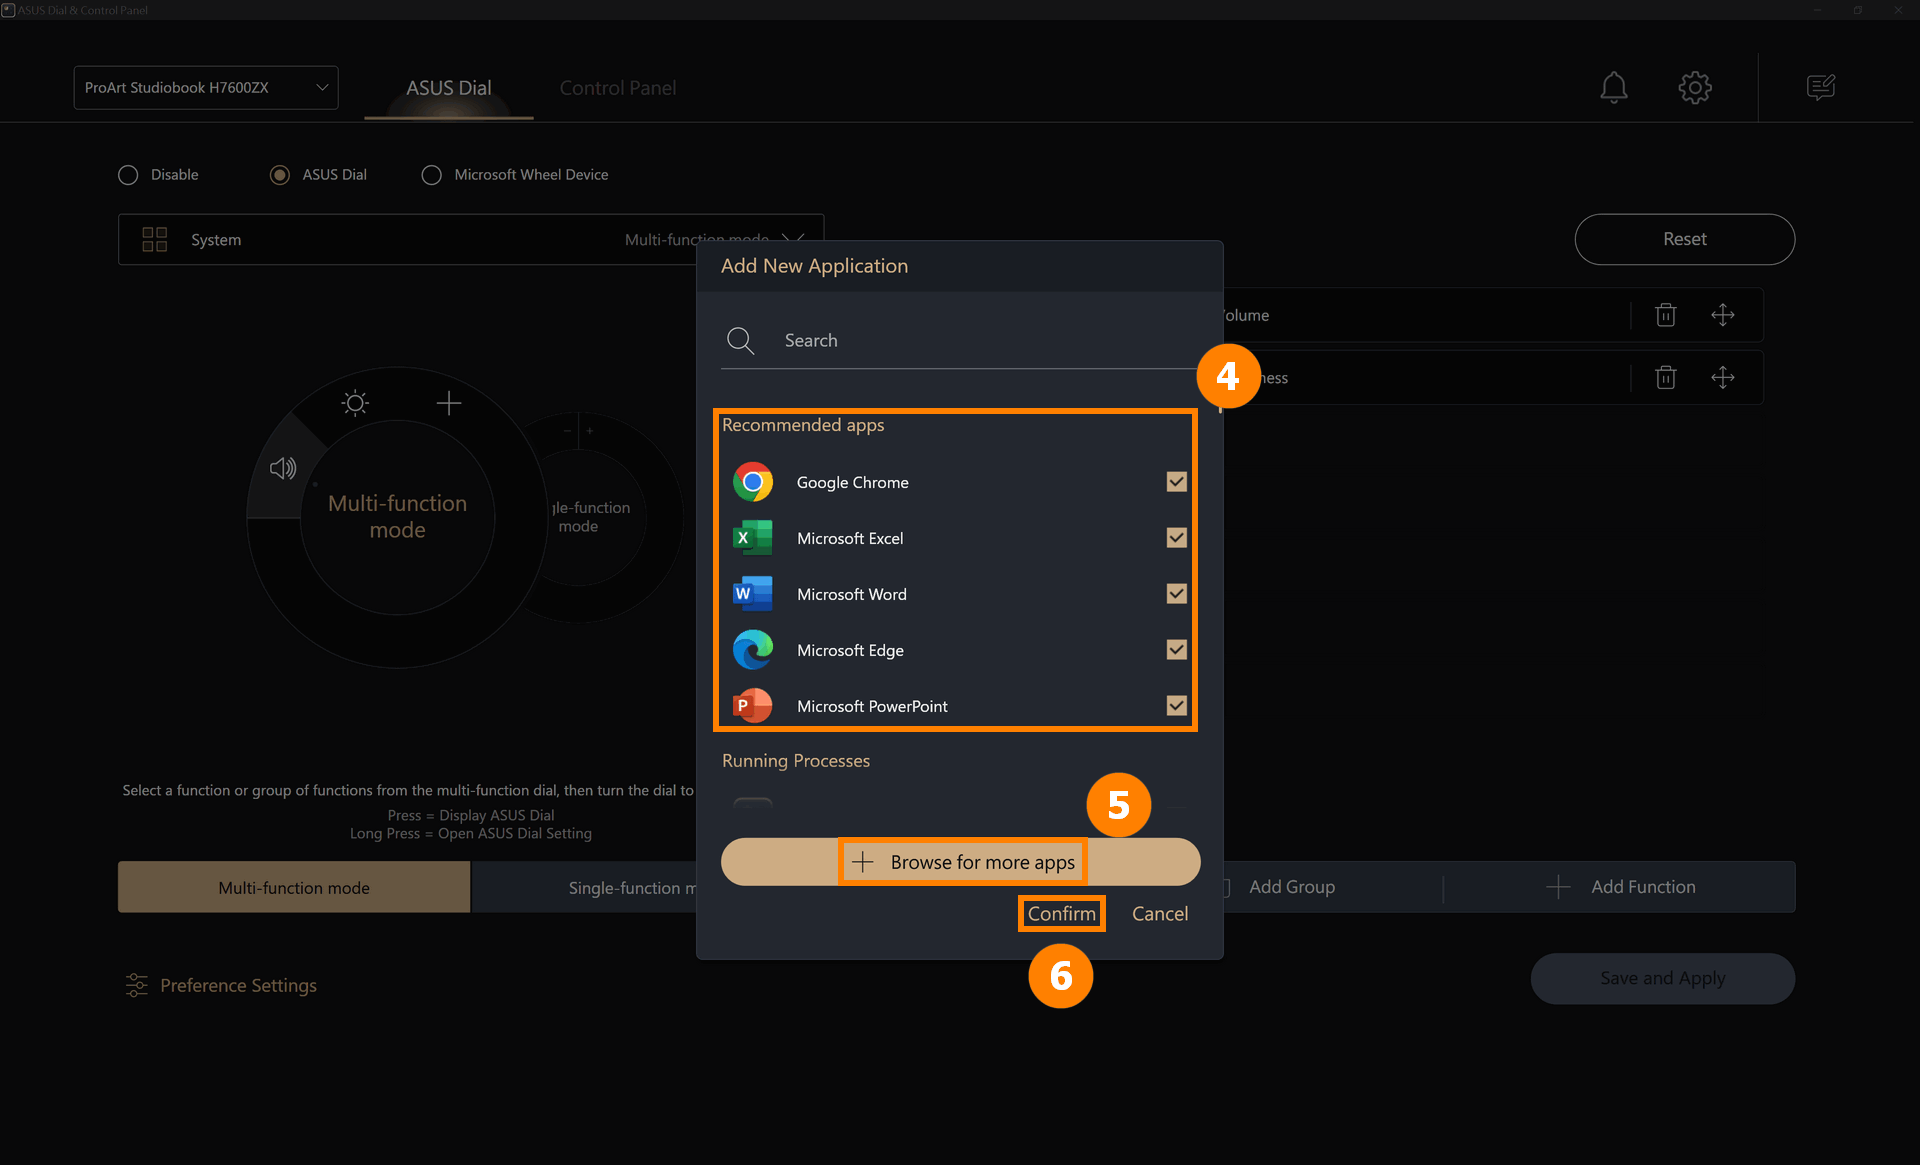
(2) In ④[Area], you can add applications that are already installed in the system, or you can click ⑤[Browse for more apps] to add applications that are not installed in the system, and click ⑥[Confirm] to complete the modification.
※ Add more apps: If you don't find the app you want to add, you can click [Add more apps] to add a program (only for programs with the suffix exe).
(1) When any application is running, rotate the ASUS Dial to the far right and you will see the [+] mark. Press the ASUS Dial to enter the add application page.
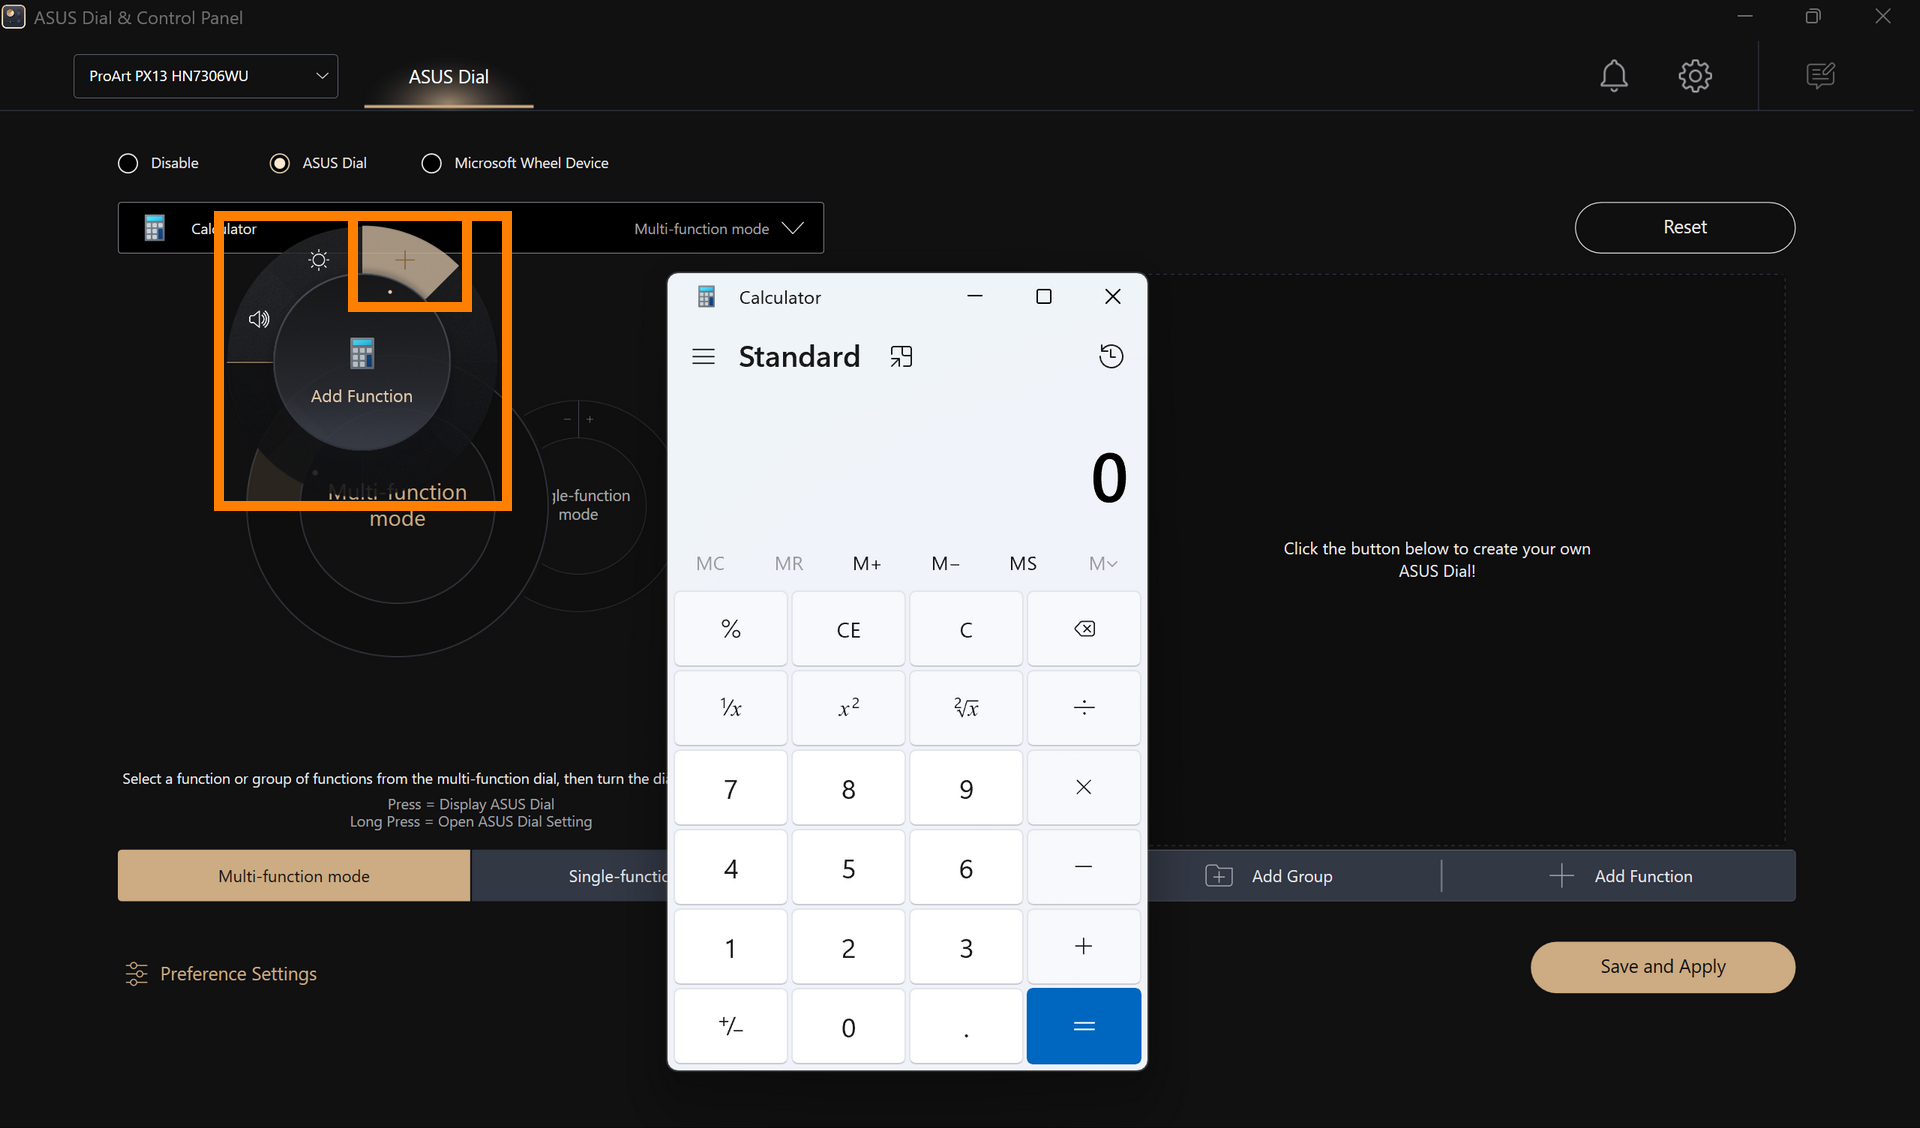
(2) On this page, you can directly edit the ASUS Dial function of the application without having to manually find the application and then add it.
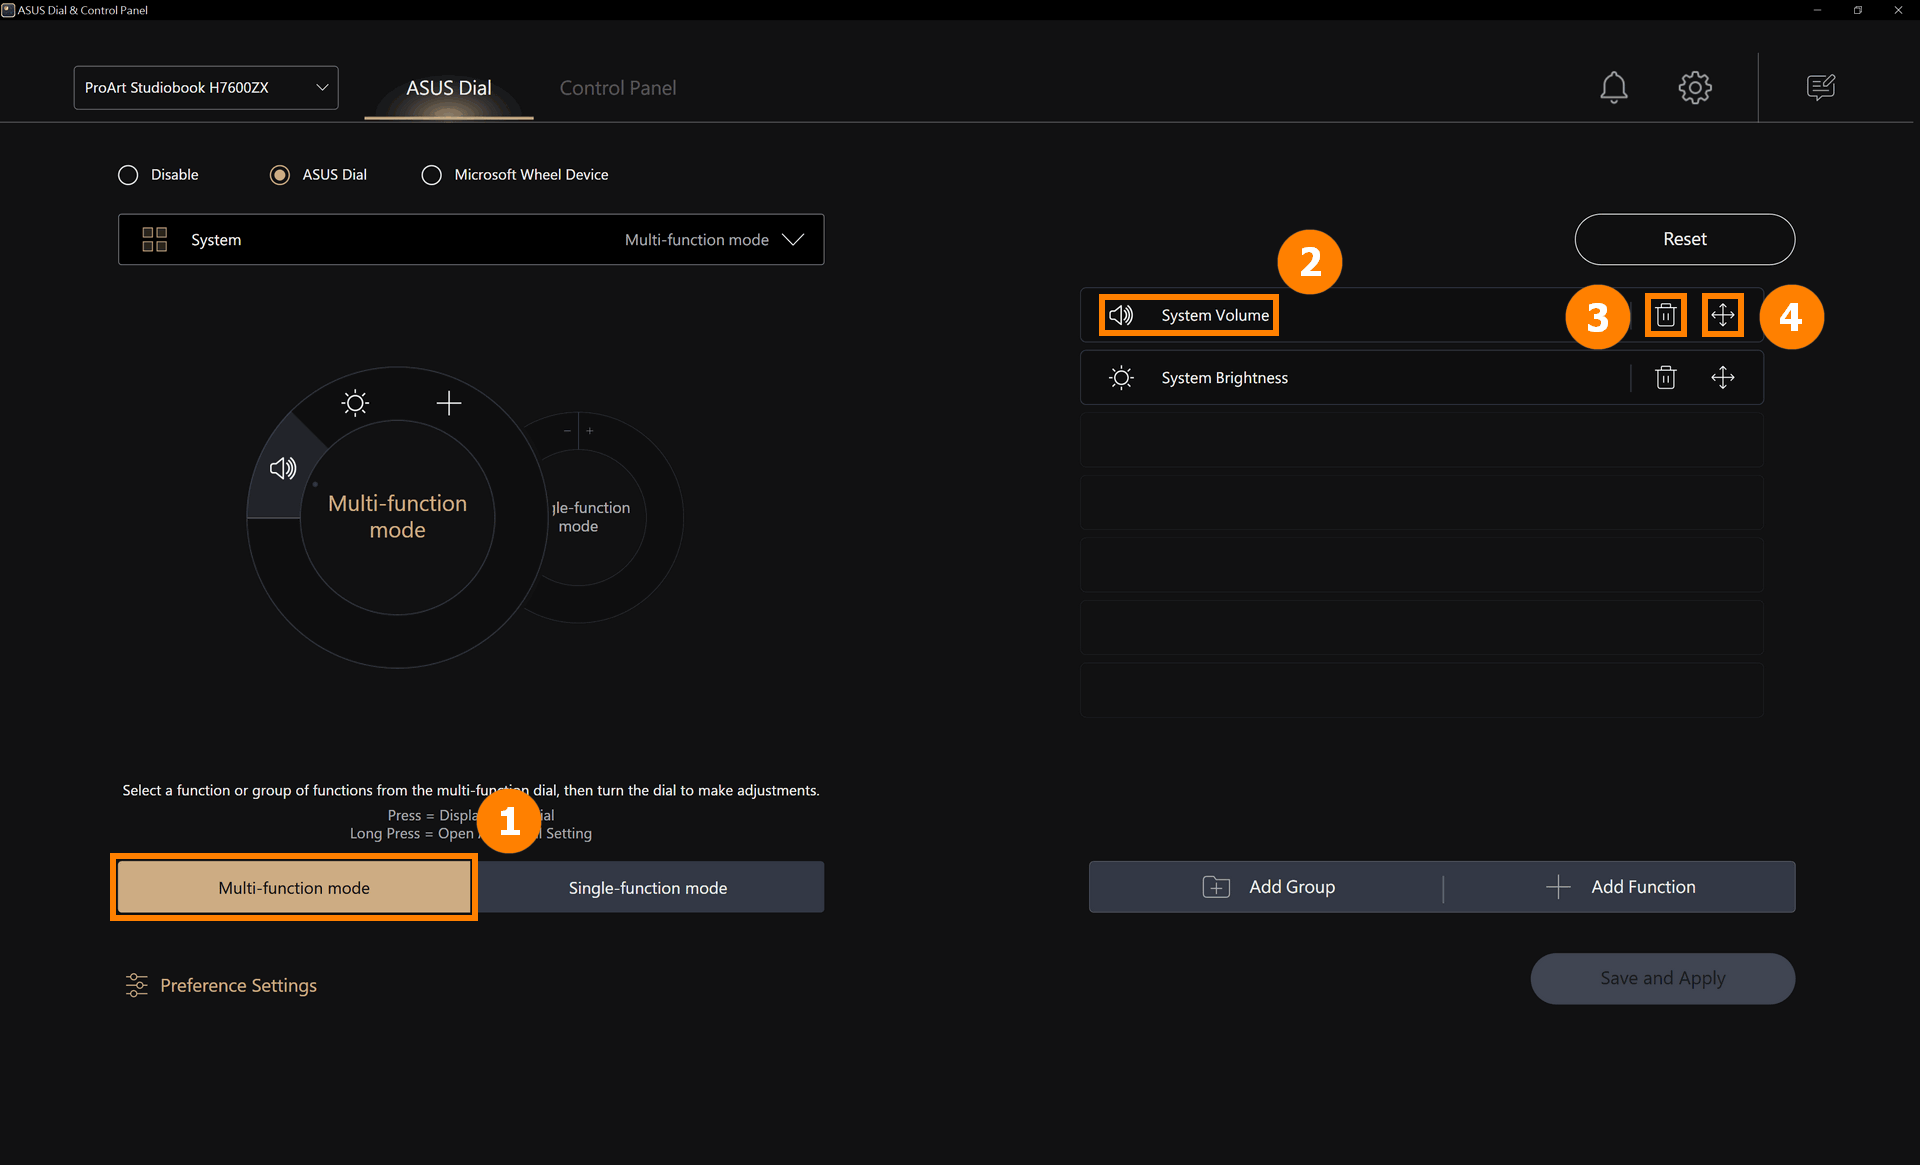
(1) Click ①[Multi-function mode], click ②[System volume] to edit the function, click ③[Delete] to delete the function, and click ④[Move] to adjust the position of the function.
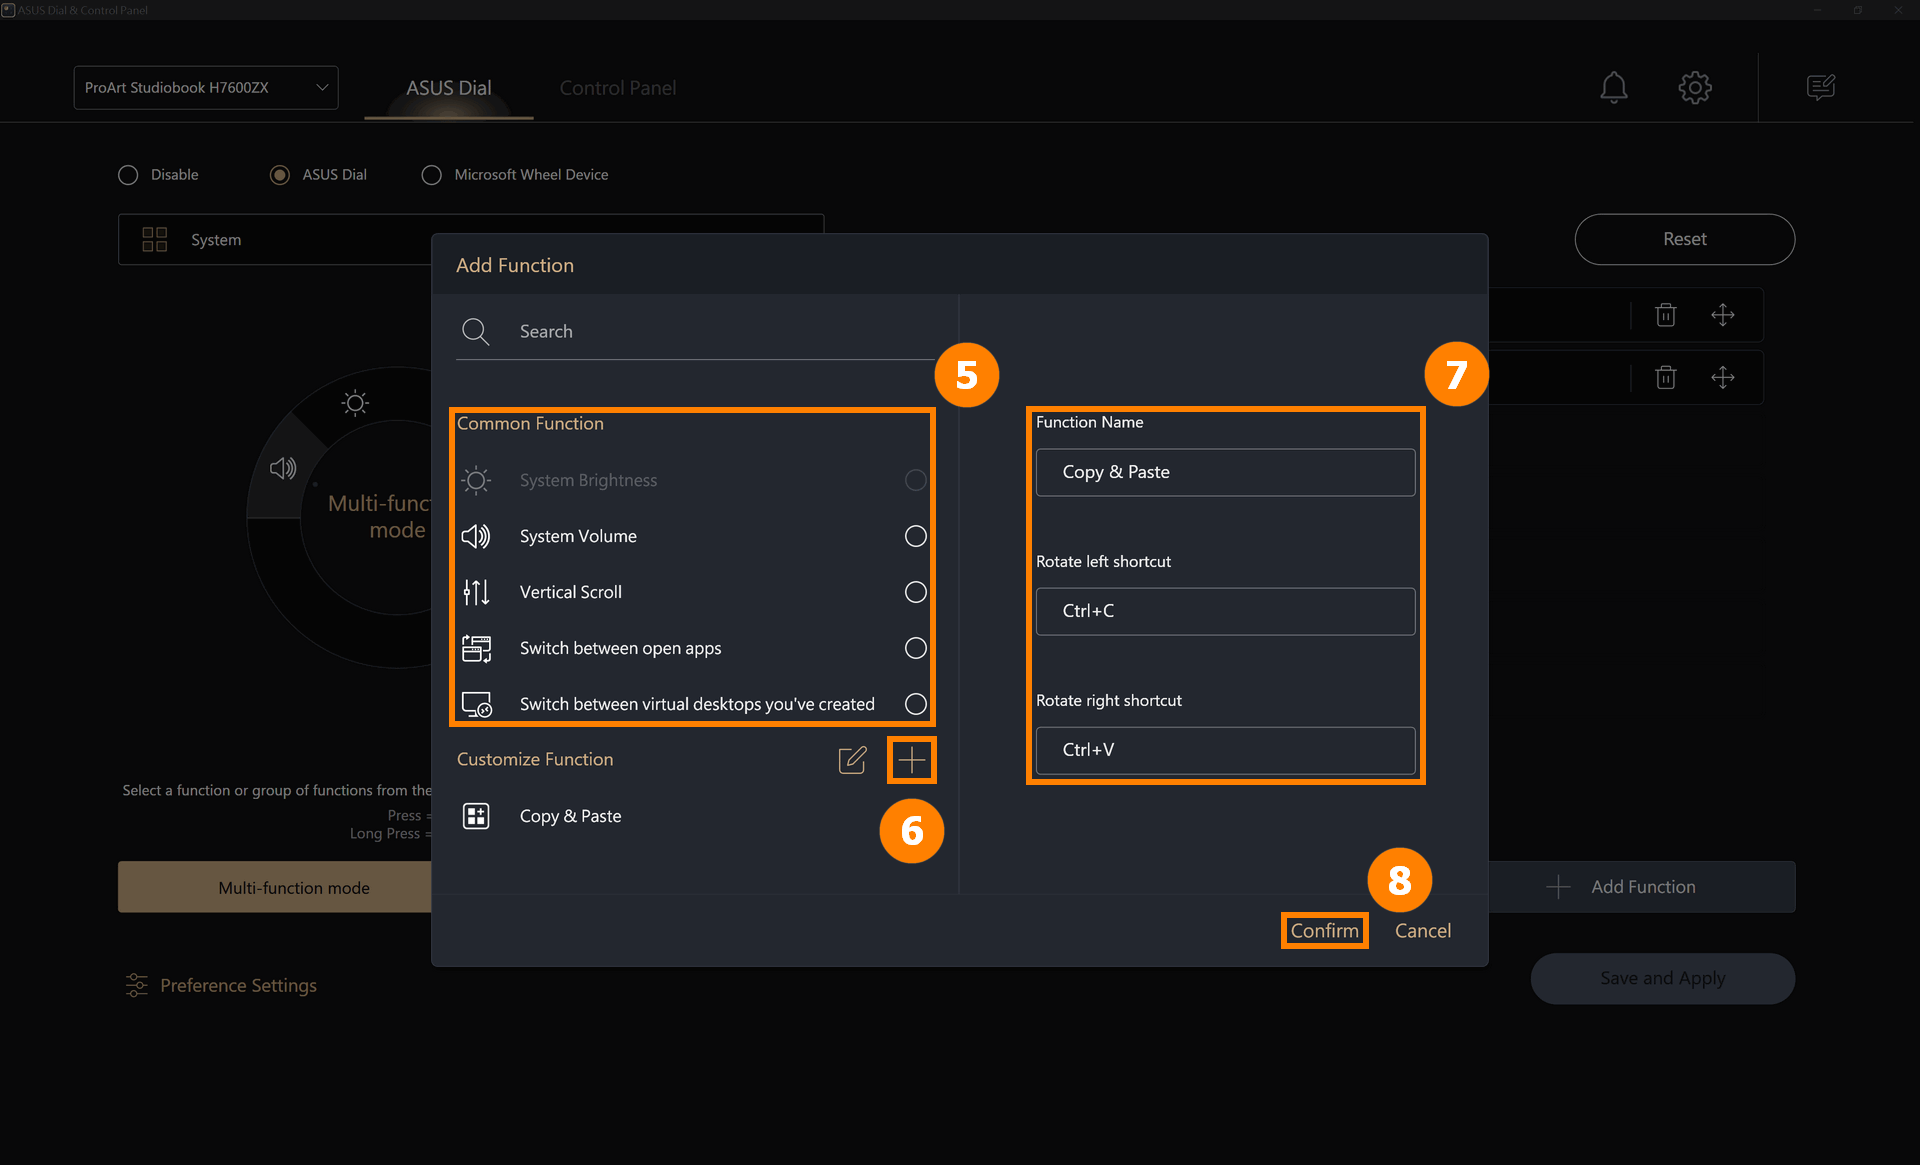
(2) You can replace the System Volume function by looking for other ASUS Dial default functions in ⑤[Area]. You can also set up custom functions, click ⑥[Add] to edit the custom function ⑦[function name and function content]. For example, in the figure below, you can rotate the ASUS Dial to the left to copy, click the mouse in the edit box, and then press the Ctrl key and the C key on the keyboard. click ⑧[Confirm] to finish editing.
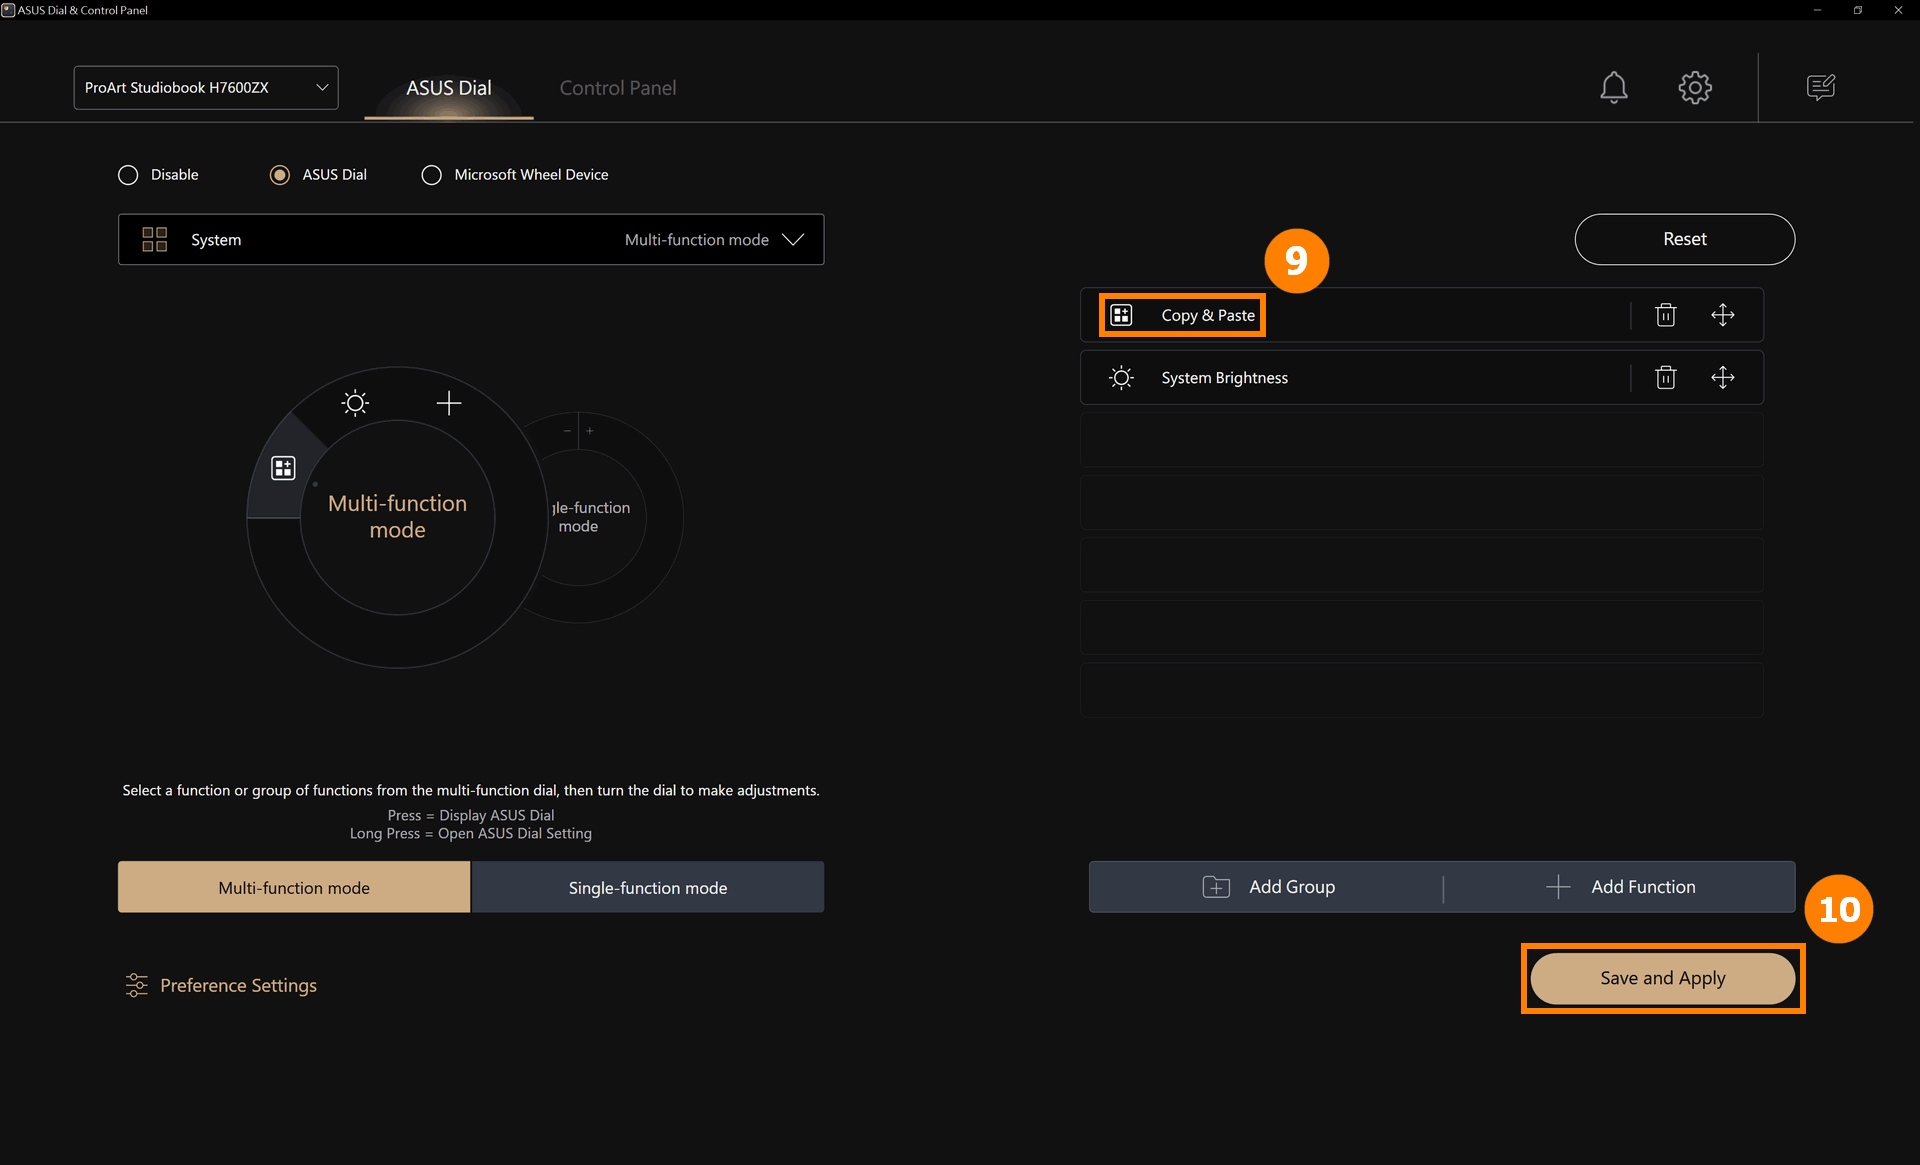
(3) Modified function ⑨[Copy and Paste] has been added, click ⑩[Save and Apply].
(4) Rotate the ASUS Dial to see that the new [Copy and Paste] function has been enabled.
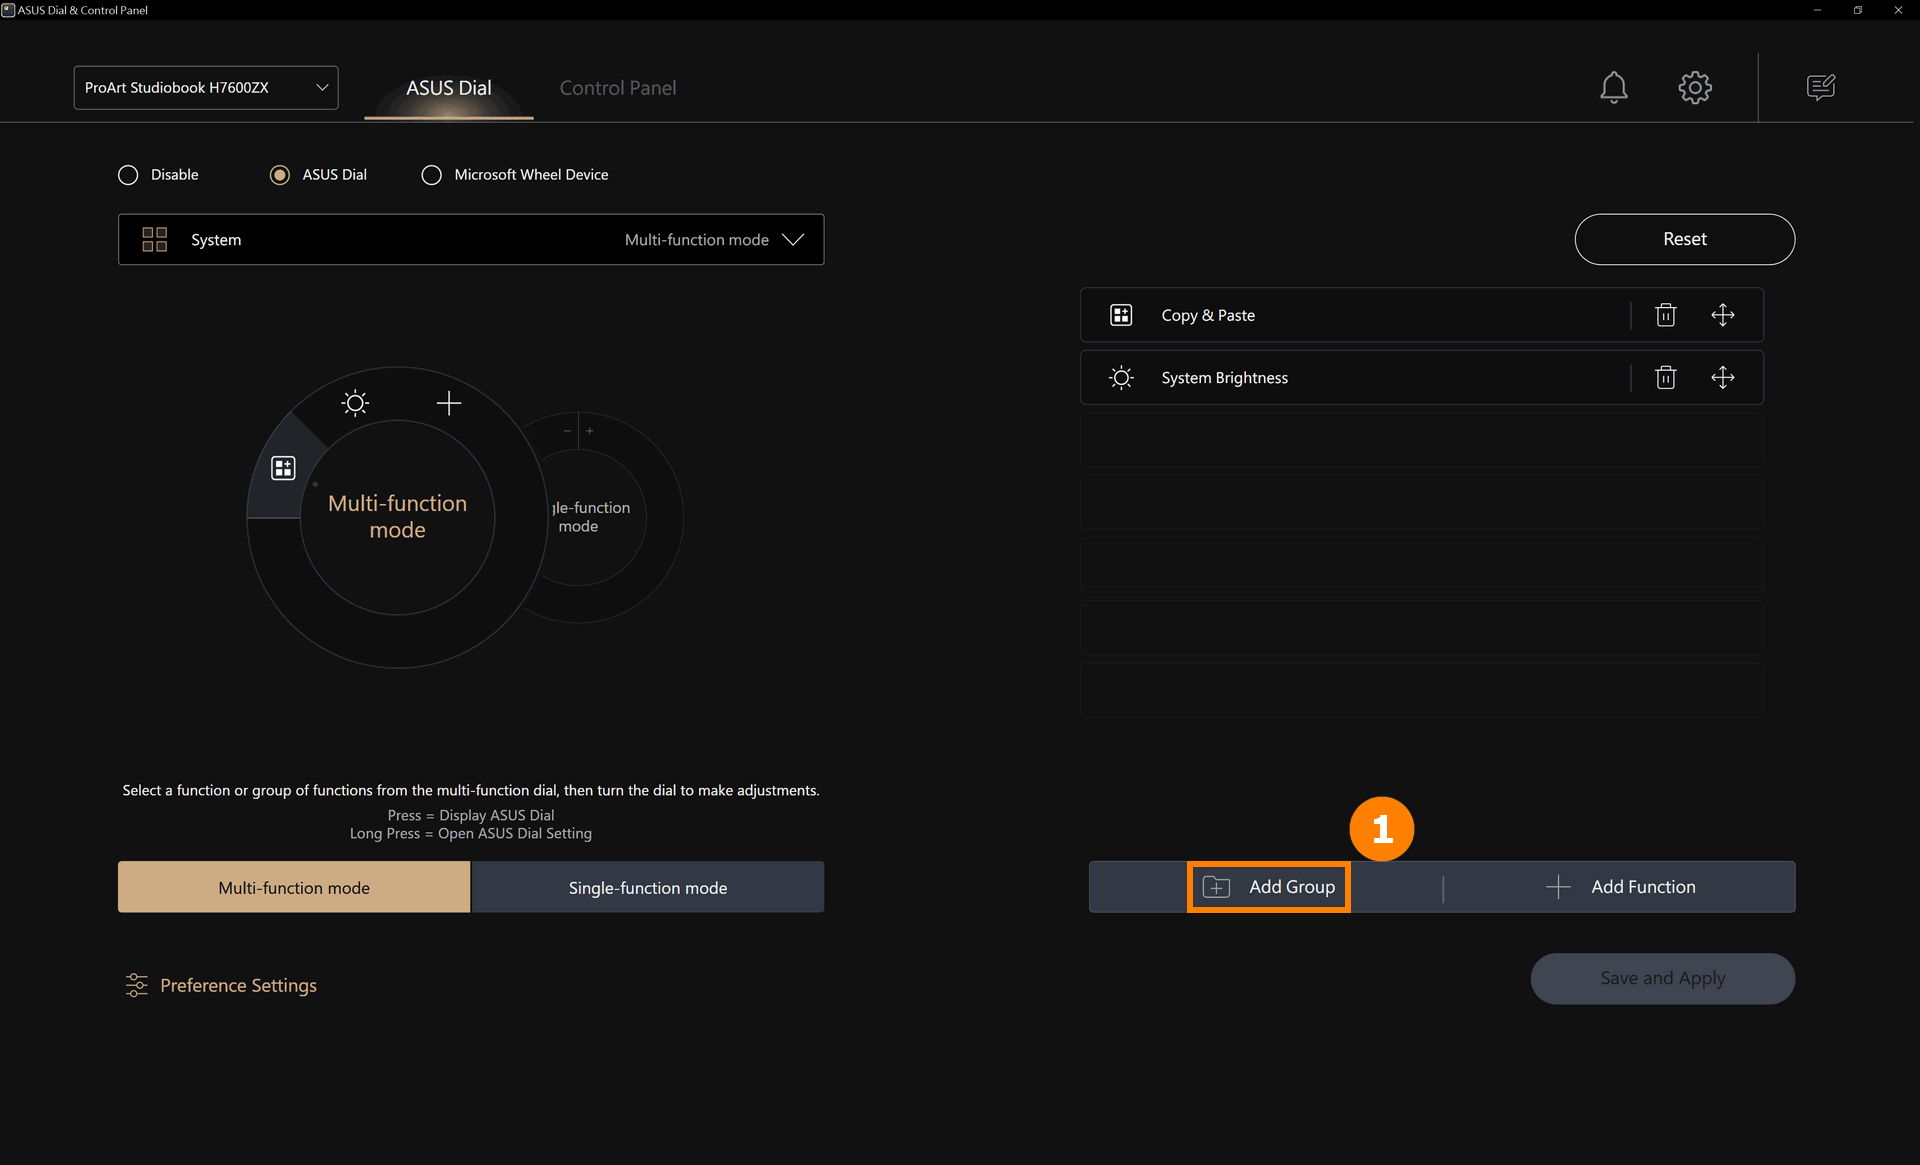
(1) Click ①[Add group].
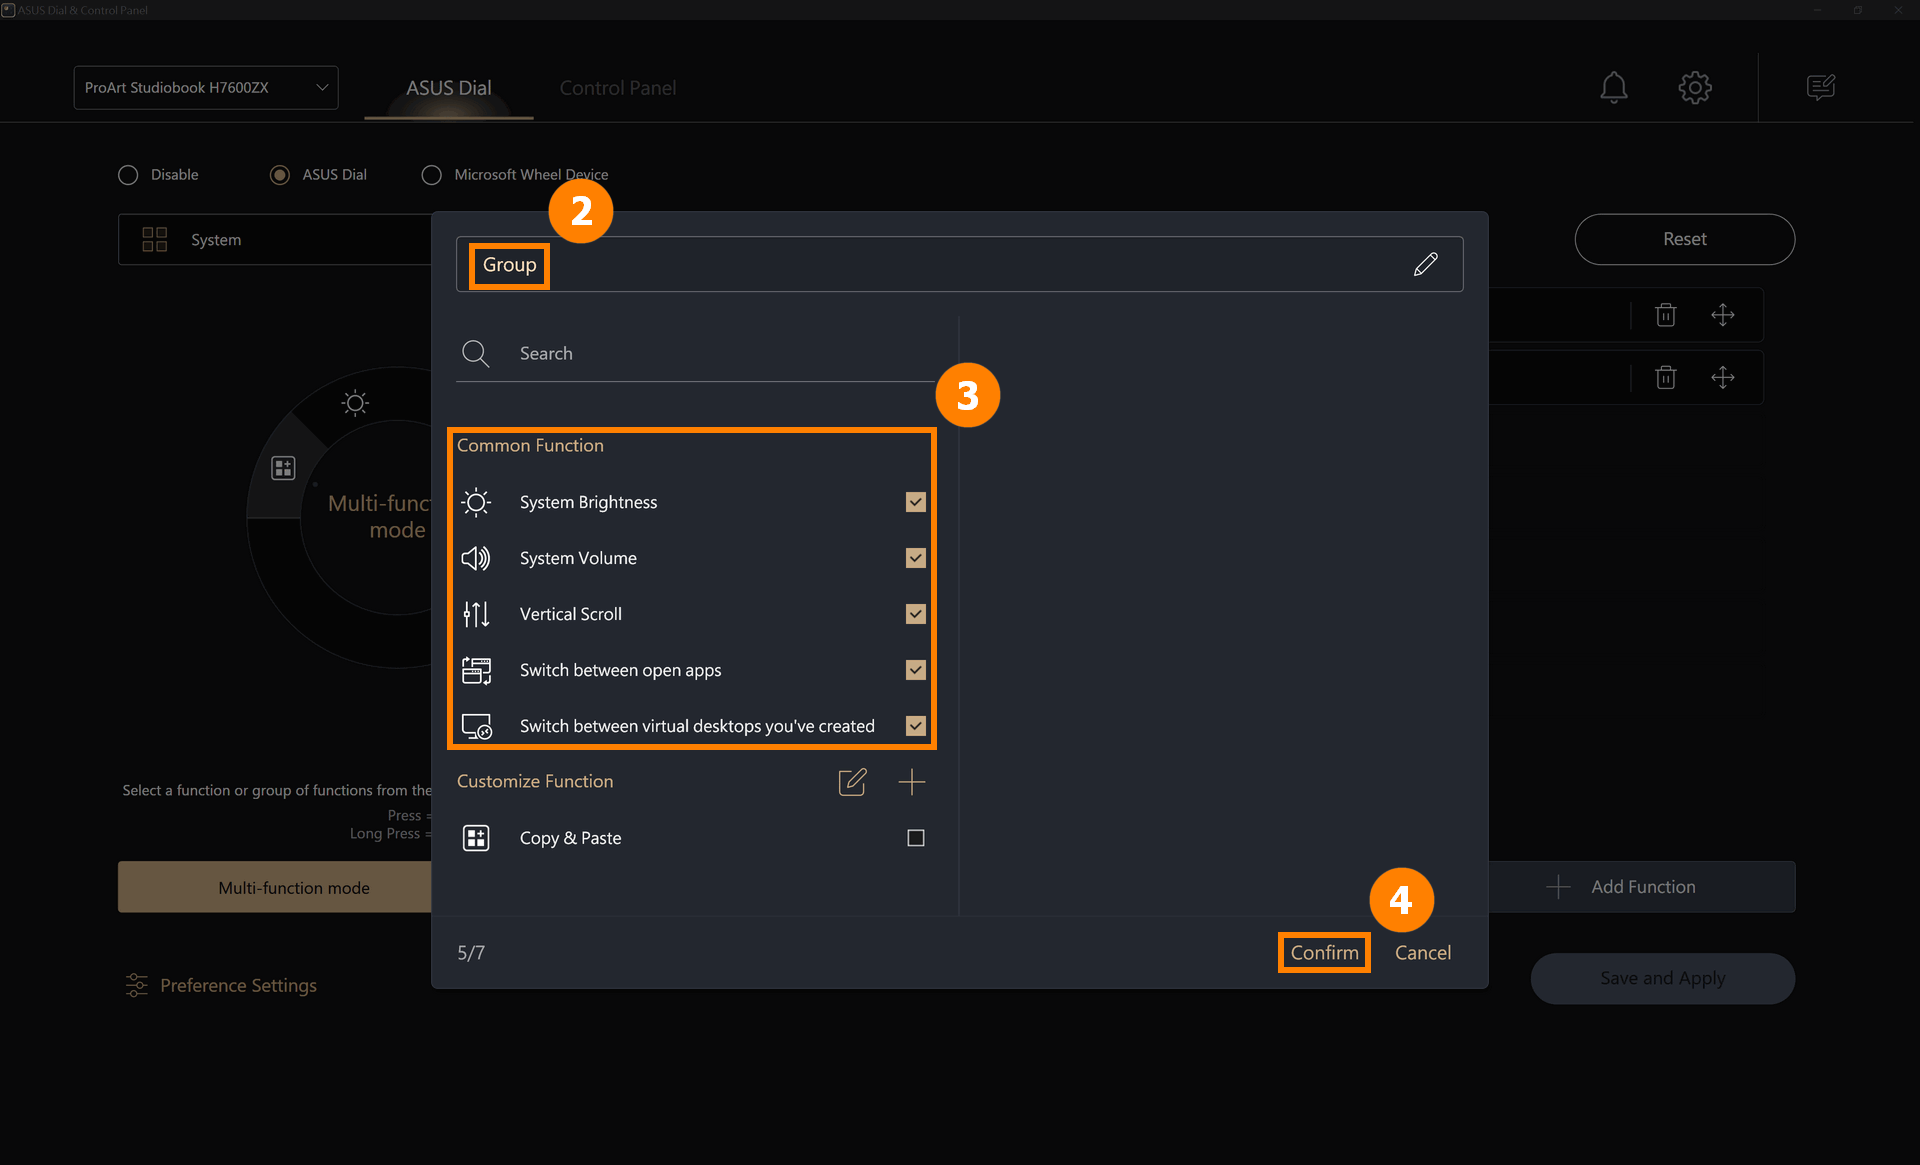
(2) Edit ②[Group name], select the ③[Function] you want, and then click ④[Confirm].
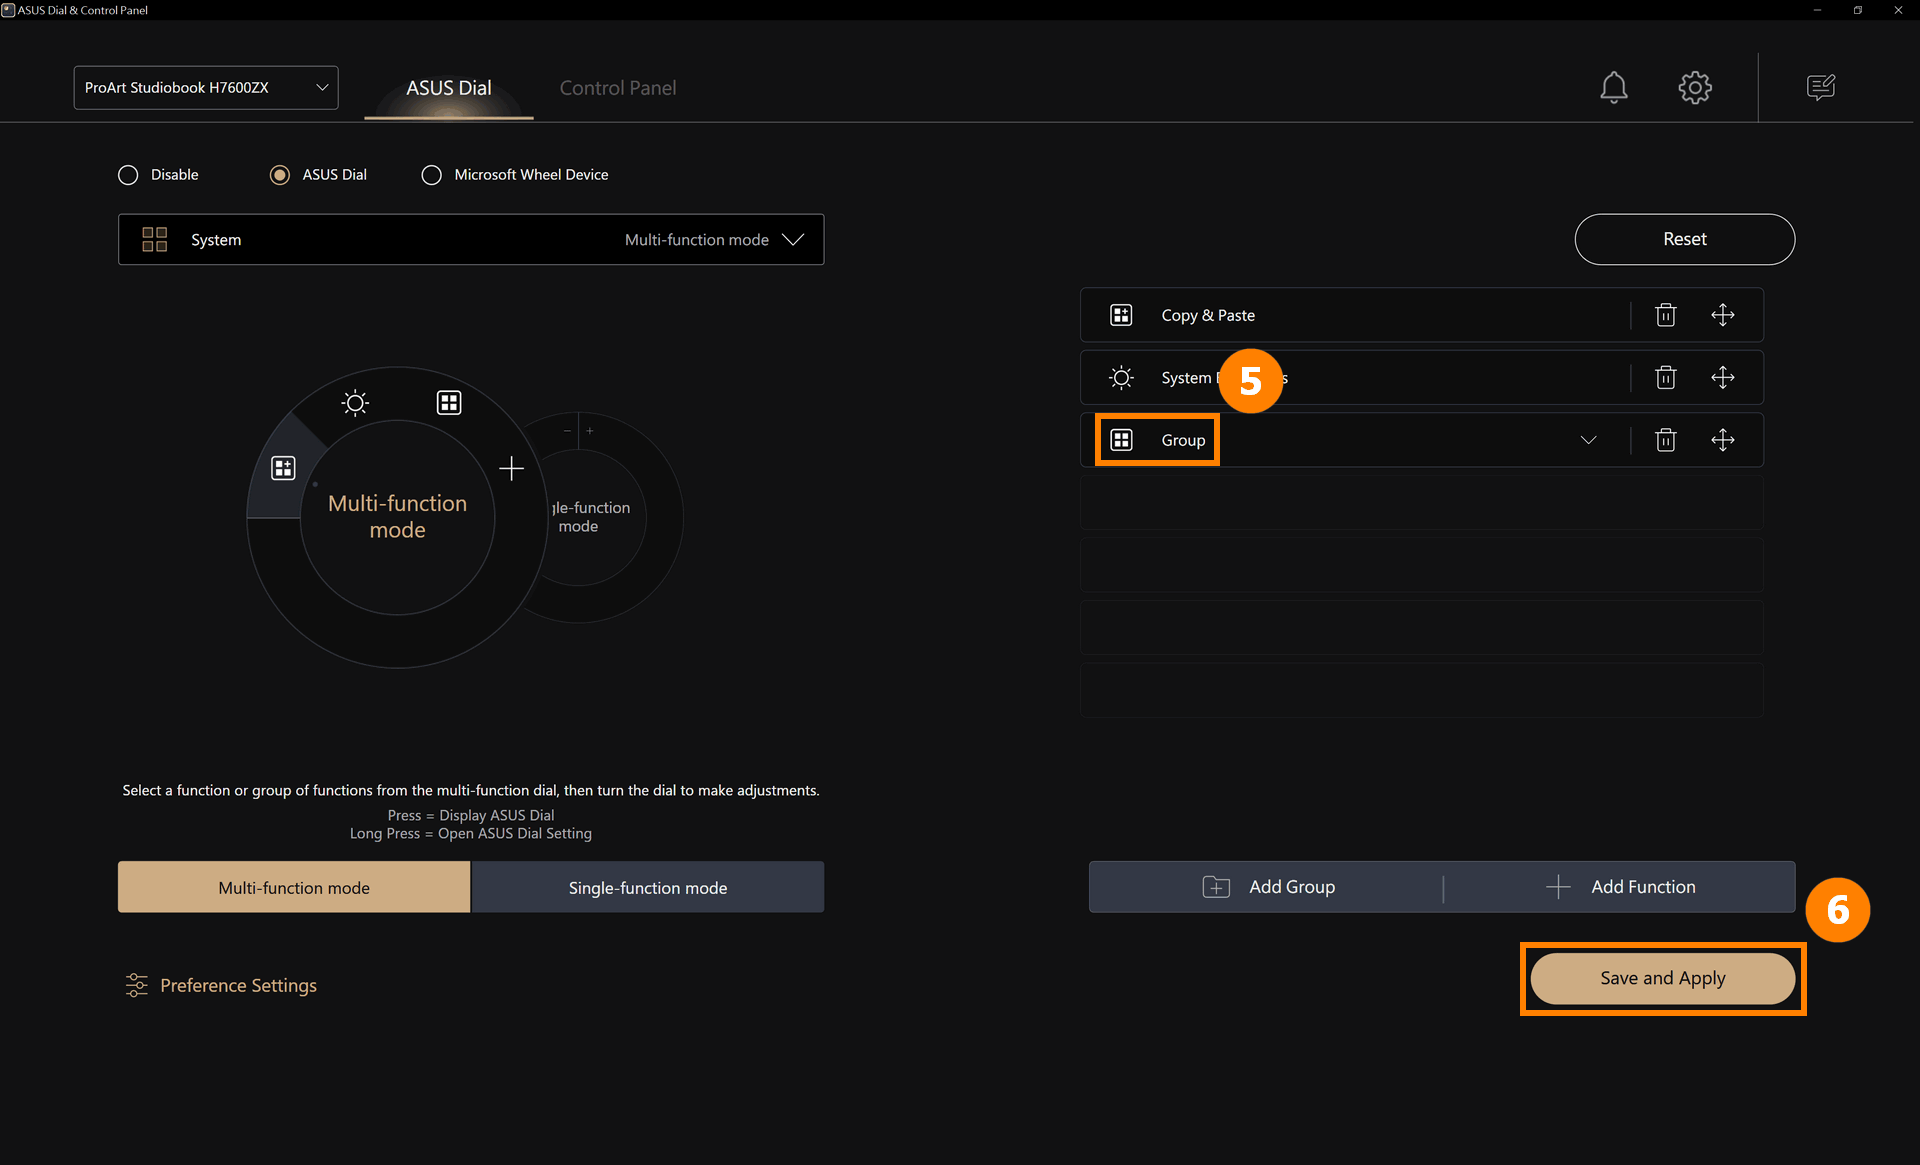
(3) The newly added group ⑤[Group] has been added, click ⑥[Save and Apply].
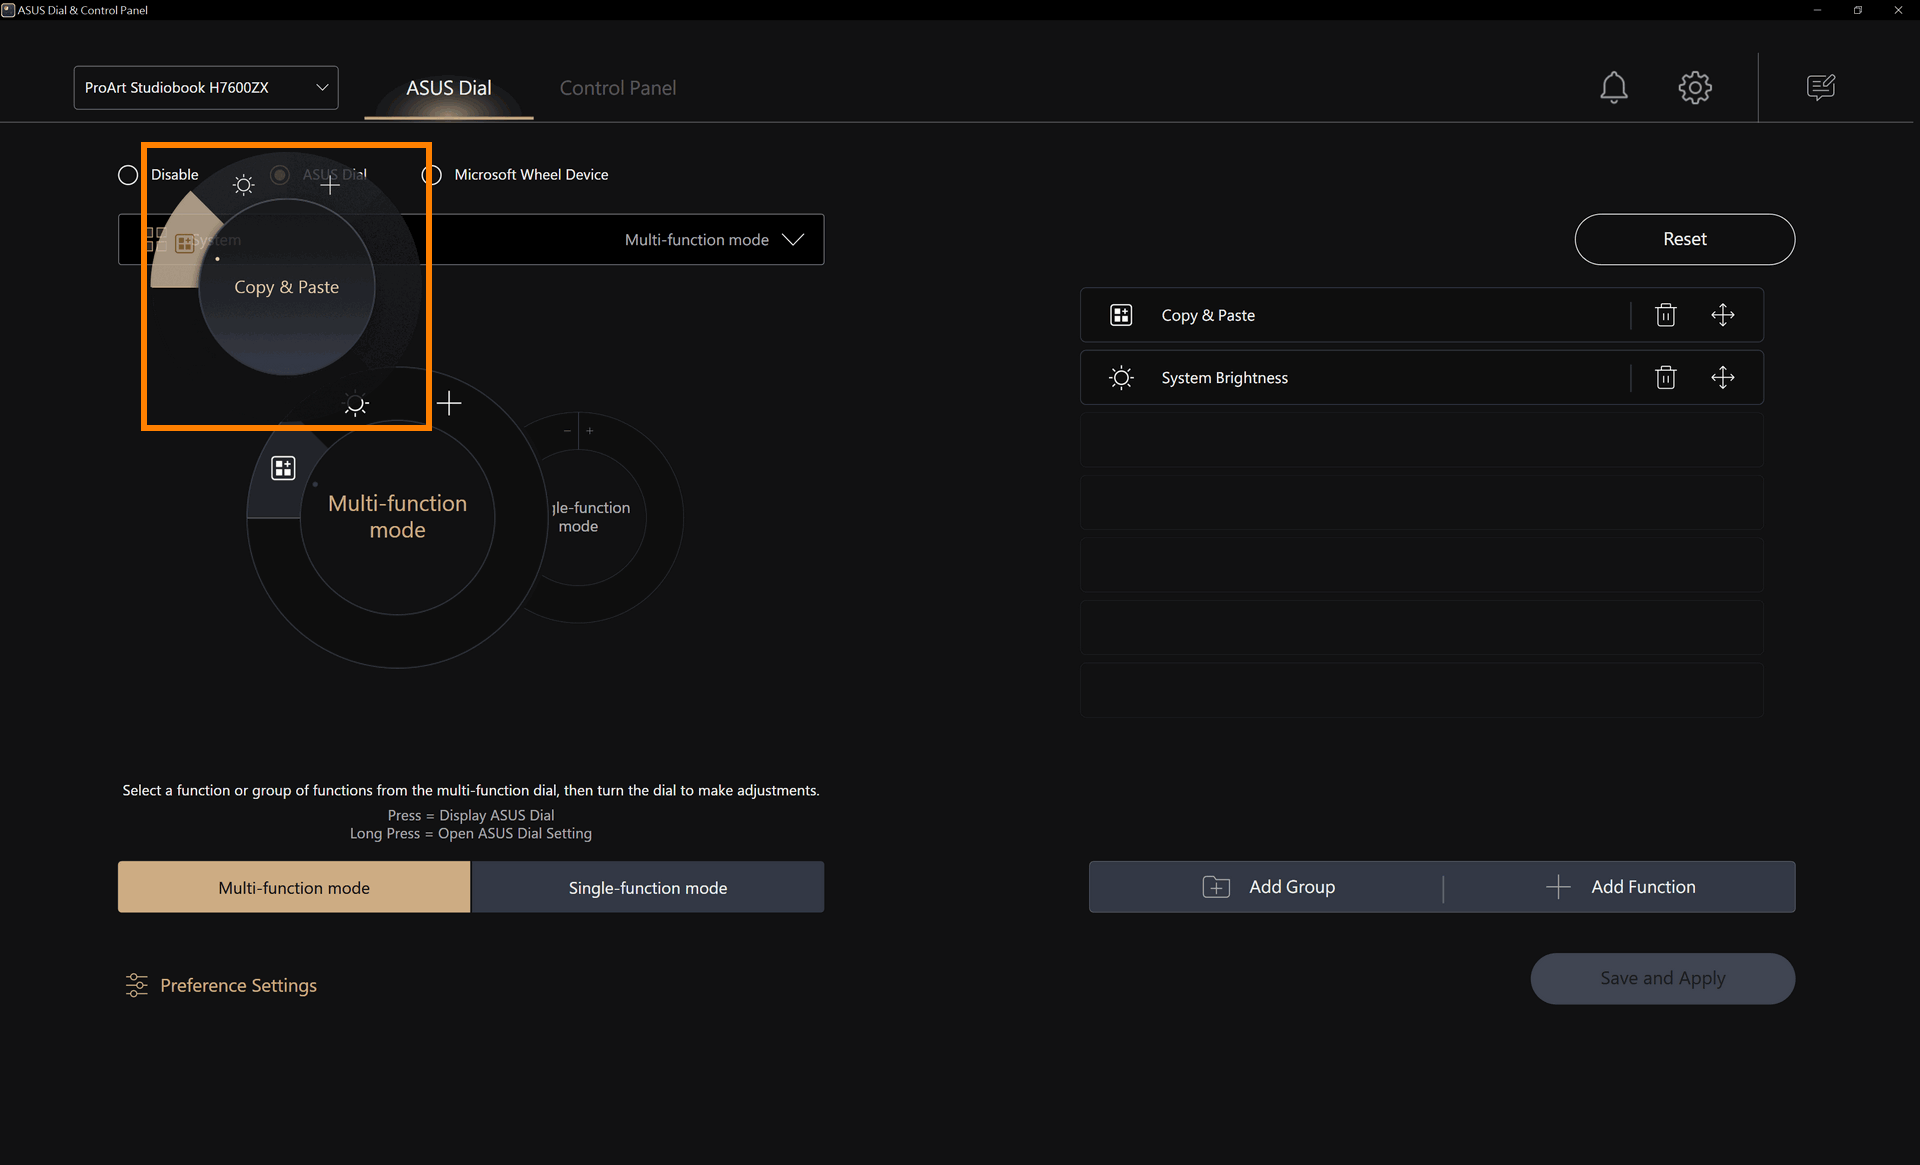
(4) Rotate the ASUS Dial to see that the new [System Function Key] function has been enabled, press the ASUS Dial with your finger to expand the functions in the group, and then use them.
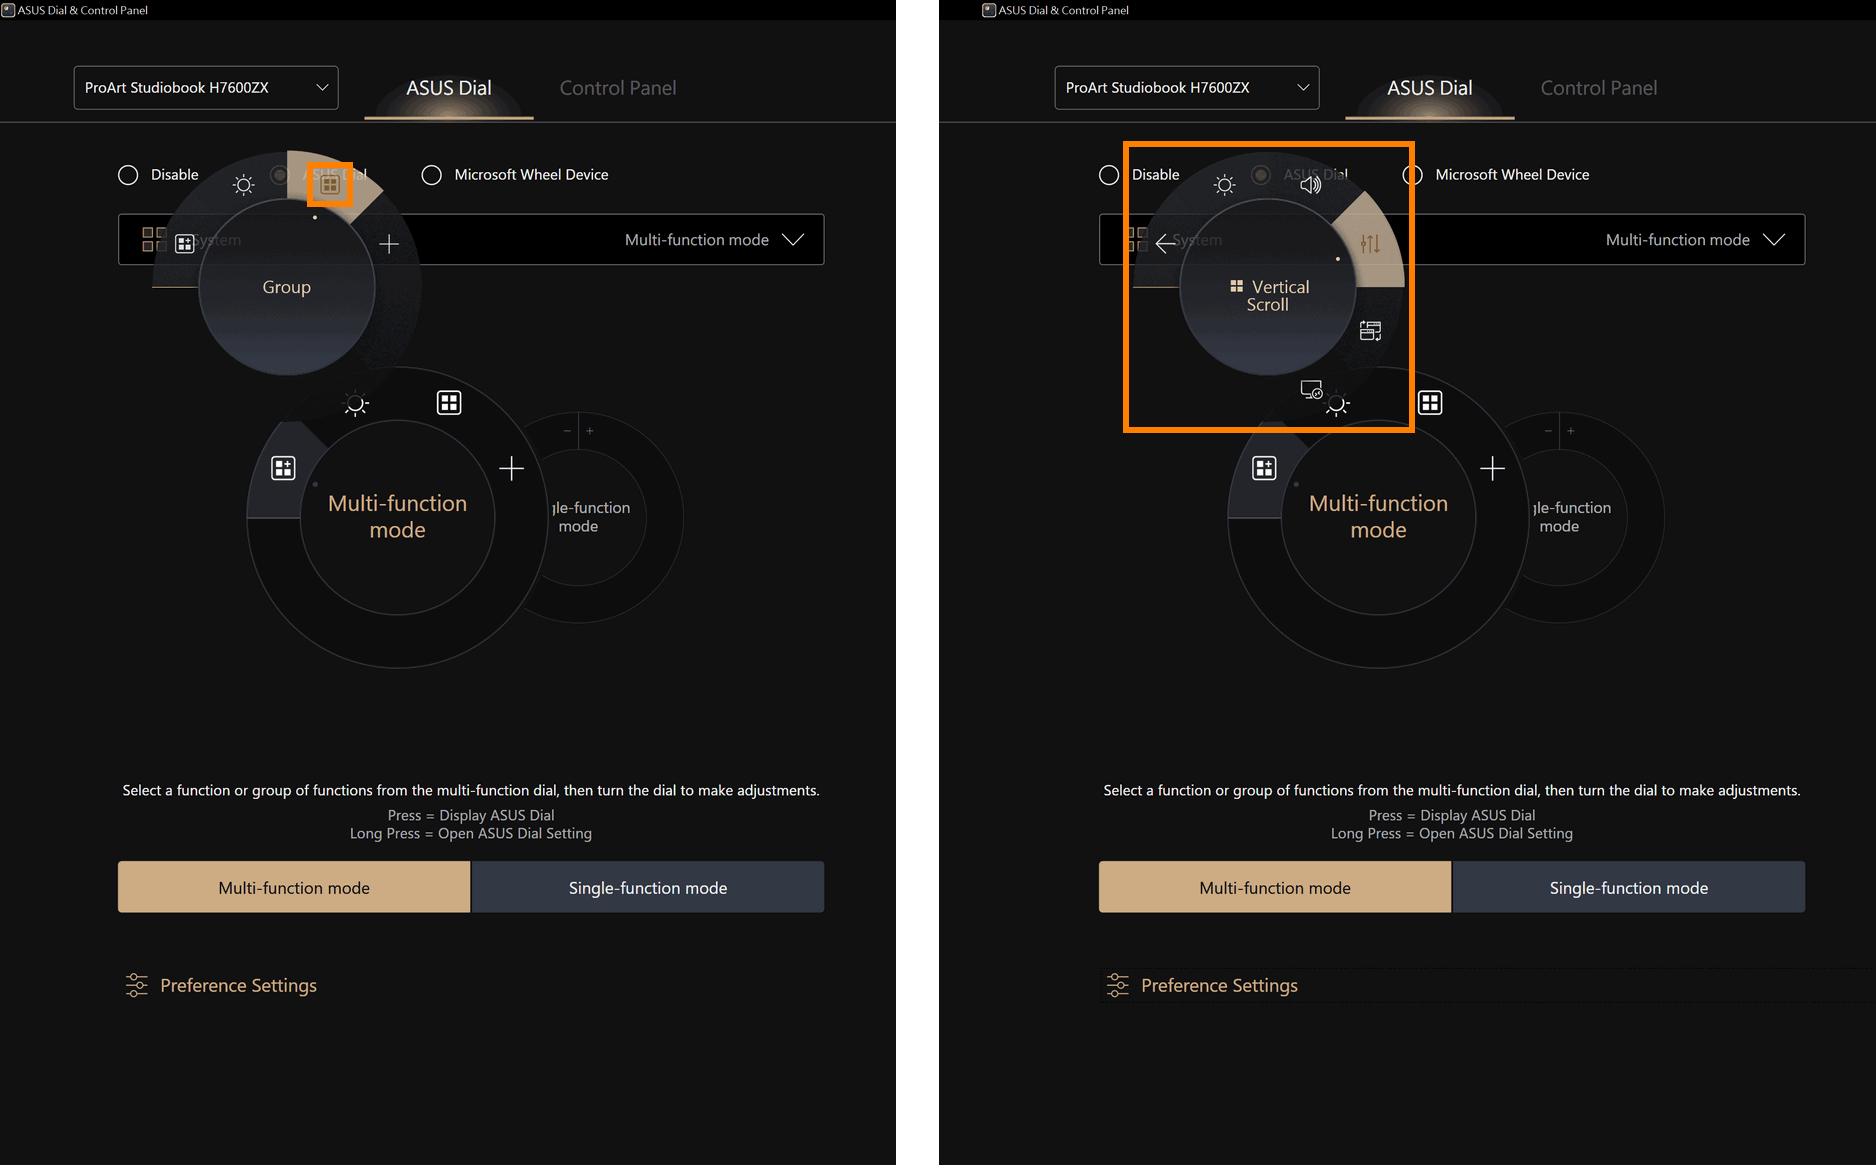
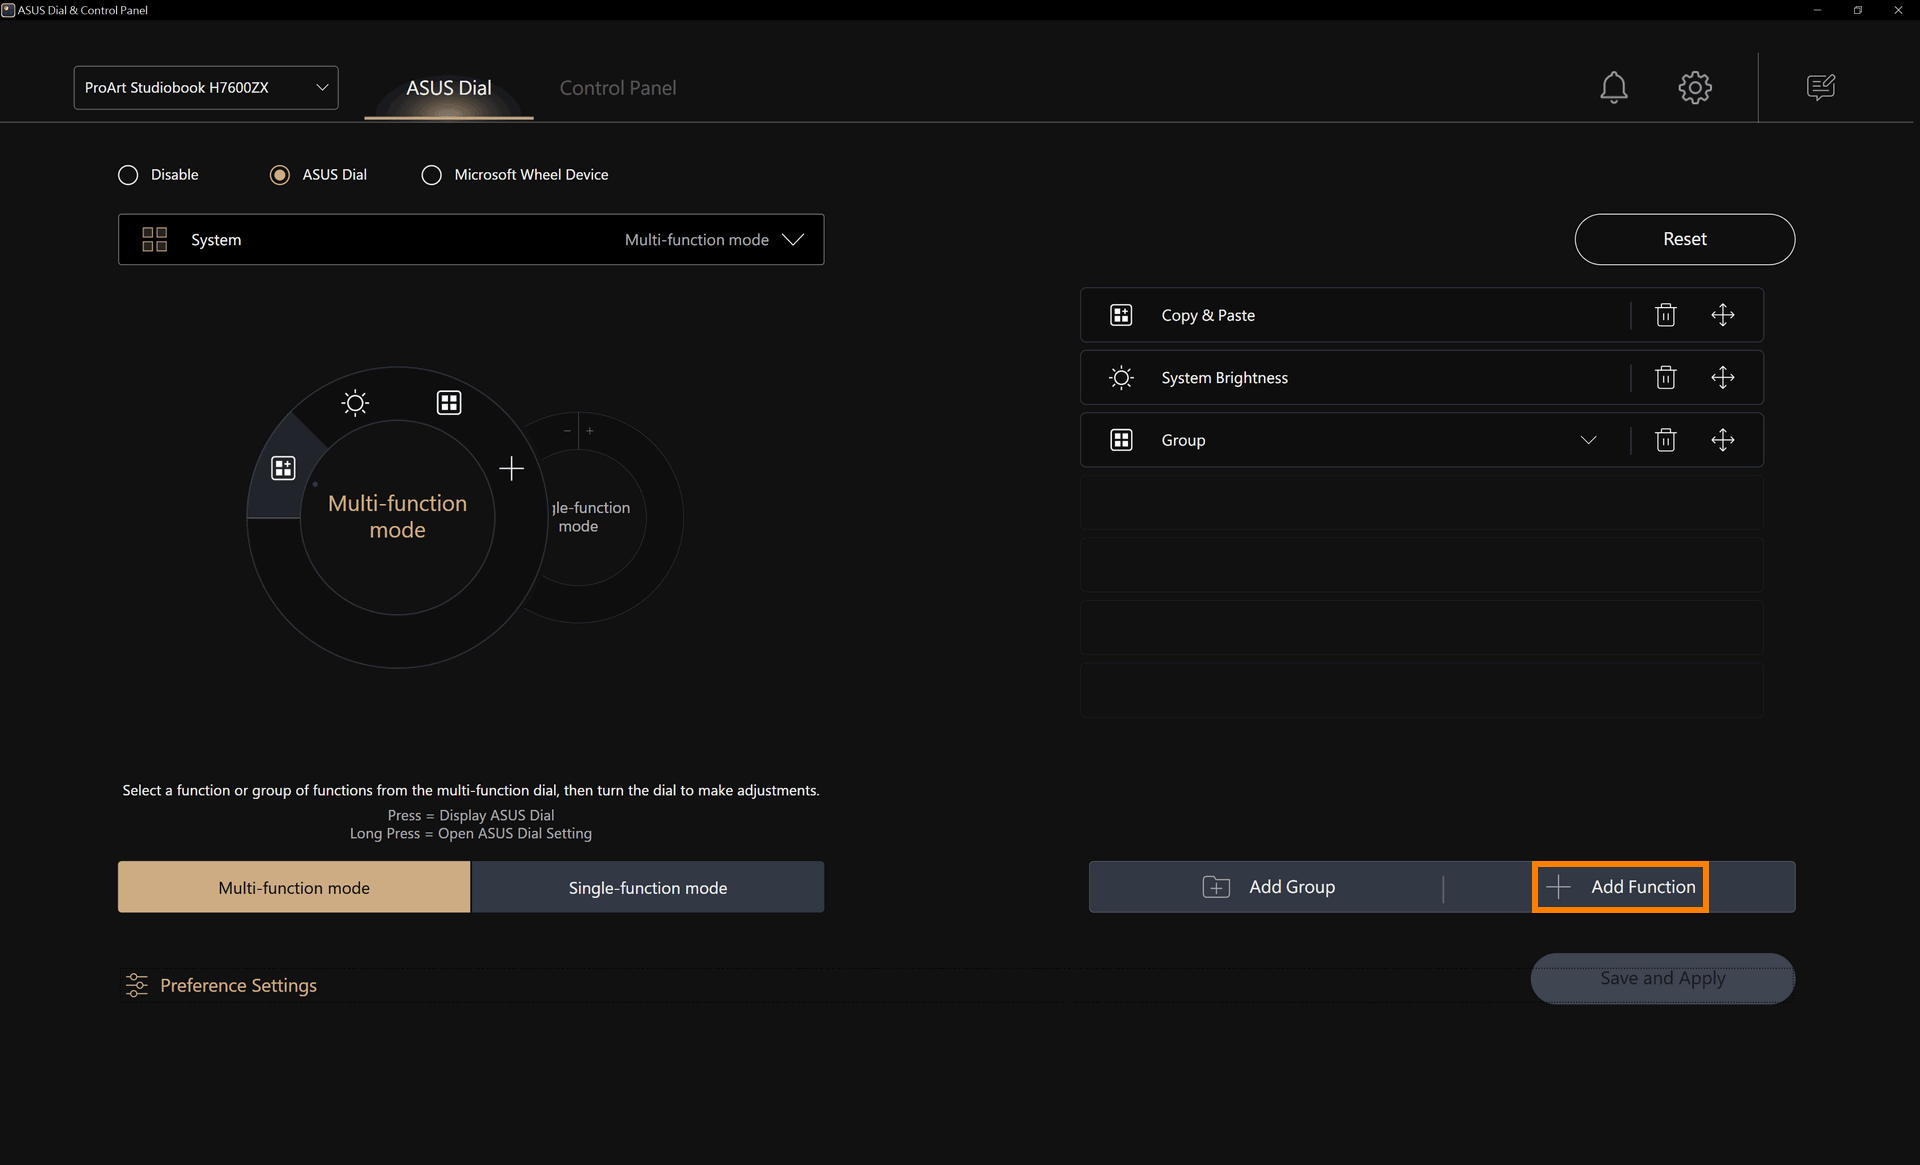
The steps for adding new functions are the same as those for [Edit an existing feature], please refer to the [Edit an existing feature] section.
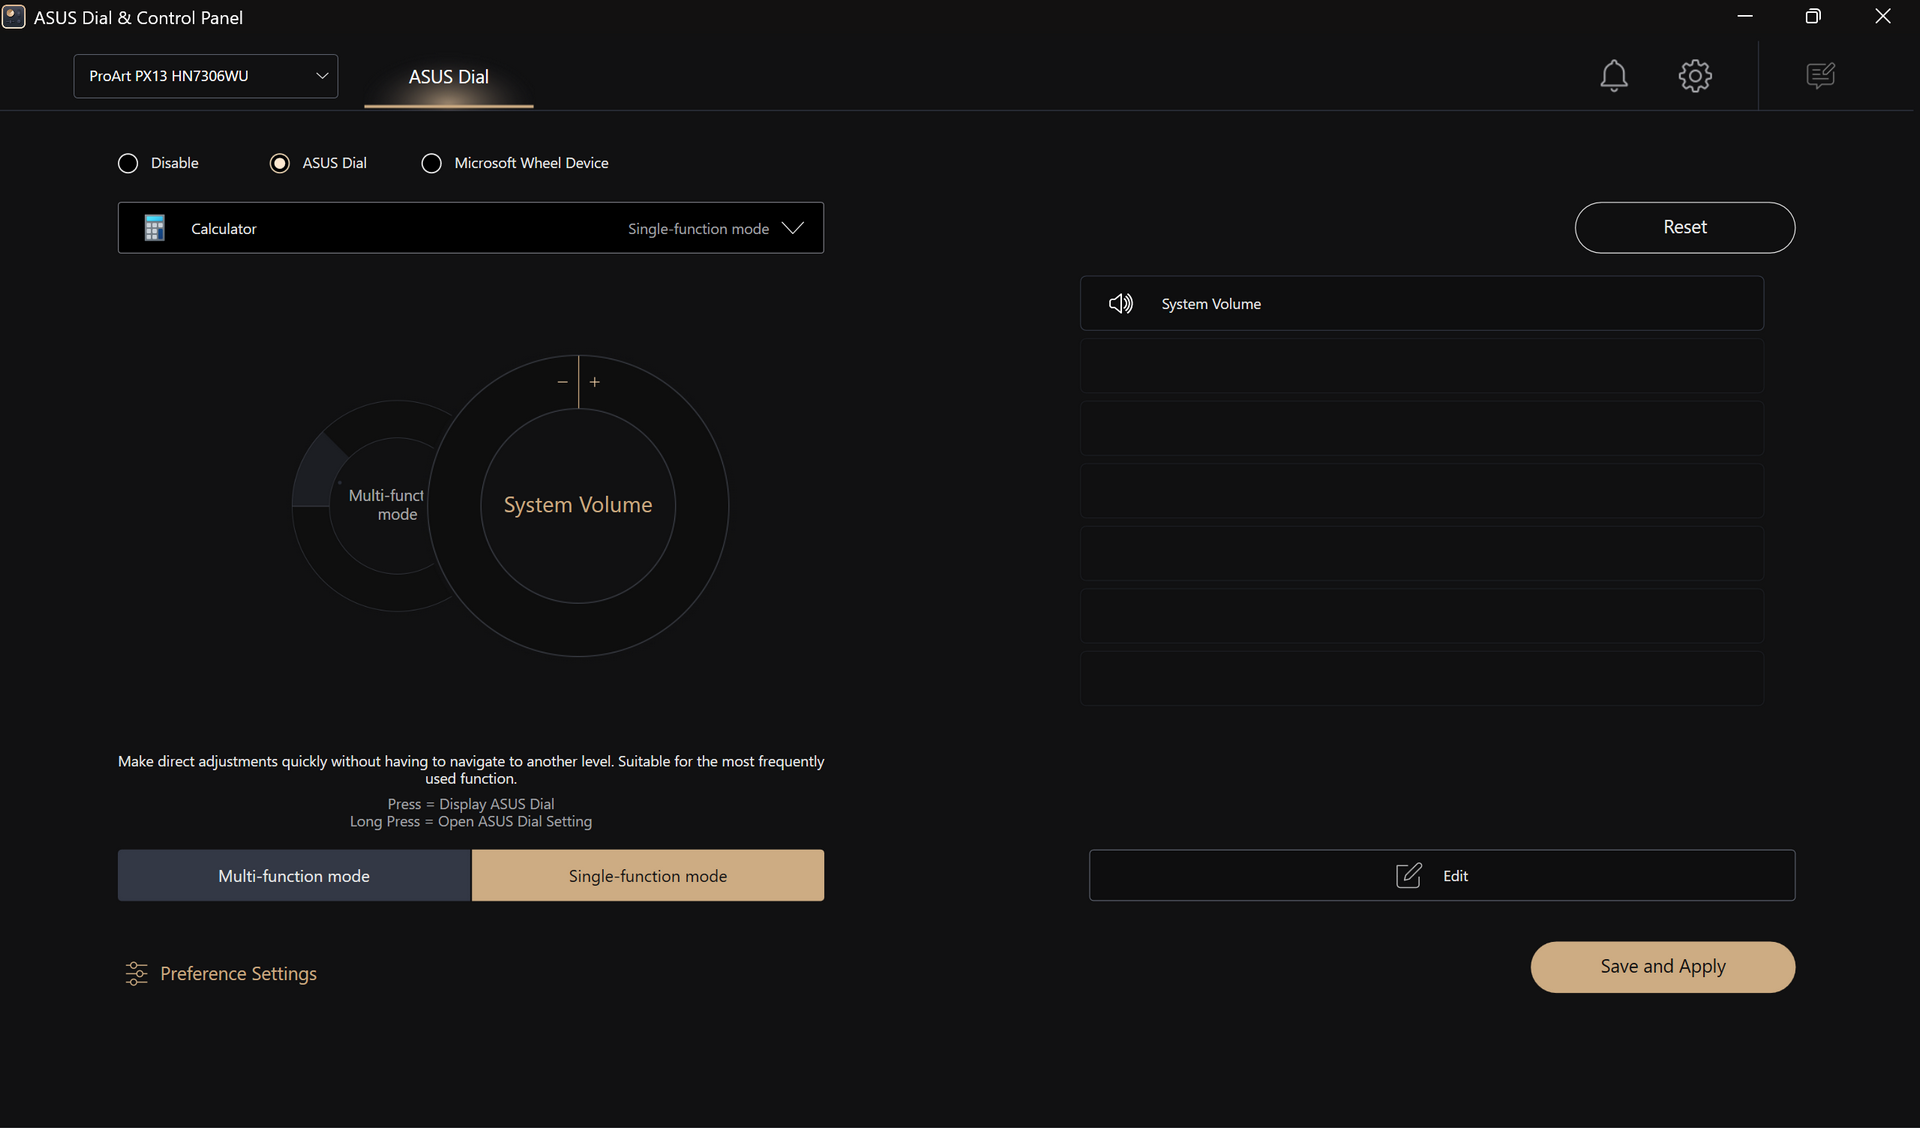
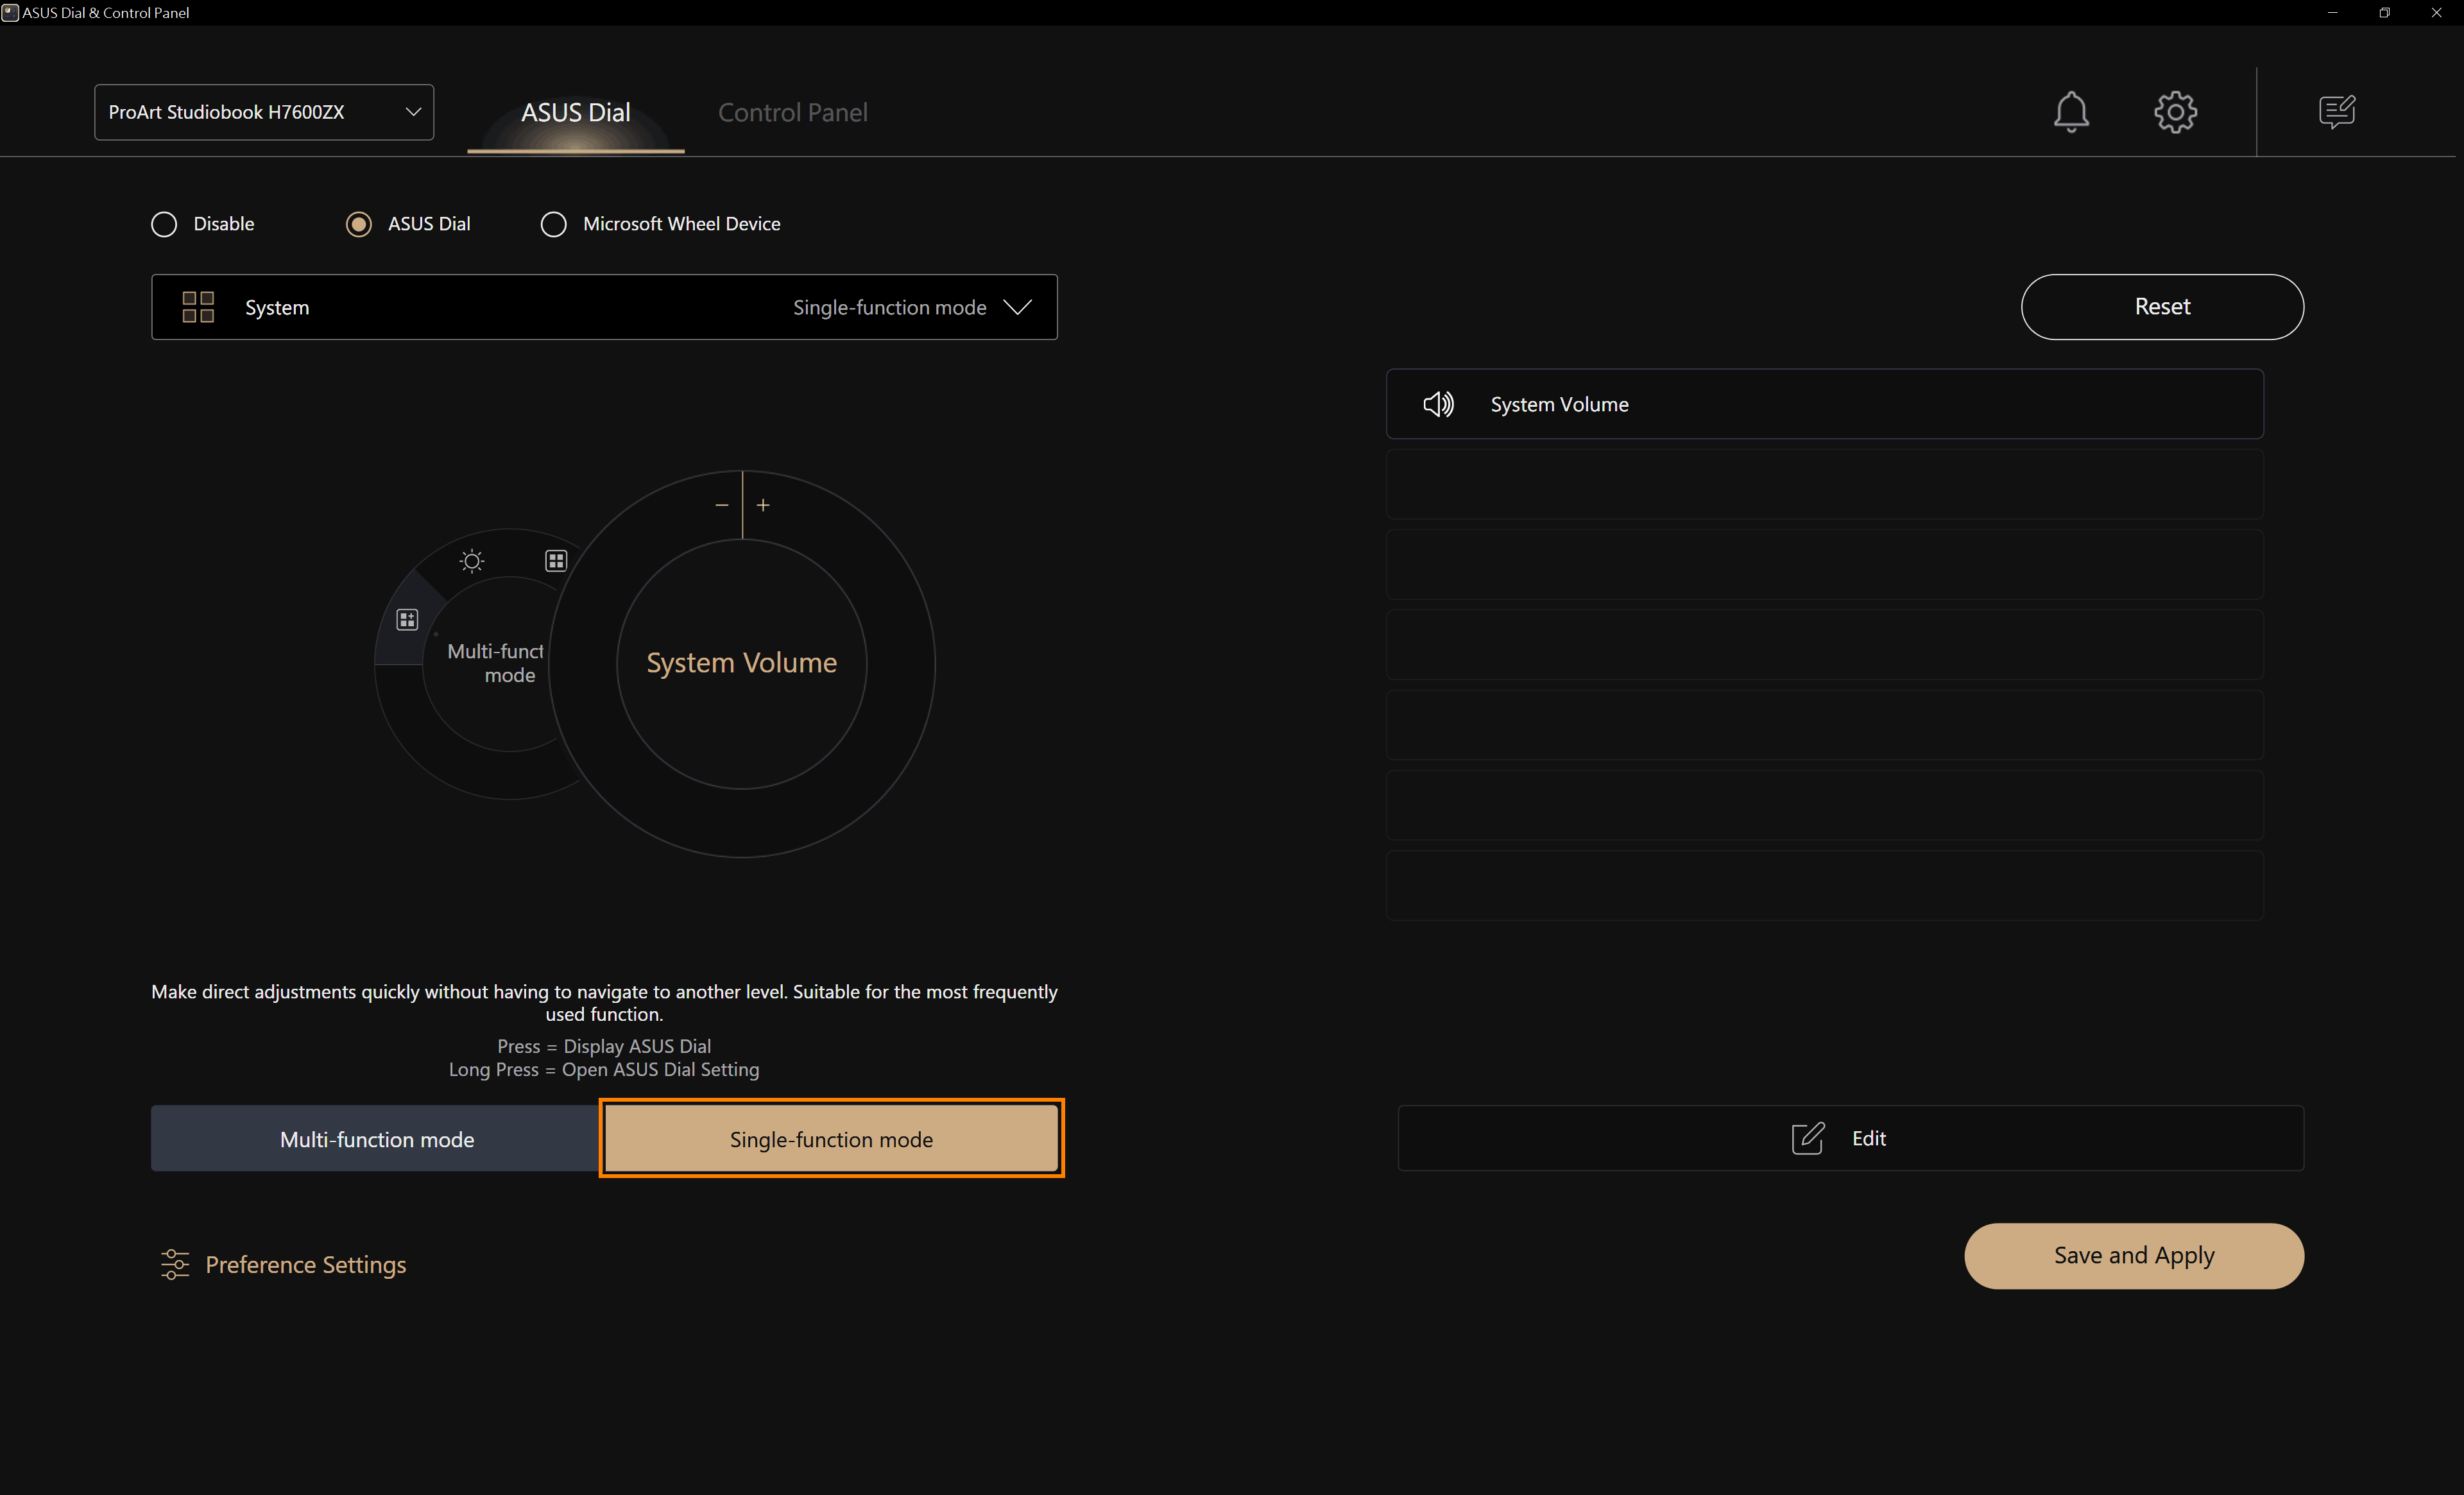
The creation and editing of the Single-function mode is the same as that of the Multi-select function mode, and will not be repeated. The Single-function mode only supports the use of one function, but when you support rotating the Dial, you can use the function without having to select it.
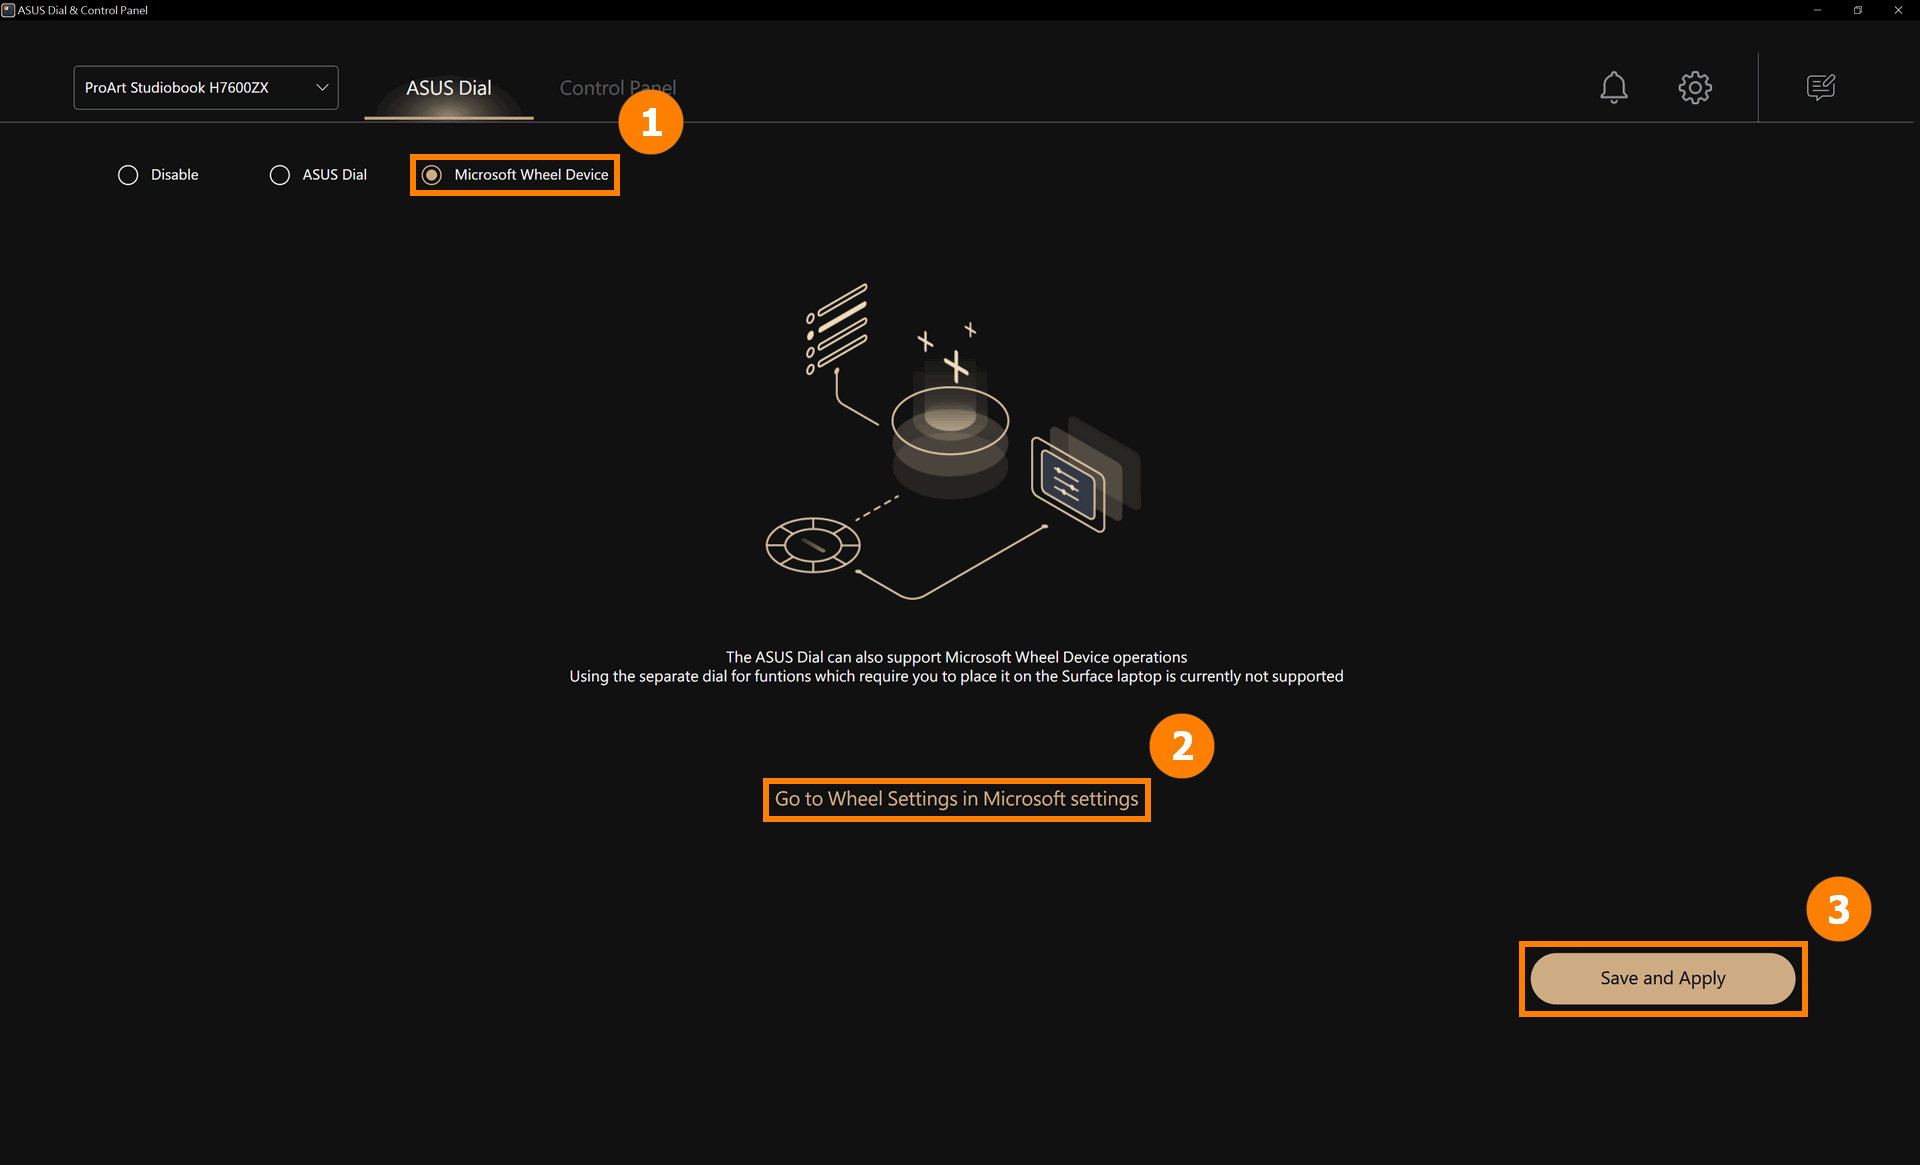
(1) Tap ①[Microsoft Wheel Device], tap ②[Save and apply]. [Microsoft Wheel Device] is a built-in function for the Windows system, click ③[Go to Wheel Settings in Microsoft settings] to modify the functions performed by ASUS Dial.
(2) Edit [Wheel settings].
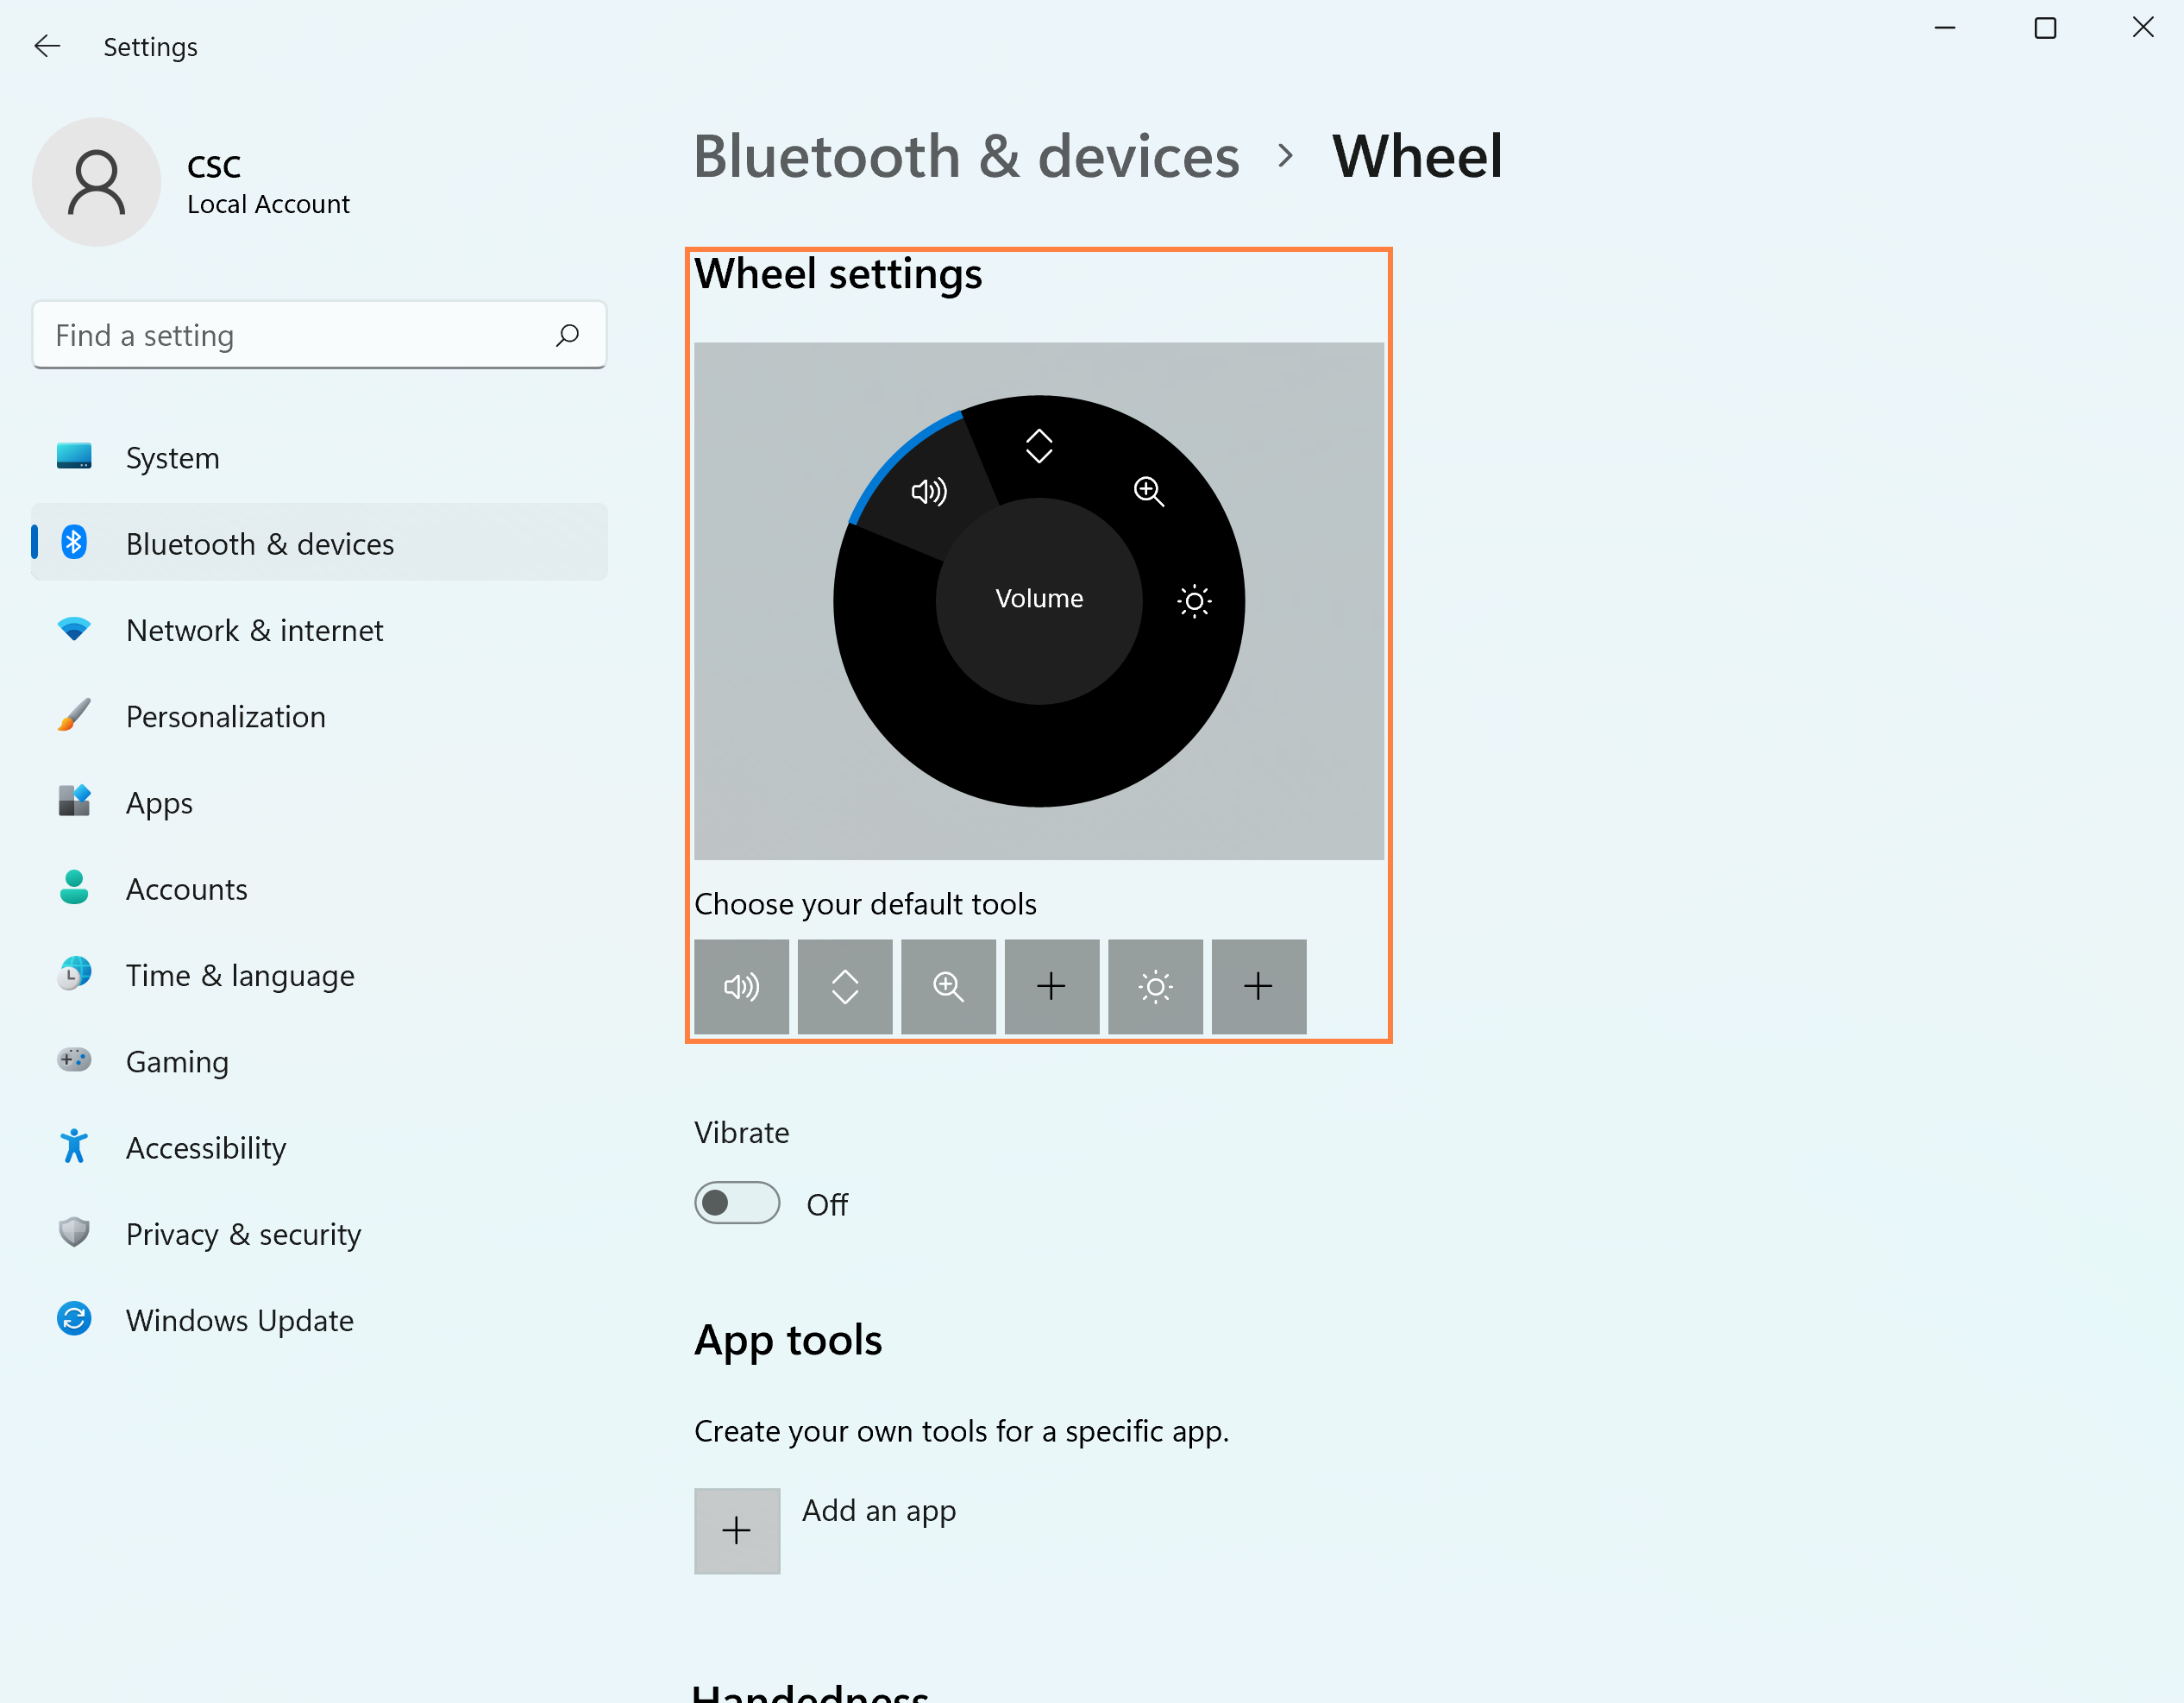
(3) After modification, rotate ASUS Dial, the Microsoft Wheel page will be brought up, rotate ASUS Dial left and right, select the volume adjustment function, and then press ASUS Dial.
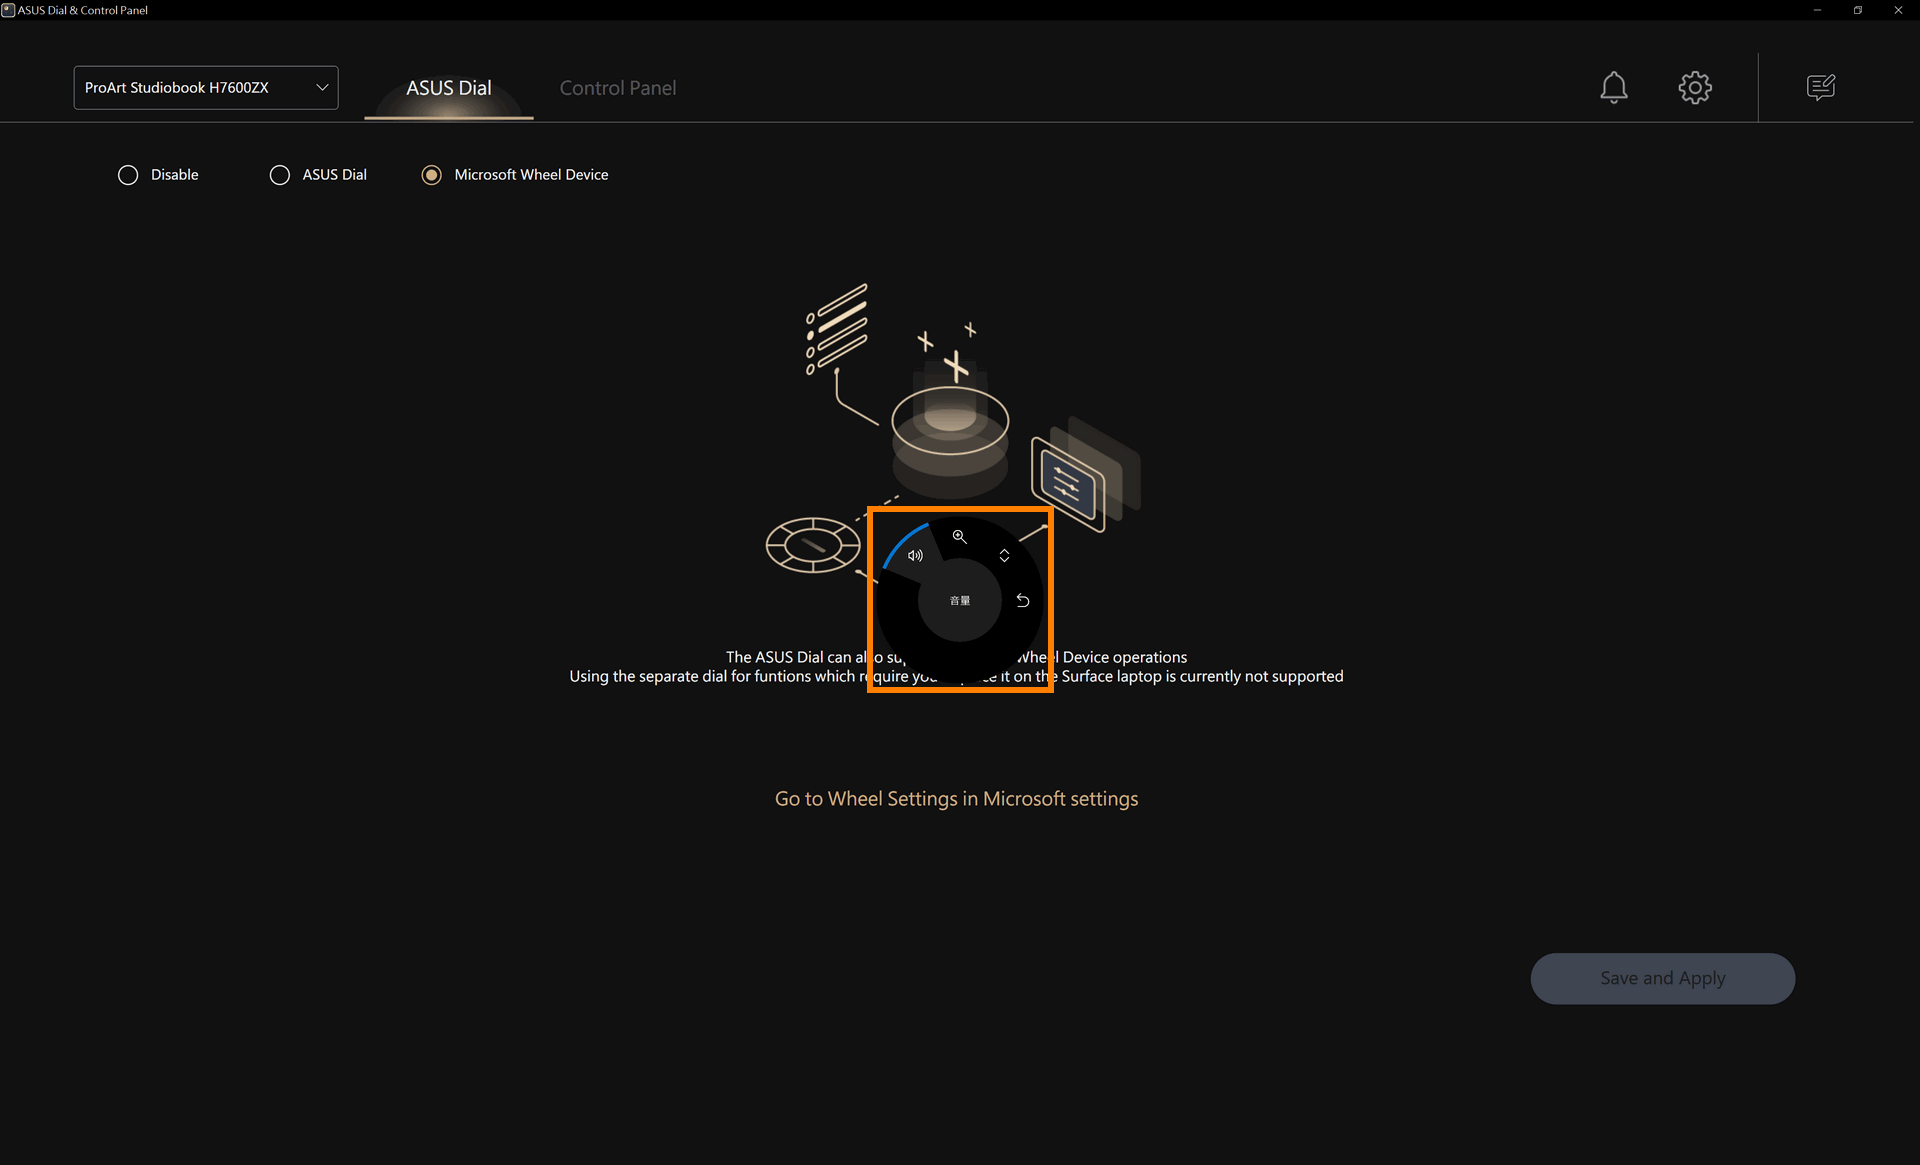
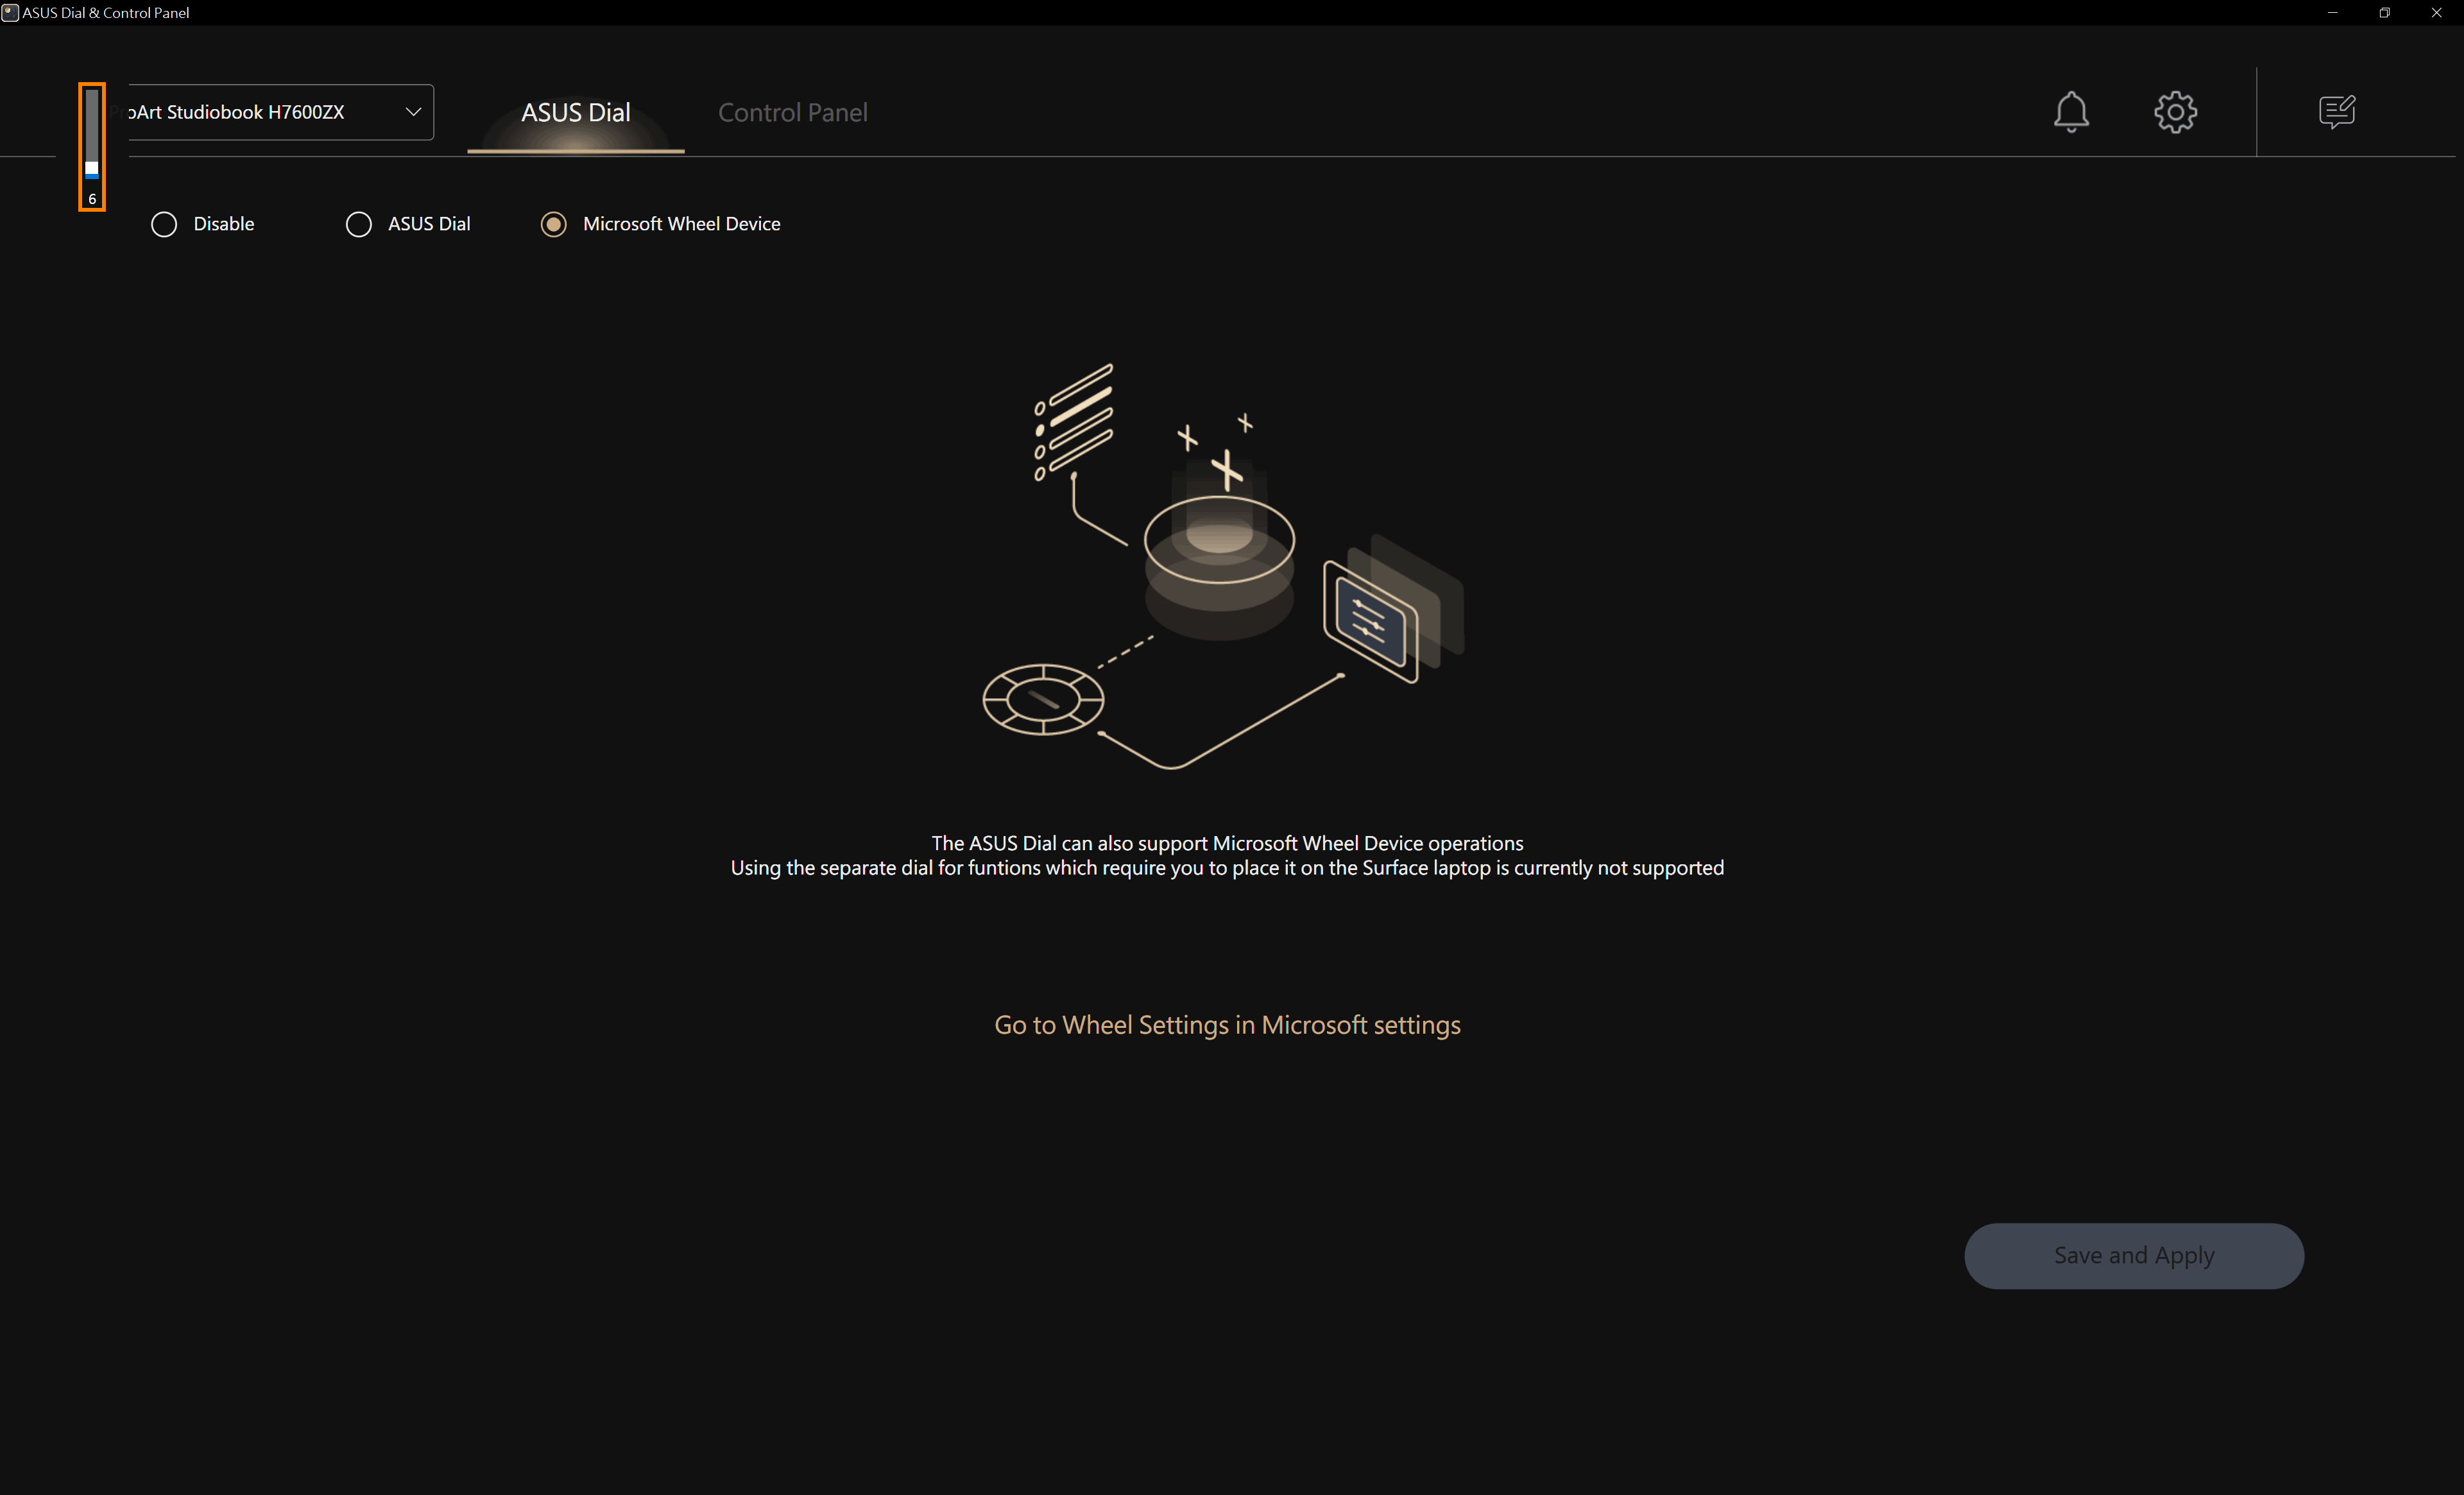
(4) Continue to rotate the ASUS Dial left and right to adjust the system volume. The next rotation of the ASUS Dial will directly adjust the system volume. However, if you want to use other functions, you need to press the ASUS Dial to wake up the selection page and reselect the other functions.
For more information, please click Information about Microsoft Wheel Devices.
10. Disable ASUS Dial function
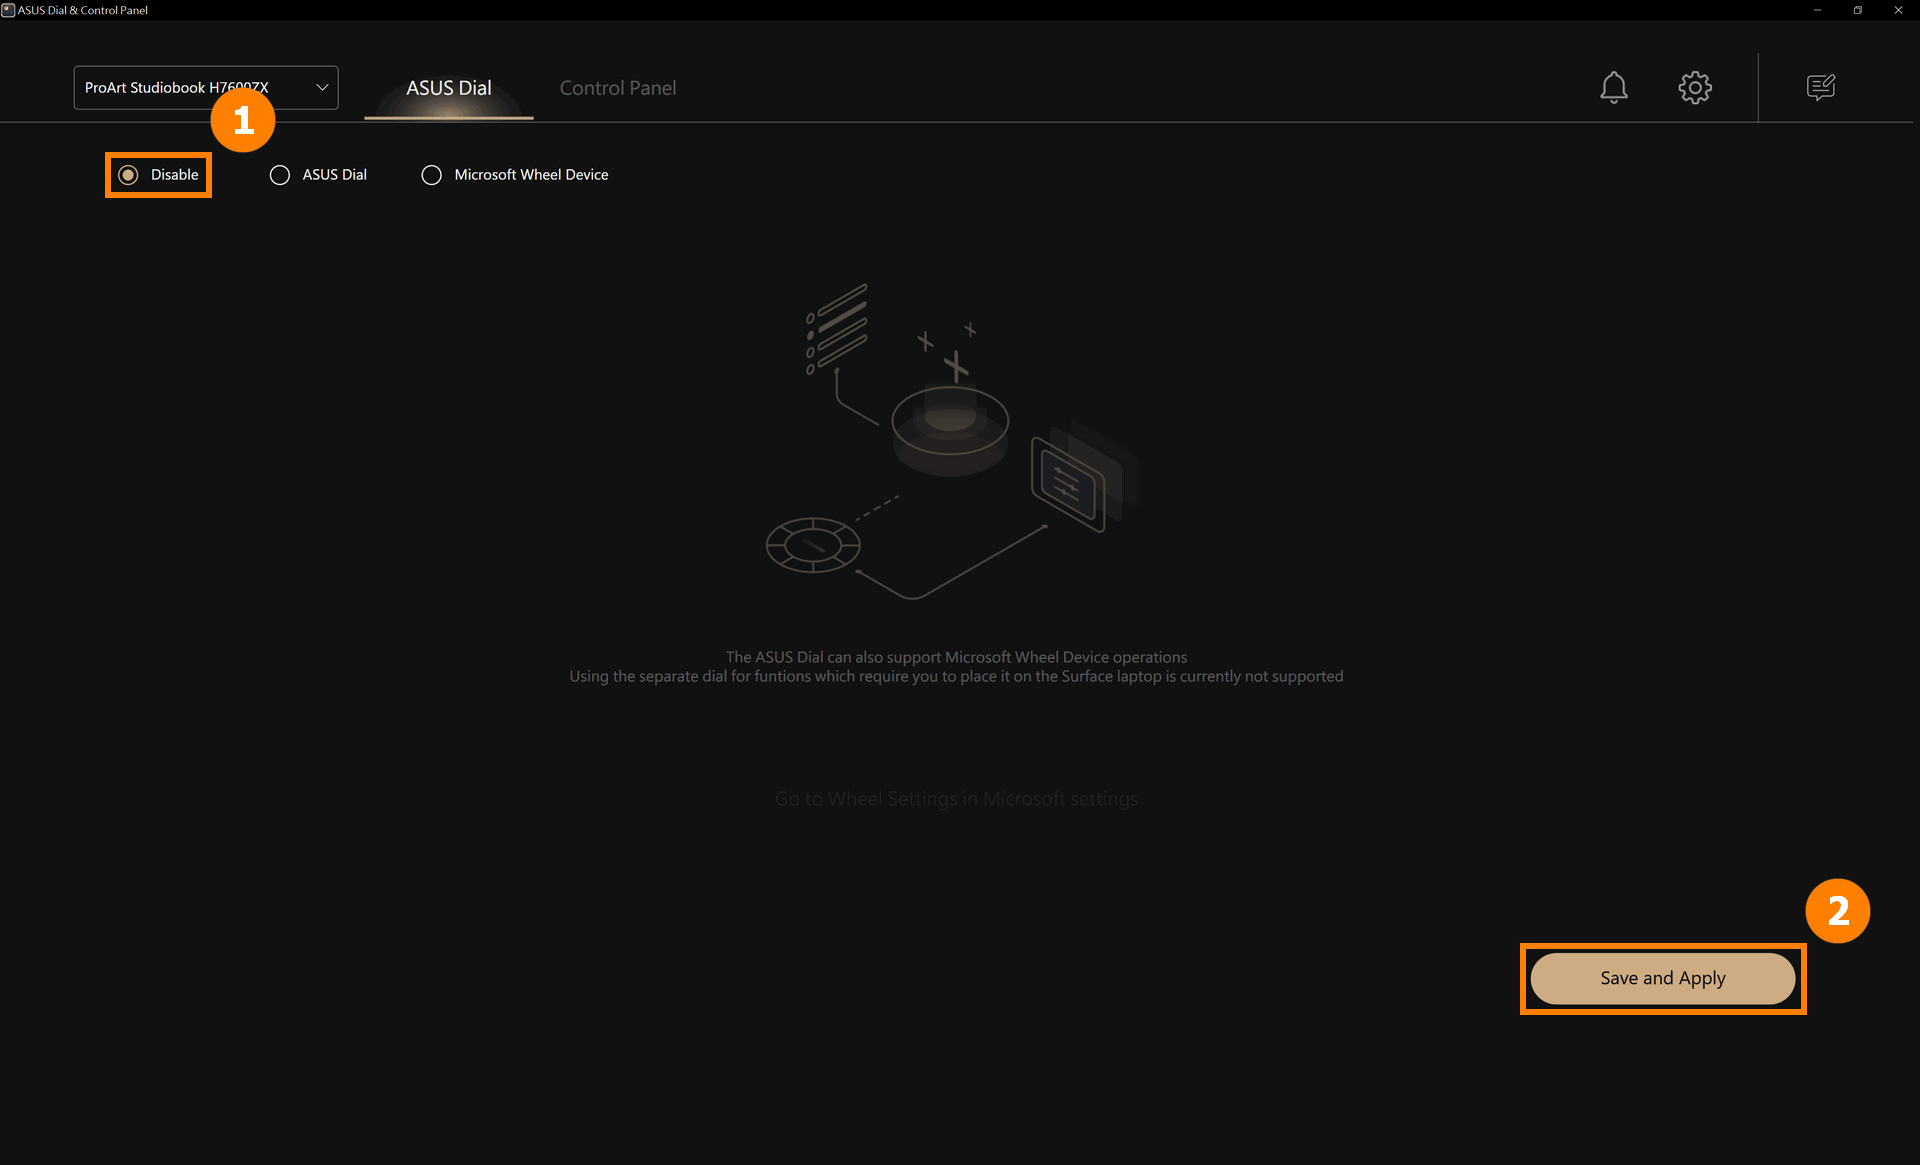
Click ①[Close], click ②[Save and Apply] to disable the ASUS Dial button function. When operating the ASUS Dial, there will be no response.
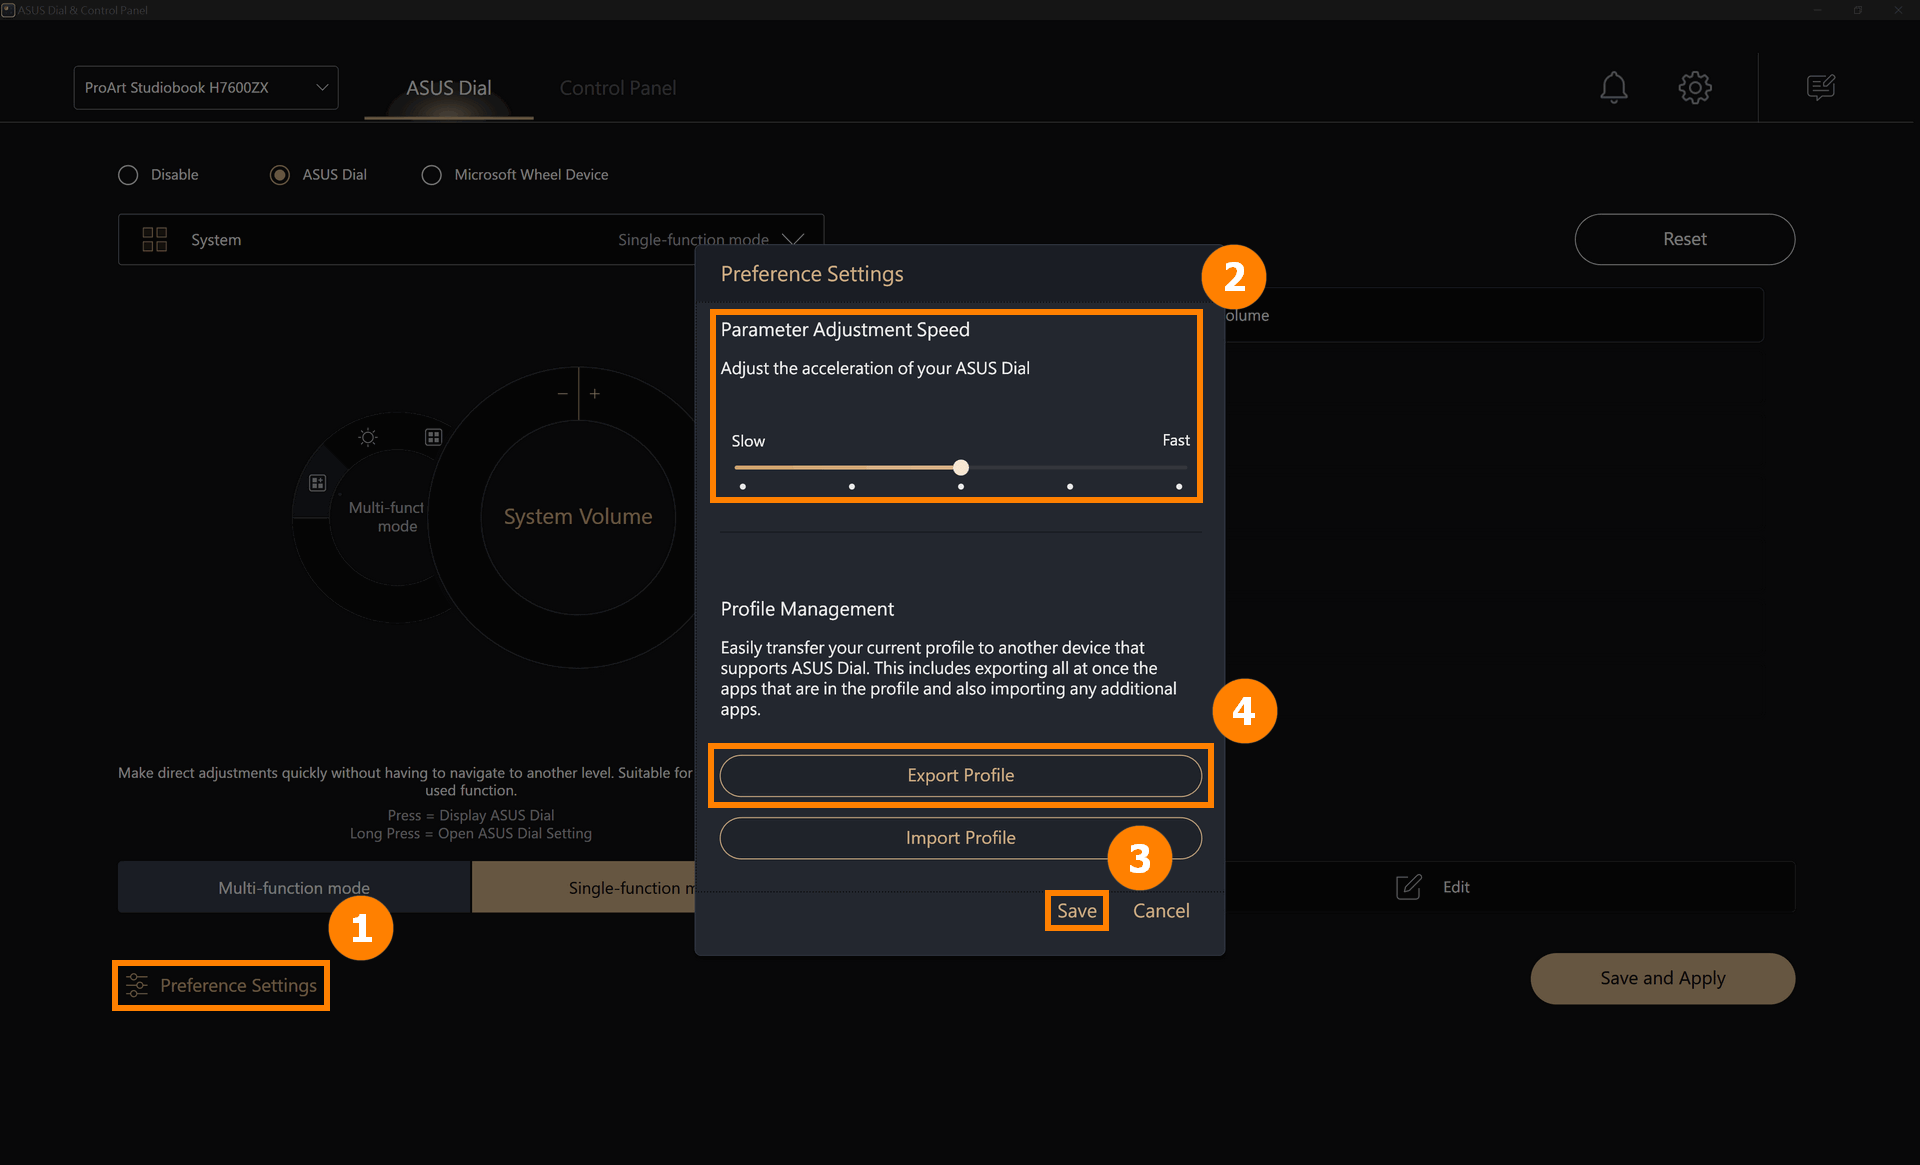
(1) Click ①[Preferences Settings], you can adjust the acceleration of your ASUS Dial in ②[Parameter Adjustment Speed], and click ③[Save] to save your changes. You can also click ④[Export Profile] to save your edits to ASUS Dial.
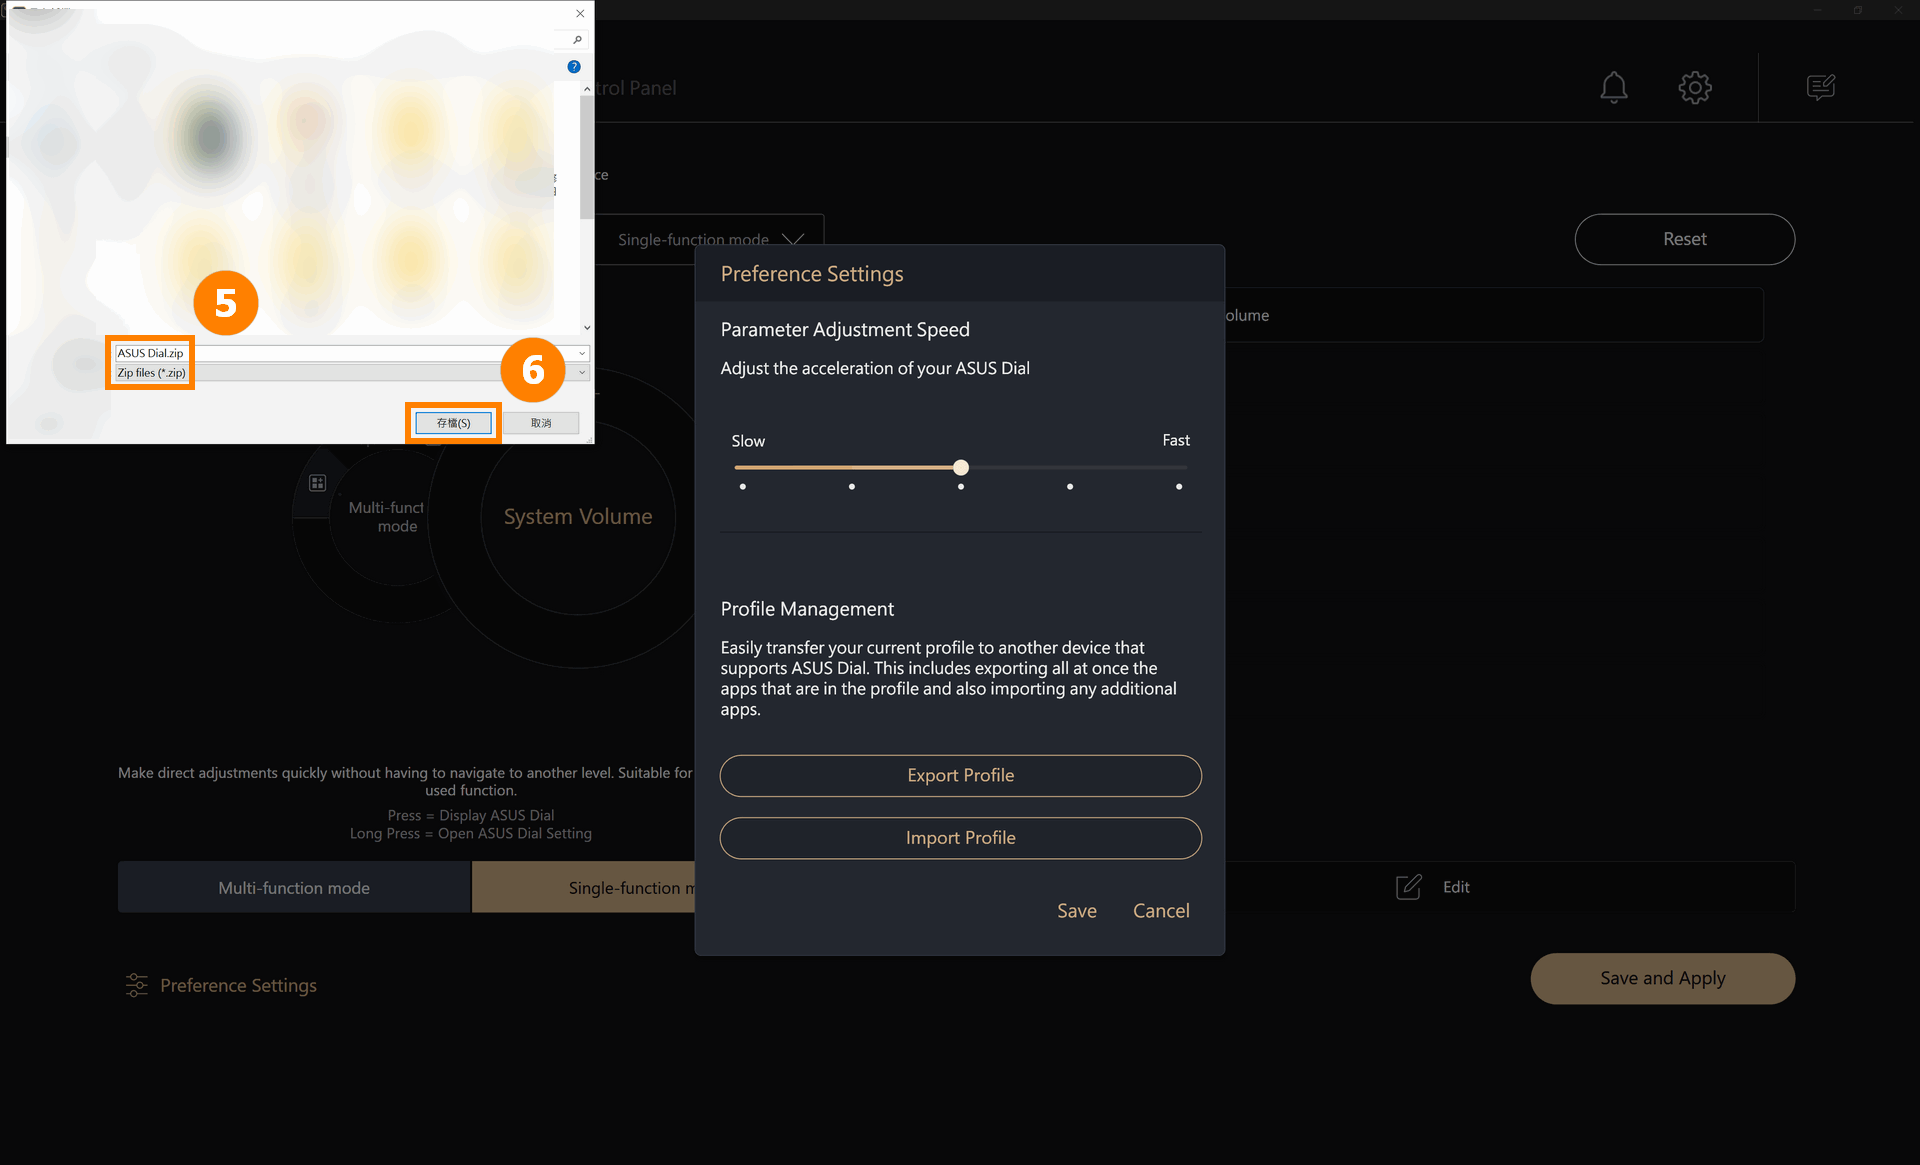
(2) Edit ⑤[File name], and then click ⑥[Save].
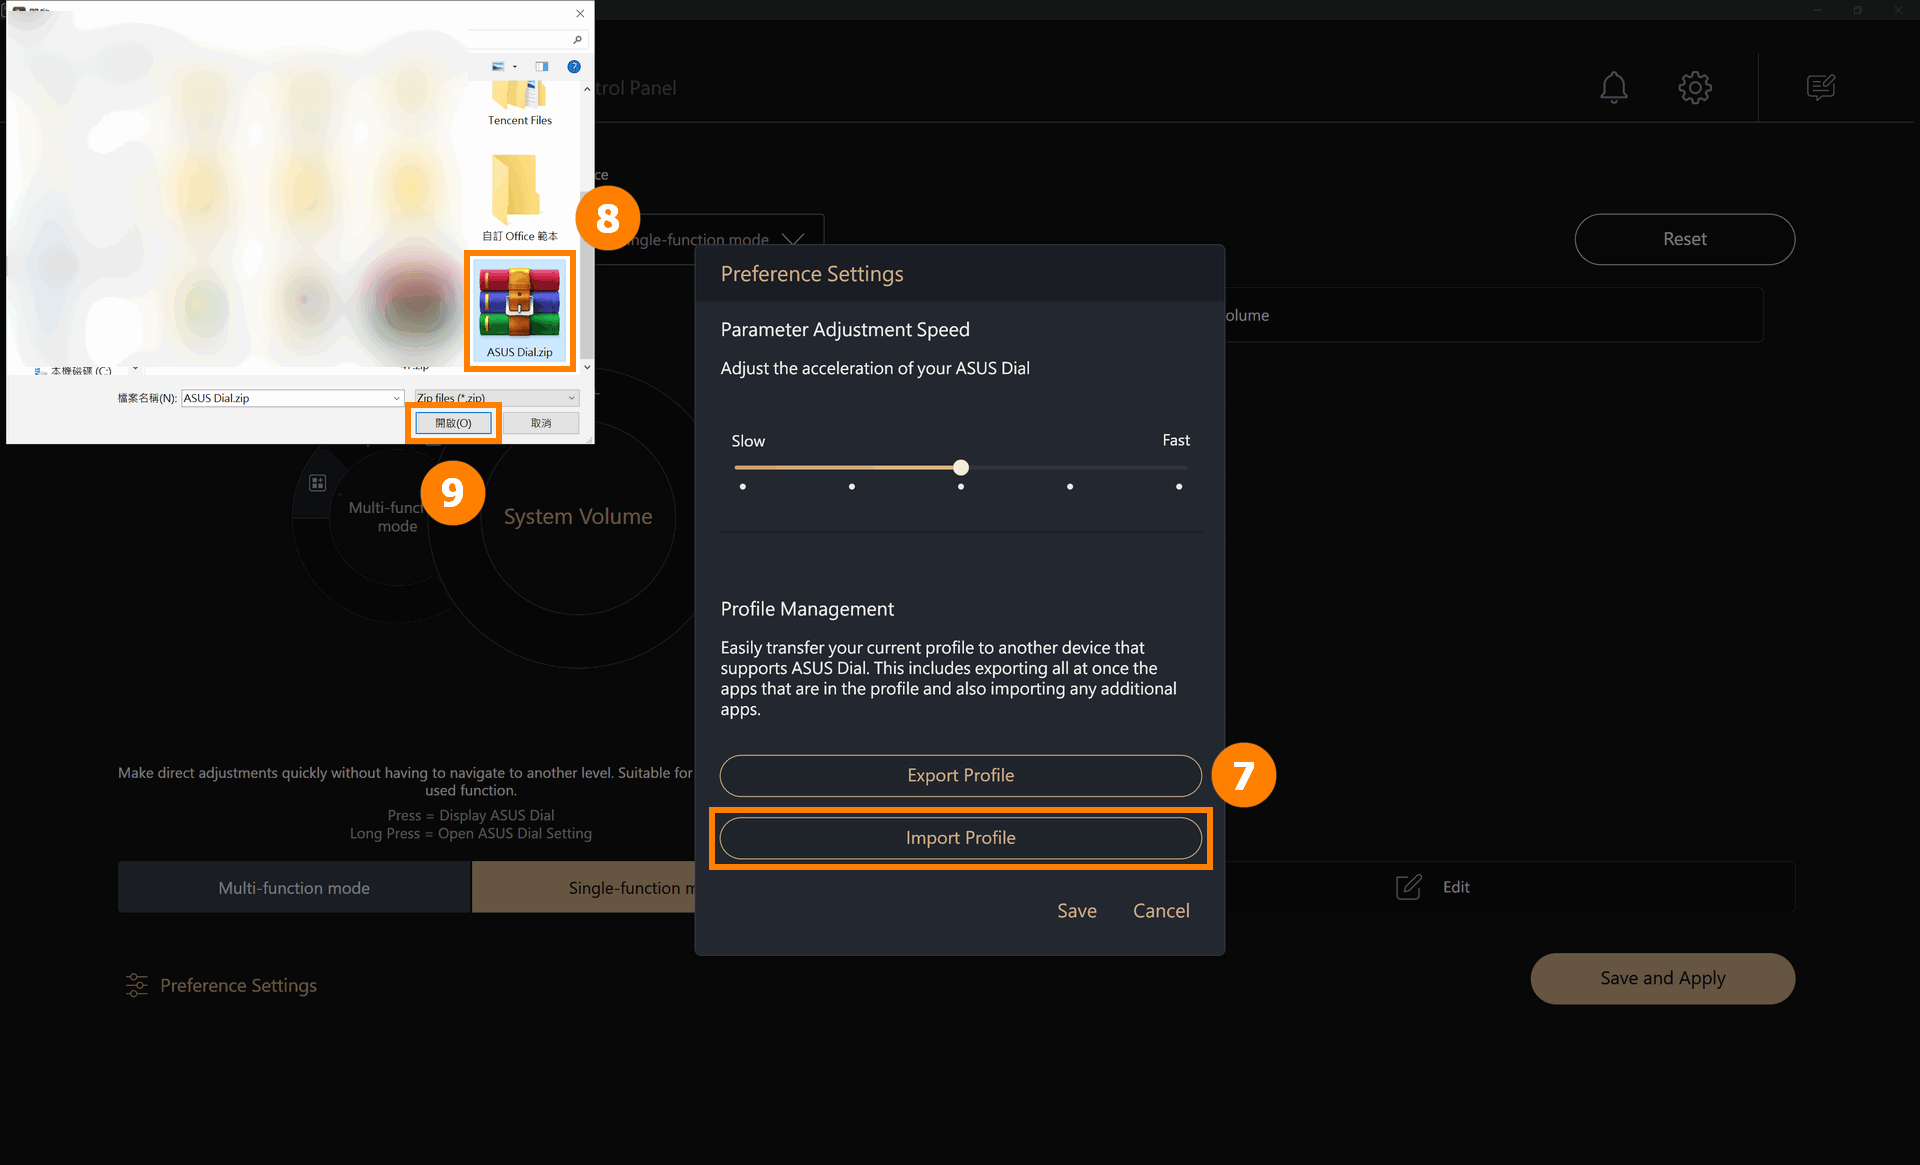
(3) When you reset Windows or replace your computer with a new one, you can click ⑦[Import Profile]. Select the ⑧[Profile] that you saved earlier, and then click ⑨[Open].
12. How to upgrade or download and uninstall the ASUS Dial control software
12.1 Upgrade ASUS Dial Control Software
ASUS Dia will automatically update to the latest version when you connect to the Internet.
12.2 When you reset your Windows system and need to reinstall the ASUS Dial control software, please go to the Microsoft App Store to download and install.
12.3 How to uninstall the ASUS Dial Control Software:
You may uninstall the ASUS Dial Control Software by following the information provided at the following link: [Windows 11/10] How to uninstall Apps, Windows installed updates, Drivers | Official Support | ASUS ...
Question 2 : How to enlarge the font of ASUS Dial?
Answer 2 : Right-click the computer desktop, left-click [Display settings], and select the size you want in Scale & Layout.

