- English
- Other Products
- FAQ
- [Notebook] Troubleshooting - Touchpad abnormal pro...
- Subscribe to RSS Feed
- Mark as New
- Mark as Read
- Bookmark
- Subscribe
- Printer Friendly Page
- Report Inappropriate Content
- Article History
- Subscribe to RSS Feed
- Mark as New
- Mark as Read
- Bookmark
- Subscribe
- Printer Friendly Page
- Report Inappropriate Content
on
01-29-2024
04:24 PM
- edited on
10-07-2025
04:43 AM
by
![]() ZenBot
ZenBot
[Notebook] Troubleshooting - Touchpad abnormal problems
You might experience the problem that the Touchpad is insensitive / invalid click / not working, etc. Please refer to the troubleshooting steps in this article.
![]()
To provide you more detailed instruction, you can also click ASUS YouTube video link below to know more about How to fix the Touchpad abnormal problems:
https://www.youtube.com/watch?v=0Zx39uHHx3o
Please go to the corresponding instruction based on the current Windows operating system on your computer:
Table of Contents:
Make sure the Touchpad hotkey is enabled
Please try to use the function key (hotkey) to enable/disable the Touchpad function to ensure there is no response on Touchpad due to it is disabled.
- Check the hotkeys location whether there is [Touchpad hotkey
 ,
,  ] on your keyboard①, it located on F6 or F9 key usually.
Note: The hotkeys function may be various based on different models, please refer to the User Manuals.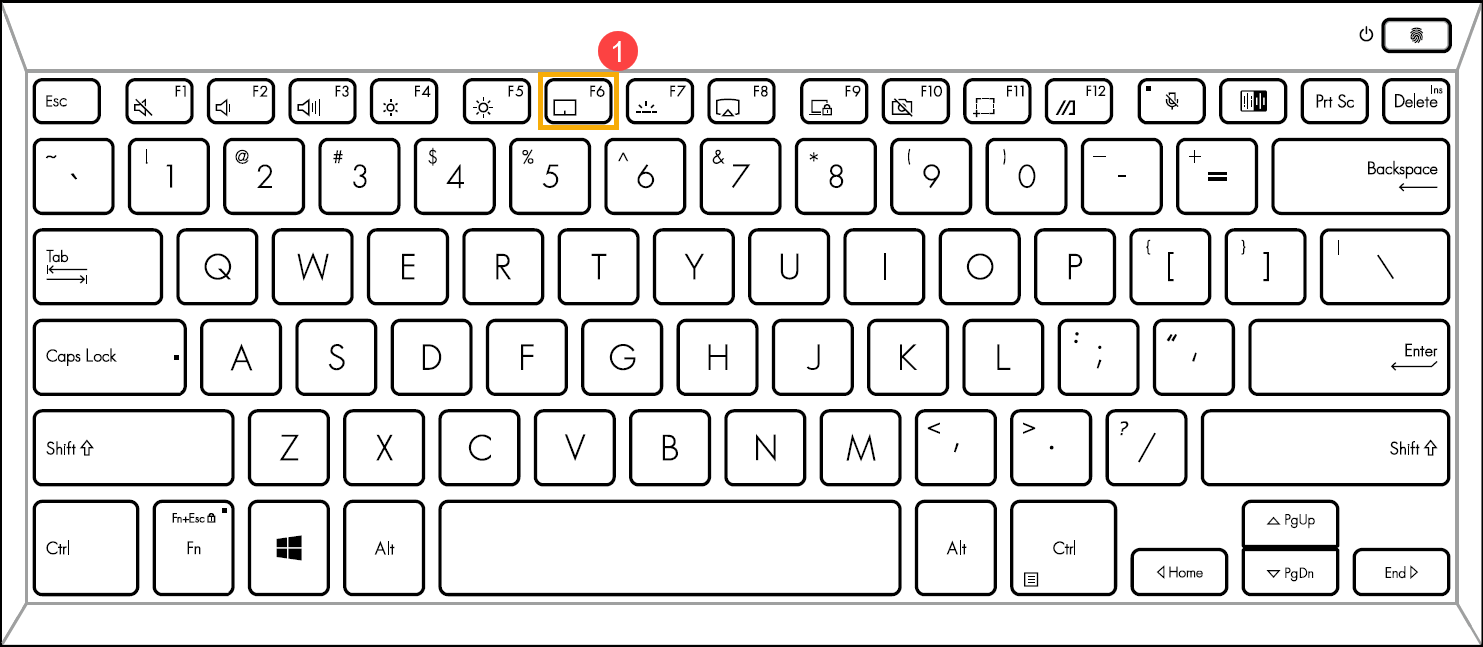
- Press
 or press the function key
  +
+  (It depends on what your hotkey option selected is.) on the keyboard, and then check whether there is a notification of [Touchpad is enabled]② on your screen.
Note: If the function key is not working, please try reinstalling the ASUS System Control Interface driver. Here you can learn more about How to download and install the ASUS System Control Interface driver.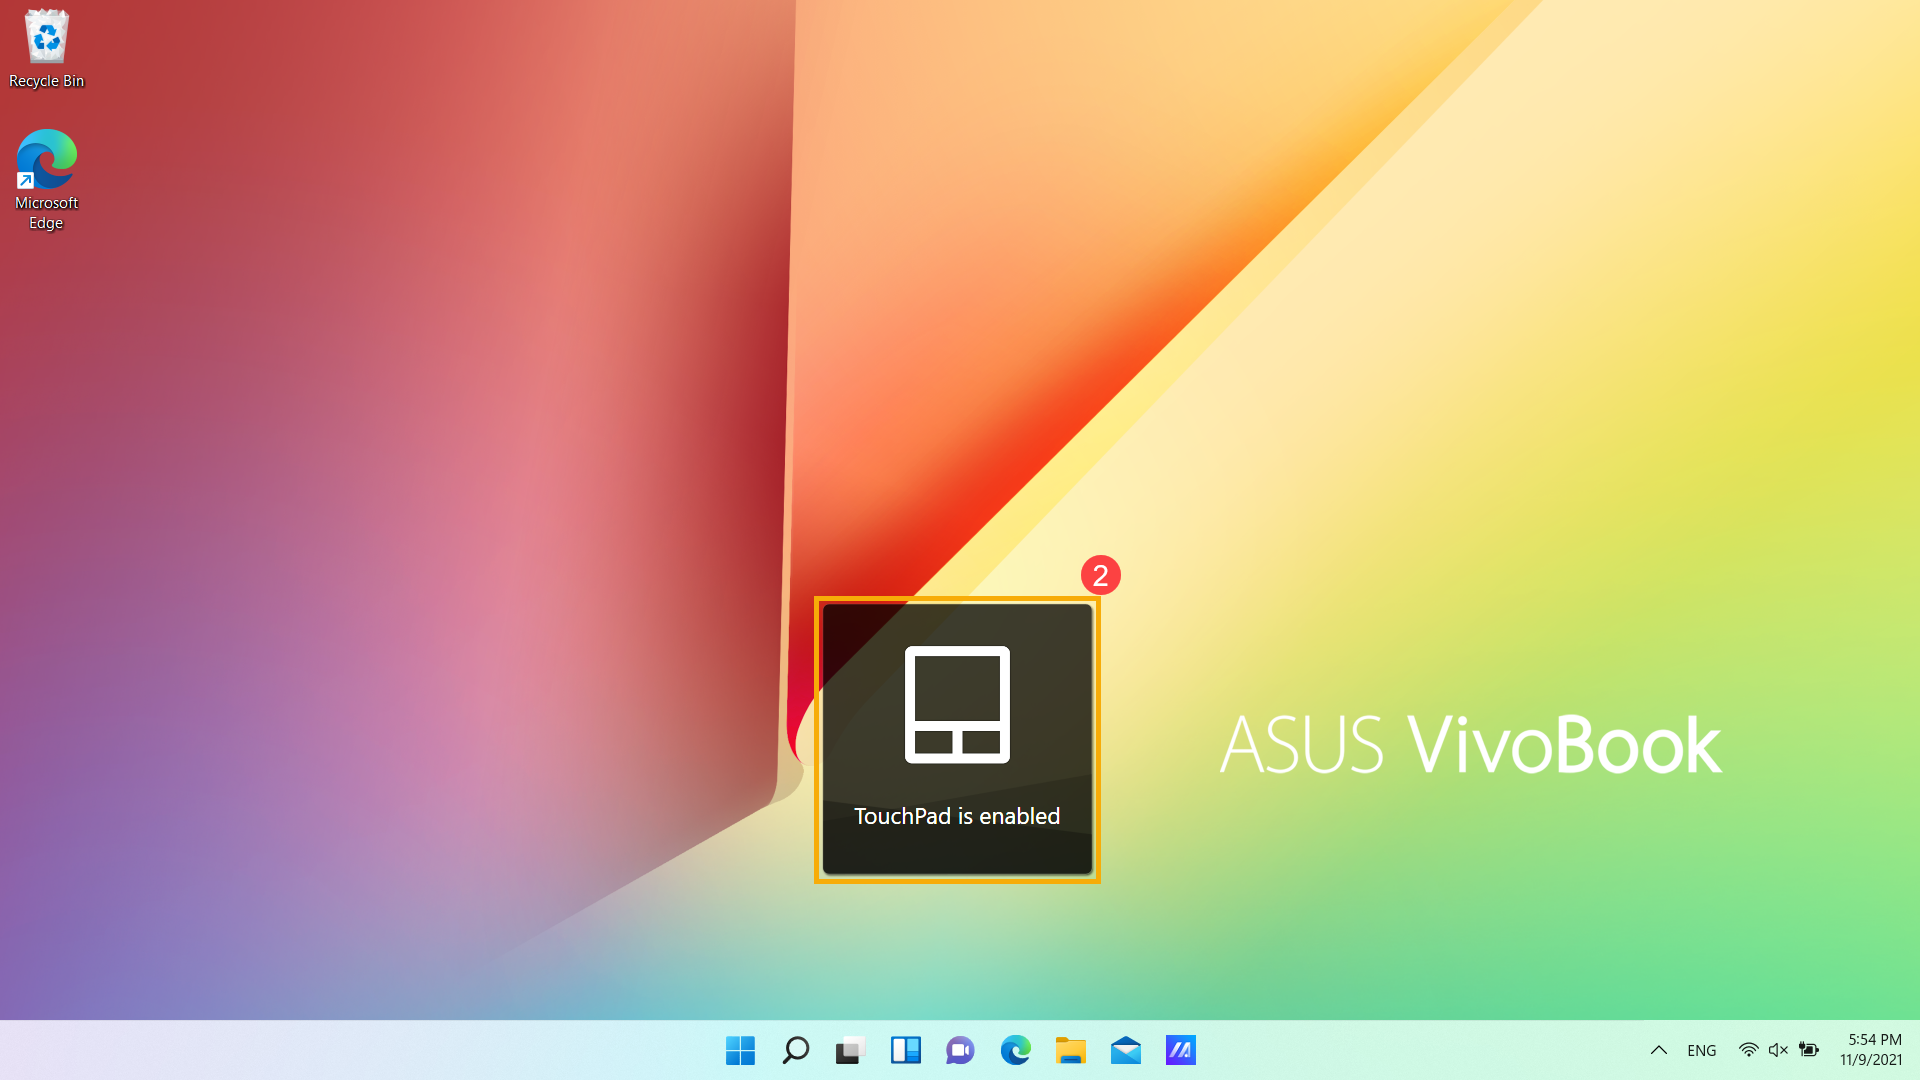
If the problem persists after the Touchpad hotkey is enabled, please continue to the next chapter for troubleshooting.
Make sure the Touchpad function is enabled in Windows settings
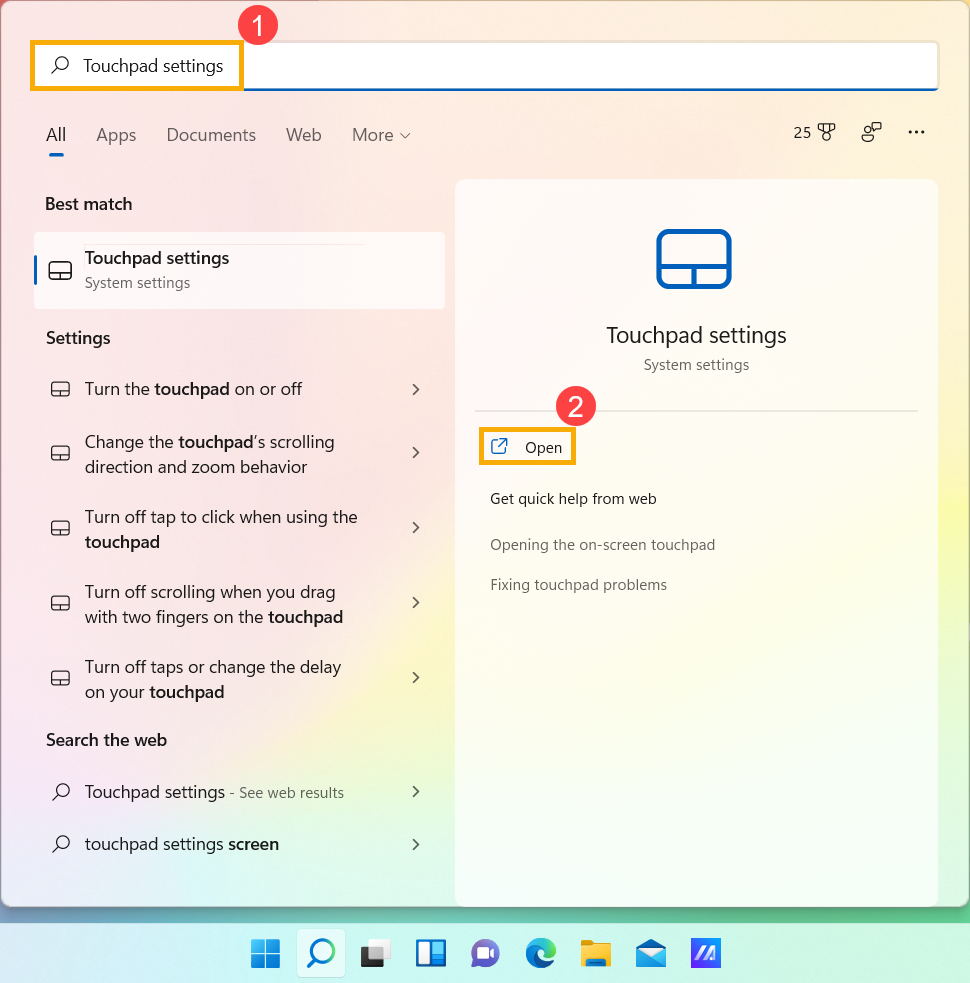
- Type and search [Touchpad settings] in the Windows search bar①, then select [Open]②.
- Make sure the Touchpad function is [On]③.
Note: If your mouse is connected, please ensure the option of [Leave touchpad on when a mouse is connected] is selected④.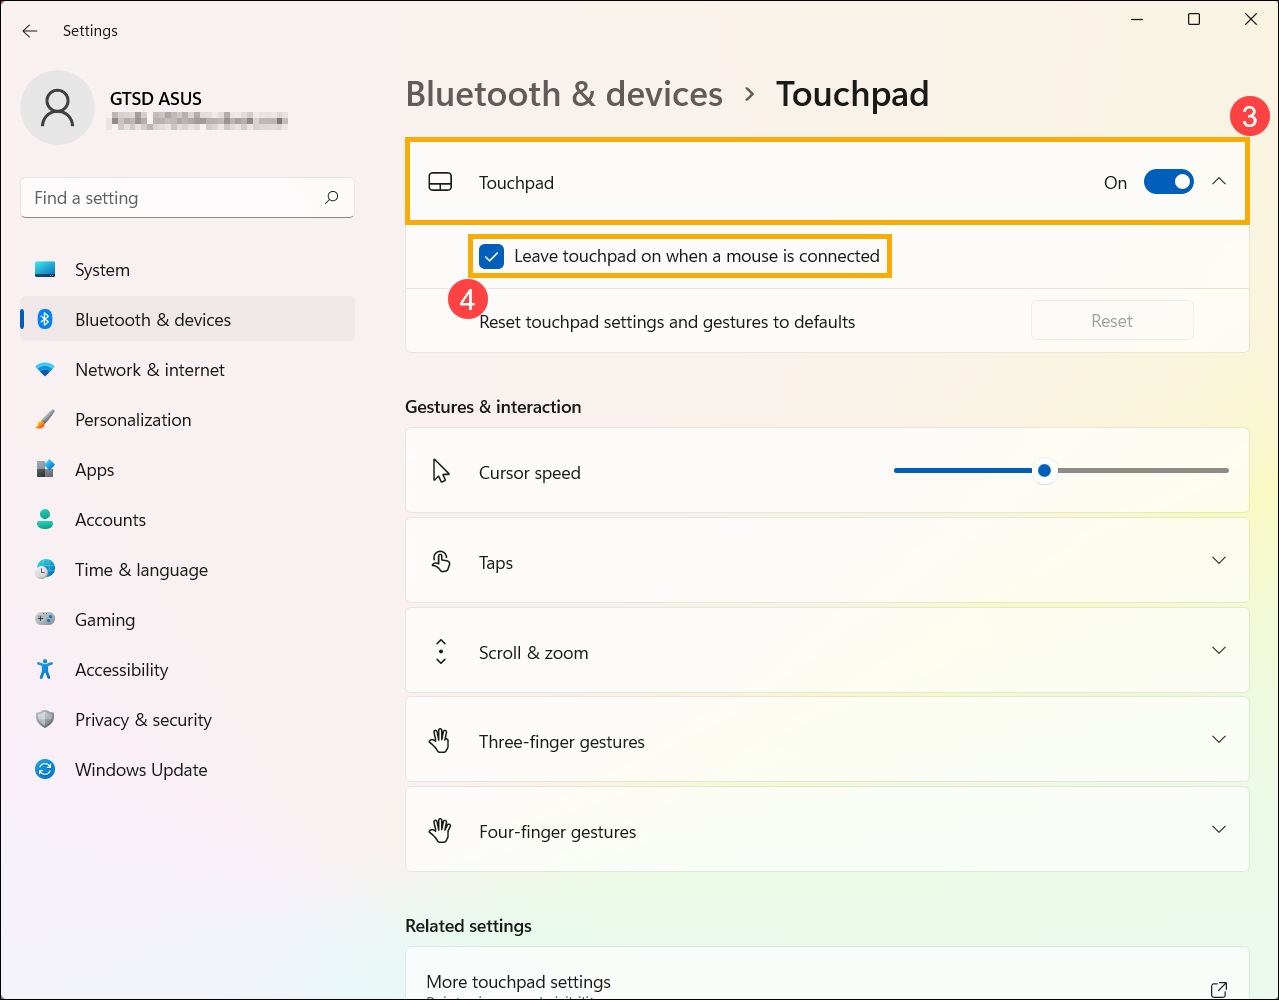
- On the Gestures & interaction filed, check the following Touchpad settings meets your expected behaviors⑤.
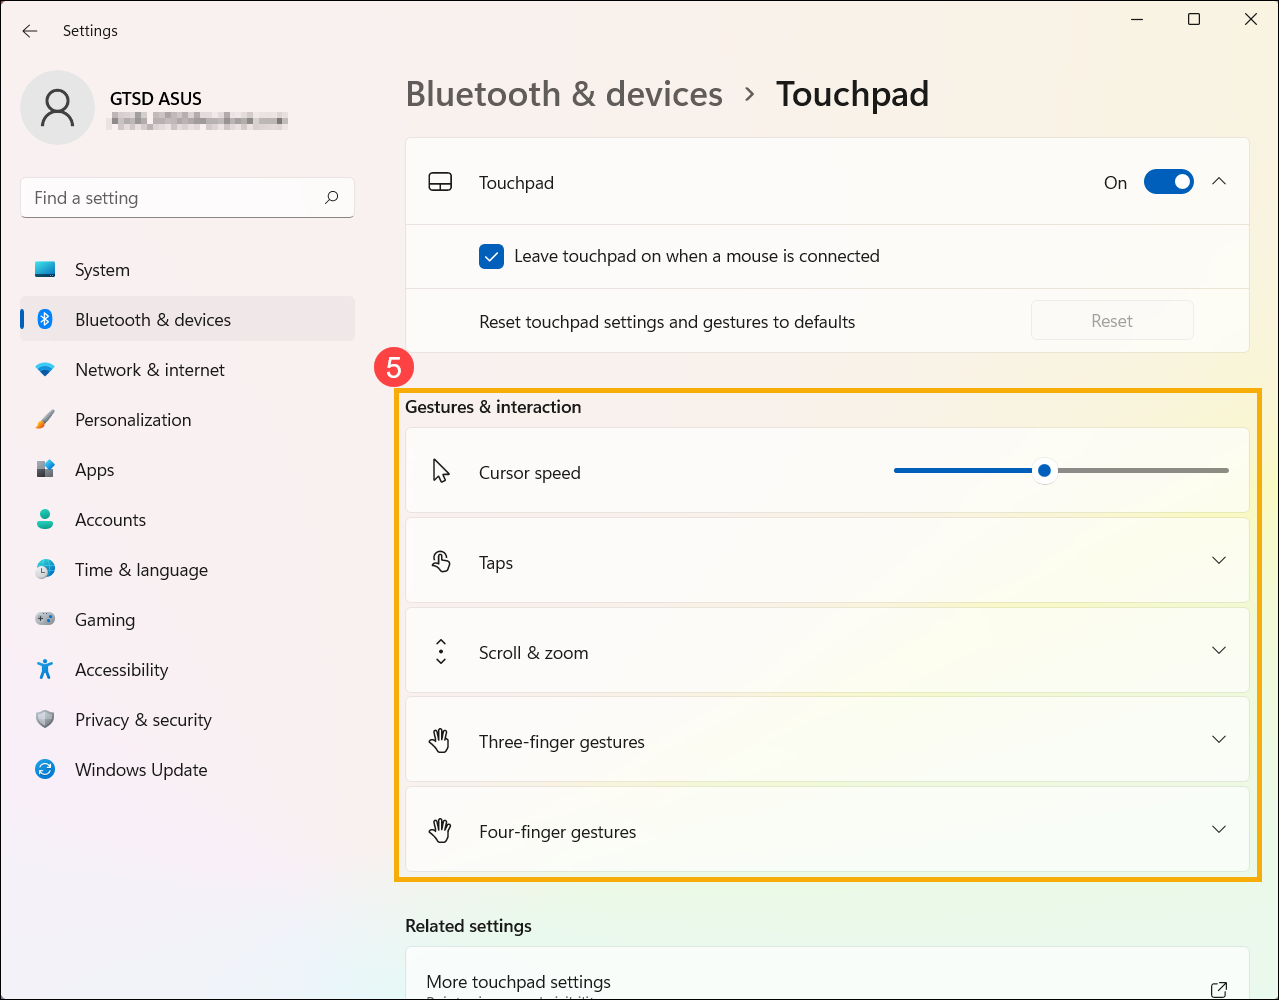
If the problem persists after the Touchpad is enabled in Windows settings, please continue to the next chapter for troubleshooting.
Check Touchpad Settings in MyASUS
- Type and search [MyASUS]① in the Windows search bar, and then click [Open]②.
Note: If you cannot find MyASUS, it may not be installed on your device. Refer to How to install MyASUS.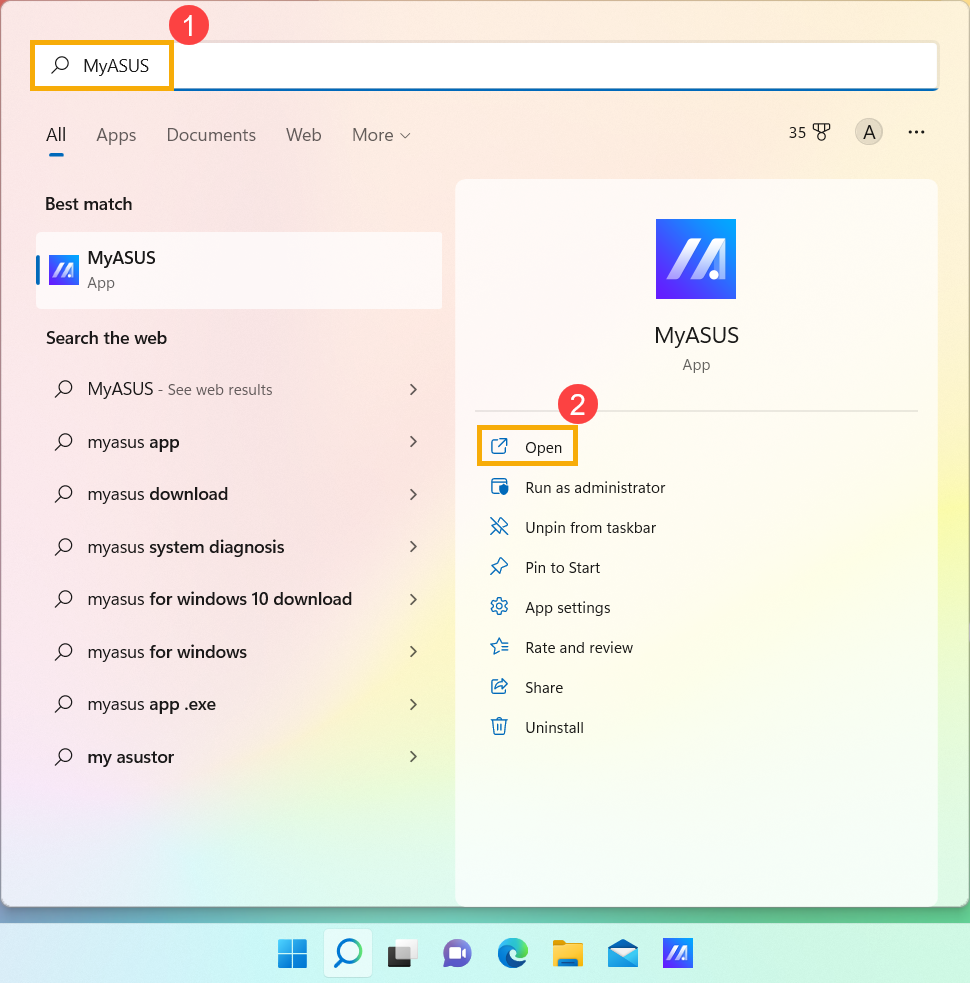
- In the MyASUS app, click [Device Settings]③.
Note: If your device does not display the device settings page in MyASUS software, it means your device does not support this feature. Continue to the next section for further troubleshooting. Here you can learn more about Why can I only see the partial features in the MyASUS app.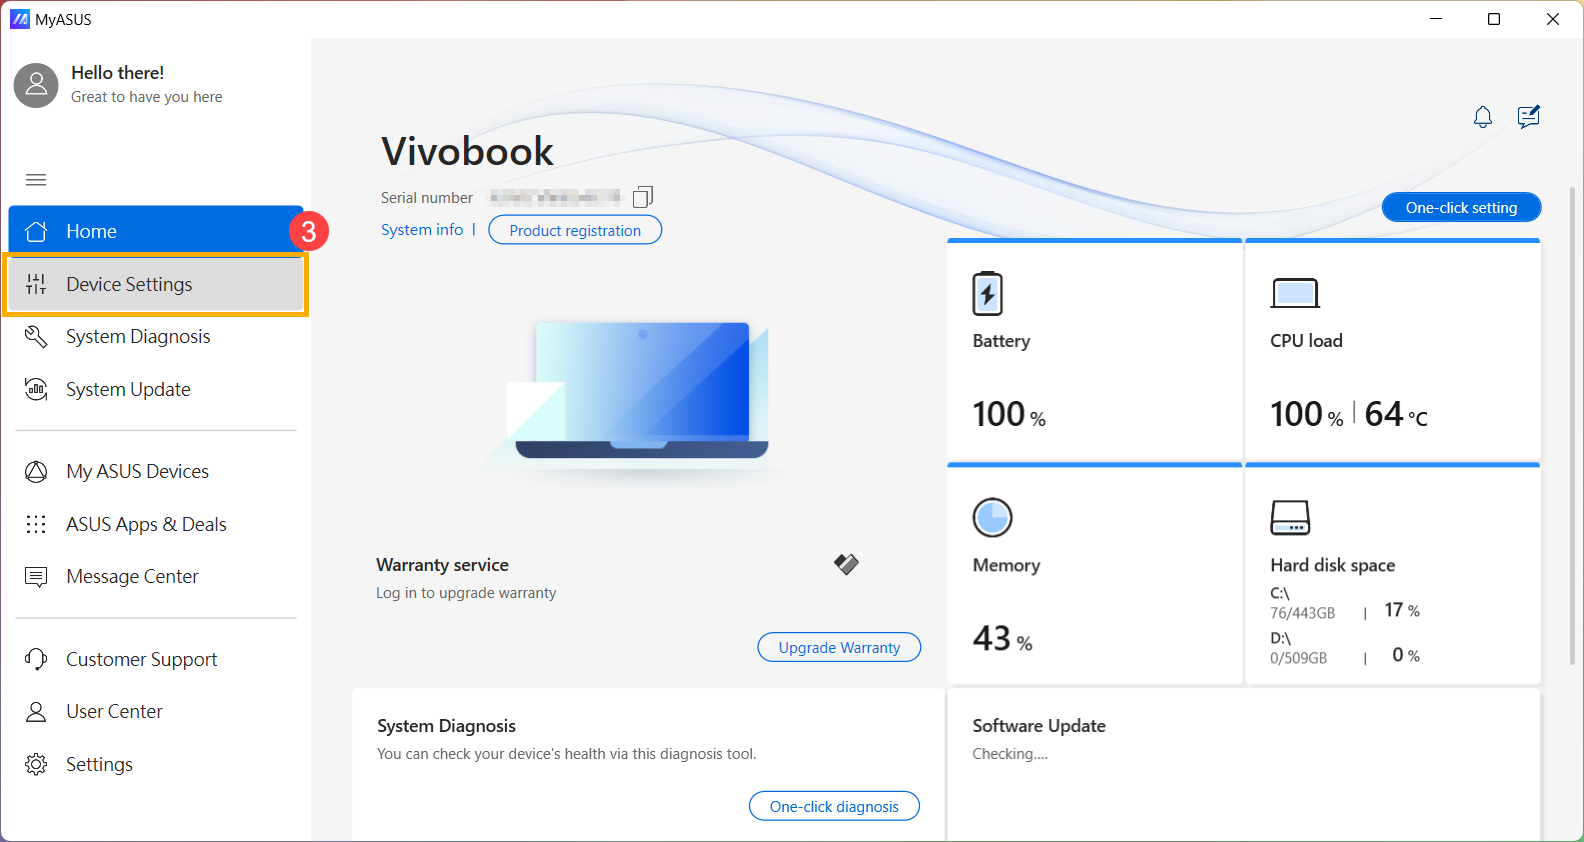
- Under Input Device Settings, locate the [Touchpad] option and set it to 「Unlock」④.
Note: When the touchpad is locked, you won't be able to use it. Ensure it's unlocked to restore normal operation. For more information on MyASUS customization, please refer to this article: MyASUS - Device Settings.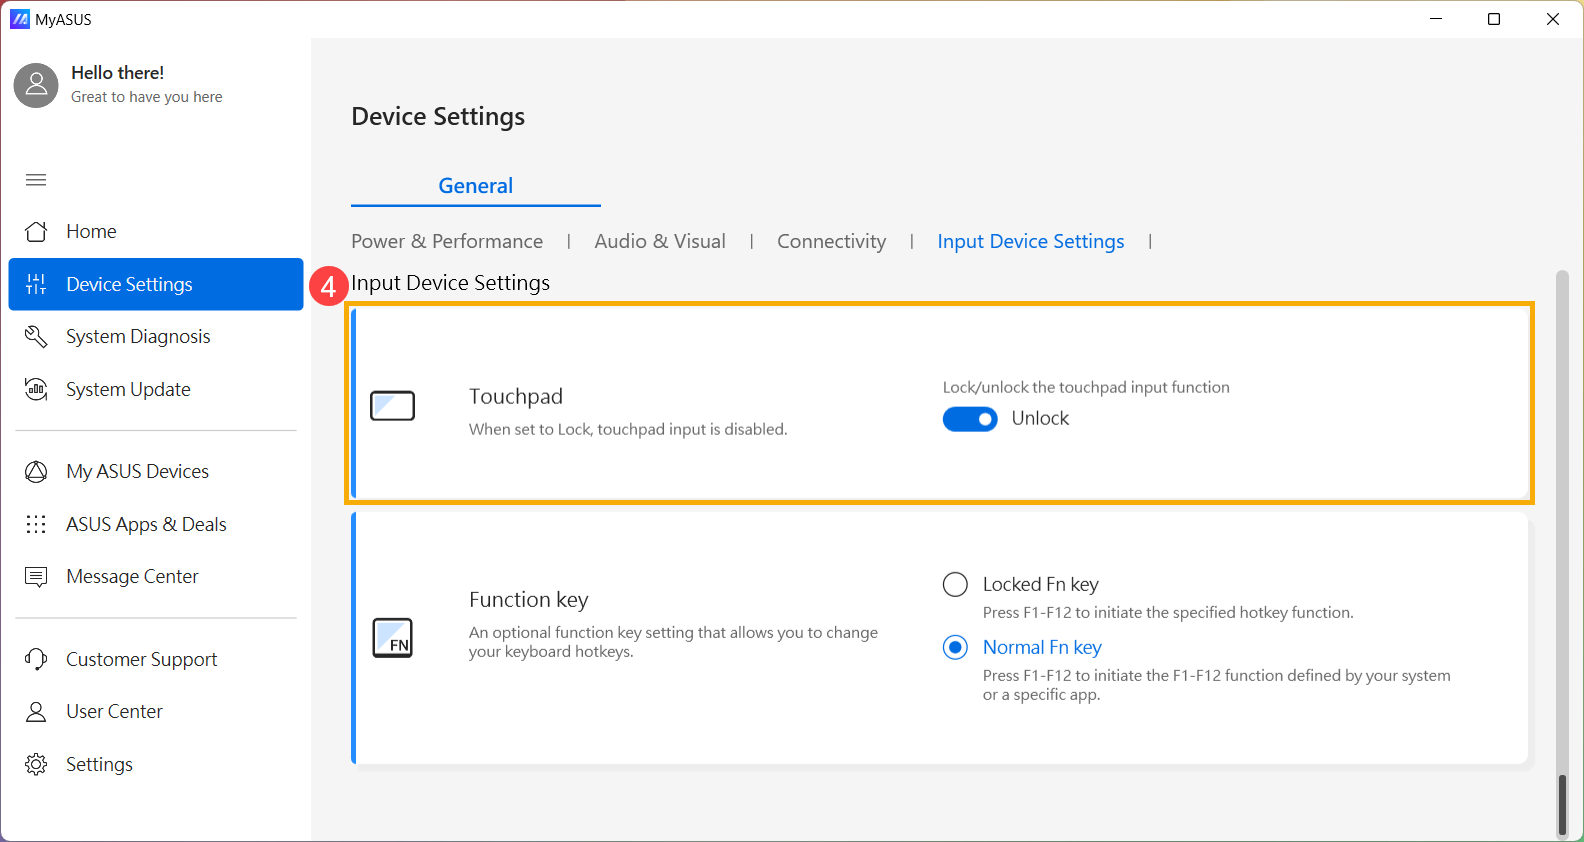
- If your ASUS laptop is equipped with a touchpad that supports a numeric keypad, there will be a [NumberPad Lock] setting in MyASUS. If you can't use the numeric keypad on the touchpad, set it to 「Unlock」.
Note: This feature only locks the NumberPad function on the touchpad and does not affect the numeric keypad on the keyboard.
Note: NumberPad Lock is not supported on gaming laptops.
Performing BIOS reset and CMOS Reset/EC Reset (Hard Reset)
Loading default settings in BIOS can help when the system is unable to function properly due to changed or corrupted settings. When you load default settings, BIOS will be restored to the original settings that were set when the motherboard was manufactured.
- Access the BIOS setup screen on the device.
When the device is not powered on, press and hold the [F2] key on the keyboard, then press the power button to turn on the device. Keep holding the [F2] key until the BIOS setup screen appears, then release the [F2] key. Learn more about How to enter the BIOS setup screen. - Once in the BIOS setup screen, please refer to this article: How to restore BIOS settings.
EC is a chip on the motherboard that controls various hardware components and power management functions of the system, and EC reset can restore hardware to default settings.
You can refer to this article: How to Reset the Embedded Controller (EC), Real-Time Clock (RTC), and Perform a Hard Reset.
If after BIOS restoration and EC reset, the touchpad is functional in the BIOS/UEFI screen but becomes inoperative upon entering the Windows system, please proceed to the next section to update the BIOS and drivers.
Note: If the touchpad still cannot operate in the BIOS/UEFI screen, it might be a hardware issue with the touchpad. We recommend visiting an authorized ASUS service center for further diagnosis.
Remove the external devices and update BIOS & Windows Update
- Remove the external devices, such as external hard drives, printers, memory cards, CD/DVDs, dongles, etc.
- Regularly updating BIOS, Windows, and drivers can enhance system stability and performance. Ensure that your device is using the latest versions. Learn more about updating BIOS:
How to update the BIOS version in Windows system
How to use EZ Flash to update the BIOS version
Learn more about updating Windows and drivers:
How to execute Windows Update
How to update drivers via System Update in MyASUS
If the problem persists after you have updated BIOS/Windows packages/drivers to the date, please continue to the next chapter for troubleshooting.
Download and install the necessary drivers
Please go to the ASUS support site to download and install the following drivers. Here you can learn more about How to search and download drivers. (The following pictures are the current version as a reference, please download the latest version from the ASUS Support Site.)
- Download and install [Intel I2C] driver on the Chipset category.
Note: if the Intel I2C driver is not available on the ASUS support site, it means that your product have been built-in Serial IO controller driver in Windows, so you don’t need to install it manually.
Note: The products with AMD CPU platform don’t have Intel I2C driver, please continue to the next step.
- Download and install [ASUS Precision Touchpad] driver on the Pointing Device category.

After installing these drivers, please restart your PC then check the Touchpad function is working or not. If the problem persists, please continue to the next chapter for troubleshooting.
Enable and reinstall drivers in Device Manager
Intel I2C driver
Note: The products with AMD CPU platform don’t have Intel I2C driver, please continue to the next chapter for troubleshooting.
- Type and search [Device Manager] in the Windows search bar①, then select [Open]②.
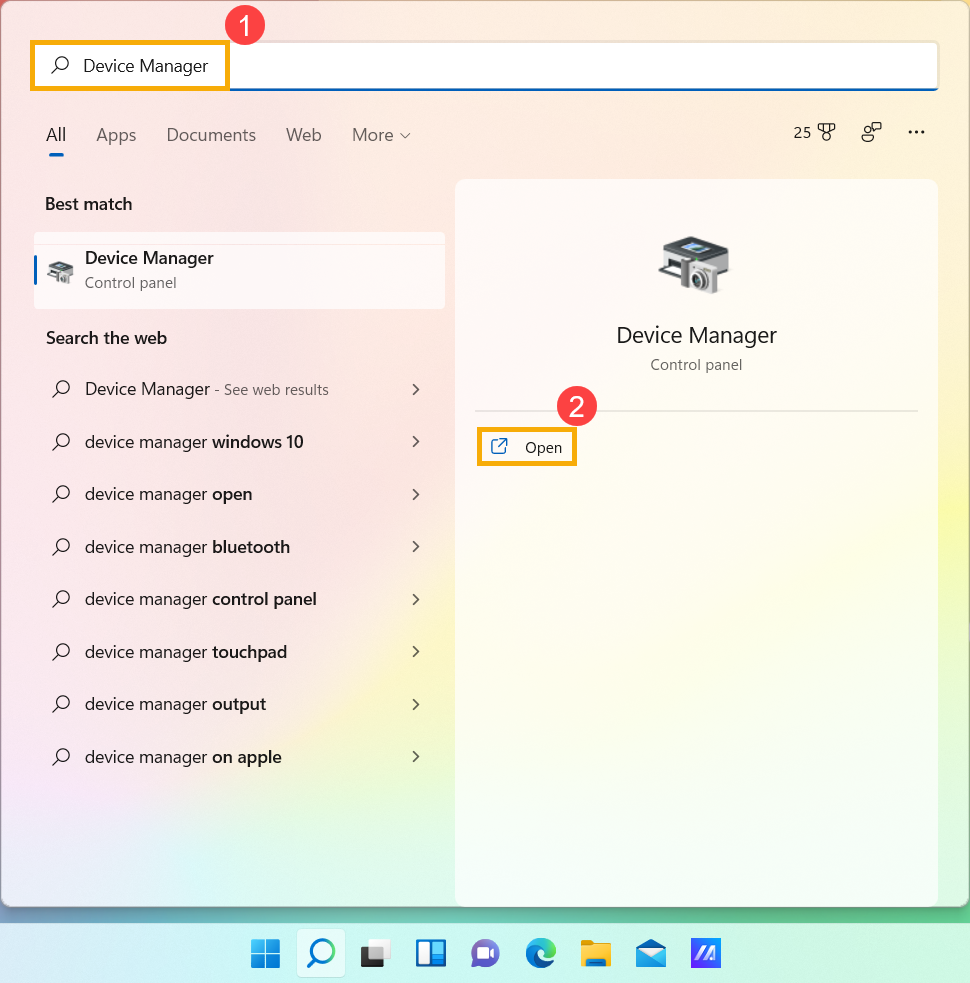
- Check on the arrow next to [System devices]③, then right-click [Intel(R) Serial IO I2C Host Controller]④ and select [Enable device]⑤. Test whether the Touchpad function works normally or not after enabling it. If the problem persists, please continue to the next step.
Note: If the [Enable device] option does not display, it means the Touchpad is enabled already, please continue to the next step.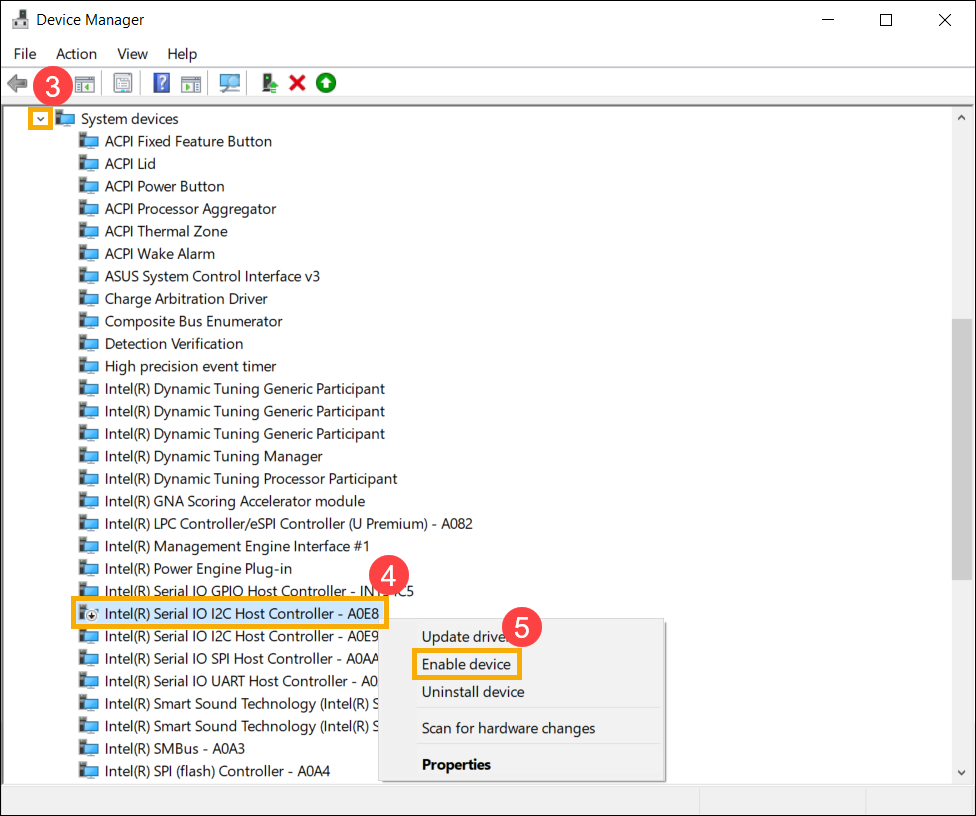
- Reinstall the Intel I2C driver. Right-click [Intel(R) Serial IO I2C Host Controller]⑥, then select [Uninstall device]⑦.
Note: If you see several Intel(R) Serial IO I2C Host Controller drivers, uninstall the first driver, and then repeat the process for the others.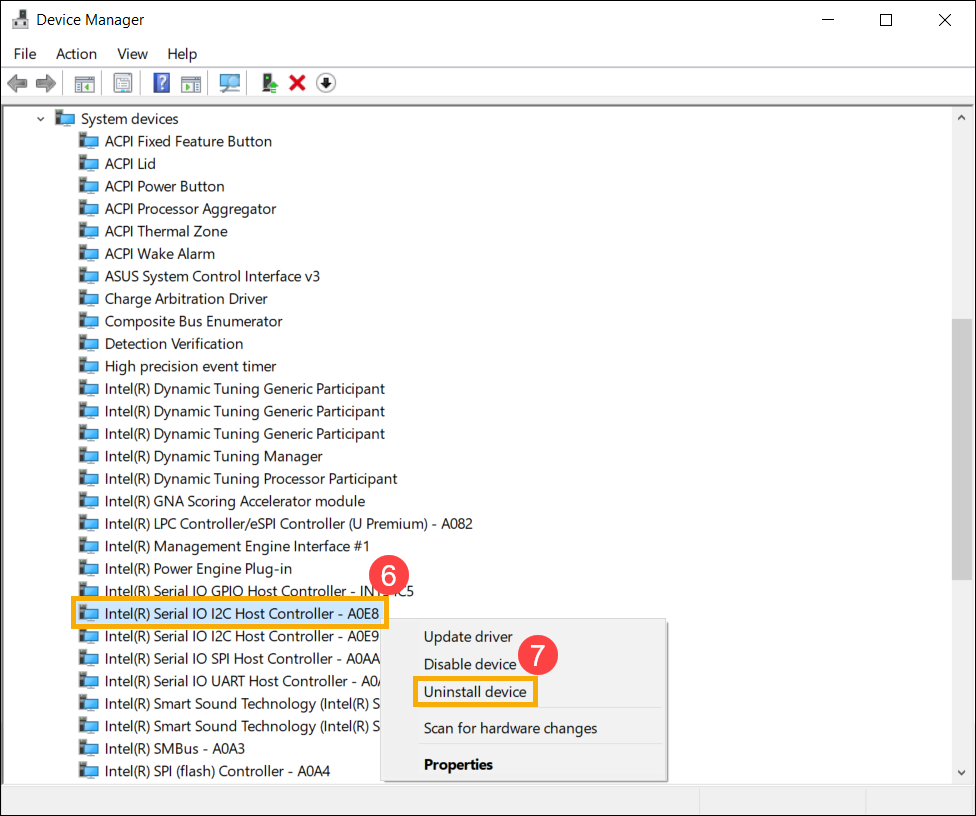
- Select [Delete the driver software for this device]⑧, and then select [Uninstall]⑨.
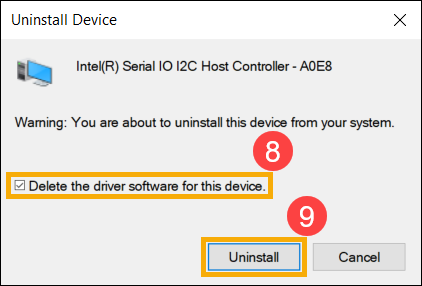
- After all Intel(R) Serial IO I2C Host Controller driver are uninstalled, please restart your PC first. The system will install the driver automatically after restarting, and then please test the Touchpad function is working or not.
If the system doesn’t install Intel(R) Serial IO I2C Host Controller driver automatically, please go to the ASUS support site to download and install the Intel I2C driver on the Chipset category. Here you can learn more about How to search and download drivers.
Note: The following picture is the current version as a reference, and please download the latest version from the ASUS Support Site.
If the Touchpad problem persists, please continue to the next chapter for troubleshooting.
ASUS Precision Touchpad
- Type and search [Device Manager] in the Windows search bar①, then select [Open]②.
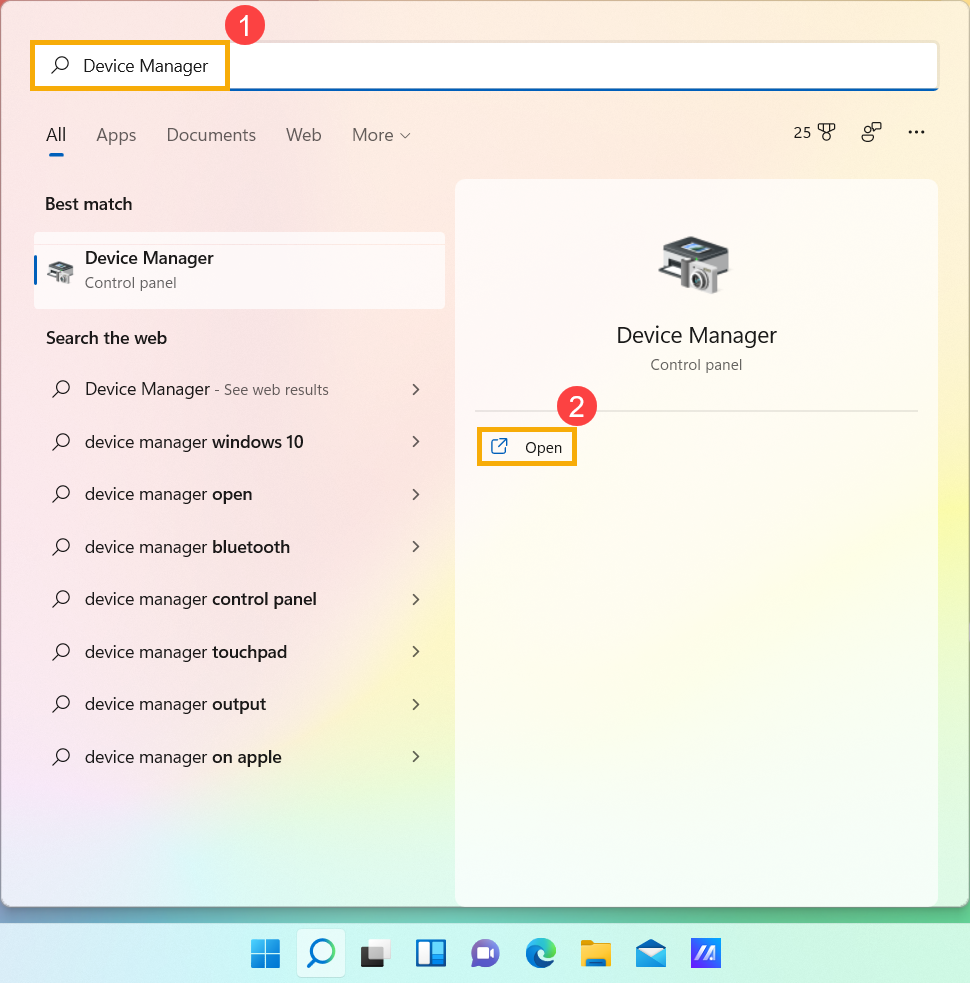
- Check on the arrow next to [Human Interface Devices]③, then right-click [ASUS Precision Touchpad]④ and select [Enable device]⑤. Test whether the Touchpad function works normally or not after enabling it. If the problem persists, please continue to the next step.
Note: If the [Enable device] option does not display, it means the Touchpad is enabled already, please continue to the next step.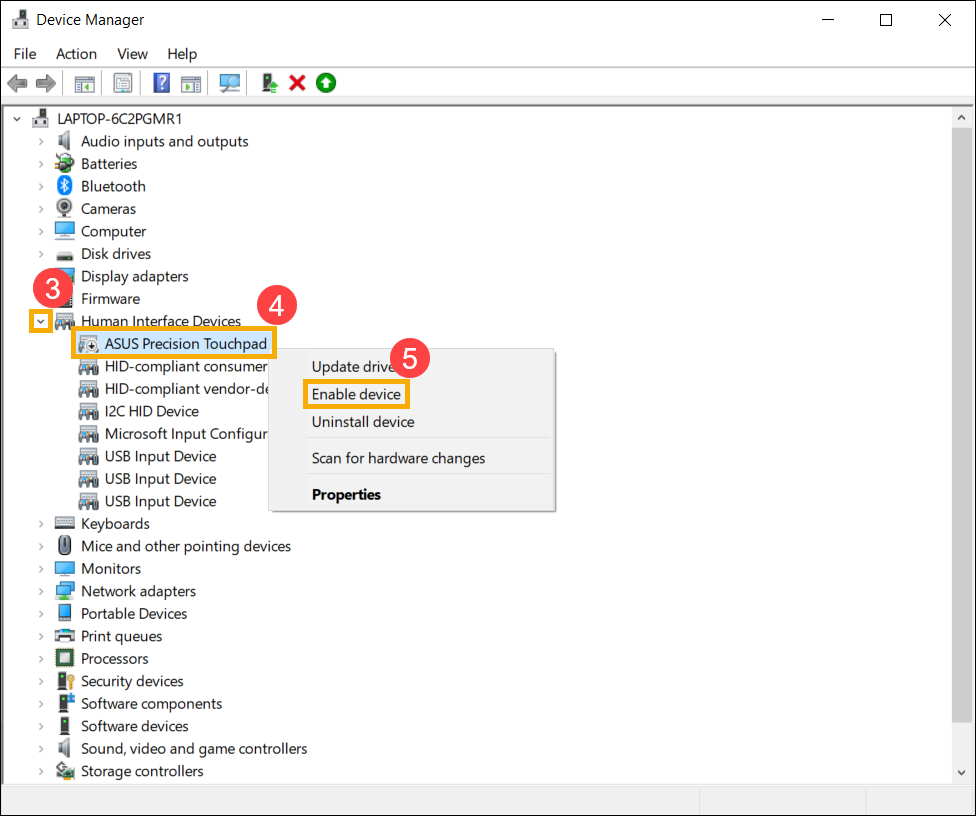
- Reinstall the ASUS Precision Touchpad driver. Right-click [ASUS Precision Touchpad]⑥, then select [Uninstall device]⑦.
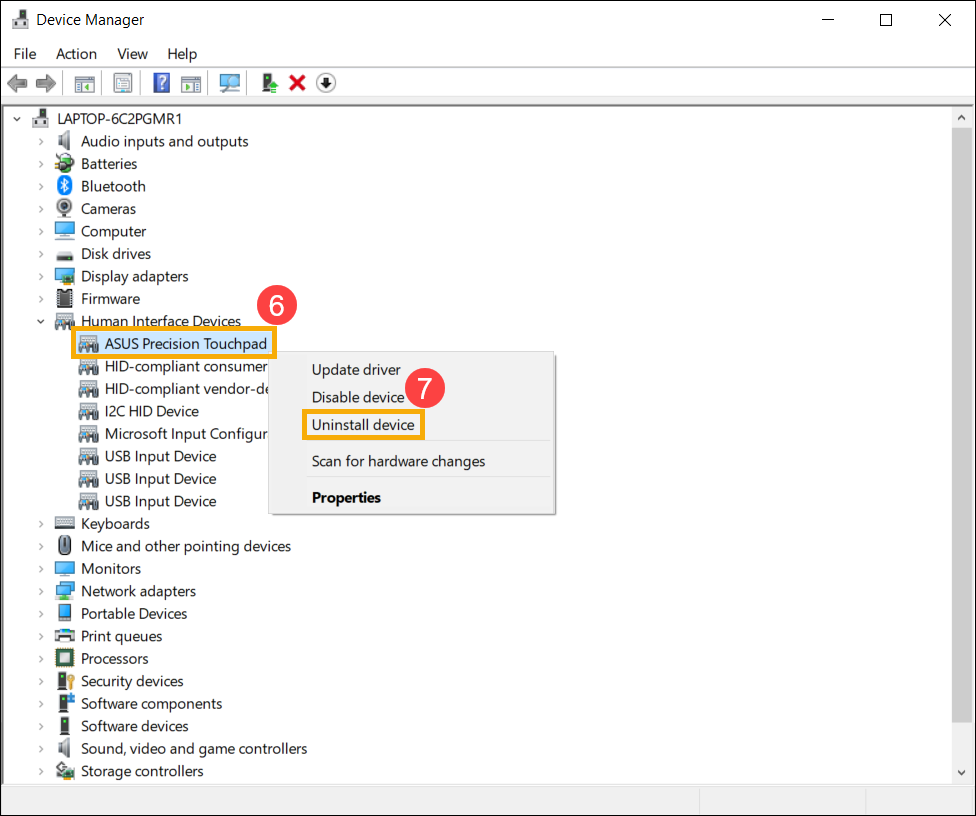
- Select [Delete the driver software for this device]⑧, and then select [Uninstall]⑨.
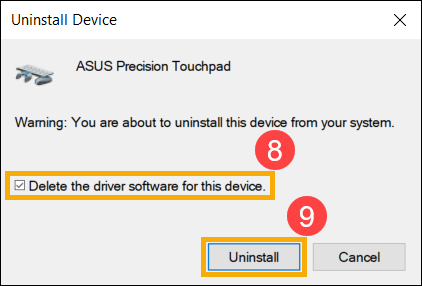
- After the ASUS Precision Touchpad driver is uninstalled, please restart your PC first. The system will install the driver automatically after restarting, and then please test the Touchpad function is working or not.
If the system doesn’t install ASUS Precision Touchpad driver automatically, please go to the ASUS support site to download and install the ASUS Precision Touchpad driver on the Pointing Device category. Here you can learn more about How to search and download drivers.
Note: The following picture is the current version as a reference, and please download the latest version from the ASUS Support Site.
If the Touchpad problem persists, please continue to the next chapter for troubleshooting.
Microsoft Input Configuration Device driver
- Type and search [Device Manager] in the Windows search bar①, then select [Open]②.
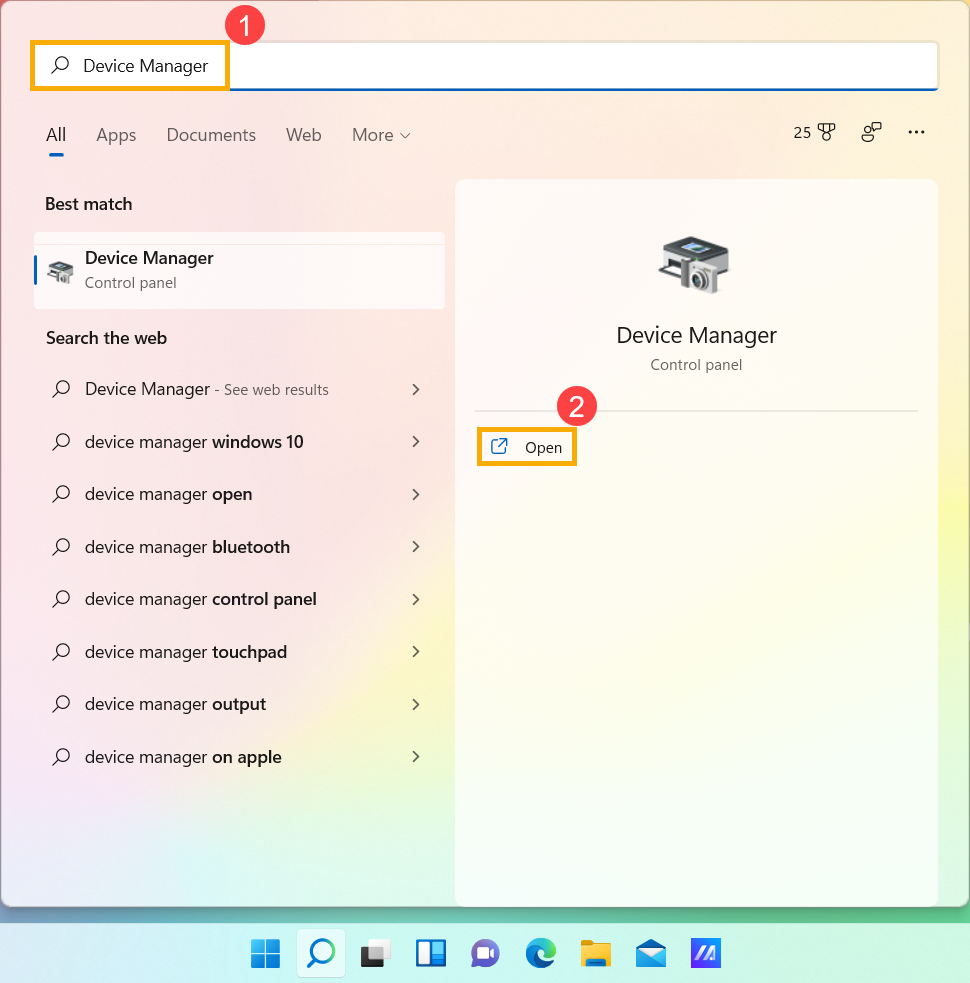
- Check on the arrow next to [Human Interface Devices]③, then right-click [Microsoft Input Configuration Device]④ and select [Enable device]⑤. Test whether the Touchpad function works normally or not after enabling it. If the problem persists, please continue to the next step.
Note: If the [Enable device] option does not display, it means the Touchpad is enabled already, please continue to the next step.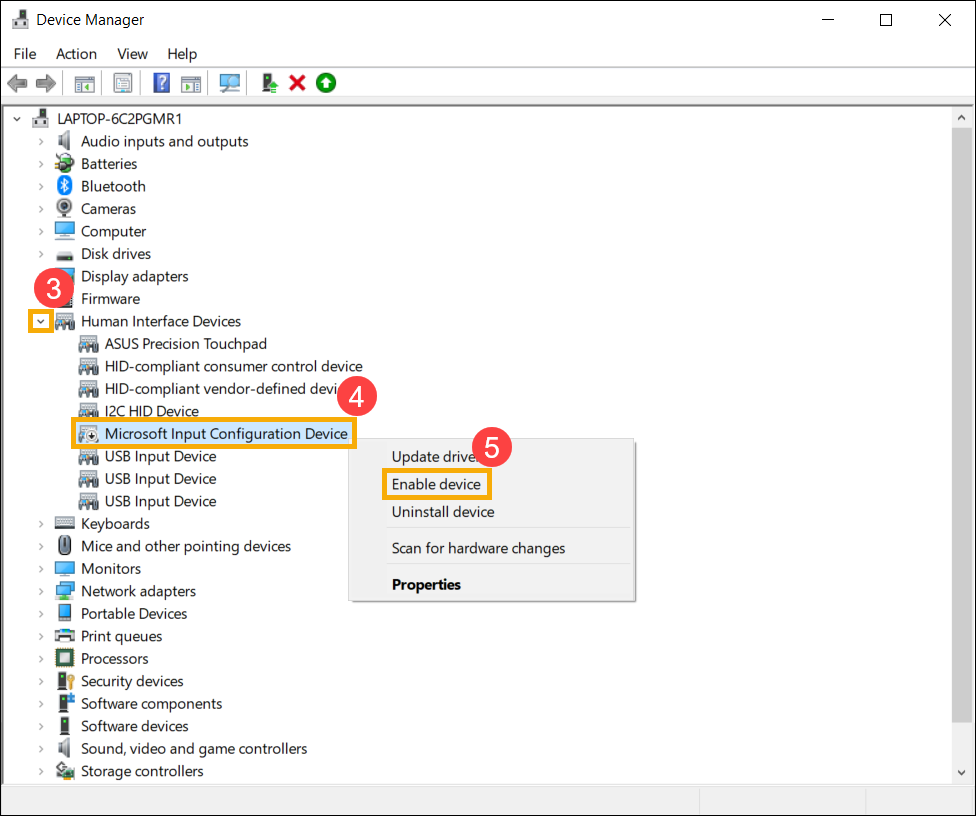
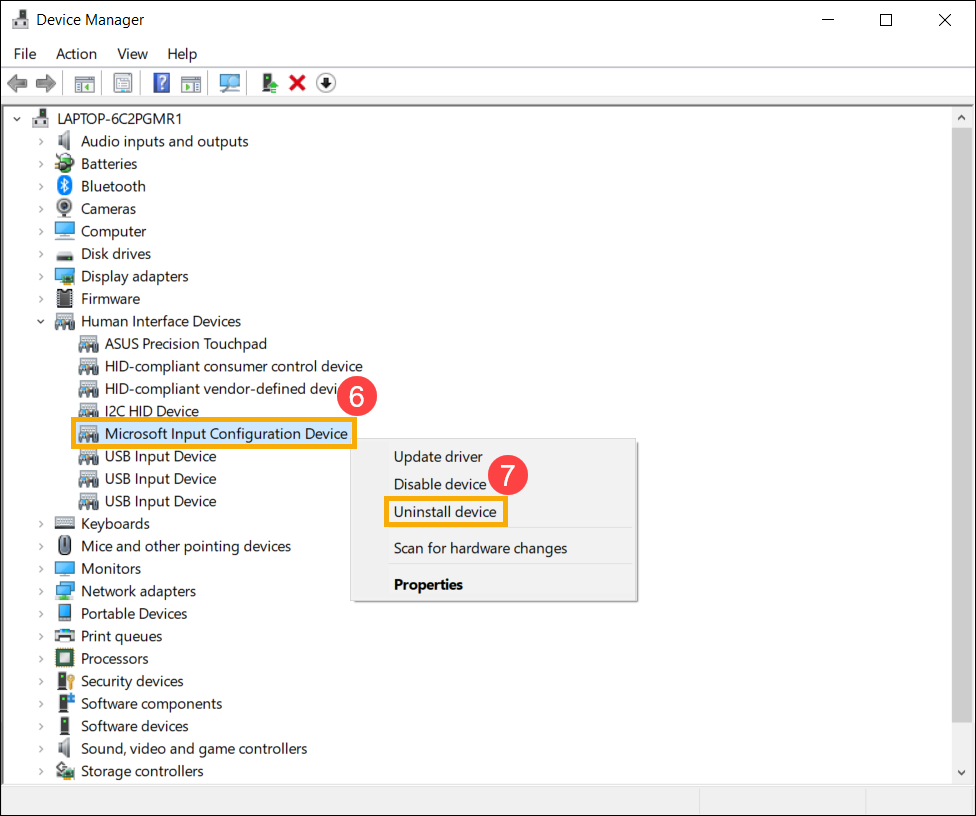
- Reinstall the Microsoft Input Configuration Device driver. Right-click [Microsoft Input Configuration Device]⑥, then select [Uninstall device]⑦.
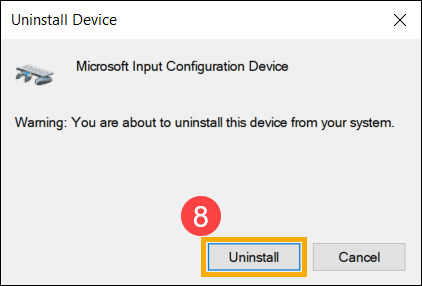
- Select [Uninstall]⑧.
- After the Microsoft Input Configuration Device driver is uninstalled, please restart your PC first. The system will install the driver automatically after restarting, and then please test the Touchpad function is working or not.
If the Touchpad problem persists, please continue to the next chapter for troubleshooting.
Restore the system from restore point
If the problem happens recently, and if you have ever created a restore point or there is an automatic system restore existed, try to restore the device to a point before the problem began to resolve the problem. Here you can learn more about How to use restore point to restore the system. If the problem persists, please continue the next troubleshooting step.
Reset your PC
If the problem persists after all troubleshooting steps are completed. Please backup your personal files, then reset the device to back to its original configuration. Here you can learn more about How to reset the system.
If your problem is not worked out with above solution and information, please contact ASUS customer service center for further information.
Table of Contents:
Make sure the Touchpad hotkey is enabled
Please try to use the function key (hotkey) to enable/disable the Touchpad function to ensure there is no response on Touchpad due to it is disabled.
- Check the hotkeys location whether there is [Touchpad hotkey
 ,
,  ] on your keyboard①, it located on F6 or F9 key usually.
Note: The hotkeys function may be various based on different models, please refer to the User Manuals.
- Press
 or press the function key
  +
+  (It depends on what your hotkey option selected is.) on the keyboard, and then check whether there is a notification of [Touchpad is enabled]② on your screen.
Note: If the function key is not working, please try reinstalling the ASUS System Control Interface driver. Here you can learn more about How to download and install the ASUS System Control Interface driver.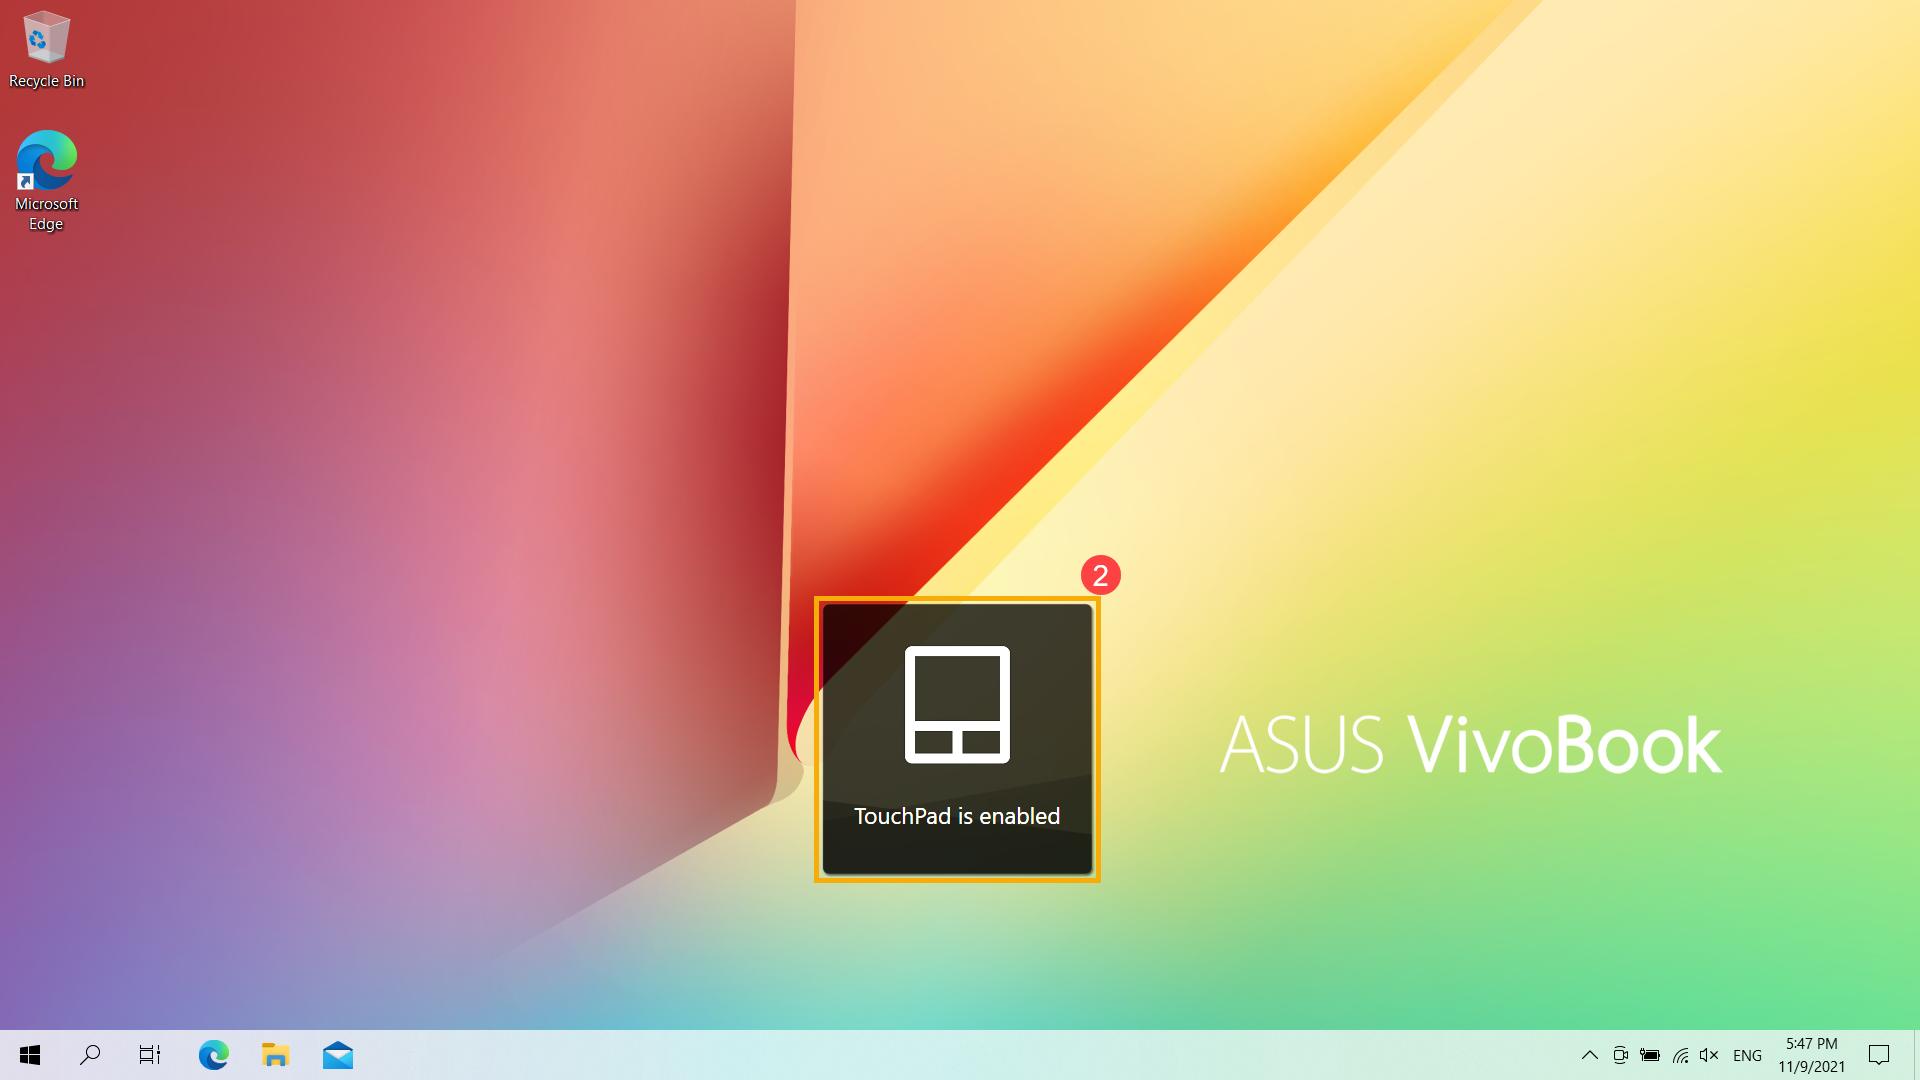
If the problem persists after the Touchpad hotkey is enabled, please continue to the next chapter for troubleshooting.
Make sure the Touchpad function is enabled in Windows settings
- Type and search [Touchpad settings] in the Windows search bar①, then select [Open]②.
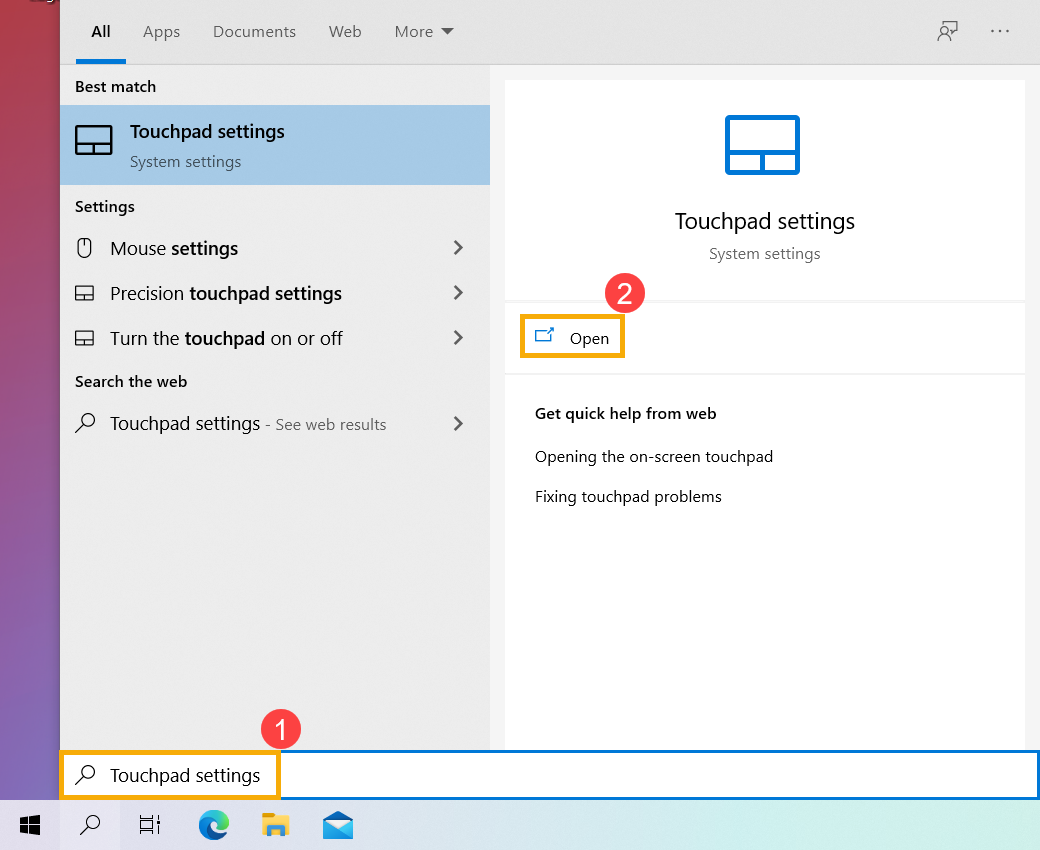
- Make sure the Touchpad function is [On]③.
Note: If your mouse is connected, please ensure the option of [Leave touchpad on when a mouse is connected] is selected④.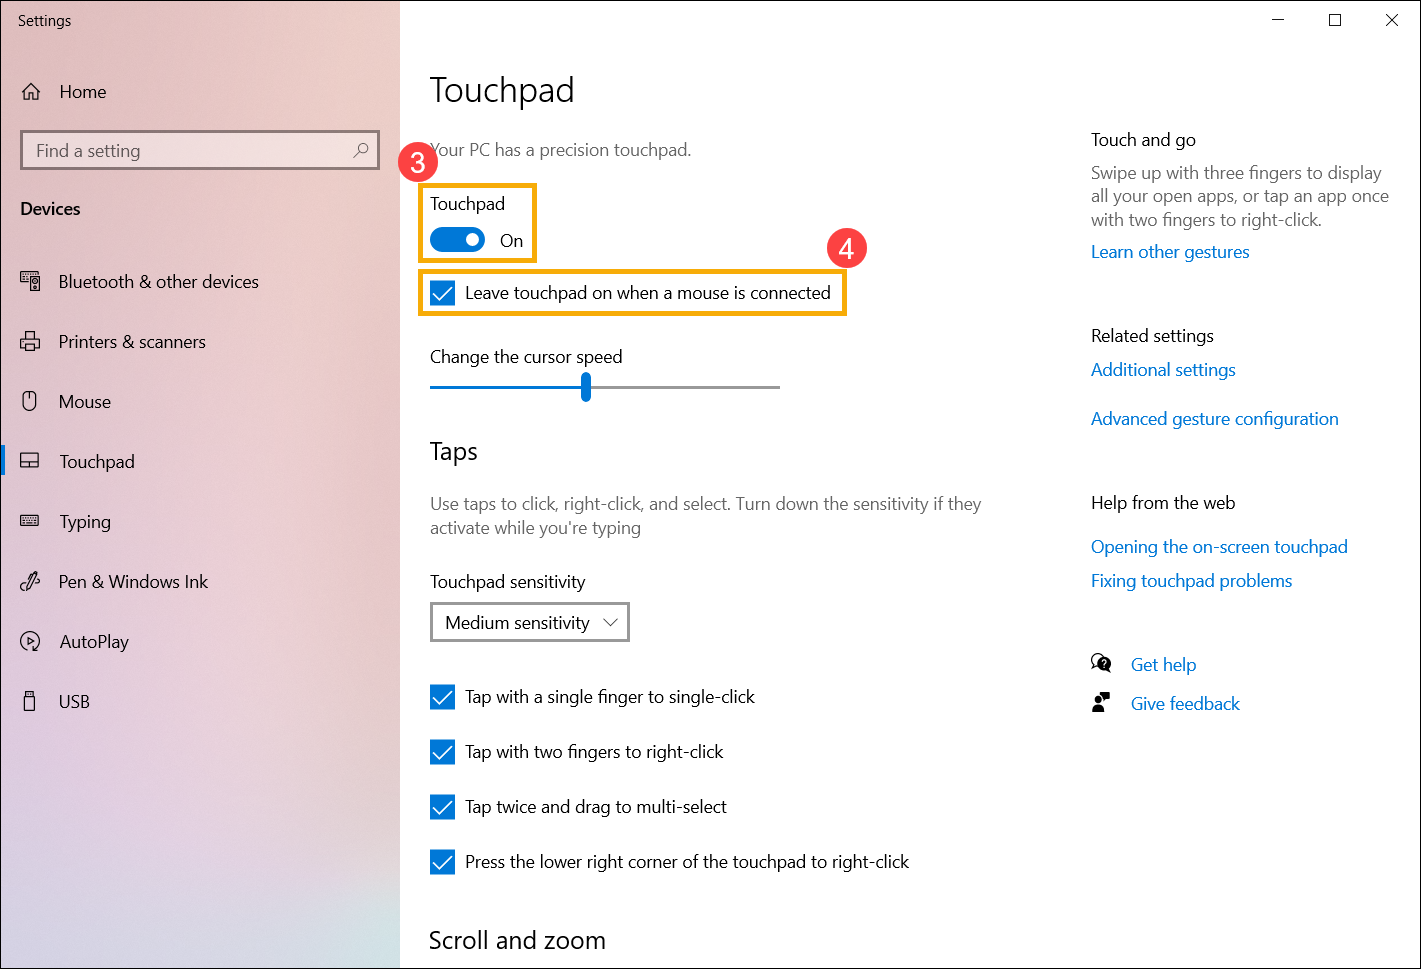
- Scroll down this page, and check the following Touchpad settings meets your expected behaviors⑤.
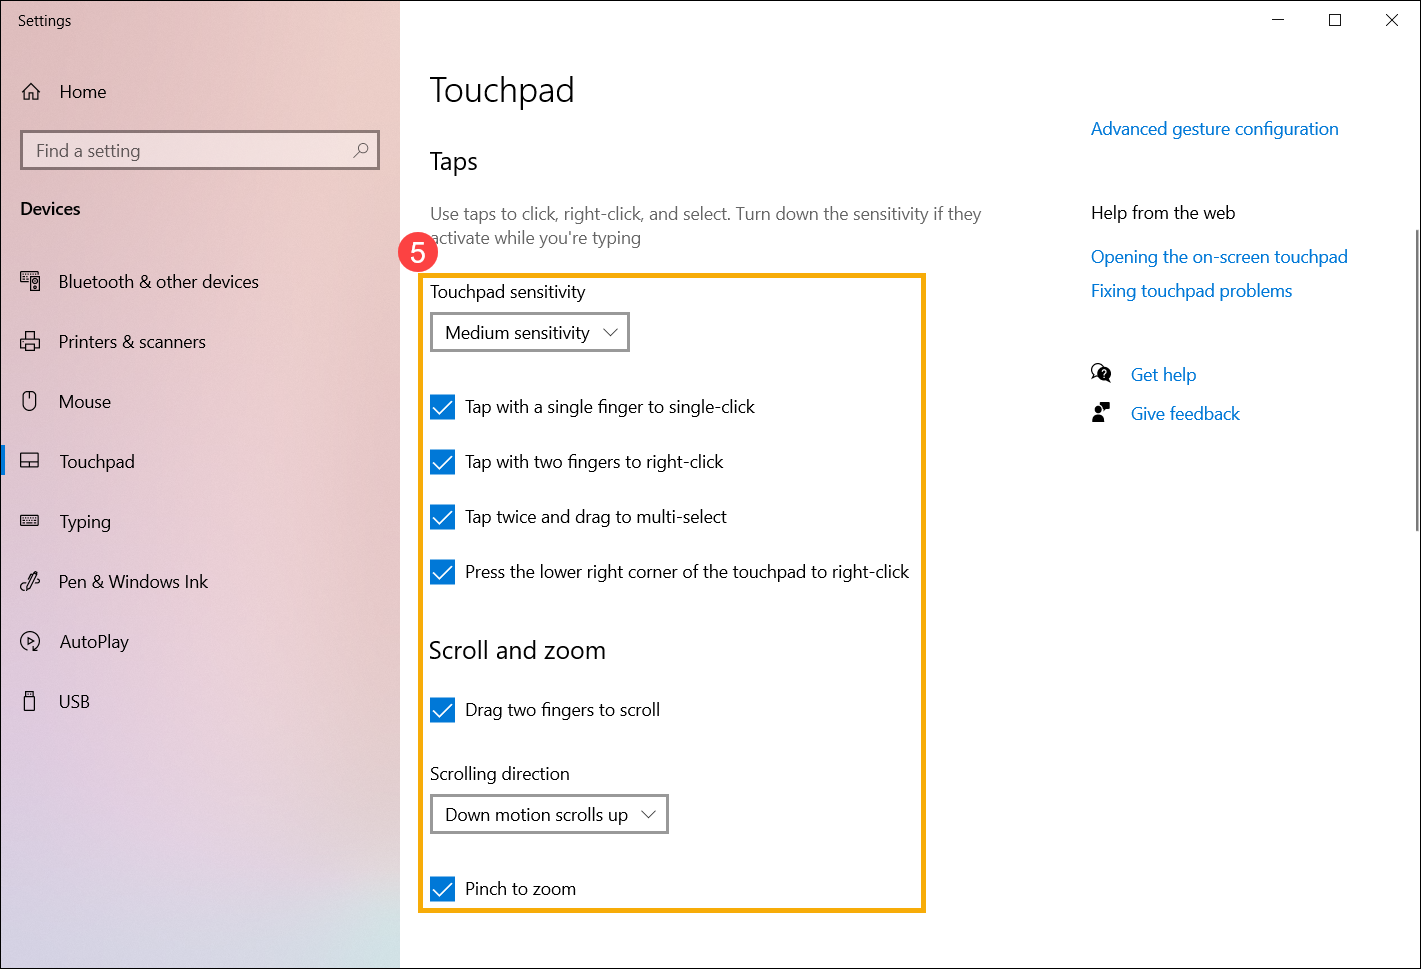
If the problem persists after the Touchpad is enabled in Windows settings, please continue to the next chapter for troubleshooting.
Check Touchpad Settings in MyASUS
- Type and search [MyASUS]① in the Windows search bar, and then click [Open]②.
Note: If you cannot find MyASUS, it may not be installed on your device. Refer to How to install MyASUS.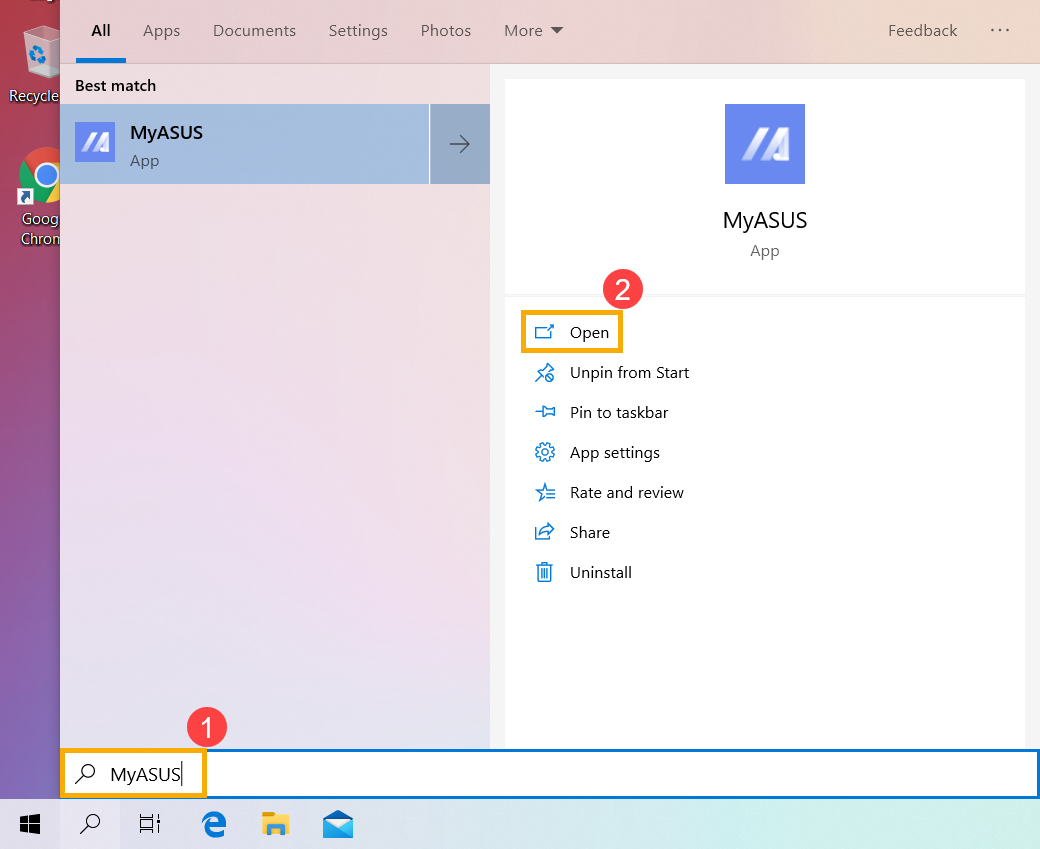
- In the MyASUS app, click [Device Settings]③.
Note: If your device does not display the device settings page in MyASUS software, it means your device does not support this feature. Continue to the next section for further troubleshooting. Here you can learn more about Why can I only see the partial features in the MyASUS app.
- Under Input Device Settings, locate the [Touchpad] option and set it to 「Unlock」④.
Note: When the touchpad is locked, you won't be able to use it. Ensure it's unlocked to restore normal operation. For more information on MyASUS customization, please refer to this article: MyASUS - Device Settings.
- If your ASUS laptop is equipped with a touchpad that supports a numeric keypad, there will be a [NumberPad Lock] setting in MyASUS. If you can't use the numeric keypad on the touchpad, set it to 「Unlock」.
Note: This feature only locks the NumberPad function on the touchpad and does not affect the numeric keypad on the keyboard.
Note: NumberPad Lock is not supported on gaming laptops.
Performing BIOS reset and CMOS Reset/EC Reset (Hard Reset)
Loading default settings in BIOS can help when the system is unable to function properly due to changed or corrupted settings. When you load default settings, BIOS will be restored to the original settings that were set when the motherboard was manufactured.
- Access the BIOS setup screen on the device.
When the device is not powered on, press and hold the [F2] key on the keyboard, then press the power button to turn on the device. Keep holding the [F2] key until the BIOS setup screen appears, then release the [F2] key. Learn more about How to enter the BIOS setup screen. - Once in the BIOS setup screen, please refer to this article: How to restore BIOS settings.
EC is a chip on the motherboard that controls various hardware components and power management functions of the system, and EC reset can restore hardware to default settings.
You can refer to this article: How to Reset the Embedded Controller (EC), Real-Time Clock (RTC), and Perform a Hard Reset.
If after BIOS restoration and EC reset, the touchpad is functional in the BIOS/UEFI screen but becomes inoperative upon entering the Windows system, please proceed to the next section to update the BIOS and drivers.
Note: If the touchpad still cannot operate in the BIOS/UEFI screen, it might be a hardware issue with the touchpad. We recommend visiting an authorized ASUS service center for further diagnosis.
Remove the external devices and update BIOS & Windows Update
- Remove the external devices, such as external hard drives, printers, memory cards, CD/DVDs, dongles, etc.
- Regularly updating BIOS, Windows, and drivers can enhance system stability and performance. Ensure that your device is using the latest versions. Learn more about updating BIOS:
How to update the BIOS version in Windows system
How to use EZ Flash to update the BIOS version
Learn more about updating Windows and drivers:
How to execute Windows Update
How to update drivers via System Update in MyASUS
If the problem persists after you have updated BIOS/Windows packages/drivers to the date, please continue to the next chapter for troubleshooting.
Download and install the necessary drivers
Please go to the ASUS support site to download and install the following drivers. Here you can learn more about How to search and download drivers. (The following pictures are the current version as a reference, please download the latest version from the ASUS Support Site.)
- Download and install [Intel I2C] driver on the Chipset category.
Note: if the Intel I2C driver is not available on the ASUS support site, it means that your product have been built-in Serial IO controller driver in Windows, so you don’t need to install it manually.
Note: The products with AMD CPU platform don’t have Intel I2C driver, please continue to the next step.
- Download and install [ASUS Precision Touchpad] driver on the Pointing Device category.

After installing these drivers, please restart your PC then check the Touchpad function is working or not. If the problem persists, please continue to the next chapter for troubleshooting.
Enable and reinstall drivers in Device Manager
Intel I2C driver
Note: The products with AMD CPU platform don’t have Intel I2C driver, please continue to the next chapter for troubleshooting.
- Type and search [Device Manager] in the Windows search bar①, then select [Open]②.
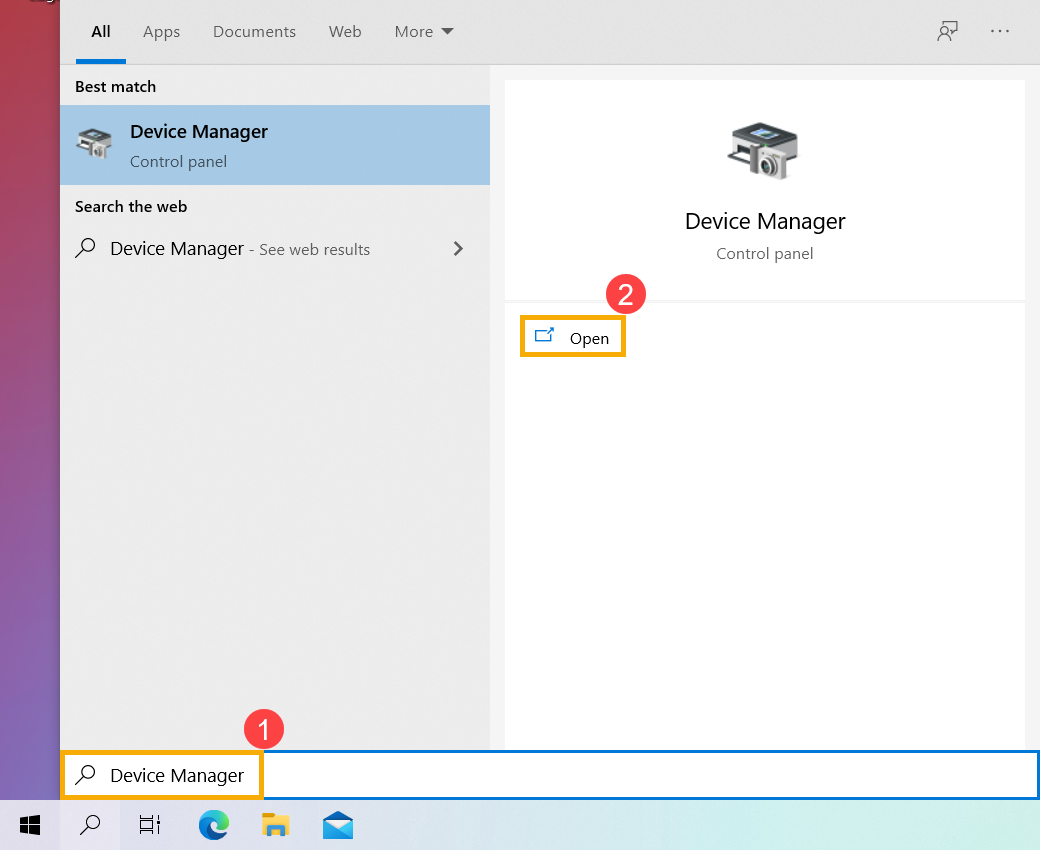
- Check on the arrow next to [System devices]③, then right-click [Intel(R) Serial IO I2C Host Controller]④ and select [Enable device]⑤. Test whether the Touchpad function works normally or not after enabling it. If the problem persists, please continue to the next step.
Note: If the [Enable device] option does not display, it means the Touchpad is enabled already, please continue to the next step.
- Reinstall the Intel I2C driver. Right-click [Intel(R) Serial IO I2C Host Controller]⑥, then select [Uninstall device]⑦.
Note: If you see several Intel(R) Serial IO I2C Host Controller drivers, uninstall the first driver, and then repeat the process for the others.
- Select [Delete the driver software for this device]⑧, and then select [Uninstall]⑨.

- After all Intel(R) Serial IO I2C Host Controller driver are uninstalled, please restart your PC first. The system will install the driver automatically after restarting, and then please test the Touchpad function is working or not.
If the system doesn’t install Intel(R) Serial IO I2C Host Controller driver automatically, please go to the ASUS support site to download and install the Intel I2C driver on the Chipset category. Here you can learn more about How to search and download drivers.
Note: The following picture is the current version as a reference, and please download the latest version from the ASUS Support Site.
If the Touchpad problem persists, please continue to the next chapter for troubleshooting.
ASUS Precision Touchpad
- Type and search [Device Manager] in the Windows search bar①, then select [Open]②.

- Check on the arrow next to [Human Interface Devices]③, then right-click [ASUS Precision Touchpad]④ and select [Enable device]⑤. Test whether the Touchpad function works normally or not after enabling it. If the problem persists, please continue to the next step.
Note: If the [Enable device] option does not display, it means the Touchpad is enabled already, please continue to the next step.
- Reinstall the ASUS Precision Touchpad driver. Right-click [ASUS Precision Touchpad]⑥, then select [Uninstall device]⑦.

- Select [Delete the driver software for this device]⑧, and then select [Uninstall]⑨.

- After the ASUS Precision Touchpad driver is uninstalled, please restart your PC first. The system will install the driver automatically after restarting, and then please test the Touchpad function is working or not.
If the system doesn’t install ASUS Precision Touchpad driver automatically, please go to the ASUS support site to download and install the ASUS Precision Touchpad driver on the Pointing Device category. Here you can learn more about How to search and download drivers.
Note: The following picture is the current version as a reference, and please download the latest version from the ASUS Support Site.
If the Touchpad problem persists, please continue to the next chapter for troubleshooting.
Microsoft Input Configuration Device driver
- Type and search [Device Manager] in the Windows search bar①, then select [Open]②.

- Check on the arrow next to [Human Interface Devices]③, then right-click [Microsoft Input Configuration Device]④ and select [Enable device]⑤. Test whether the Touchpad function works normally or not after enabling it. If the problem persists, please continue to the next step.
Note: If the [Enable device] option does not display, it means the Touchpad is enabled already, please continue to the next step.
- Reinstall the Microsoft Input Configuration Device driver. Right-click [Microsoft Input Configuration Device]⑥, then select [Uninstall device]⑦.

- Select [Uninstall]⑧.

- After the Microsoft Input Configuration Device driver is uninstalled, please restart your PC first. The system will install the driver automatically after restarting, and then please test the Touchpad function is working or not.
If the Touchpad problem persists, please continue to the next chapter for troubleshooting.
Restore the system from restore point
If the problem happens recently, and if you have ever created a restore point or there is an automatic system restore existed, try to restore the device to a point before the problem began to resolve the problem. Here you can learn more about How to use restore point to restore the system. If the problem persists, please continue the next troubleshooting step.
Reset your PC
If the problem persists after all troubleshooting steps are completed. Please backup your personal files, then reset the device to back to its original configuration. Here you can learn more about How to reset the system.
If your problem is not worked out with above solution and information, please contact ASUS customer service center for further information.
