This widget could not be displayed.
This widget could not be displayed.
Turn on suggestions
Auto-suggest helps you quickly narrow down your search results by suggesting possible matches as you type.
Showing results for
- English
- Other Products
- FAQ
- [Gaming NB/DT] ScreenXpert 3.0 Introduction
Options
- Subscribe to RSS Feed
- Mark as New
- Mark as Read
- Bookmark
- Subscribe
- Printer Friendly Page
- Report Inappropriate Content
Community Manager
Options
- Article History
- Subscribe to RSS Feed
- Mark as New
- Mark as Read
- Bookmark
- Subscribe
- Printer Friendly Page
- Report Inappropriate Content
a week ago
- edited
Sunday
by
![]() ZenBot
ZenBot
[Gaming NB/DT] ScreenXpert 3.0 Introduction
ScreenXpert Control Center Mode
ScreenXpert Introduction
ScreenXpert 3.0 allows general users to use it on single-screen laptop models, aiming to provide a better user experience when managing screen window operations. In ScreenXpert 3.0, we have combined the most beloved design language and functional elements from previous versions of ScreenXpert. On the main screen, we provide a ScreenXpert control center icon that displays all the ScreenXpert features prepared by ASUS for gaming laptops. Users can also adjust and select the list of functions displayed through settings. We believe this can offer users greater flexibility and a better operational experience.
Model Supported
ScreenXpert application support ASUS laptops and desktops. This article only applies to Gaming Laptops and Desktop products.
Install and Uninstall
How to get ScreenXpert application, please visit Microsoft Store to download
How to uninstall ScreenXpert application, please refer to [How to uninstall Apps]
Launch ScreenXpert
*For ASUS Gaming Laptops and Desktops
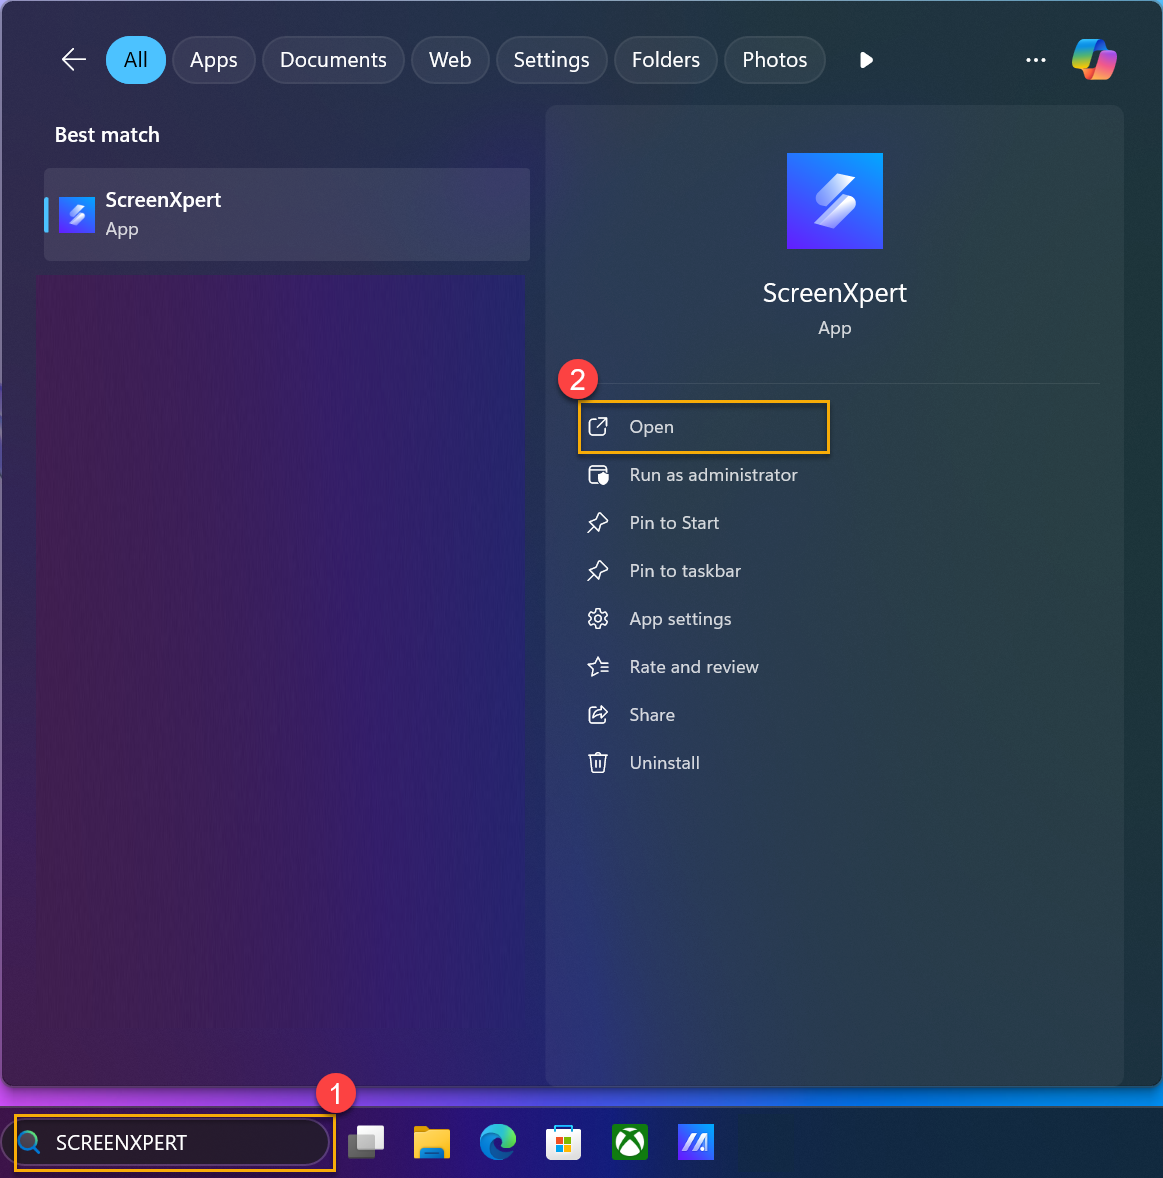
Please type and search [SCREENXPERT]① in the Windows Search Box, and then click on [Open]②.
*For 2025 ROG Flow Z13 GZ302
At right side of GZ302 model, user can click [Command Center Button] to launch ScreenXper Application. 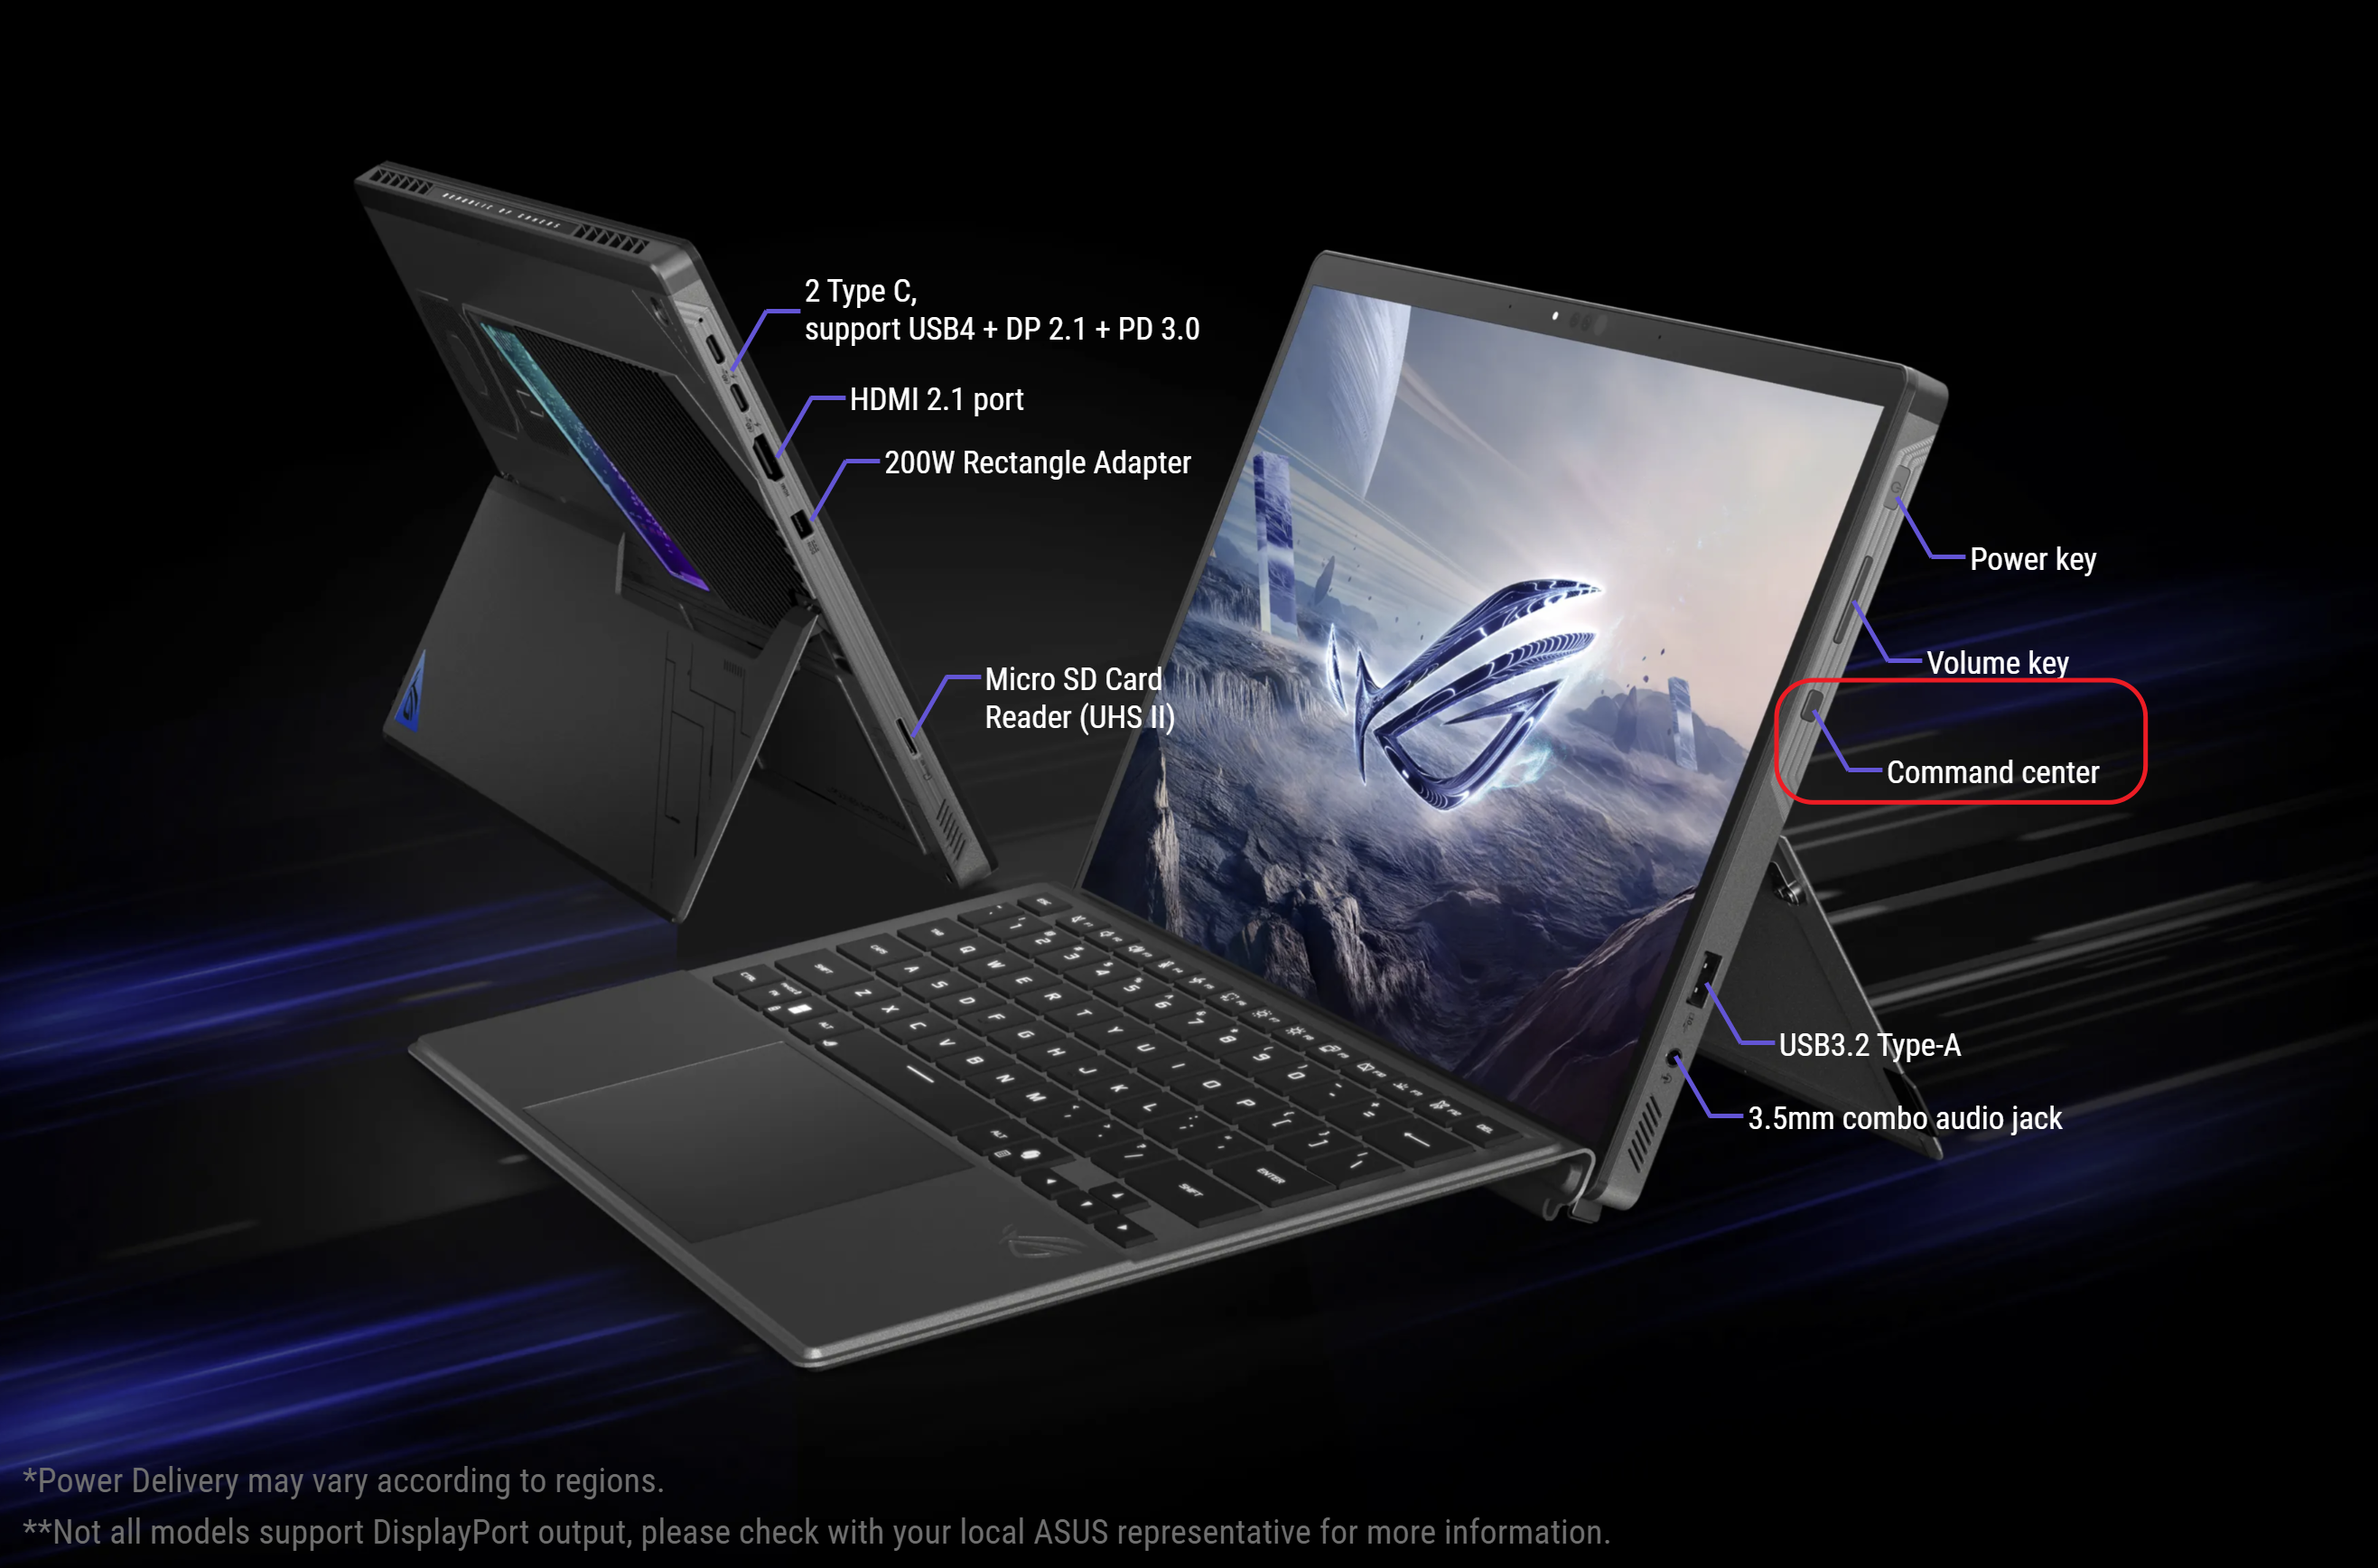
ScreenXpert Control Center Mode
Control Center
The initial icon, user can click the icon to change Control Center Mode.

Bar Mode
User can click [Panel Mode] (a) to change to Panel Mode.

Panel mode
User can click [icon] (b) to change to Bar Mode.
Feature Introduction
Users can directly click each feature icon to launch the feature in either Bar Mode or Panel Mode.
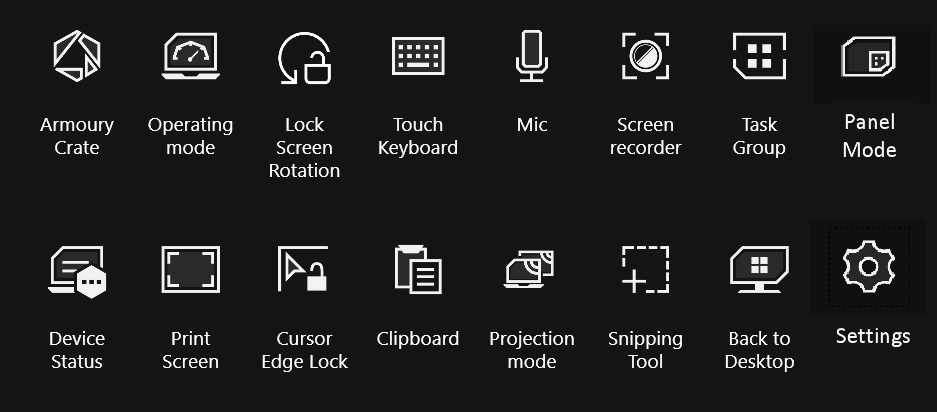
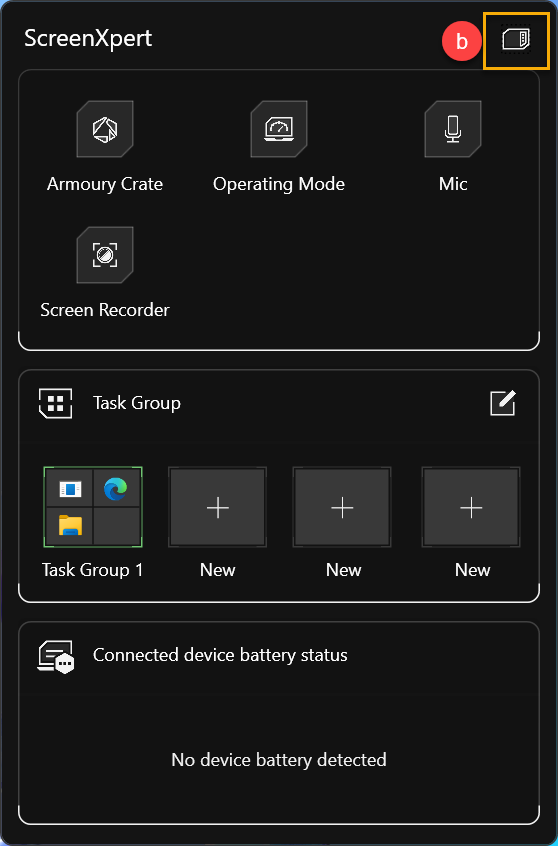
Armoury Crate
Provide users with quick access to Armoury Crate application, clicking the icon to quickly launch.
* This feature is only supported on models with Armoury Crate application installed.
Operating mode
(To be update)
Lock Screen Rotation
When the device is in tablet mode, users can click [Lock Screen Rotation] to keep the screen orientation fixed and unaffected.
*This feature is only applicable when the device is in tablet mode.
Touch Keyboard
Click [Touch Keyboard] to quick access Touch Keyboard for typing.
*This feature is only applicable with model GZ302EA.
Mic
Click [Mic] to quick turn the computer's microphone function on or off.
Screen Recorder
Click [Screen Recorder], then select the screen area you want to record to start screen recording.
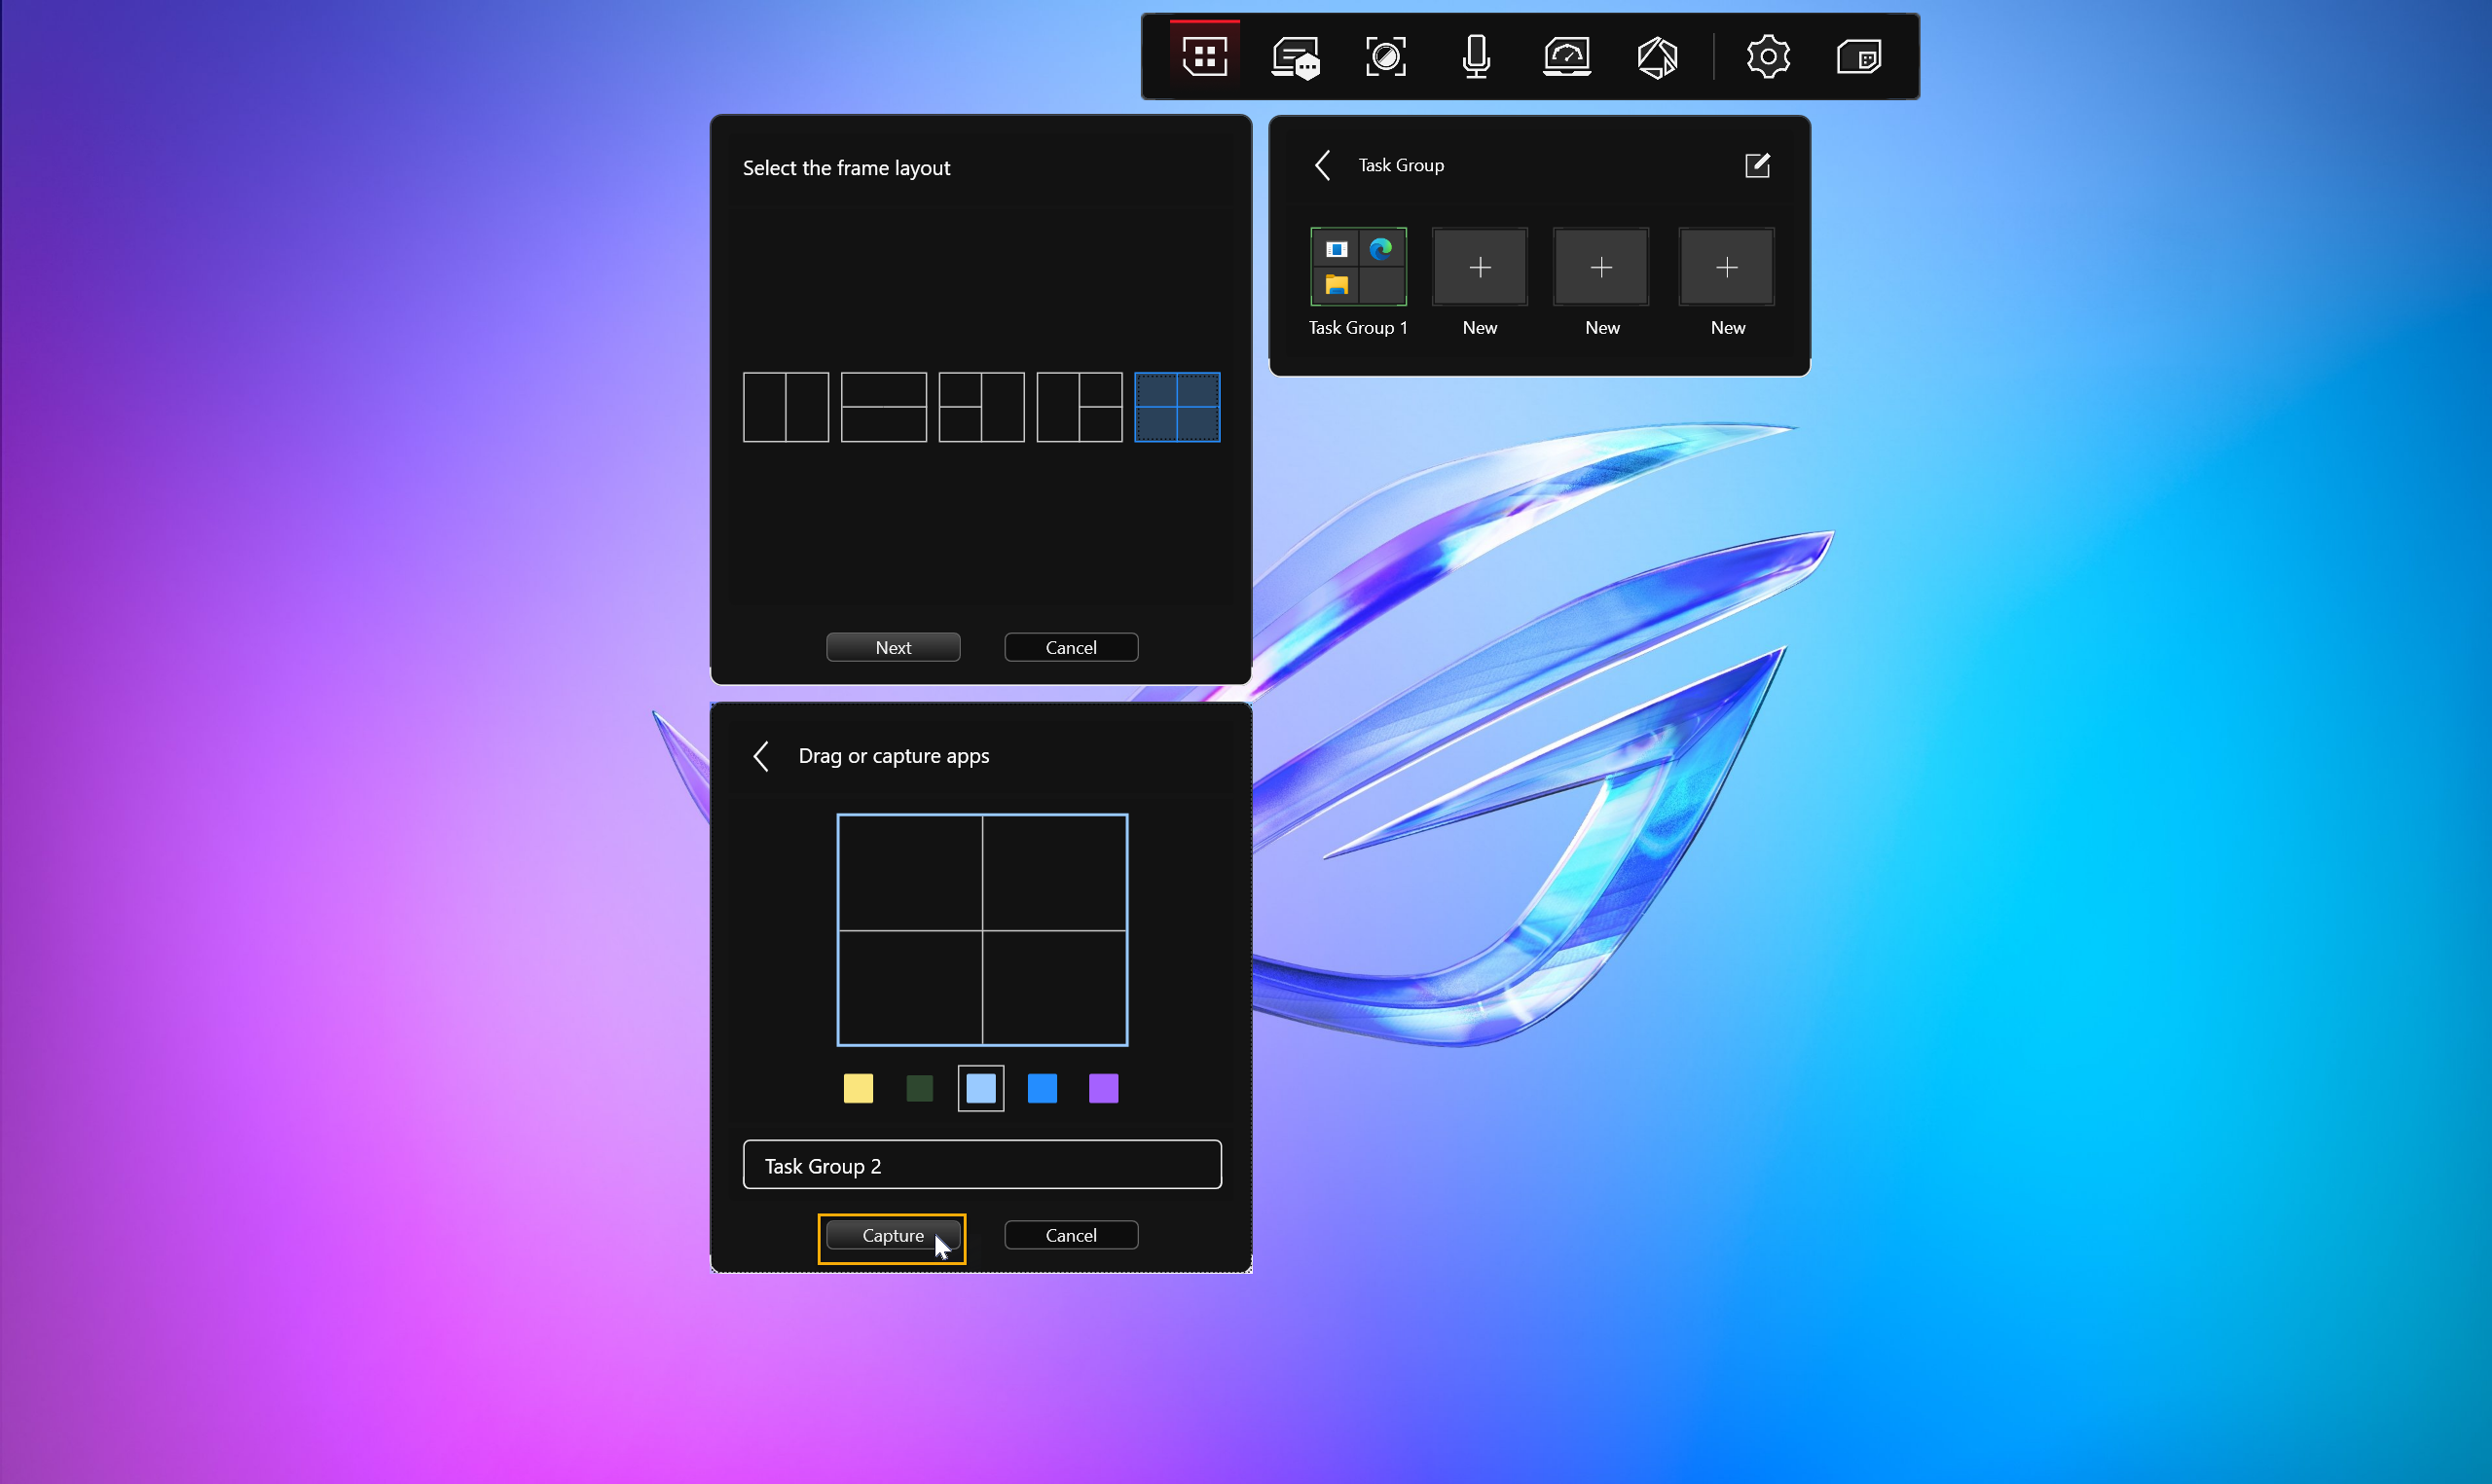
Task Group
Click [Task Group] to allow users to create a group of various applications based on their needs or preferences and open them simultaneously. By using the capture button, you can add currently displayed program windows on the desktop to the same task group. You can also adjust the display position of each program window by dragging them. Once the task group is created, you can click on it to open all your favorite applications simultaneously with a single click.
Device Status
Click [Device Status] to allow users to check the battery status of Bluetooth devices currently connected to the computer.
Print Screen
Click [Print Screen] to capture the current computer desktop screen and save the file.
Cursor Edge Lock
When enabled  , if two or more monitors are connected to the computer, you can keep the mouse within a designate screen area.
Clipboard
Click [Clipboard] to open it. When users copy content on the computer, it will automatically be copied to the clipboard for later use. You can paste multiple items from the clipboard history and also pin frequently used items to the top.
Projection Mode
Click [Projection Mode] to change the display mode of the screen. When two or more monitors are connected to the computer, this feature helps users quickly switch between different display modes, such as Duplicate, Extend, or single screen only.
Snipping Tool
The Snipping Tool allows you to capture a portion of the screen. After selecting the screen area you want to capture, the screenshot will be automatically copied to the clipboard for use.
Back to Desktop
Click [Back to Desktop] to minimize all open windows and return to the desktop view.
Settings
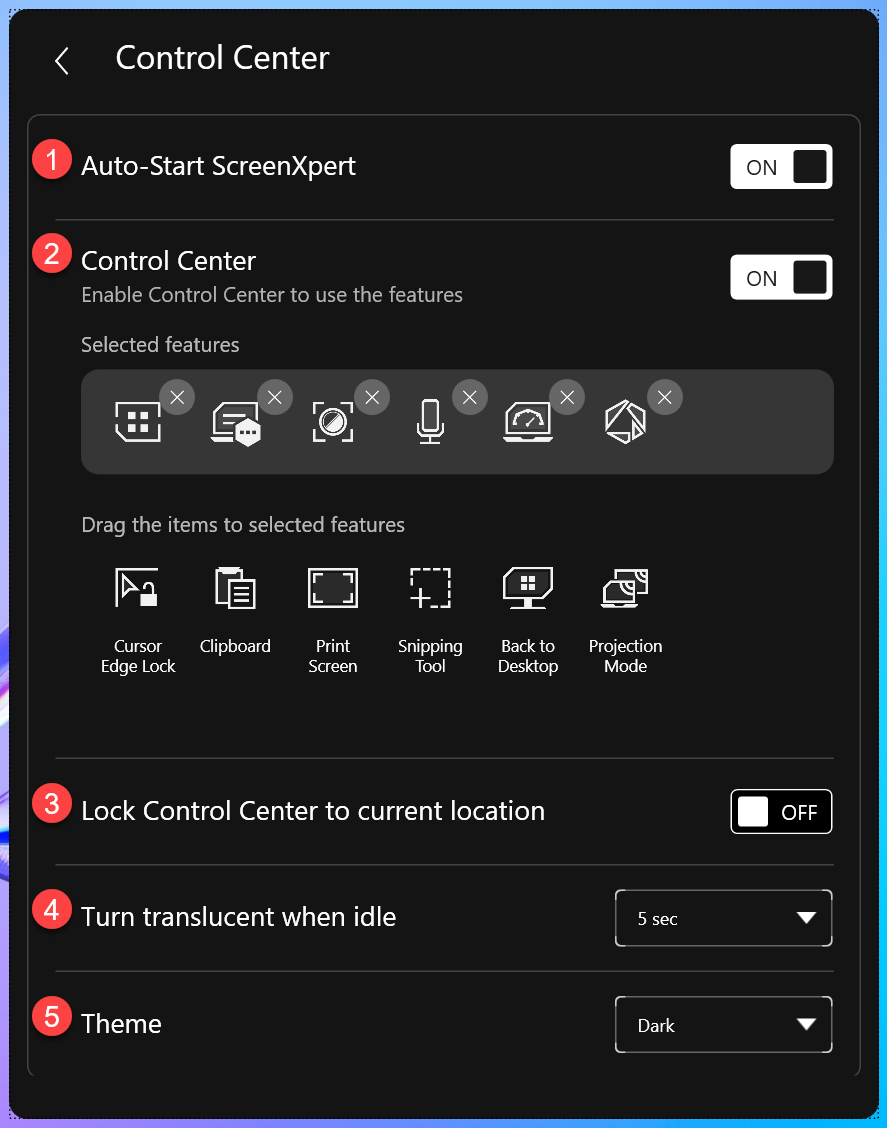
Control Center
①Auto-Start ScreenXpert: When set to ON, ScreenXpert will automatically launch when the computer is turned on.
②Control Center: Customize the display functions in the Control Center based on personal needs and preferences.
③Lock Control Center to current location: When set to ON, the position of the Control Center will be fixed and cannot be dragged.
④Turn translucent when idle: Set the duration for the ScreenXpert icon to turn semi-transparent when idle.
⑤Theme: Set the theme color of the ScreenXpert user interface.
Windows Management
①App Switcher: When set to ON, while moving application windows on the screen, users can specify the layout of the application window from a quick menu. If two or more monitors are connected to the computer, a quick menu will appear on the desktop, allowing users to choose where to place the application window on the screen.
②Flick App Window: When set to ON, if two or more monitors are connected to the computer, you can use a finger (on a touch screen) or the mouse cursor to hold the window and throw the application window to another monitor for display.

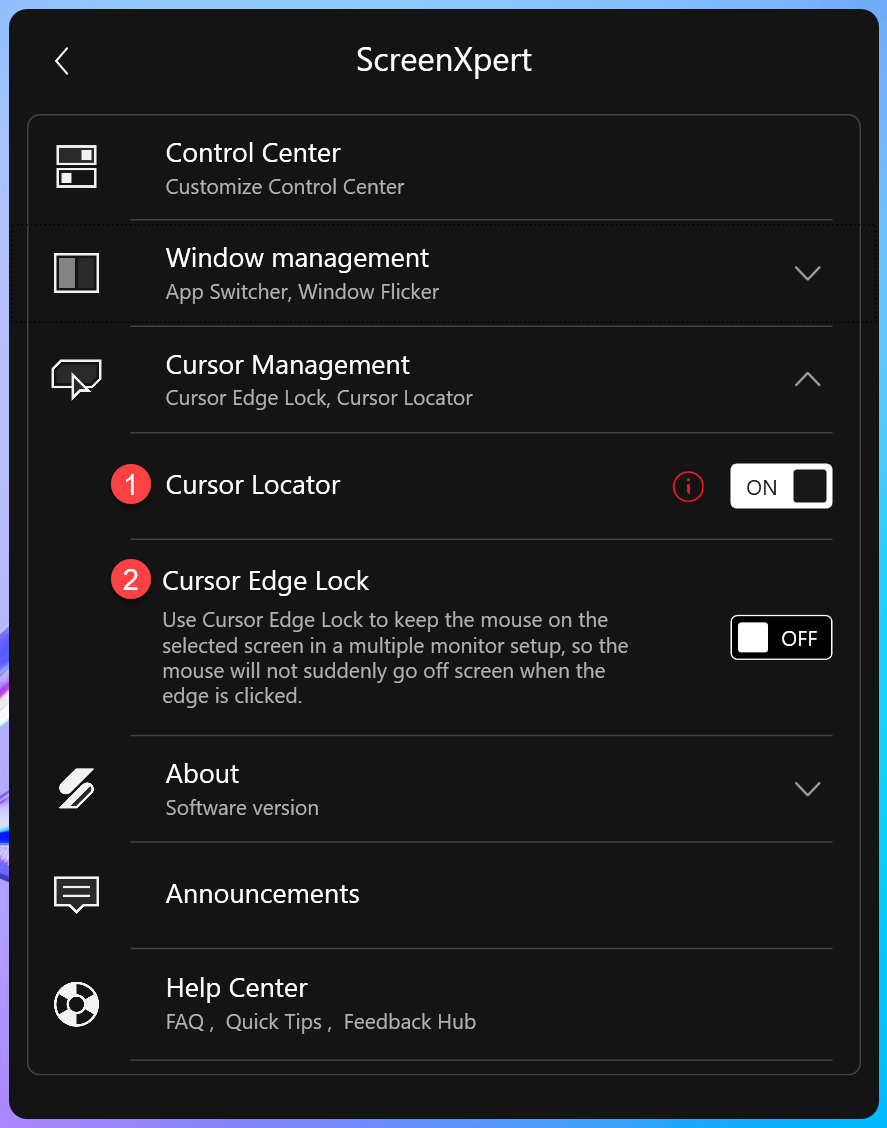
Cursor Management
①Cursor Locator: When set to ON, quickly shaking your mouse will cause an indicator animation to appear around the cursor.
②Cursor Edge Lock: When set to ON, if two or more monitors are connected to the computer, you can temporarily lock the cursor within a designated screen area.
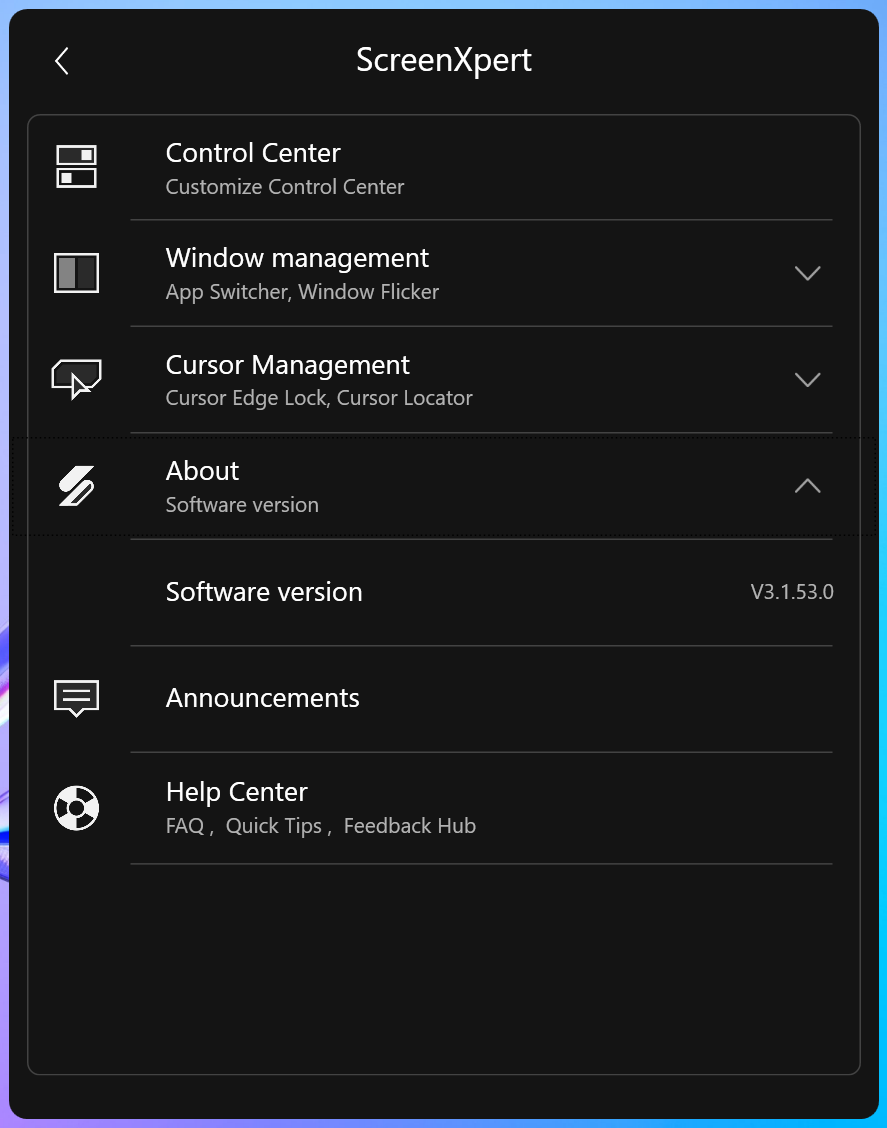
About
Software version: Displays the current version of the ScreenXpert application.
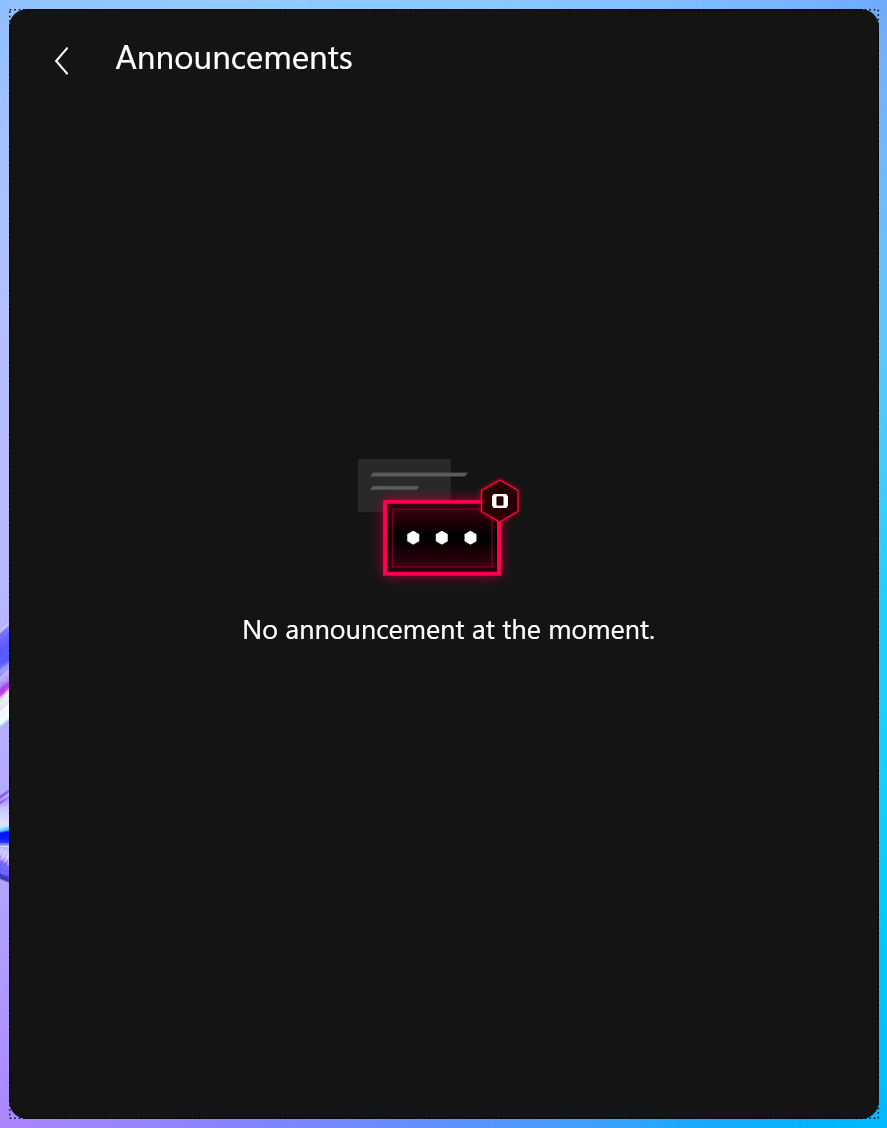
Announcements
Display current information and announcements for ScreenXpert.
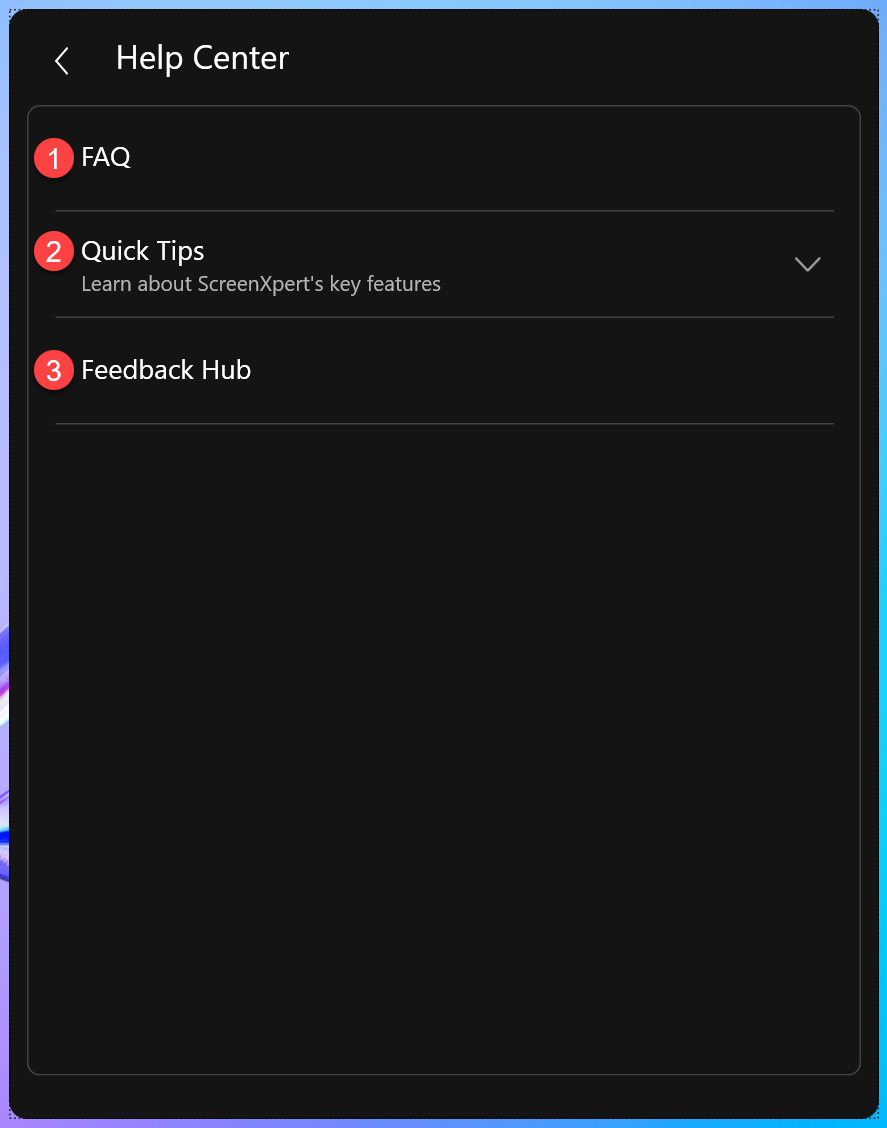
Help Center
①FAQ: Provides information on common issues related to the ScreenXpert application.
②Quick Tips: Helps you understand the main features of ScreenXpert.
③Feedback Hub: Share your evaluation of the ScreenXpert software.