- English
- Other Products
- FAQ
- [Gaming NB/DT] Armoury Crate Introduction (Ver4.0)
- Subscribe to RSS Feed
- Mark as New
- Mark as Read
- Bookmark
- Subscribe
- Printer Friendly Page
- Report Inappropriate Content
- Article History
- Subscribe to RSS Feed
- Mark as New
- Mark as Read
- Bookmark
- Subscribe
- Printer Friendly Page
- Report Inappropriate Content
on
01-29-2024
05:22 PM
- edited
Sunday
by
![]() ZenBot
ZenBot
[Gaming NB/DT] Armoury Crate Introduction (Ver4.0)
Armoury Crate Install& Uninstall
1. Armoury Crate Introduction
Armoury Crate is an integration application developed for ROG series and TUF series of gaming laptop and desktop by integrating NB ROG Gaming Center and DT AEGIS III functions. Gamers can use Armoury Crate platform to launch system performance adjustments on their homepage and set up related applications and obtain system information. The lighting and AURA Sync integrated by Armoury Crate can also be used to set various lighting effects on the laptop& desktop, and the supported external devices.
Support ROG series and TUF series of gaming laptop and desktop, please refer to Armoury Crate Compatible Devices for more details.
*The article is applicable to Armoury Crate Ver4.xx version only.
3. Application Install& Uninstall
How to get and install the application program,please refer to ASUS official website
How to uninstall application program,please refer to ASUS official website
4-1 How to Start Armoury Crate
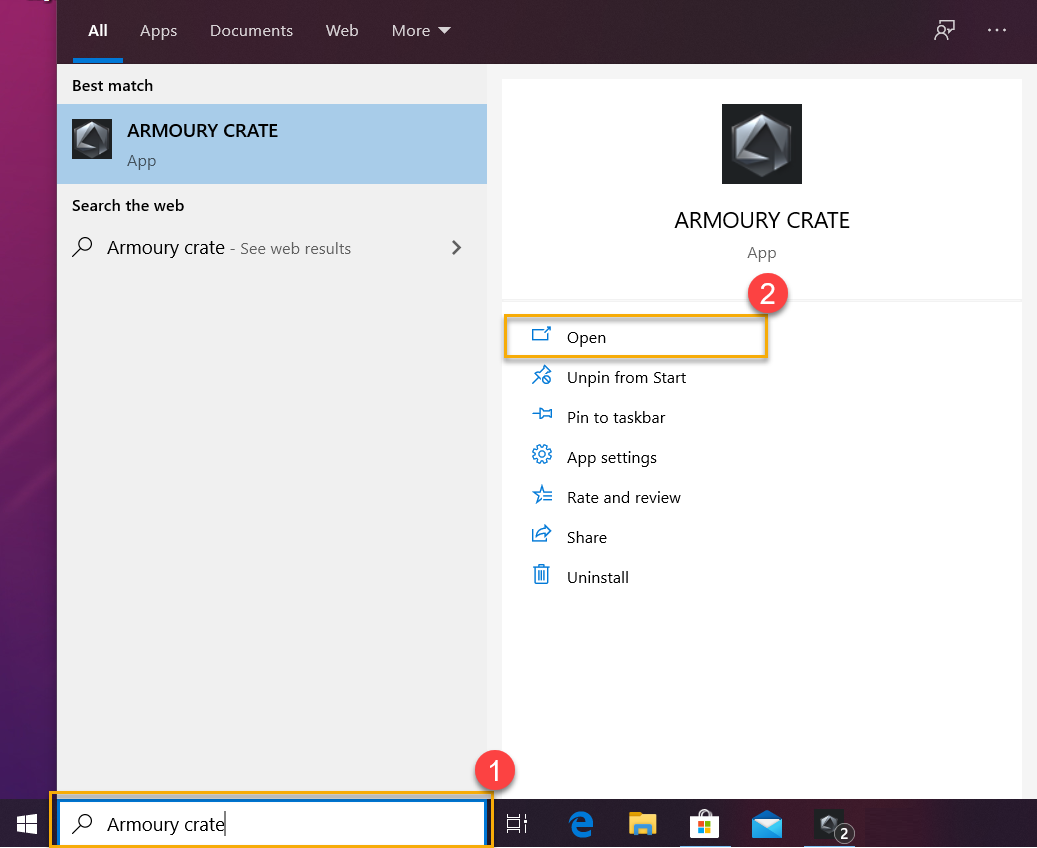
Please type and search [ARMOURY CRATE]① in Windows Search Box , and then click [Open]②,the Home page will pop out.
4-2 Armoury Crate Home
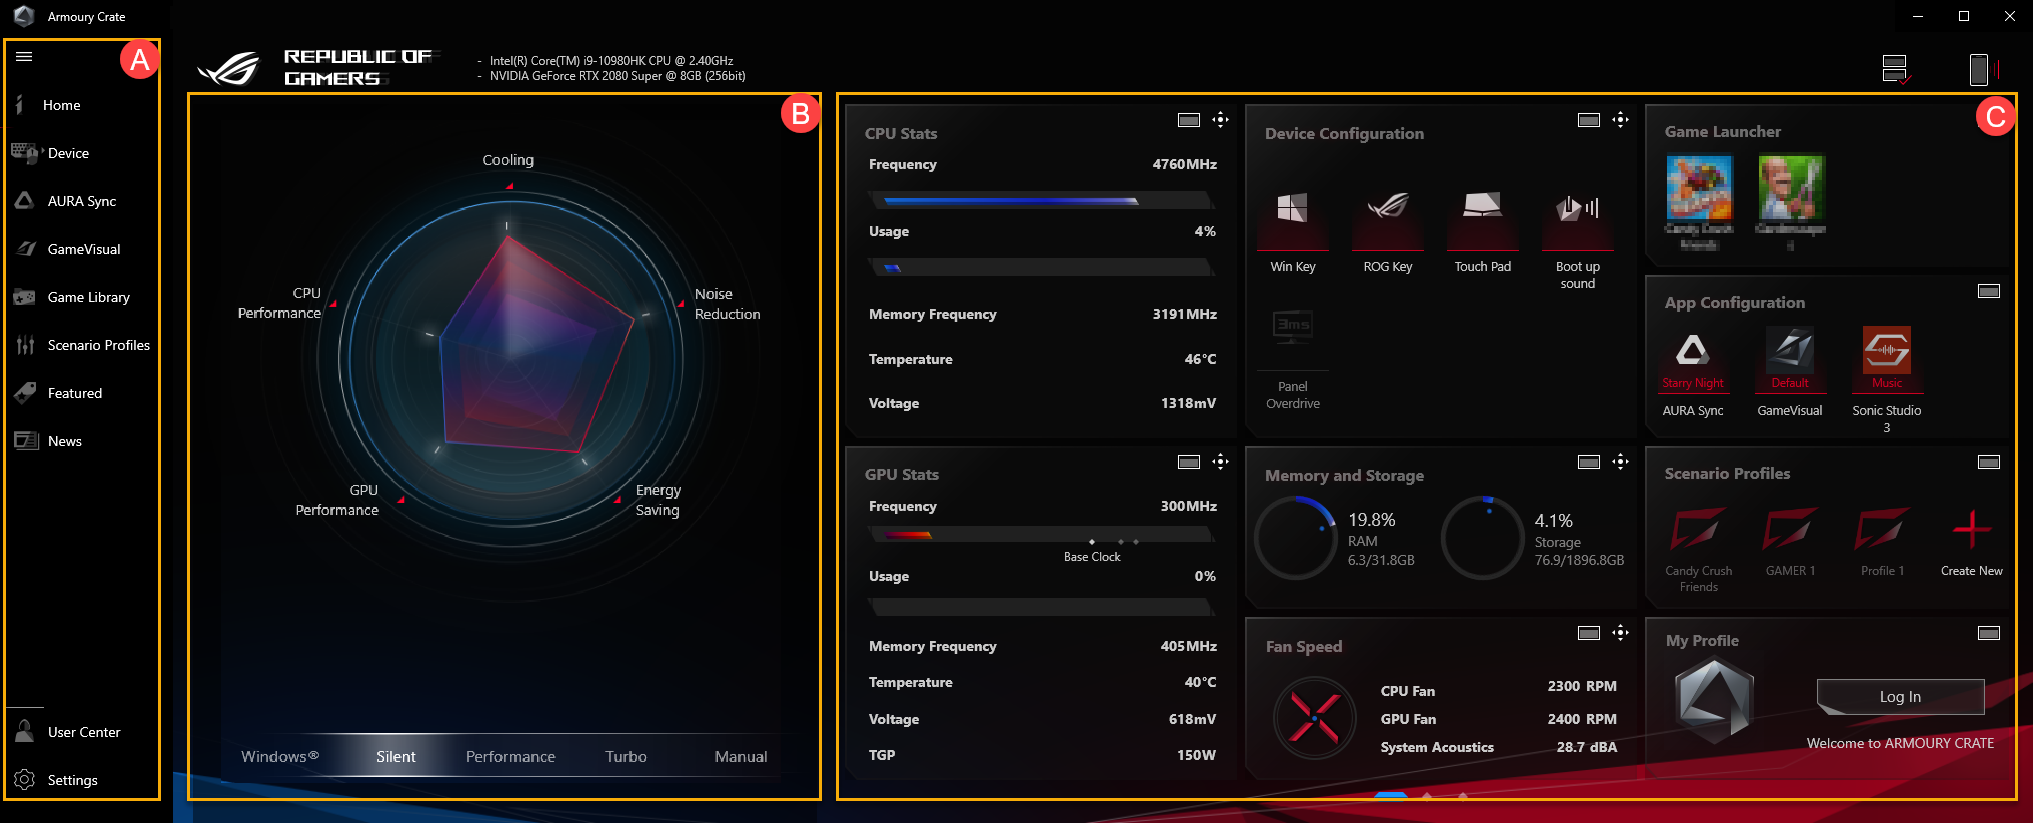
Main Menu(A): To display Armoury Crate main features and page switch.
HyperFan Mode(B): To provide gamers a quick system performance adjustments, and each mode is with different CPU&GPU performance、Cooling、Noise Reduction and Energy Saving default setting, for example Windows®、Silent、Performance、Turbo、Manual and Tablet/Vertical mode.
* Please refer to HyperFan Mode Category for more details.
System Info Display Blocks(C): To provide gamers having a quick view for system relative info, for example CPU&GUP Stats、Memory and Storage、Fan Speed、System Acoustics、Device Configuration、Game Launcher、App Configuration、Scenario Profiles and My Profile.
5. Device(D)
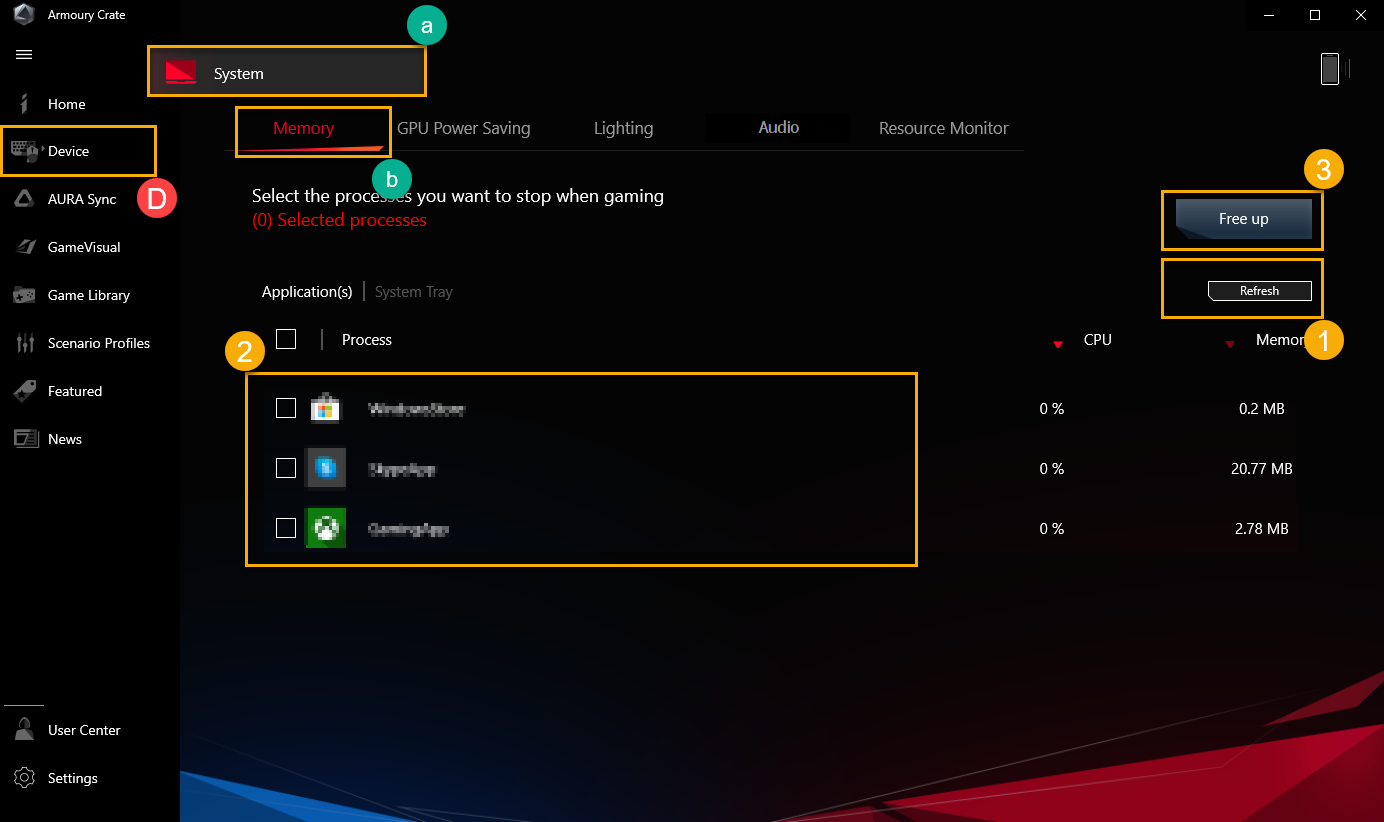
*System(a) - Memory(b): Gamers can select the Apps and release those occupied memory while game playing.
Refresh①: To select “Refresh”,it will list the Apps currently occupying memory.
Applications②: To display the Apps list which is with currently occupying memory.
Free Up③: To select “Free Up”,the memory occupied by the selected application will be released.
GPU Power Saving(c)
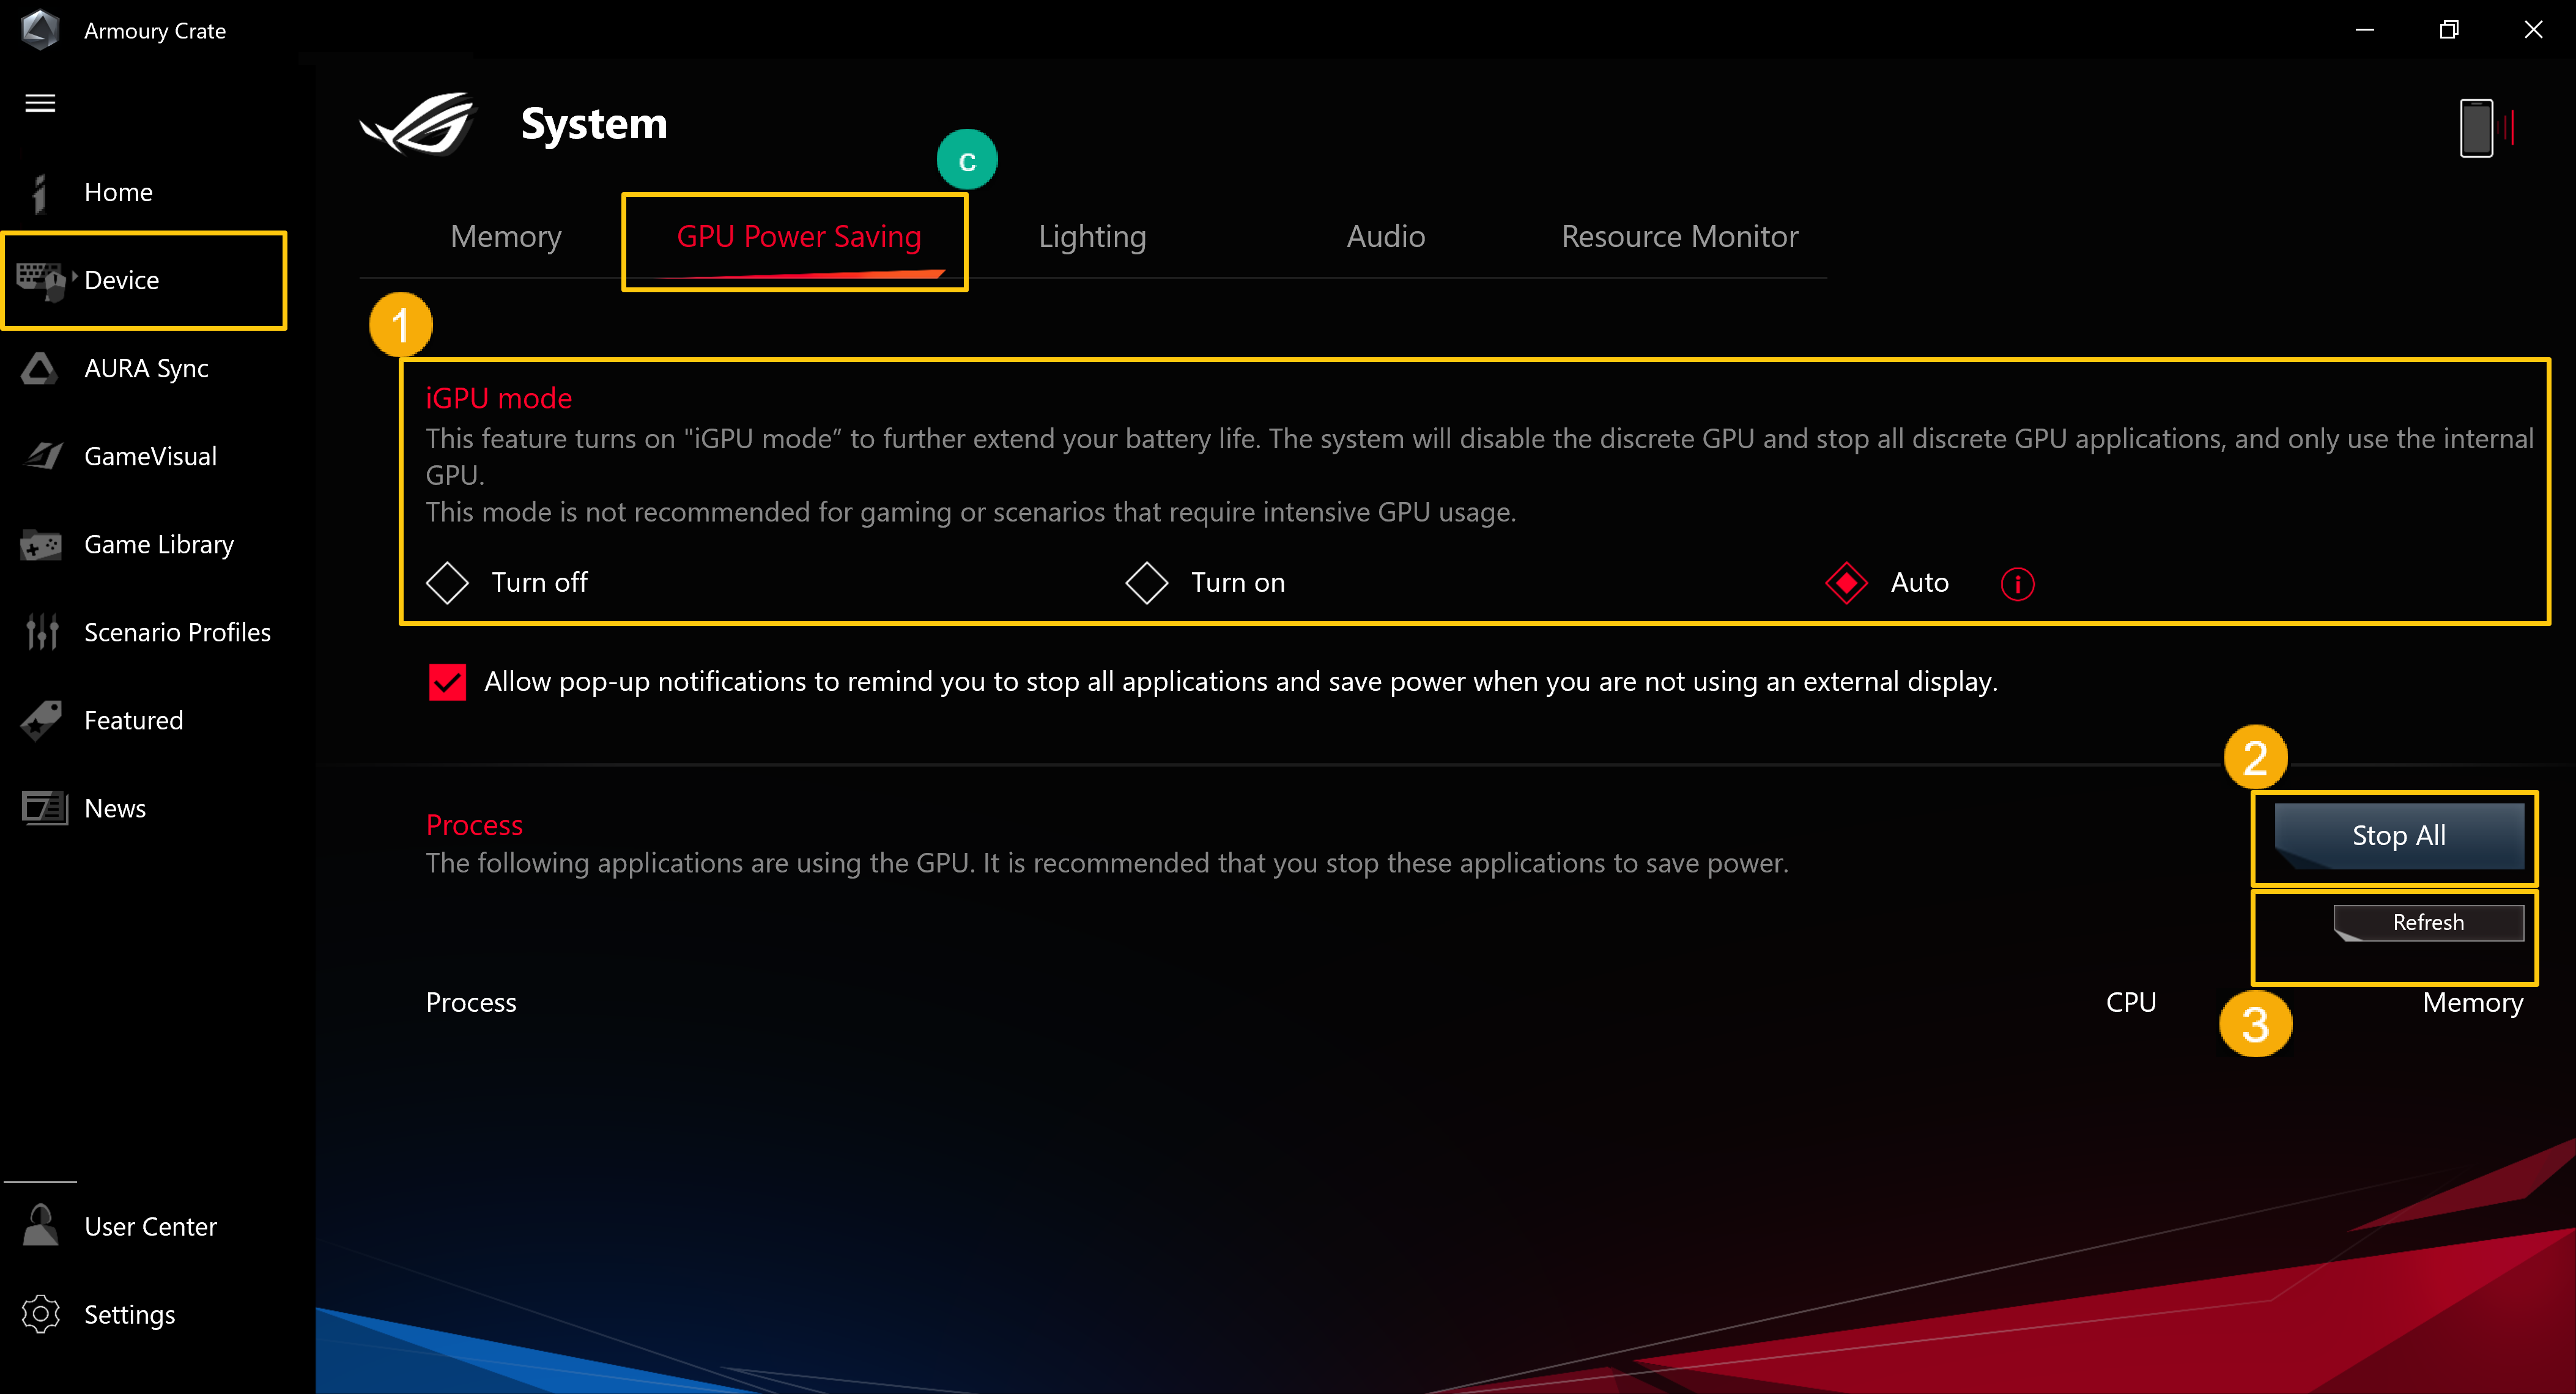
Gamers can stop application(s) which is using GPU currently to save power.
IGPU Mode①: This feature is able to extend your battery life. The system will disable the discrete GPU applications, and only use internal GPU. This mode is not recommended for gaming or require intensive GPU usage.
Stop All②: To select “Stop All”, all applications using GPU currently will be stopped.
Refresh③: To select “Refresh”, it will list the Apps currently running on GPU.
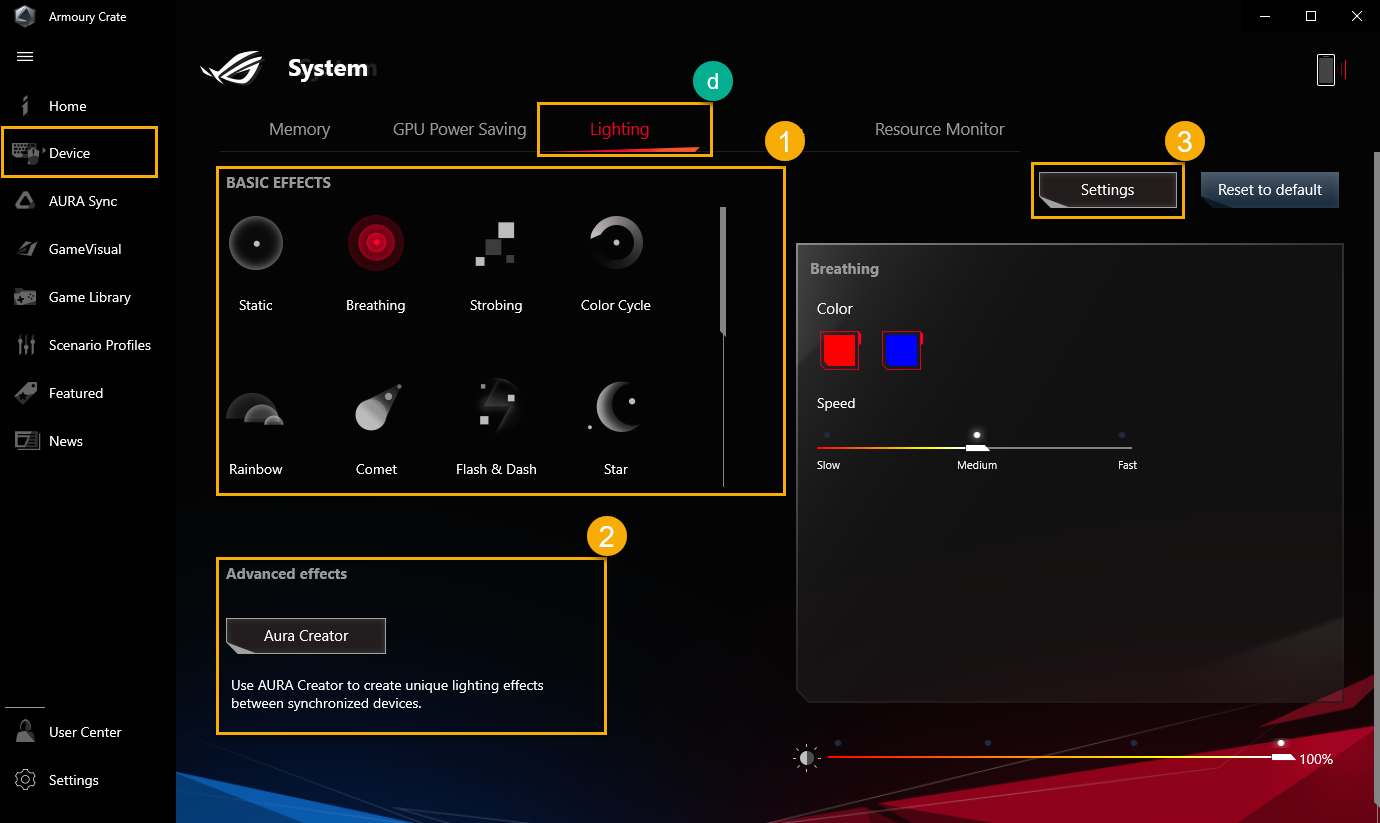
Lighting(d)
To setup device lighting effects.
Basic Effects①: To setup device lighting effects, the lighting effects will vary depending on the device.
Advanced Effects②: Using ARUA Creator to create unique lighting effects, please refer to AURA Creator Introduction for more details.
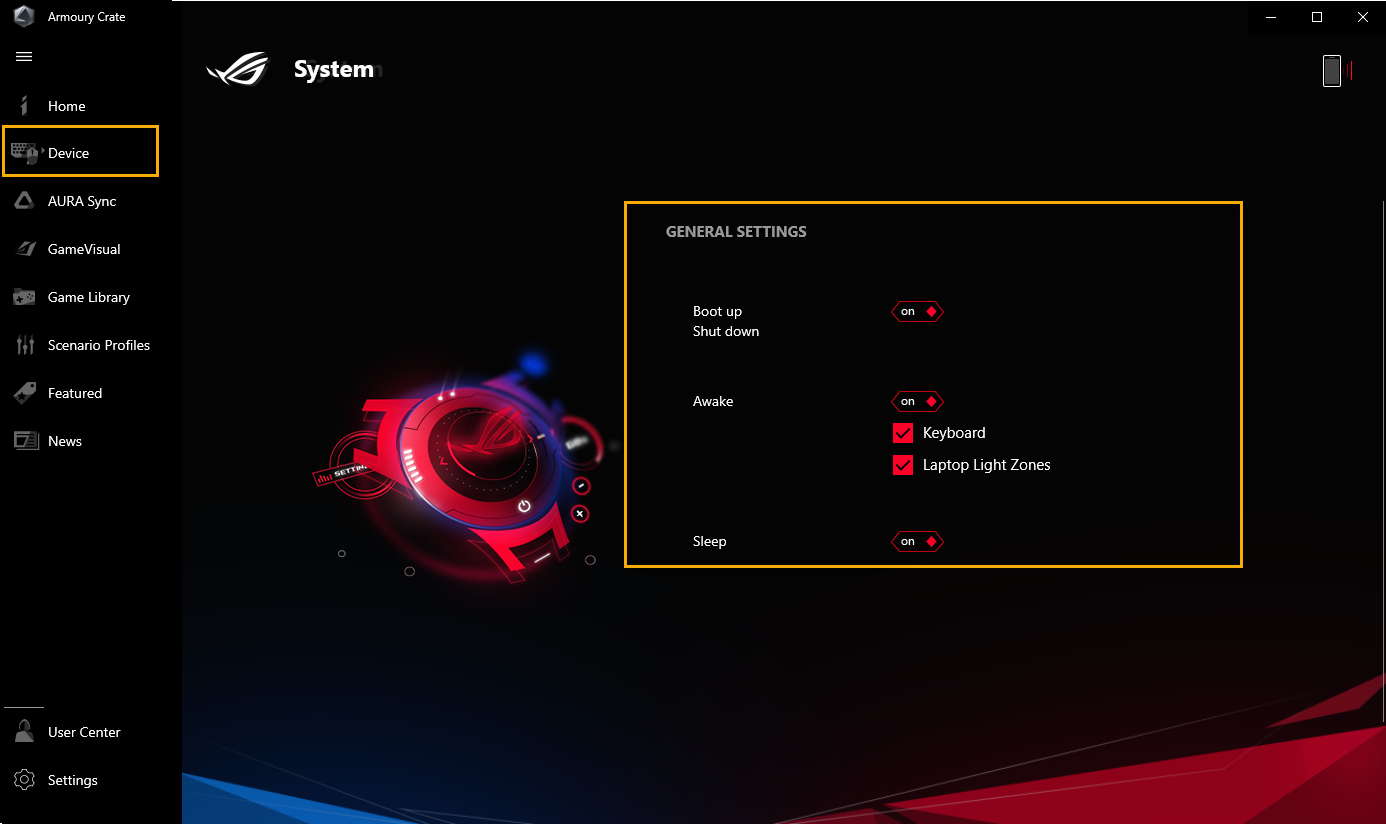
Settings③: To select “Setting” to get into General Settings* page, and gamers can turn on/ off device lighting effects.
*General Settings: Gamers can enable or disable the AURA lighting effects for Keyboard & Laptop Light Zone under the status (Boot Up/ Shut Down/ Awake/ Sleep), the available lighting effects will vary depending on the device.
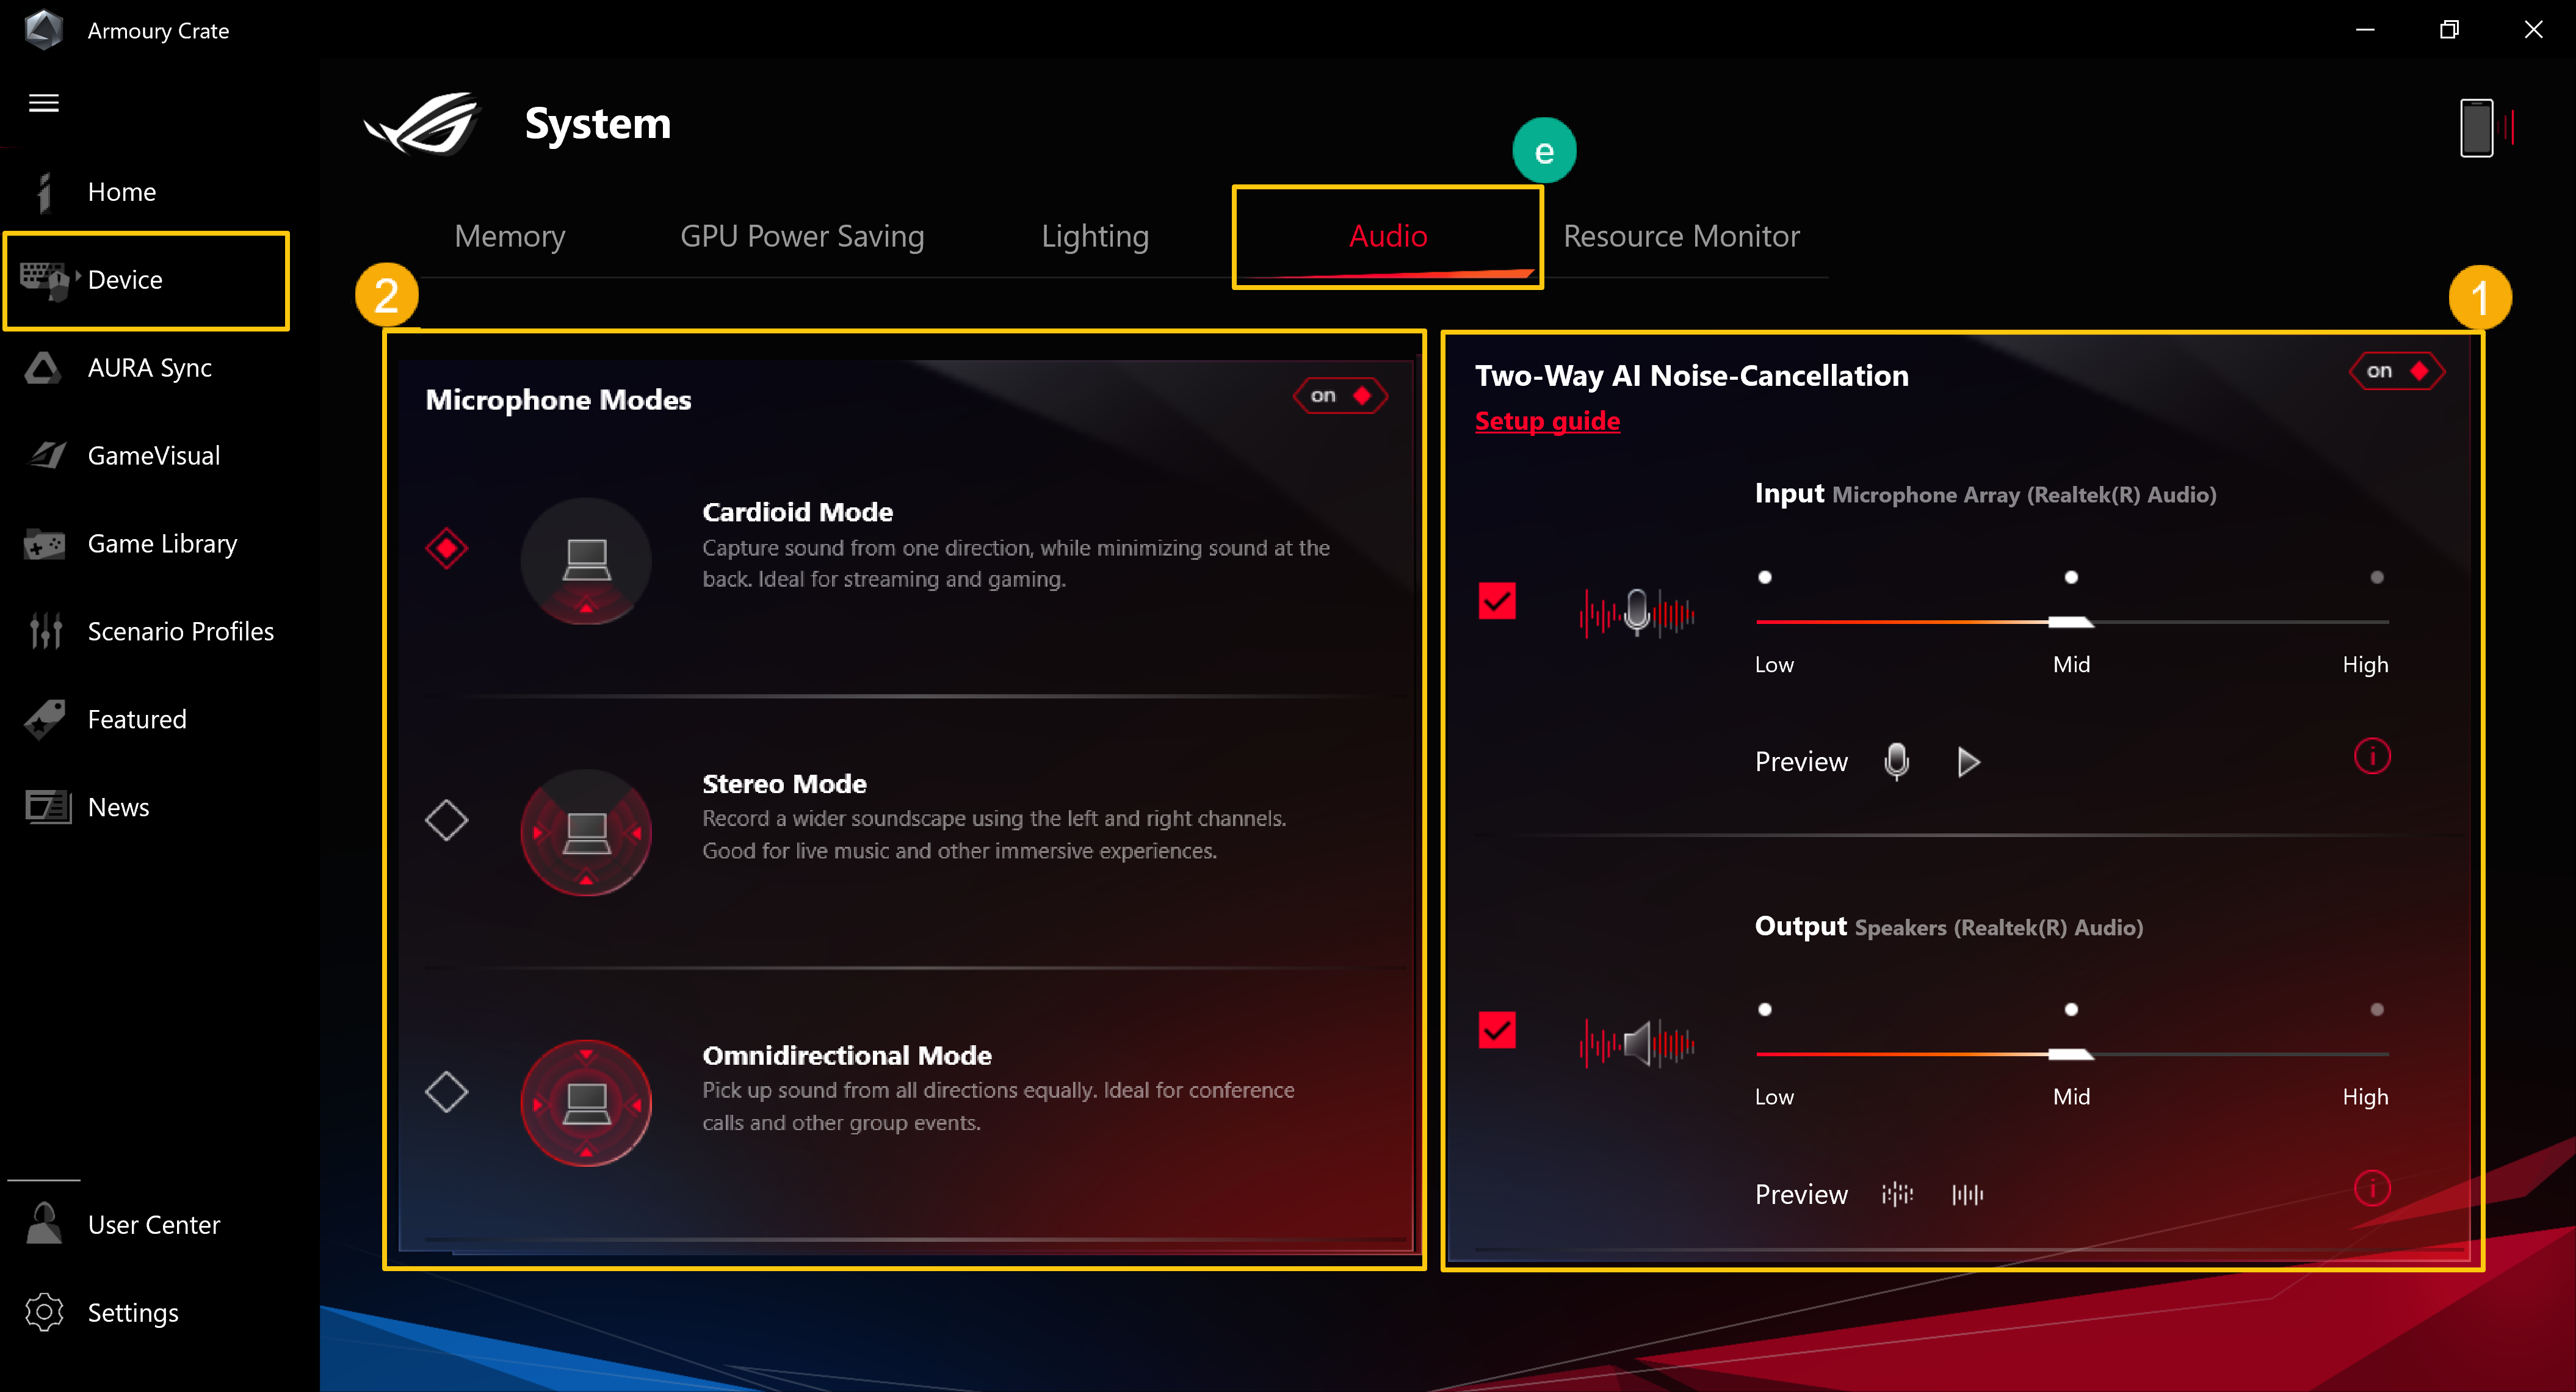
Audio(e)
Two-Way AI Noise Cancelation①:
It is exclusively featured on ASUS gaming laptops and desktops. Through the massive deep-learning database, the utility leverages to preserve the sound of your voice while eliminating distracting keyboard clatter, mouse clicks, and other forms of environmental noise. It only occupies a slight load on the CPU, and ensures the least impact on gaming performance.
*The function can only support some models, please refer to Two-Way AI Noise Cancelation for operation detail.
**In Audio setup, gamers can not turn on both of Two-Way AI Noise Cancelation and Microphone Modes function at the same time.
Microphone Modes②:
CARDIOID Mode: Records sound source directly in front of the microphone, and delivers rich sound. It’s perfect for game streaming or vocal performers.
STEREO Mode: Stereo mode uses left and right channels to capture wider and more realistic sound impression. For example: ASMR, guitar or choir.
OMNI Mode: OMNI mode picks up sound equally from everywhere around the mic. This setting is perfect for conferance call and other group events.
*Only available on laptop equipped with 3D-MIC Array (GA503、GU603 and GX703 Series), and please refer to ROG Official Website for more details.
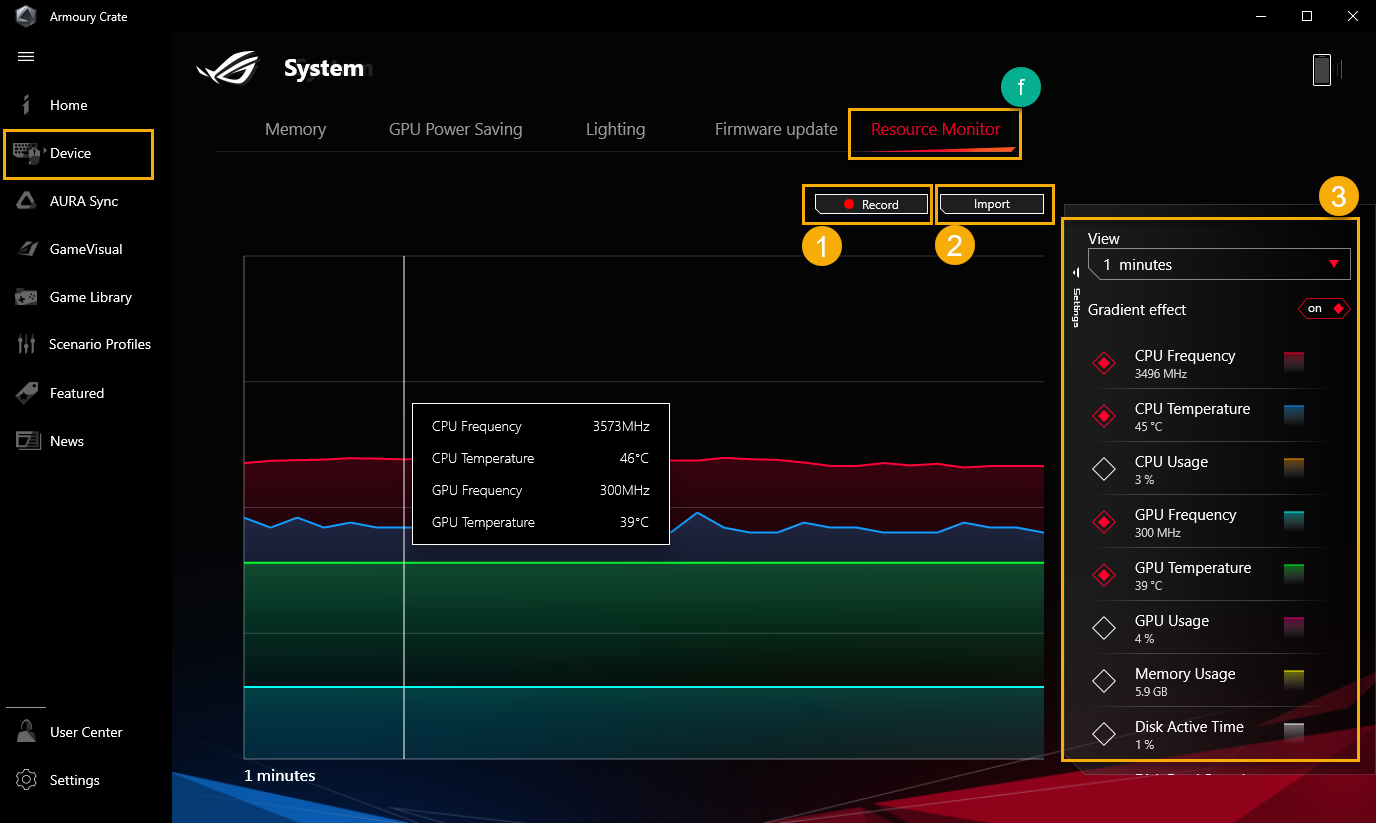
Resource Monitor(f)
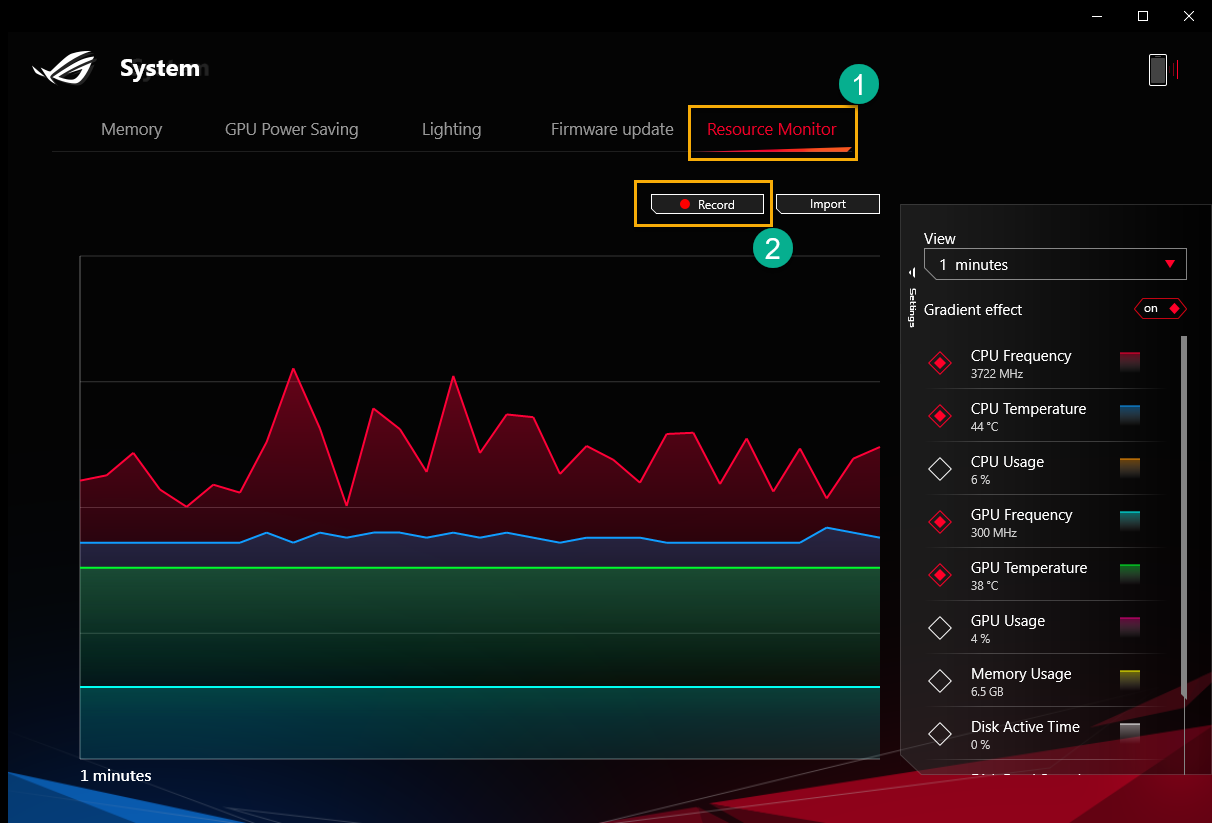
To view and monitor system information for CUP、GPU、Memory、Disk relative resource.
Record①: Gamers can record CPU、GPU、Memory and Disk resource information.
Import②: Gamers can import previous resource record, and check those resource details.
Setting③: Gamers can adjust timer view、Gradient effect and resource items.
*For more details, please refer to Using "Record" and "Import" function in Resource Monitor
*Device- Keystone(g)
Keystone can easily personalize your gaming laptop and desktop. The pluggable keystone attracts the exclusive slot on the right side of the keyboard by magnetic force. When keystone docked, It can apply lighting effects、sound effects and activate Shadow Drive storage capacity.
*The function can only support some models, please refer to Keystone Introduction for operation detail.
*Device- AniMe Matrix(h)
Creators can freely express your creativity through the AniMe Matrix™ setup with custom patterns、GIF animations or visual animations of sound effects that change with the rhythm of the music, and can also display the status of the system battery level.
*The function can only support some models, please refer to AniMe Matrix™ Introduction for operation detail.
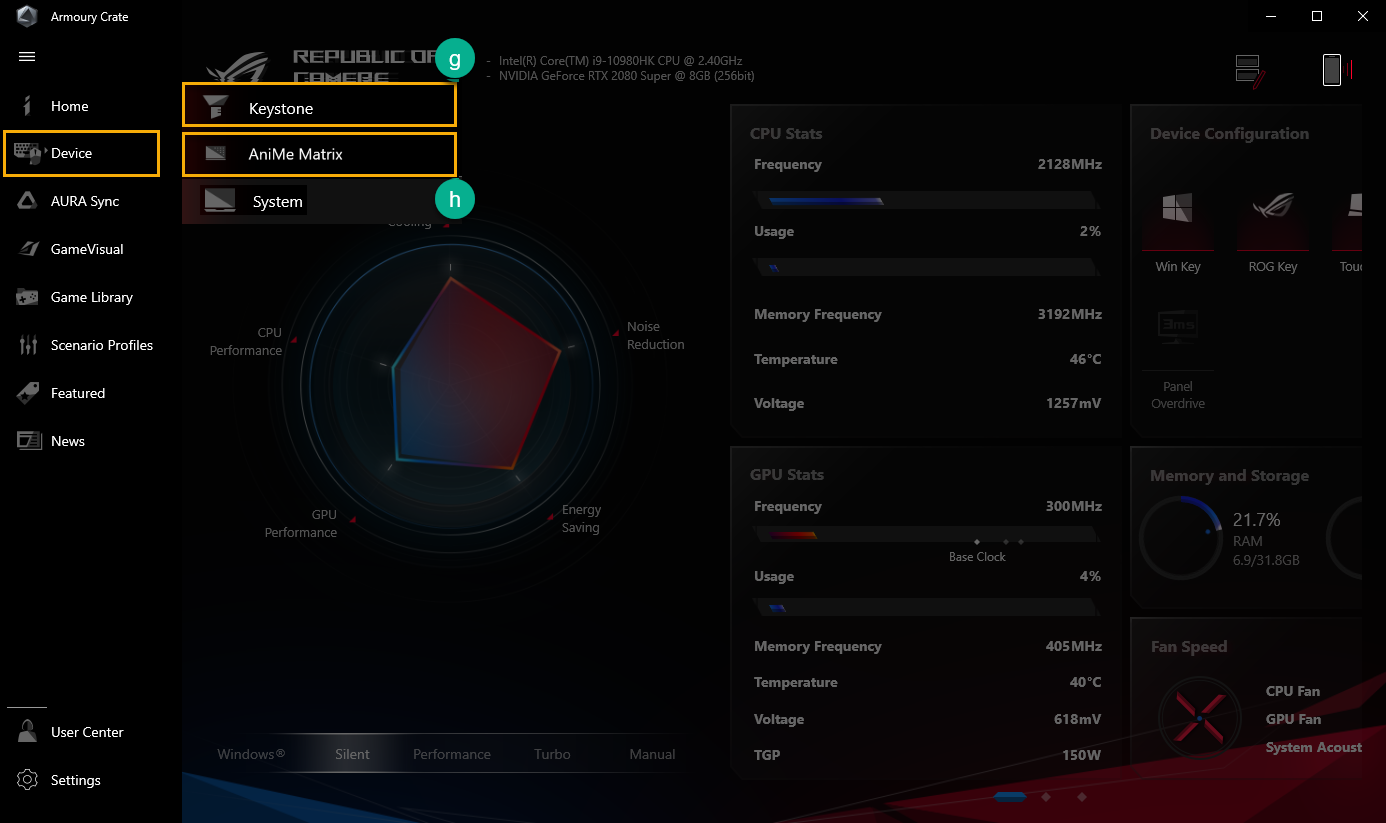
Multiwheel(I)*
The Multiwheel provides more advanced functions than previous Volume wheel, and gamers can optimize the operation process with function customizable. Long press to trigger setting bar, and then scroll and click Multiwheel to select function you need. After that, scrolling the Multiwheel for the function adjustment. Besides, gamers can also make more settings through the Armoury Crate application.
Function menu①: Gamers can click or unclick the item to add or reduce the Multiwheel function to display, the Volume item is default.
Order adjustment②: Thru dragging the function items, gamers can adjust function order to display.
*Only available on laptop equipped with the Multiwheel (GX703 Series), and please refer to ROG Official Website for more details.
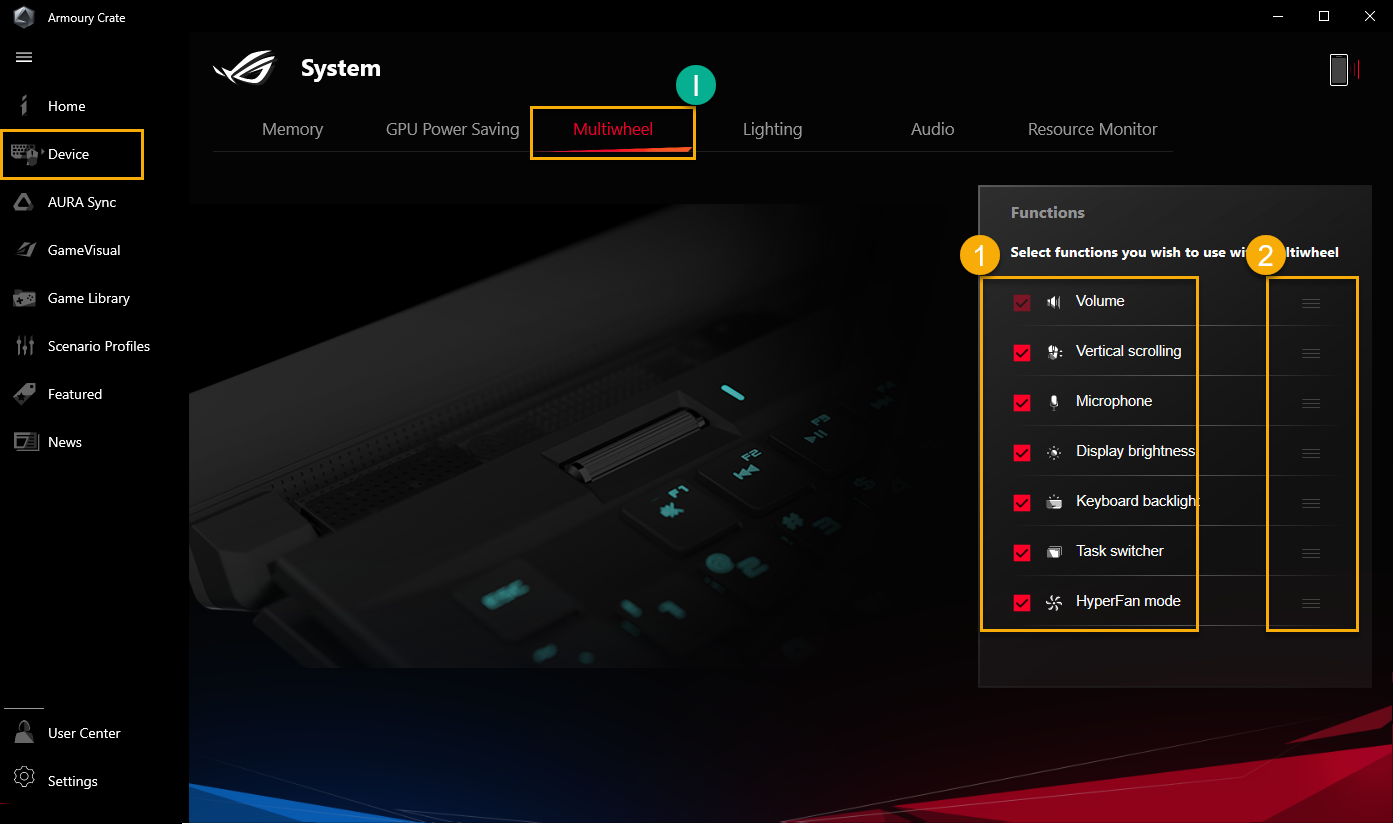
6. AURA SYNC(E)
The AURA SYNC can support compatible devices to sync AURA effects, and launch individual application AURA Creator to create unique lighting effects between synchronized devices in advanced effects.
Sync Device(a): To select AURA SYNC compatible devices to sync.
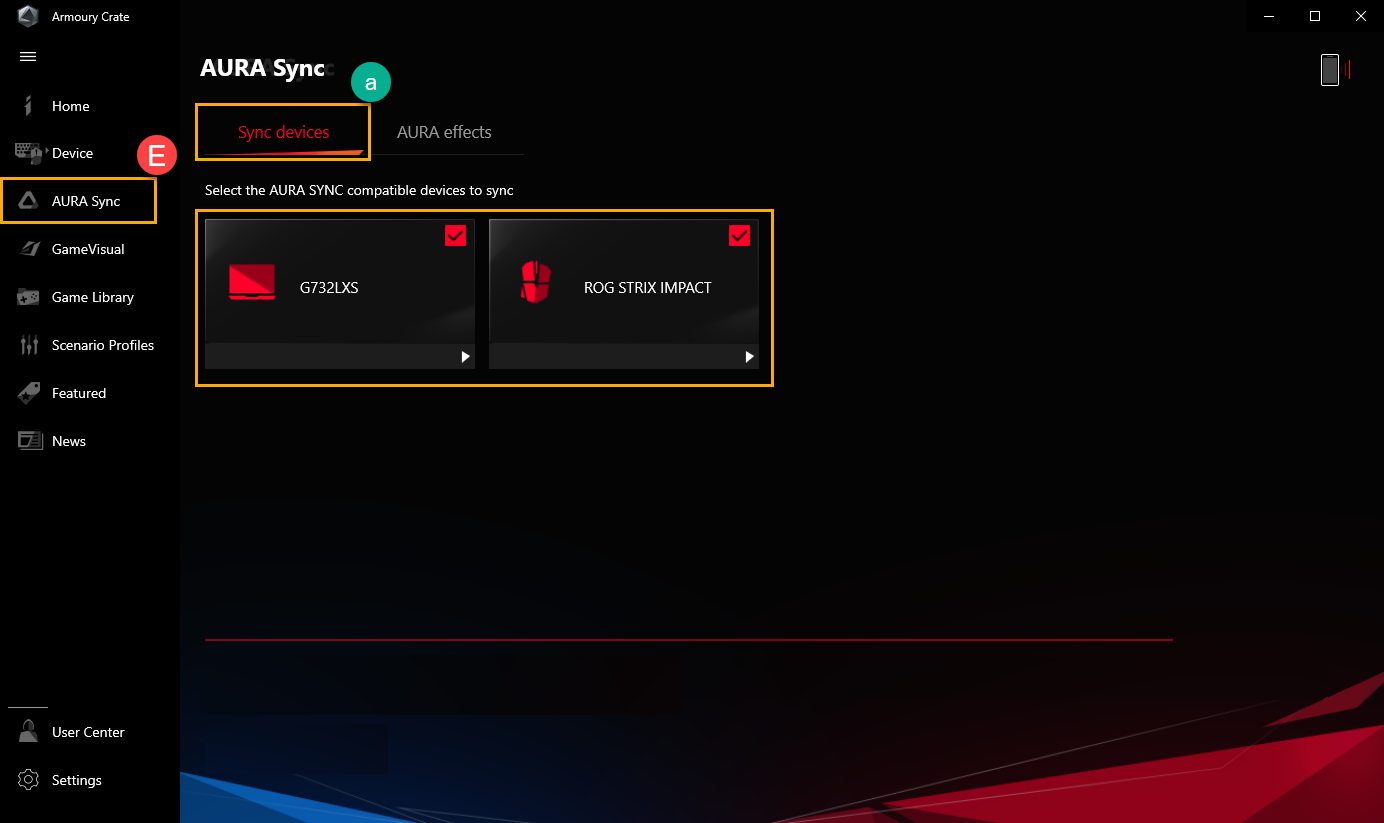
AURA Effects(b): To setup devices for AURA SYNC basic lighting effects.
Basic effects①: To setup compatible devices to sync lighting effects, the type of lighting effects will vary depending on the device.
In-Game Lighting effects②: AURA cooperates with game providers to provide ROG gamers with a unique lighting experience, which gamers can achieve through devices that support Aura Sync, please refer to ASUS AURA Website for more details.
Advanced Effects③: Using AURA Creator to create unique lighting effects between synchronized devices in advanced effects, please refer to AURA Creator Introduction for more details.
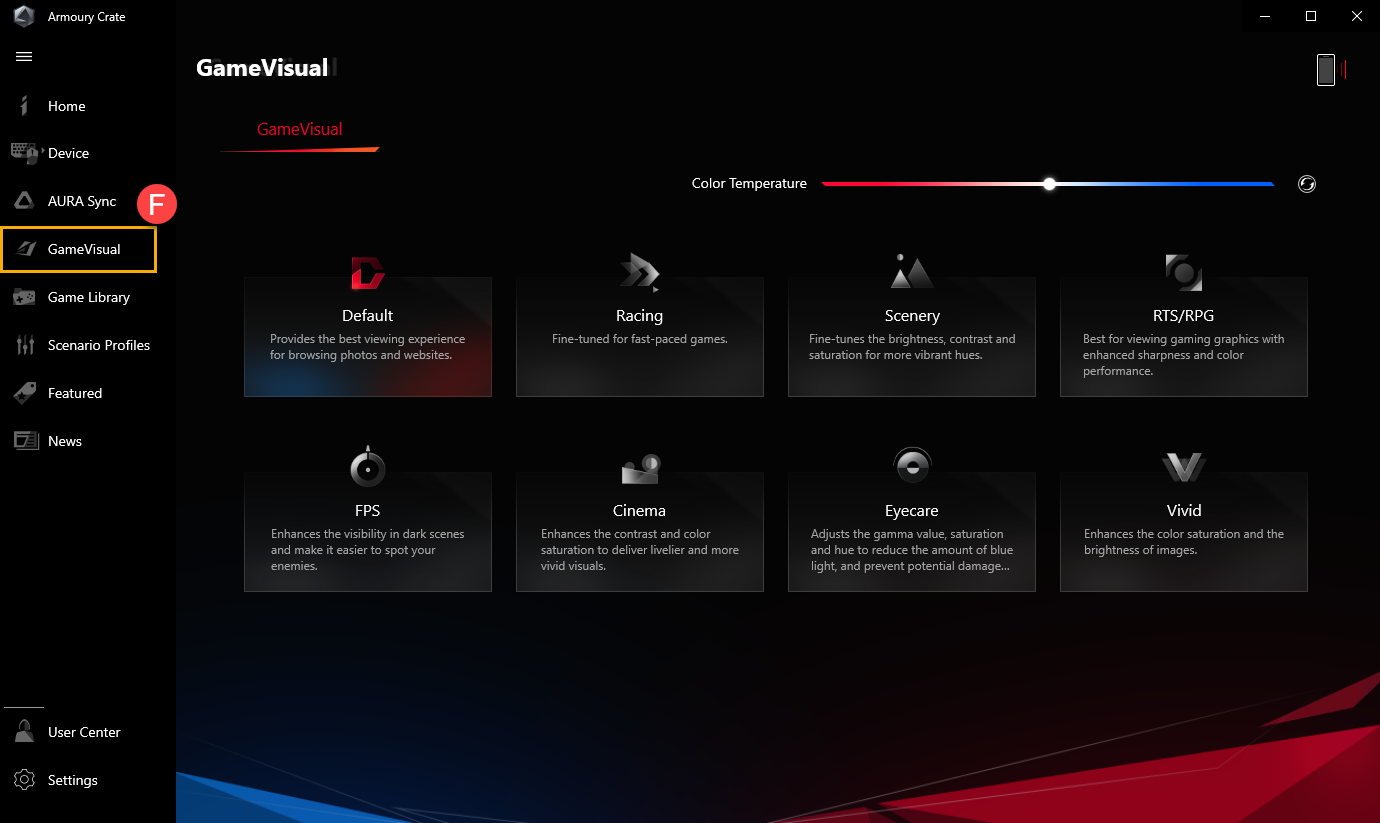
GameVisual is a screen color management tool that provides a variety of screen color scenarios to bring players the best personal visual experience, for example Default、Racing、Scenery、RTS/RPG、FPS、Cinema、Eyecare and Vivid mode.
*This feature can only support gaming laptop products, please refer to Game Visual Introduction for operation detail.
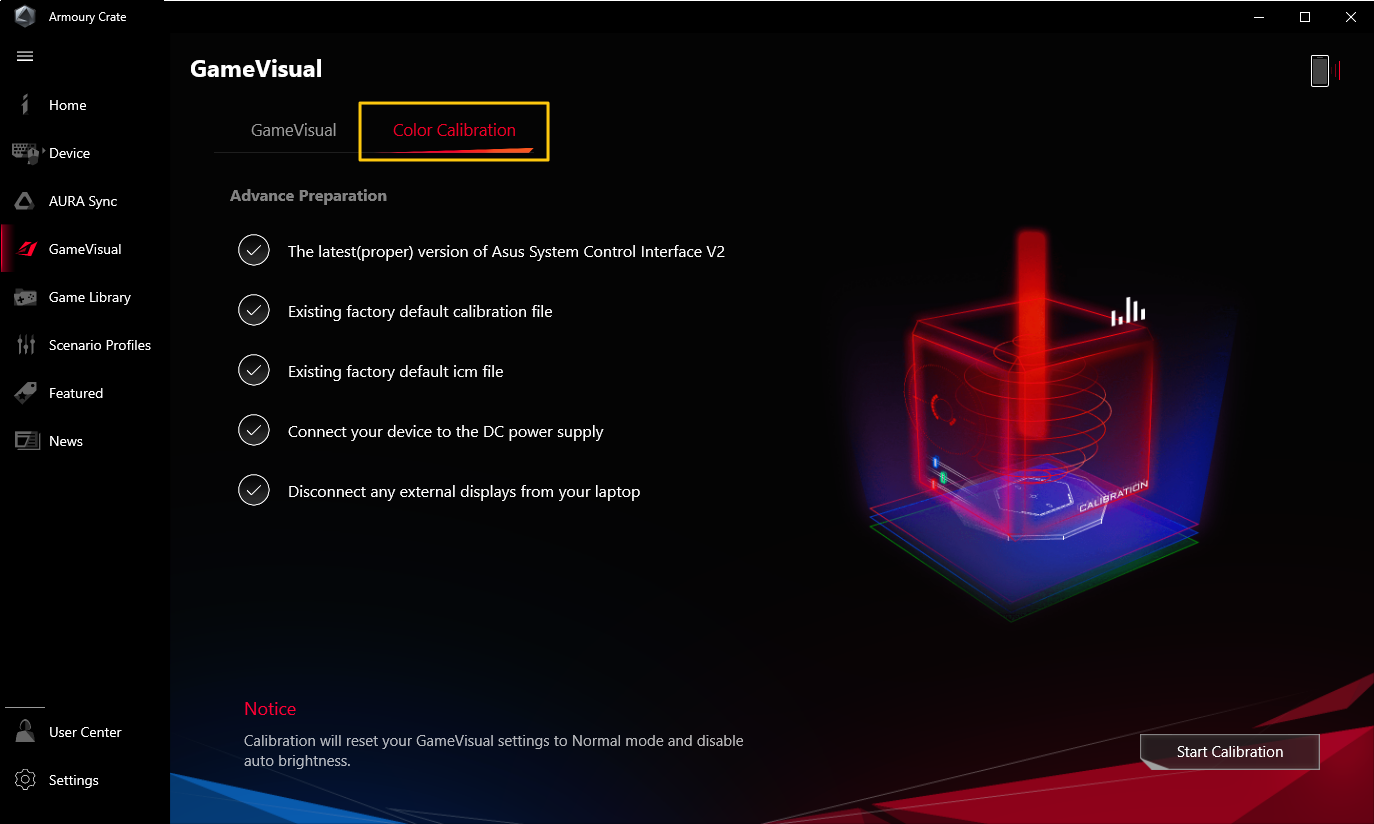
Color Calibration
Through GameVisual Color Calibration and color calibrator (X-Rite i1 Display Pro), it can provide gamers for a basic calibration with high level of color accuracy on ROG gaming laptop screen.
*This feature can only support some gaming laptop products, and must work with color calibrator X-Rite i1Display Pro, please refer to Game Visual Introduction for more details.
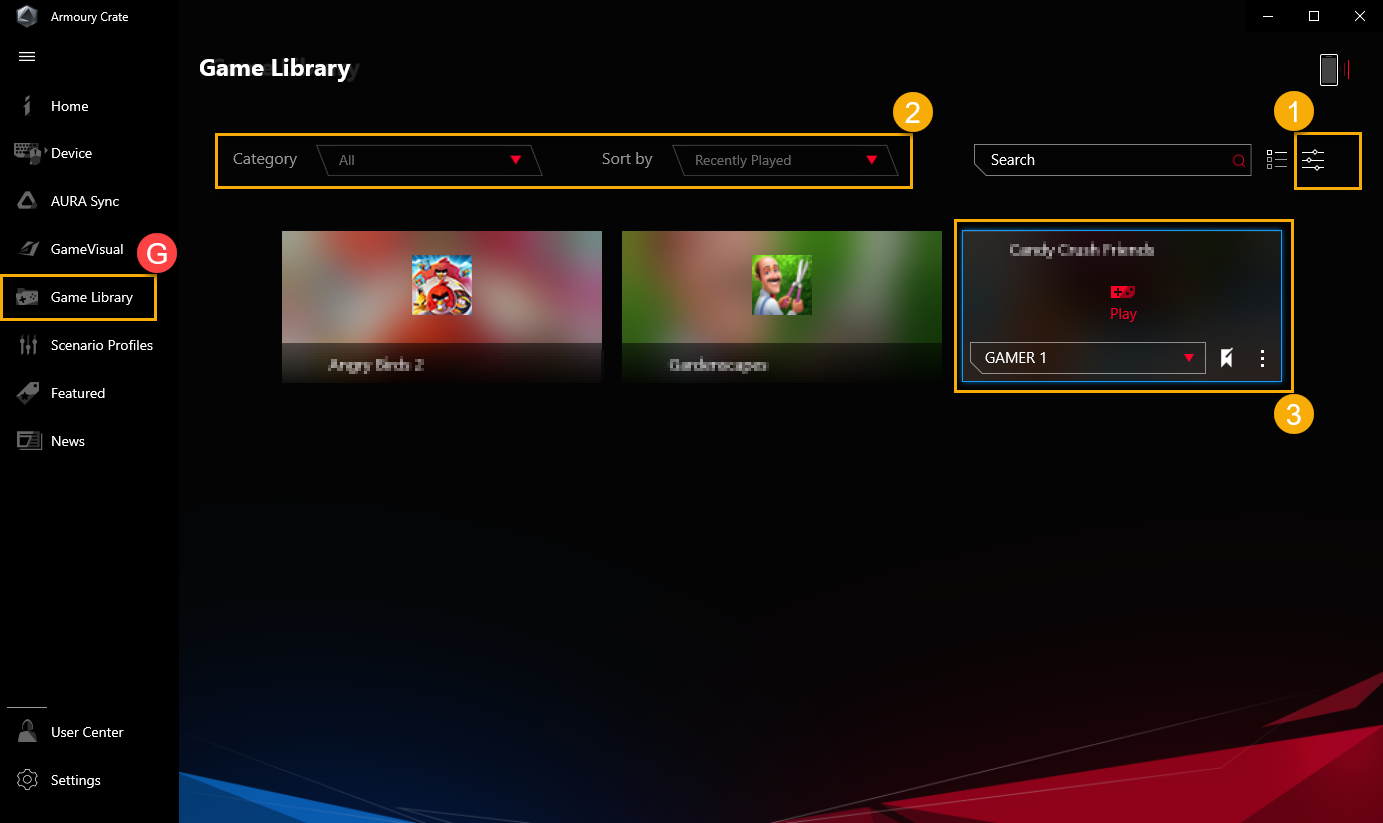
To scan the games and applications by gamers In order to program sort or Scenario profiles apply.
Add or scan games①: Gamers can select auto scan or manual add to create the games or applications into game library.
Games sort and category②: To filter and sort the games and applications in library.
Apply③: Gamers can select the games and applications to apply scenario profile or add tag. While clicking “Play”, gamers can launch game directly.
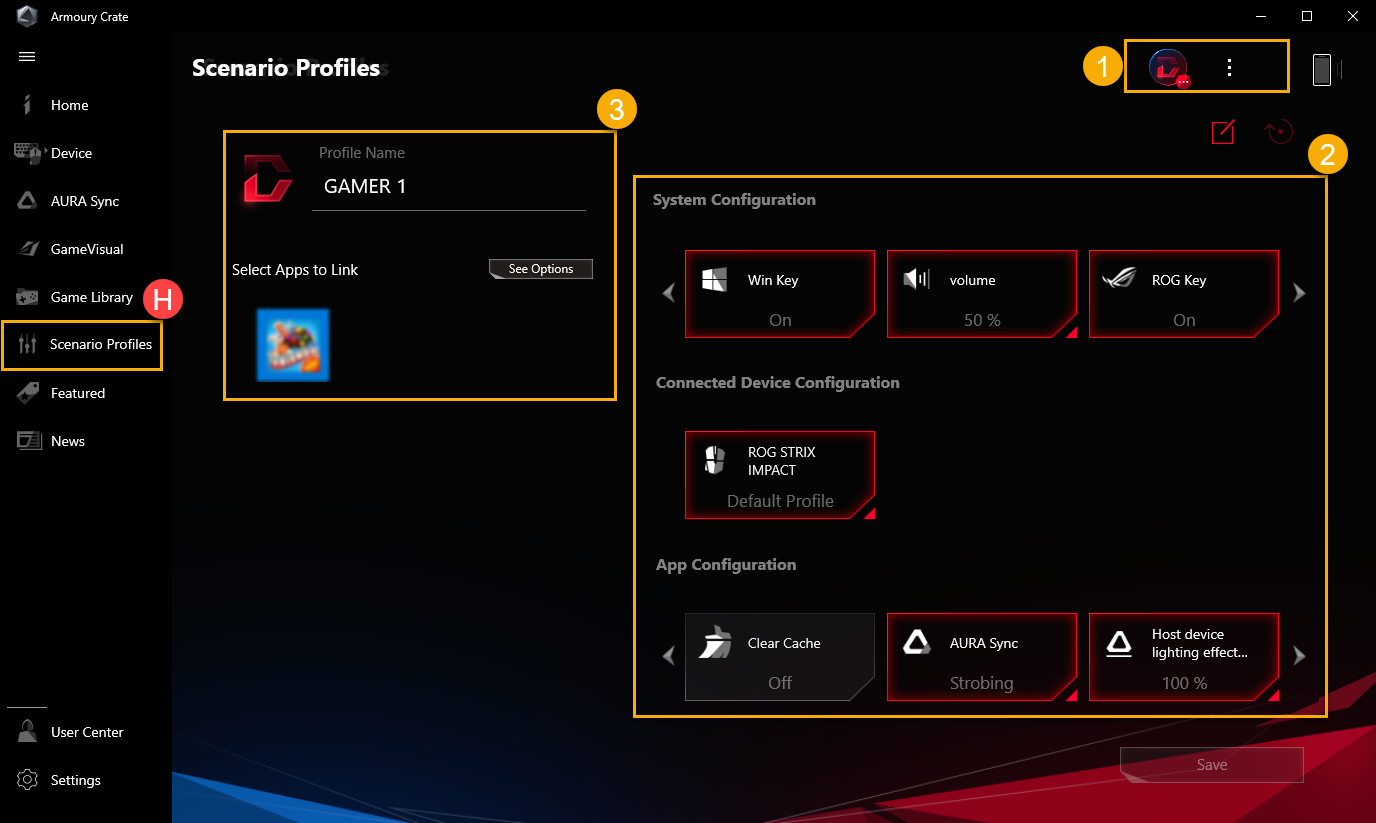
According to the personal required, gamers can setup system configuration and save as profiles, in order to link selected the games and applications.
Create Profiles①: To create and delete personal scenario profiles.
System Configuration②: According to the personal required, gamers can setup system configuration, for example system configuration、Connected Device configuration and App configuration.
Profiles Name③: To modify profile name or select "See Options" to link the games or applications.
10. Featured(I)
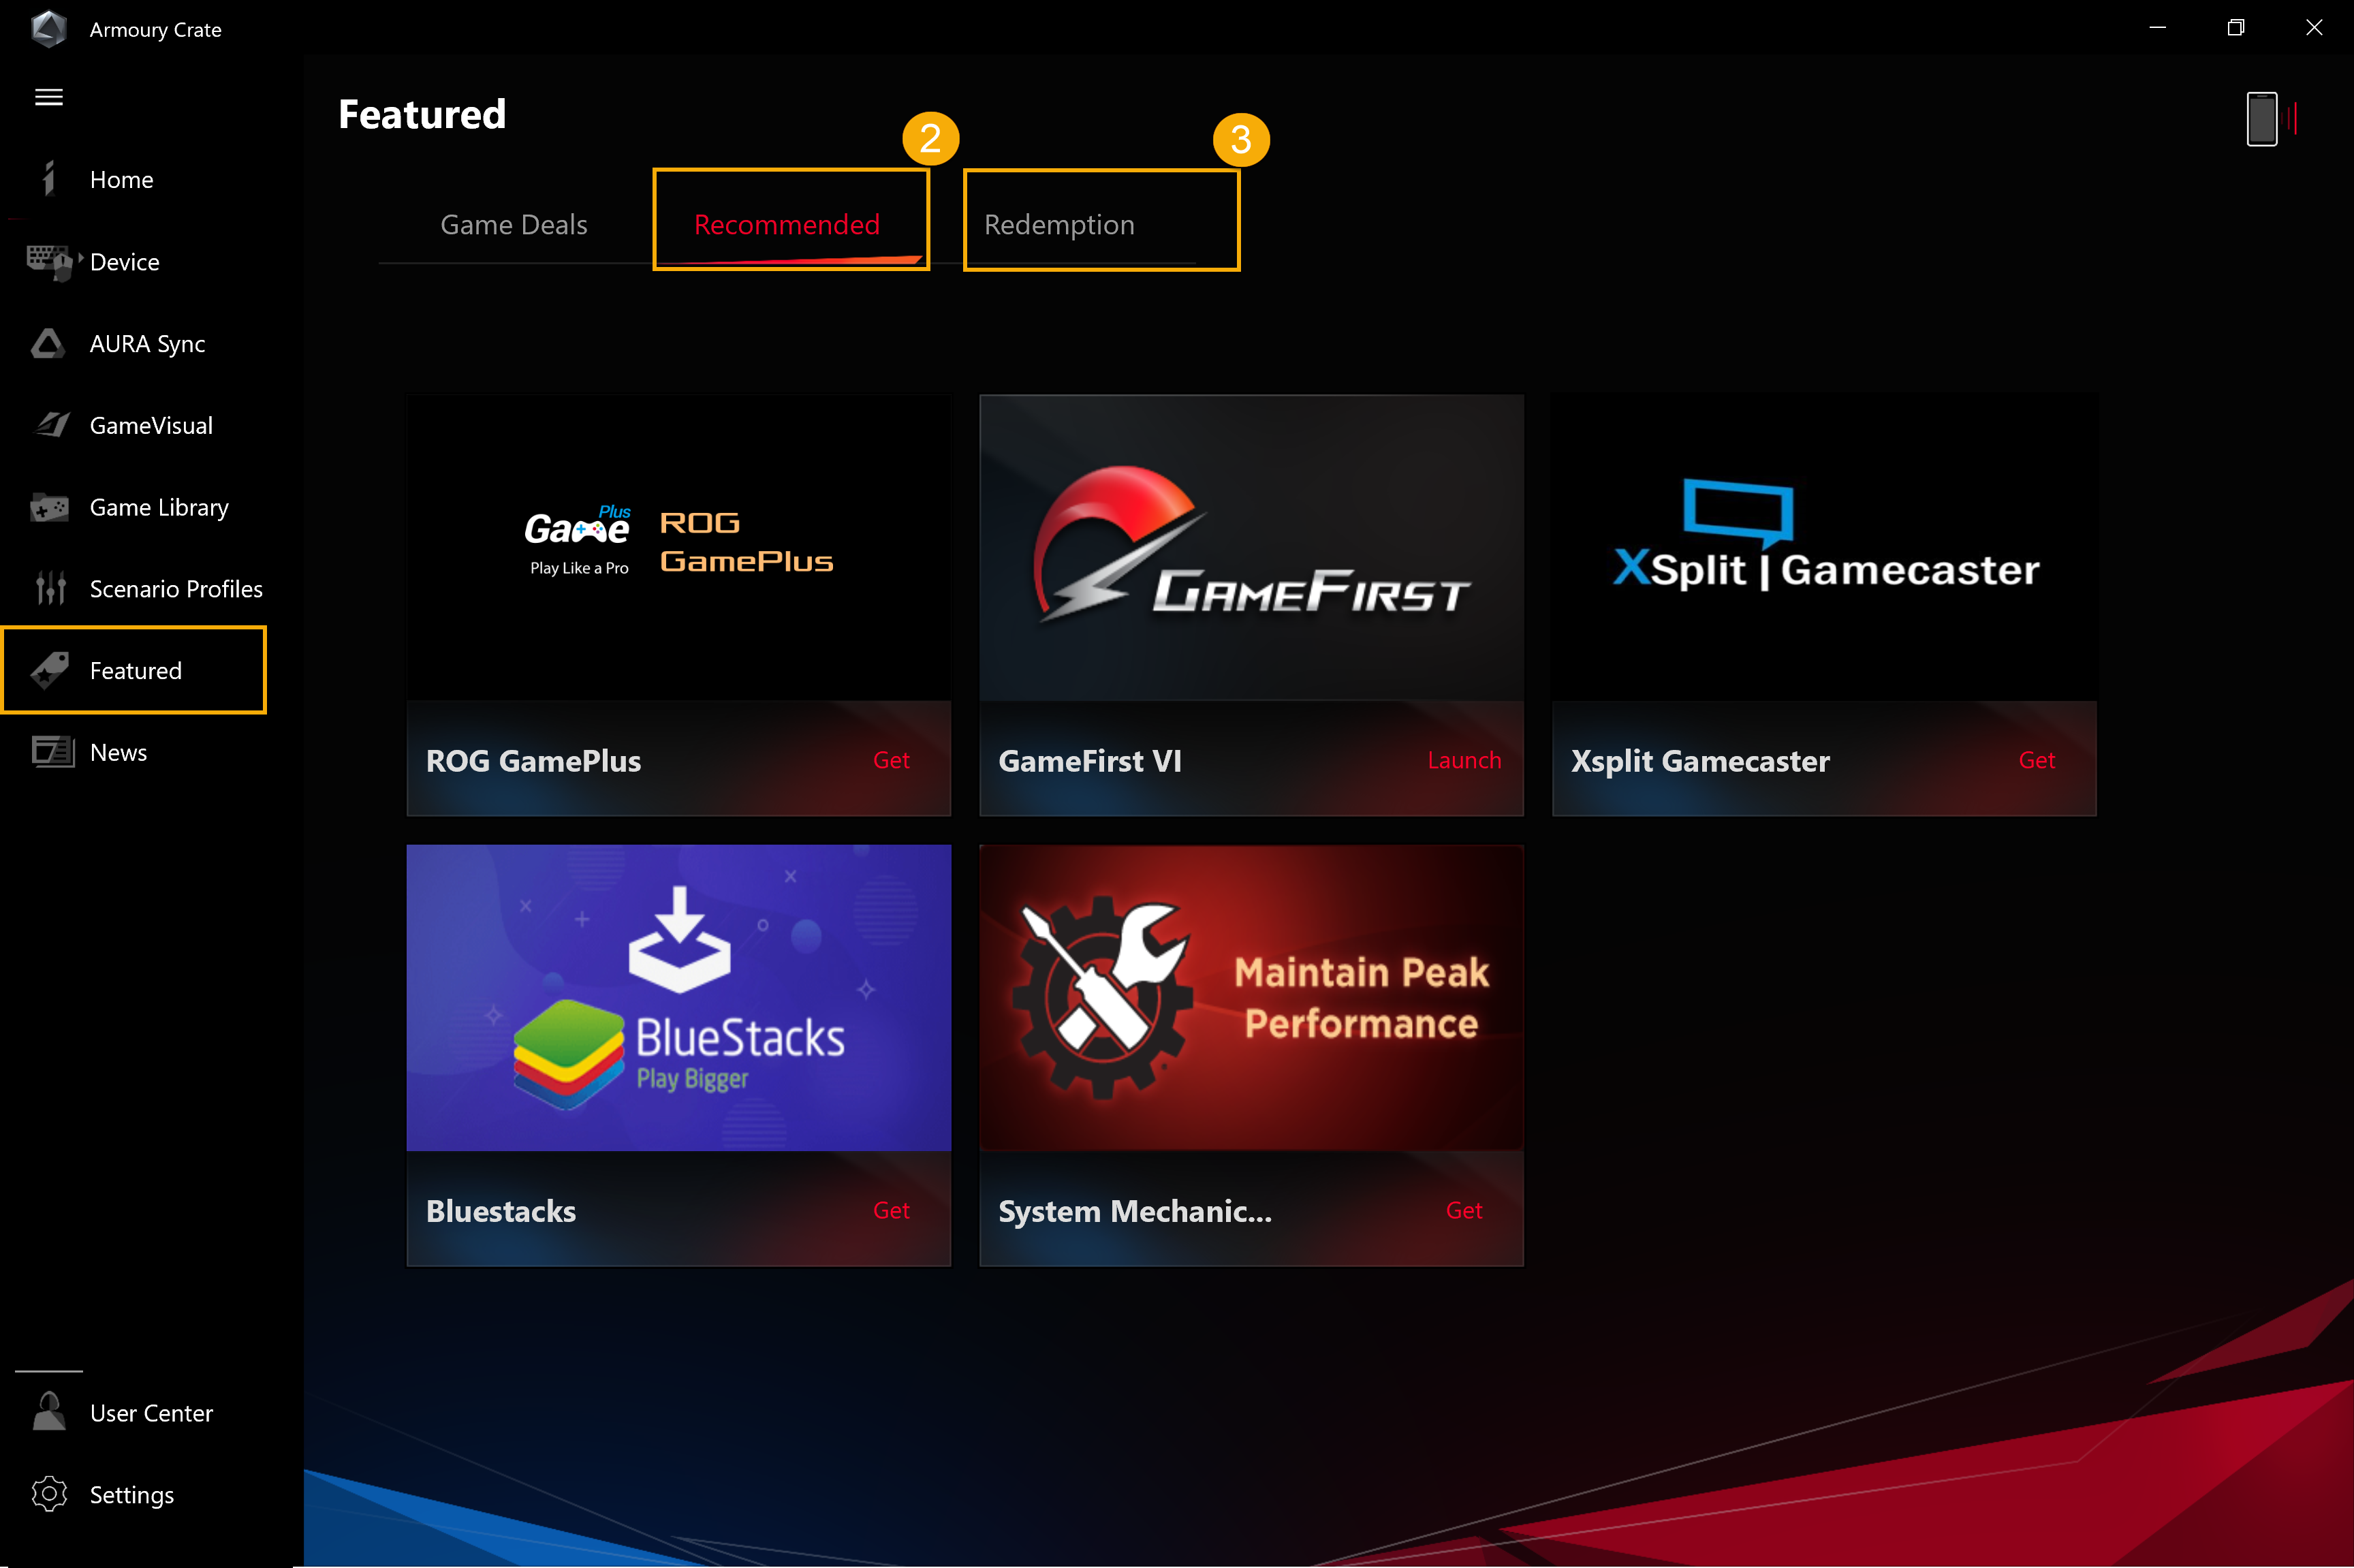
Game Deals①: Discover, explore, and pick-up great games at online with Game Deals.
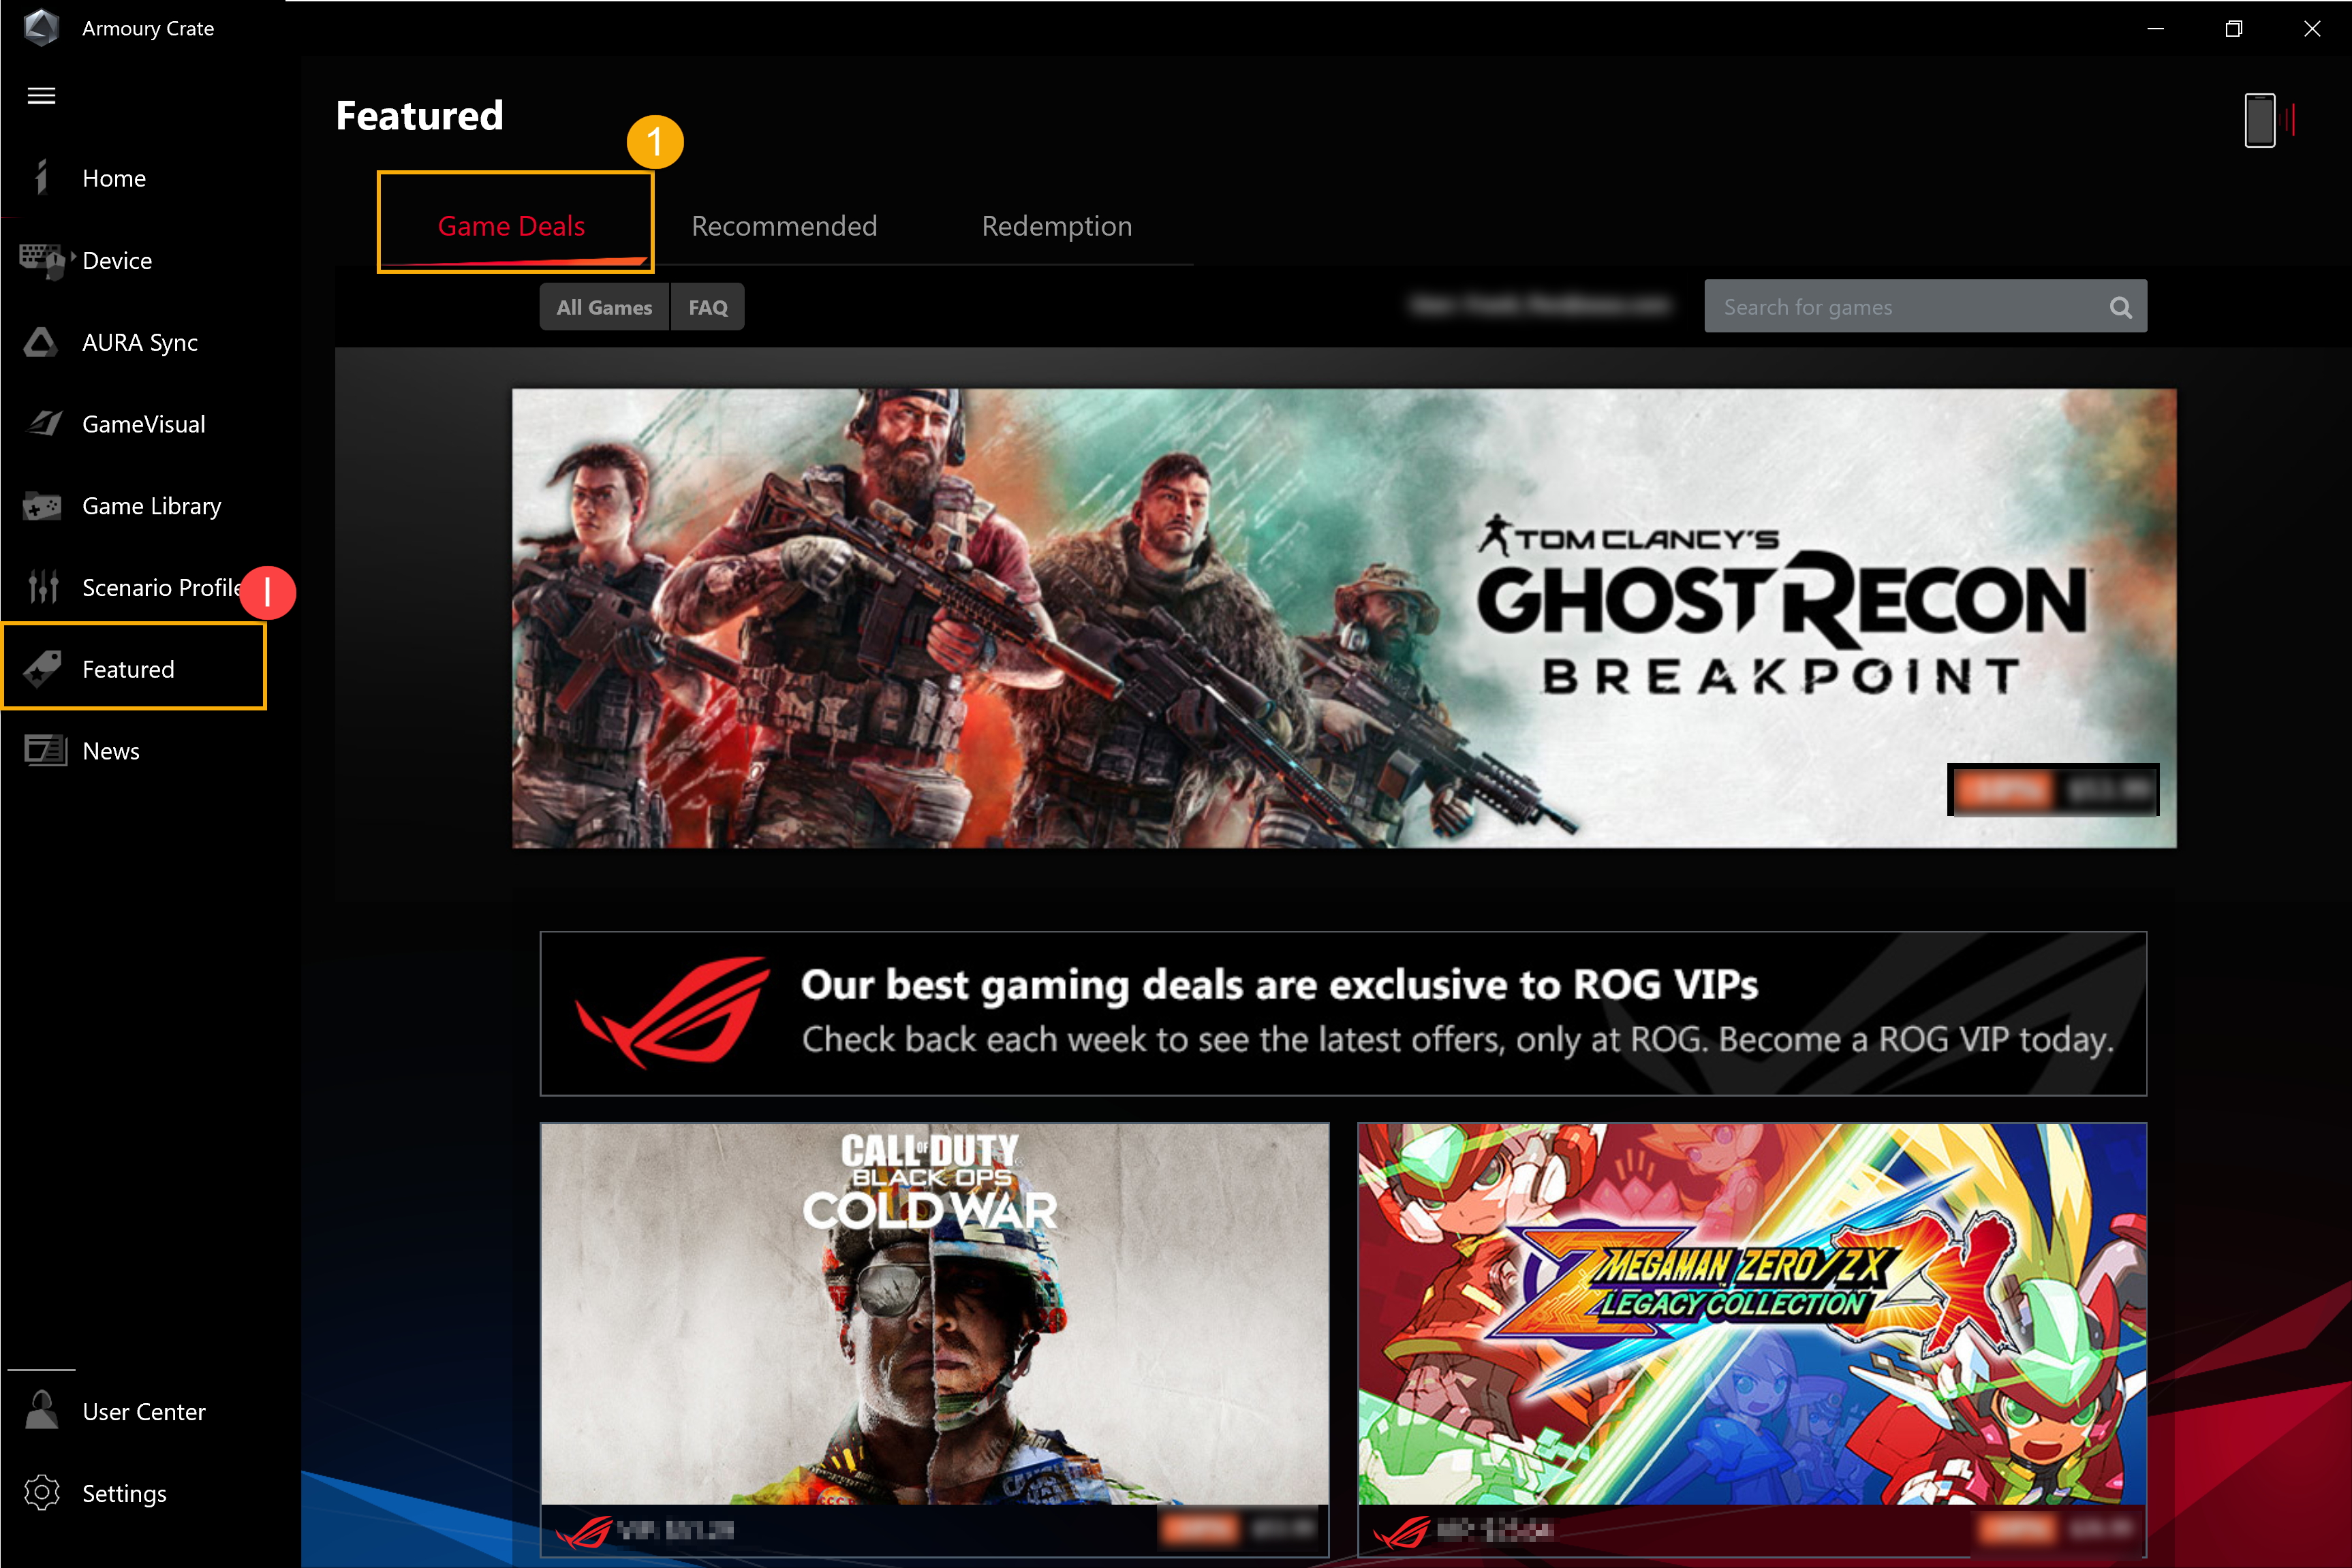
Recommended②: To display related applications recommended or supported for your ROG devices.
Redemption③: Log in to ASUS member account, gamers can review contents or records of eligible redemption activities.
*For how to register an ASUS member account, please refer to Link.
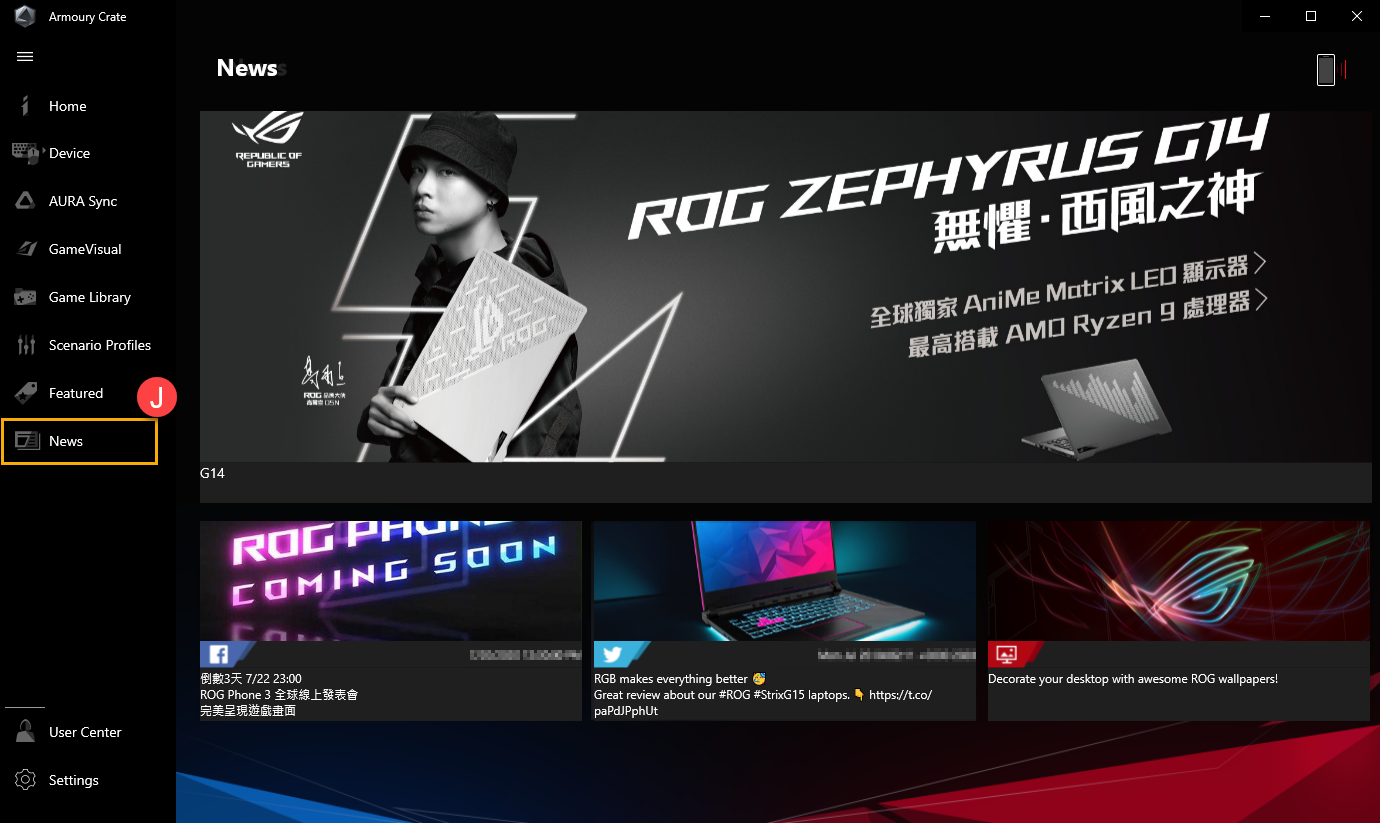
11. News(J)
To display global and local ROG recommended articles, events and product information.
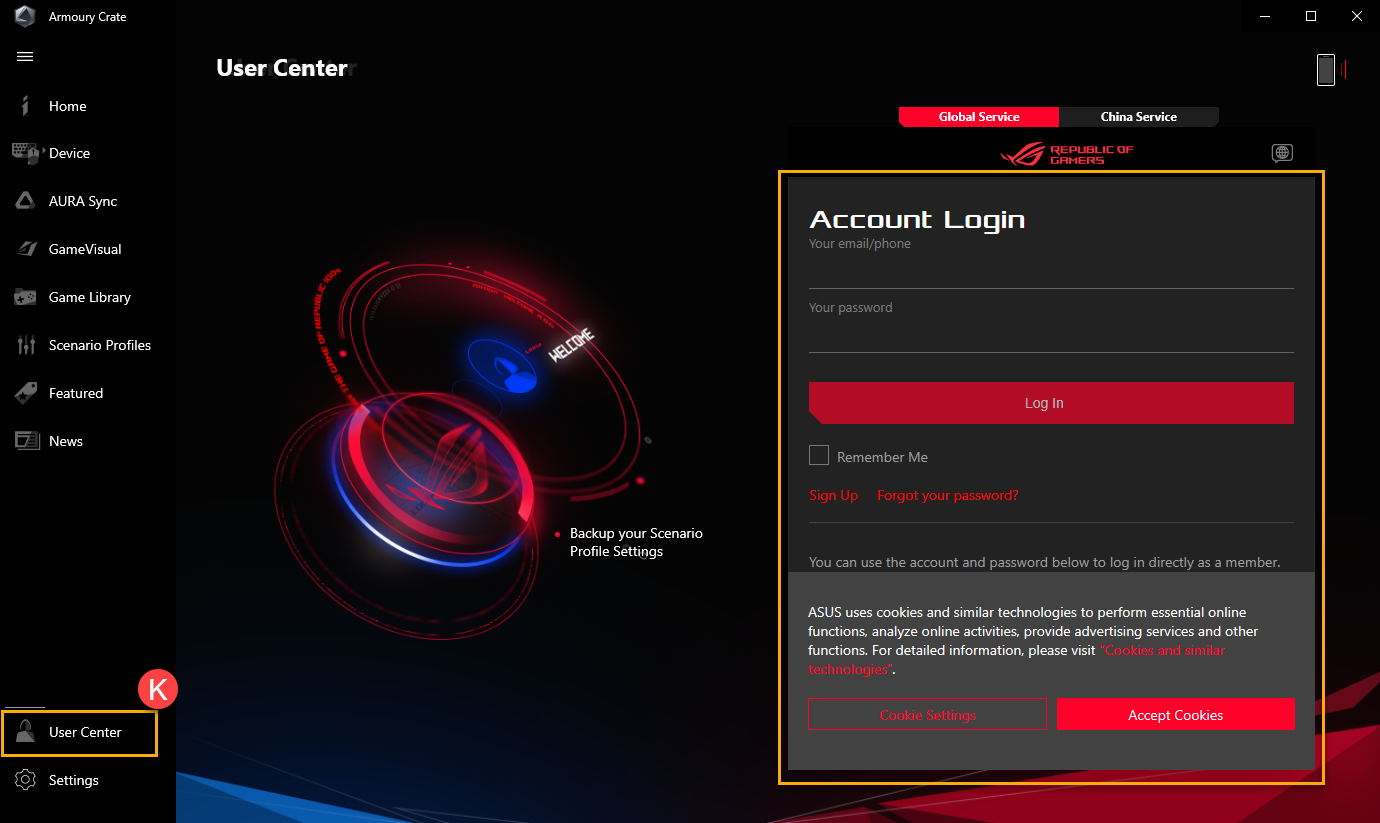
Log in to ASUS member account, the page will show My Profile、My Products、Registered Events、Notification and Join Elite.
*For how to register an ASUS member account, please refer to Link.
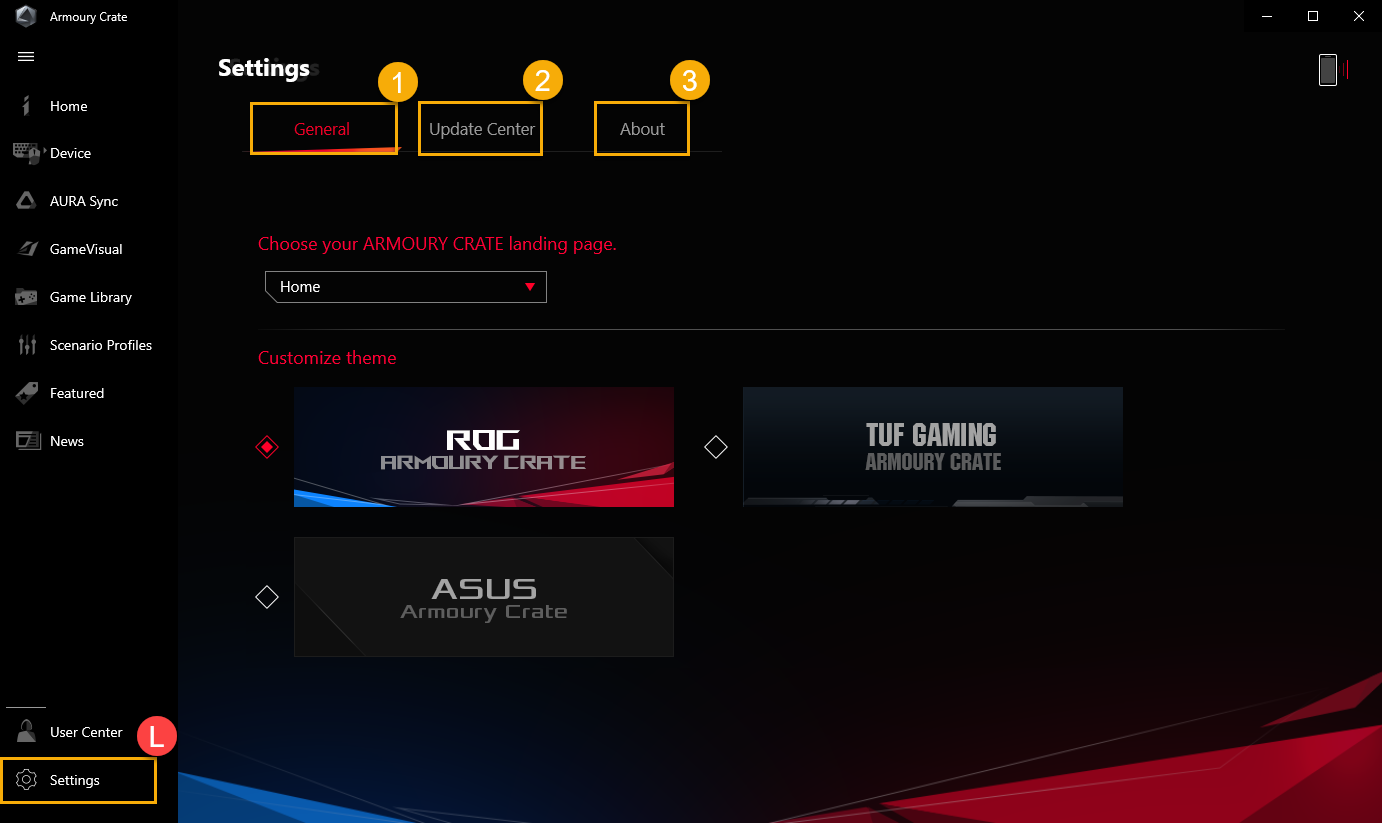
13. Settings(L)
General①: Gamers can choose Armoury Crate landing page, and customize theme.
Update Center②*: To select “Check for Update”, utility will display the driver or firmware that need to be updated will be listed for gamers to choose.
About③: To display Armoury Crate Version、Service Version、App Diagnostics、Privacy Policy and FAQ.
*Before processing the update, ensure that your laptop is plugged in with charger.
Q1: HyperFan mode category and Introduction
A1:
Windows® Mode: According to Windows operating system power plan to set up.
Silent Mode: The system silence is first. The fan will keep on low speed for noise reduction, but the performance will be limited.
Performance Mode: The performance is a balance between silent and Turbo.
Turbo Mode: The system Turbo is first, and keep in high performance (Only available in charging mode).
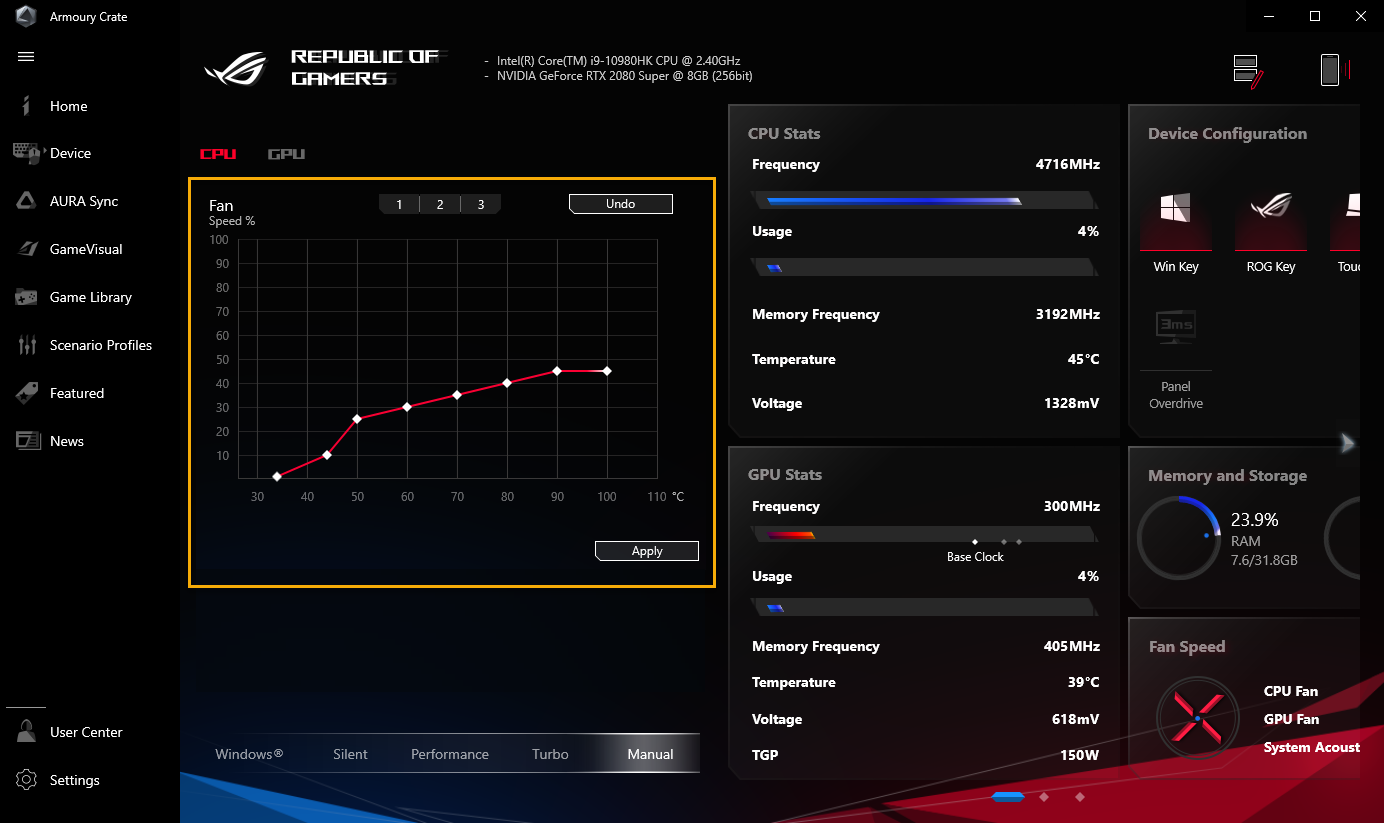
Manual Mode*: To provide manual adjustment for Fan Curve and CPU/GPU overclock.
Tablet/Vertical Mode**: When Tablet/ Vertical mode detected, the performance will be optimized for Tablet/ Vertical mode only.
*Support most of ROG series, it can launch under AC Mode (Charging Mode) only. (Selected models only)
**It supports ROG FLOW series of gaming laptop only.
Q2: What is HyperFan supported mode for Gaming laptop(NB) and desktop(DT)?
A2:
| Windows® | Silent | Performance | Turbo | Manual |
ROG Series NB | P | P | P | P | P |
ROG Series DT | P |
| P | P |
|
TUF Series NB | P | P | P | P |
|
TUF Series DT | P |
| P | P |
|
Q3: What is HyperFan supported mode for Gaming laptop(NB) in the different power mode?
A3:
| Power Mode | Windows® | Silent | Performance | Turbo | Manual |
ROG Series NB | Charging Mode | P | P | P | P | P |
Battery Mode | P | P | P |
|
| |
TUF Series NB | Charging Mode | P | P | P | P |
|
Battery Mode | P | P | P |
|
|
Q4: HyperFan Manual mode function introduction.
A4:
※Fan Curve : Gamers can manually adjust fan speed according to own need.
a. The X-axis is Temperature and the Y-axis is fan speed percentage, and there are 3 default optionss for gamers.
b. In each Fan Curve default option, 8 points are provided for gamers to adjust within the temperature range, and the fan speed of each point must be greater than the previous point.
c. Gamers can click "Apply" to keep the settings after adjustment at any time, and click "Undo" to back previous applied.
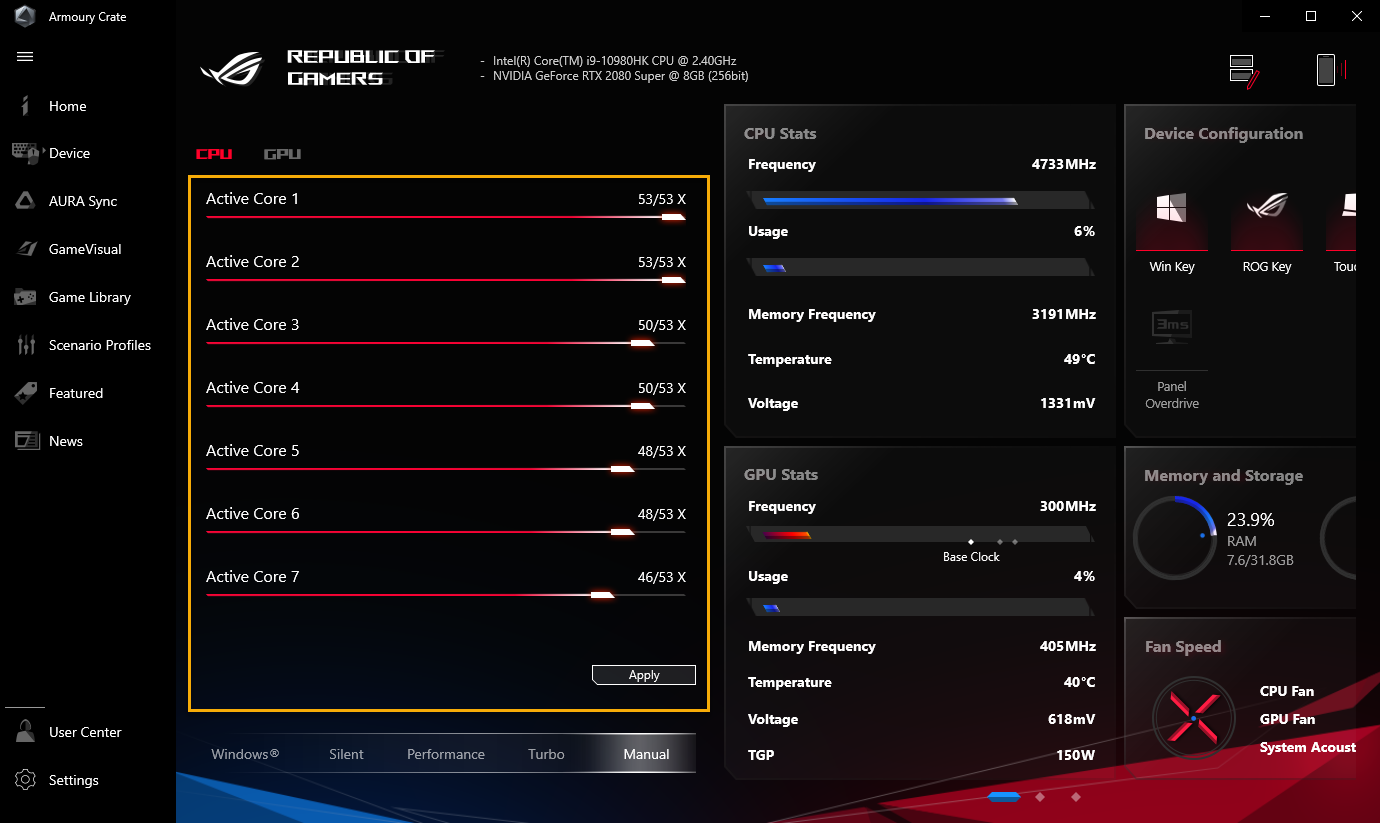
※CPU/GPU Overclock: Gamers can manually adjust the core clock frequency for CPU/GPU to achieve performance improvements.
a. CPU: Active Code
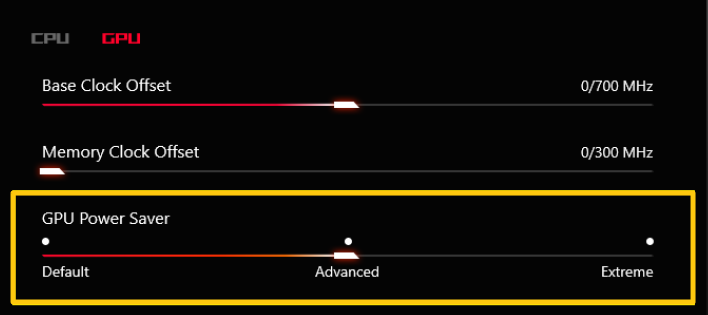
b. GPU: Base Clock、Memory Clock and GPU Power Saver
*If the model does not support overclocking, there is only Fan Curve provide.
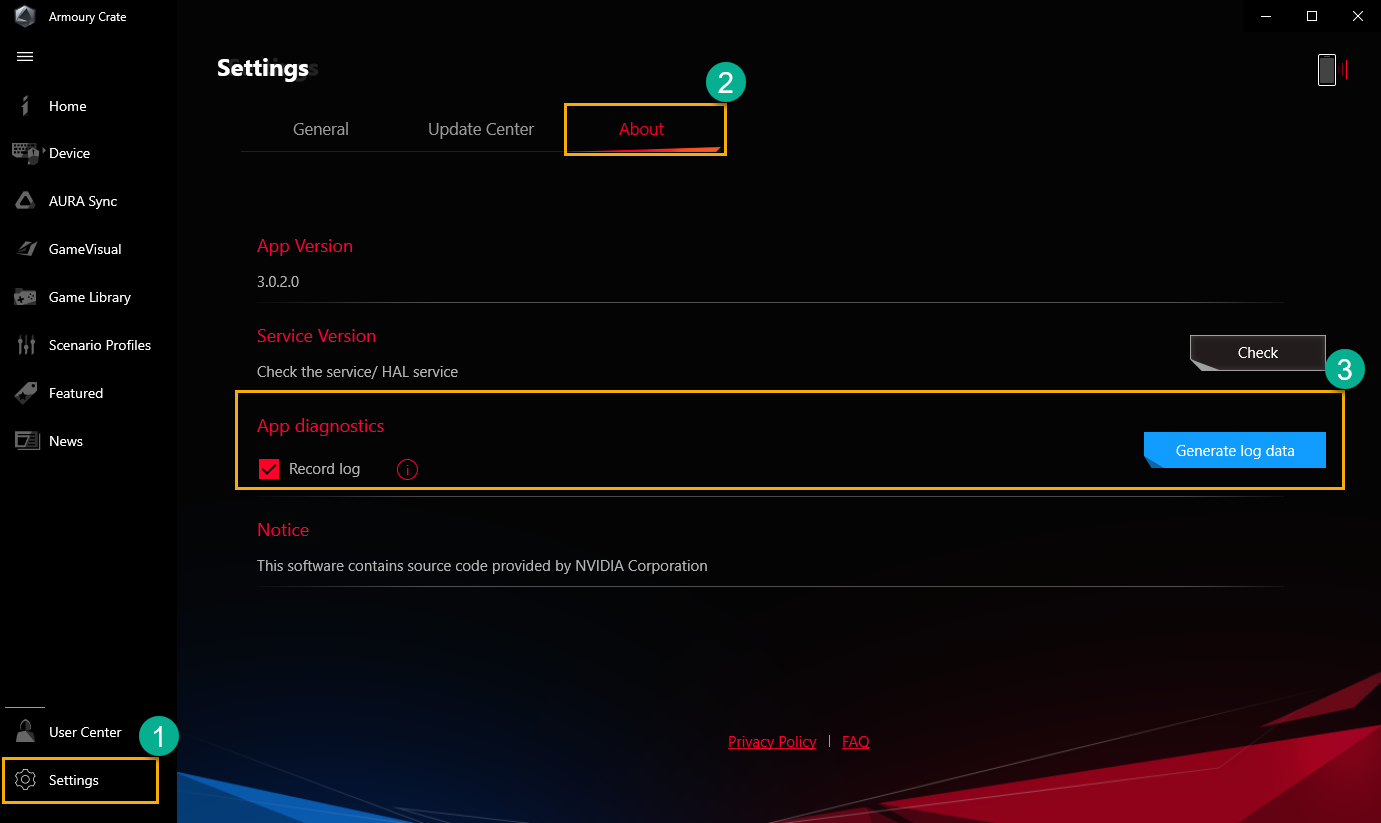
Q5: What is App Diagnostics? (New Feature)
A5: In Armoury Crate "Settings"① and check "About"② page, If clicking App Diagnostics "Record Log"③, the Privacy Policy Statement will pop out. Once user agreed statement, the Armoury Crate will start to collect problem log and user can click "Generate log data"③ to generate the log file with encrypted (ASUS log file). After log saved, user can provide it to the repair center or technical supporter for further Armoury Crate problem diagnostics.
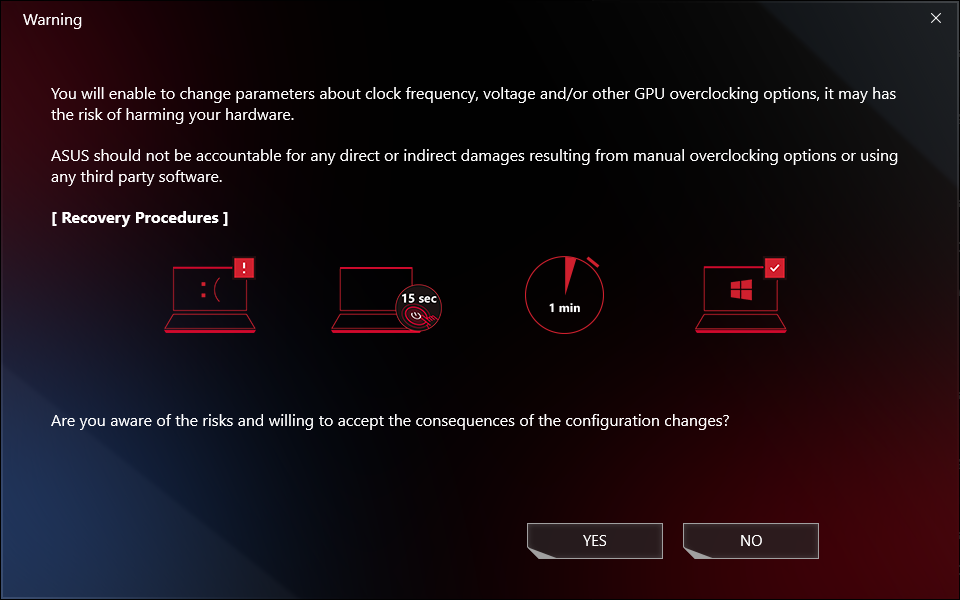
Q6: Why does warning window pop out while applying Fan Curve and CPU/GPU overclock?
A6: The warning window is to remind gamers that may has the risk of harming your hardware, while parameters adjusted, and how to do the Recovery Procedures.
[Recovery Procedures] Once facing Auto Shutdown or Blue Screen of Death, please pressing power key for 15 second and then waiting for a minute. After that, try to reboot your computer again.
Q7: Why I cannot execute GPU Power Saving to stop process?
A7: Once the process cannot be stopped at the time, please try to confirm below:
1. The process is using external display and cannot be stop.
2. The process cannot be stopped while your computer is on AC power supply.
Q8: How to connect the Armoury Crate application with using a mobile device?
A8: Using your mobile device to connect to Armoury Crate and modify the settings of your computer, please refer to the Link for details.
Q9: Why I cannot upgrade my previous Armoury Crate application to the version 3.0 or above?
A9: Please try to restart your computer and launch the Armoury Crate again. If it still cannot be upgraded, please refer to the Link to download Armoury Crate application and install it manually.
Q10: What is "GPU Power saver " in HyperFan - Manual Mode?
A10: "GPU Power saver " is NVIDIA technology about Whisper Mode. There are 3 different levels to provide gamer to reduce fan noise from laptop, and also reduce the amount of heat generated by the GPU. It means that the laptop fans can run at lower speeds and produce less noise.
Q11: How should I select iGPU mode?
A11:
iGPU Off: Using Microsoft Hybrid Graphics mode, discrete Graphics priority first.
iGPU On: The system will disable the discrete GPU,and only use internal GPU.
Auto: When the external display is not used for output purposes "iGPU mode" will be turned on automatically in battery mode, and will automatically turm off when your computer is connected to a power source.
Q12: How to use "Record" and "Import" function in Resource Monitor?
A12:
※Resource Monitor "Record"
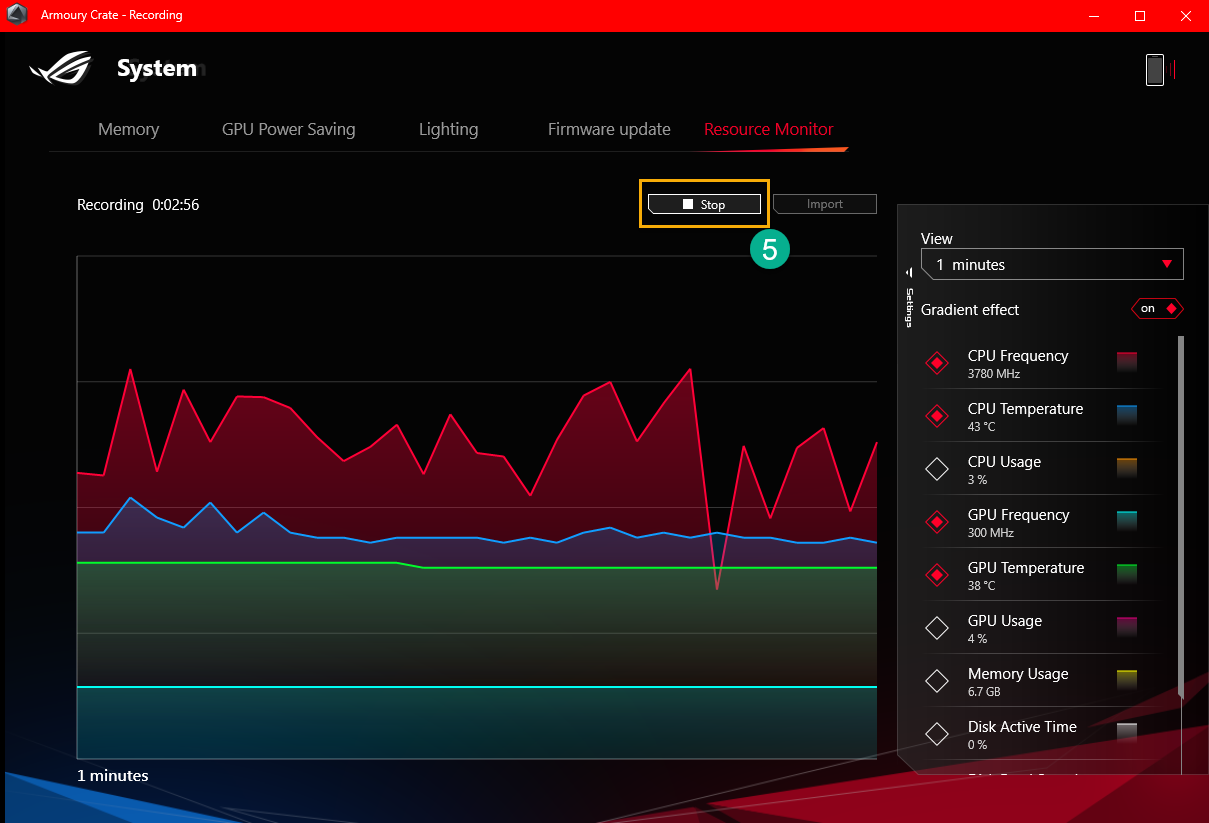
In Resource Monitor①,clicking "Record"② to start record function, and the Save As screen will pop out.
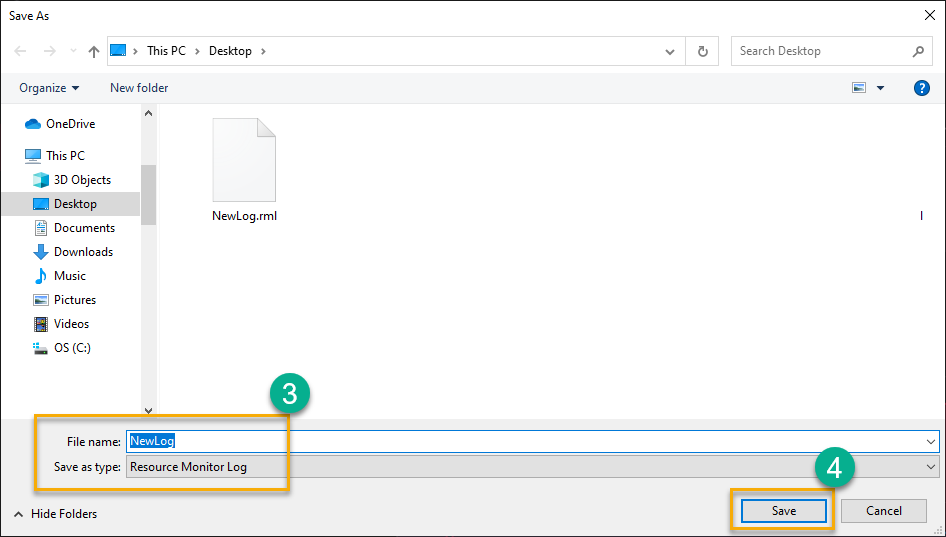
In the Save As screen, you can name the file③ and click "Save"④ to designate the file (*.RML File) to save.
During recording, once click "Stop"⑤, the recording will stop immediately.
※Resource Monitor "Import"
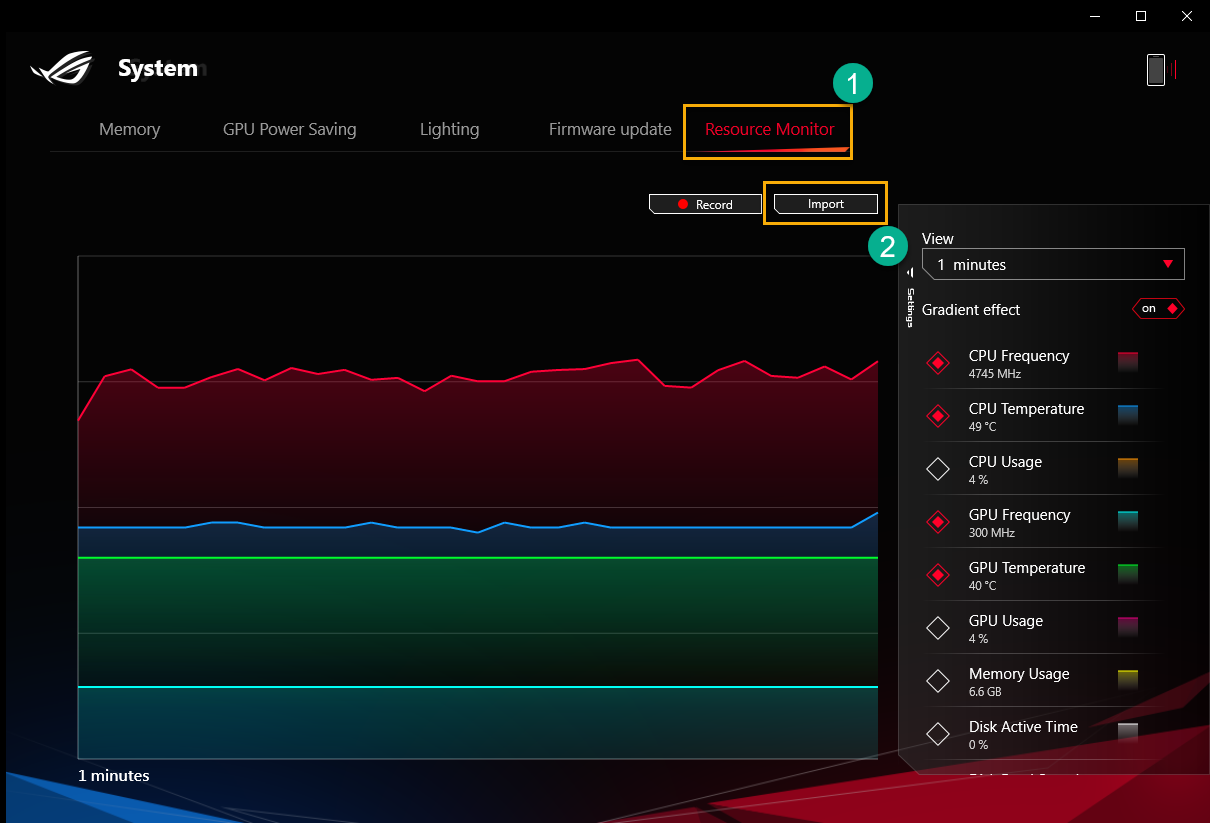
In Resource Monitor①,clicking "Import"② to import previous file, and the Open screen will pop out.
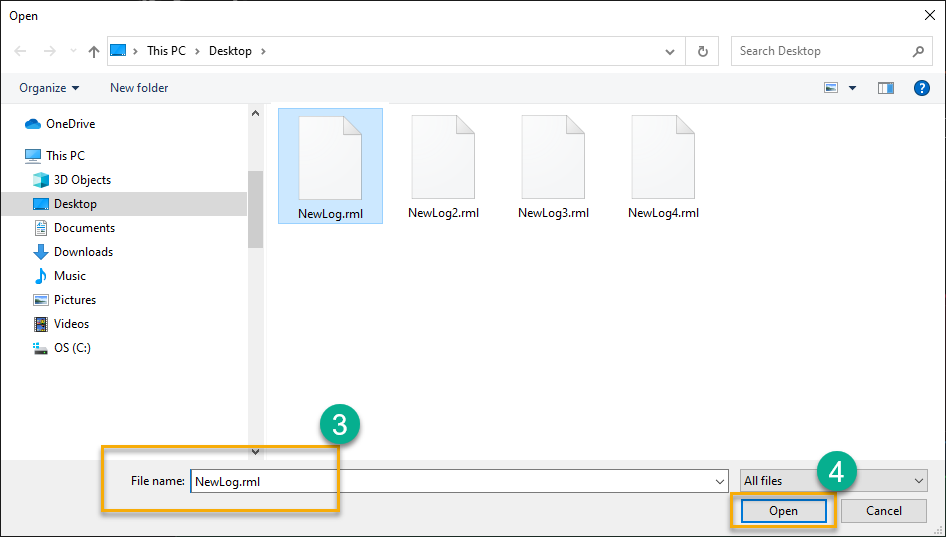
In the Open screen, you can select the file③ (*.RML File) you need, and click "Open"④.
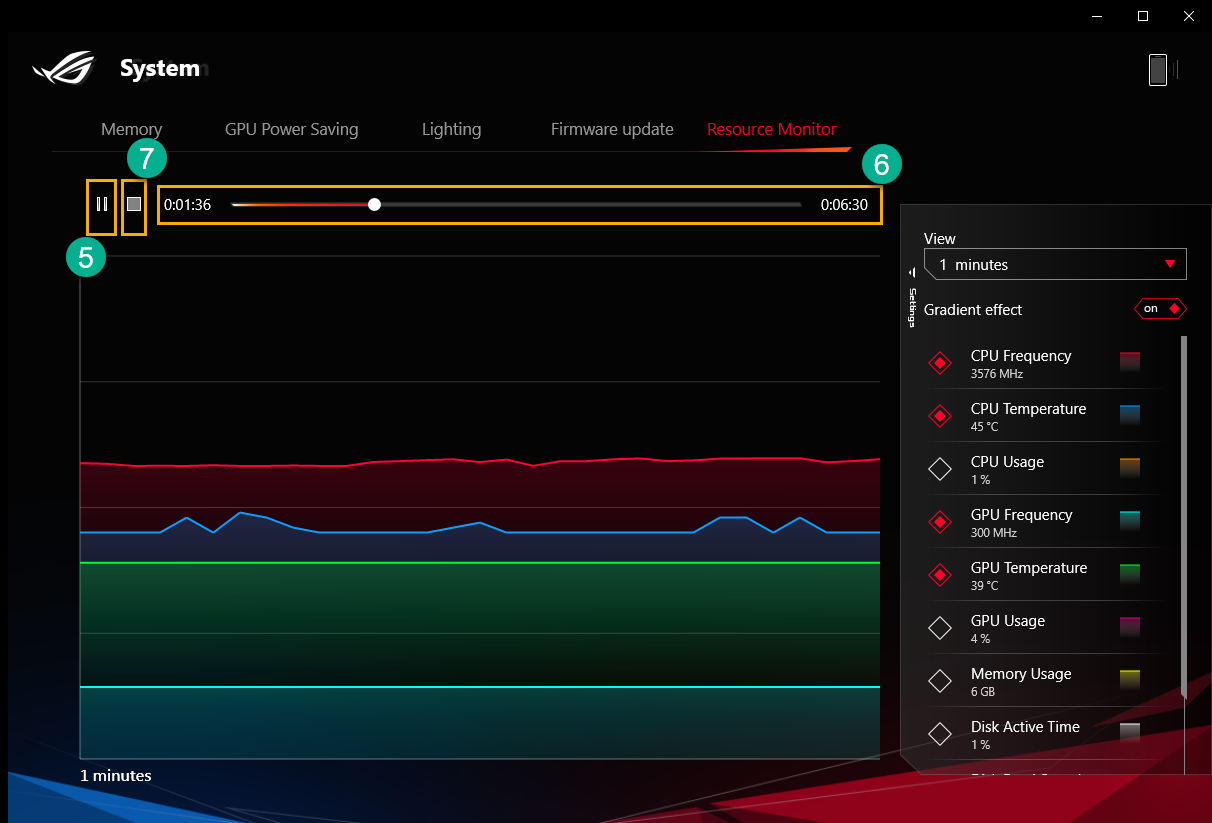
While watching previous record, you can control screen via "Play/Pause"⑤、"Timeline"⑥ and "Stop"⑦ button.
Q13: How to edit and apply "Macro" function?
A13:
※Edit "Macro"
In Armoury Crate Device①, selecting "Macro"② to launch Macro action setting page.
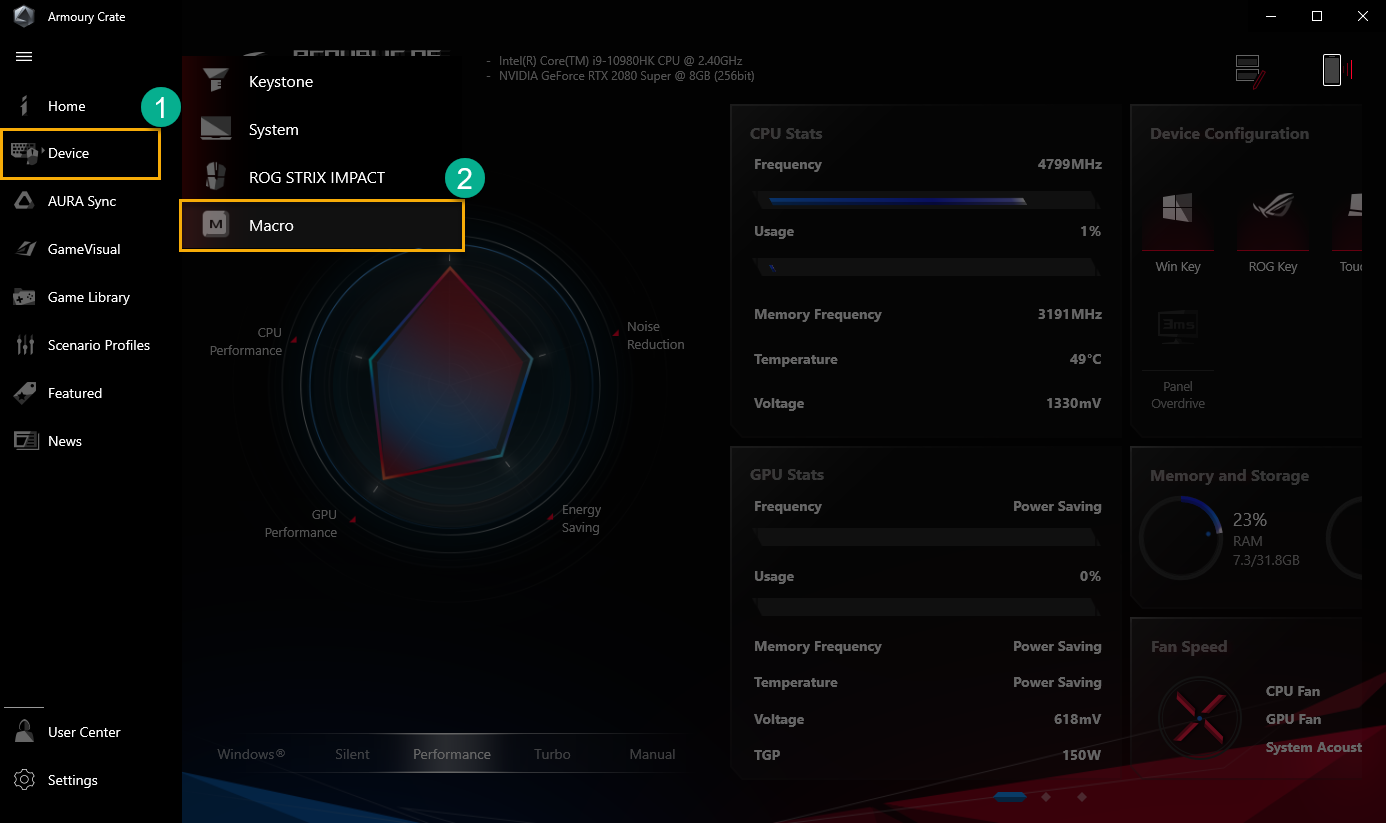
*The macro function requires peripheral devices that support ASUS ROG.
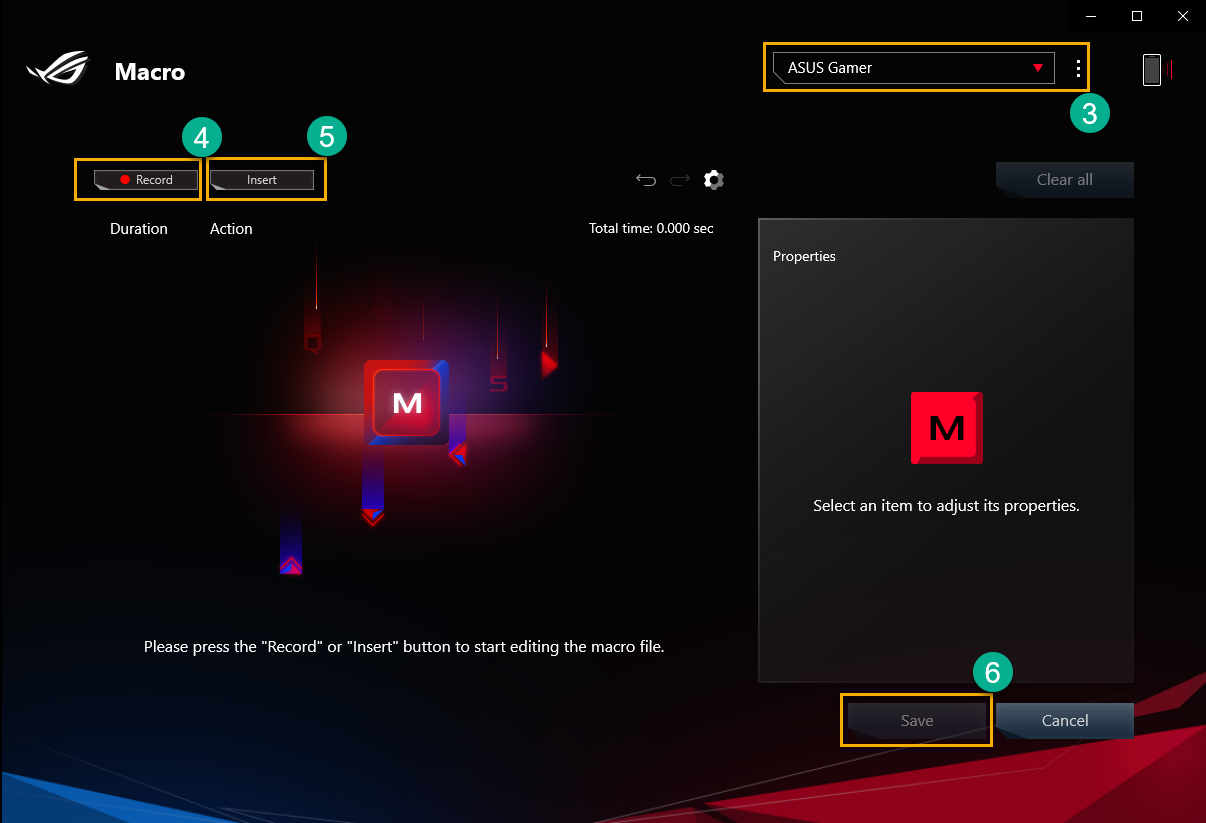
In Macro action setting page, gamer can modify Macro actions, and edit a series of keystroke and mouse click actions into one step.
Macro Files③: To create and rename Macro files.
Record④: Recording your real keystroke and mouse click actions.
Insert⑤: To indert the keystroke and mouse click actions.
Save⑥: Once Macro action edit completely, you can click "Save" to save the content.
※Apply "Macro"
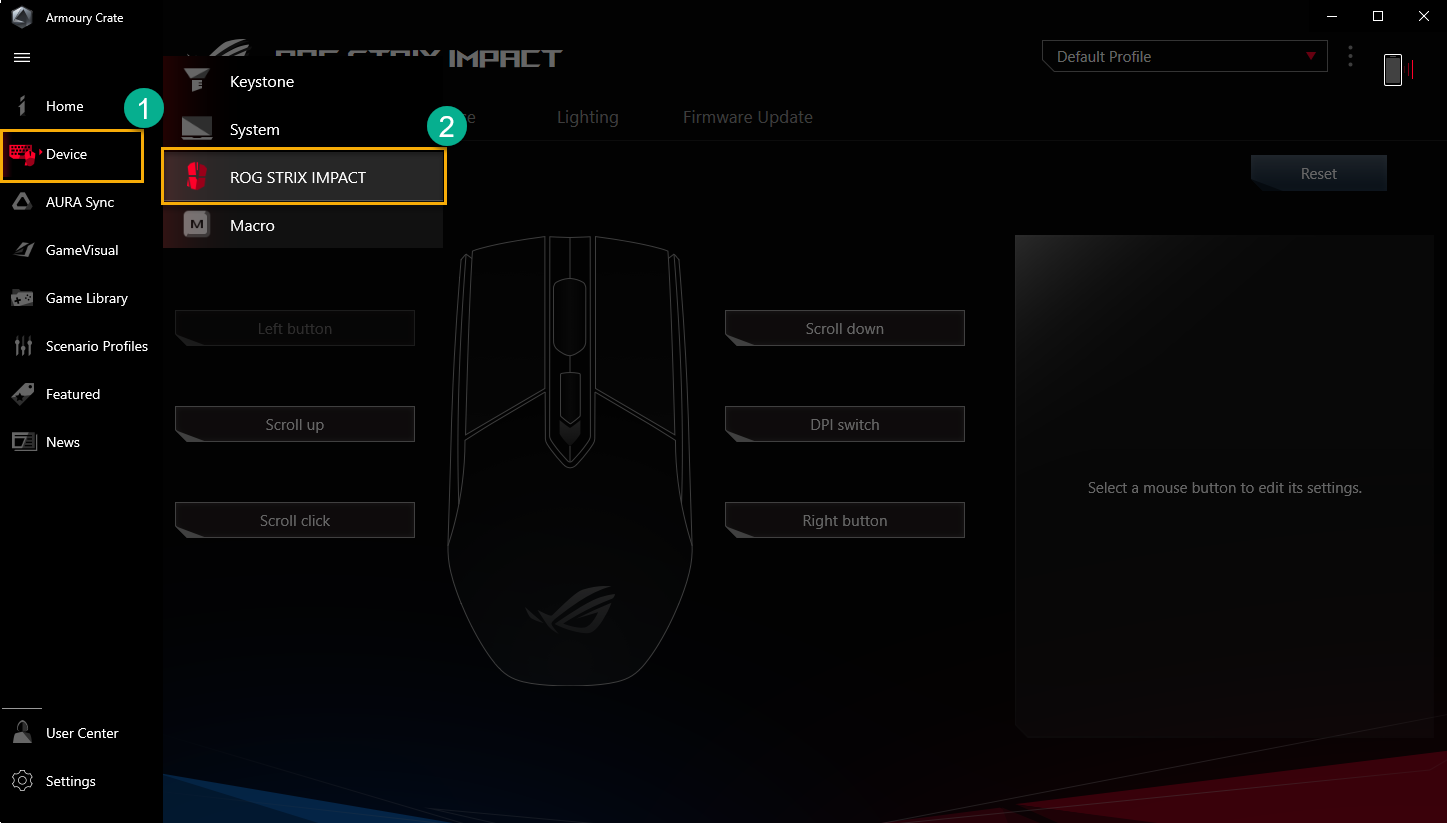
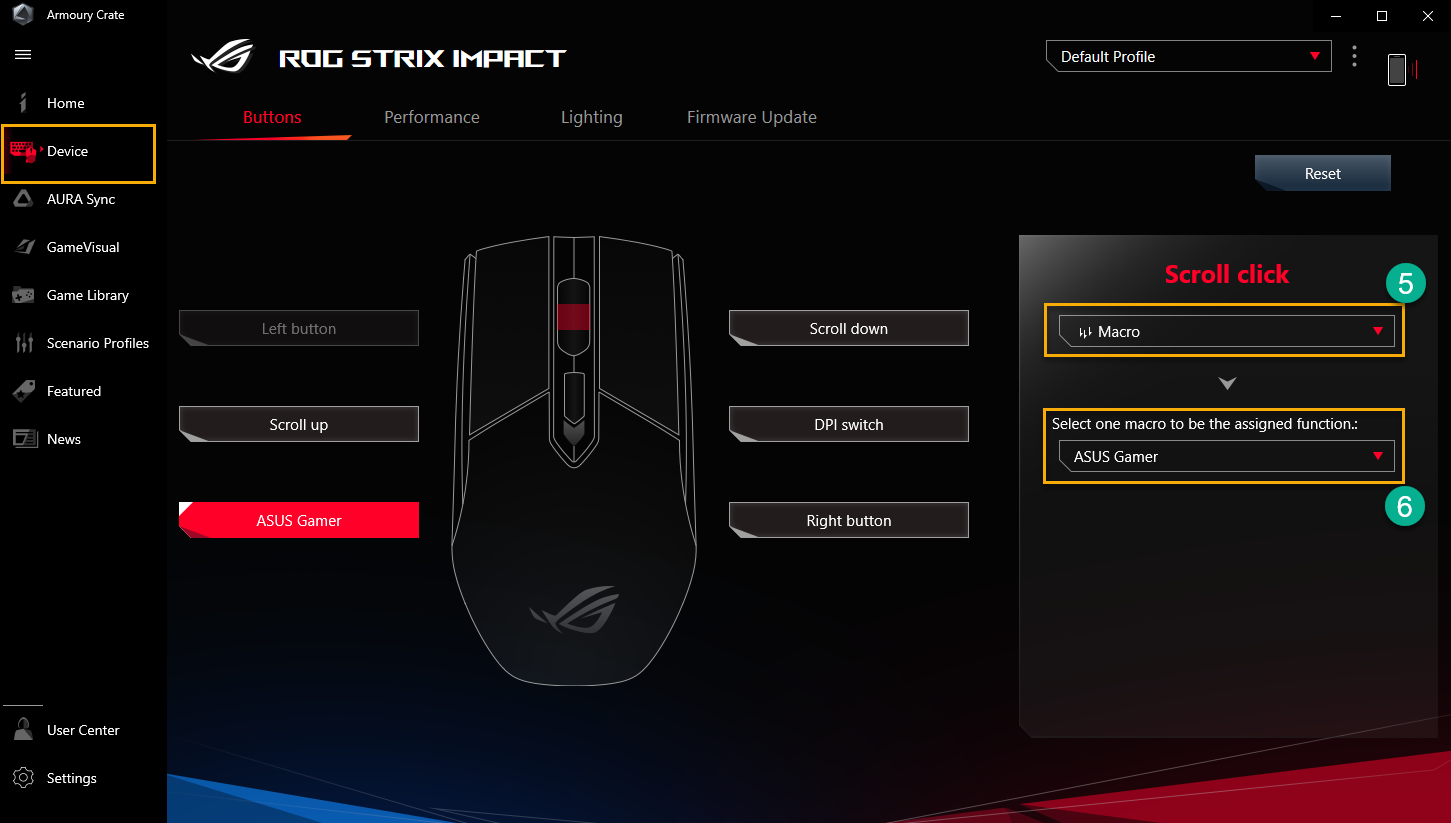
*The Macro function can only support with ASUS ROG peripheral devices, and below are using ROG STRIX IMPACT mouse for demonstration.
In Armoury Crate Device①, selecting ROG STRIX IMPACT② to launch setting page.
To select "Buttons"③,and choose mouse function key④ you would like to apply, for example choosing "Scroll click"
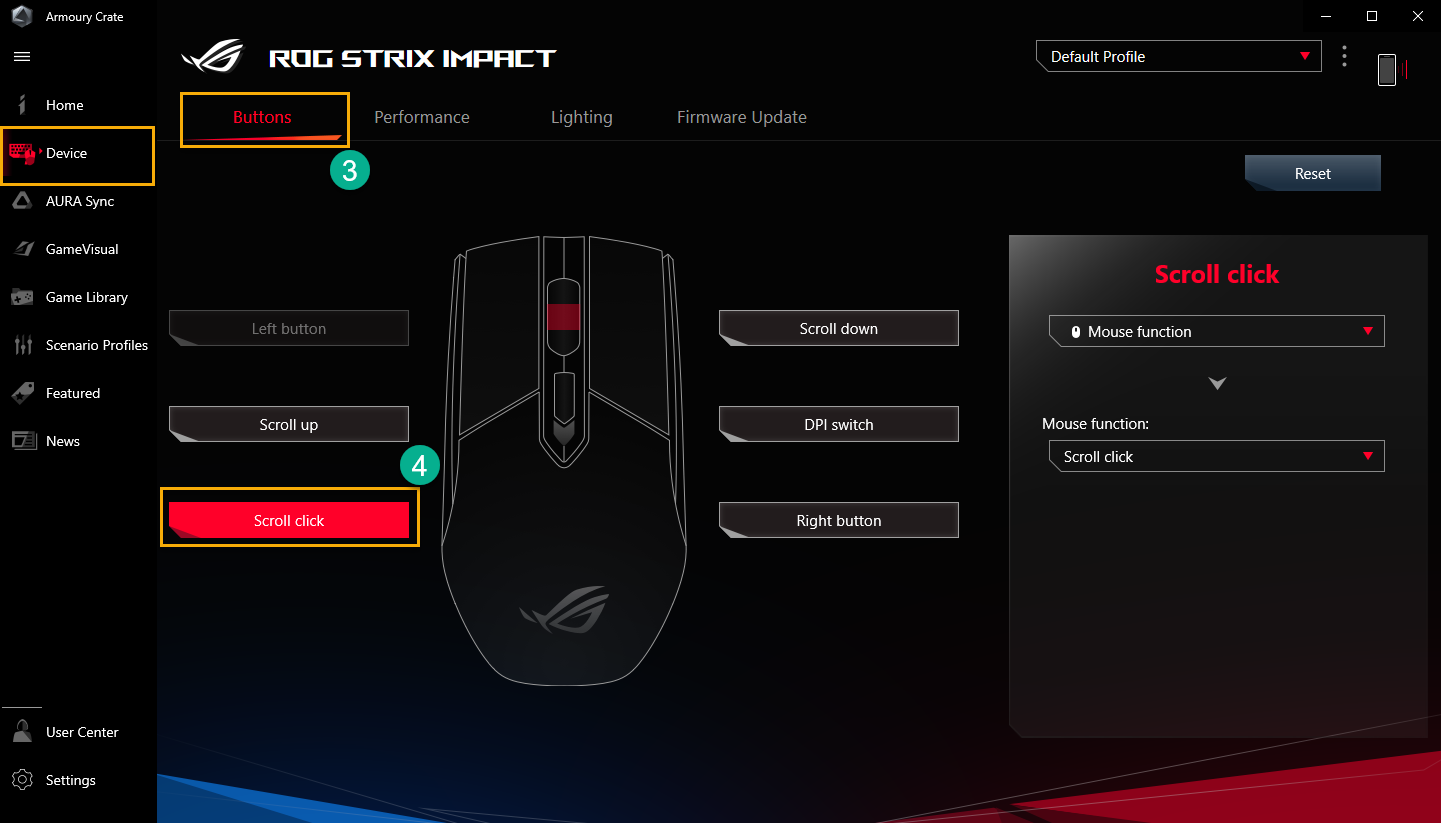
Once mouse function key selected, you can select Macro⑤ and also assign the function⑥ which you saved in Macro before.
Q14: How to enable NVIDIA® MAX-Q Dynamic Boost*?
A14:
1. Gamers have to enable MAX-Q Dynamic Boost* function in NVIDIA® Control Panel,please refer to NVIDIA® official website about How to Enable or Disable Dynamic Boost in the NVIDIA Control Panel.
2. In Armoury Crate application setup, the HyperFan mode should be under Turbo or Manual mode.
*The feature can only support the model equipped NVIDIA® MAX-Q Dynamic Boost.
※According to your product and application version, the operation and interface may have differences.
※According to your location, ASUS may provide different product function and information.
*If you have any questions, please contact ASUS Support for further assistance.
