- English
- Other Products
- FAQ
- [Desktop Chassis] A31/A31 PLUS Front Panel Disasse...
- Subscribe to RSS Feed
- Mark as New
- Mark as Read
- Bookmark
- Subscribe
- Printer Friendly Page
- Report Inappropriate Content
- Article History
- Subscribe to RSS Feed
- Mark as New
- Mark as Read
- Bookmark
- Subscribe
- Printer Friendly Page
- Report Inappropriate Content
10 hours ago
- edited
10 hours ago
by
![]() ZenBot
ZenBot
[Desktop Chassis] A31/A31 PLUS Front Panel Disassembly and Assembly Instructions
Notice
1. Kindly wear gloves to protect your hands before proceeding with disassembly or assembly. Pay special attention to the corners of the parts to avoid any scratches.
2. When the side panel is made of glass, please handle it with extreme care during disassembly to avoid any collisions, falls, or undue stress.
3. When disassembling, please lay the casing flat on a stable surface to prevent the side panel from falling during the process.
4. Kindly ensure that the relevant wires are neatly arranged during assembly to prevent any damage to the wires throughout the process.
5. Keep track of all screws and small components during disassembly and assembly to avoid losing any parts.
Preparation
Phillips screwdriver PH2

Dissembling method:
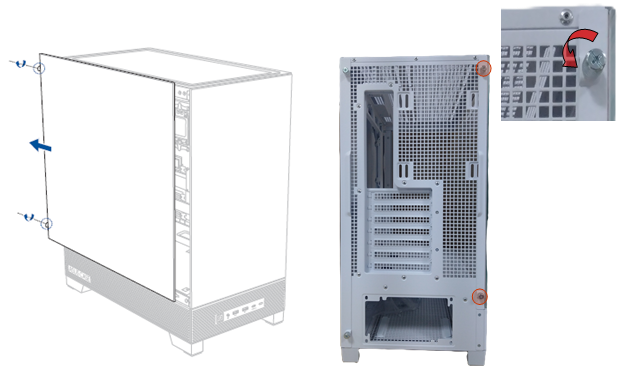
1. Loosen the two of hand screws by turning them counterclockwise, then slide the left side panel towards the rear of the case to remove.

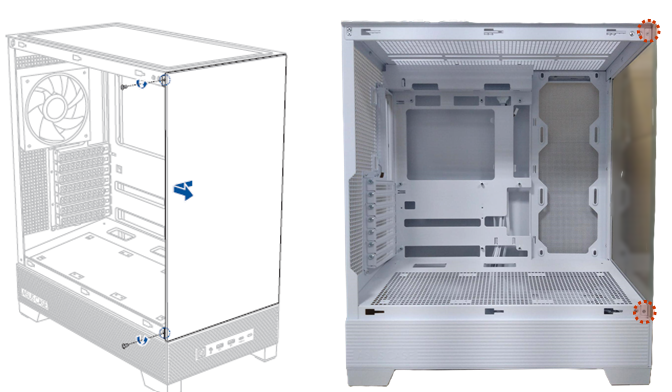
2. Remove the screws located at the upper and lower ends at the left side of the chassis, then slide the front panel out to remove.

For more information, please visit product spec page or support site.
