- English
- Other Products
- FAQ
- ASUS Self Replacement Solution
- Subscribe to RSS Feed
- Mark as New
- Mark as Read
- Bookmark
- Subscribe
- Printer Friendly Page
- Report Inappropriate Content
- Article History
- Subscribe to RSS Feed
- Mark as New
- Mark as Read
- Bookmark
- Subscribe
- Printer Friendly Page
- Report Inappropriate Content
Saturday
- edited
Sunday
by
![]() ZenBot
ZenBot
ASUS Self Replacement Solution
ASUS Self Replacement Solution is designed for individuals possessing the familiarity required for electronic device repairs. If you're well-versed in the intricacies of fixing electronic devices, ASUS Self Replacement Solution offers you the opportunity to access authentic ASUS parts, tools, and repair manuals, enabling you to independently conduct out-of-warranty repairs. Follow the provided steps to execute a range of out-of-warranty repairs for devices like laptops, desktops, all-in-one PCs, mini-PCs, gaming handhelds and smartphones, including tasks such as motherboard replacements and other component replacements.
Disclaimer:
1. ASUS Self Replacement Solution is intended for Out-of-Warranty users. We strongly recommend In-Warranty units to be sent back to ASUS for professional support. Should you choose to proceed with the Self Replacement Solution and encounter any damage leading to machine malfunction or cosmetic issues, such damage will be classified as CID (Customer Induced Damage) and will not be covered ASUS Warranty. Opting for repair services from ASUS for such issues will be treated as an Out-of-Warranty repair, and users will incur charges for diagnostic and repair material fees.
2. The warranty for the materials you purchased will be handled by the store where you made the purchase. If there are any issues with the material warranty, please contact the purchasing store.
3. Prior to proceeding with ASUS Self Replacement Solution, it is crucial to thoroughly review the repair manual. However, for intricate components that may pose challenges without proficient hardware and computer knowledge, users are strongly advised to return their units to ASUS for professional service. This precaution is recommended to prevent unintentional damage to your machine.
Applied Area: America
Things you should know before getting started with self-repair process:
| Product | Self-Repair Process |
| Phone | Please click here for details. |
(Windows operating system) Laptops, Desktops, All-in-one PCs, Mini-PCs and Gaming handhelds | Please click here for details. |
| Chromebook | For an introduction to the self-repair process for Chromebook products, please visit https://www.asus.com/support/FAQ/1051520. |
| Chromebox | For an introduction to the self-repair process for Chromebox products, please visit https://www.asus.com/support/FAQ/1051593. |
| Monitor, Gaming Case | Please click here for details. |
1. Please read through service manual first
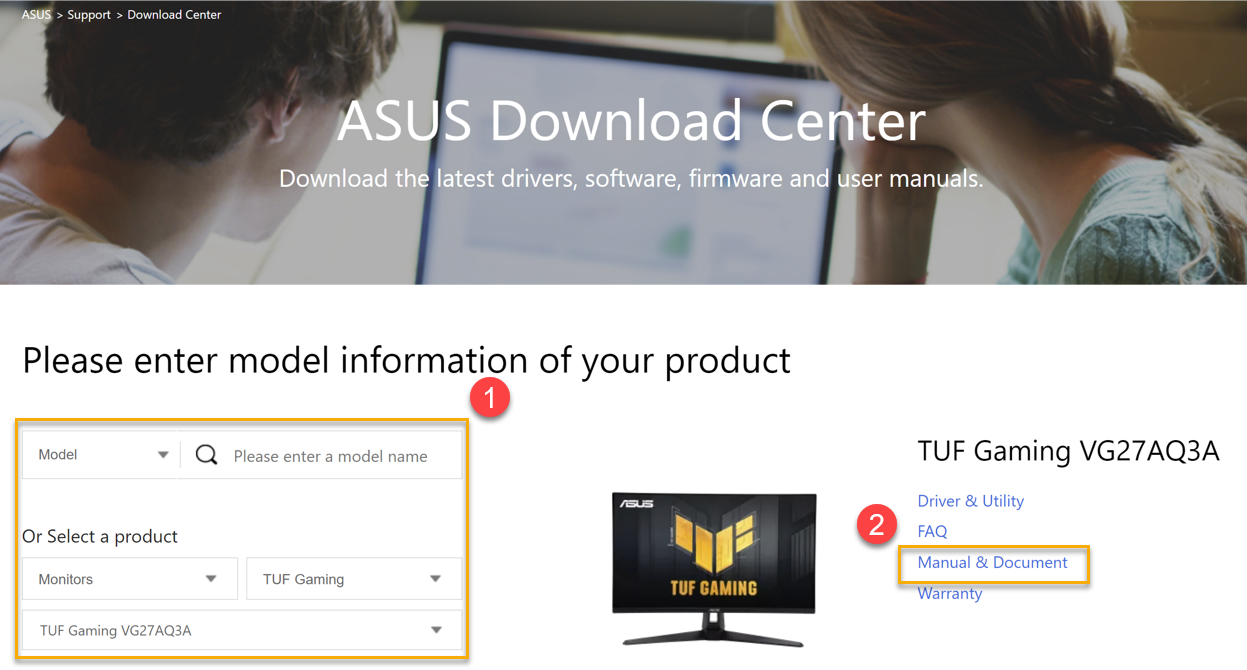
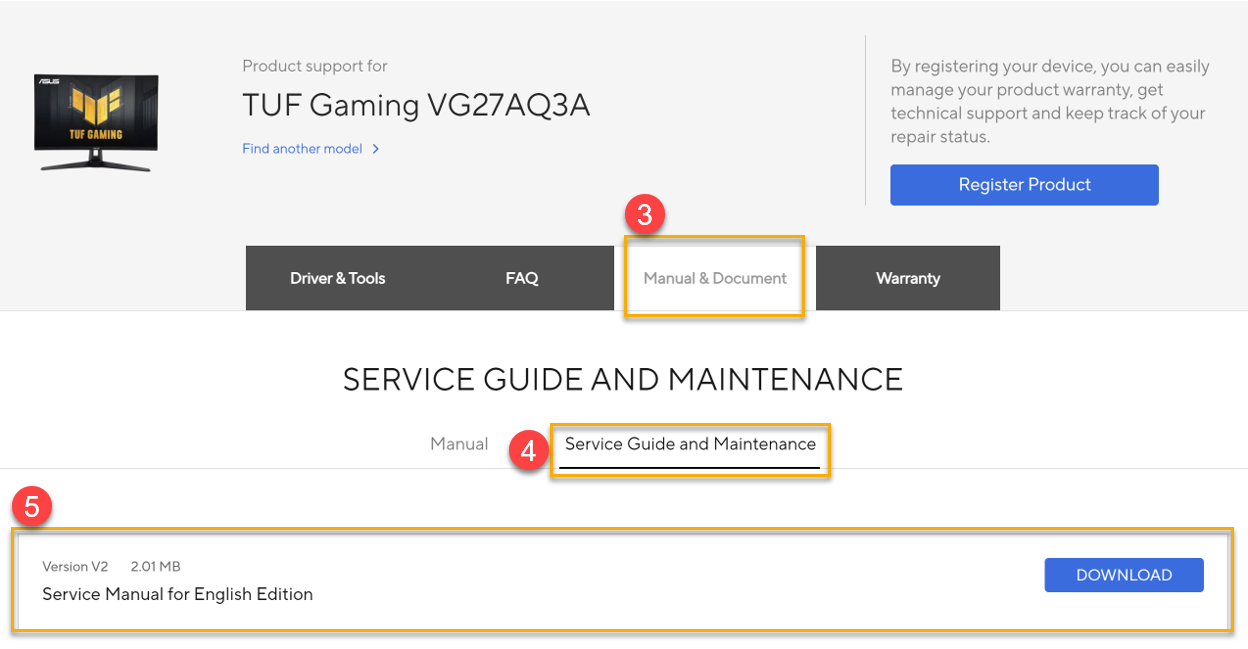
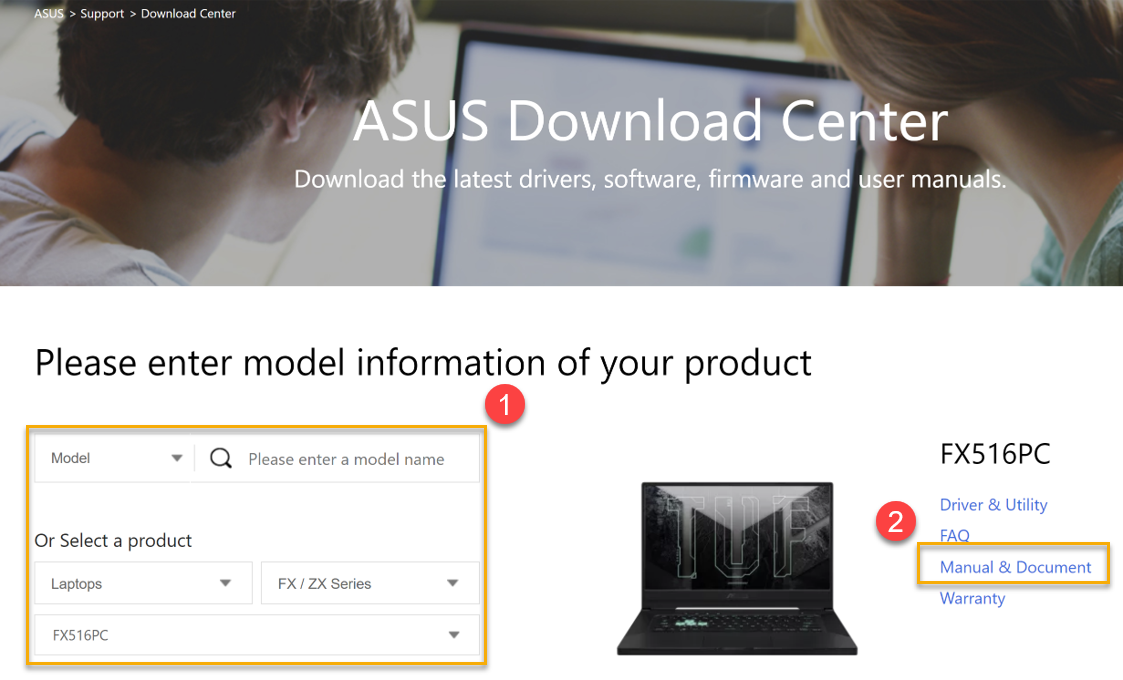
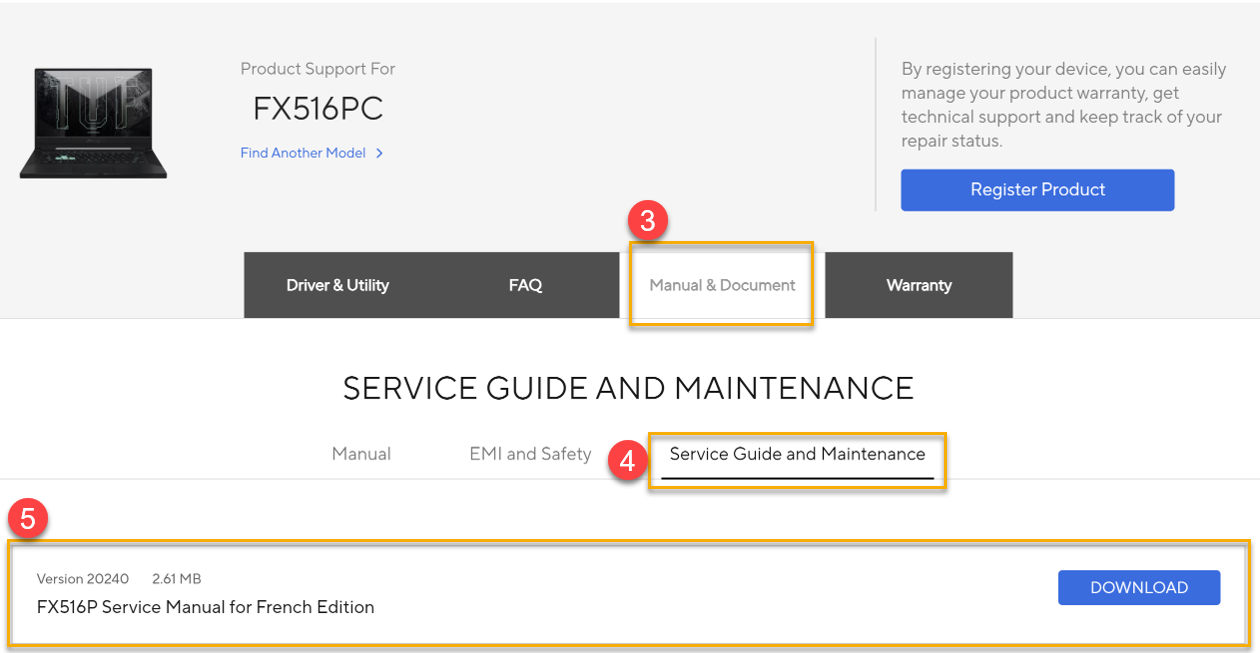
Read the product service manual before you start self-repair process to make sure you are familiar with the essential steps, required parts, tools, and materials of your specific model and repair type. Please go to the ASUS support download center to download the Product service manual according to the product model.
Product service manual download:
(ASUS support download center > Choose Model > Manual & Document > Service Guide & Maintenance)
Example:
2. Please execute System Diagnostic Tool before repair process
You can use ASUS system diagnostic tool to test function of your device and get to know which component needs to be replaced, please follow below table for system diagnostic tool coverage:
Component / Diagnostic tool | MyASUS in WinRE | MyASUS in UEFI | MyASUS in Windows | ASUS Extensive Diagnostic tool | Self-diagnosis (Please click the link below to download the user guide.) | |
1 | Memory | V | V | V |
| |
2 | Disk (HDD/SSD) | V | V | V |
| |
3 | Fan | V | V | V |
| |
4 | Battery | V | V | V |
| |
5 | Wi-Fi Card | V | V | V |
| |
6 | Bluetooth | V | V | V |
| |
7 | Panel | V | V |
| ||
8 | Keyboard | V | V |
| ||
9 | Touchpad | V | V |
| ||
10 | USB(Type-C) port | V | V | V |
| |
11 | Speaker | V |
| |||
12 | Microphone | V |
| |||
13 | HDMI(Display) output port | V |
| |||
14 | SD Card Port | V |
| |||
15 | Camera | V |
| |||
16 | Touch Screen | V |
| |||
17 | Screenpad/Numberpad |
|
|
|
| |
18 | Fingerprint |
|
|
|
|
3. Please execute repair software tool after you replaced specific components
The placement of specific software tools on the ASUS support site depends on the repaired component. Refer to the table below for details on where to find the dedicated software tool for your replaced parts.
Note: To execute the Panel Color Repair Tool, you have to use it with a color calibrator, and the Panel Color Repair Tool can only support calibrator (X-Rite i1Display Pro, Display Plus HL, Display Pro HL, ClolorChecker Display Plus, ColorChecker Pro).
| Replaced Component | Software Tool | Tool and User guide Location |
| Panel | Panel Color repair tool | Please click here to download tool and user guide. |
| Speaker | ASUS Extensive Diagnostic tool (Calibration Items -> Cirrus Speaker Calibration) | Please click here to download tool and user guide. |
| Touch Screen | Touch Screen Firmware update tool | Please go to the ASUS Download Center according to the product model. Choose Model > Click on Manual & Document > Click on Service Guide and Maintenance, and download [Model_Touch Screen Firmware update tool and user guide]. |
| Mainboard | 1. Mainboard Configuration Tool
2. Panel Color repair tool | 1. After successfully installing your new motherboard, please start the device and sign up/Login for ASUS member, and click here go to "ASUS Self Replacement Solution Page" Continue executing the "Mainboard Configuration Tool". For more detailed instructions on the “Motherboard Configuration Tool”, please visit https://www.asus.com/support/FAQ/1051579
2. Please click here to download tool and user guide. |
Gaming handhelds (left/right stick, left/right trigger, Gyro) | [Armoury Crate SE] application (Calibration advanced settings) | For detailed instructions on Armoury Crate SE Application>Calibration advanced settings, please visit https://www.asus.com/support/FAQ/1050220. |
AniMe Matrix™ display (LCD cover) | Matrix LED Firmware update tool | For Please go to ASUS Download Center according to the product model, Choose Model > Click on Manual & Document > Click on service Guide and Maintenance, and download [Matrix_LED Firmware update tool and user quide]. Note: Only applicable to GA402X, GA402N, GU604V series models. |
Things you should know before getting started with ASUS Phones:
1. Please read through service manual first
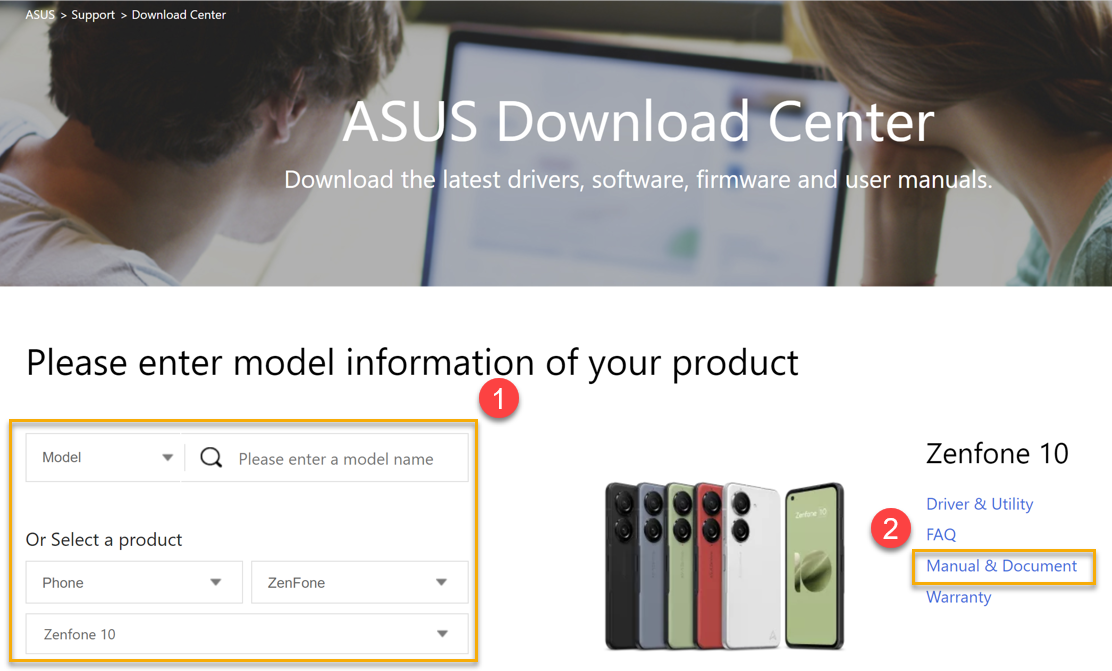
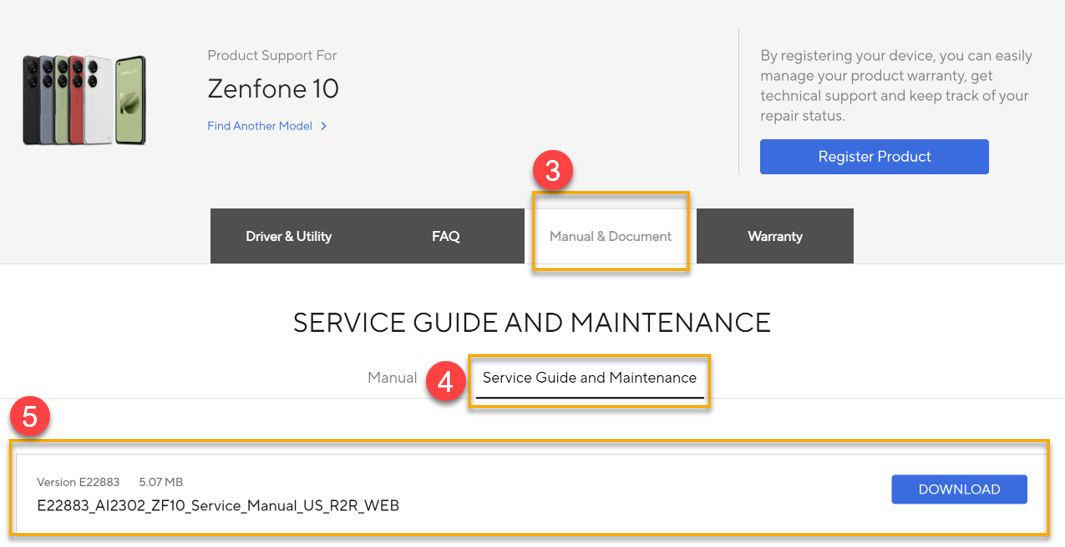
Read the product service manual before you start self-repair process to make sure you are familiar with the essential steps, required parts, tools, and materials of your specific model and repair type. Please go to the ASUS support download center to download the product service manual according to the product model.
Product service manual download:
(ASUS support download center > Choose Model > Manual & Document > Service Guide & Maintenance)
Example:
2. Please execute ASUS SMMI function test application before initiating the repair process
You can use ASUS SMMI function test application on Android system to test function of your device and get to know which part needs replacement, please refer to the table below for coverage details of the ASUS SMMI function test application.
*Please refer to product service manual for SMMI Function test instructions.
No. | Component | SMMI Function test |
1 | Mainboard | V |
2 | Touch Screen (Finger print On Display) | V |
3 | Battery | V |
4 | Receiver | V |
5 | Speaker | V |
6 | Fan | V |
7 | Sub board | V |
8 | Camera | V |
3. Please execute calibration tools or Android application after replacing specific part
The placement of specific calibration tools or Android application on the ASUS support site depends on the repaired component. Please refer to the table below for details on where to find the dedicated calibration tools or Android application for the replaced parts.
| Replaced Component | Software Tool | Tool and User guide Location |
| All | Audio Calibration Assistant Tool | Please go to the ASUS Download Center according to the product model. Choose Model > Click on Manual & Document > Click on Service Guide and Maintenance, and download [AudioCalibrationAssistant Tool.zip and User guide] |
| LCD module | Model Fingerprint Calibration Assistant Tool *Applies exclusively to phone models equipped with a Fingerprint On Display. | Please go to the ASUS Download Center according to the product model. Choose Model > Click on Manual & Document > Click on Service Guide and Maintenance, and download [Model_FingerprintCalibrationAssistant Tool and User guide] |
| Mainboard | Model Fingerprint Calibration Assistant Tool *Applies exclusively to phone models equipped with a Fingerprint On Display. | Please go to the ASUS Download Center according to the product model. Choose Model > Click on Manual & Document > Click on Service Guide and Maintenance, and download [Model_FingerprintCalibrationAssistant Tool and User guide] |
4. Ensuring your warranty coverage
After successfully installing your new motherboard and completing all removal and reassembly steps, the unit's serial number is updated to a new one to ensure the application of the new security certificate. Please click here to register your device. This requires logging in/signing up as an ASUS Member to ensure that your online experience is securely protected. Furthermore, please provide both the original serial number and the new serial number associated with the replaced mainboard to maintain the continuity of your warranty coverage.
Things you should know before getting started with ASUS Monitor, Gaming Case:
1. Please read through service manual first
Read the product service manual before you start self-repair process to make sure you are familiar with the essential steps, required parts, tools, and materials of your specific model and repair type. Please go to the ASUS support download center to download the Product service manual according to the product model.
Product service manual download:
(ASUS support download center > Choose Model > Manual & Document > Service Guide & Maintenance)
Example:
