This widget could not be displayed.
This widget could not be displayed.
Turn on suggestions
Auto-suggest helps you quickly narrow down your search results by suggesting possible matches as you type.
Showing results for
- English
- Other Products
- FAQ
- [AIOT] Tinker Config Application for Tinker Board ...
Options
- Subscribe to RSS Feed
- Mark as New
- Mark as Read
- Bookmark
- Subscribe
- Printer Friendly Page
- Report Inappropriate Content
Community Manager
Options
- Article History
- Subscribe to RSS Feed
- Mark as New
- Mark as Read
- Bookmark
- Subscribe
- Printer Friendly Page
- Report Inappropriate Content
on
07-12-2025
10:56 AM
- edited on
10-07-2025
03:47 AM
by
![]() ZenBot
ZenBot
[AIOT] Tinker Config Application for Tinker Board 3
Introduction
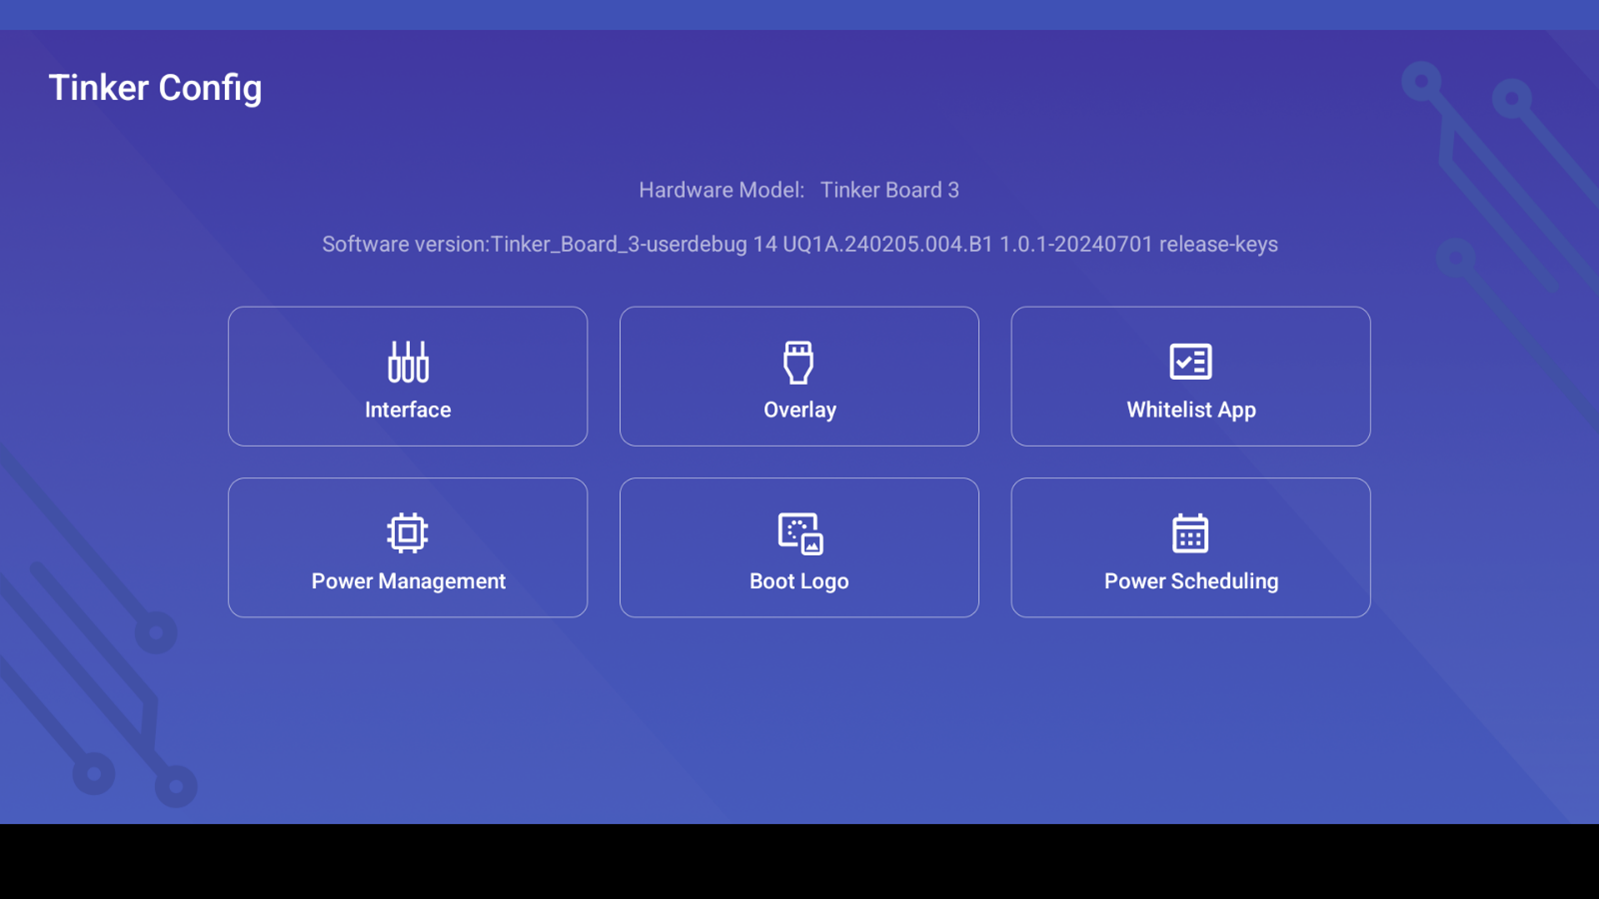
Tinker Config is an Android-based application that offers flexibility and an easy way to configure I/O interfaces on 40pin header, the MIPI DSI connector as well as Linux kernel Device tree overlays while using Tinker Board 3.
- Prerequisites
Tinker Board 3 with Android 14 OS v.1.0.1 (or later) installed. For image installation, please visit Tinker Board’s wiki page on Github.
Optional: hardware accessories such as LED modules, monitors … etc.
Tinker Config is built-in and can be found in the app list.

Features
- Interface: allows users to configure functions for 40 pin GPIO header. The complete GPIO config table can be found on Github wiki. Below are the supported functions:
UART Settings: UART0, UART1, UART4
I2C Settings: I2C1, I2C5
AUDIO Settings: I2S3_2CH, SPDIF_8CH
SPI Settings: SPI2 SPI3
PWM Settings: PWM0, PWM1, PWM2, PWM5, PWM7, PWM8
OTHER Settings: XIN32K, AUTO_UMS

Reset the all functions to default setting icon:
Note: Changes will not take effect immediately, please reboot the board each time after changes are made.
- Linux Kernel Devicetree Overlays: For DSI panel and touch support to change configuration.
Device tree blob (DTB) supported include: dsi_LKW070N13000-V2, dsi_in_main_display_LKW070N13000-V2, i2c5_ilitek, mipi2edp_G156HAB02

Note: Changes will not take effect immediately, please reboot the board each time after changes are made.
- Application Whitelisting: allows users to prevent running applications being terminated when out of memory (OOM) occurred. Applications ticked in the Whitelist will be allowed running when OOM.

Note: Changes will not take effect immediately, please reboot the board each time after changes are made.
- Power Management: users can scale the CPU and GPU frequency in order to either save power or enhance improvement. Below are the supported options of power policies:
CPU:
Governor: interactive, conservative, ondemand, userspace, powersave, performance, schedutil
Core Frequency: 408000, 600000, 816000, 1104000, 1416000, 1608000, 1800000
GPU:
Governor: rknpu_ondemand, dmc_ondemand, vop2_ondemand, vdec2_ondemand, venc_ondemand, userspace, powersave, performance, simple_ondemand
USB:
Enable, Disable, and Reset the power of USB3.0 and USB2.0


- Boot Logo: This feature allows user to change the image shown when the board is booting.
Select an image (size limit: 233k pixels / 700KB), click “Change image“, and click “Apply”.


Note: Changes will not take effect immediately, please reboot the board each time after changes are made.
The boot image change stays even when the board is reset to factory settings. Please wipe and re-flash the OS image to change boot logo back to default settings.
- Power Scheduling: Allow users to set a scheduler to boot or shutdown the devices, users can be notified by SMS, email or system notification before the scheduler is triggered.

Add scheduler: Click the “+” icon button at the corner, choose the action, execution time, repeat, and notification and press “Save”.

Note: The default status of a new scheduler is disable, please remember to enable it by clicking the toggle button on the right side of the scheduler.
Modify scheduler: Click the scheduler to be modified, after setting the scheduler, press “Apply”.
Delete scheduler: Click the scheduler to be deleted, then click the delete button.

Notification: Enable or disable the notification and set the notify time before the scheduler triggered.

The mail server settings can be set up by clicking the “Set up” button.

History: Shows the scheduler related logs and the reasons for the last shutdown.
