This widget could not be displayed.
This widget could not be displayed.
Turn on suggestions
Auto-suggest helps you quickly narrow down your search results by suggesting possible matches as you type.
Showing results for
- English
- Other Products
- FAQ
- [Notebook] ScreenXpert - Introduction
Options
- Subscribe to RSS Feed
- Mark as New
- Mark as Read
- Bookmark
- Subscribe
- Printer Friendly Page
- Report Inappropriate Content
Community Manager
Options
- Article History
- Subscribe to RSS Feed
- Mark as New
- Mark as Read
- Bookmark
- Subscribe
- Printer Friendly Page
- Report Inappropriate Content
on
01-29-2024
05:29 PM
- edited on
10-07-2025
04:05 AM
by
![]() ZenBot
ZenBot
[Notebook] ScreenXpert - Introduction
5. ScreenXpert exclusive features for Zenbook DUO (UX8406 Series)
7. ScreenXpert Download and Uninstall
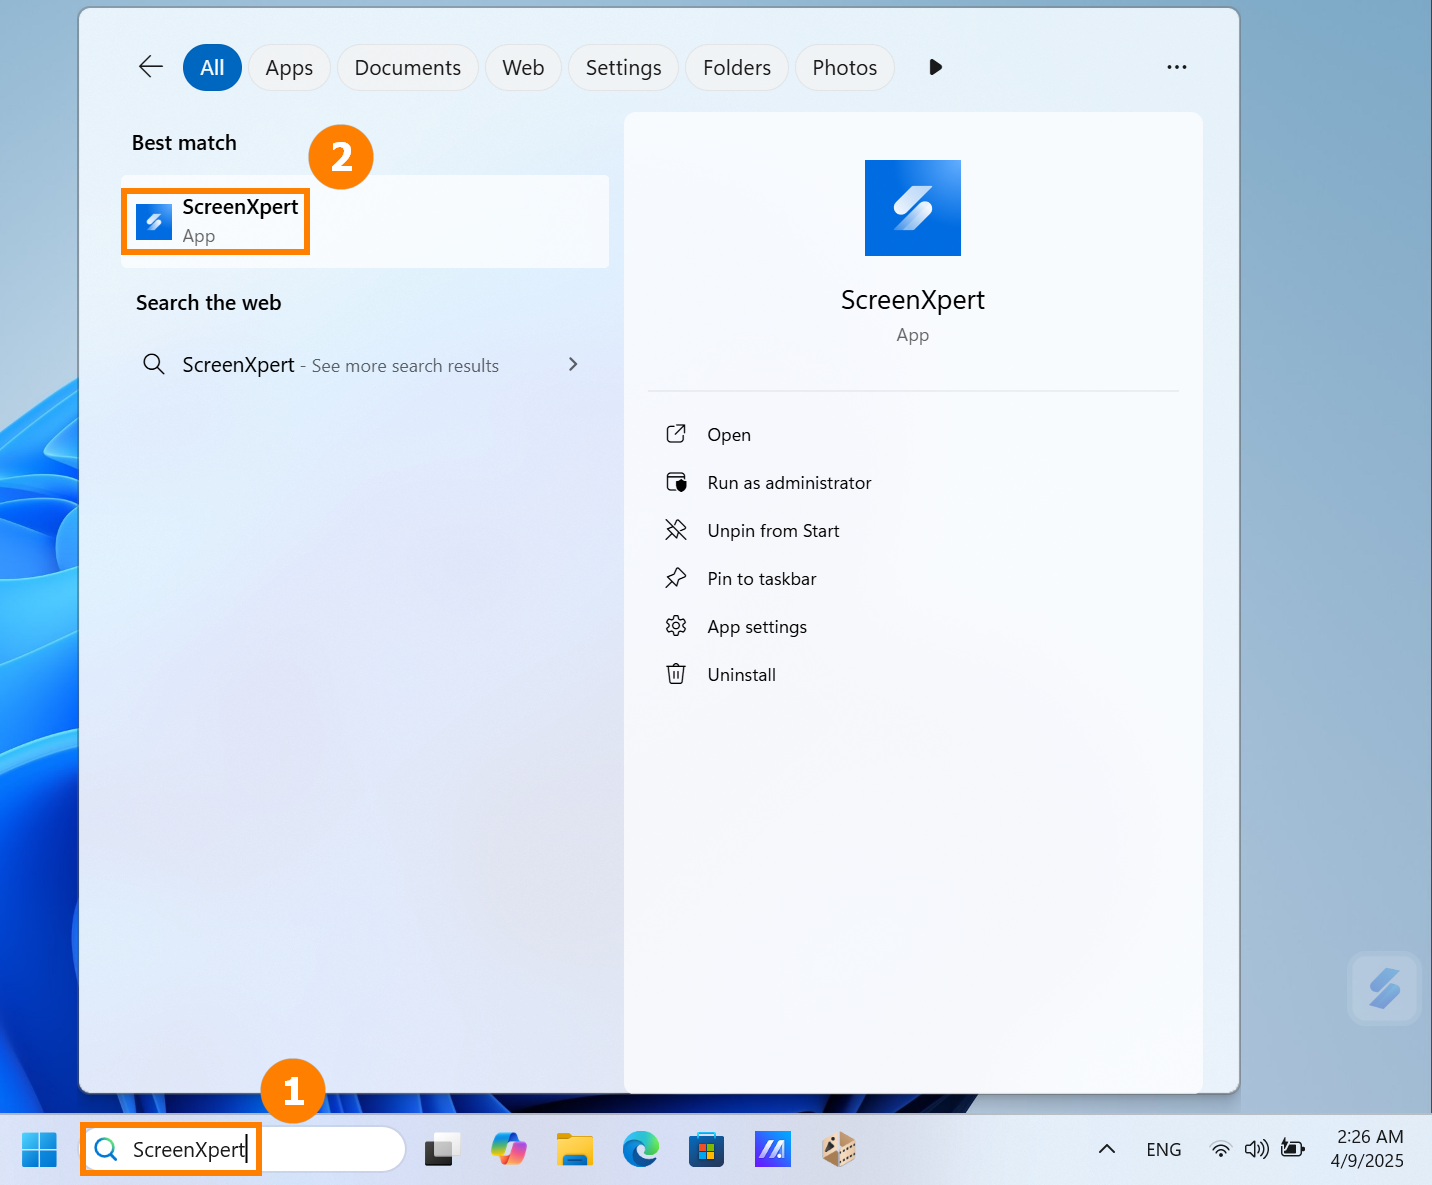
1. Open ScreenXpert for the first time
(1) Enter ①[ScreenXpert] in the search bar on the desktop. Click ②[ScreenXpert], and ScreenXpert will open.
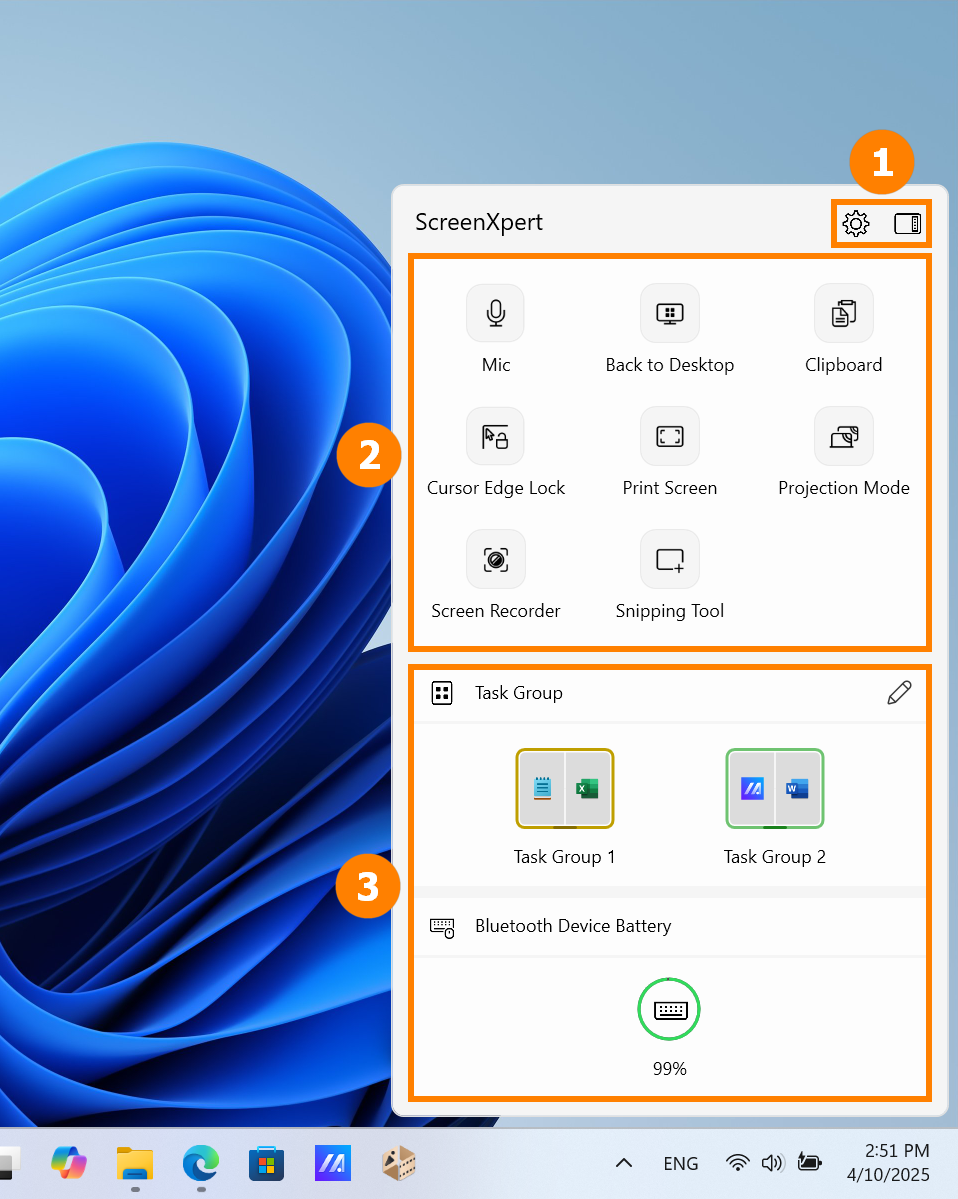
(2) Click the ScreenXpert icon to see four function areas: ①[Settings and Style transfer], ②[Quick functions], ③[Quick panel].
※ The contents displayed in [Quick panel] may vary depending on the model.
(3) You can click  or
or  to switch between different ScreenXpert style.

(1) If your computer can control more than one screen, when you drag the App window on the home screen, ①[Screen Markings] will display and allow you to confirm the location of the screen. The ②[App Switcher] menu function is also displayed, which contains screen 1 and screen 2 icons. (In the example, the computer has two screens)
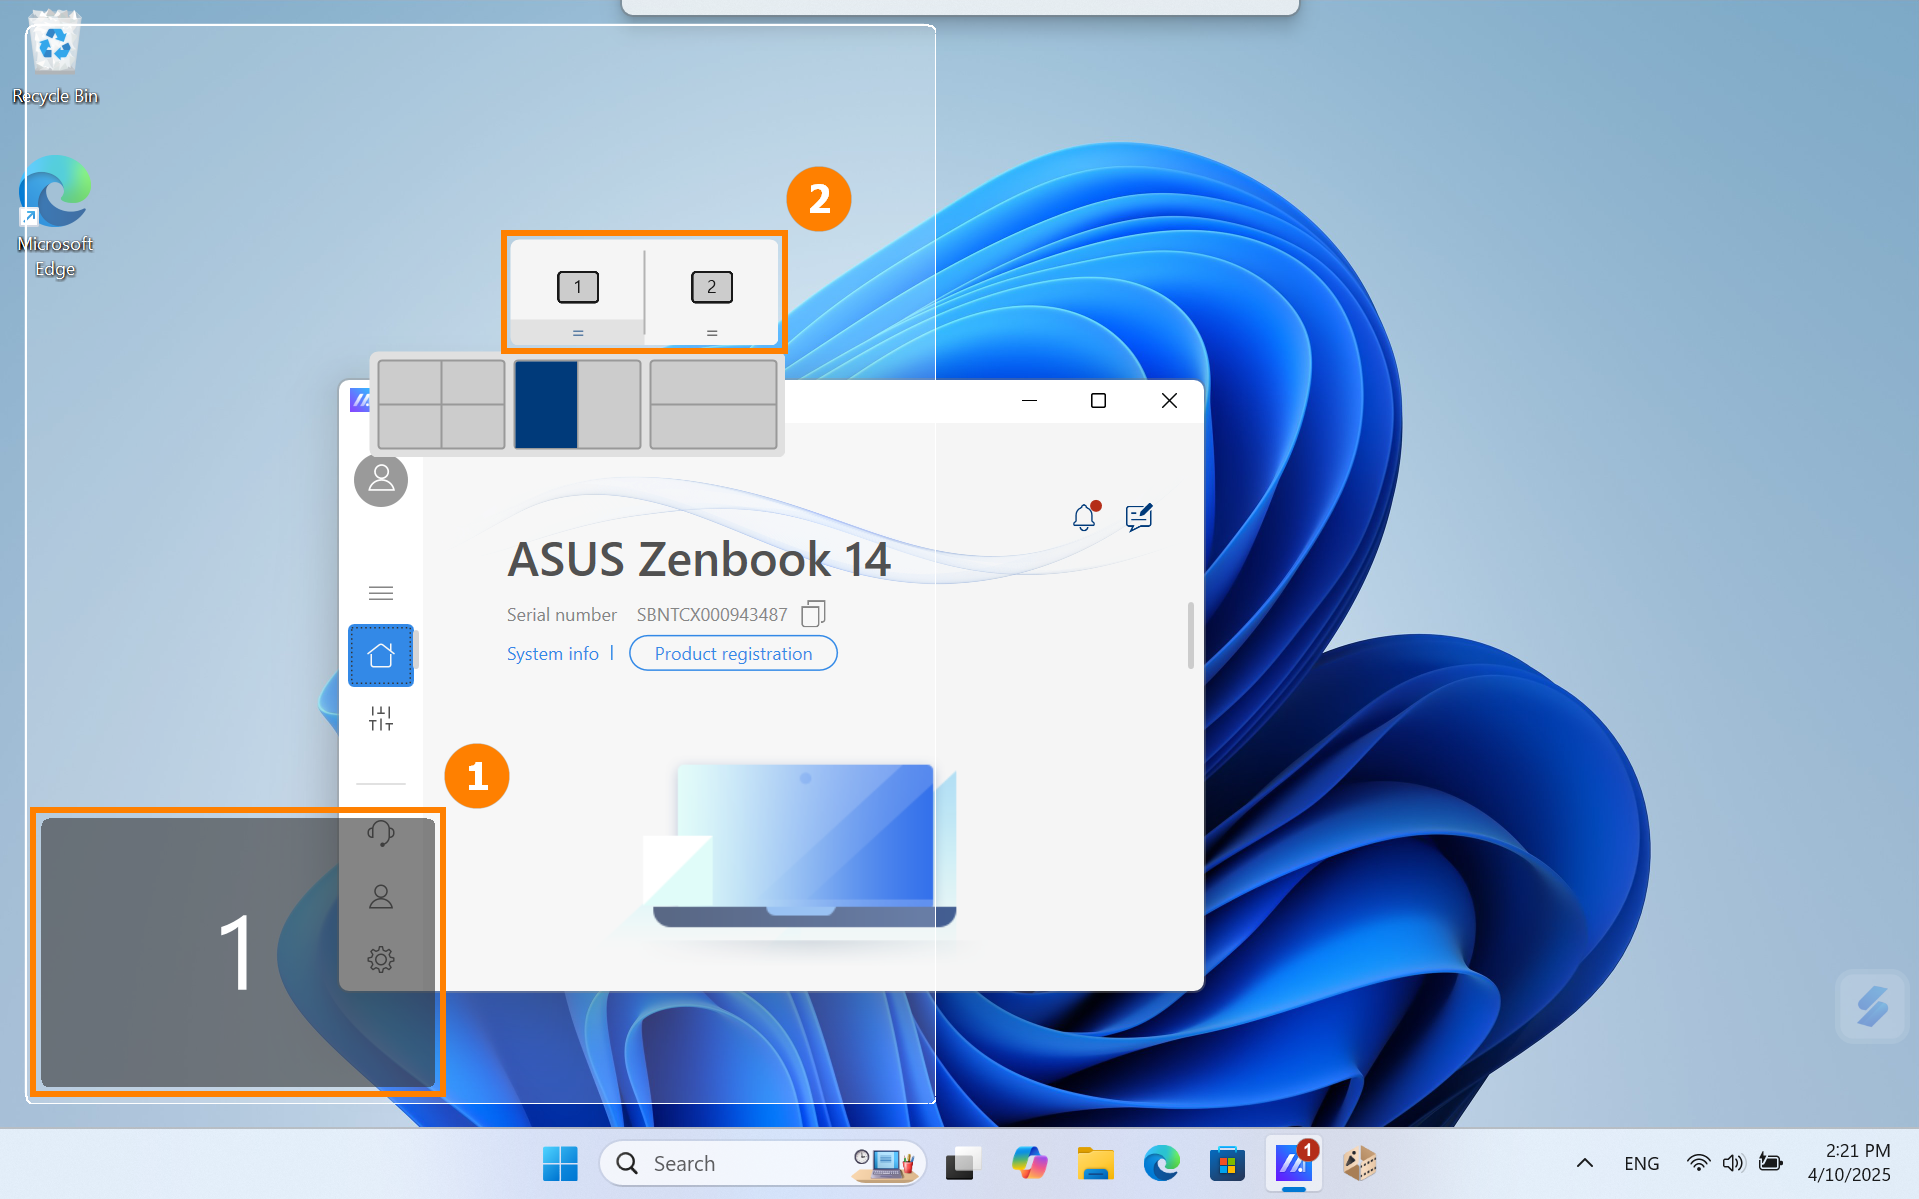
(2) ScreenXpert supports interaction between single or multiple screens. When you drag a window on the desktop, the [App Switcher] icon appears. If you drag the mouse into the range of ③[Screen 1], 3 usable icons will be displayed. You can also drag the mouse into [Screen 2] and the window will be transferred to [Screen 2] for display.

- Drag the mouse inside ①, and the App window will display within screen 1 to occupy a quarter of the screen.
- Drag the mouse to the ②, and the App window will display within screen 1 to occupy one-half of the left and right of the screen.
- Drag the mouse inside ③, and the App window will display within screen 1 to occupy one-half of the top and bottom of the screen.
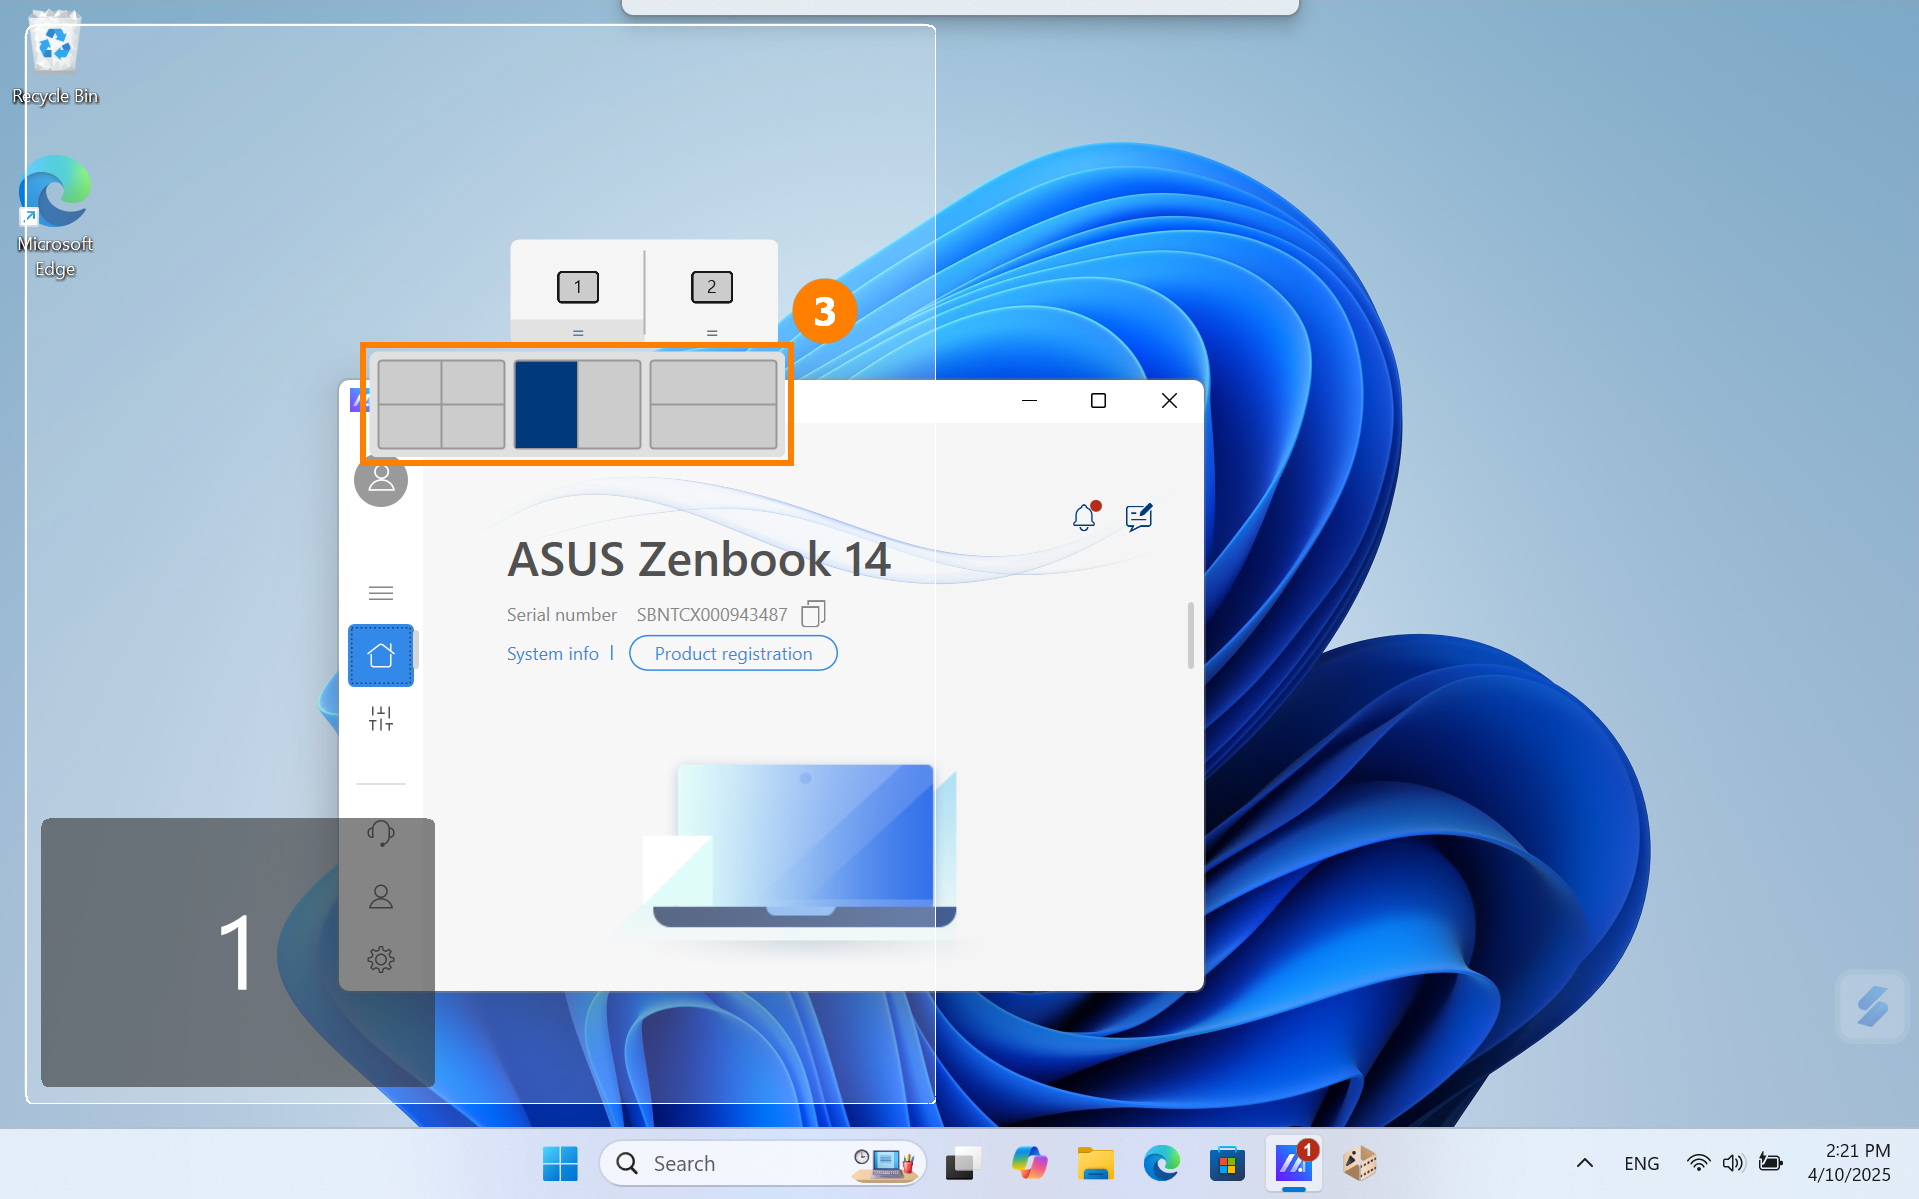
(3) The window is already in [Screen 1], occupying the left half of the display.

(4) If you are using two screens at this time but the label displayed on both screens is 1. You can use the shortcut [Windows key + P] to quickly switch the screen display mode.
- Duplicate is suitable for daily office and study.
Extend is suitable for sharing your screen with others.

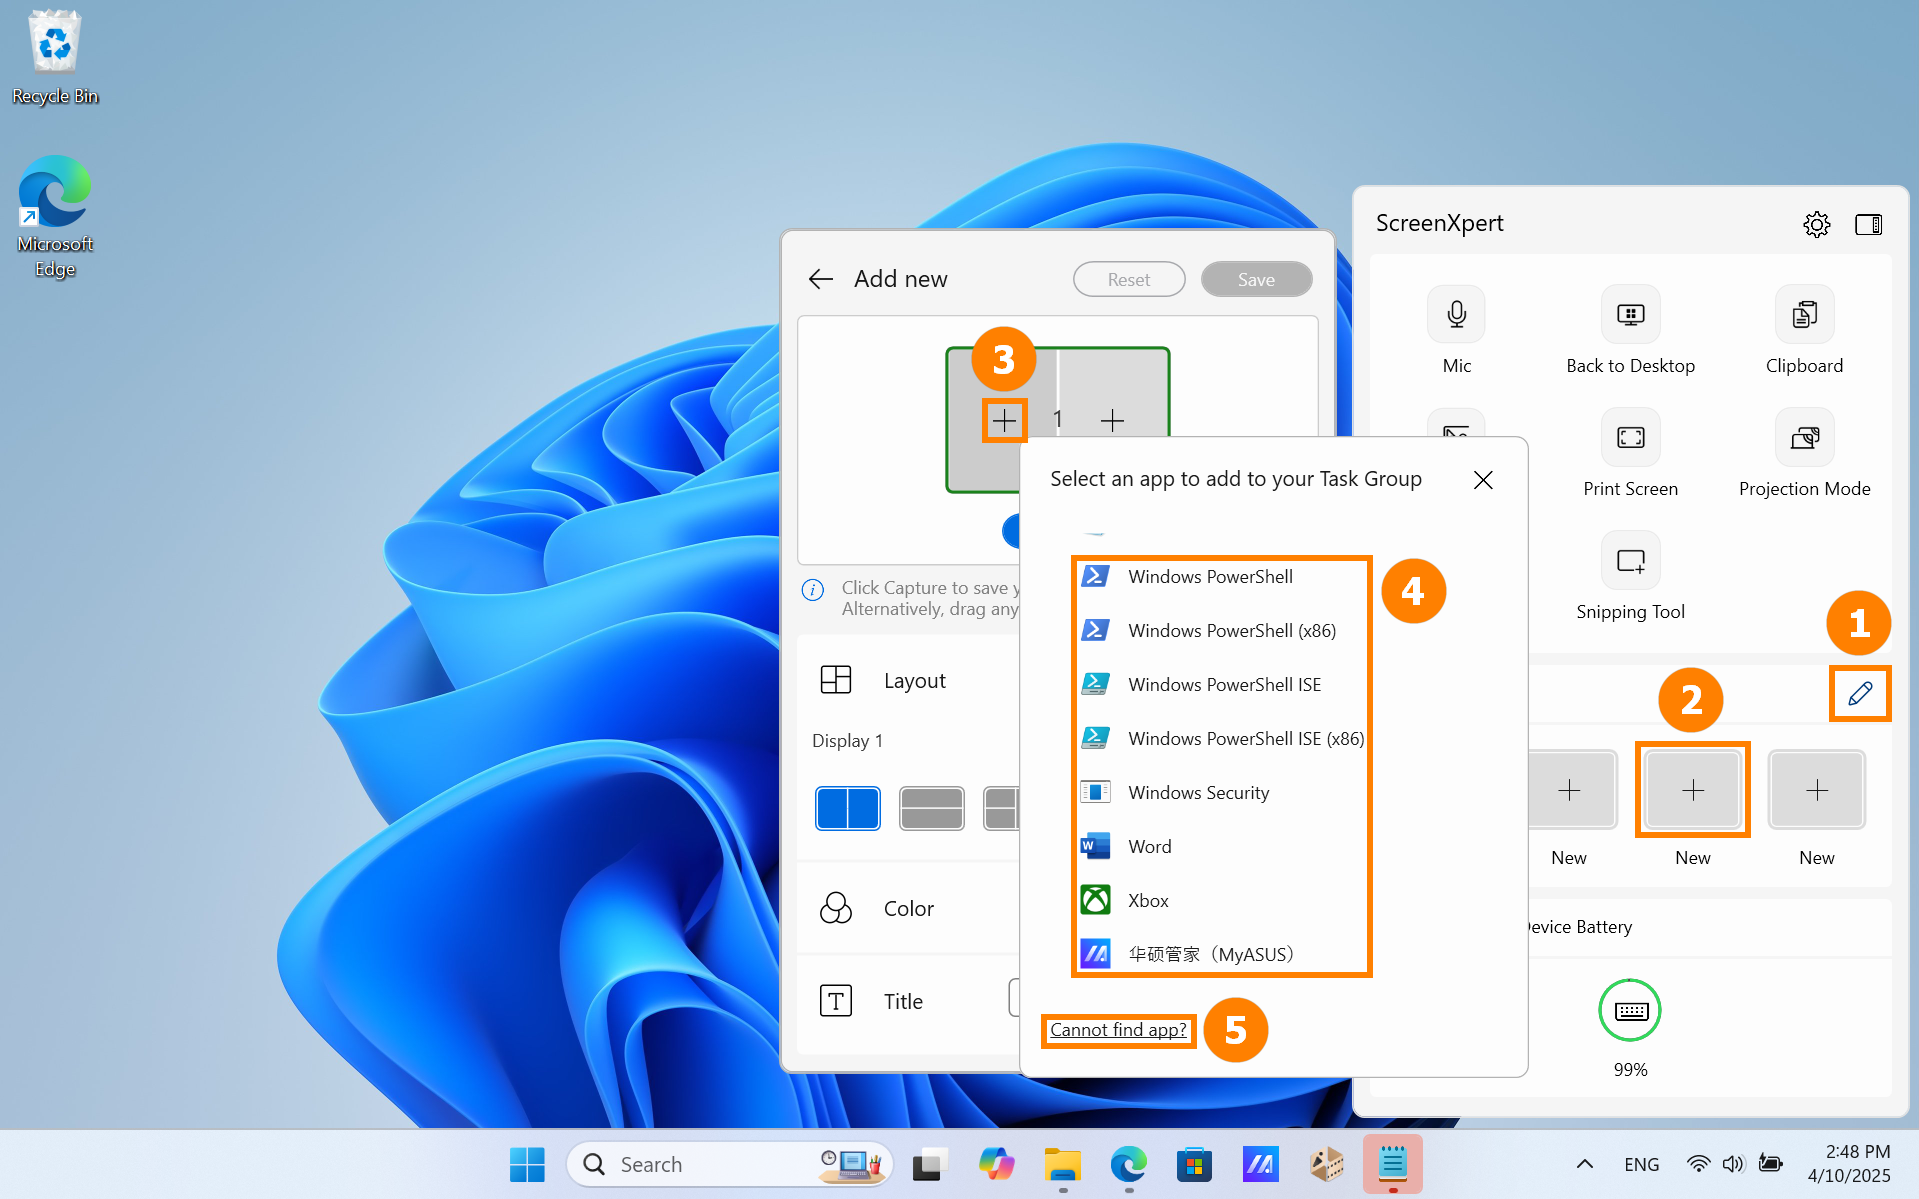
(1) Open ScreenXpert, click ①[Edit], click ②[Add], click ③[Add], and select the ④[App] you want to add. If you cannot find the app you want to add, click ⑤[Cannot find app?].
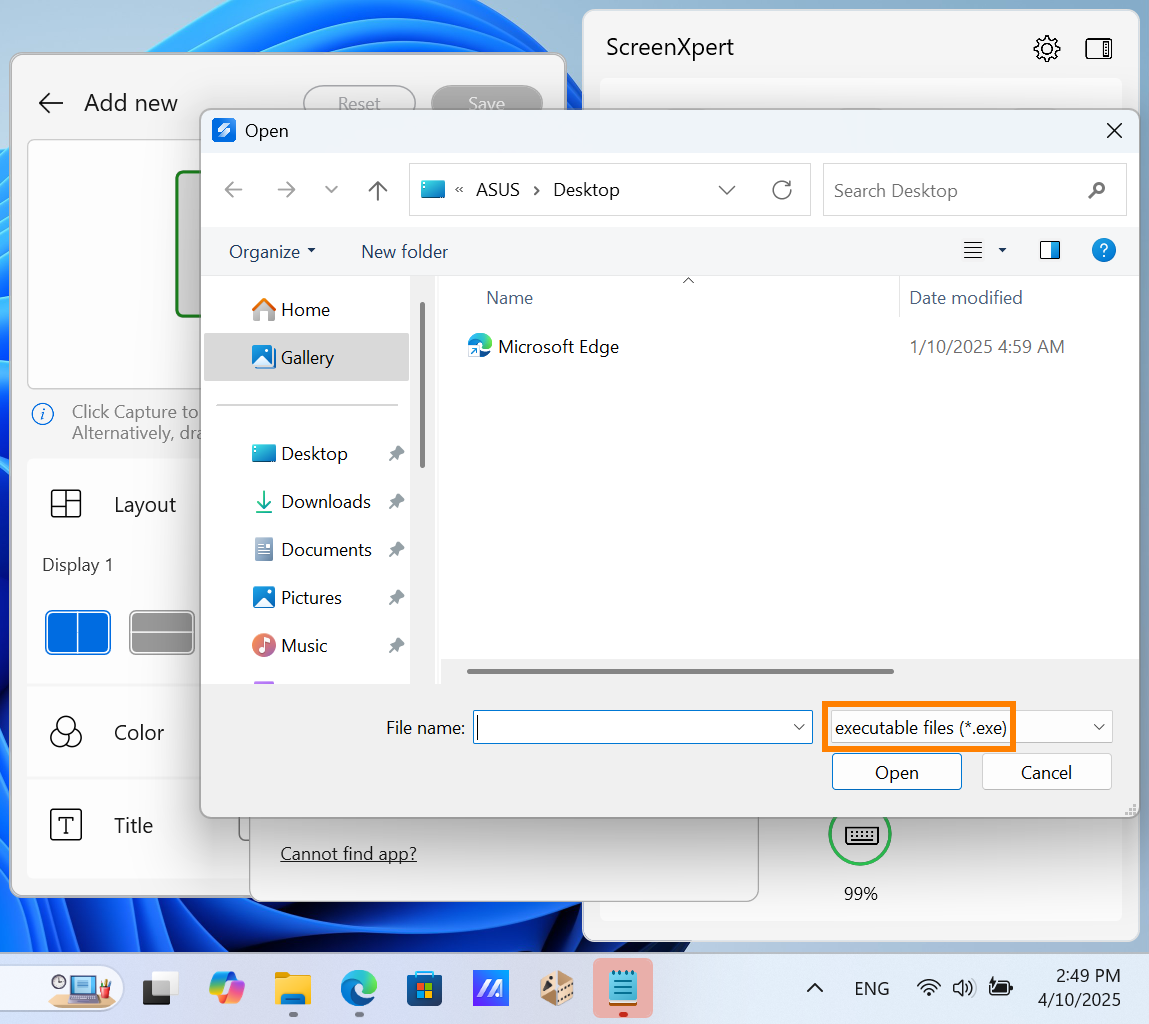
(2) Click [Cannot find app?] and a pop-up window will appear. Select the app you need.
※ ScreenXpert supports apps in .exe format. Even if the app is not installed on the computer, it can be quickly launched by ScreenXpert.
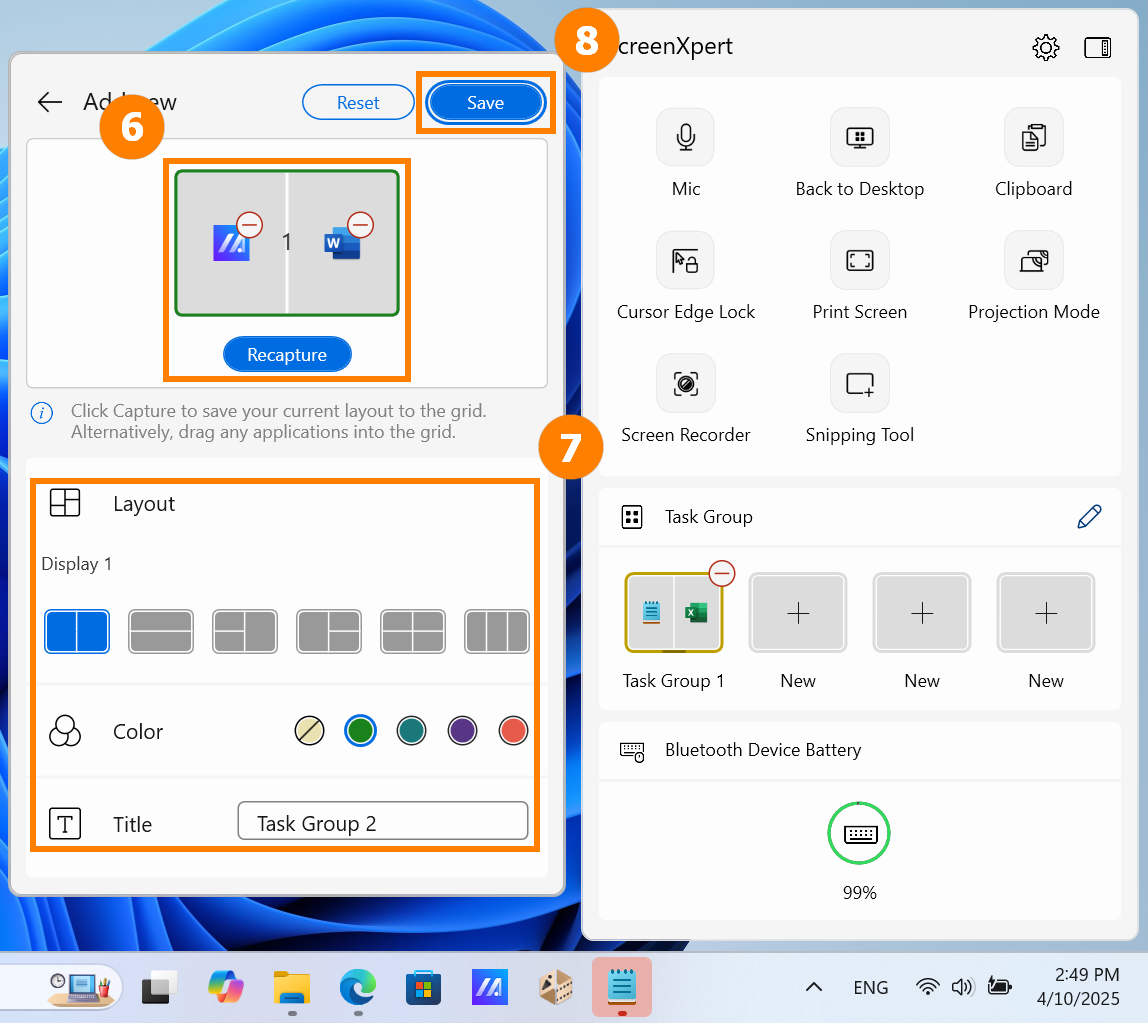
(3) The app has been added. You can also click ⑥[Recapture] to capture the app running on the desktop as a Task Group.
In ⑦[Personalize], modify the Layout, Color and Title of the current Task Group, and then click ⑧[Save].
(4) In ScreenXpert, click on the group you have created to quickly launch the App group.
※ ScreenXpert supports up to four personalized groups.

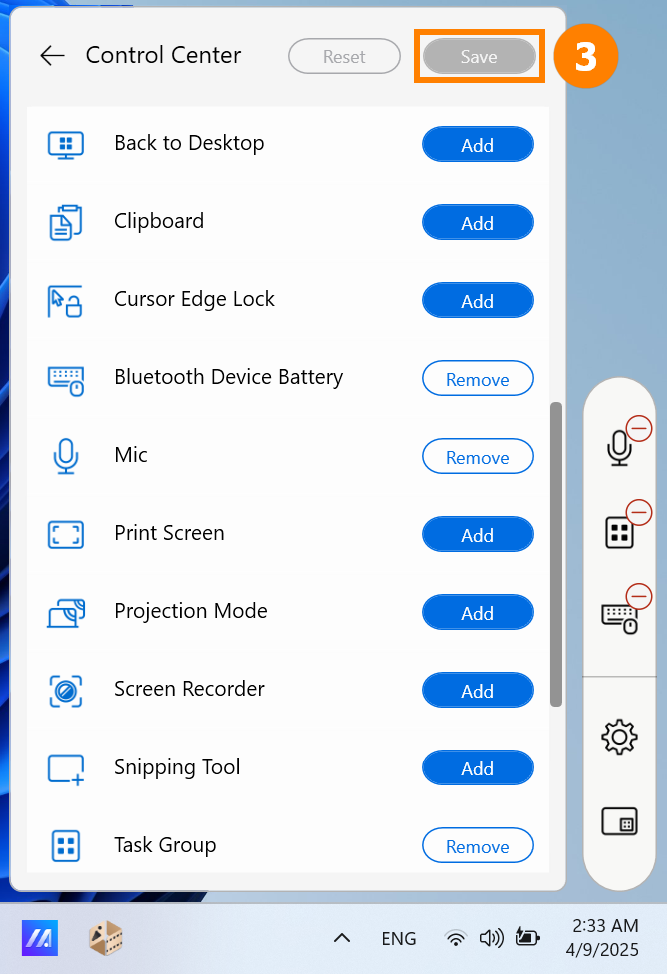
(1) Open ScreenXpert, tap ①[Settings], tap ②[Control Center].
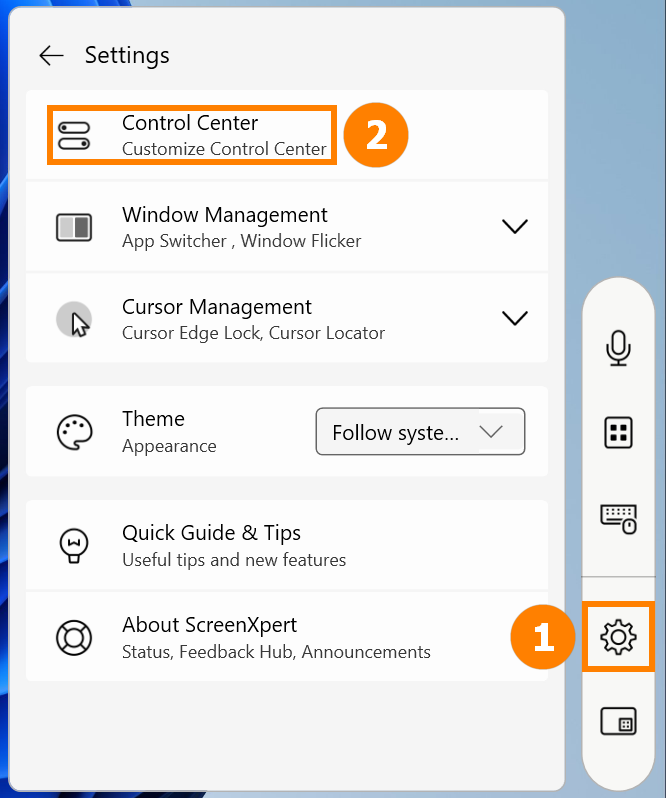
(2) You can move, add or delete Quick Functions. After editing, click ③[Save].
The following is a detailed explanation of Quick Functions (functions vary depending on the model):
- Back to Desktop: Minimize all open windows and return to the desktop.
- Clipboard: This function is a built-in Windows function. Please refer to Clipboard History | Microsoft Windows
- Cursor Edge Lock: If you have two or more monitors, you can keep the mouse within a designated screen area.
- Bluetooth Device Battery: Requires you to connect to a Bluetooth device that supports battery display.
- Mic: Quick turn the computer's microphone function on or off.
- Print Screen: Capture full screen.
- Projection Mode: Quickly switch between multiple screen display modes.
- Screen Recorder:Turn on screen recording.
- Snipping Tool: System screenshot tool.
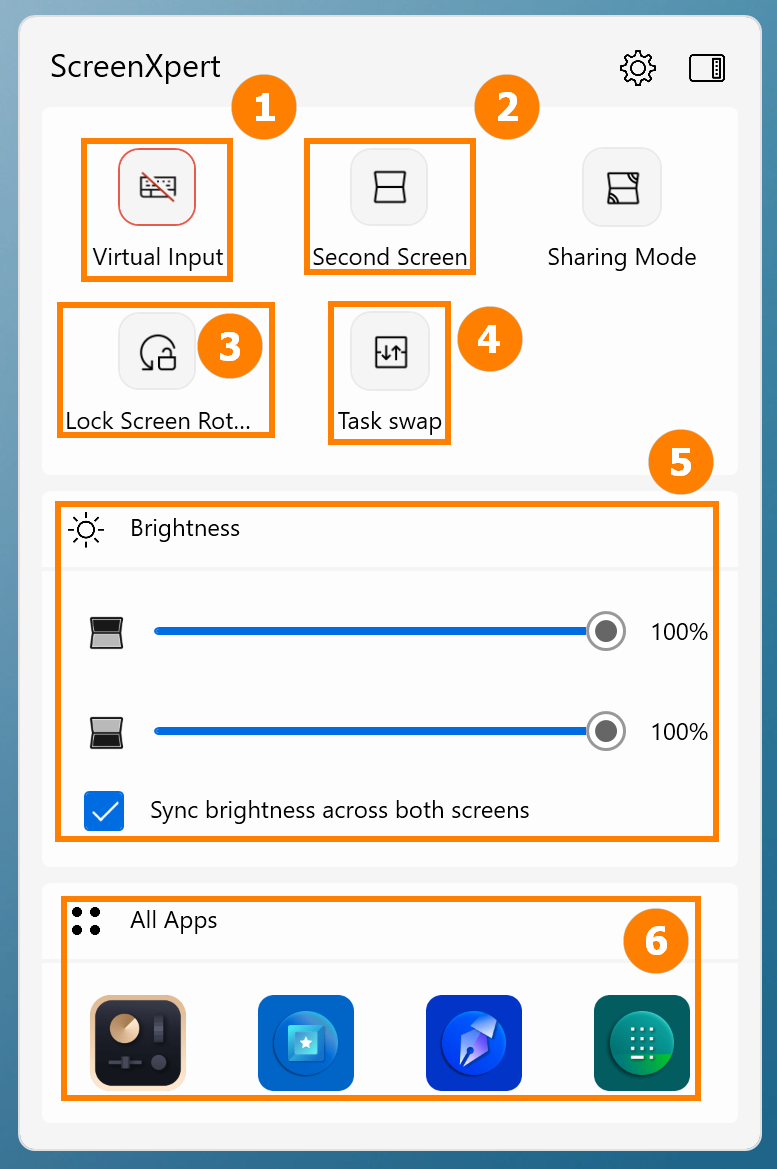
5. ScreenXpert exclusive features for Zenbook DUO (UX8406 Series)
(1) ①Virtual Input: Quickly open the virtual keyboard on the second screen.
②Second Screen: Quickly open or close the second screen.
③Lock Screen Rotation: When you rotate the laptop, neither screen rotates.
④Task swap: Quickly switch apps between two screens
⑤Brightness adjustment: Quickly adjust the screen brightness. Check Sync to adjust the brightness of both screens synchronously.
⑥All Apps: Quickly enable ASUS functions. If there is no Control Panel in your All Apps, please refer to: ASUS Control Panel - Introduction | Official Support | ASUS Global
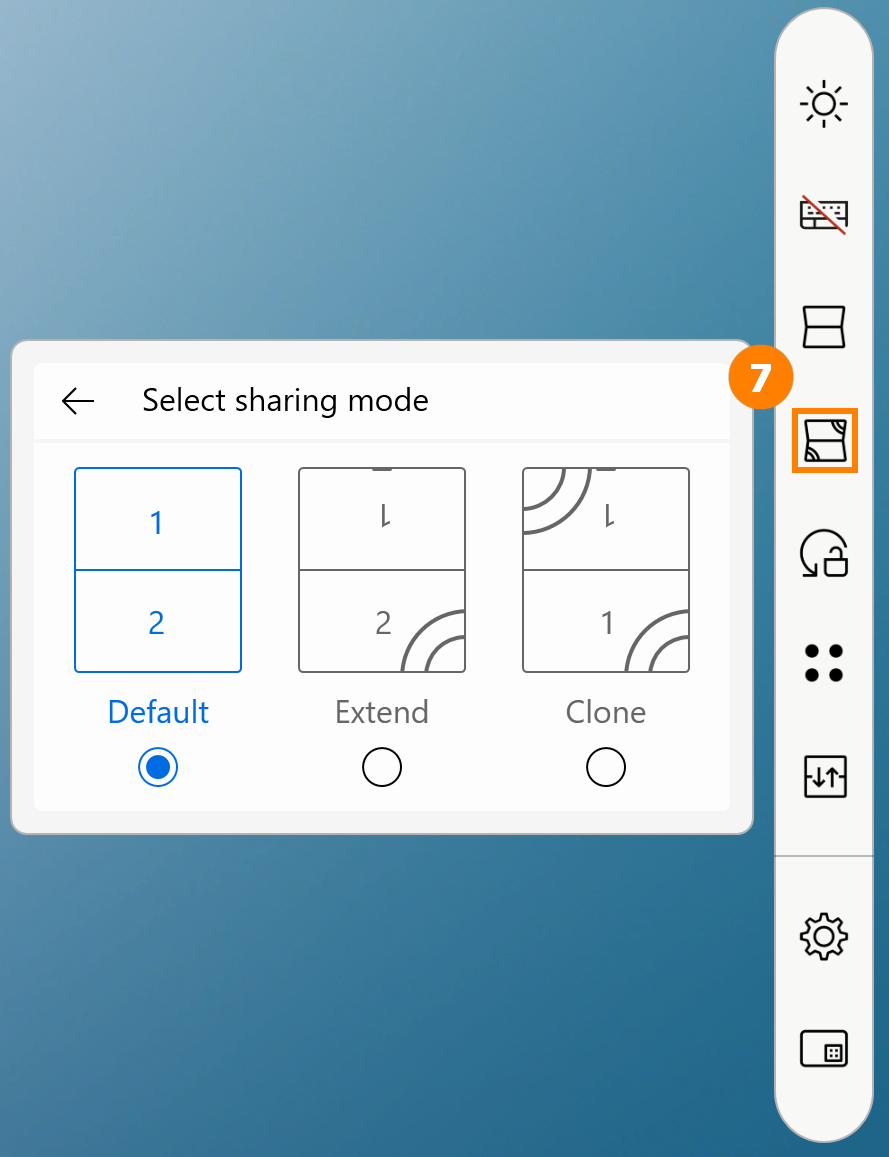
(2) ⑦Sharing mode:
- Default: Suitable for daily office and study
- Extend: Suitable for introducing PPT and other content to others
- Clone: Suitable for sharing your screen with others
※ If you encounter fluency or other problems when using screen gestures, please update the latest version of the BIOS and ScreenXpert before using it.
Click ①[Settings], then click ②[Gesture Control] to turn off or on the gesture function you want.

(1) Five-finger control mode
For example, if you open MyASUS, you can use five fingers to expand the folder on the screen to display the folder on the full screen.
If you use five fingers to shrink on the screen, the folder will be displayed full-screen on the home screen.
(2) One-finger control mode
You only need to use one finger, drag the window and slide it gently, and the window can be displayed on another screen in full screen.

(3) Two-Finger Control Mode - Gadget Switch
Before using this function, you need to turn on the gadget in ScreenXpert first, please place the gadget on the second screen as shown below, and the virtual keyboard needs to be turned on during the placement process. The placement is complete, and you can quickly switch the gadget with two fingers. The next time you use the six-finger function, the gadget will be opened first, and you will need to swipe up again to open the virtual keyboard.

If gadget doesn't appear on the second screen, place it on the second screen manually.

※ The gadget needs to be placed in the same position to support the two-finger switching function.
※ If you only want to use the virtual keyboard function, please click the [X] to turn off the small function, and then use six functions to turn on the virtual keyboard function only.
Control Panel supports personalized settings, please refer to: ASUS Control Panel - Introduction | Official Support | ASUS Global
(4) Three-finger control mode
On the second screen of the Zenbook DUO, tap the screen with three fingers to wake up the virtual touchpad. The virtual touchpad allows you to move around at will, and turning it off and back on will remain the same as when it was last turned off.
(5) Six-finger control mode
On the second screen of the Zenbook DUO, tap the screen with six fingers to wake up the virtual keyboard, and swipe up again to display the virtual keyboard on the full screen. Swipe down with six fingers to turn off functions in order they are on, and swipe down with six fingers in the lower third of the second screen to turn off all functions directly.
※ If your computer is not connected to a Bluetooth keyboard, the virtual keyboard will automatically turn on when you tap the text box with your finger.
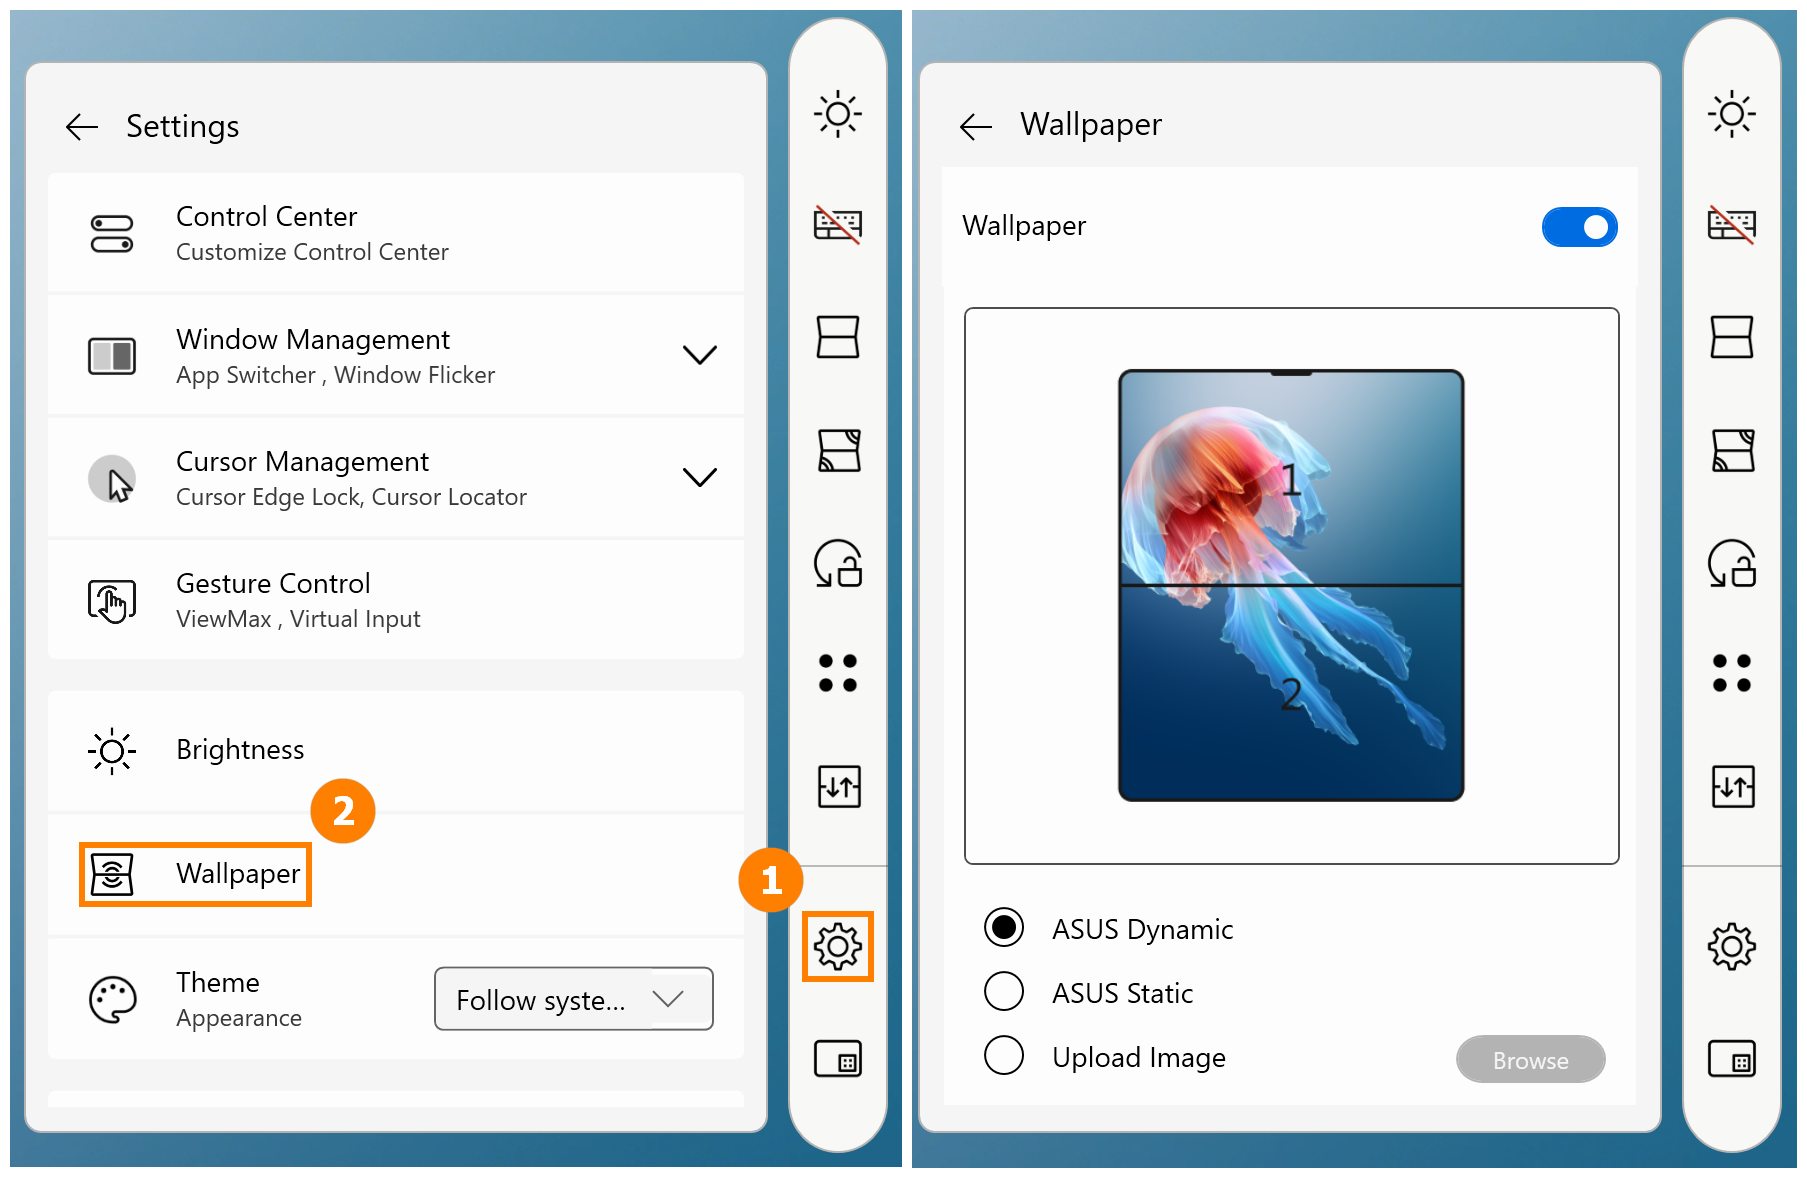
Wallpaper supports dynamic, static or uploading your favorite pictures.
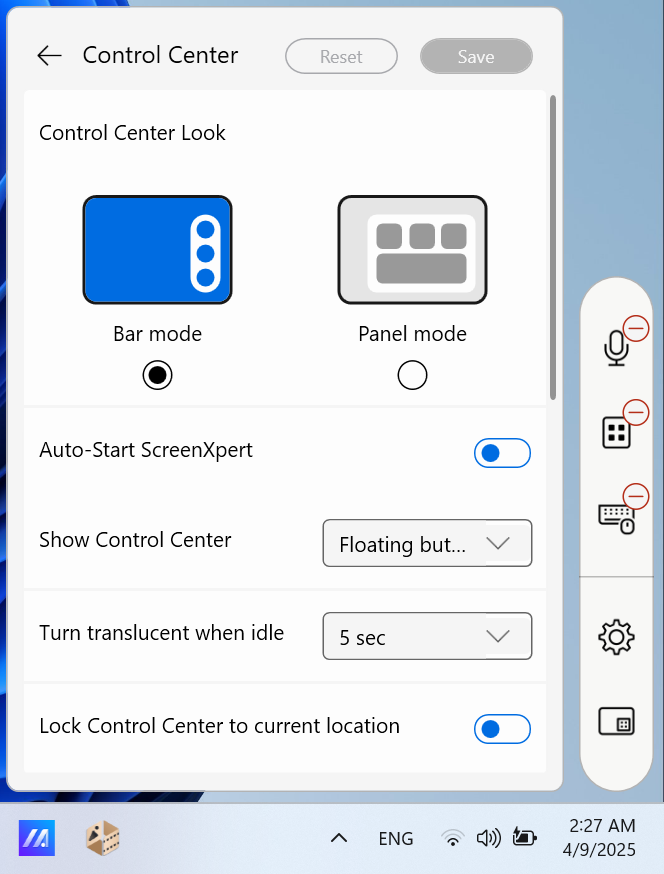
(1) Open ScreenXpert -> Settings -> Control Center, from top to bottom:
- Control Center Lock: Divided into Bar model and Panel Model. You can also click the icon on ScreenXpert to quickly switch.
- Auto-Start ScreenXpert: Start ScreenXpert when Windows starts.
- Show Control Center: If you have turned it off, refer to the first section of this article to turn it back on.
- Turn translucent when idle: adjust the time.
- Lock Control Center to current location: Fix the location of ScreenXpert.
(2) Windows Management
- App Switcher on and off: Please refer to Section 2 of this article.
- Windows Flicker: Use finger flick gesture to move apps across dual screens.
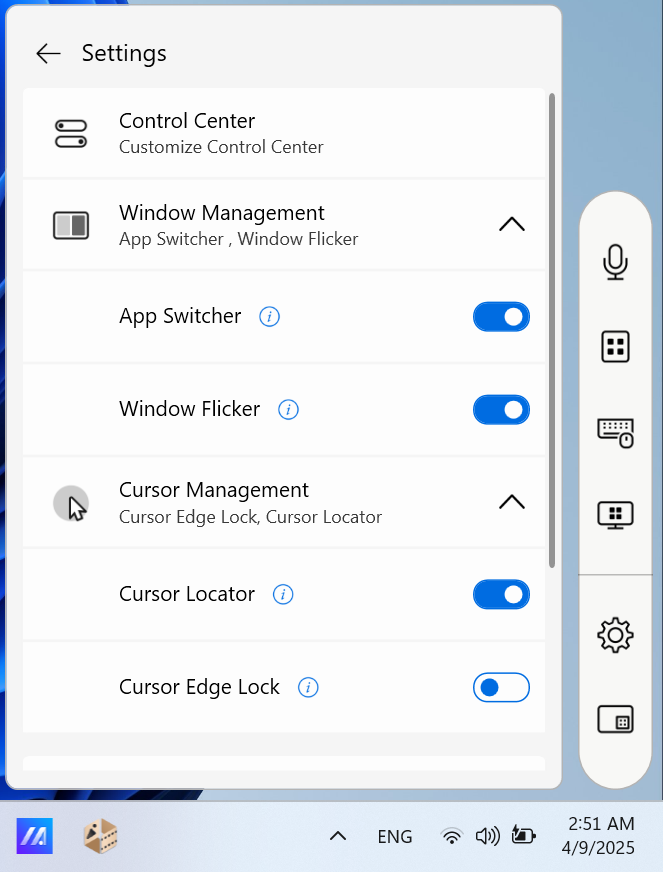
(3) Cursor Management
Cursor Locator: Give your mouse a quick shake to activate an animation a spotlighting your cursor.
Cursor Edge Lock: If you have two or more monitors, you can keep the mouse within a designate screen area.
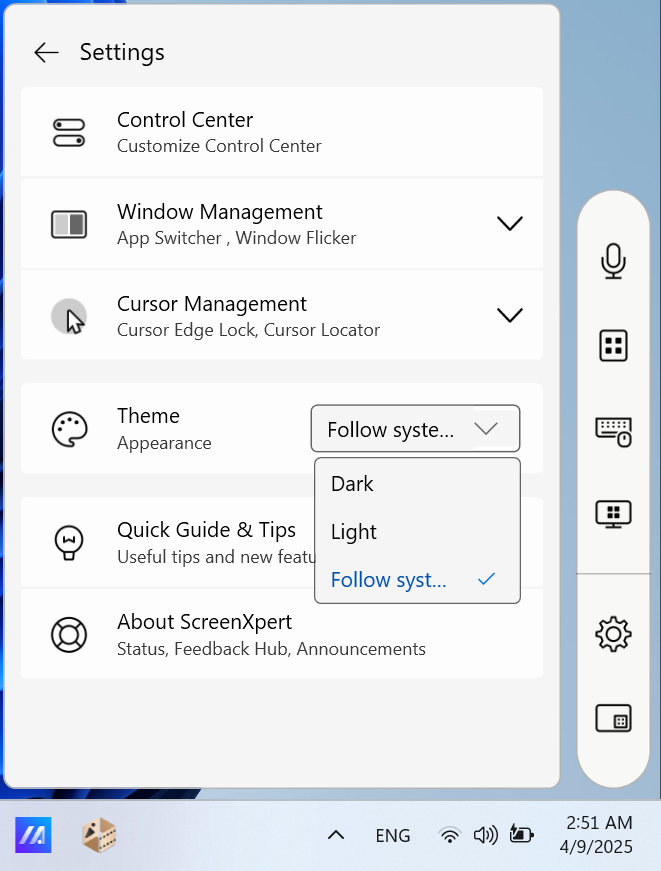
(4) ScreenXpert Theme: Dark, Light, Follow system settings.
7. ScreenXpert Download and Uninstall
(1) Please go to Microsoft App Store to download ScreenXpert.
(2)To uninstall ScreenXpert, please click on the link for more information.
