Community Manager
[NUC] NUC 套件的 RAID 設定步驟
軟體 RAID 技術允許將多個物理磁碟組合成一個邏輯單元或磁碟。您可以使用此技術以達到冗餘、性能或兩者兼而有之的目的。
所有具有多個驅動器的 NUC 產品都允許創建軟體 RAID。本指南展示了使用 SATA (AHCI) 方法和 PCIe (NVMe) 方法設定軟體 RAID 的過程,並提供在 Linux* 中設置 RAID 的資源。
如果您想在支援的 Intel NUC 上配置 Optane™ 技術,請參閱在 NUC 套件上安裝 Optane™ 記憶體。
需要什麼?
- USB 隨身碟
- 最新的 Rapid Storage Technology Driver 安裝軟體與 Optane™ 記憶體或 Rapid Storage Technology (RST) 使用者介面和驅動程式,可在下載中心找到
- Windows 7*, Windows 8.1*, 或 Windows® 10 64 位元* 安裝程式
- 驅動器(以下其中一種組合):
- 一個 2.5" SATA 驅動器和一個 M.2 SATA 驅動器
- 兩個 M.2 NVMe SSD (僅支援 NUC11PHKi7C[x], NUC9i[x]QNX, NUC9V[x]QNX, NUC8i7HNK, NUC8i7HVK, 和 NUC6i7KYK)
| 注意事項 |
|
注意 | 創建新的 RAID、SATA 或 PCIe 會格式化您的磁碟,並清除所有內容。 |
Aptio® V UEFI 固件核心(BIOS)適用於第 11 代 NUC
SATA (AHCI) RAID
- 在開機時按 F2 進入 BIOS 設置。
- 導航至,進階 > 存儲。
- 設置, 啟用 VMD 控制器(啟用 RAID 和 Optane 記憶體), 至 啟用。
- 更改, 將此根端口映射至 VMD, 至 啟用。
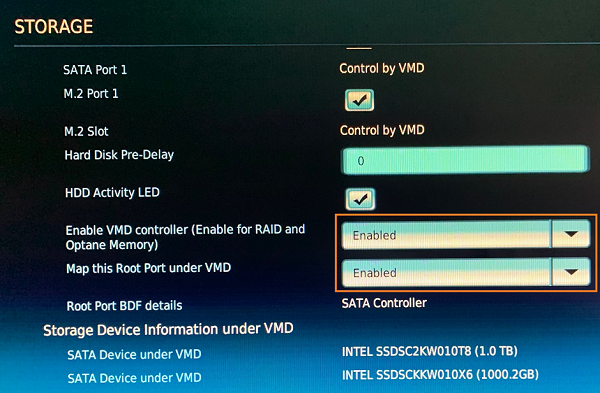
- 按 F10 保存更改,然後 選擇 OK and the system will reboot.
- Press F2 during boot to enter the BIOS setup.
- Navigate to Advanced > Add-in config > Intel(R) Rapid Storage Technology, then select Create RAID Volume.
| Note | If you do not see two discs in the Non-RAID Physical Disks section, turn off the NUC, open the chassis and check the connections for both discs. You must see two discs to continue. |
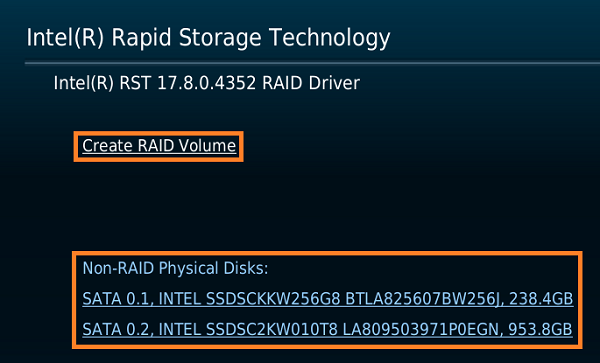
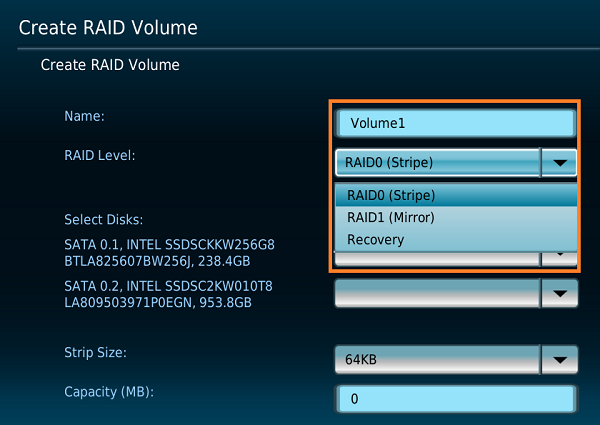
- Name the volume and set the RAID Level.
- For both Disks, click the pull-down menu and select X.
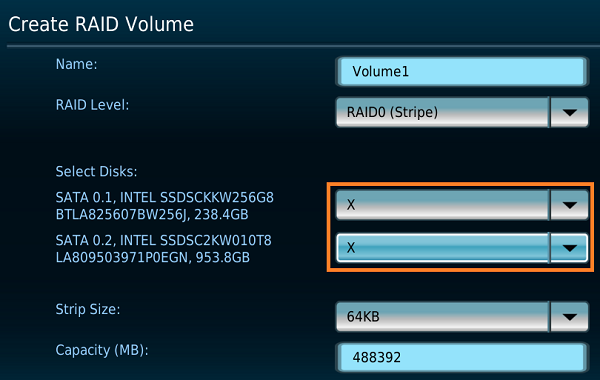
- Select the stripe size, and if desired, Capacity.
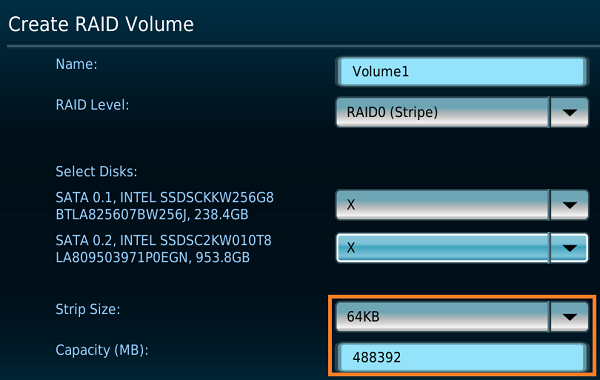
- Select, 建立卷。

- 您將看到已完成的 RAID 卷。
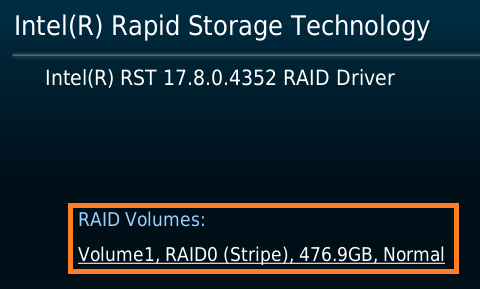
- 按下 F10 來保存並退出 BIOS 設定。
- Intel NUC 將重新啟動。關閉 Intel NUC。
- 連接 包含 Windows* 安裝文件的 USB 閃存驅動器或 USB 光碟機。
- 開啟電源並按下 F10 鍵在啟動期間。
- 按照 Windows 安裝說明進行操作。
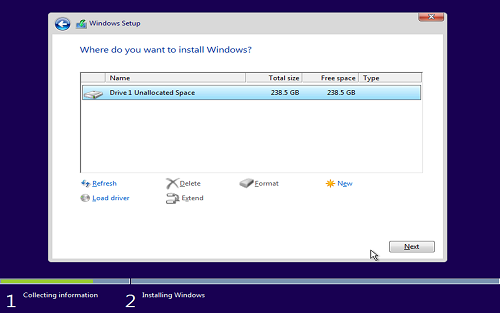
| 注意 | 當您到達如下圖所示的 您想要將 Windows 安裝在哪裡? 畫面時,Windows 可能 看不到您的磁碟。繼續按照以下說明進行操作。 |
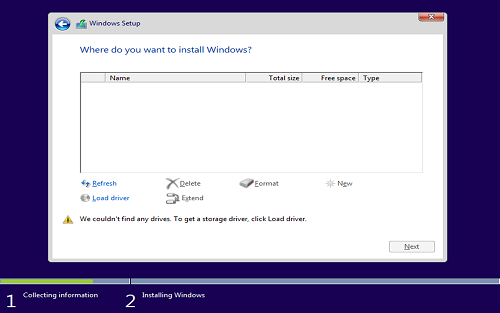
- 導航到 Rapid Storage Technology 驅動程式安裝軟體與 Optane™ Memory, 並下載,F6flpy-x64 (VMD).zip。
- 解壓縮 F6flpy-x64 (VMD).zip and 拖動解壓縮的文件夾到USB設備上。
- 插入帶有最新F6flpy-x64 (VMD)驅動程序的USB設備到Intel NUC中。
- 選擇 加載驅動程序 > 瀏覽 > (你的USB驅動器) > F6flpy-x64 (VMD) 文件夾

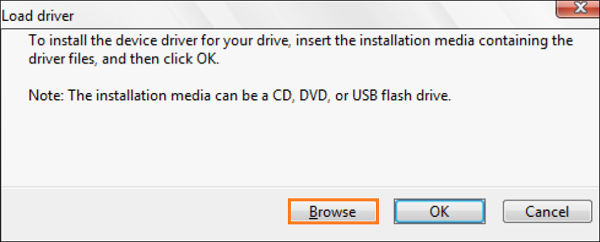
| 注意 | 如果Windows找到Rapid Storage Driver,你會看到以下屏幕。 |
- 選擇 下一步。加載驅動程序可能需要一兩分鐘。當顯示以下屏幕時,Windows已準備好安裝。選擇 下一步 以開始安裝。
PCIe (NVMe) RAID
| 注意 |
|
- 按下 F2 進入 BIOS 設定。
- 按一下 Advanced > Storage。
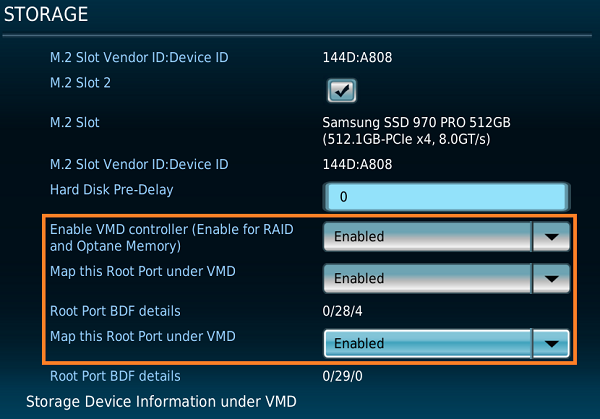
- 設定 SATA Controller(s) 為 Enabled。

- 向下捲動,然後設定 以下選項為 Enabled
- VMD controller (Enable for RAID and Optane Memory)
- 兩者, Map this Root Port under VMD
- 按下 F10 以儲存變更,然後選擇 OK 並重新啟動系統。
- 按下 F2 在啟動時進入 BIOS 設定。
- 選擇 Advanced > Add-in Config > Intel(R) Rapid Storage Technology。
- 選擇, Create RAID Volume。
- 命名 RAID 卷。
- 選擇 RAID 級別。
- 選擇 磁碟,通過選擇 X,在下拉選單中。
- 設定 Stripe Size 和 Capacity。
- 選擇, Create Volume. 注意 您將看到完成的 RAID 卷。
- 按下 F10 以保存並退出 BIOS 設置。
- 關閉 Intel NUC。
- 插入 您的 Windows 安裝程序到任何 Intel NUC 的 USB 埠並 按下 電源按鈕以啟動 Intel NUC。
- 遵循 Windows 安裝說明。
- 當到達 您想要將 Windows 安裝在哪裡? 畫面時,使用另一台電腦 導航 前往 https://downloadcenter.intel.com

- 選擇, 記憶體和存儲, 並 導航 至最新的 Intel Rapid Storage Technology Driver Installation Sowtware with Optane Memory 安裝程序。
- 下載; F6flpy-x64 (VMD).zip.
- 解壓縮 文件夾
- 複製 解壓縮的文件夾到 USB 閃存驅動器
- 插入 USB 閃存驅動器到 Intel NUC。
- 選擇 載入驅動程序 > 瀏覽 > USB 驅動器 > RSTxxxx 文件夾。
| 注意 | USB 閃存驅動器是 C: 驅動器: 例如, xxxxx (C:) |
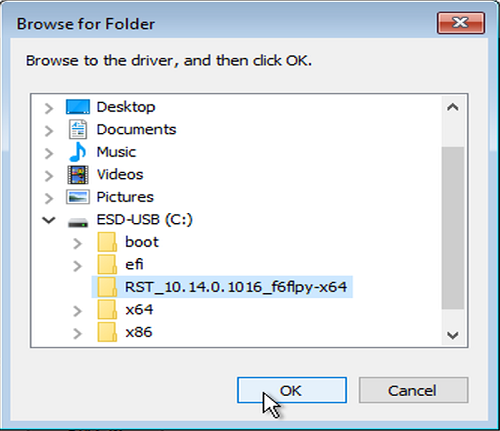
以下畫面顯示 Windows 是否發現 Rapid Storage Driver。

- 選擇 Next。載入驅動程式可能需要一到兩分鐘。當下列畫面顯示時,Windows 準備安裝。選擇 Next 開始安裝。

Aptio® V UEFI Firmware Core (BIOS) 適用於部分第 8、9 和第 10 代 Intel NUC
SATA (AHCI) RAID
- 在開機過程中按下 F2 進入 BIOS 設定。
- 點擊 Advanced > Storage.
- 將 SATA Mode Selection 設為 RAID。
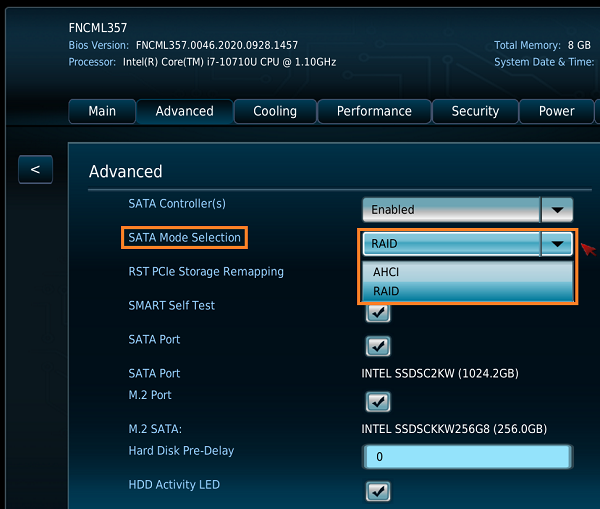
按下 F10 保存並退出 BIOS 設定。
- 系統將重新啟動。 在開機過程中按下 F2 進入 BIOS 設定。
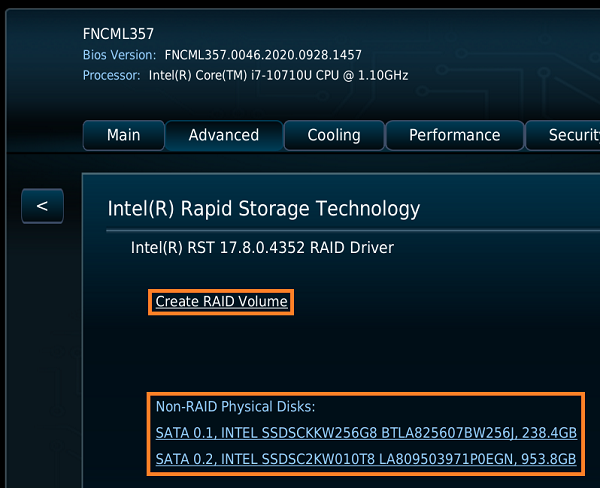
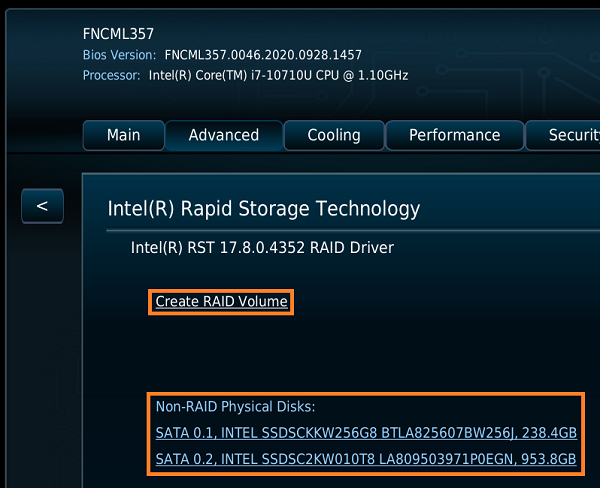
| 注意 | 在 非RAID物理磁碟:部分以創建RAID磁碟區。 |
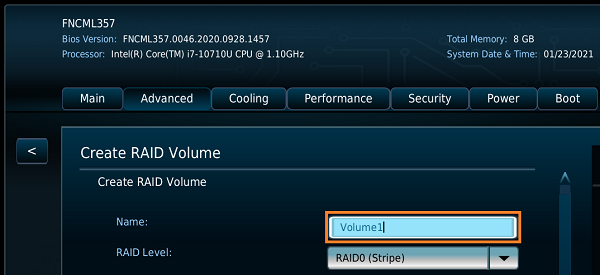
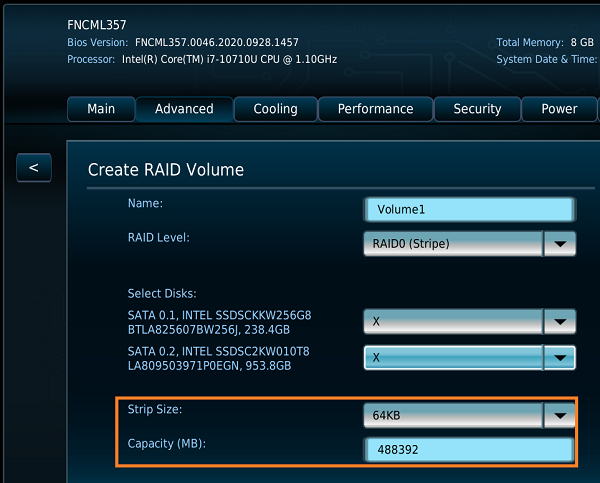
- 命名 磁碟區。
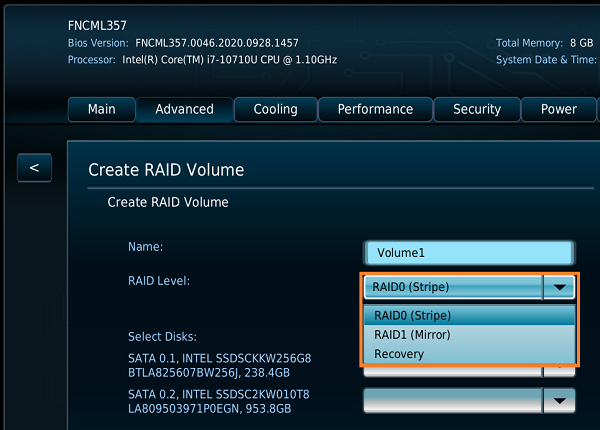
- 選擇 RAID層級。
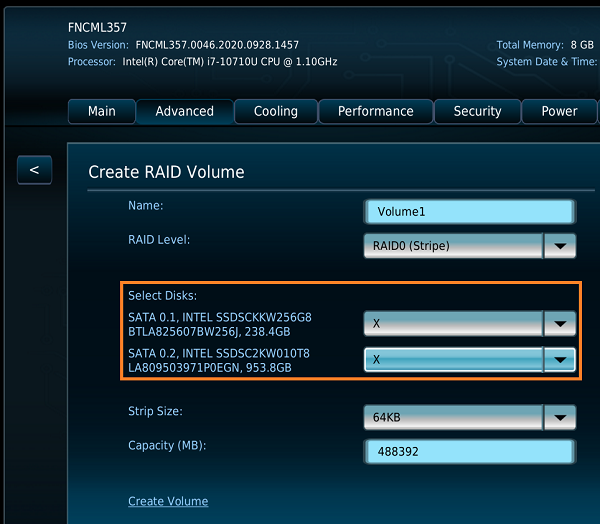
- 選擇 磁碟,通過在下拉菜單中選擇X。
- 設定 條帶大小和磁碟空間。
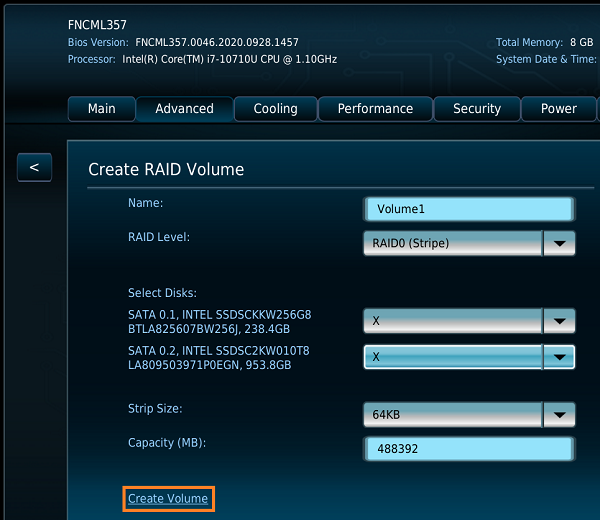
- 選擇 創建磁碟區
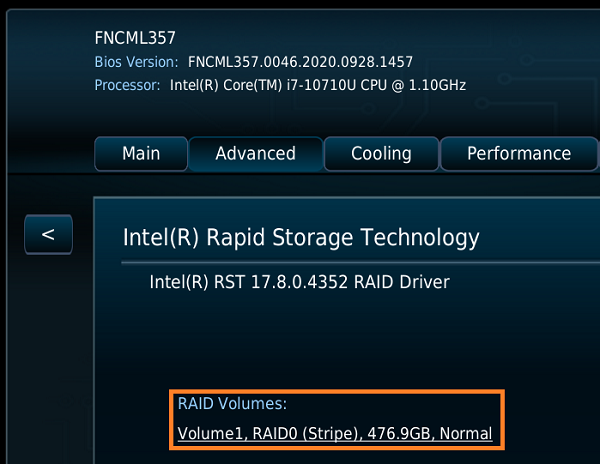
- 您將看到完成的RAID磁碟區。
- 按下 F10 以保存並退出BIOS設定。
PCIe (NVMe) RAID
| Note | PCIe (NVMe) RAID is only supported via UEFI boot. Windows 7* must be installed via UEFI. For instructions, see a Guide to Create a Windows 7* UEFI Installer. |
- 按F2 在開機時進入BIOS設置。
- 點擊Advanced > Storage。
- 設置SATA Mode Selection 為RAID 並選擇兩者 M.2 Slot 1 RST PCIe Storage Remapping 和M.2 Slot 2 RST PCIe Storage Remapping。

- 按F10 至Save and Exit BIOS 設置。
- 系統將重新啟動。按F2 在開機時進入BIOS設置。
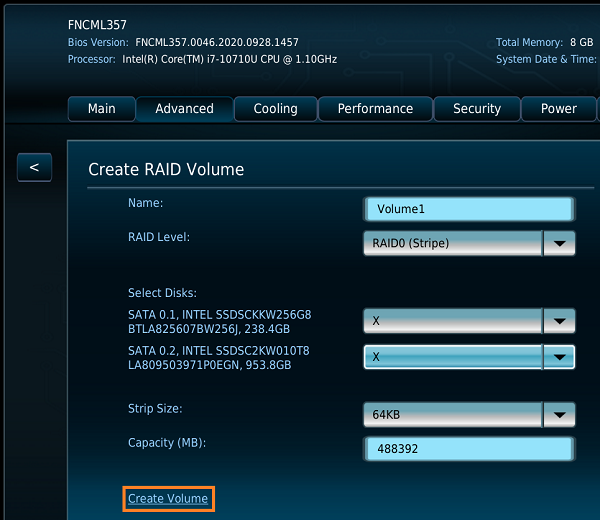
- 點擊Advanced > Add-in Config > Intel(R) Rapid Storage Technology > Create RAID Volume。
| Note | You must see two discs in the Non-RAID Physical Disks: section in order to create the RAID volume. |
- 命名 RAID 卷。
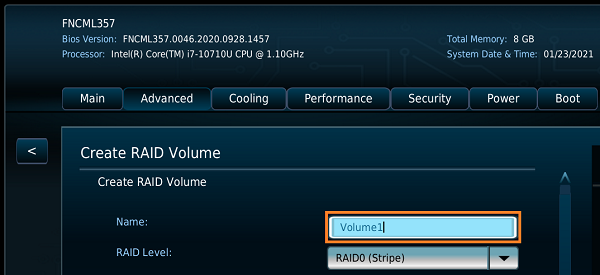
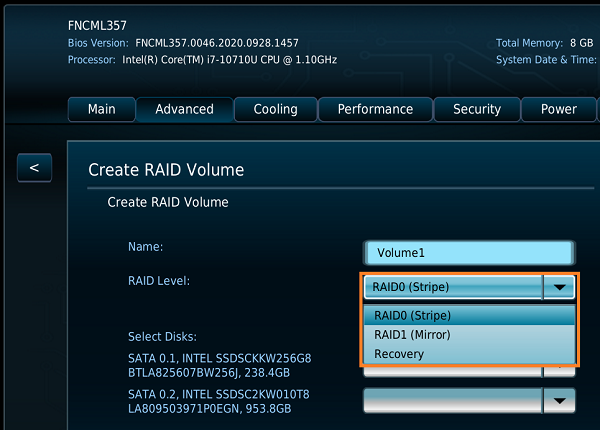
- 選擇 RAID 級別。
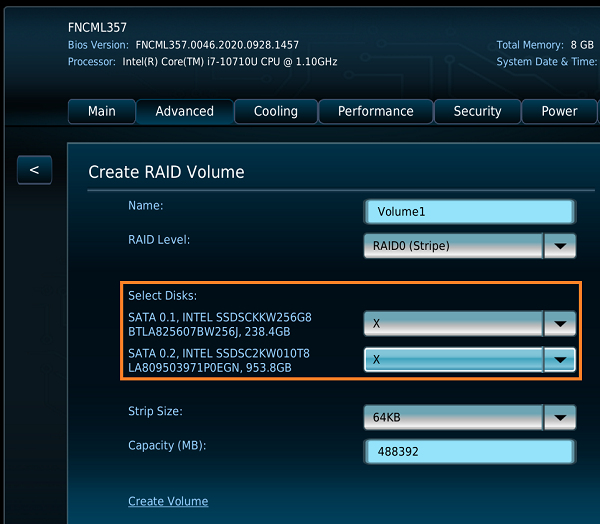
- 選擇 磁碟 通過在下拉選單中選擇X。
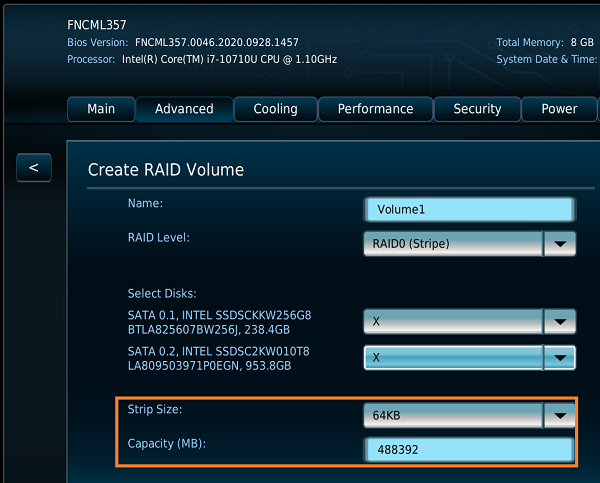
- 設置 條帶大小 和容量。
- 選擇 創建卷。
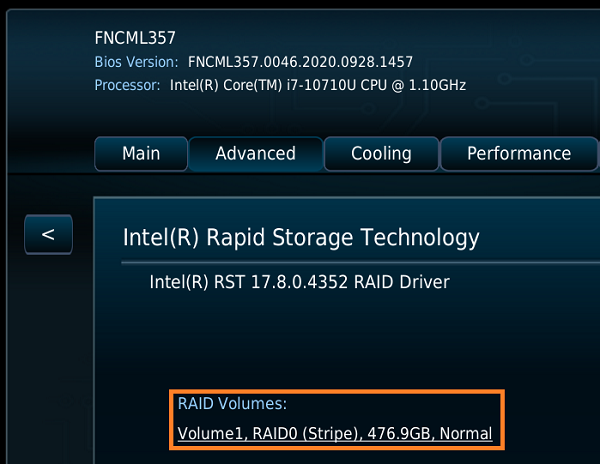
- 你將看到已完成的 RAID 卷。
- 按 F10 以保存並退出 BIOS 設置。
適用於 NUC8i7HVK & NUC8i7HNK、NUC8i7DN 及所有第 7 代及更早產品的 Visual BIOS
SATA (AHCI) RAID
- 按 F2 在開機過程中進入BIOS設置。
- 點擊 進階 > 裝置 > SATA。
- 將 晶片組 SATA 模式 設置為 RAID。
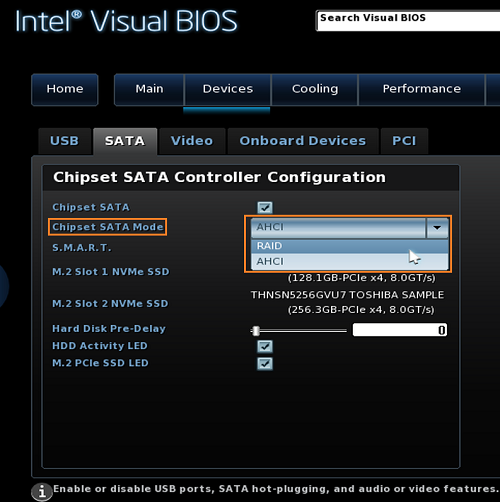
- 按 F10 以 保存 並 退出 BIOS設置。
- 系統將重新啟動。按 CTRL+I 在開機過程中(如有必要,重複按)直到RAID選項ROM實用工具打開。
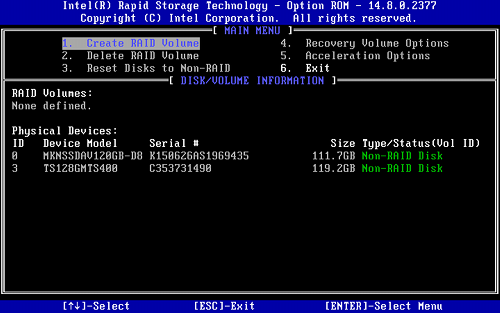
- 選擇 創建RAID卷。
- 命名 RAID卷。
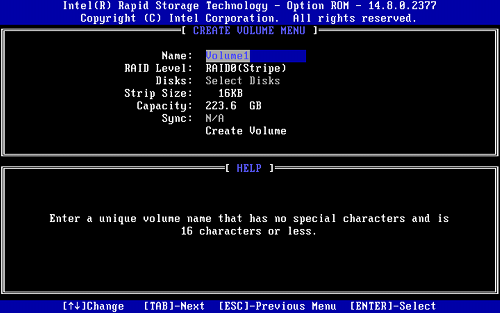
- 設置 條帶大小。
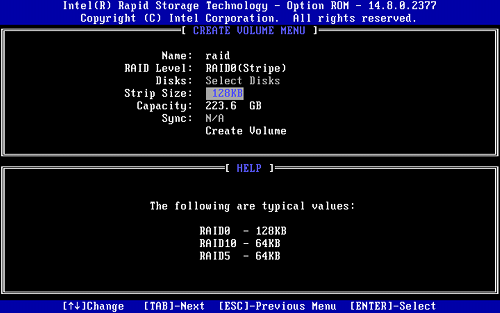
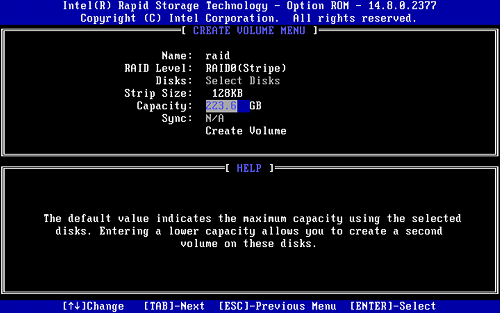
- 設置 容量。
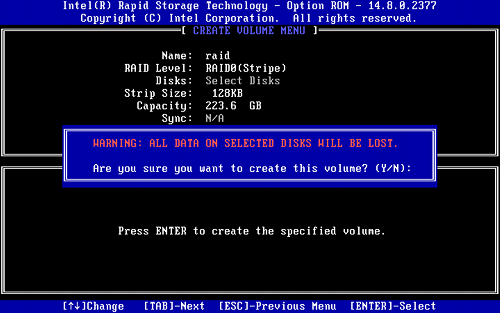
- Select Create Volume and press Y to confirm.
- Exit the RAID Option ROM utility and press Y to confirm.
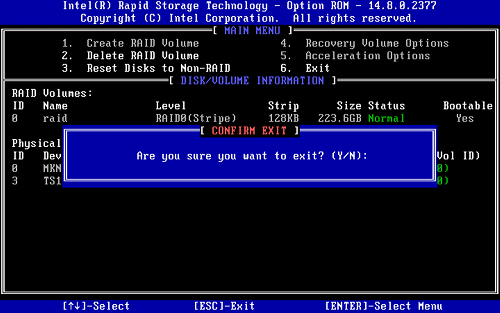
- Install Windows*.
PCIe (NVMe) RAID
| Note | PCIe (NVMe) RAID is only supported via UEFI boot. Windows 7* must be installed via UEFI. For instructions, see a Guide to Create a Windows 7* UEFI Installer. |
- Press F2 during boot to enter BIOS setup.
- Click Advanced > Devices > SATA.
- Set Chipset SATA Mode to RAID.
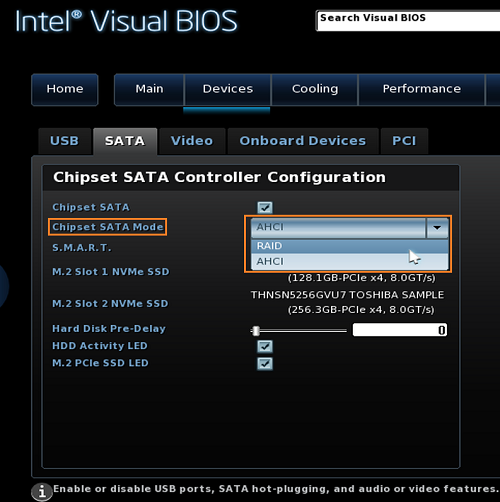
- 啟用 M.2 插槽 1 RST PCIe 儲存重新映射和 M.2 插槽 2 RST PCIe 儲存重新映射。
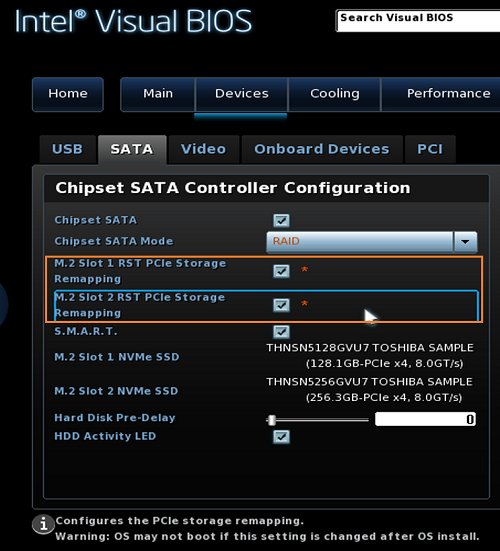
- 按下 F10 以儲存 並 退出 BIOS 設定。
- 再次進入 BIOS 設定,開機時按下 F2。
- 點擊 進階 > 裝置 > 擴充 配置.
- 點擊 配置 在 Intel® 快速 儲存 技術 旁邊
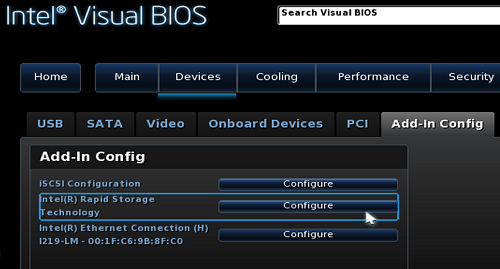
- 選擇 創建 RAID 卷。
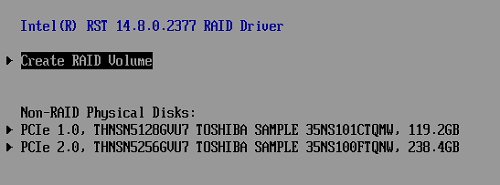
- 命名 RAID。
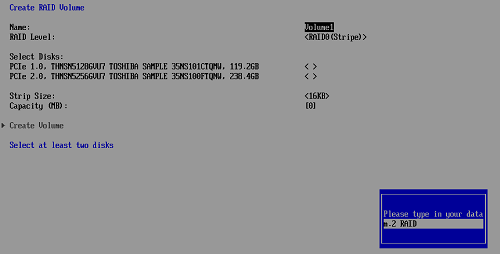
- 選擇 使用哪個RAID版本。
| 注意 | 僅支援RAID0和RAID1。 |
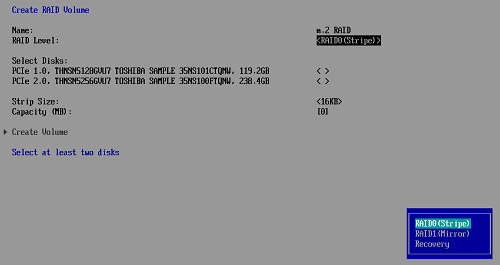
- 選擇 要成為RAID一部分的磁碟,按Enter 在磁碟上,然後選擇 X。重複 對第二個磁碟進行操作。
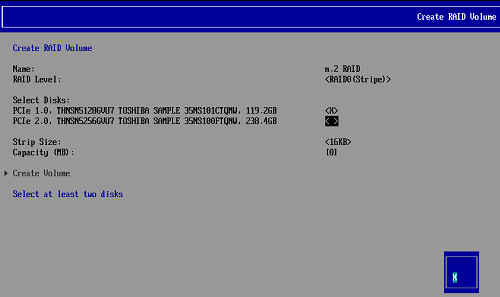
- 選擇 Strip Size和容量。
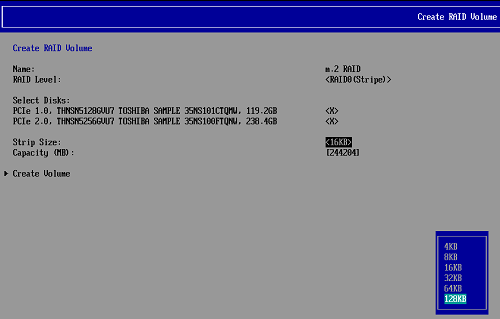
- 選擇 Create Volume。
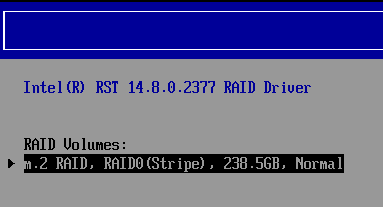
- 按 ESC 退出並按Y 確認。
- 按 F10 保存並退出BIOS設定。
- Intel NUC將重新啟動。關閉Intel NUC。
- 連接 the USB flash drive or USB optical drive that has the Windows* installation files.
- 開啟Intel NUC。
- 在開機提示時,按下F10以開啟開機選單並選擇UEFI USB。
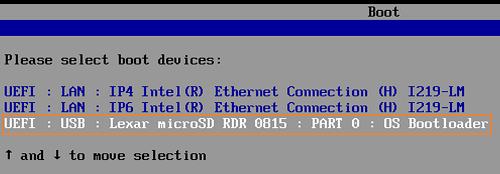
- 按照Windows 安裝指示進行操作。
- 當您進入以下的Where do you want to install Windows?畫面時:

插入帶有 Rapid Storage Technology driver 的 USB 隨身碟:RST_f6floppy_Win7_8.1_10_64_14.8.0.1042.zip。
| 注意 | 請確保驅動程序已解壓縮。 |
- 選擇Load Driver > Browse > USB drive > RSTxxxx Folder。
| 注意 | USB 隨身碟是 C: 磁碟:例如,xxxxx (C:) |

- 下圖顯示 Windows 是否找到 Rapid Storage Driver。

- 選擇 Next。 可能需要一到兩分鐘來加載驅動程式。
- 當下圖顯示時,Windows 準備安裝。選擇 Next 開始安裝。

RAID on Linux
所有具有多個硬碟的 Intel NUC 均支援 Linux 上的軟體 RAID。
要在 Linux 中建立和管理軟體 RAID,請參閱以下連結:
Rapid Storage Technology (RST) in Linux*。
| Note | 要在 NUC8i5INH 或 NUC8i7INH 上啟用 RAID:
Then continue to step 4 of both scenarios above. |
| 注意 | 在 NUC9V[x]QNX 或 NUC9i[x]QNX 上,RAID0 和 RAID1 卷只能在 NUC Element 上的存儲可用時構建。 如果您將額外的存儲驅動器連接到底板,則無法將它們添加到與 NUC Element 上的內置驅動器相同的 RAID0 或 RAID1 卷中。 更多信息請參見 技術產品規範。 |
