This widget could not be displayed.
This widget could not be displayed.
Turn on suggestions
Auto-suggest helps you quickly narrow down your search results by suggesting possible matches as you type.
Showing results for
- English
- Announcement
- FAQ
- [Phone] ROG GamePad Introduction
Options
- Subscribe to RSS Feed
- Mark as New
- Mark as Read
- Bookmark
- Subscribe
- Printer Friendly Page
- Report Inappropriate Content
Community Manager
Options
- Article History
- Subscribe to RSS Feed
- Mark as New
- Mark as Read
- Bookmark
- Subscribe
- Printer Friendly Page
- Report Inappropriate Content
on 10-26-2023 06:12 PM
[Phone] ROG GamePad Introduction
[Phone] How do I assemble the ROG Kunai Gamepad (ROG Kunai holder + ROG Kunai controllers) ?
[Phone] How do I set up the connection for the ROG Kunai Gamepad ?
[Phone] How to turn on the ROG Kunai Gamepad's cursor mode ?
[Phone] Why can't I use ROG Kunai Gamepad when my game says that it supports Gamepad mode?
Assembly steps:
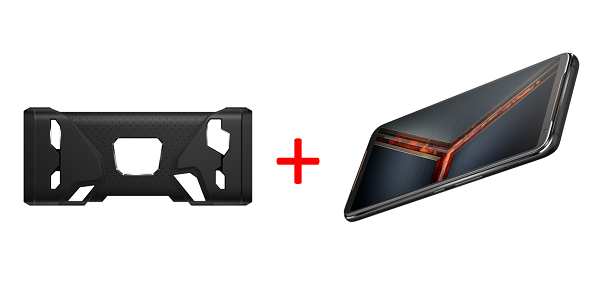
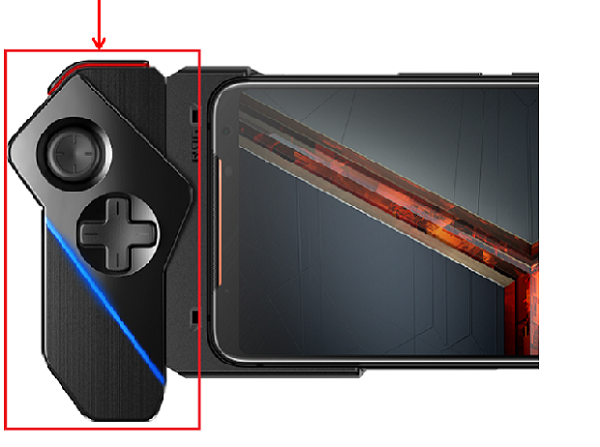
1.Attach the ROG Kunai bumper onto the ROG Phone. Insert the protruding USB Type-C connector of the bumper into the USB Type-C port at the bottom of the phone.
Note: When detaching, remove the bumper from the top of the phone first and then the bottom.

2. Detach the left and right ROG Kunai controllers from the ROG Kunai holder. Remove the controllers by pushing up (when holding vertically) or pushing forward (when holding horizontally).
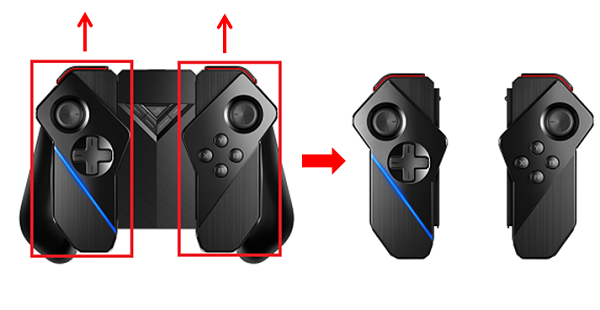
3. Attach the ROG Kunai controllers onto both ends of the phone that has the bumper attached. Hold the phone horizontally (with the power button at the top), slide both controllers down until they are locked in.
Note:
1. ROG Kunai Gamepad can be assembled into three operating modules:
— ROG Kunai bumper + ROG Kunai controllers (as shown in the example above)
— ROG Kunai bumper + ROG Kunai left controller
— ROG Kunai holder + ROG Kunai controllers
2. ROG Kunai right controller cannot be used alone
3. ROG Kunai controllers (both left and right) don't have battery
Assembly steps:
1.Attach the ROG Kunai bumper onto the ROG Phone. Insert the protruding USB Type-C connector of the bumper into the USB Type-C port at the bottom of the phone.
Note: When detaching, remove the bumper from the top of the phone first and then the bottom.
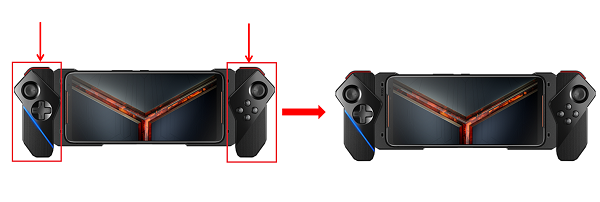
2. Detach the left controller from ROG Kunai holder. Remove it by pushing up (when holding vertically) or pushing forward (when holding horizontally).
3. Attach the ROG Kunai left controller onto the left side of the phone that has the bumper attached. Hold the phone horizontally (with the power button at the top), slide the controller down until it is locked in.
Note:
1. ROG Kunai Gamepad can be assembled into three operating modules:
— ROG Kunai bumper + ROG Kunai controllers
— ROG Kunai bumper + ROG Kunai left controller (as shown in the example above). For some games, 4 virtual buttons will appear on the right side of screen.
— ROG Kunai holder + ROG Kunai controllers
2. ROG Kunai right controller cannot be used alone
3. ROG Kunai controllers (both left and right) don't have battery
[Phone] How do I assemble the ROG Kunai Gamepad (ROG Kunai holder + ROG Kunai controllers) ?
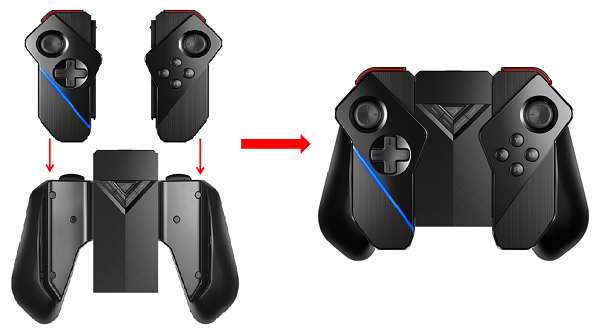
Assembly steps:
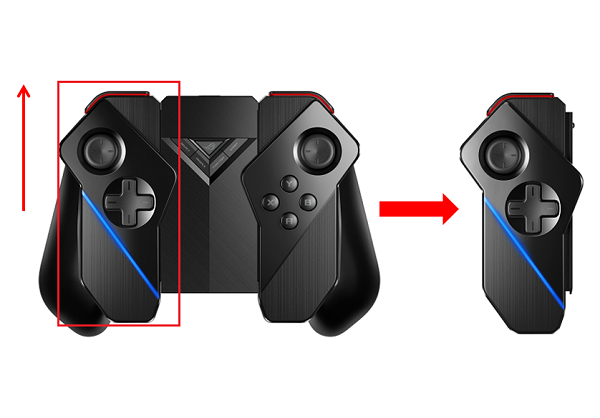
Push the ROG Kunai controllers down along both sides of the ROG Kunai holder until locked in.
Note:
1. ROG Kunai Gamepad can be assembled into three operating modules:
— ROG Kunai bumper + ROG Kunai controllers
— ROG Kunai bumper + ROG Kunai left controller
— ROG Kunai holder + ROG Kunai controllers (as shown in the example above)
2. ROG Kunai right controller cannot be used alone
3. ROG Kunai controllers (both left and right) don't have battery
[Phone] How do I set up the connection for the ROG Kunai Gamepad ?
Connection settings:
The ROG Kunai Gamepad can be connected via Bluetooth, USB Type-C cable, and USB Wi-Fi adapter. You can switch among these 3 modes of connection at the bottom of the ROG Kunai holder. A USB Wi-Fi adapter is included, which is used for the 2.4GHz radio frequency (RF) connection.

1. Bluetooth mode
1.1 Move the switch to the Bluetooth symbol (the option on the left on the selector at the bottom of ROG Kunai holder).
1.2 Press and hold the ROG logo button on the ROG Kunai holder for 5 seconds, you will see a blue light flashing next to the USB Type-C on the holder.
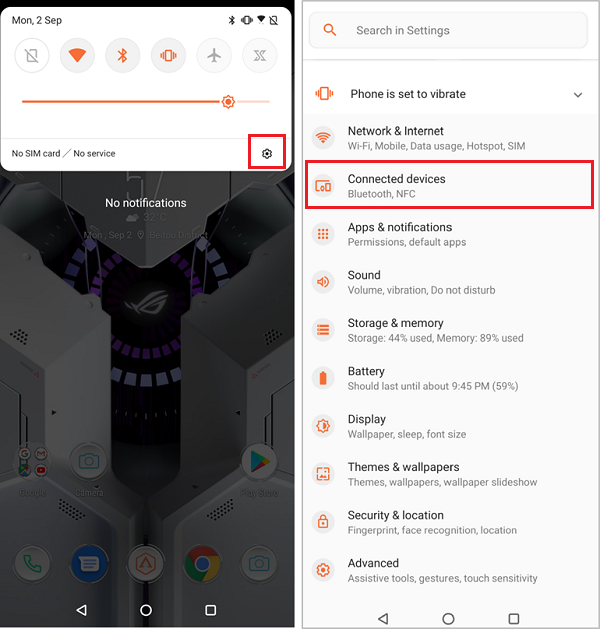
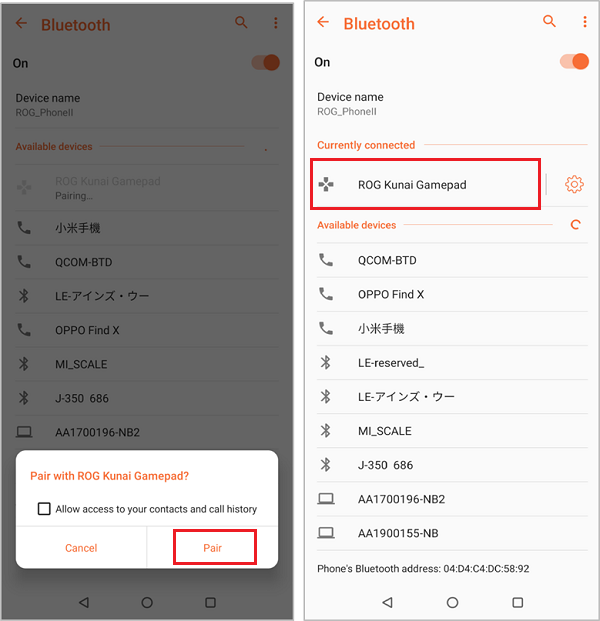
1.3 Swipe down on your phone's screen to call out Quick Settings > Tap Settings button > Connected devices > Bluetooth (on) > Select ROG Kunai Gamepad under the Available devices list.
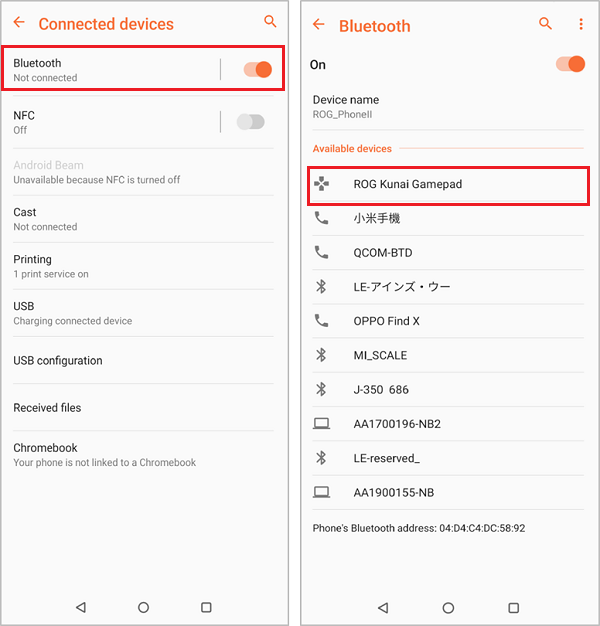
1.4 Tap "Pair" on the pop-up message. ROG Kunai Gamepad will then appear under the Currently connected list and the indicator light on the holder will turn solid green.
2. USB Type-C cable mode
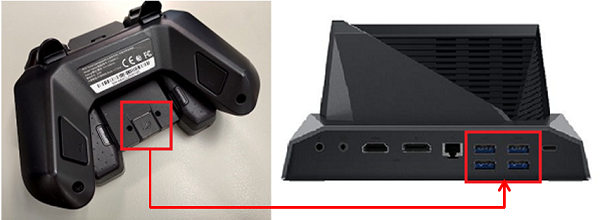
2.1 Move the switch to the USB port symbol (the option in the middle on the selector at the bottom of ROG Kunai holder).
2.2 Ready a male-to-male Type-C cable. Connect one end of the cable to the ROG Phone and the other end to the ROG Kunai holder.
2.3 Once the connection is done the ROG Kunai Gamepad is ready for use.

3. USB Wi-Fi adapter mode
3.1 Move the switch to the Wi-Fi symbol (the option on the right on the selector at the bottom of the ROG Kunai holder).
3.2 Remove the USB Wi-Fi adapter from the bottom of the ROG Kunai holder. Insert it into the Mobile Desktop Dock or WiGig Display Dock. (Suitable for projecting the phone screen onto large screens such as TV or computer screens)
3.3 Press the ROG logo button to start using the ROG Kunai Gamepad.
Note:
1. ROG Kunai Gamepad can be assembled into three operating modules:
— ROG Kunai bumper + ROG Kunai controllers (as shown in the example above)
— ROG Kunai bumper + ROG Kunai left controller
— ROG Kunai holder + ROG Kunai controllers
2. ROG Kunai right controller cannot be used alone
3. ROG Kunai controllers (both left and right) don't have battery
[Phone] How to turn on the ROG Kunai Gamepad's cursor mode ?
When Cursor Mode is turned on, a cursor will appear on the screen. This allows you to use the cursor to access the controls or the virtual buttons on the screen when the touch screen is not active (e.g. when Key Mapping is turned on).
Please follow the steps below:
1. You must first connect your phone to the ROG Kunai Gamepad and launch a game, then you can turn on this function.
Refer:[Phone] How do I assemble the ROG Kunai Gamepad (ROG Kunai holder + ROG Kunai controllers)?
[Phone] How do I set up the connection for the ROG Kunai Gamepad?
2. When the connection is successful, click the FUNCTION button on the holder.
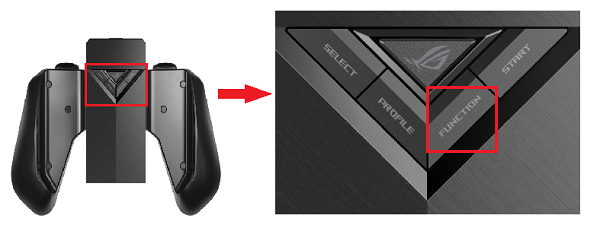
3. Cursor will appear on the screen.

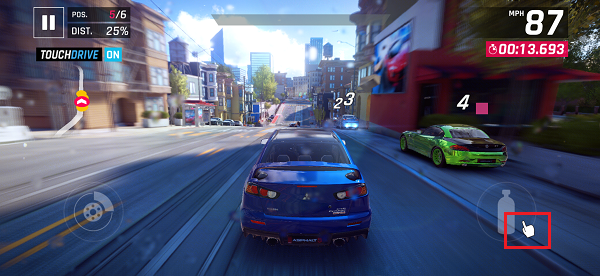
4. Use the right joystick to control the cursor. Use the L1 button on the left controller to touch virtual buttons on the screen. You can move the cursor around the screen with the right joystick; then press L1 button on the left controller to touch the virtual button (e.g. as shown below).
[Phone] Why can't I use ROG Kunai Gamepad when my game says that it supports Gamepad mode?
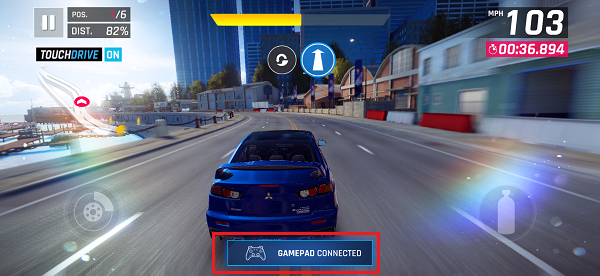
Games that support the gamepad mode do not need to use Key Mapping to play. Please turn off Key Mapping (as shown below).

When the gamepad is connected, a toast will appear to notify you
.
Note : If the ROG Kunai controllers are mounted on the ROG Kunai holder, you can use the PROFILES button on the ROG Kunai holder to open the editing page, then press the FUNCTION button to call the mouse cursor, move the cursor to the on/off toggle on the editing bar, and press the L1 button on the ROG Kunai holder to turn off Key Mapping in order to use the preset settings.
