This widget could not be displayed.
This widget could not be displayed.
Turn on suggestions
Auto-suggest helps you quickly narrow down your search results by suggesting possible matches as you type.
Showing results for
- English
- Announcement
- FAQ
- [Notebook/Desktop/AIO] GlideX - Introduction
Options
- Subscribe to RSS Feed
- Mark as New
- Mark as Read
- Bookmark
- Subscribe
- Printer Friendly Page
- Report Inappropriate Content
Community Manager
Options
- Article History
- Subscribe to RSS Feed
- Mark as New
- Mark as Read
- Bookmark
- Subscribe
- Printer Friendly Page
- Report Inappropriate Content
on
10-10-2022
11:58 PM
- edited
Sunday
by
![]() ZenBot
ZenBot
[Notebook/Desktop/AIO] GlideX - Introduction
GlideX - is a cross-device screen sharing solution. Wired or wireless connections can be used to create a larger and better space for work or play. GlideX optimizes your workflow in the blink of an eye!
※ GlideX supports linkage with ASUS Control Panel, please refer to ASUS Control Panel - Introduction | Official Support | ASUS Global
Before you start reading this article, we recommend that you watch our introductory video.
1. Requirements for computer and mobile devices
2. Open GlideX for the first time
3. Permission management
3.1 Android devices
3.2 iOS devices
6. Cross-device operation
6.1 Mirror
6.2 Extend
6.3 Unify Control
7. File Transfer & URL Sharing
7.1 File Transfer - Computer to Mobile
7.2 File Transfer - Mobile to Computer
7.3 URL Sharing - Computer to Mobile
7.4 URL Sharing - Mobile to Computer
8.1 Pairing PC and Mobile
8.2 Hands-free calling
8.3 Call History
8.4 Contacts
8.5 Notification
9. Remote Access
9.1 Pairing on PC and Mobile
9.2 Remote File Access
9.3 Remote Desktop
1. Requirements for computer and mobile devices:
computer device:
·Supports computers with Windows operating system, LAN, Wi-Fi and USB
·Windows operating system: Windows 10/11 64-bit (version 1909 and later) (please note that GlideX does not support Windows S mode)
·Graphics driver supports H.264 codec
Mobile device:
·iOS devices require 14.0 and above,
·Android devices require 9.0 and above
Network requirements: Mobile internet, Wi-Fi, Personal Hotspot and Bluetooth
Supported mobile devices: iPhone, iPad, Android Phone, Android Pad
2. Open the GlideX App for the first time
Tap ①[Agree] End User License Agreement and GlideX Terms and Conditions, and then tap ②[OK]. Tap ③[I am above the age of 14 years], and tap ④[OK]. Download the GlideX App if your device does not have GlideX installed, if you already have GlideX installed, tap ⑤[Got it]. Tap ⑥[OK] agree to Request Nearby devices permission. Tap ⑦[Allow all the time] to allow discover and connect to nearby devices. Tap ⑧[Allow all the time] to allow notifications to be sent. GlideX goes to the main page.
(1) Search for ①[GlideX] in the search bar, and then click ②[GlideX], GlideX will open.
(2) On the End User Software License Agreement and GlideX Terms and Conditions, click ③[I acknowledge and agree to the above], and then click ④[Confirm].
(3) On the Privacy page, click ⑤[I am above the age of 14 years & I agree] and click ⑥[Confirm].
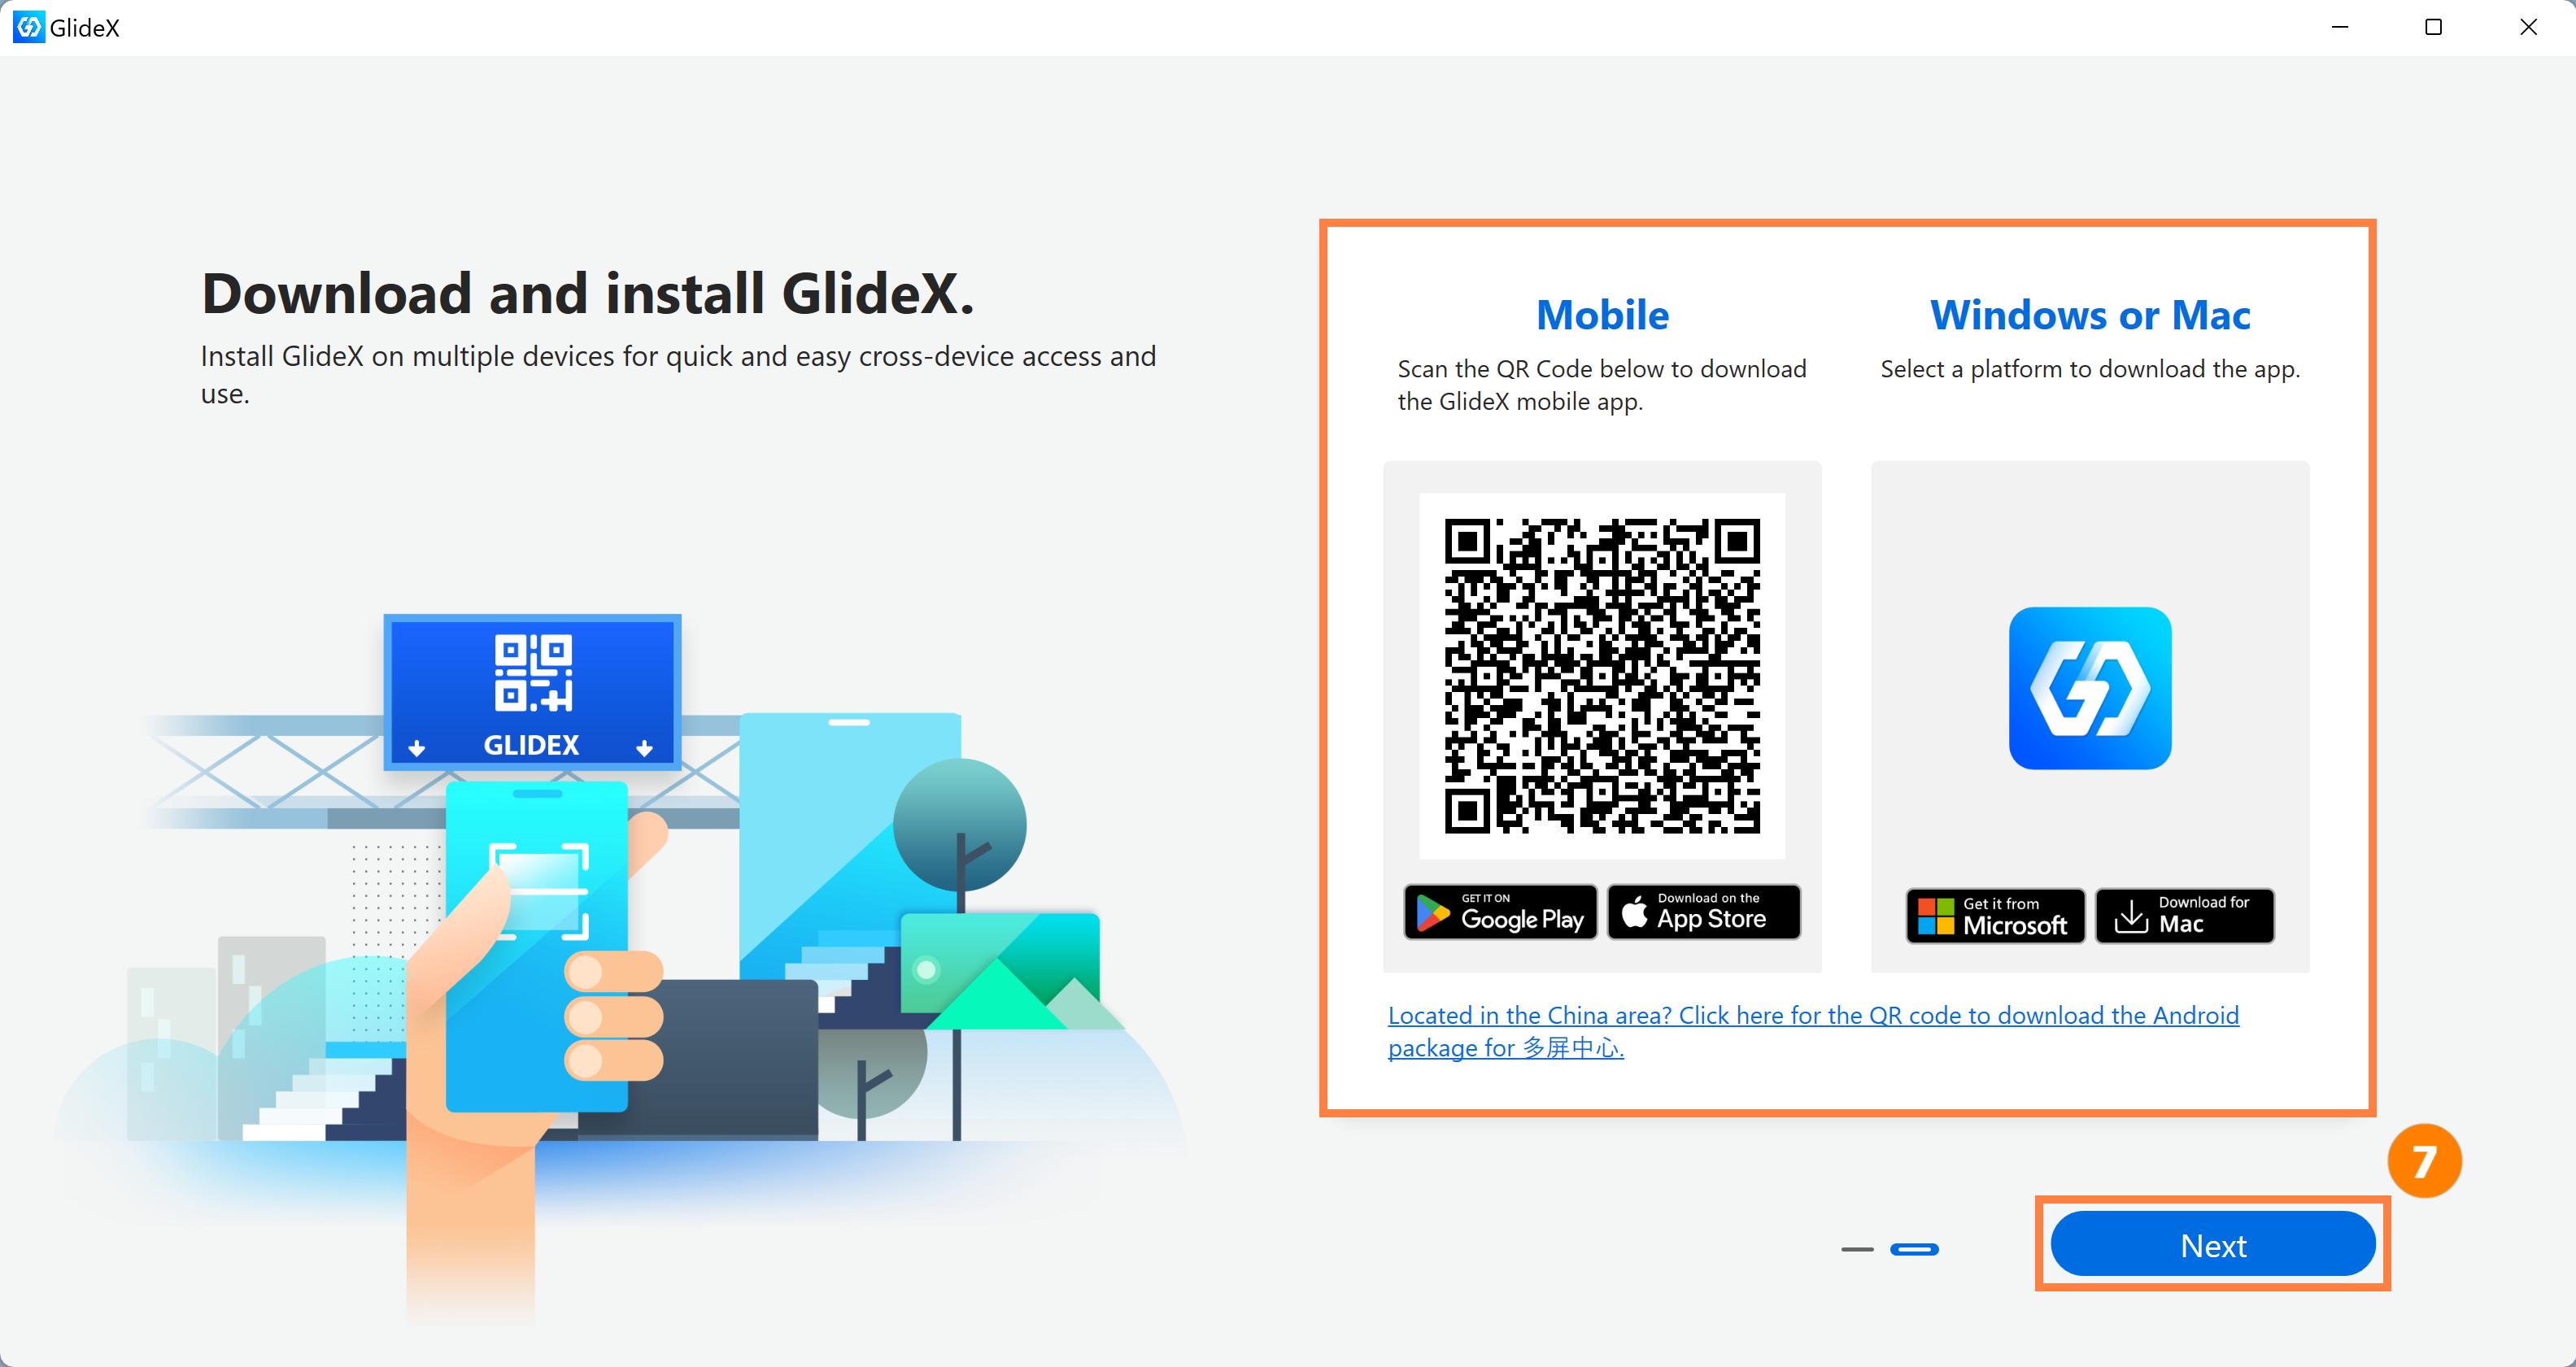
(4) In the Download GlideX app page, download the GlideX app if your device does not have GlideX installed. Click ⑦[Next].
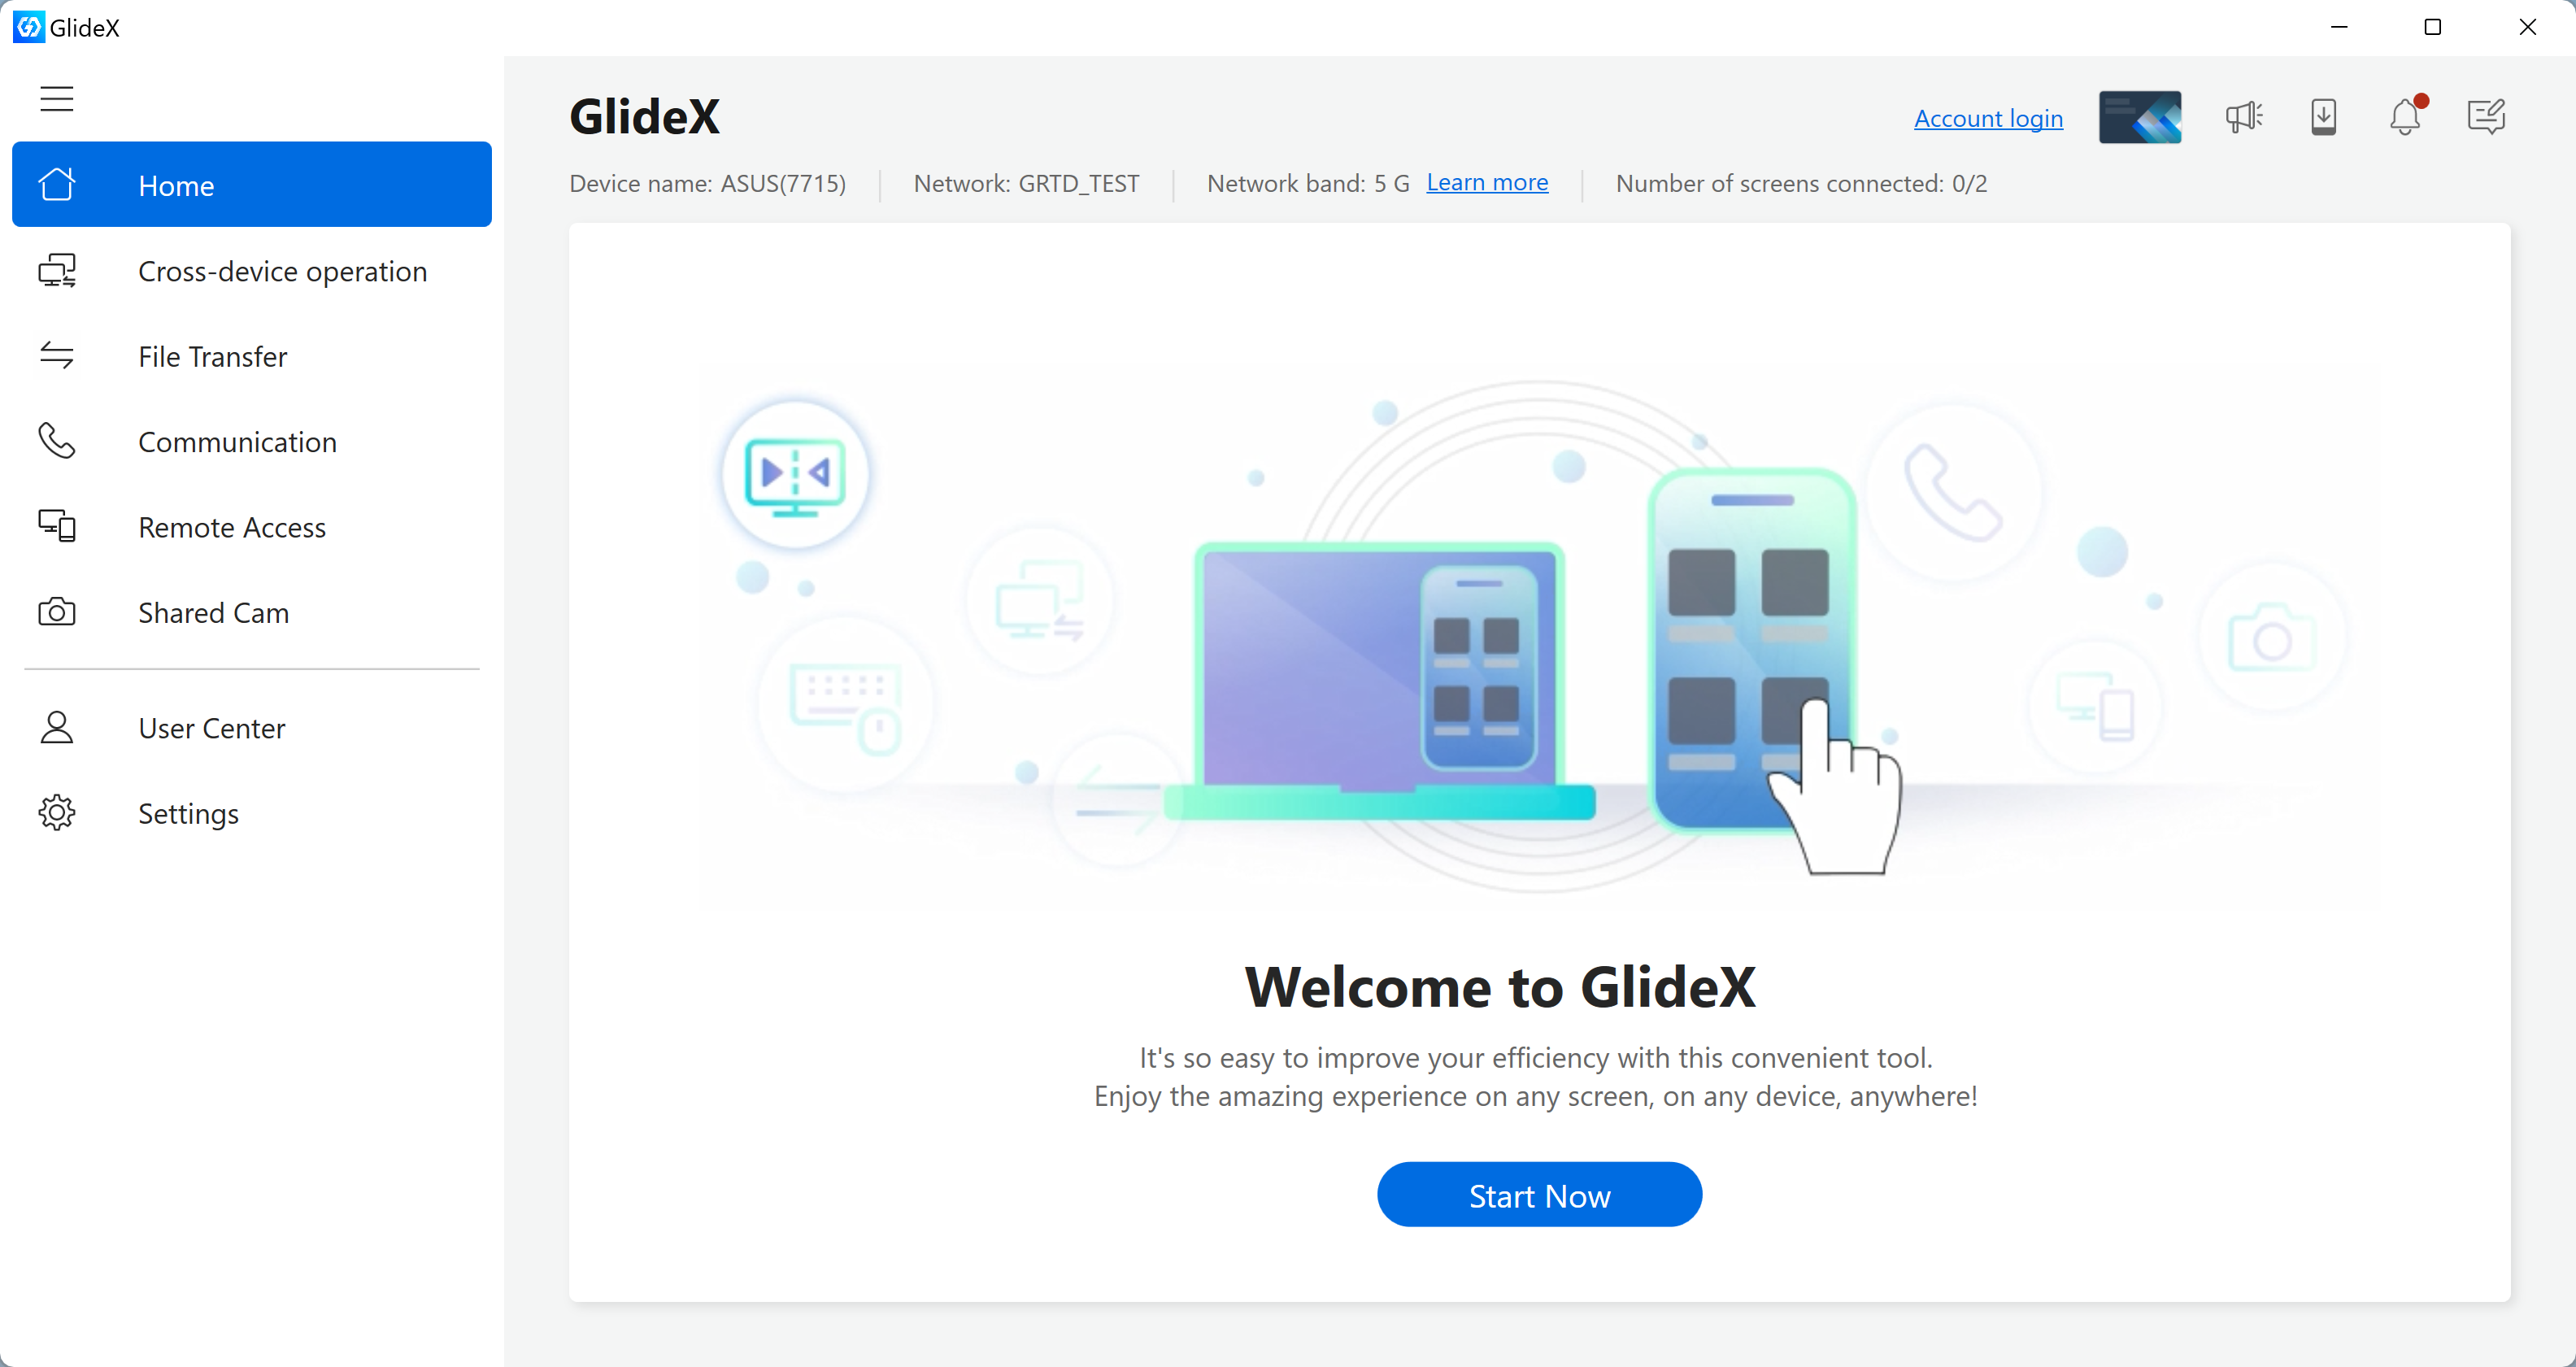
(5) GlideX will enter the main page.
GlideX on the mobile device is used normally, and the permissions that should be enabled on the mobile device.
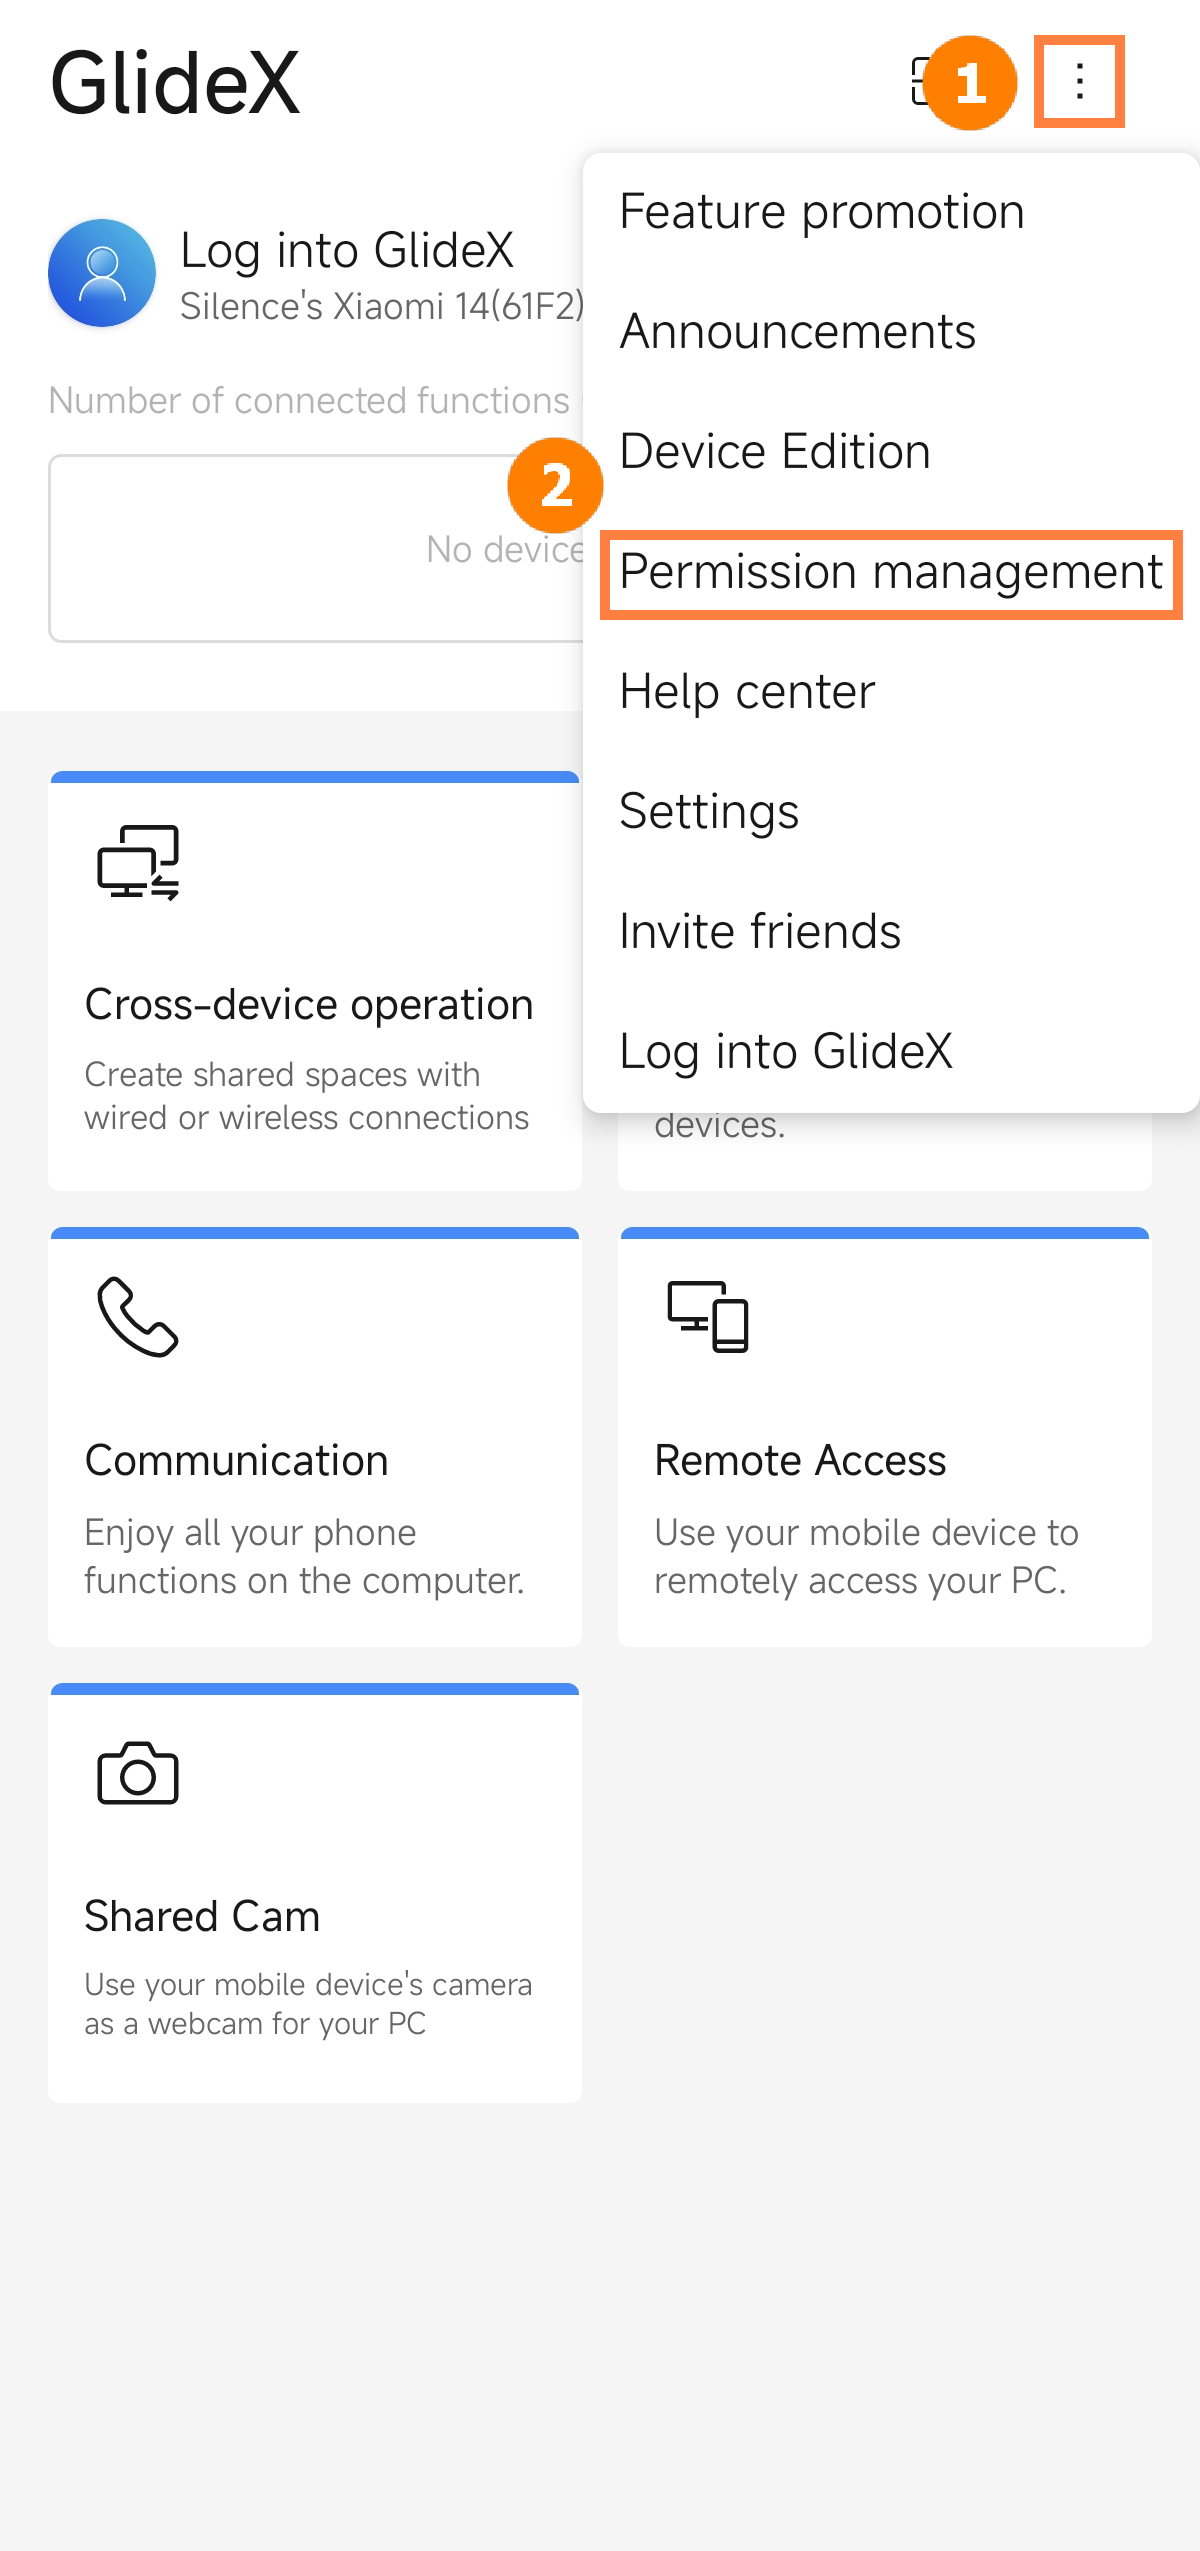
Tap ①[More] in the upper right corner, click ②[Permission Management] to open the Permission Management page.
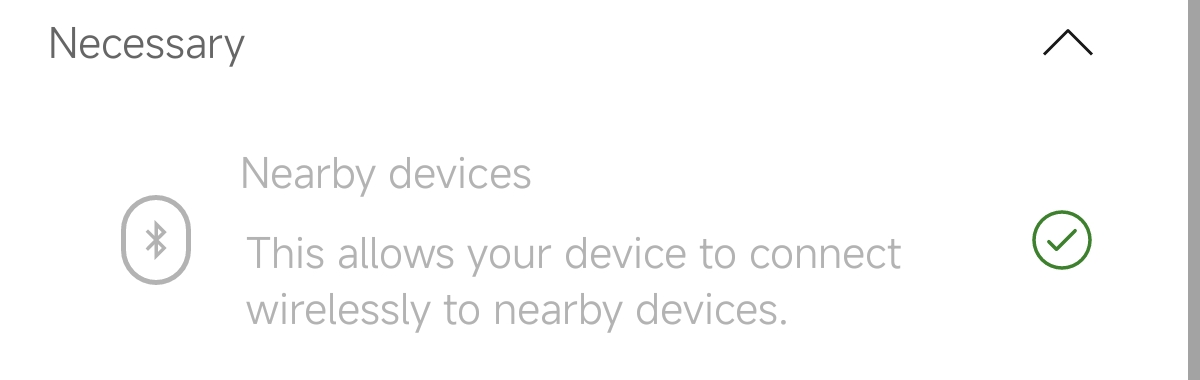
(1) Necessary Permission - Nearby Devices
Nearby Device permission is necessary permission, which you have enabled when you first launched the GlideX App.
※ Turn on the Nearby Device permission, this allows your device to connect wirelessly to nearby devices.
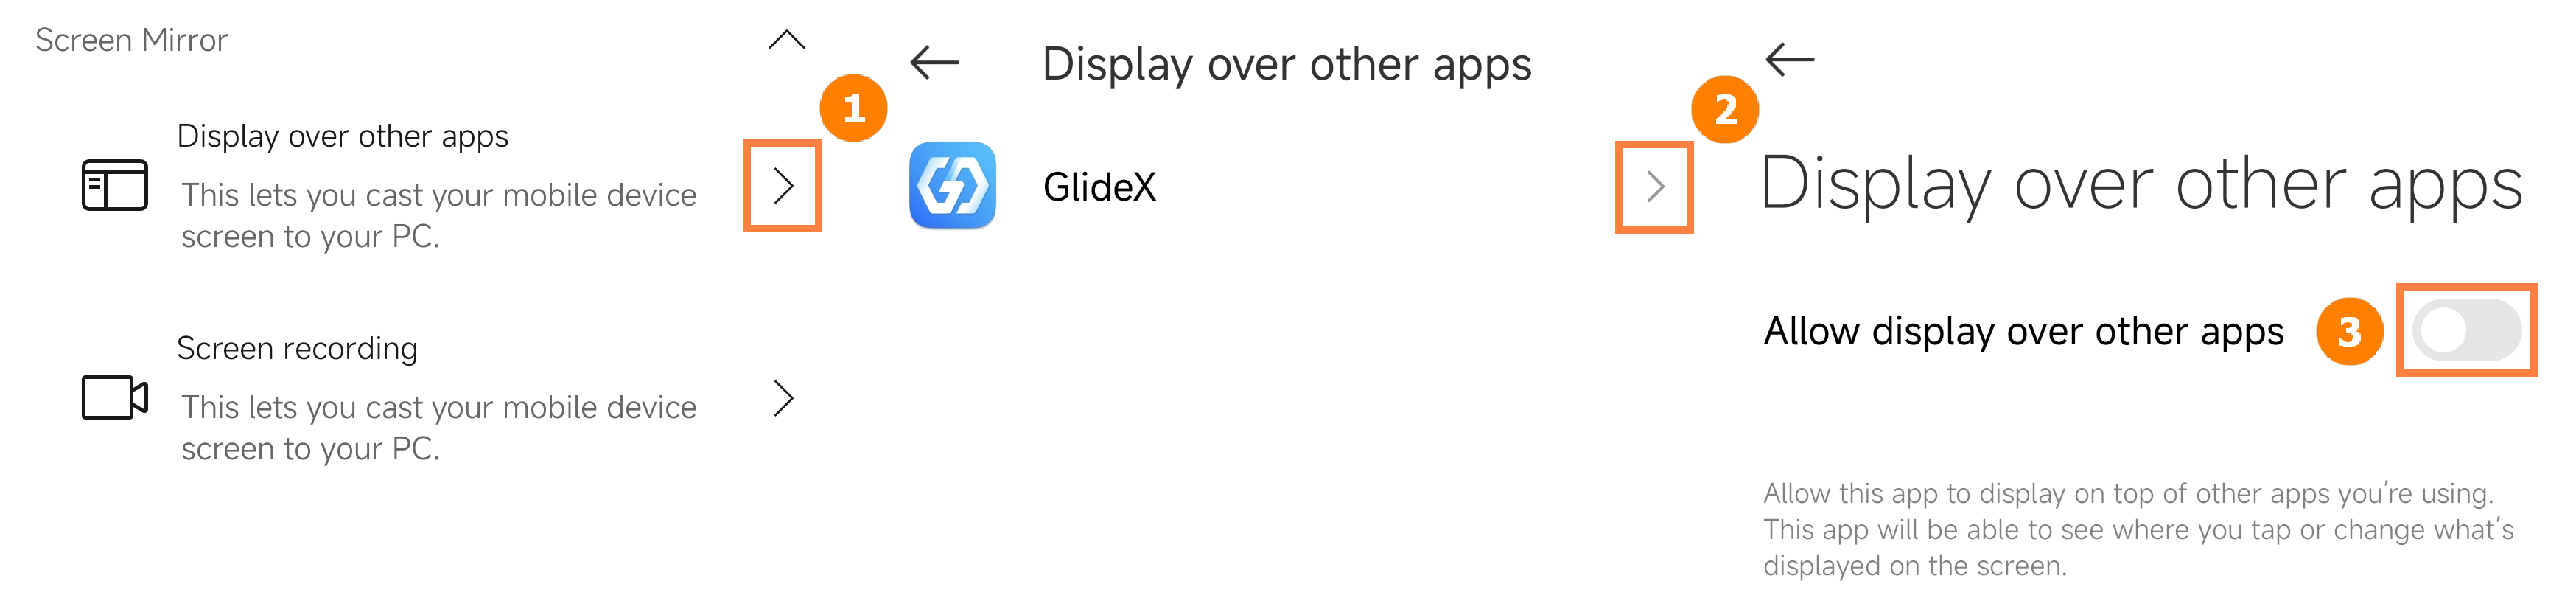
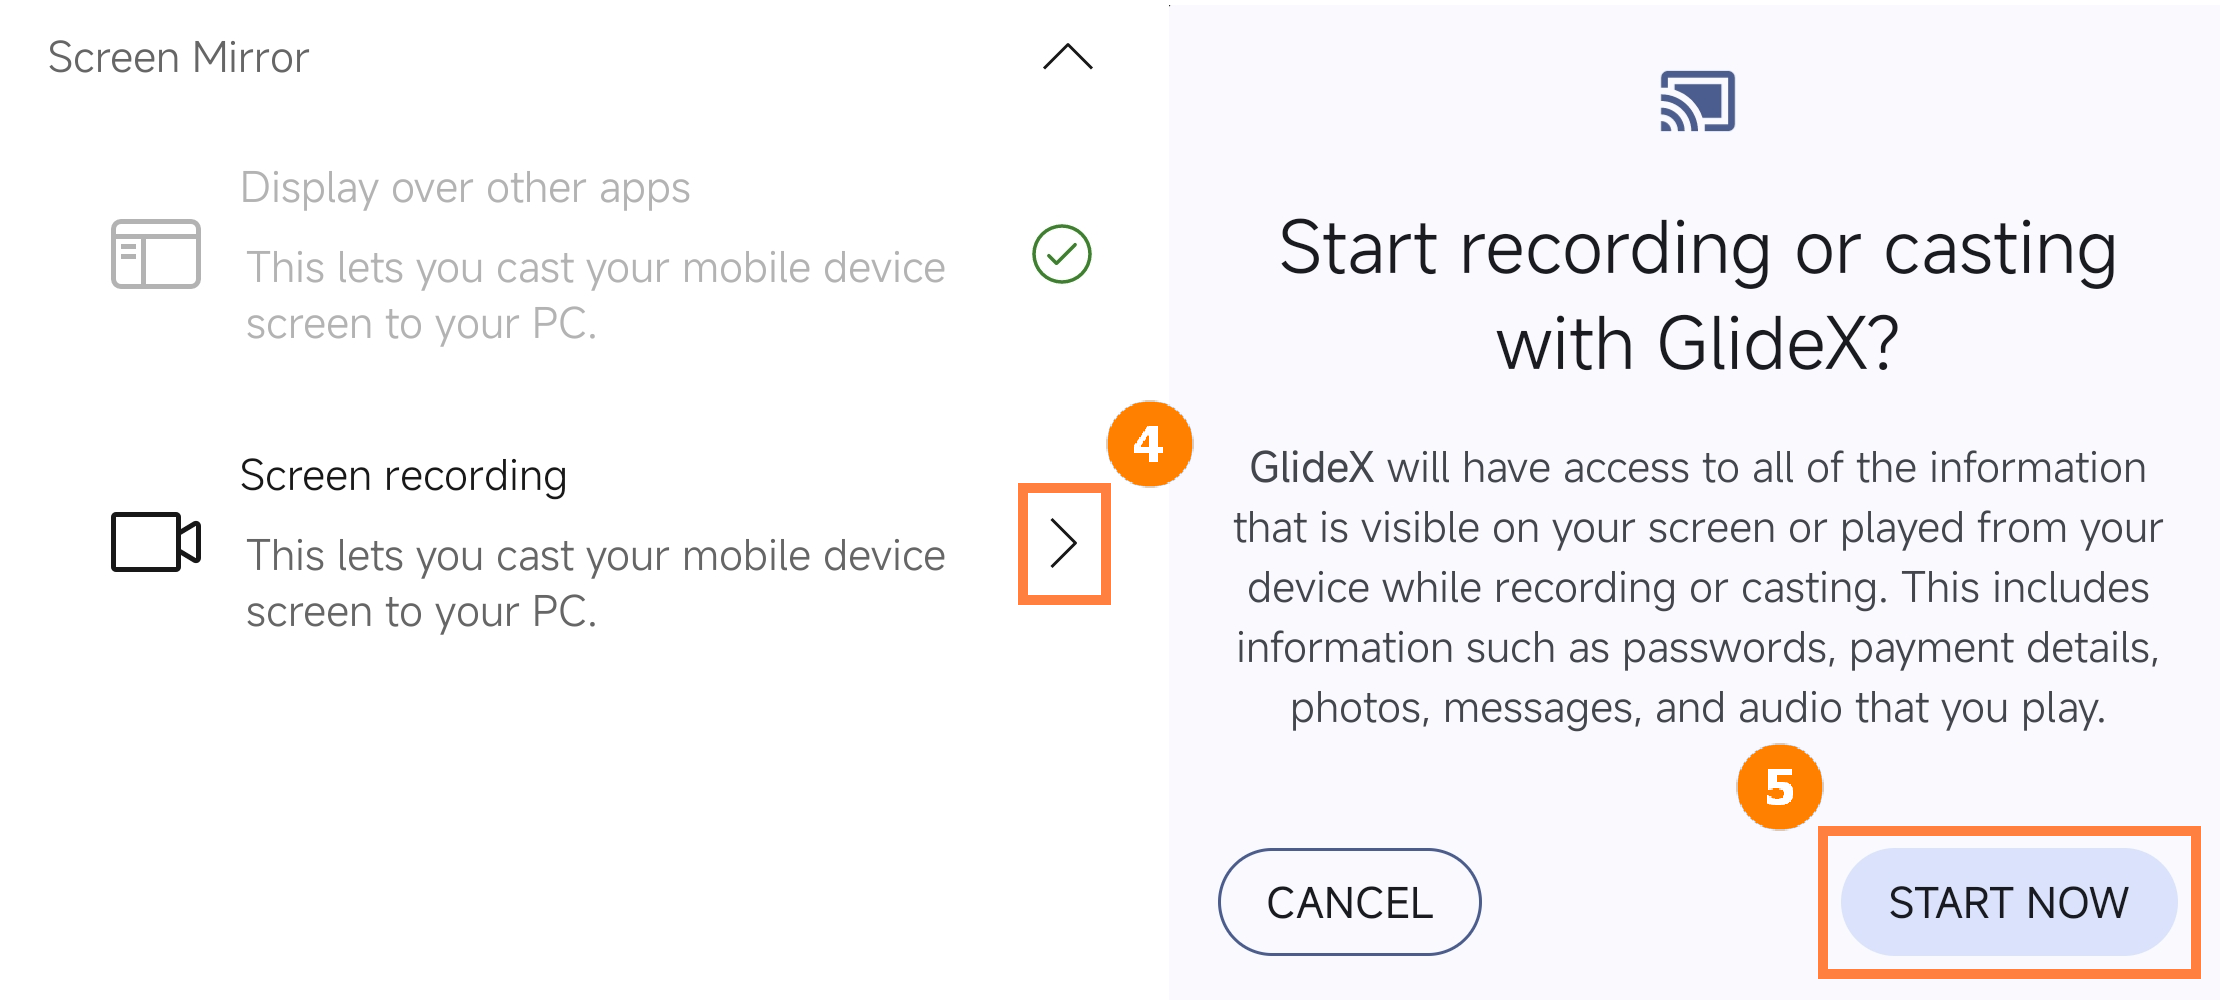
(2) Screen Mirror - Display over other apps and Screen Recording
Tap ①[Display over other apps], find and tap ②[GlideX], and tap to turn on ③[Allow display over other apps]. Go back to the permissions management page, tap ④[Screen Recording], and tap ⑤[Start Now].
※ Turn on the Display over other apps permission, this lets you cast your mobile device screen to your PC.
※ Turn on the Screen Recording permission, this lets you cast your mobile device screen to your PC.
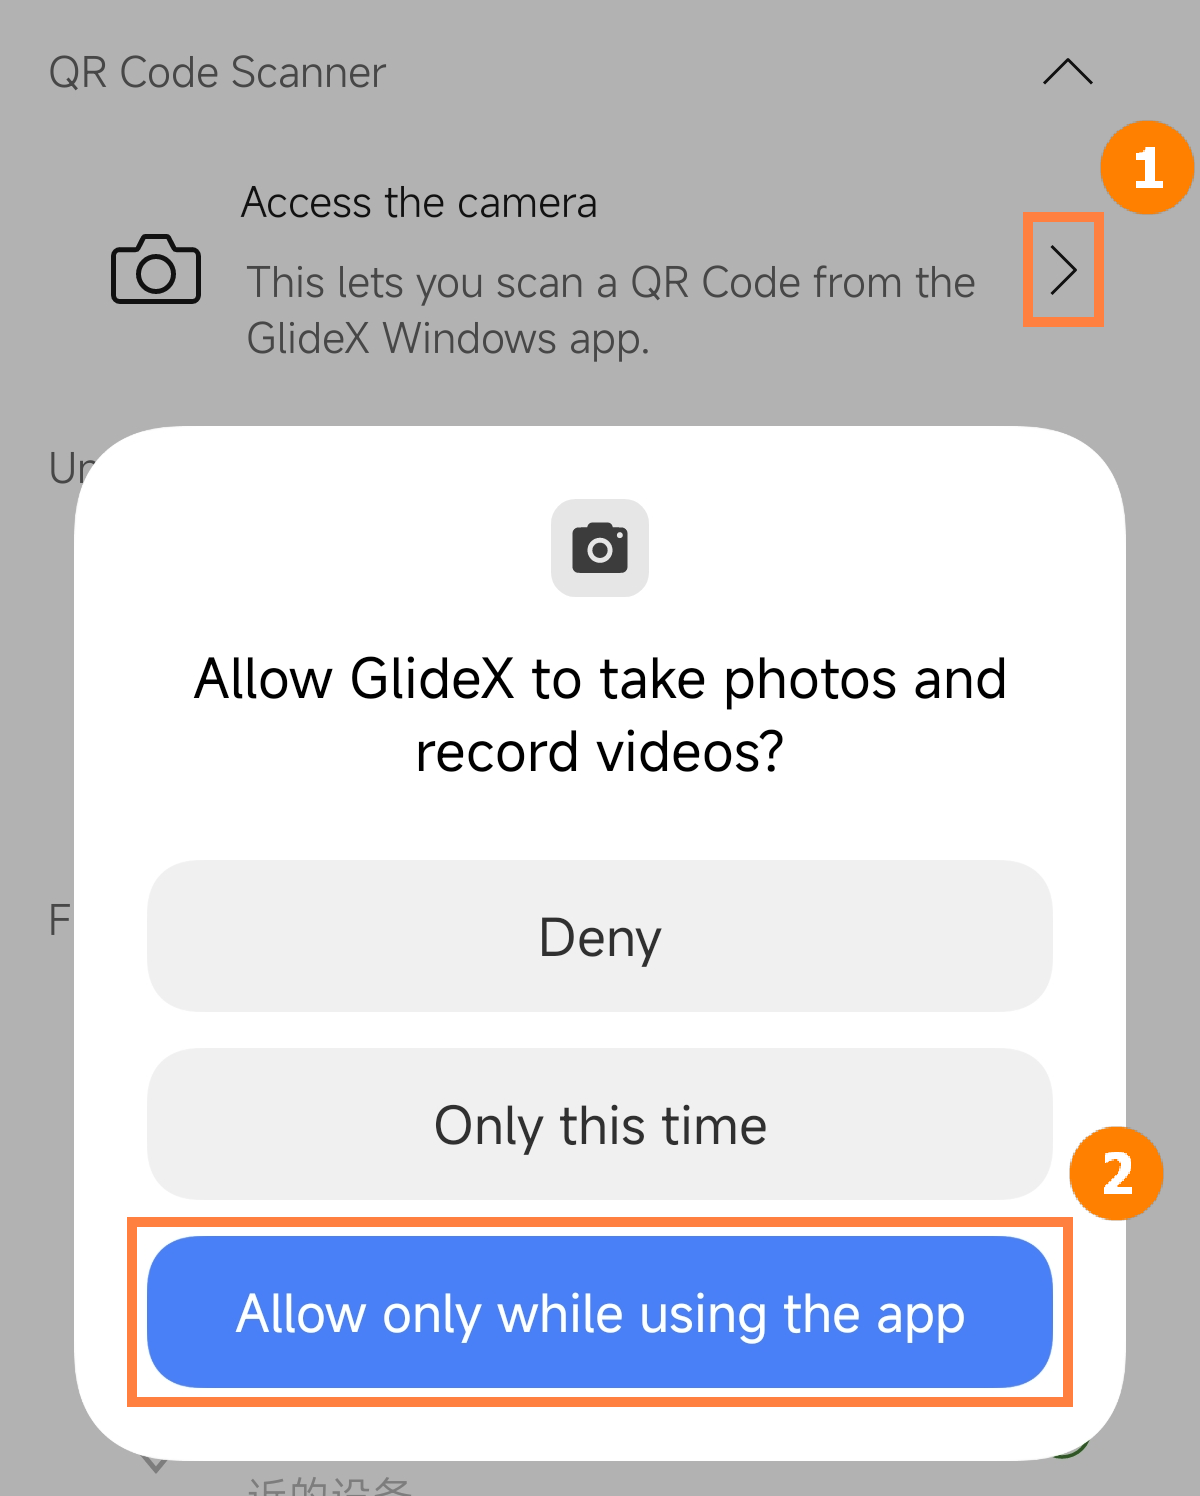
(3) QR Code Scanner - Access Camera
Tap ①[Access the Camera], tap ②[Allow only while using the app].
※ Turn on the Access the Camera permission, this lets you scan a QR Code from the Glidex Windows app.
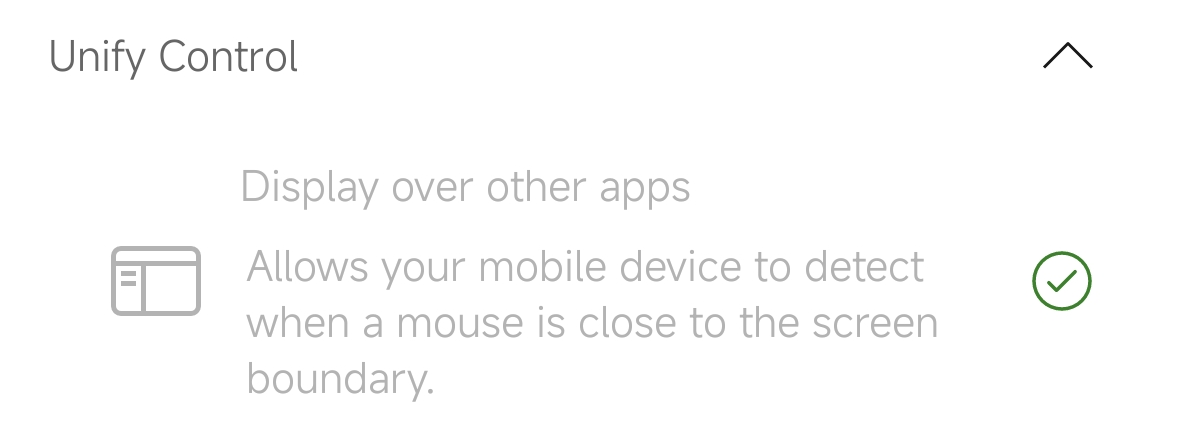
(4) Unify Control - Display over other apps
Display over other apps, enabled in the previous step.
※ Turn on the Display over other apps permission, allows your mobile device to detect when a mouse is close to the screen boundary.
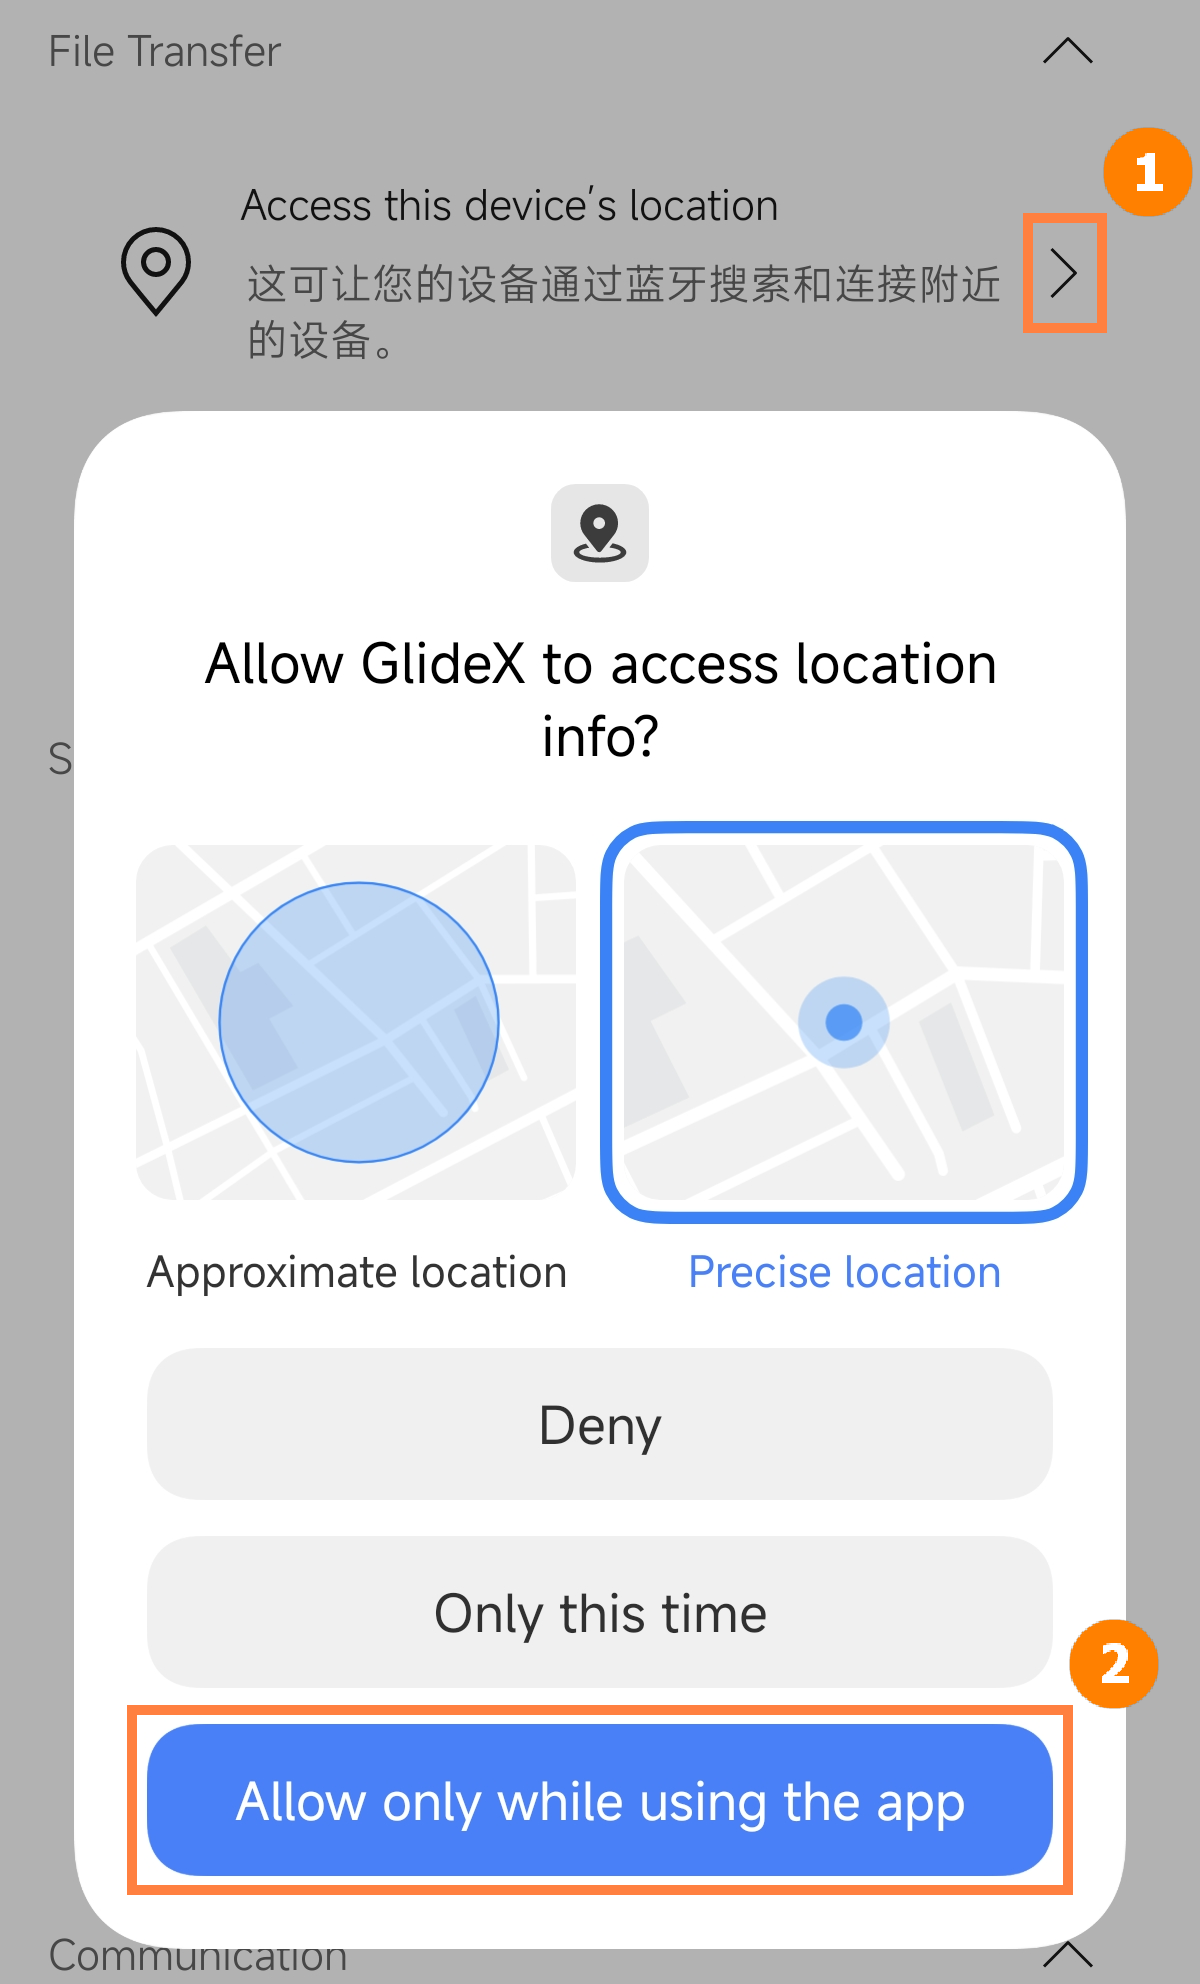
(5) File Transfer - Access this device's location
Tap ①[Access this device's location], tap ②[Allow only while using the app]. The Use location information permission was turned on in the previous step.
※ Turn on the Access this device's location permission, which allows your device to search and connect to nearby devices via Bluetooth.
※ Turn on the Use location information permission, which let your device search and connect to nearby devices via Wi-Fi.
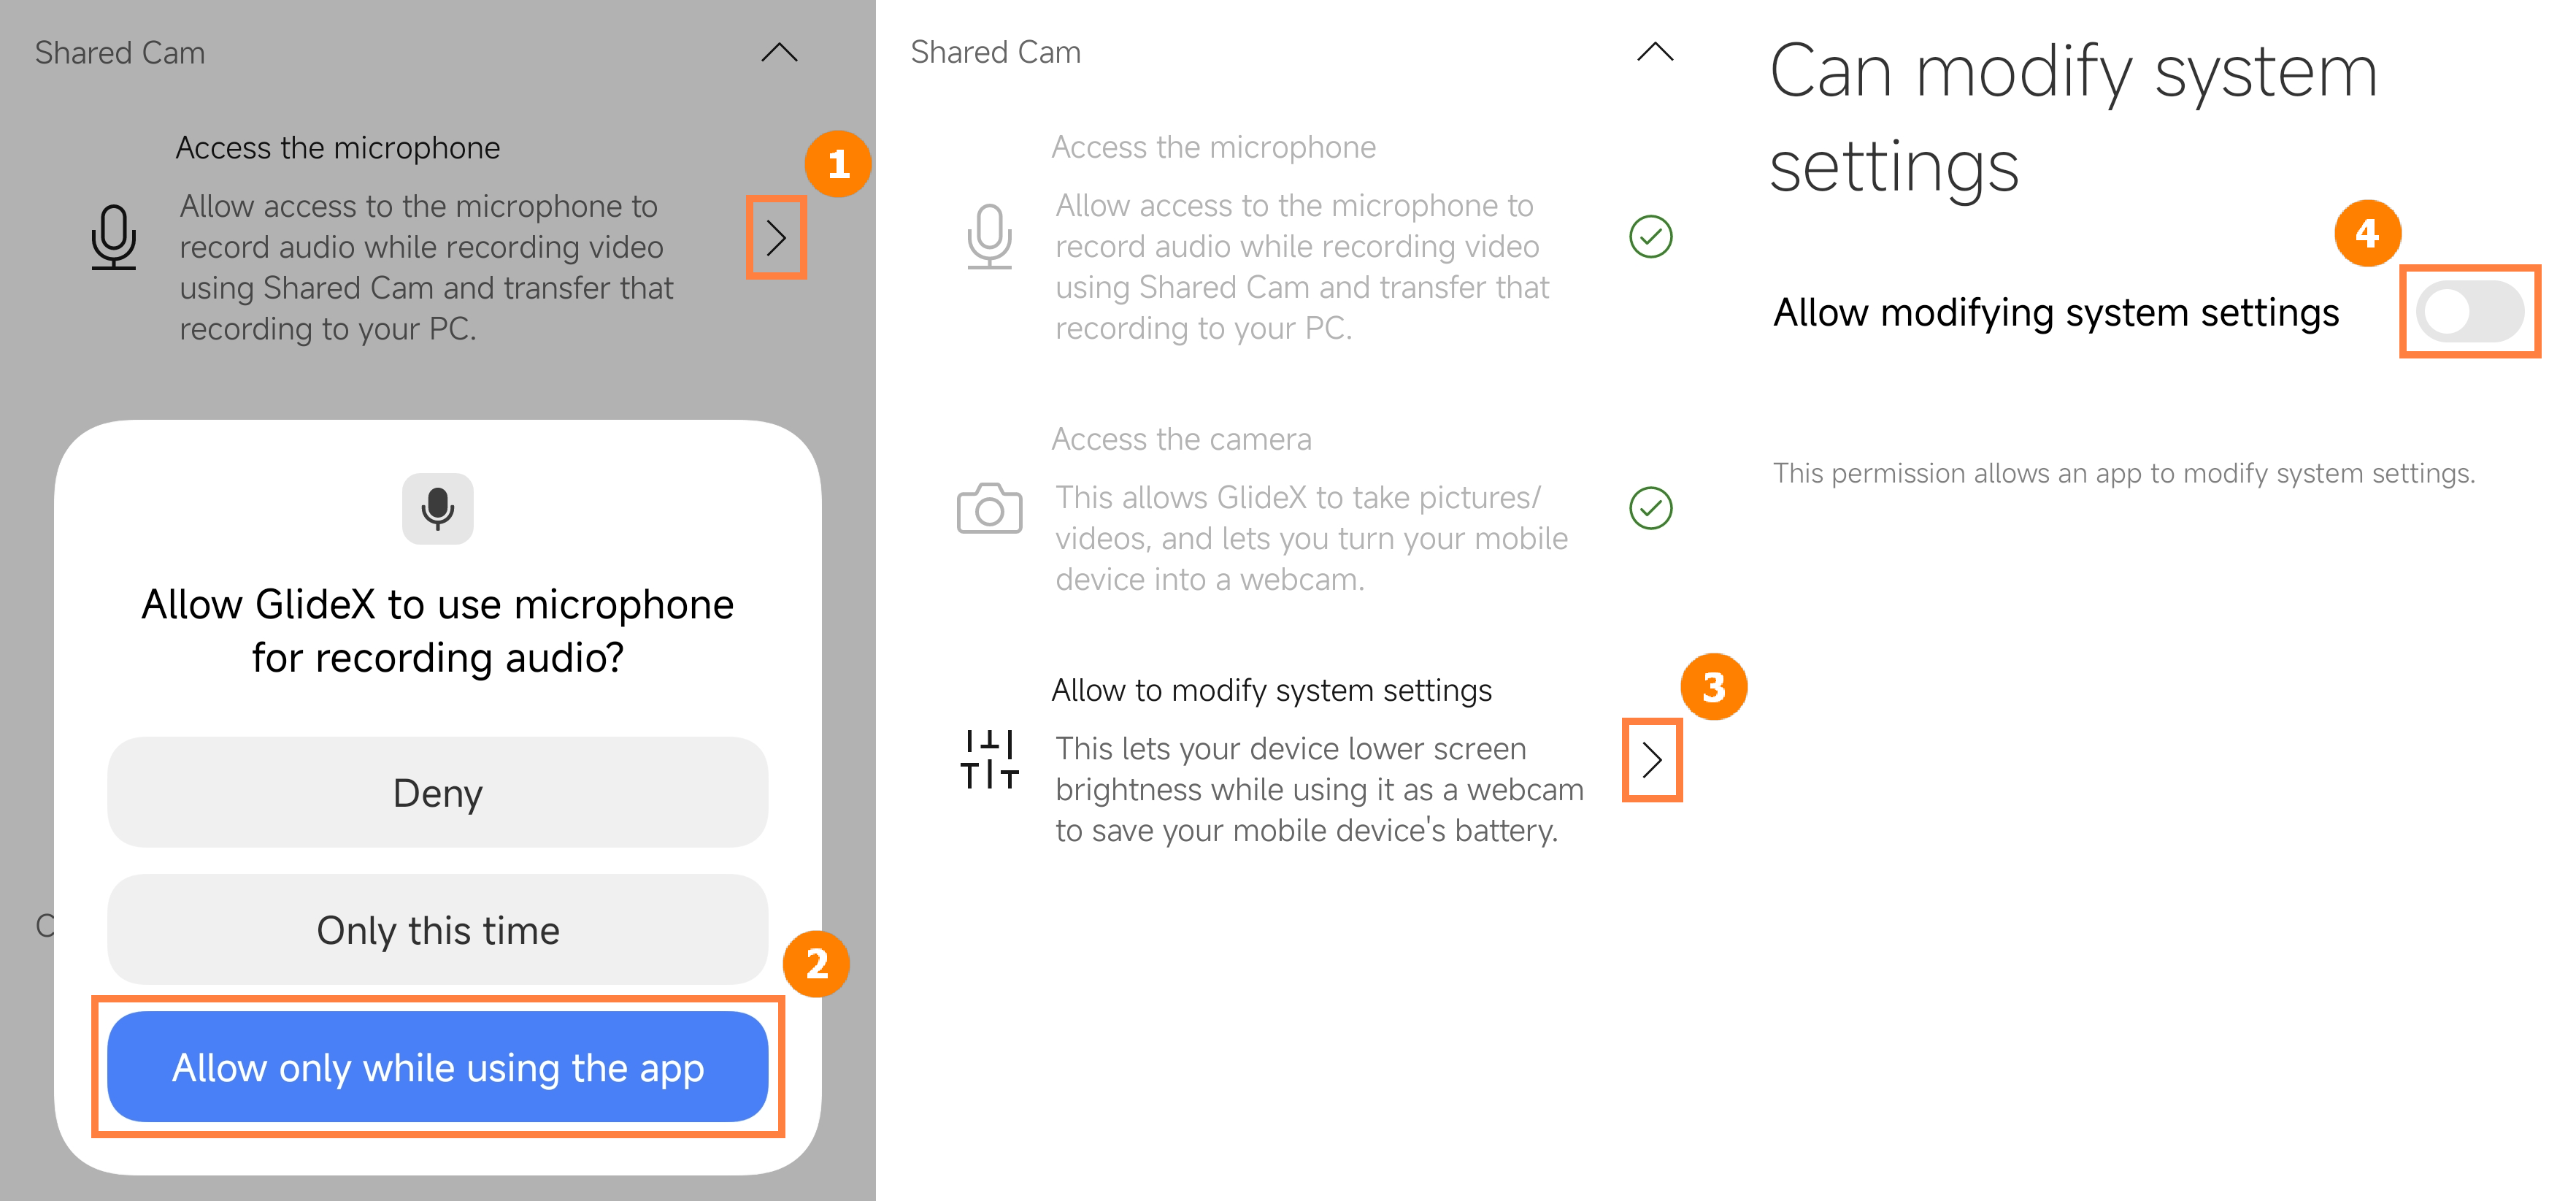
(6) Shared Camera - Access the microphone, Access the camera and Allow to modify system settings.
Tap ①[Access the microphone], tap ②[Allowed only while using the app]. The permission to Access the camera was enabled in the previous step. Click ③[Allow to modify system settings], and then click to open ④[Allowed only while using the app].
※ Turn on the Access the microphone permission, which allow access to the microphone to record audio while recording video using Shared Cam and transfer that recording to your PC.
※ Turn on the Access the camera permission, which allow Glidex to take picture/videos, and lets you turn your mobile device into a webcam.
※ Turn on the Allow to modify system settings permission, which lets your device lower screen brightness while using it as a webcam to save your mobile device's battery.
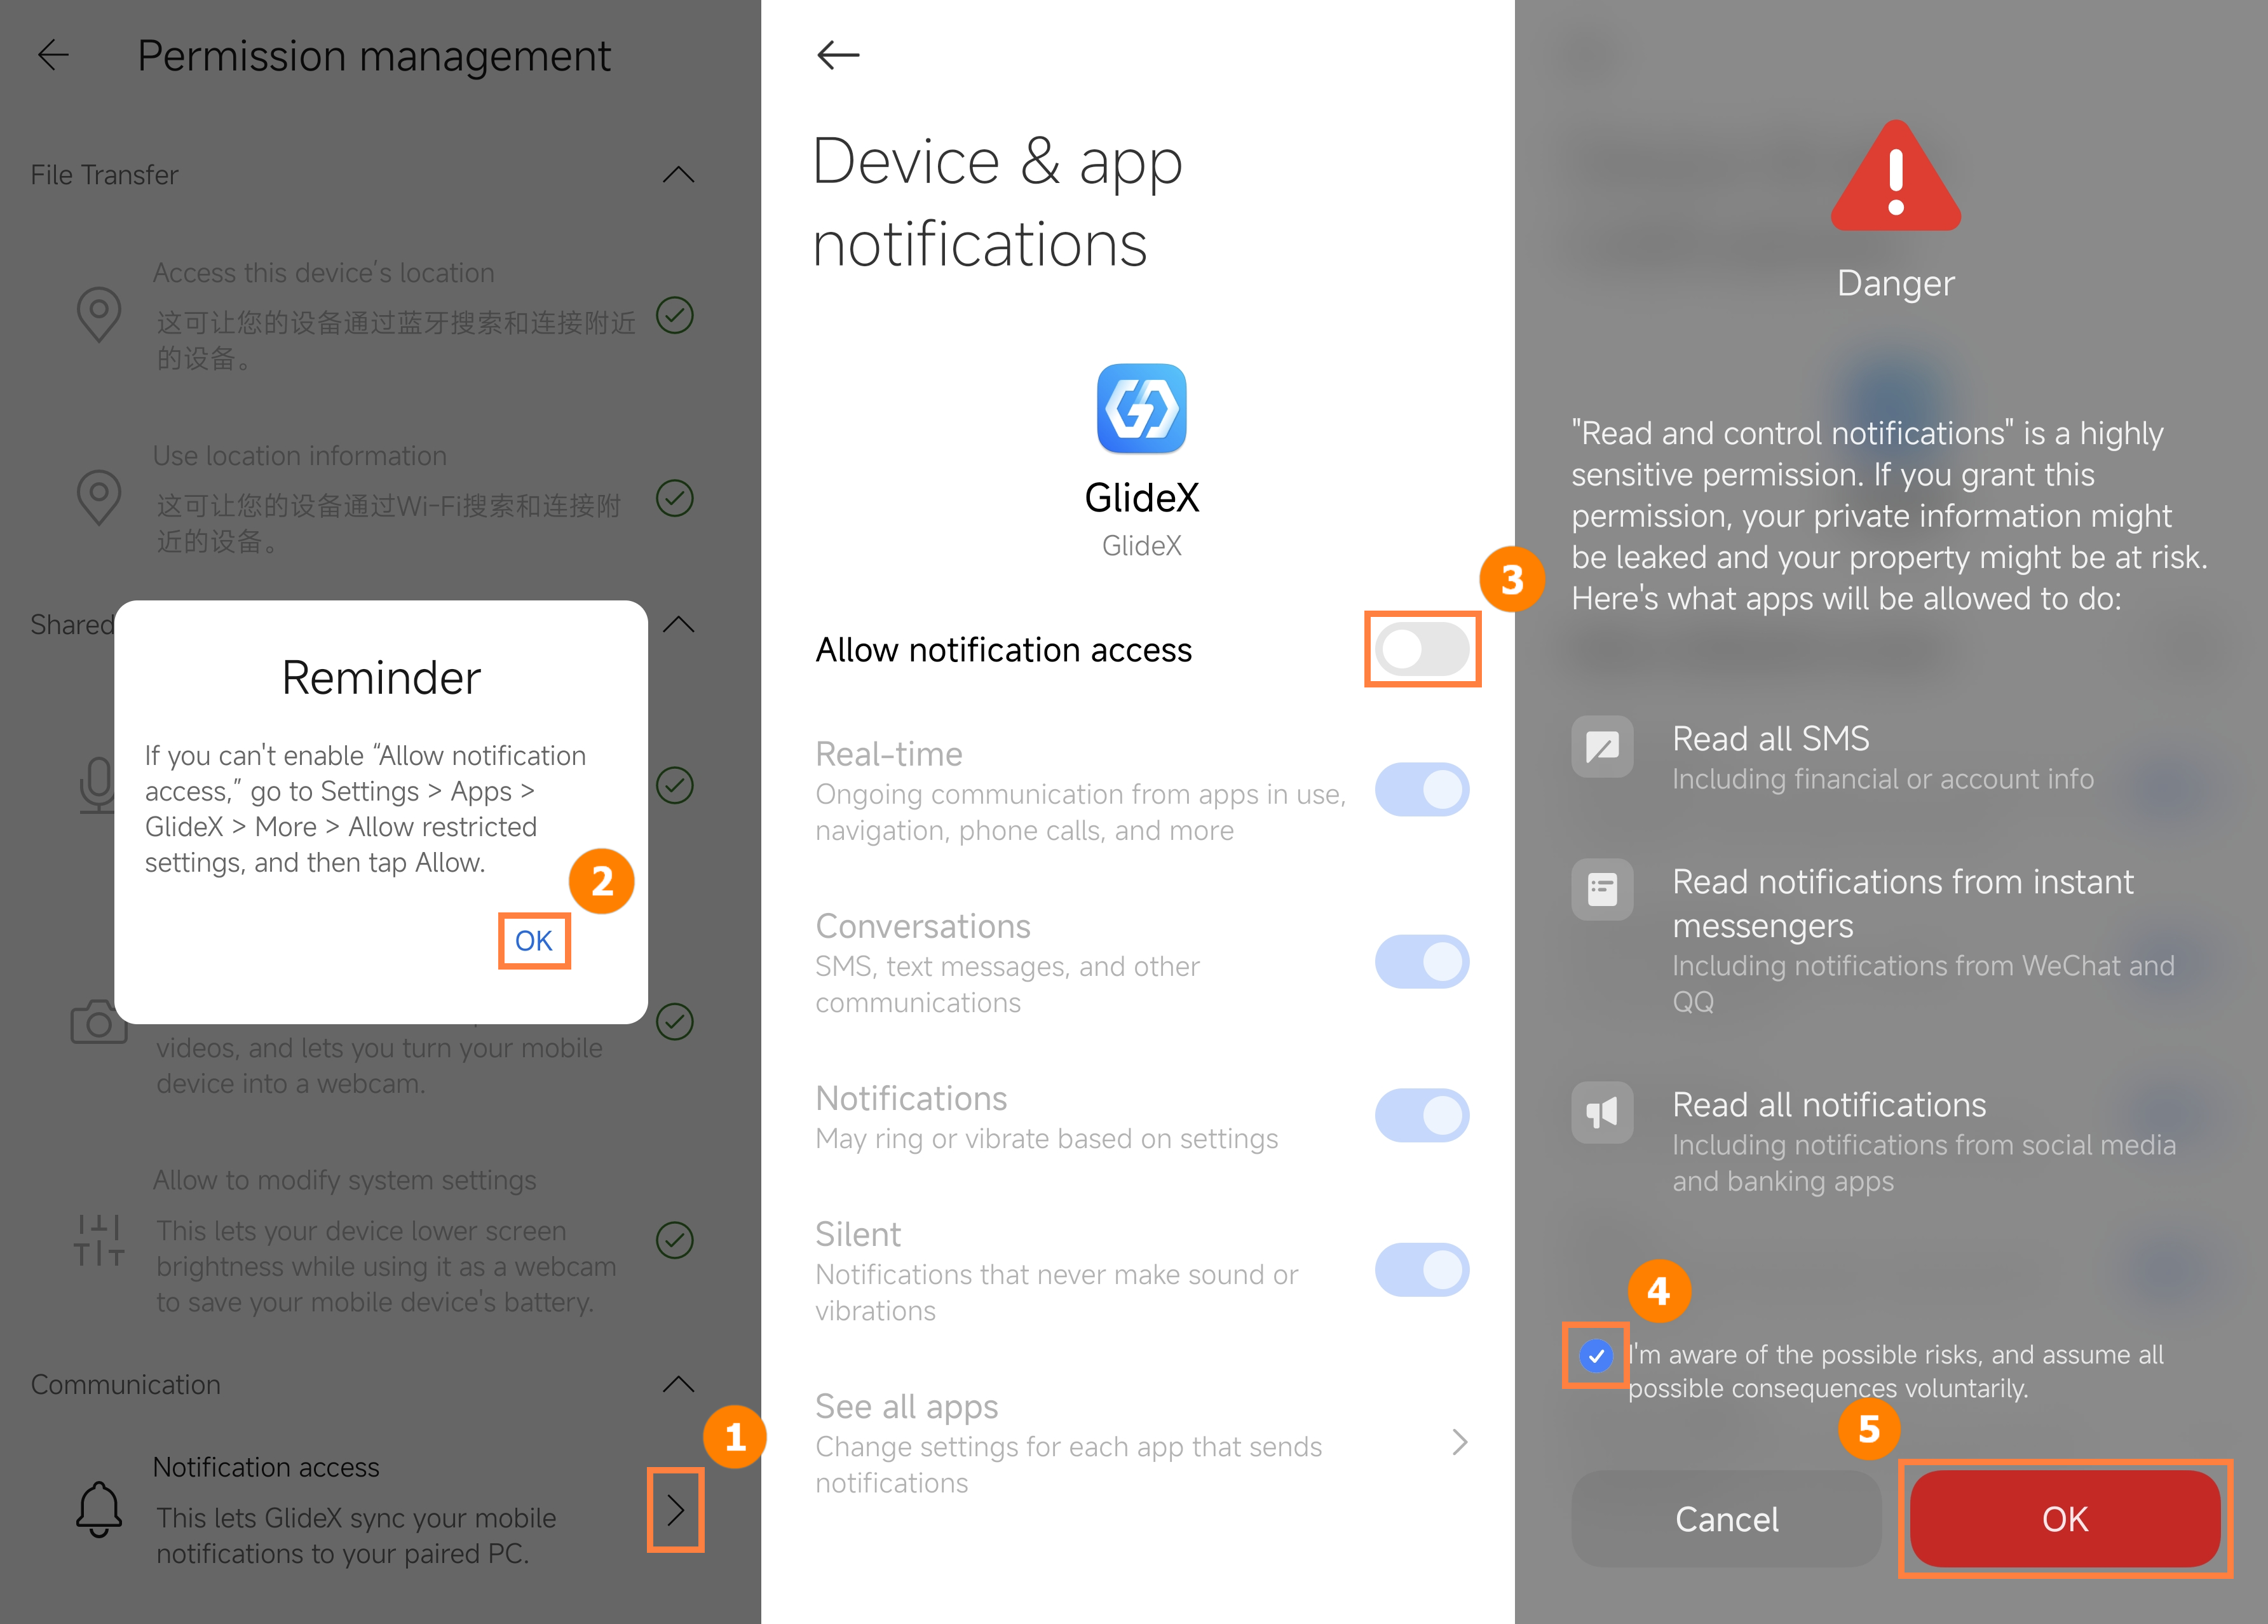
(7) Communication - Notification access
Tap ①[Notification Access], tap ②[OK], tap ③[Grant Notification Access], tap ④[I know], tap ⑤[OK].
※ Turn on the Notification access permission, lets GlideX sync your mobilenotifications to your paired PC.
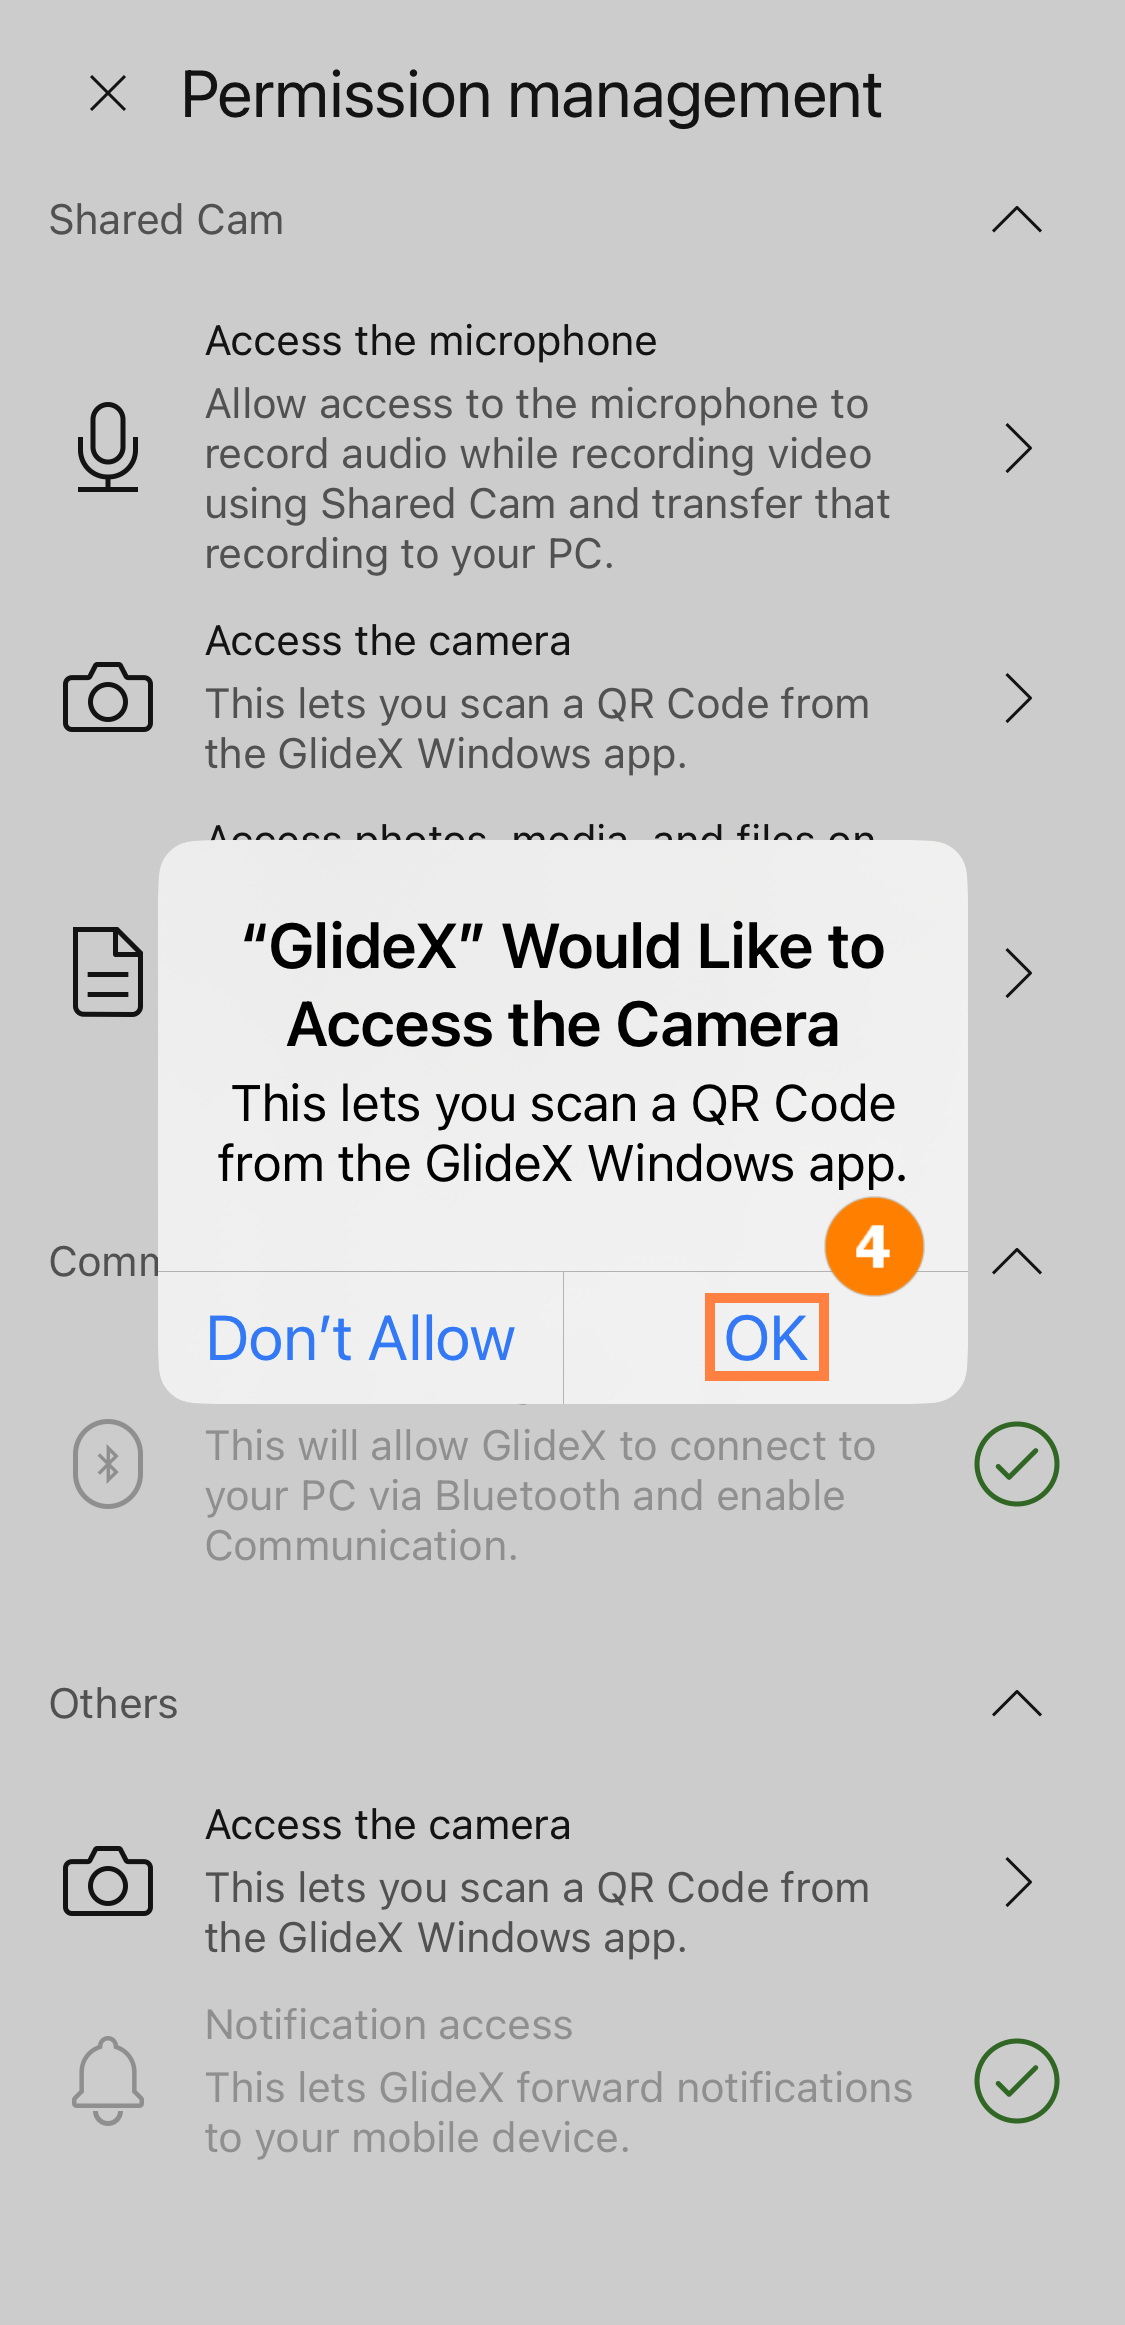
(1) Tap ①[Allow] to allow GlideX's local network access, then tap ②[OK] to get Bluetooth permissions, and tap ③[Allow] to get Notification permissions.
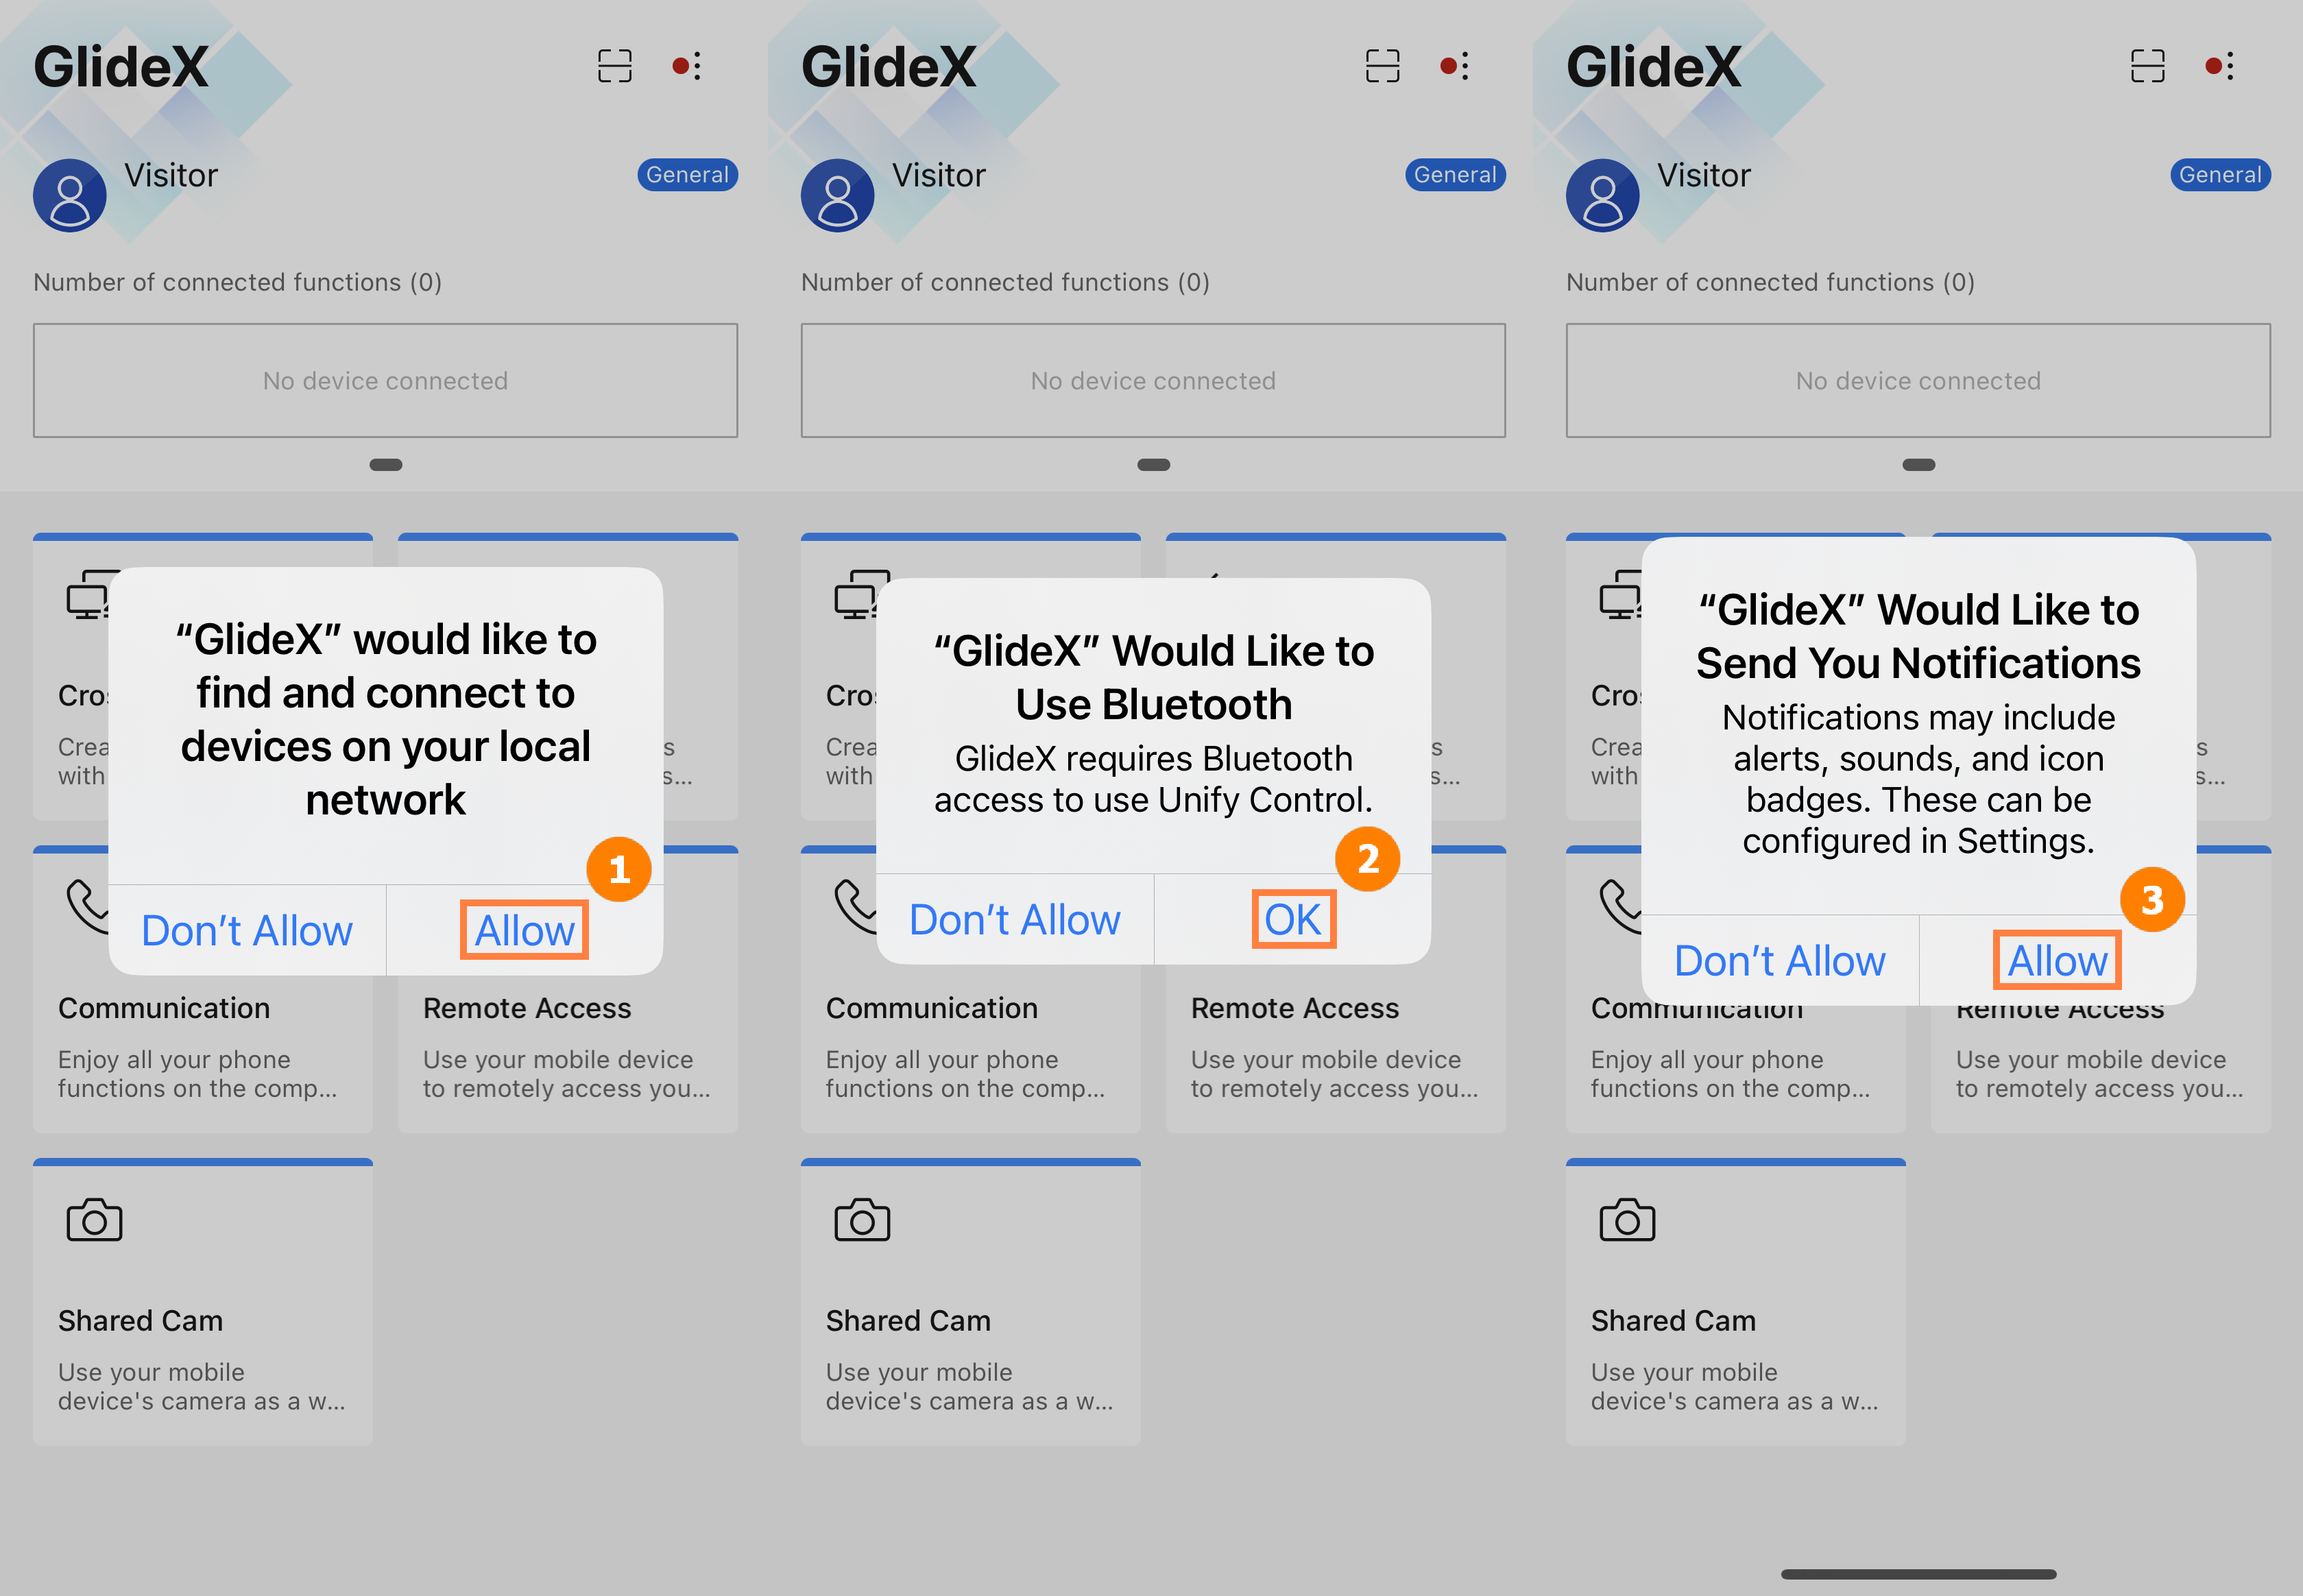
(2) To scan the QR code from the GlideX app on your computer, open the side menu> [Permission Management], tap [Access Camera] and tap ④[OK] to allow permissions.
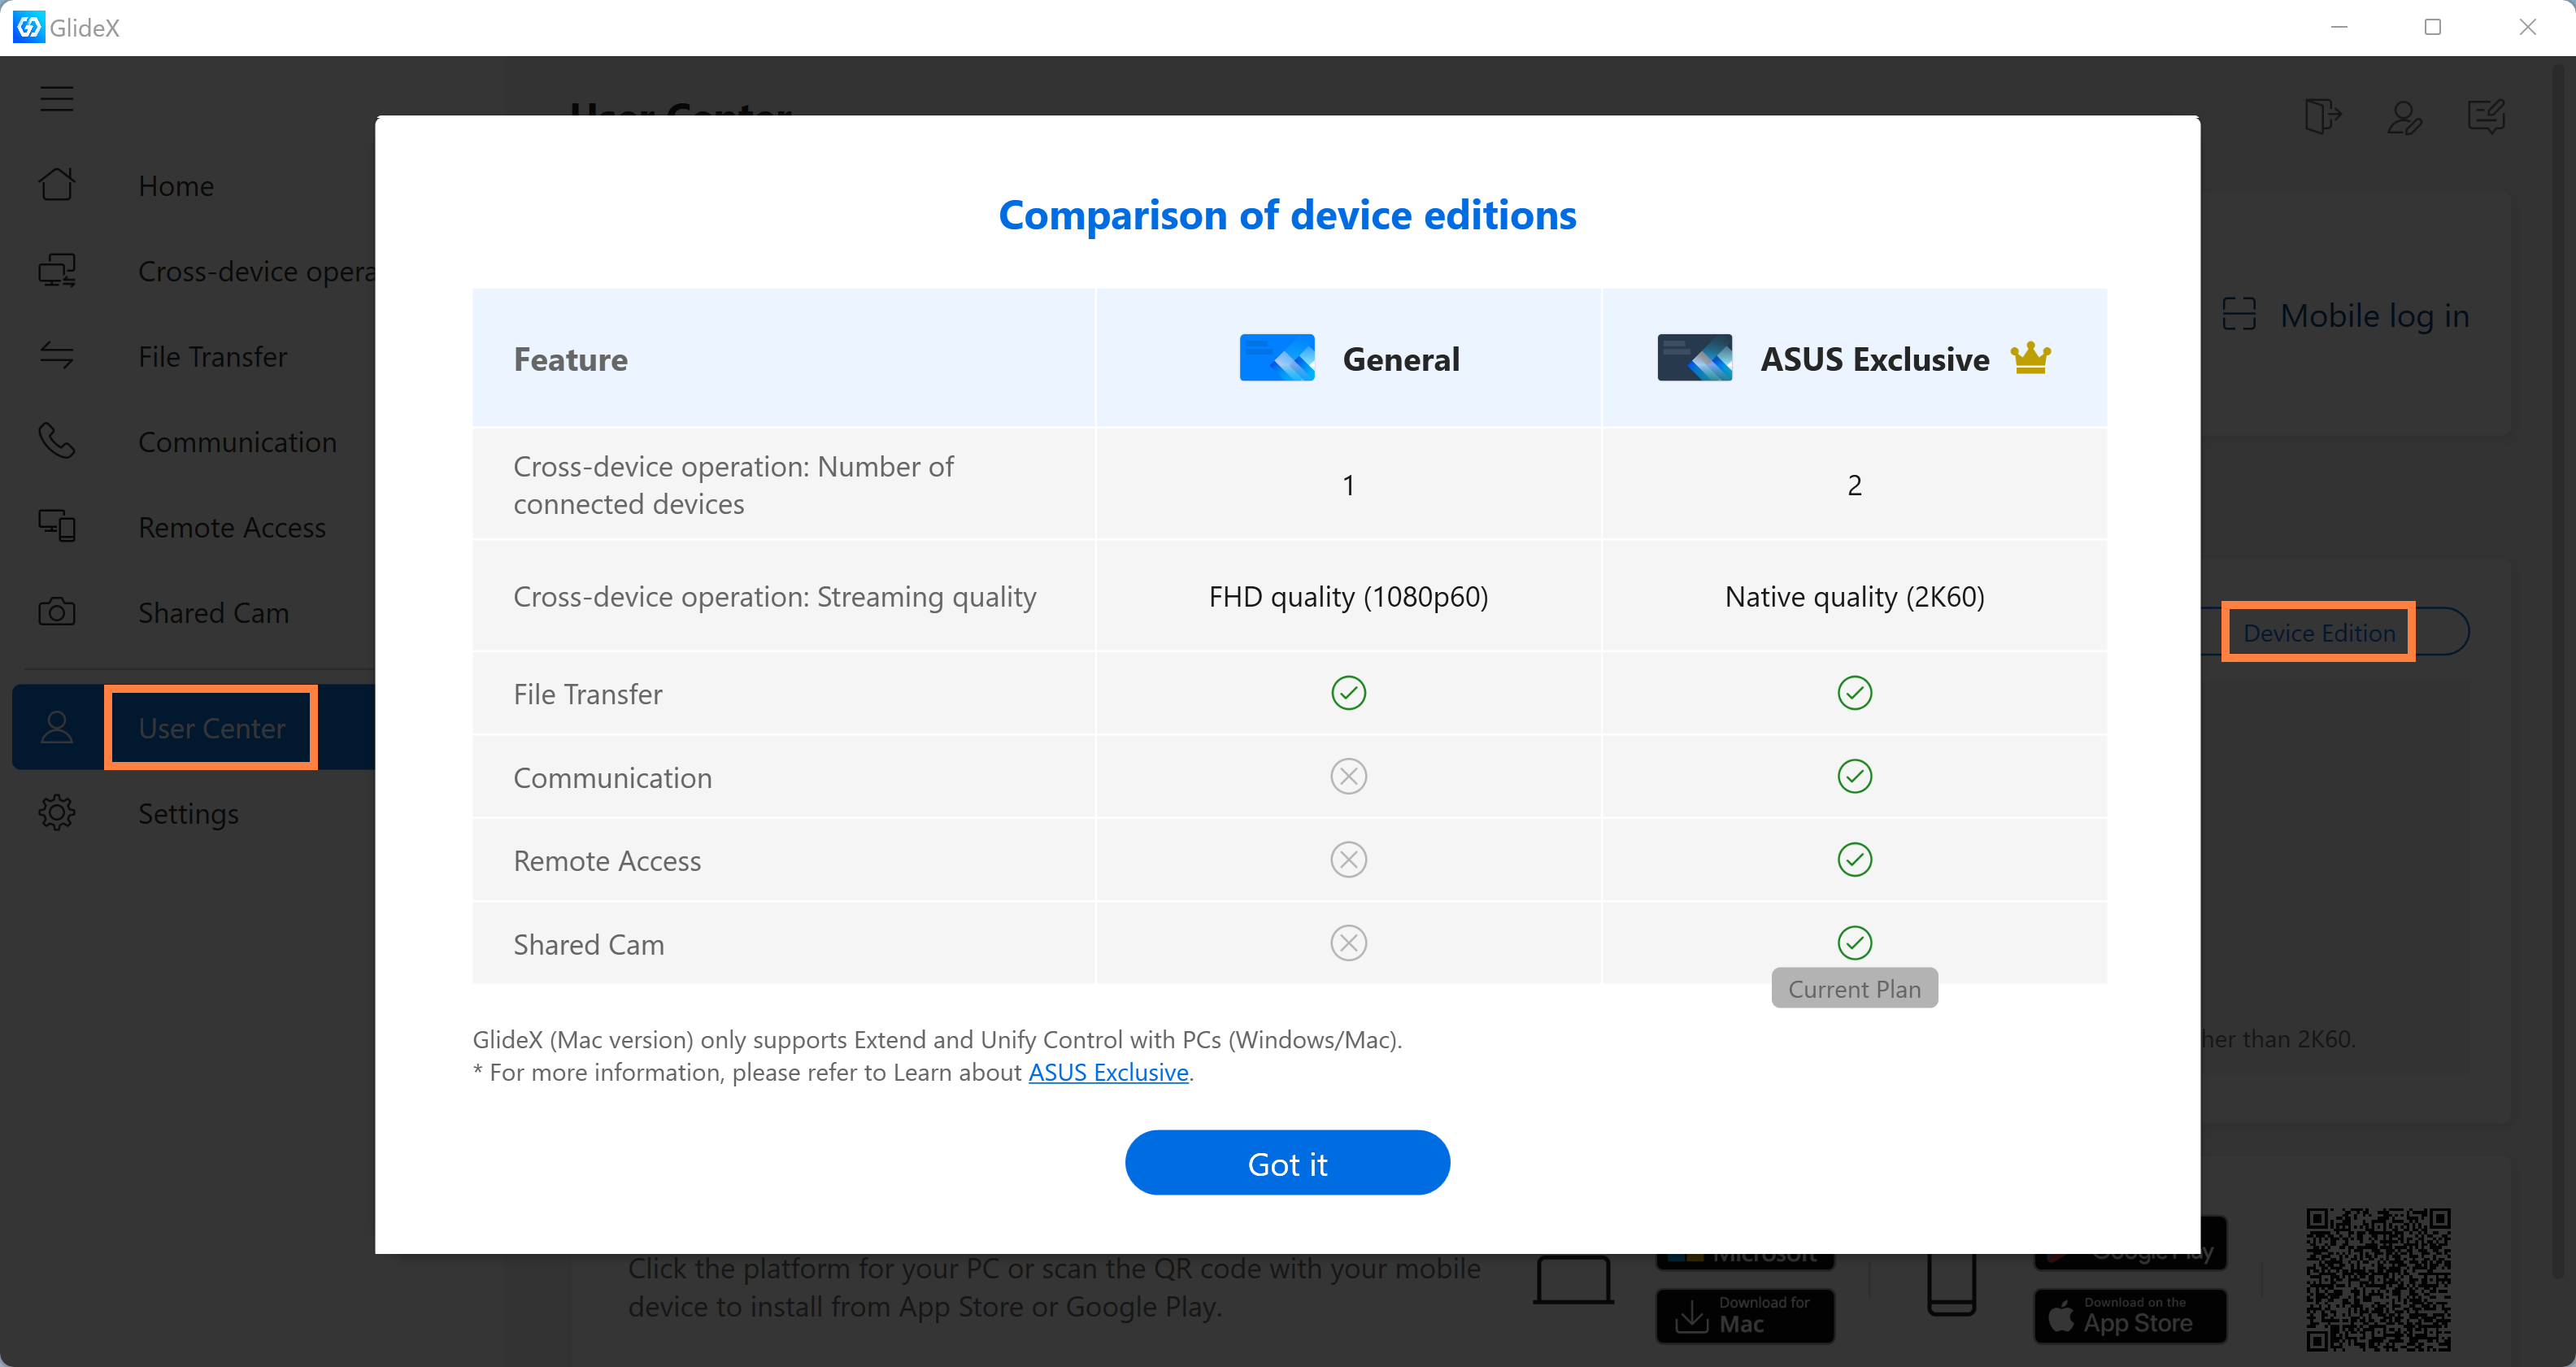
The GlideX version is divided into ASUS Exclusive version and General version.
You can enjoy the ultimate and complete software features with the Exclusive version.
Please install GlideX first, click on [User Center], and then click on [Device Edition] to check the device edition for your current GlideX device.
You can obtain ASUS Exclusive version by purchasing ASUS products that can install GlideX.
The ASUS Exclusive version offers more features than the General version:
(1) Device Connection count: The ASUS Exclusive version can connect two devices, while the General version can only connect one device.
(2) Image transmission quality: The ASUS Exclusive version can enjoy up to 2K60Hz image quality, while the General version can only use 1080p60Hz image quality.
(3) The ASUS Exclusive version can use Communication, Remote Access, and Shared Cam functions, which are not available in the General version.
※ As for the Native quality, the resolution and refresh rate may actually be higher than 2K / 60 Hz depending on your network and hardware capability.
※ The ASUS Exclusive Plan is tied to your device, and you can get the ASUS Exclusive Plan by purchasing an ASUS product that can install GlideX. For example, you have an ASUS Zenfone-9 phone and Microsoft Surface. When you are using a Zenfone-9 phone, the current plan is ASUS Exclusive. When you are using Microsoft Surface, the current plan is the General version. When you connect your ASUS Zenfone-9 to Microsoft Surface, the Microsoft Surface Cross-Device operation: Streaming quality feature will be temporarily upgraded to Native quality (2K60), and will revert to FHD quality (1080p60Hz) after disconnection.
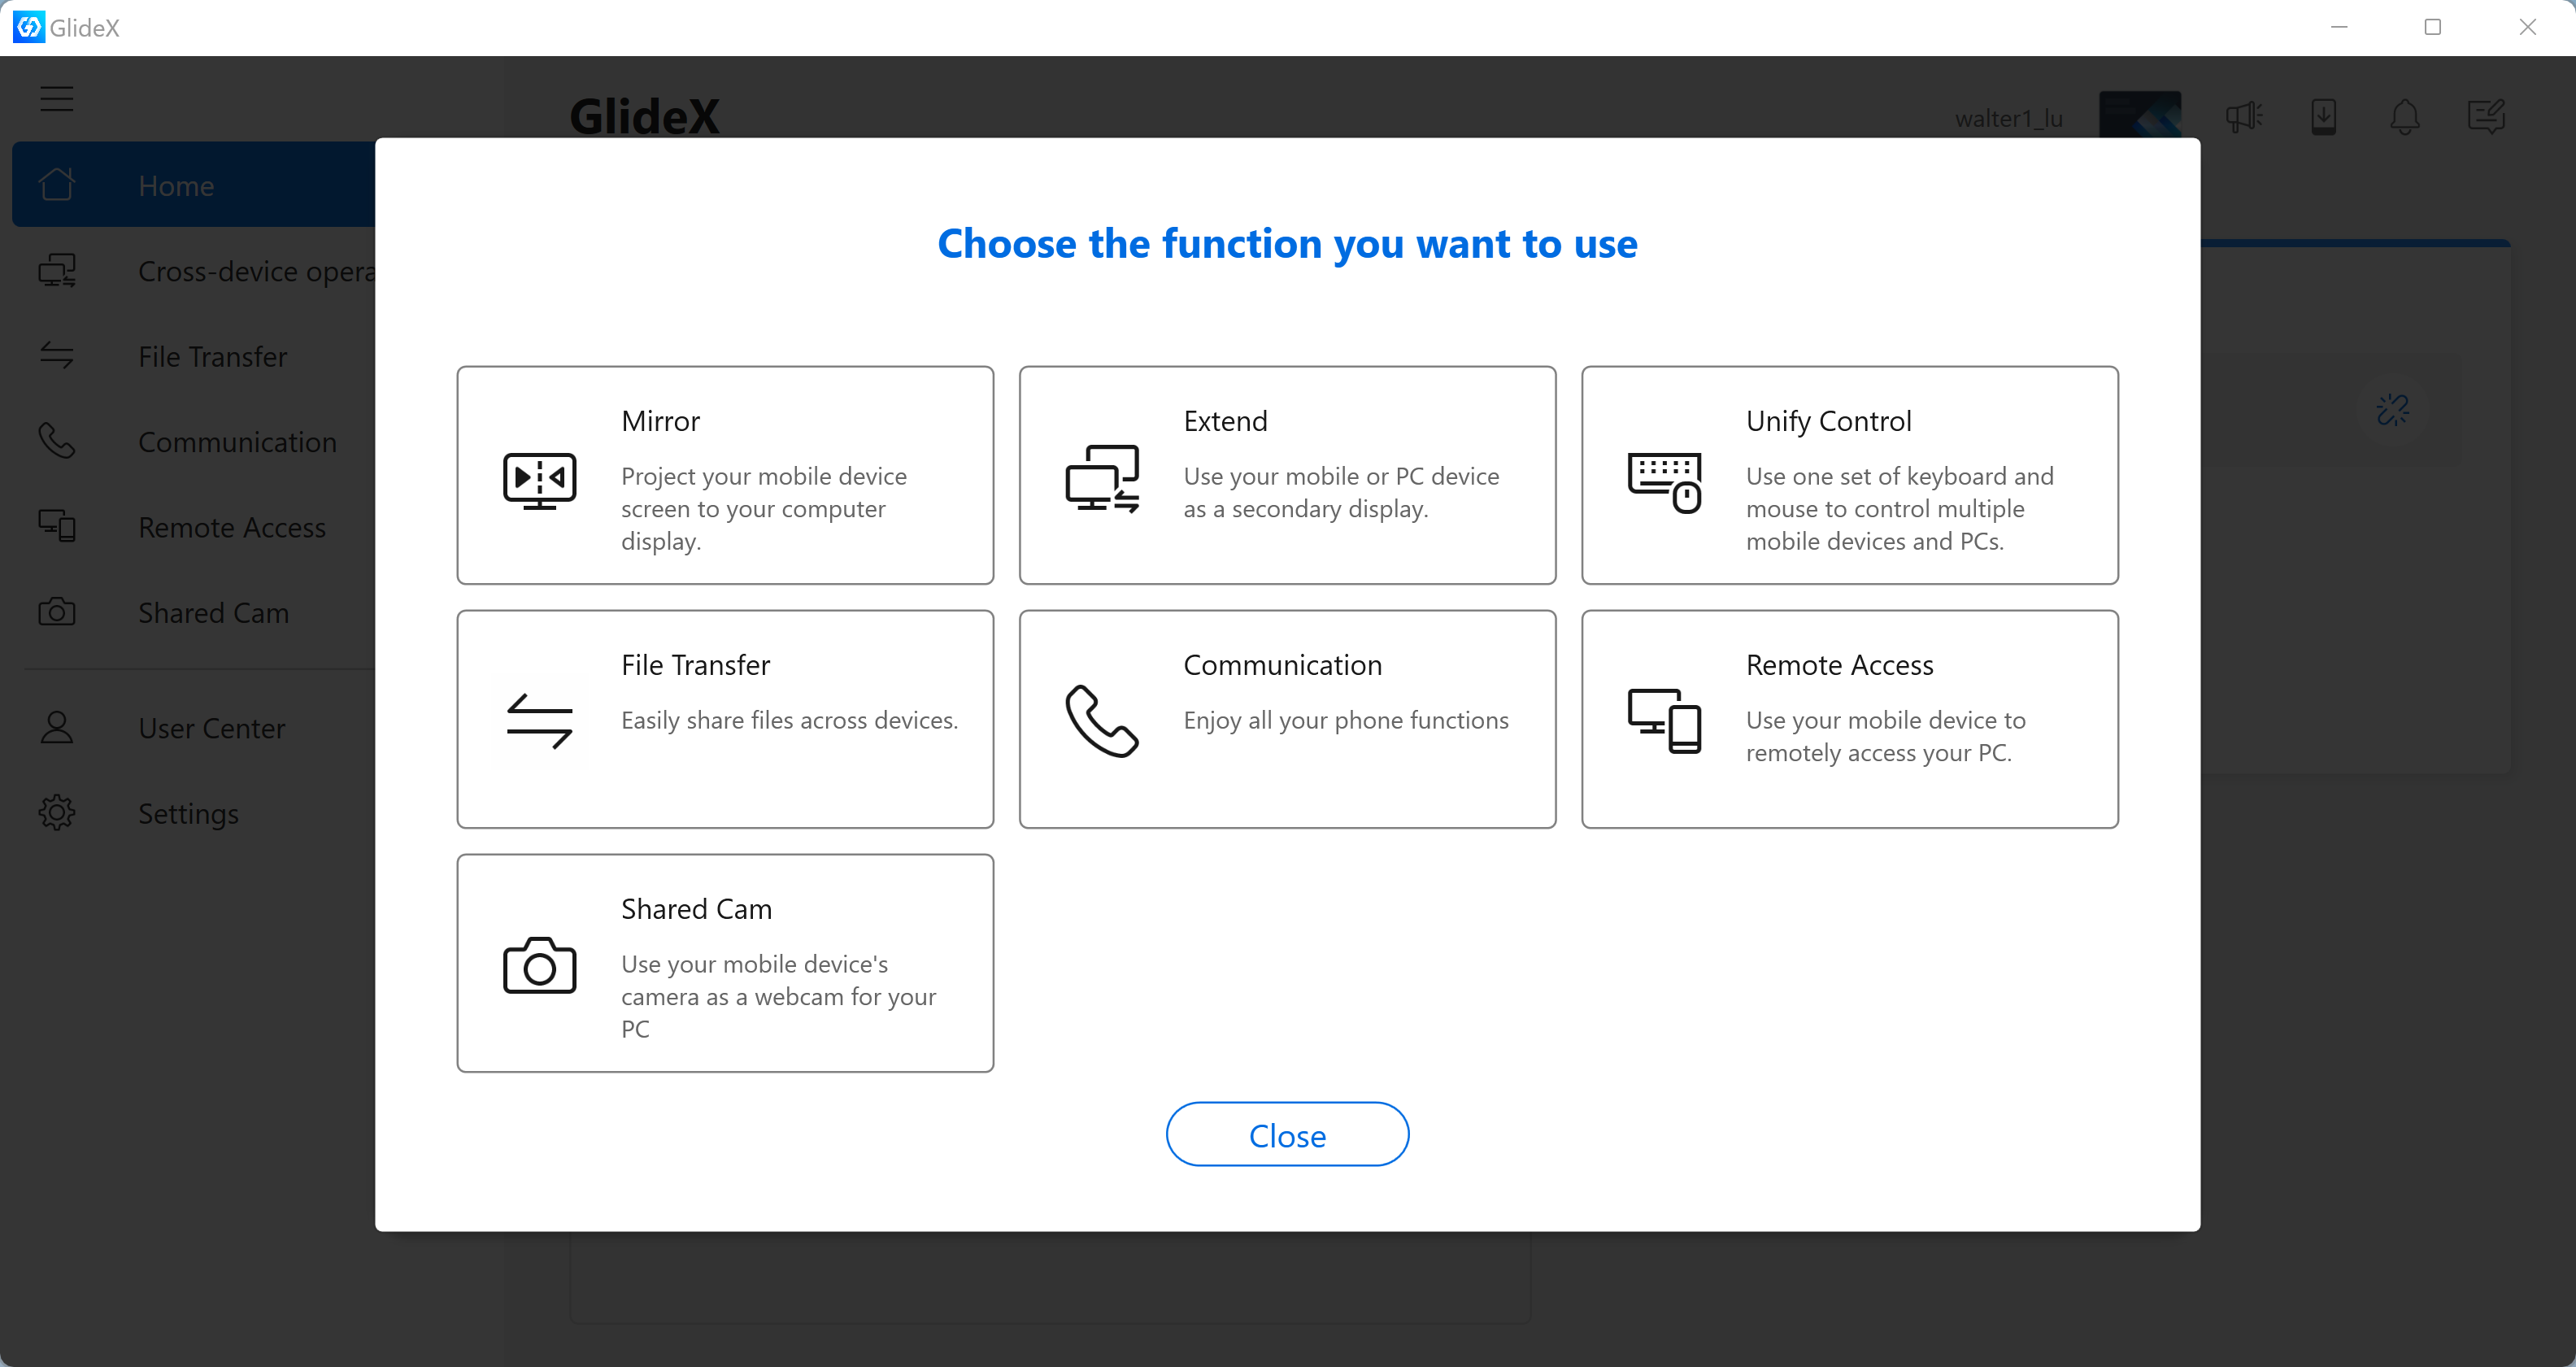
(1) The Homepage will display the ①[Functions] that GlideX has enabled, and you can quickly and easily operate the enabled functions. You can click ②[Add] to quickly enable the new feature.
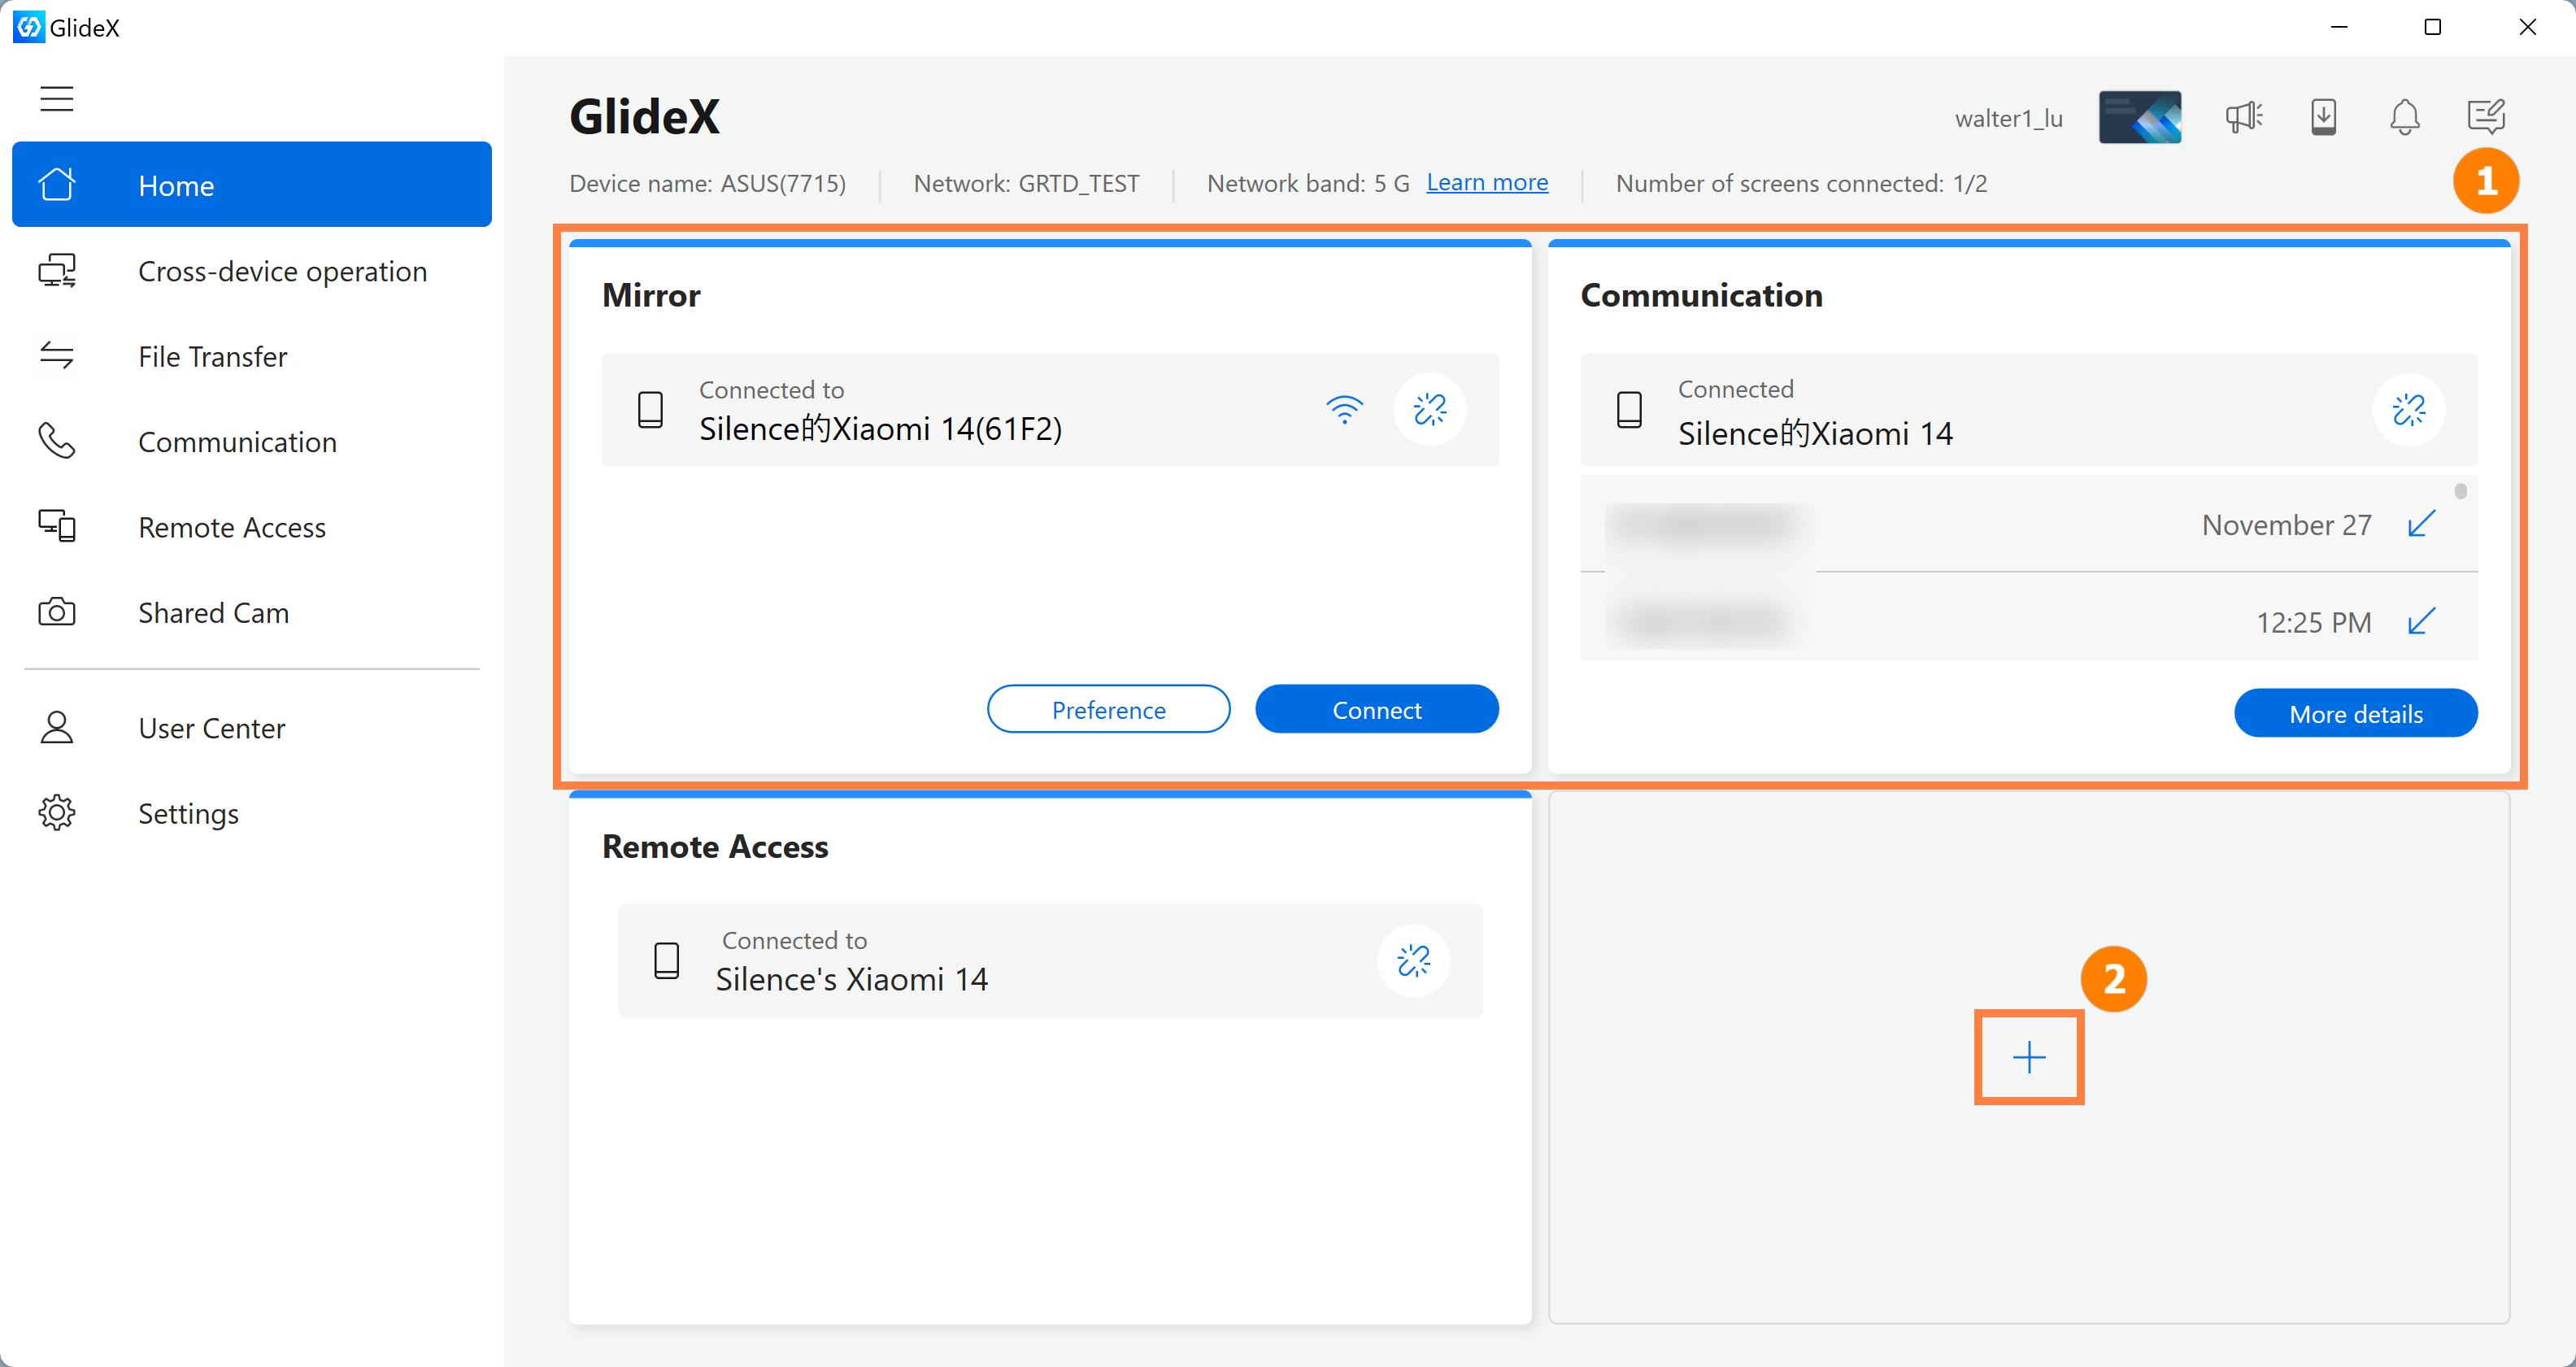
(2) Select the feature you want to use and enable it.
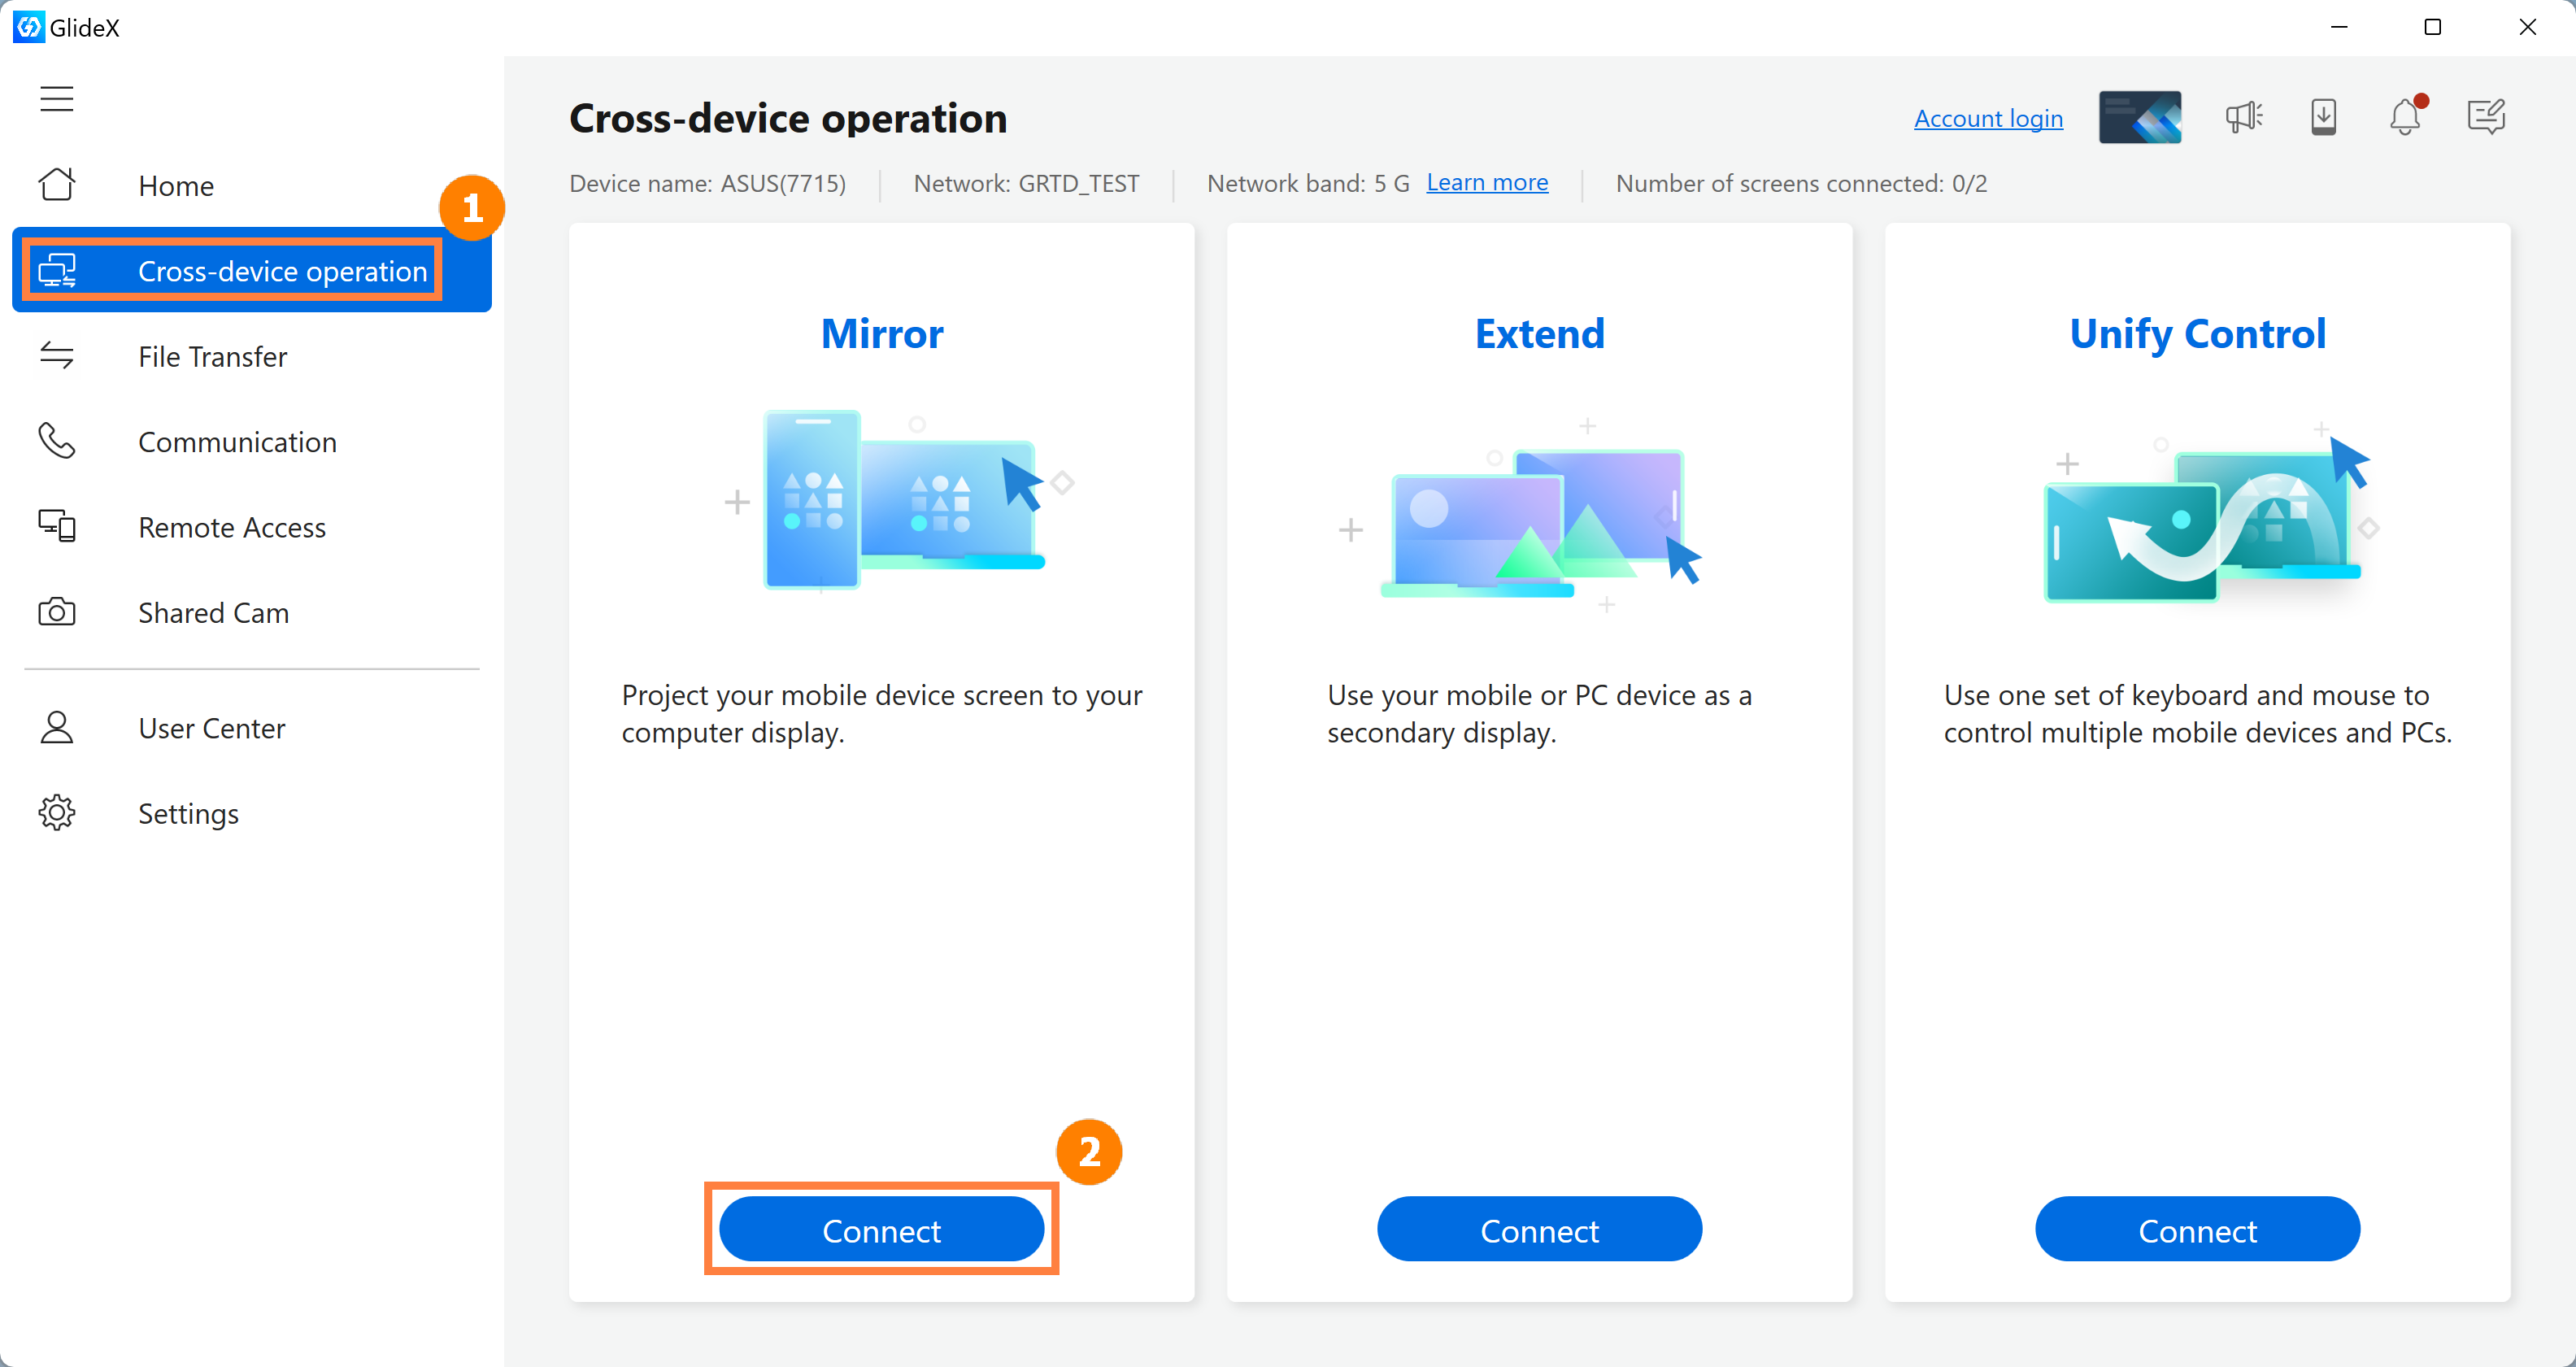
(1) On the main page of GlideX, Click ①[Cross-device operation], and then click ②[Connect].
If you are logged in to the same ASUS member account on your computer and mobile device, notifications from the receiving device will be omitted, please refer to: [GlideX] GlideX login to the same ASUS member account can be directly connected | Official Support |...
If your computer is connected to a 2.4G Wi-Fi, please click the following connection to switch the Wi-Fi to 5G: [GlideX] How to switch from 2.4GHz to 5GHz for a better screen sharing experience? | Official Suppor...
If you are using an Android device to connect to your computer via USB wired and need to enable the USB debugging setting first, please click the following connection: [GlideX] How to enable USB debugging for Android devices? | Official Support | ASUS Global
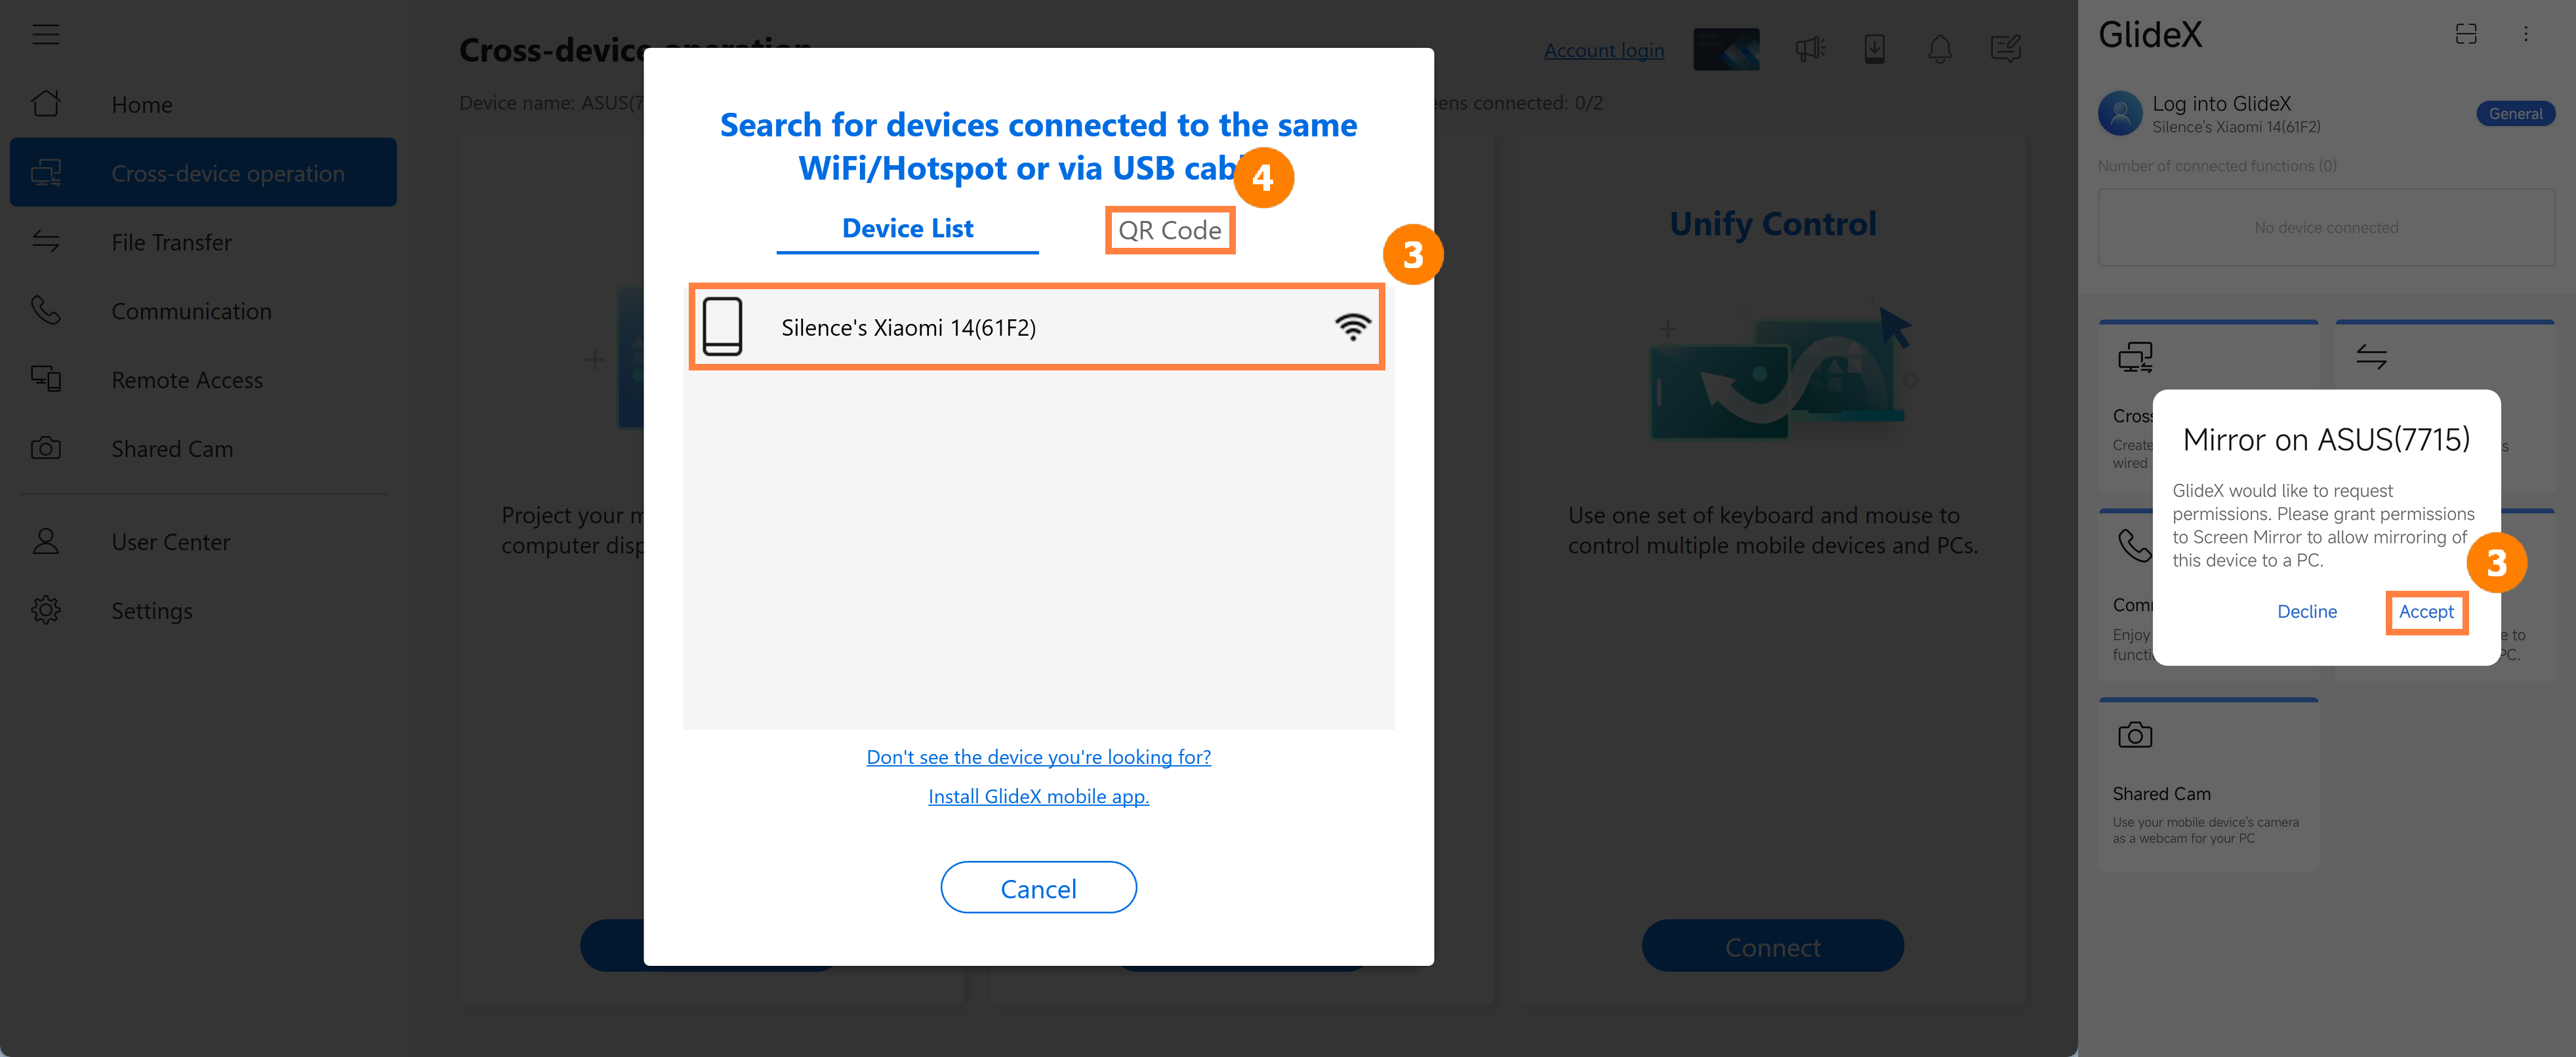
(2) Click ③[Device] on the computer, and a Mirror notification will appear on the mobile device, click ③[Accept]. You can also click ④[QR Code] to scan the QR Code connection via the camera on your mobile device. If you are logged in to the same ASUS membership account on your desktop and mobile device, notifications will be omitted on your mobile device and your desktop and mobile device will be directly linked.
※If you are logged in to the same ASUS member account on your computer and mobile device, the [Accept] notification on the mobile device will be omitted, and the computer and mobile device will be directly connected.
※ The connection method of Extend, Unify control and other functions is similar to the steps of Mirror, and will not be repeated in the future.
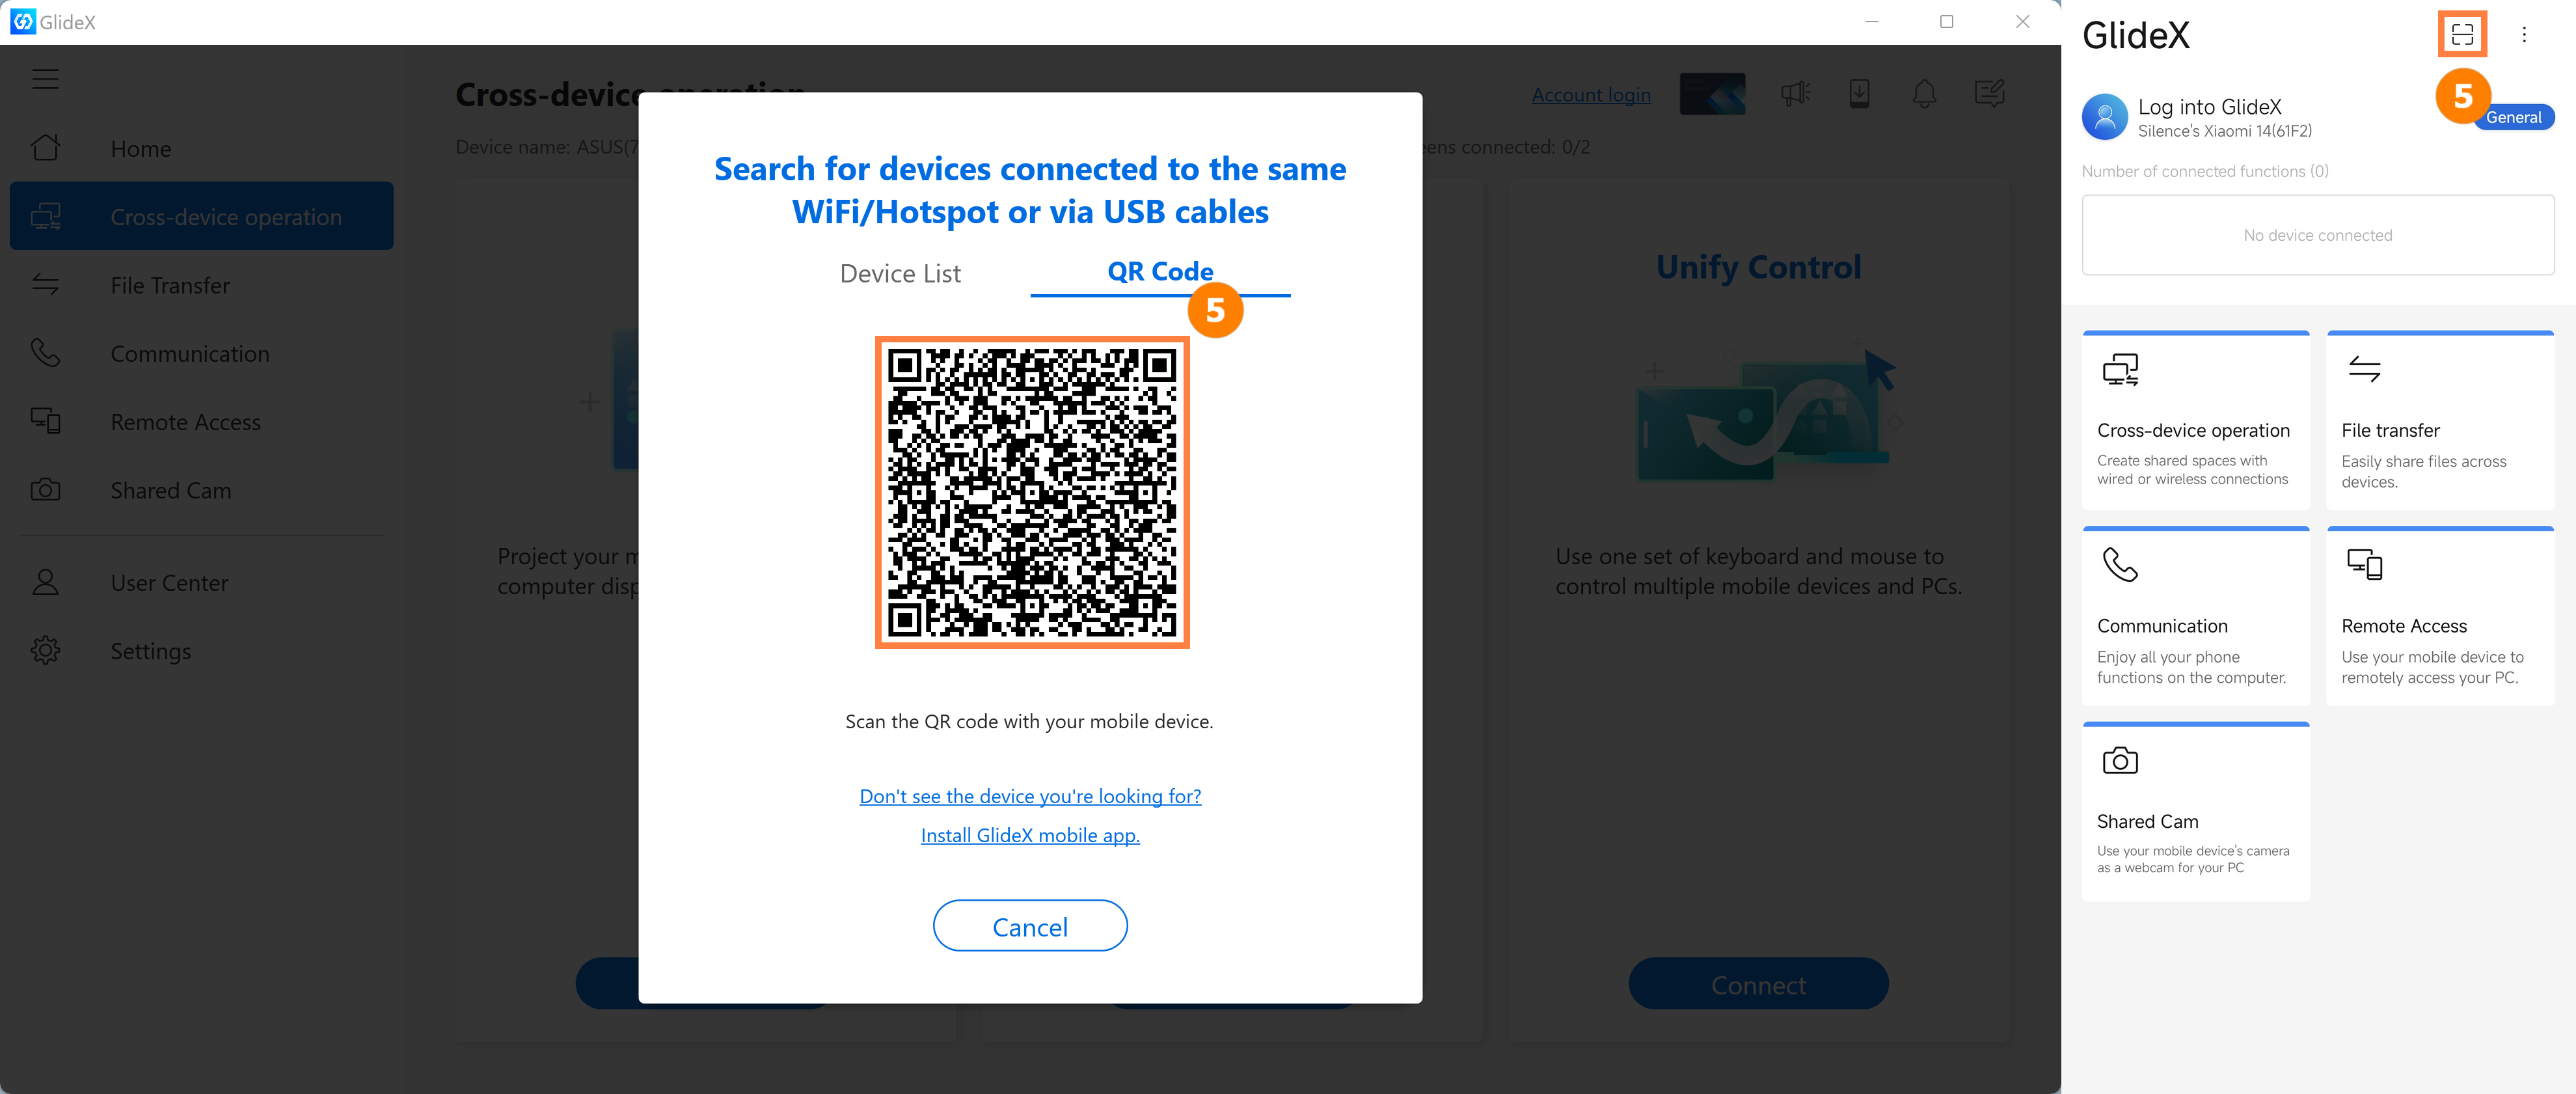
(3) Click ⑤[Scan] on your mobile device and scan ⑤[QR Code] displayed on your computer to quickly connect.
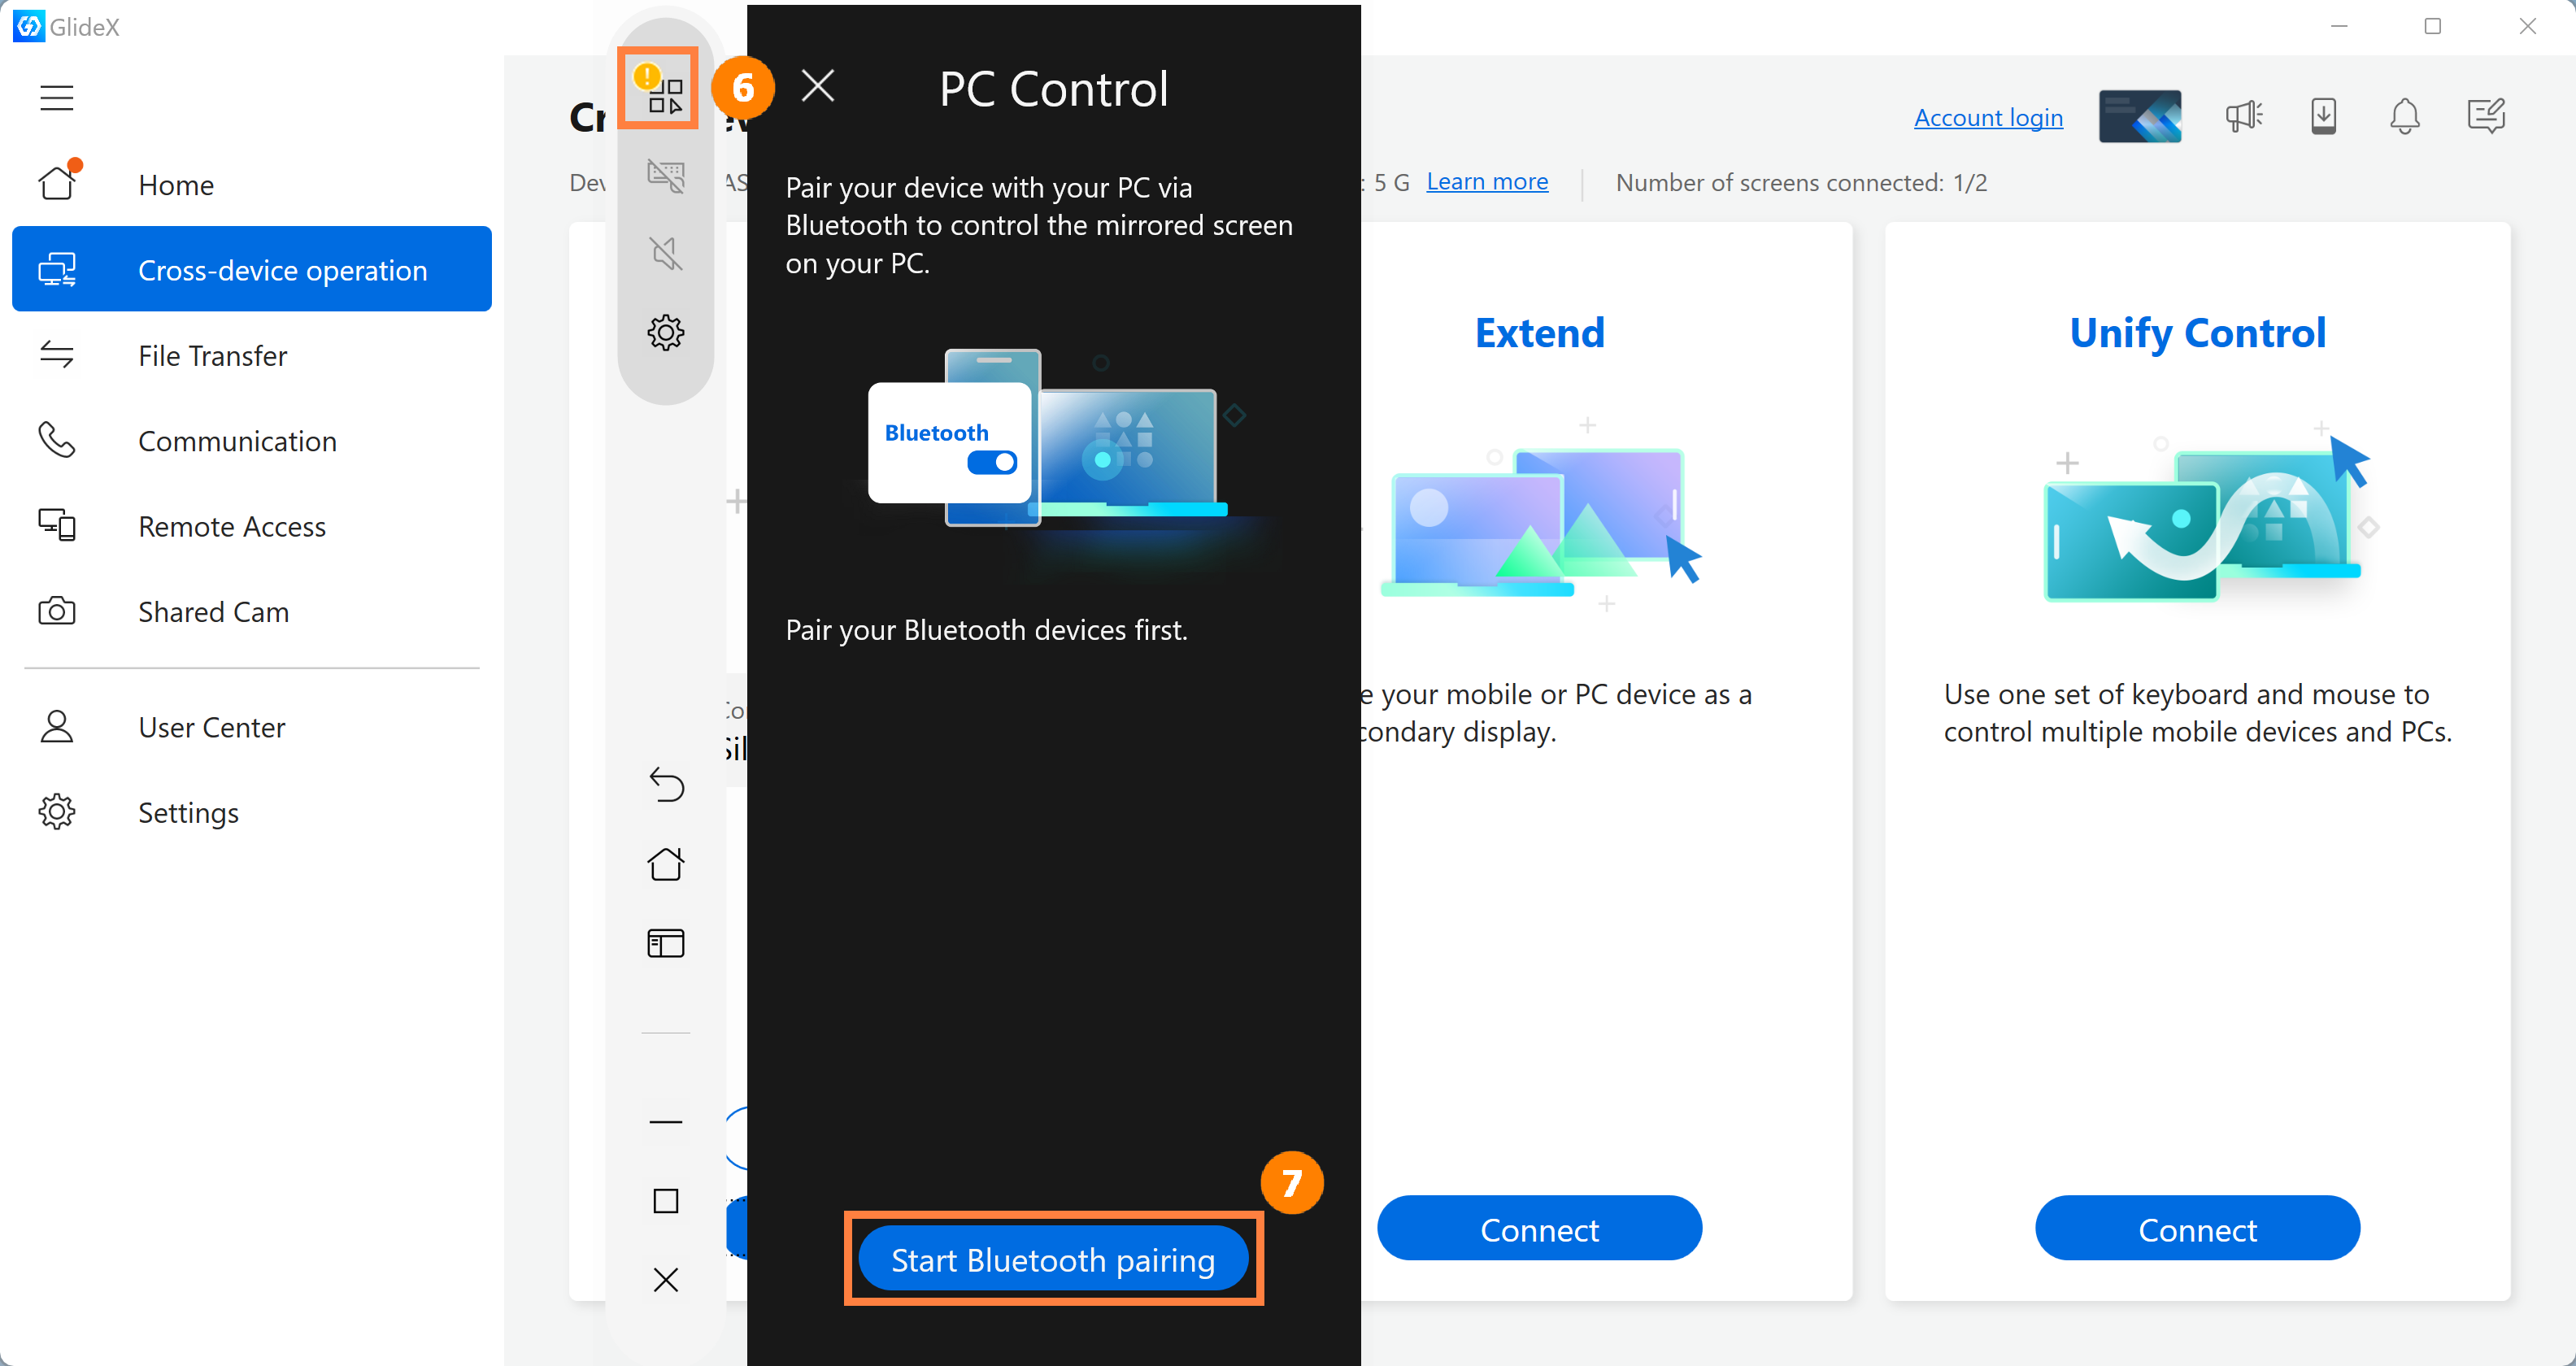
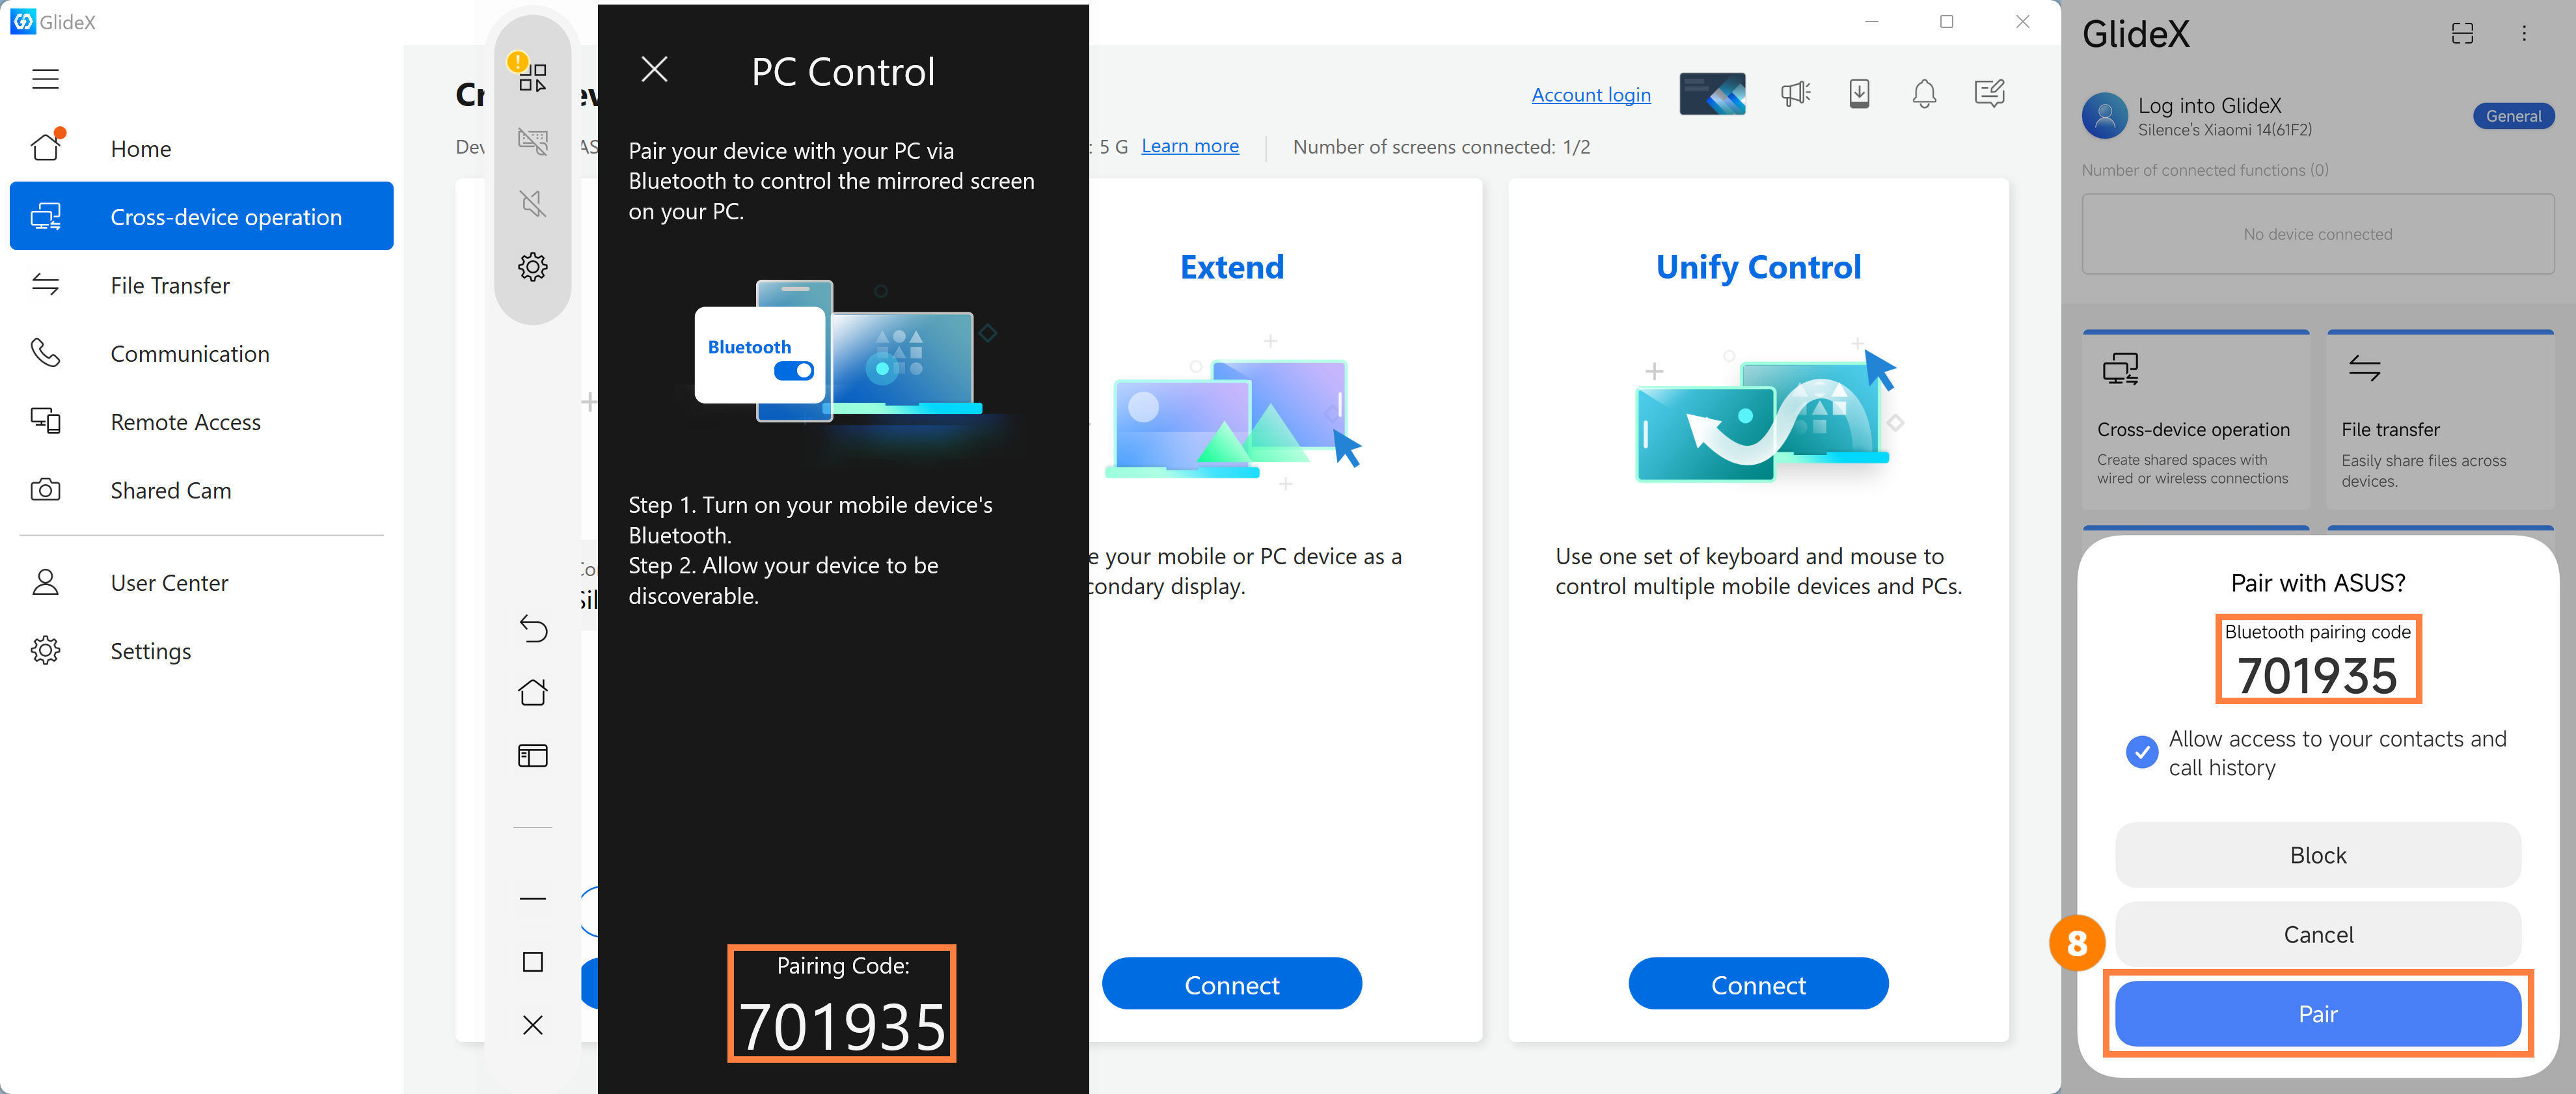
(4) If you want to use the mouse or keyboard on the computer to control the mobile device, or use the speakers of the computer to play the media sound of the mobile device, please click the ⑥[Computer Control] button on the left, and then click ⑦[Start Bluetooth pairing].
If you encounter problems using this function, please refer to: [GlideX] Bluetooth pairing problems | Official Support | ASUS Global
(5) A pop-up window will appear on the mobile device, please confirm whether the [pairing code] on the computer and mobile device are the same, and then tap ⑧[Pairi] on the computer and mobile device. If pairing fails, please unpair both sides on the Bluetooth pairing page of the computer and mobile device, and then pair manually on the Bluetooth pairing page.
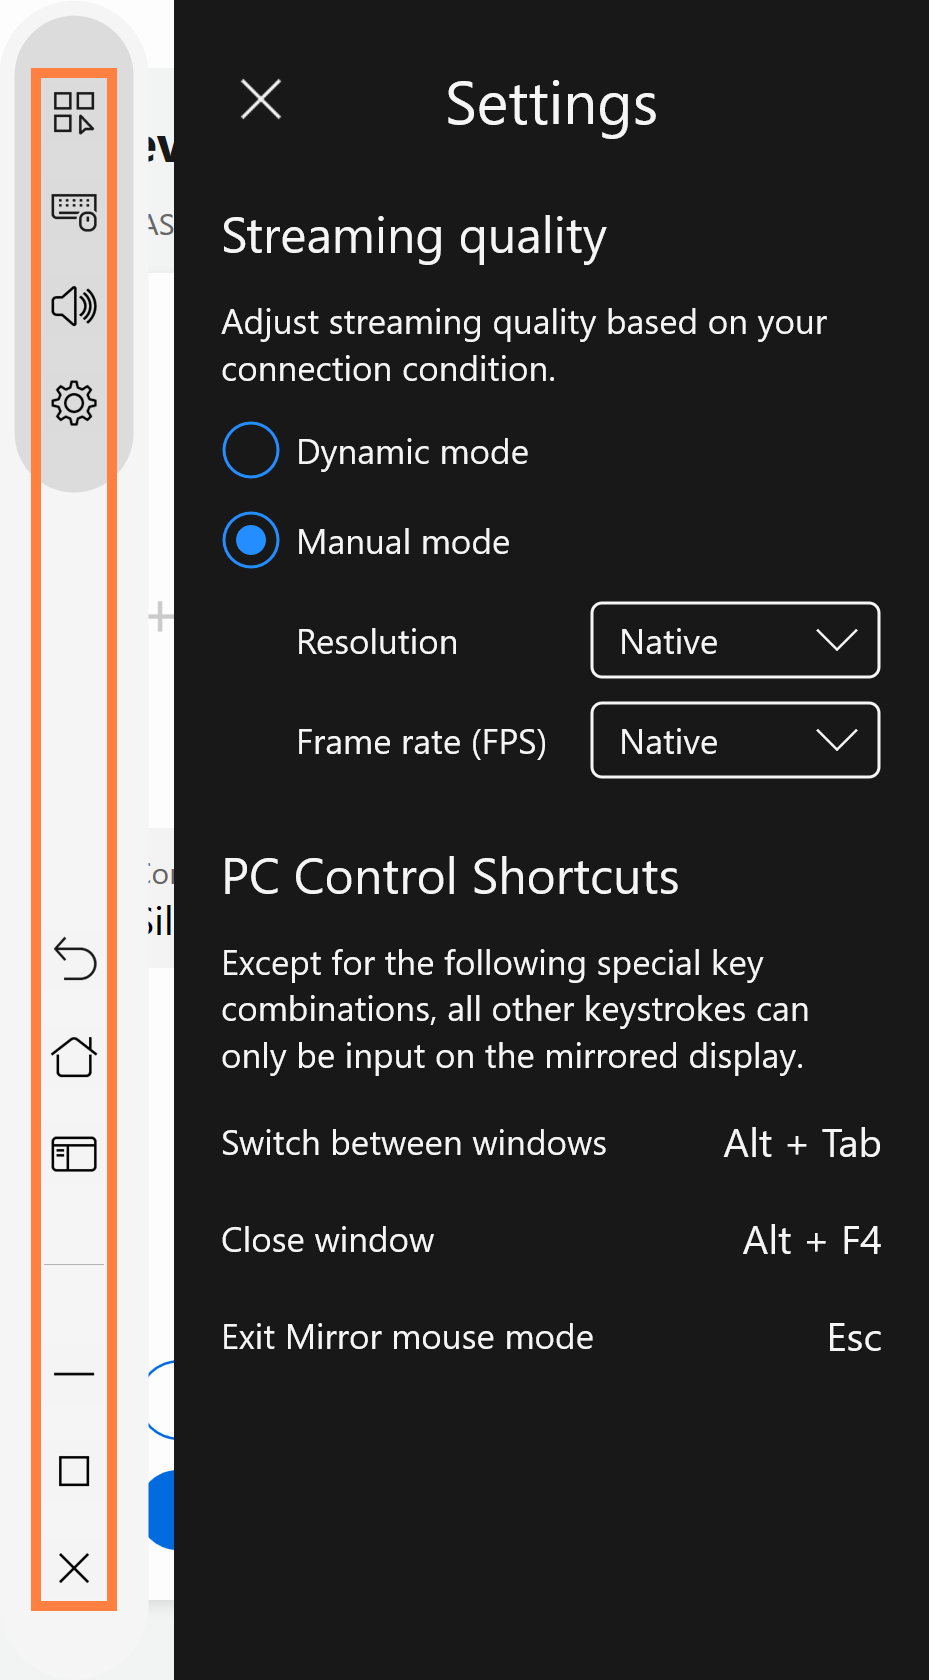
(6) After the computer is successfully paired, the following screen will be displayed. When the computer control function is turned on, go to the sidebar on the left side of your mobile device from top to bottom [PC Control] function, including [Keyboard & Mouse] switch button, [Audio] switch button, [Settings] button, [Mobile device control] button, and [Control] button.
To use PC's mouse on the mobile device*, switch to Mirror mouse mode by clicking on the mirrored screen. To exit from that mode, press Esc. Moreover, you can also customize your pointer speed based on the mobile systems:
·Android devices: Click the [Settings] button to adjust the speed.
·iOS devices: Go to your mobile device [Settings] > [General] > [Trackpad & Mouse]. We recommend you drag the "Tracking Speed" slider to the lowest. At the same time, turn off the [Natural Scrolling] setting to maintain your scrolling behavior on the computer.
* Go to your mobile device [Settings] > [Accessibility] > [Touch] > Turn on [AssistiveTouch], or ask Siri to [Turn on AssistiveTouch].
Audio - This function requires PC later than 20H1 devices. If it is a lower version, it is recommended that you upgrade the operating system for this function. Currently, GlideX supports streaming stereo music.
(7) When your mobile device is displayed in landscape orientation (for example, when you watch a video), the computer's mirror page is also displayed in landscape orientation. At this point, you can play the sound on your mobile device on your computer and watch the video on your computer.
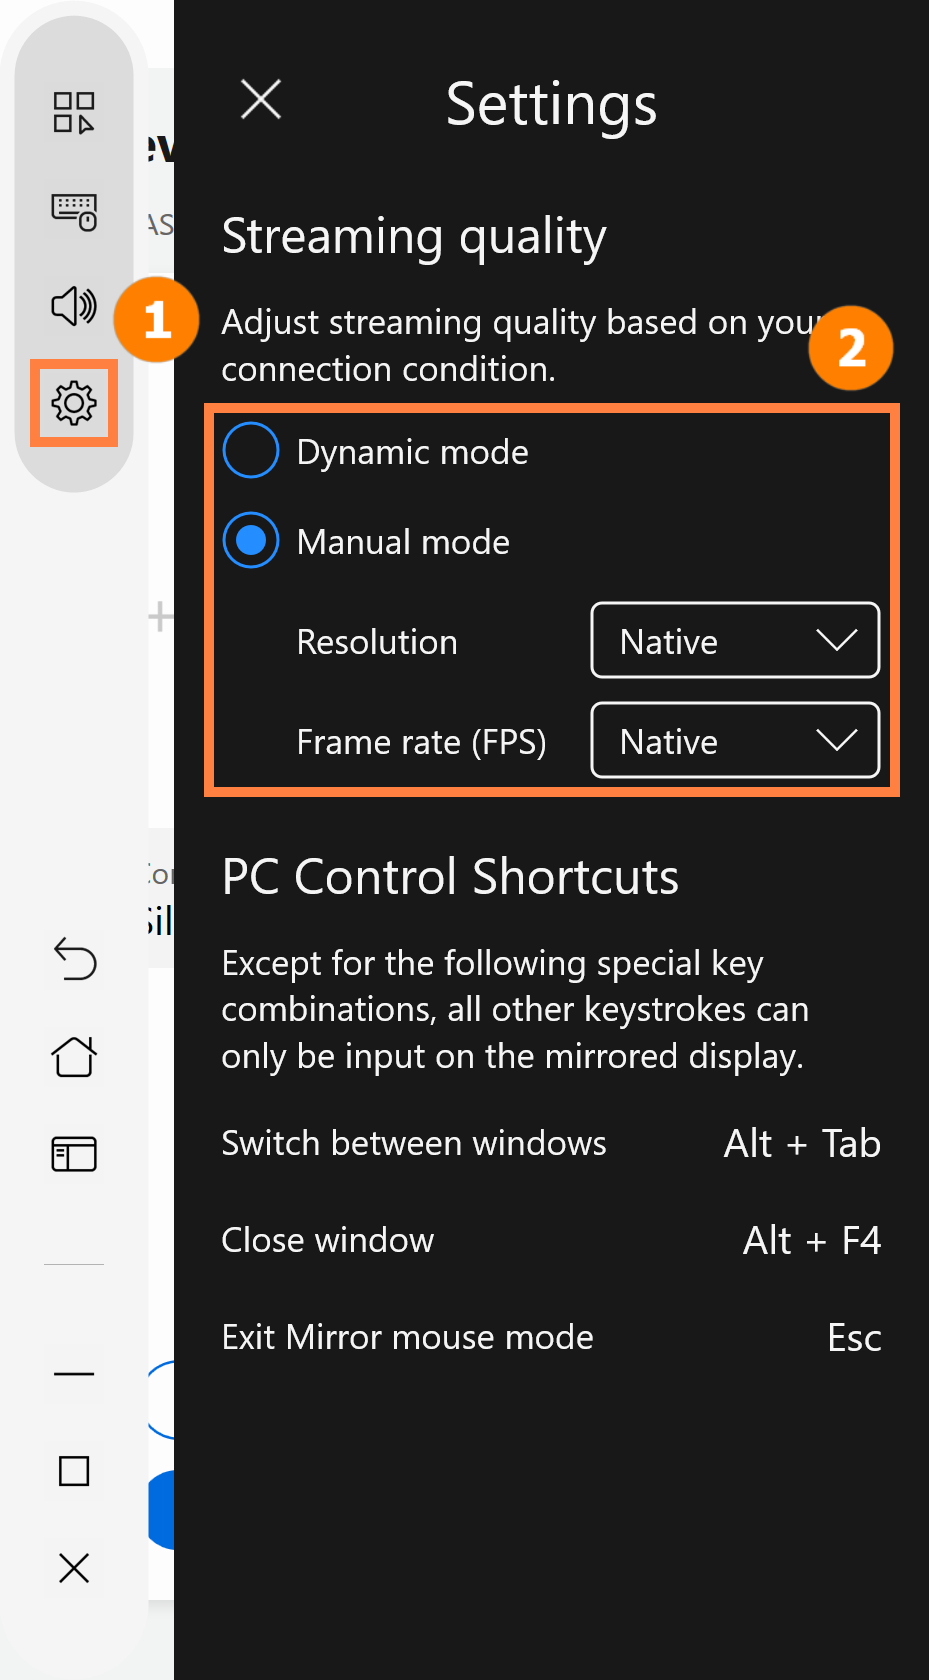
(8) How to switch your mirrored or extended picture quality? If your network is unstable, we recommend that you switch to 5 GHz WiFi, or tap①[Settings] to use dynamic adjustment mode in ②[Image Quality] or connect with a USB cable to enjoy a better experience.
※ GlideX supports linkage with ASUS Control Panel, please refer to ASUS Control Panel - Introduction | Official Support | ASUS Global
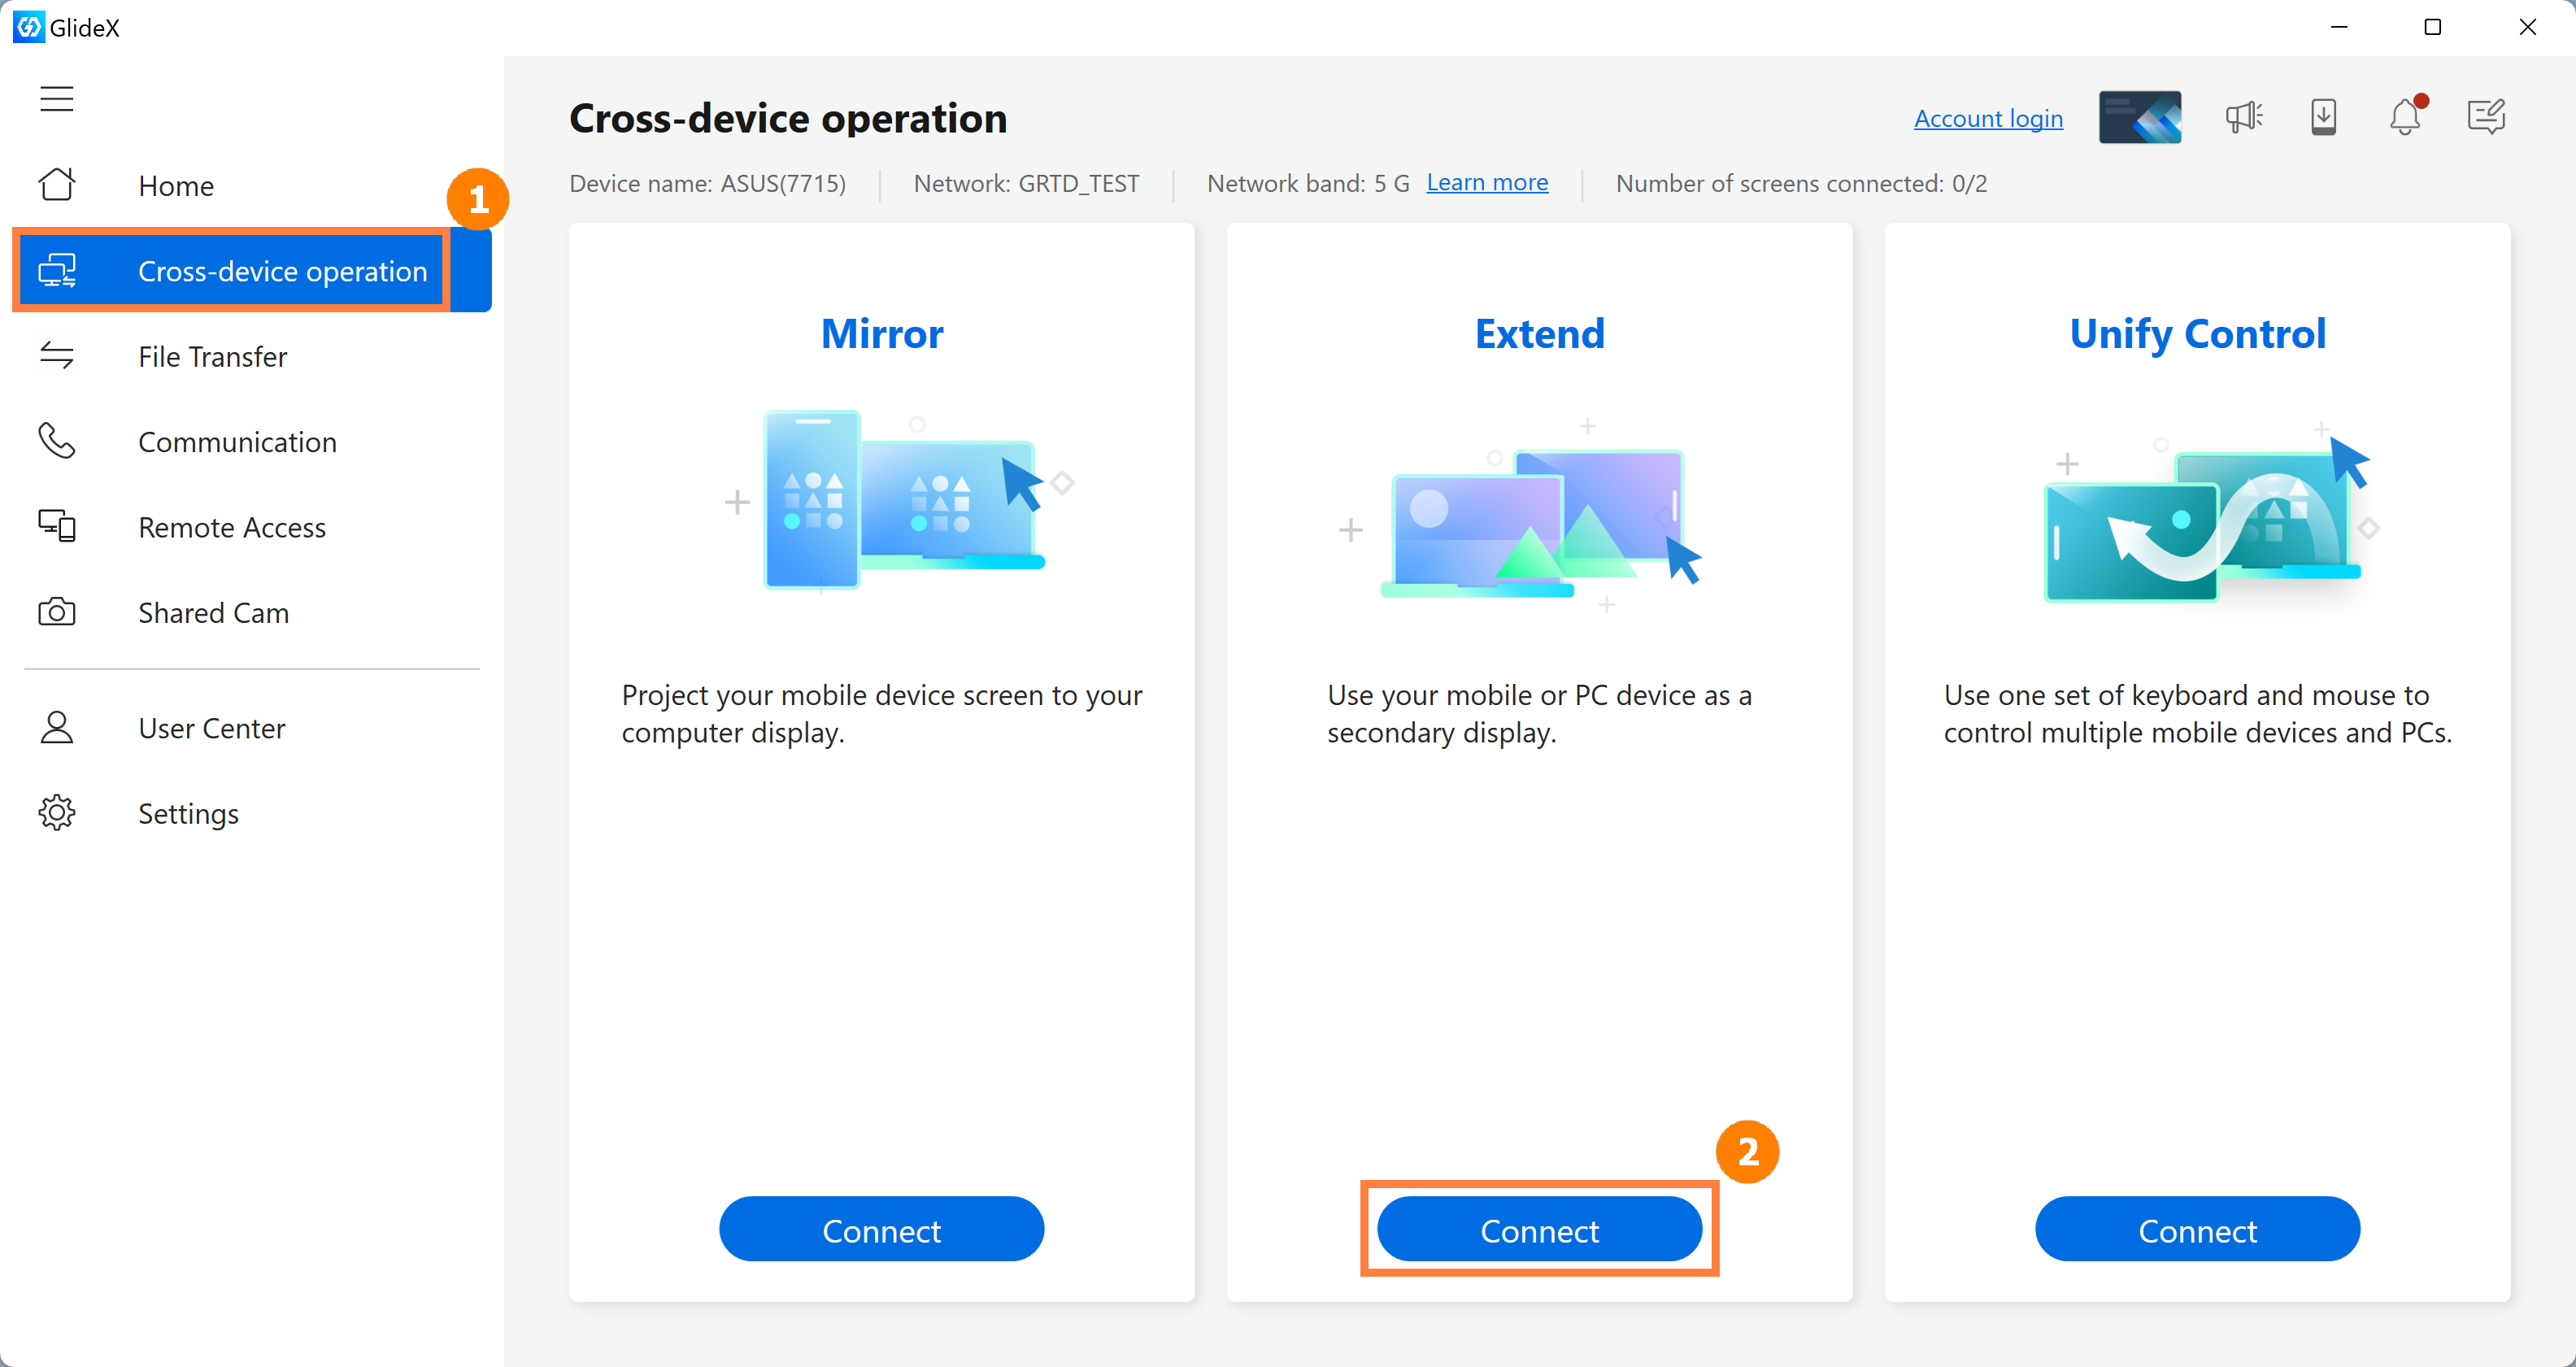
(1) On the main screen of GlideX, tap ①[Cross-device operation] and then tap ②[Connect].
※ The Extended function allows ASUS Exclusive users to connect two devices at the same time, and the devices can be another computer or mobile device.
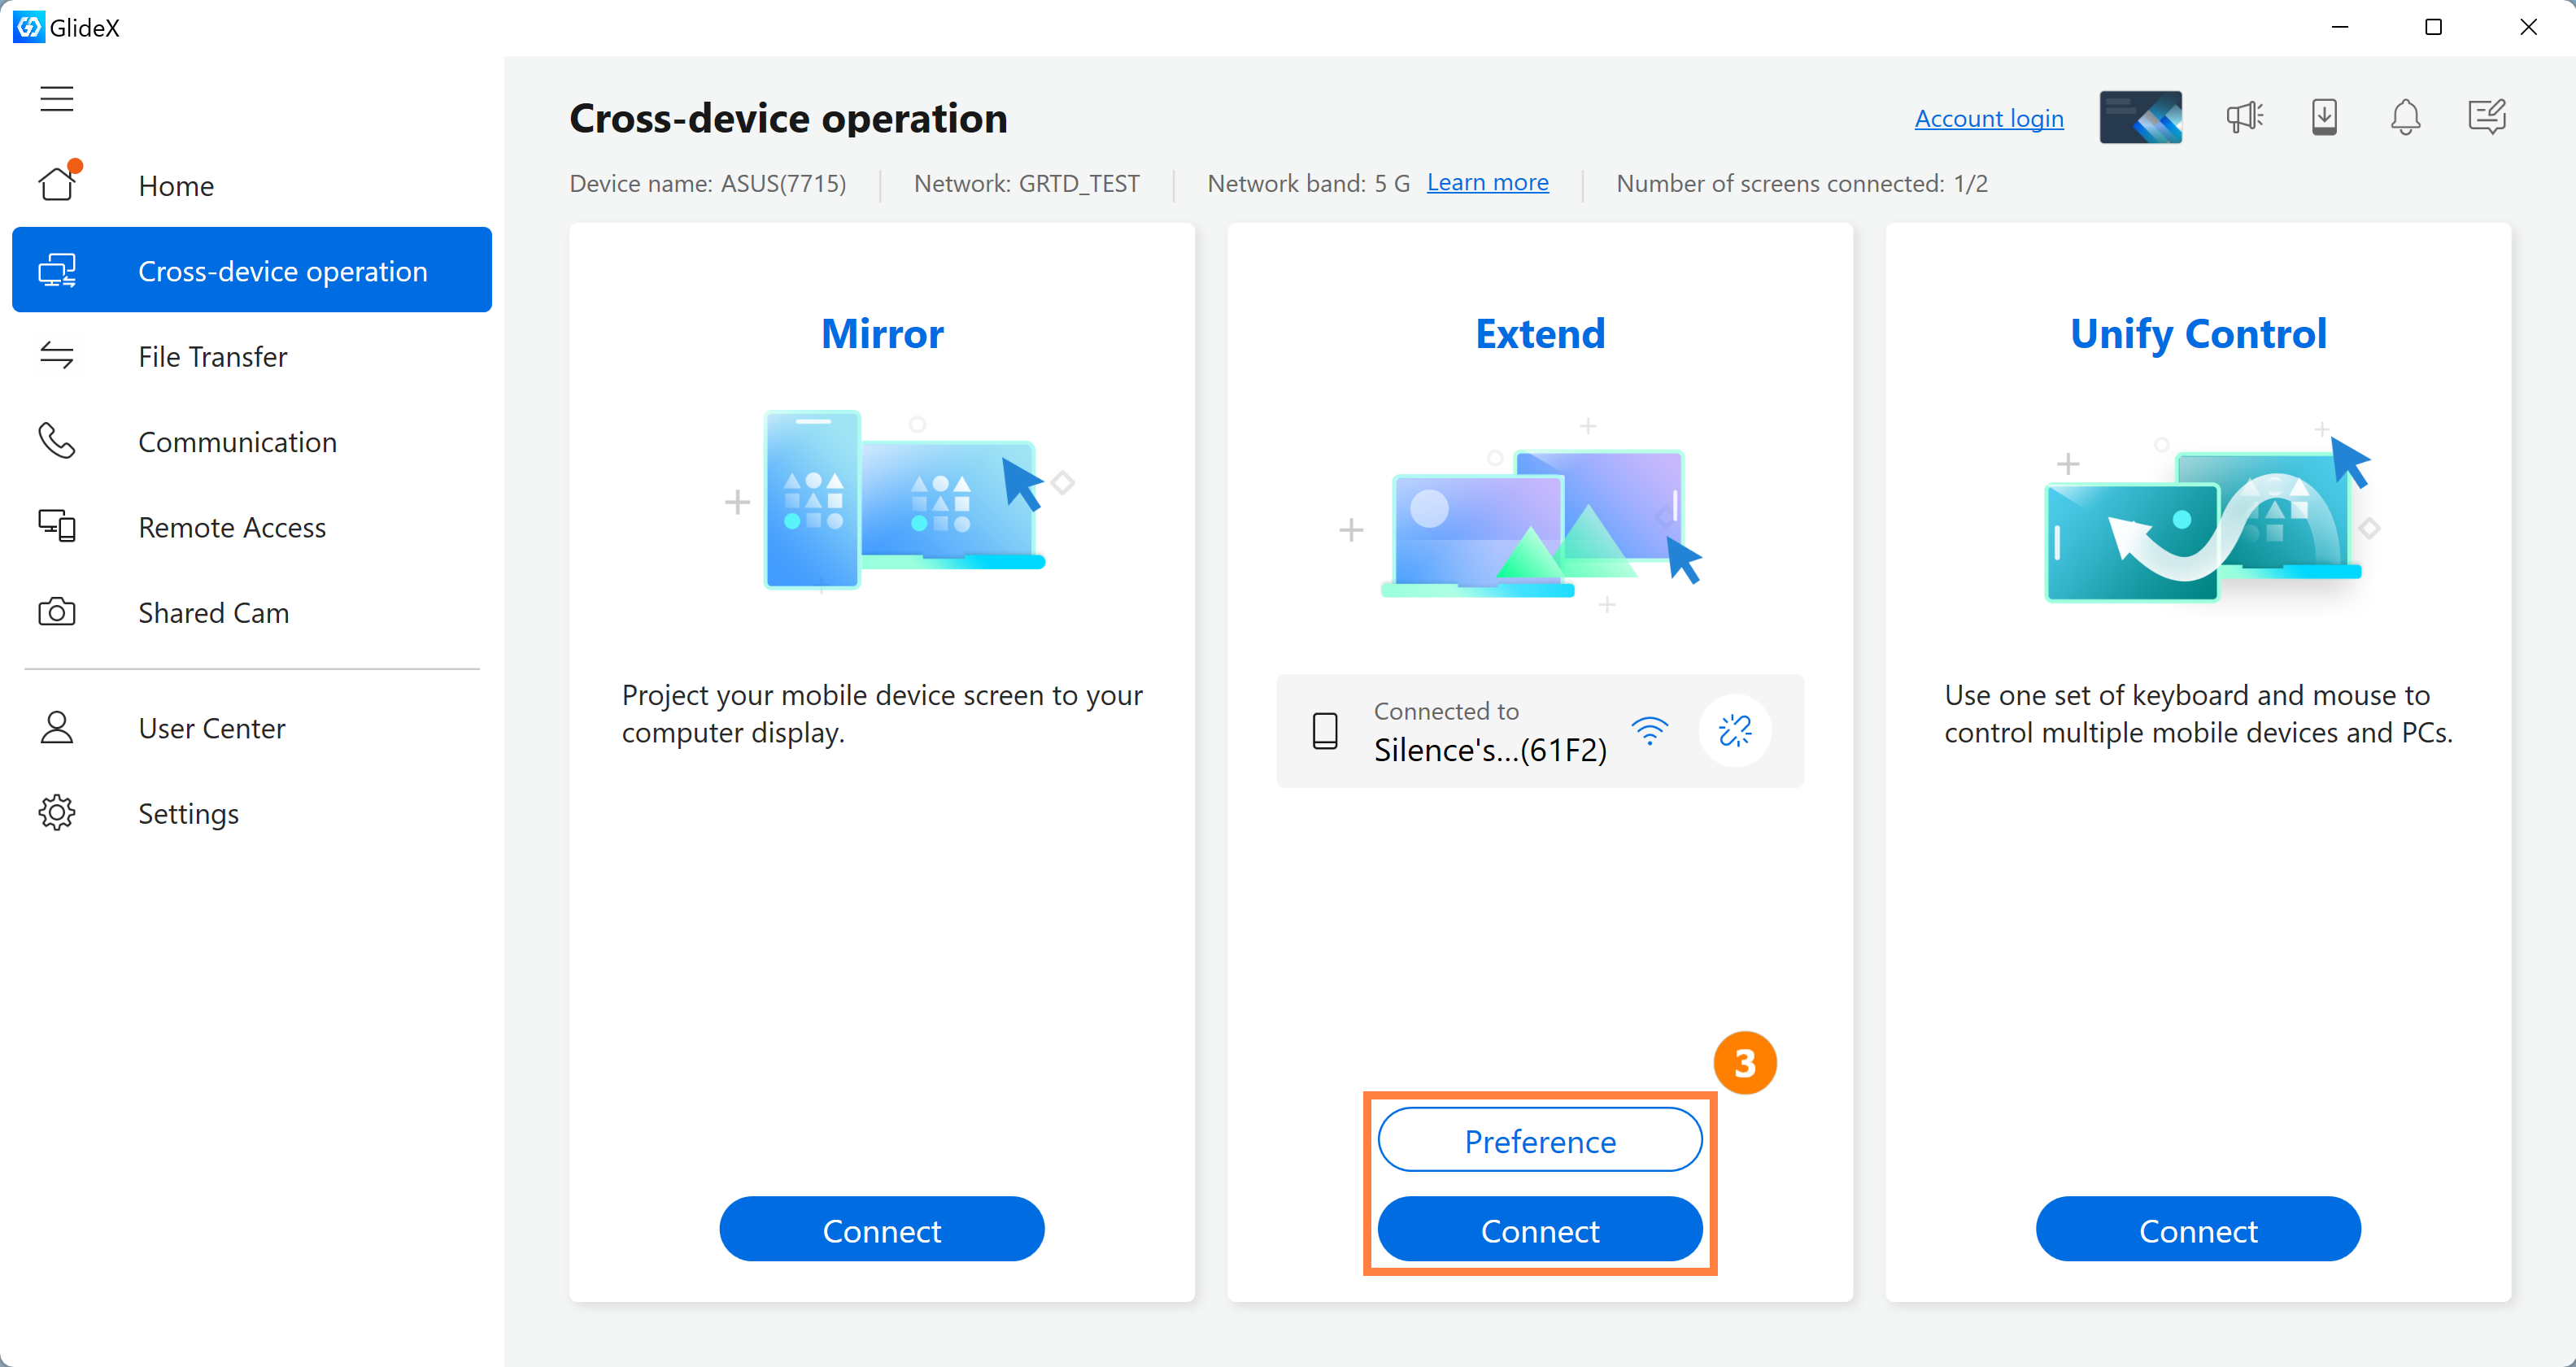
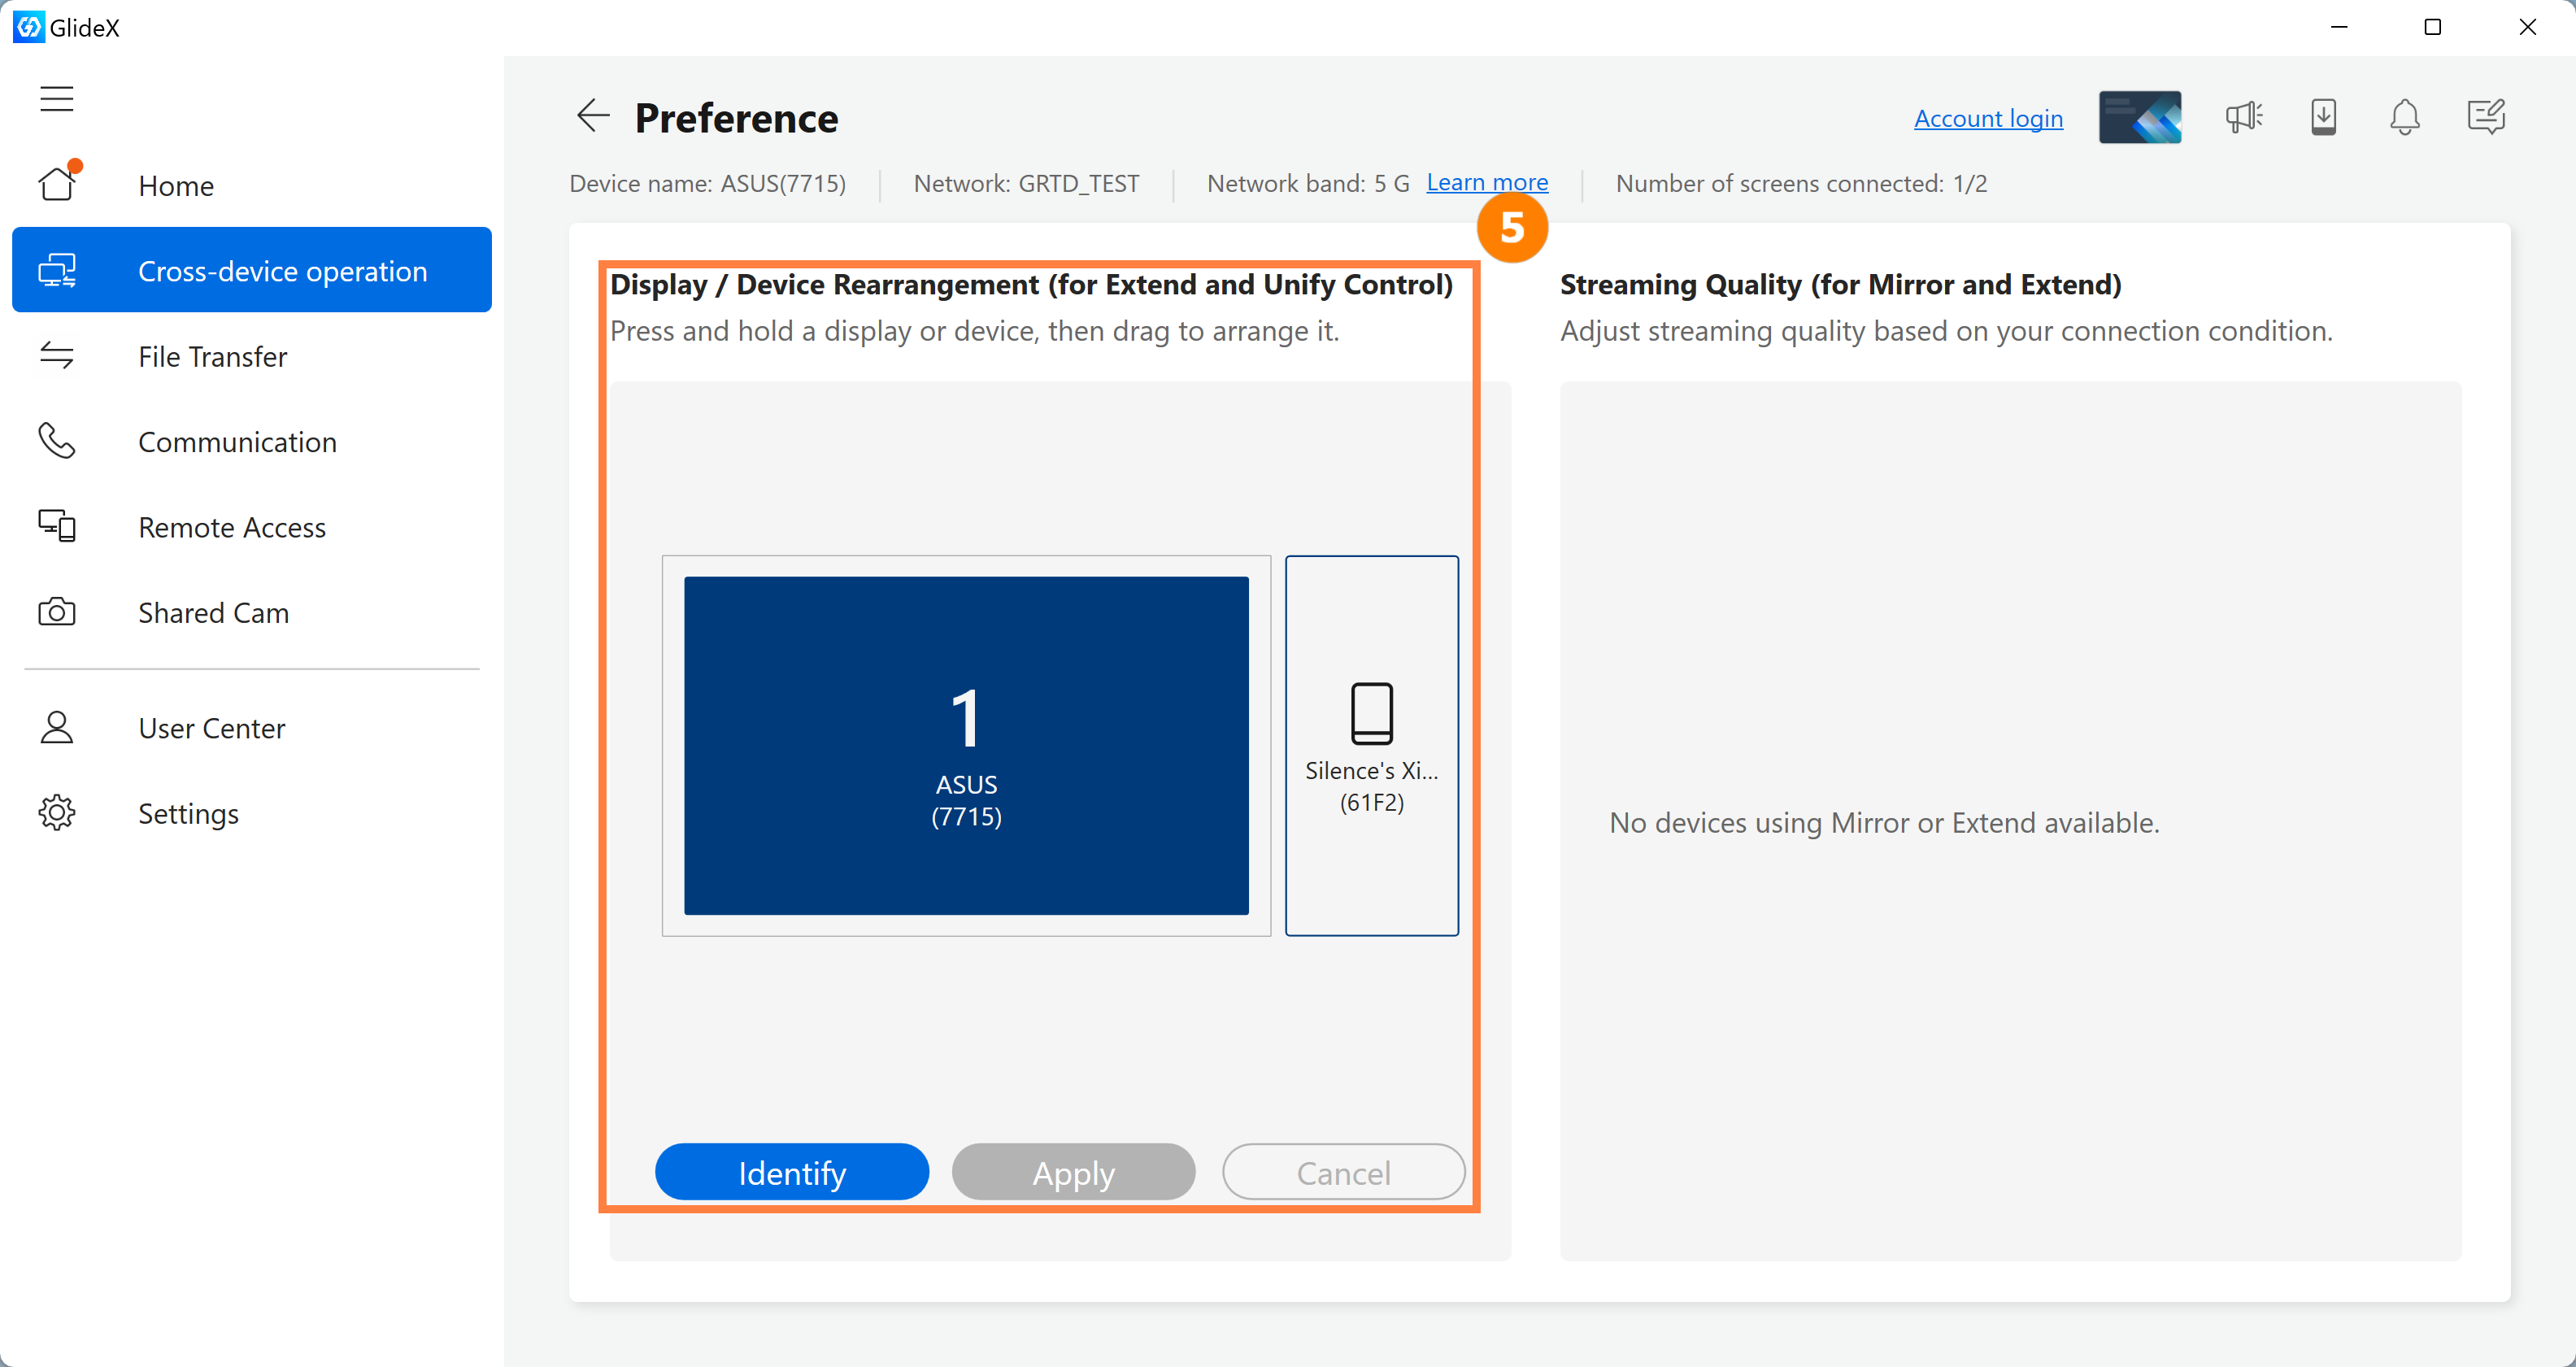
(2) The connection is complete. Now GlideX can connect two devices at the same time, click ③[Connect] to connect the second device. We can click on ③[Preference].
(3) In ④[Display/Devices Rearrangement] on the left, you can set the relative position of the screen. In ⑤[Image Quality] on the right, you can set the image quality of the two extended screens. At this point, the position of ⑥[Extended Screen] relative to the Home screen is shown in the following figure.

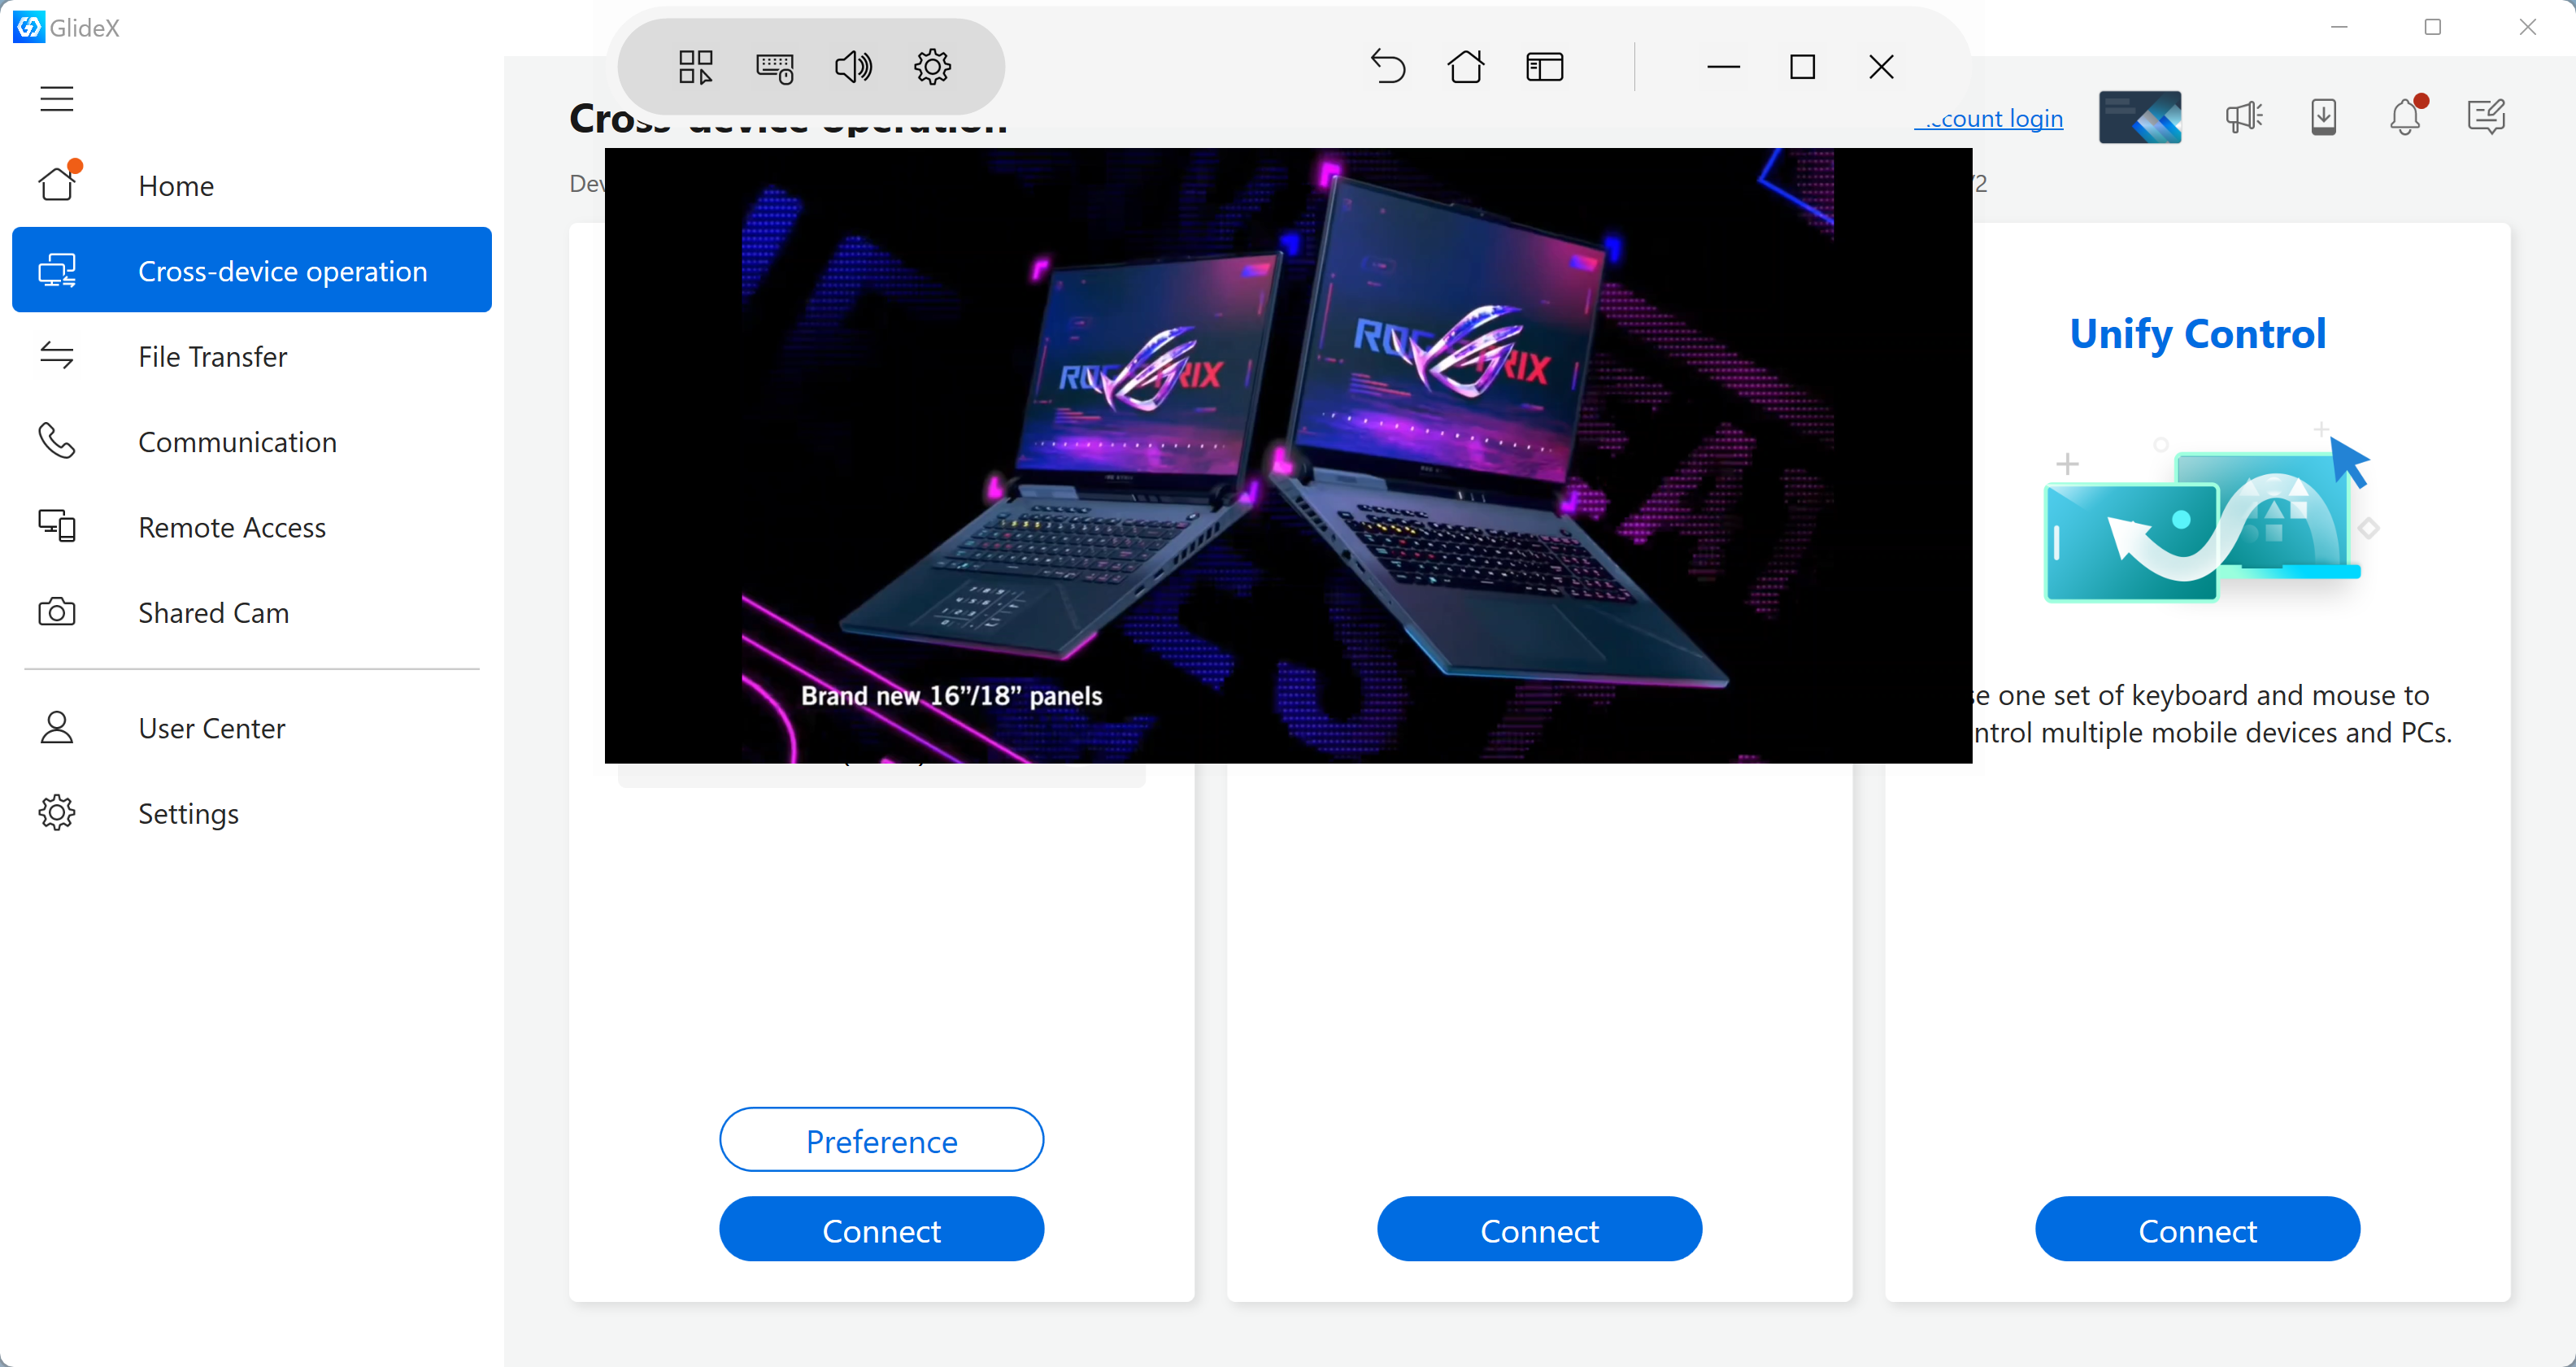
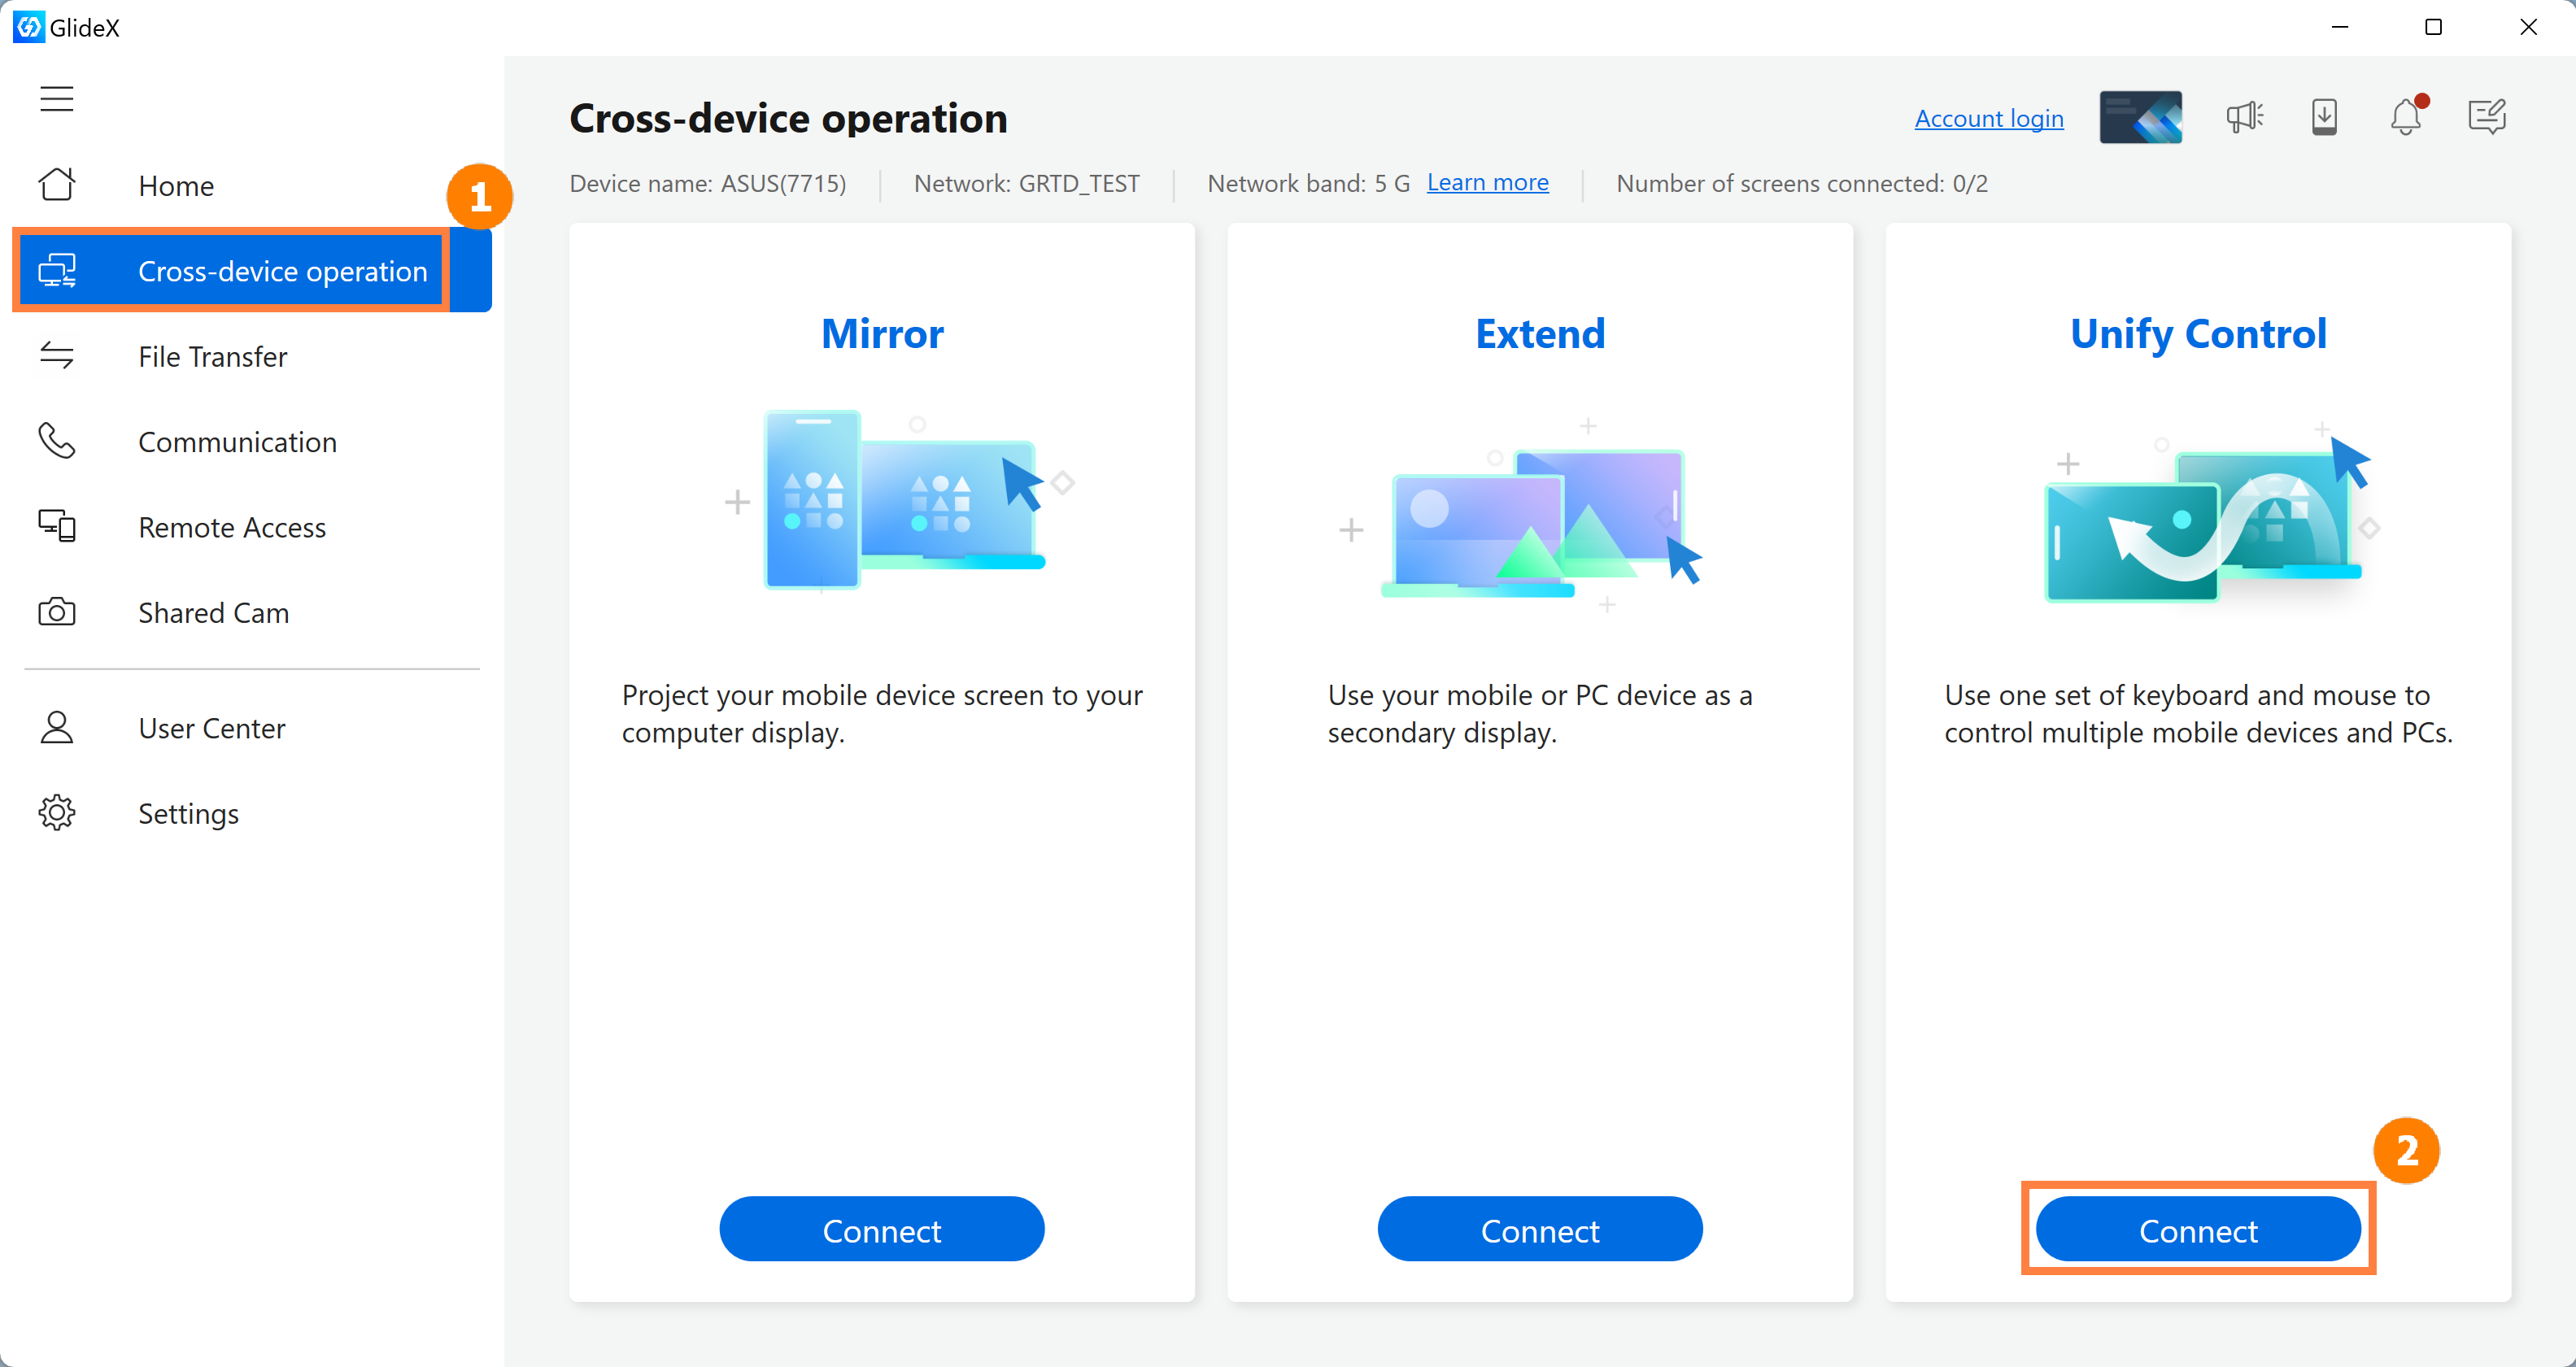
(1) On the main screen of GlideX, click ①[Cross-device operation], then click ②[Connect].
※ The Unify Control allows ASUS Exclusive users to connect two devices at the same time, and the device can be another computer or mobile device.
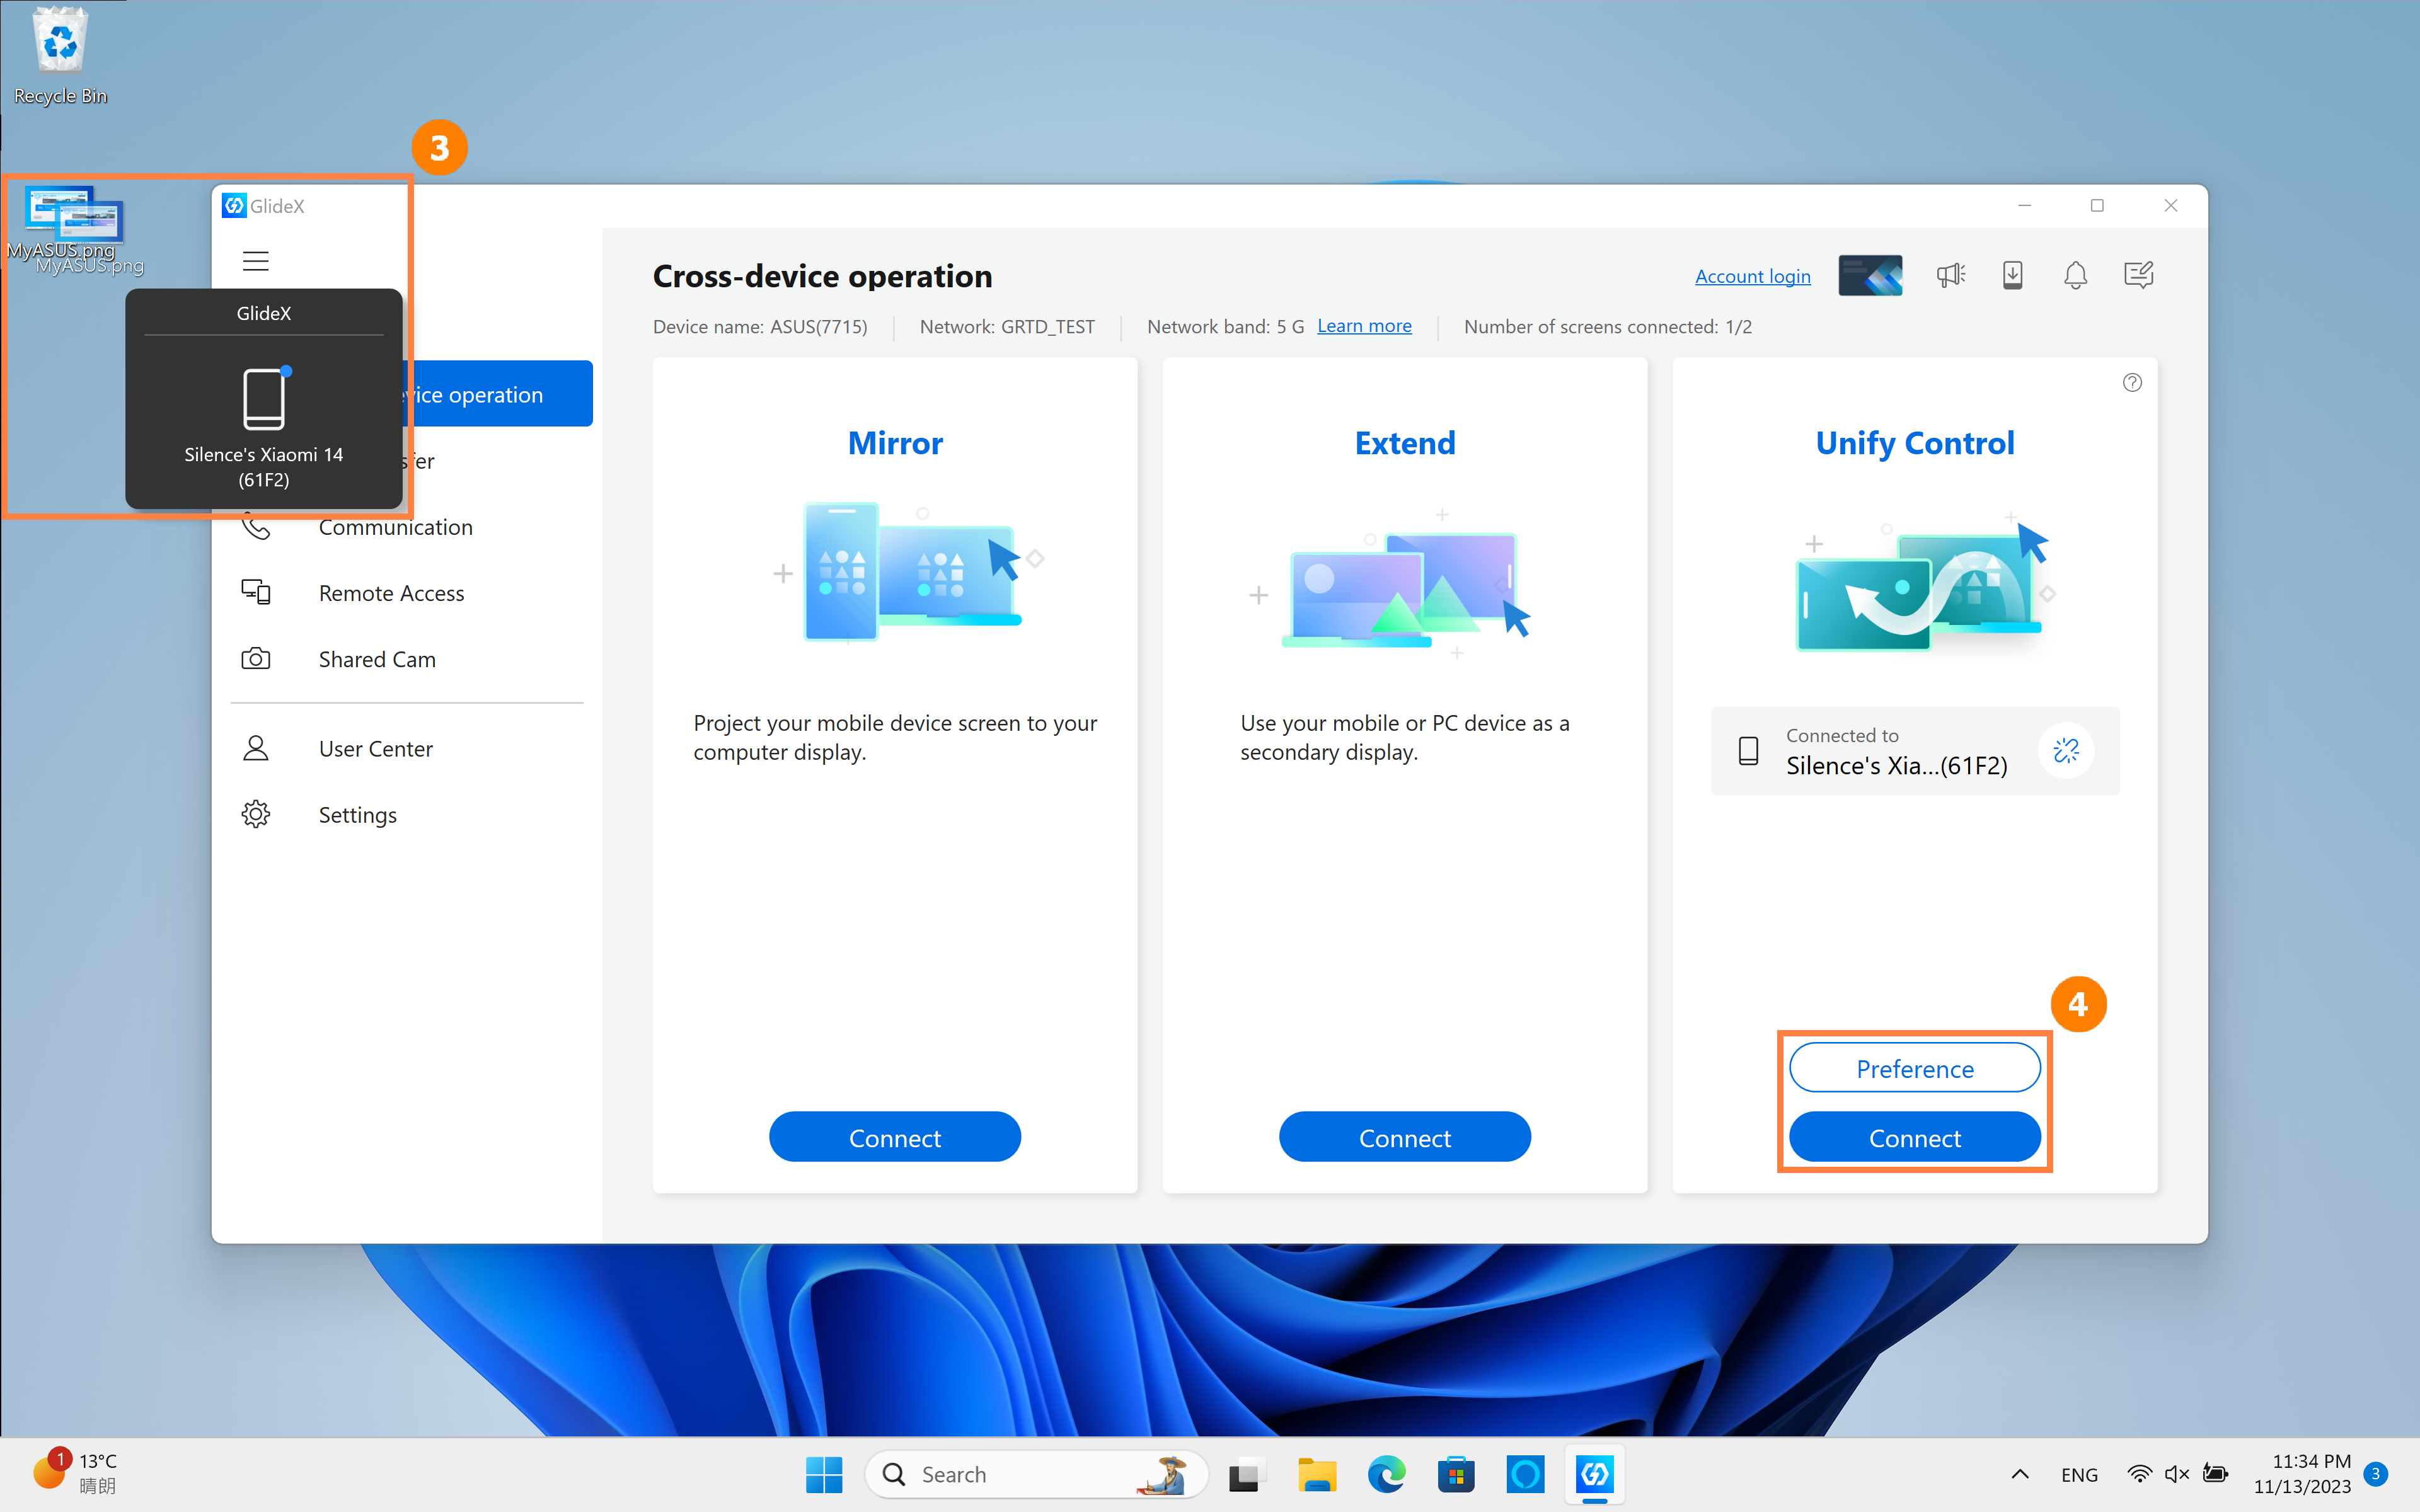
(2) After the device is connected, drag the file on the desktop as shown below, ③[Device icon] will appear, you can drag the file into the icon to achieve quick file transfer between devices, and the received file is in the [File Management-> Download] folder of the receiving device. We can click ④[Preference] to edit online.
(3) Adjust the relative position between devices in ⑤[Display/Devices Rearrangement].
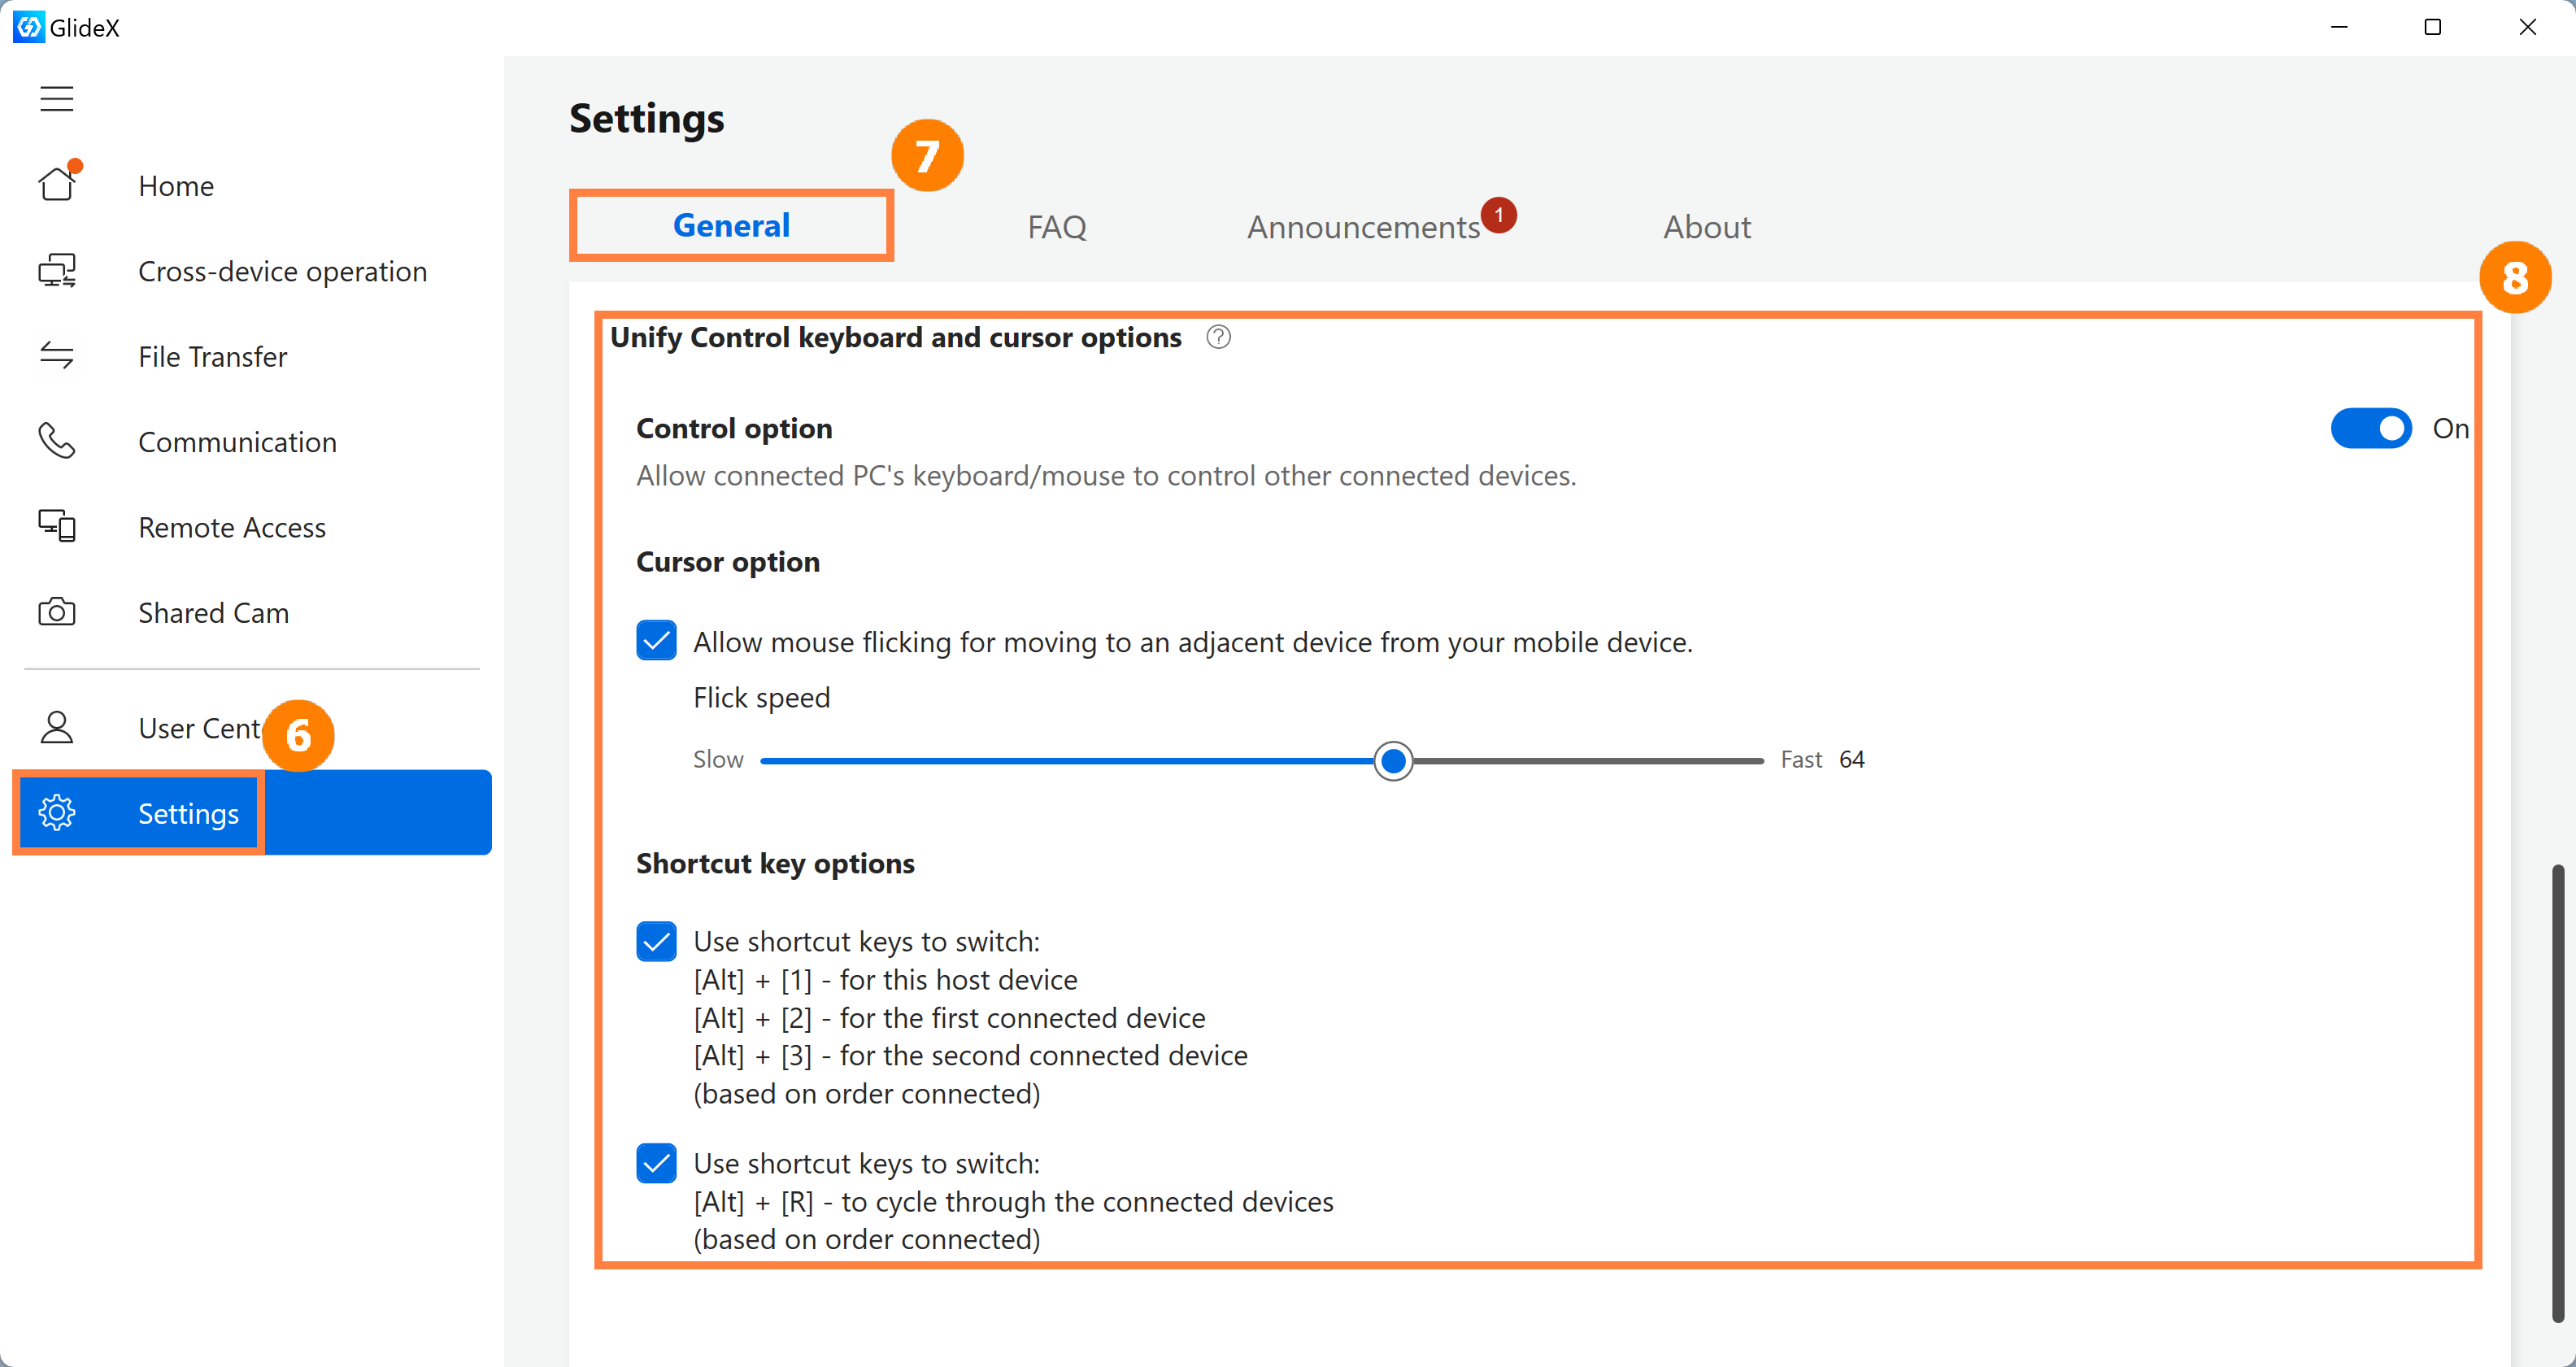
(4) When using the collaborative control function, you may encounter problems such as not being able to find the mouse. Click ⑥[Settings], click ⑦[General], and adjust the mouse or keyboard switching options in ⑧ [Unify Control keyboard and cursor Options].
7. File Transfer & URL Sharing
The File Transfer & URL Sharing feature requires two devices to be connected to the network, or have been connected via Bluetooth, and the [Searchable] function is turned on, and the [File Transfer] function is turned on.
If you encounter problems using this function, please refer to: [GlideX] Cannot find the device you want to connect in the device list? | Official Support | ASUS Gl...
7.1 File transfer - computer to mobile device transfer
※ There are two types of file transfer:
· Transfer files from the computer to other devices (the receiving device is a computer or a mobile device)
· Transfer files from a mobile device to other device (the receiving device is a computer or a mobile device)
(1) Click ①[File Transfer] and drag ②[File] to the dialog box, or manually select ②[File] and click ③[Send].

(2) In the new pop-up dialog box, we can select ④[Select nearby devices], the steps are similar to the introduction of the mirror function, and will not be repeated.
Or we can click ④[Please enter the pairing code displayed on the receiving device], and then on the receiving device, tap ⑤[File Transfer], ⑥[Receive], and fill in the ⑦[Pairing Code] displayed on the device to the App on the file sender.
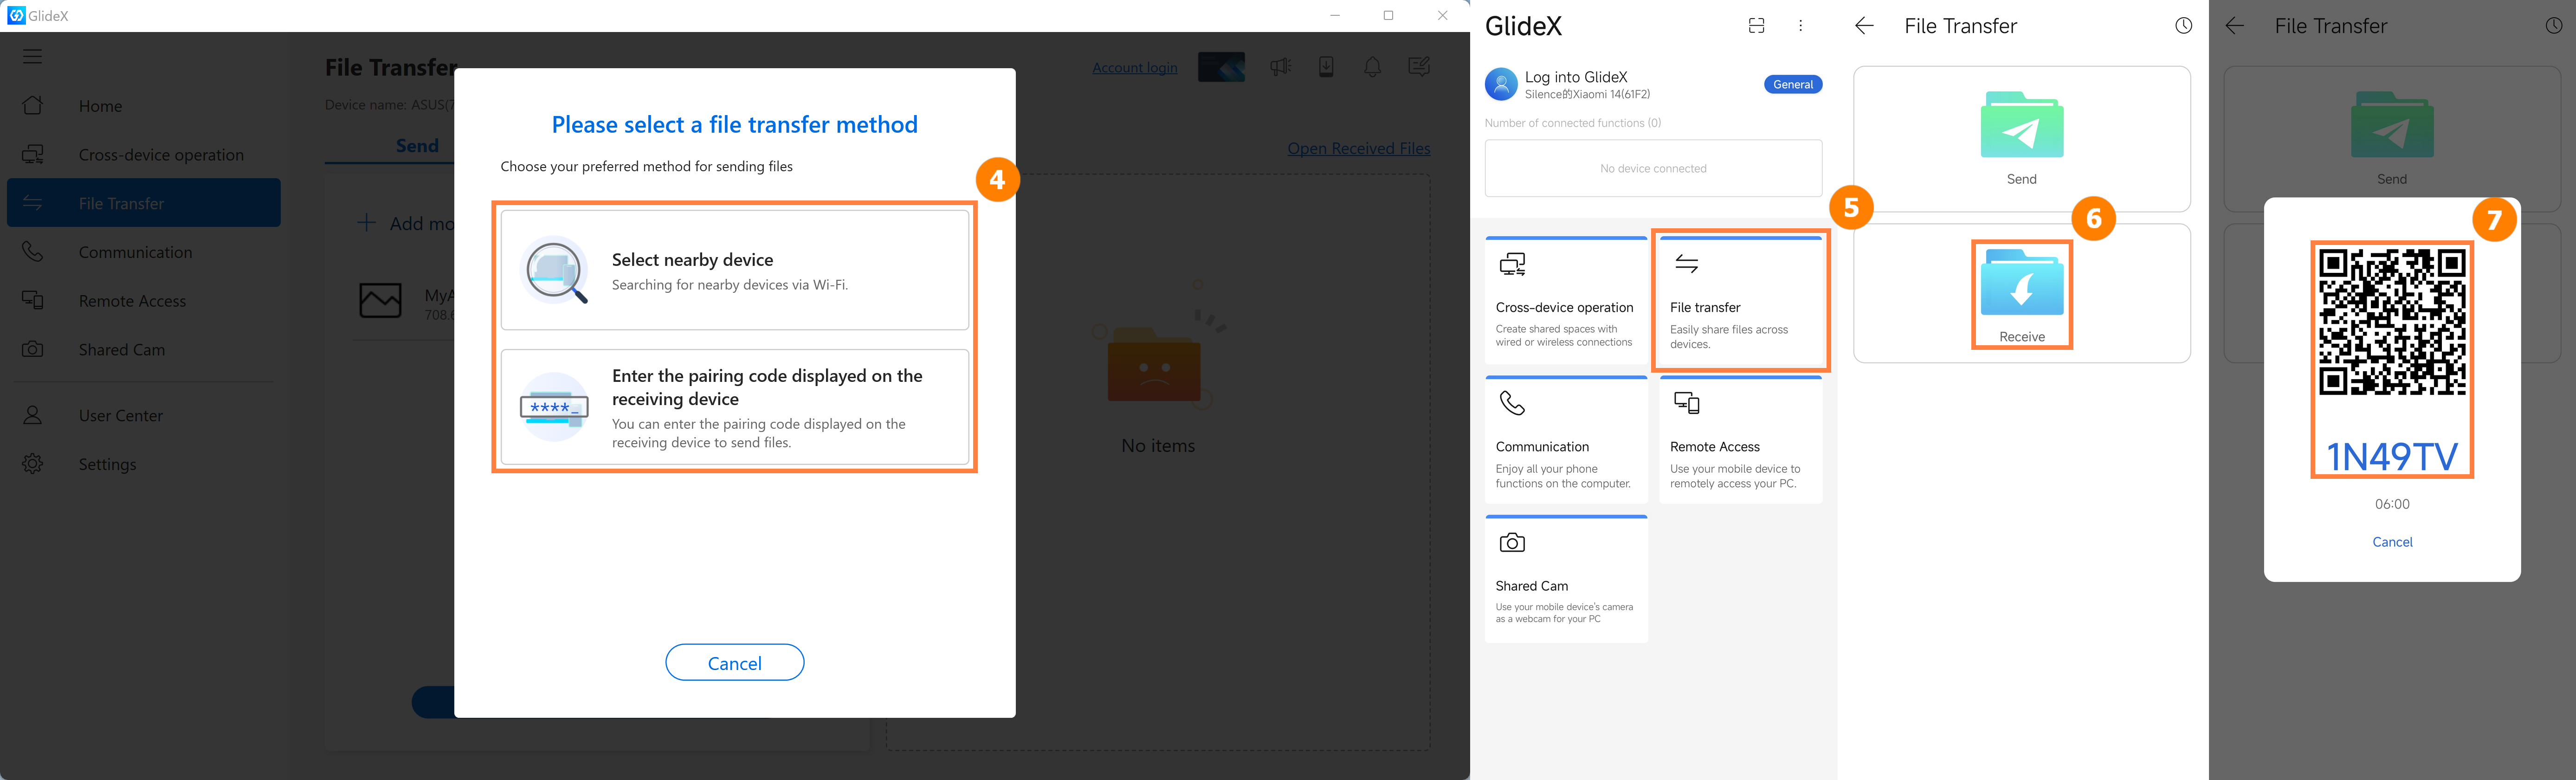
(3) When the file transfer is complete, tap ⑧[History] on the receiving device to open the received [File].

7.2 File Transfer - Transfer from Mobile Device to Computer
(1) Click ①[File transfer], click ②[Send], click ③[File] to be transferred, click ④[Send].

(2) In the new pop-up dialog box, we can select ⑤[Select nearby devices], the steps are similar to those introduced in the Mirror, and will not be repeated.
Or we can tap ⑤[Enter the pairing code displayed on the receiving device], and then on the receiving device, click ⑦[File Transfer], ⑧[Receive], and fill in the ⑨[Pairing Code] displayed on the device to ⑥[bar], or scan ⑨[QR Code] with ⑥[Camera].

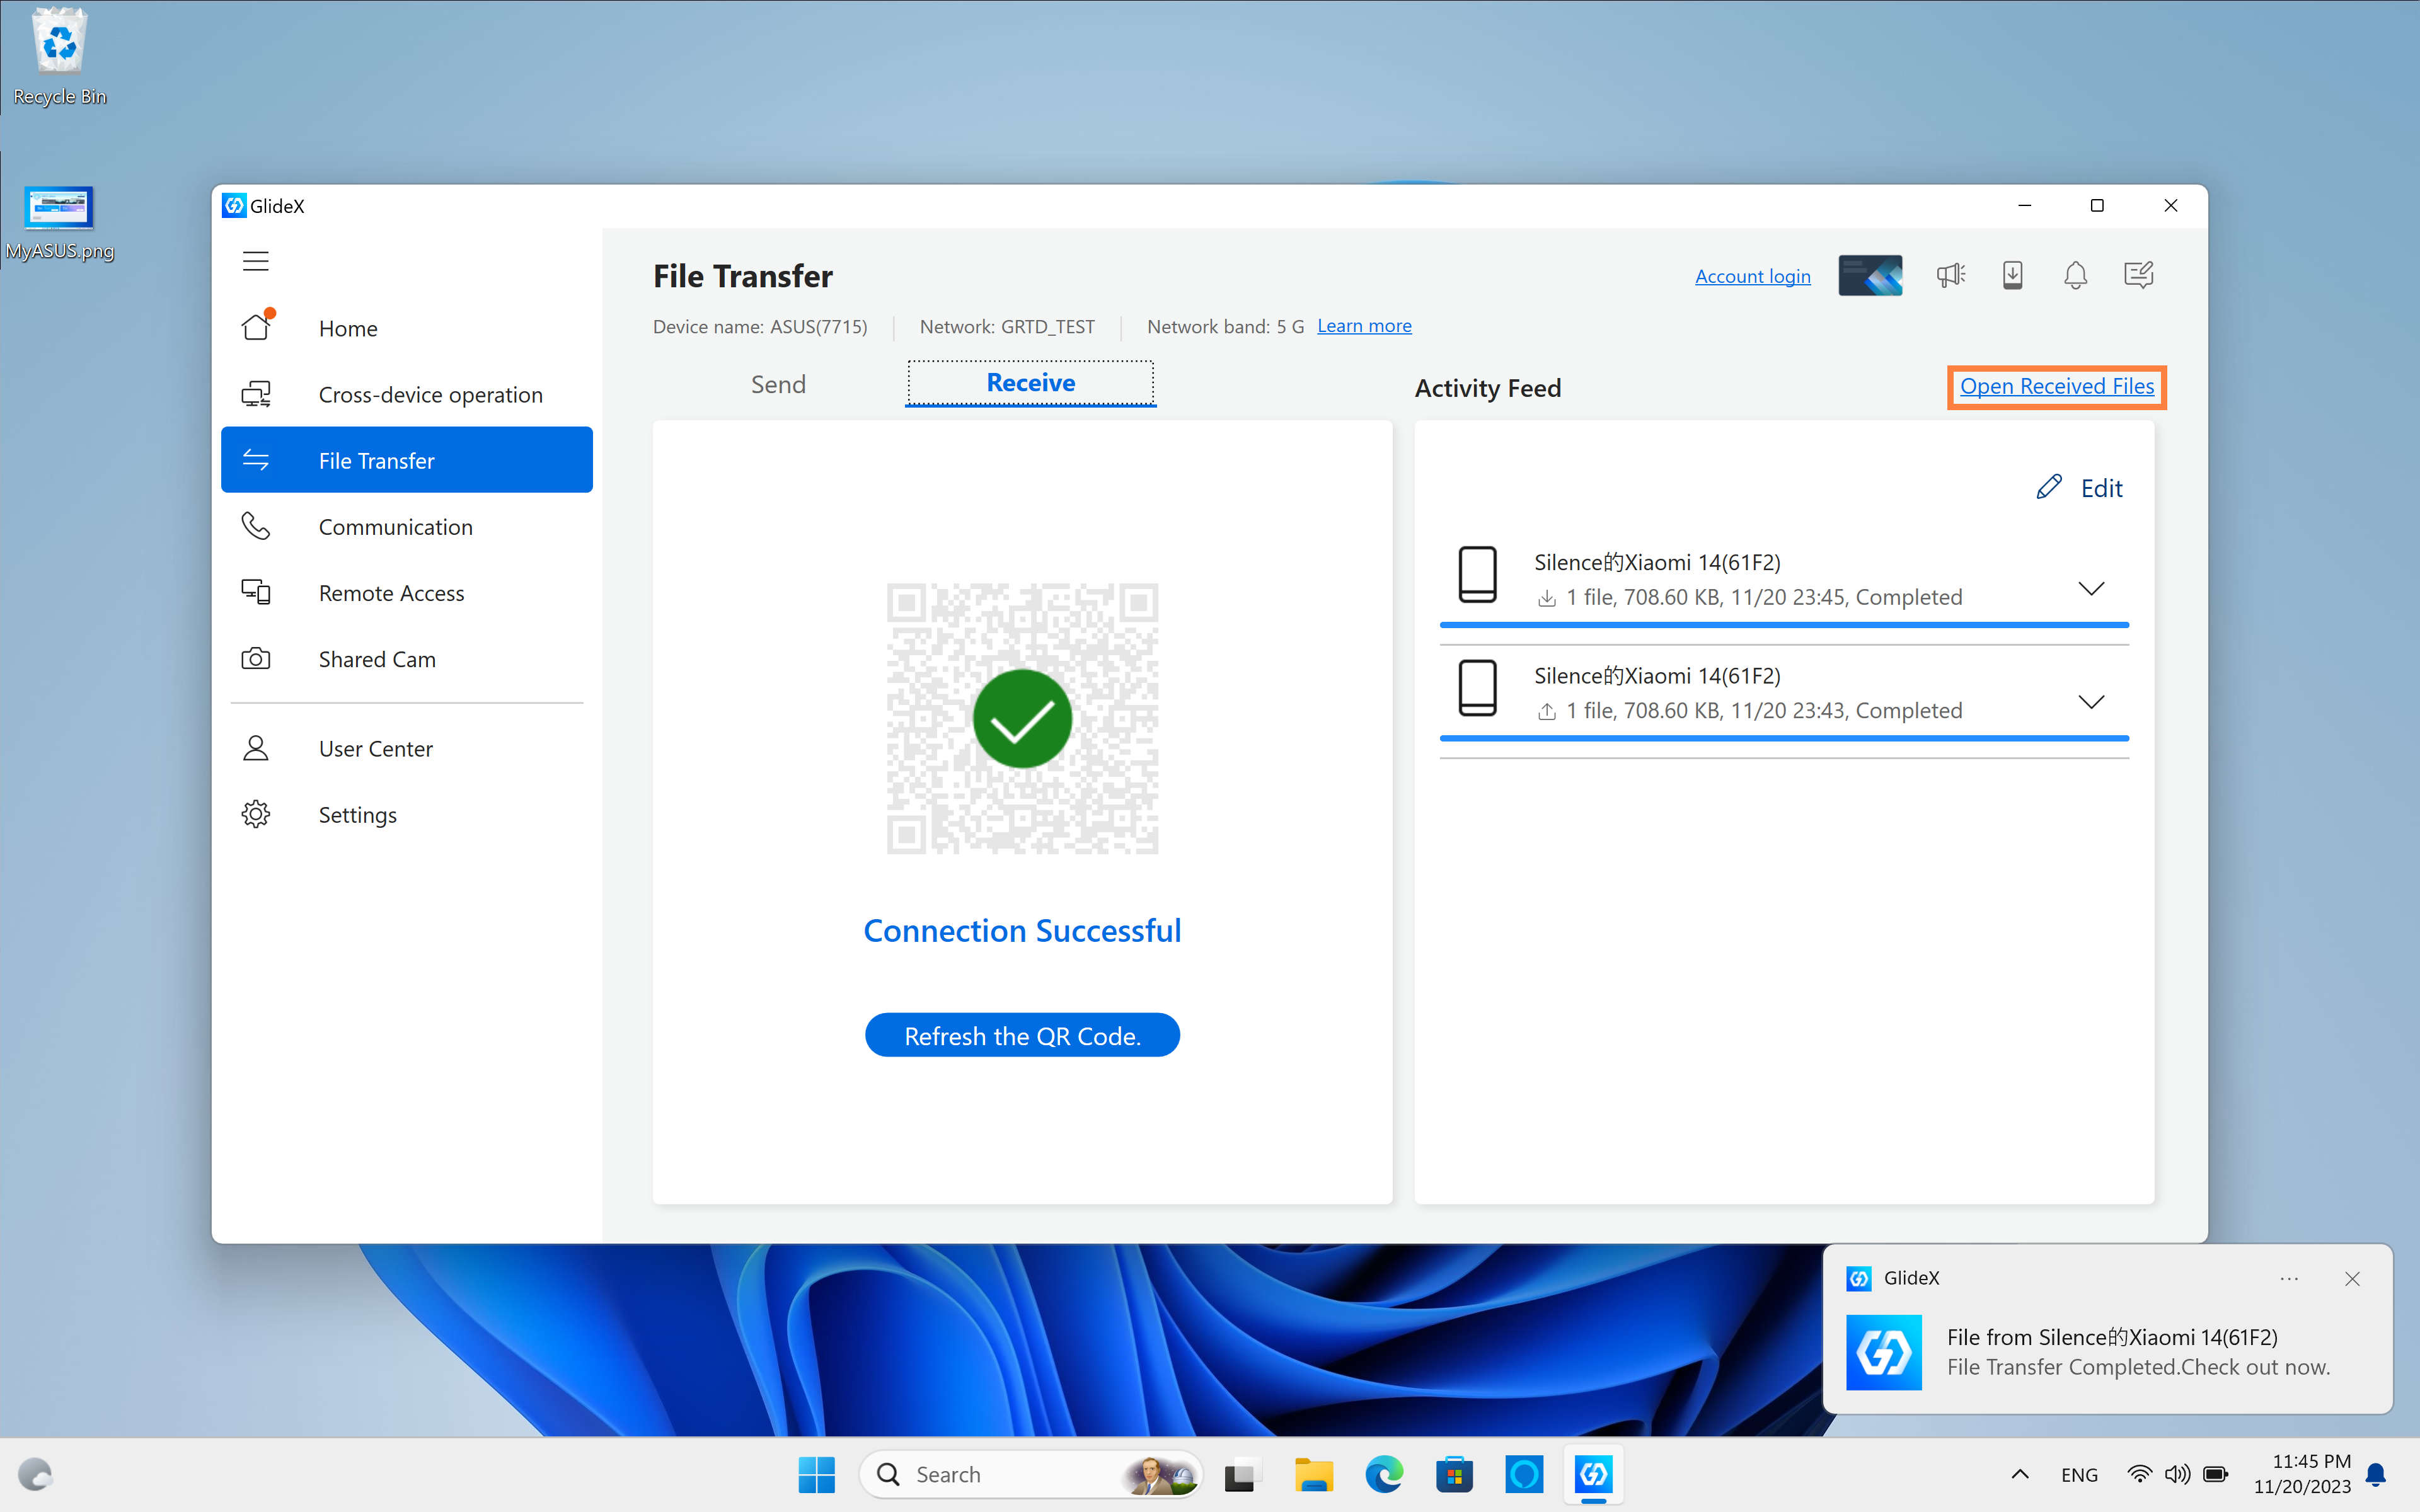
(3) After the file transfer is complete, click [Open Received Files] on the receiving device to open the received [Files].
7.3 URL Sharing - Share from Computer to Mobile
※ There are two types of URL sharing:
· Share URLs from Computer to other devices (the receiving device is a computer or mobile device)
· Share URLs from Mobile to other devices (the receiving device is a computer or mobile device)
Computer URL sharing is limited to Microsoft Edge browser.
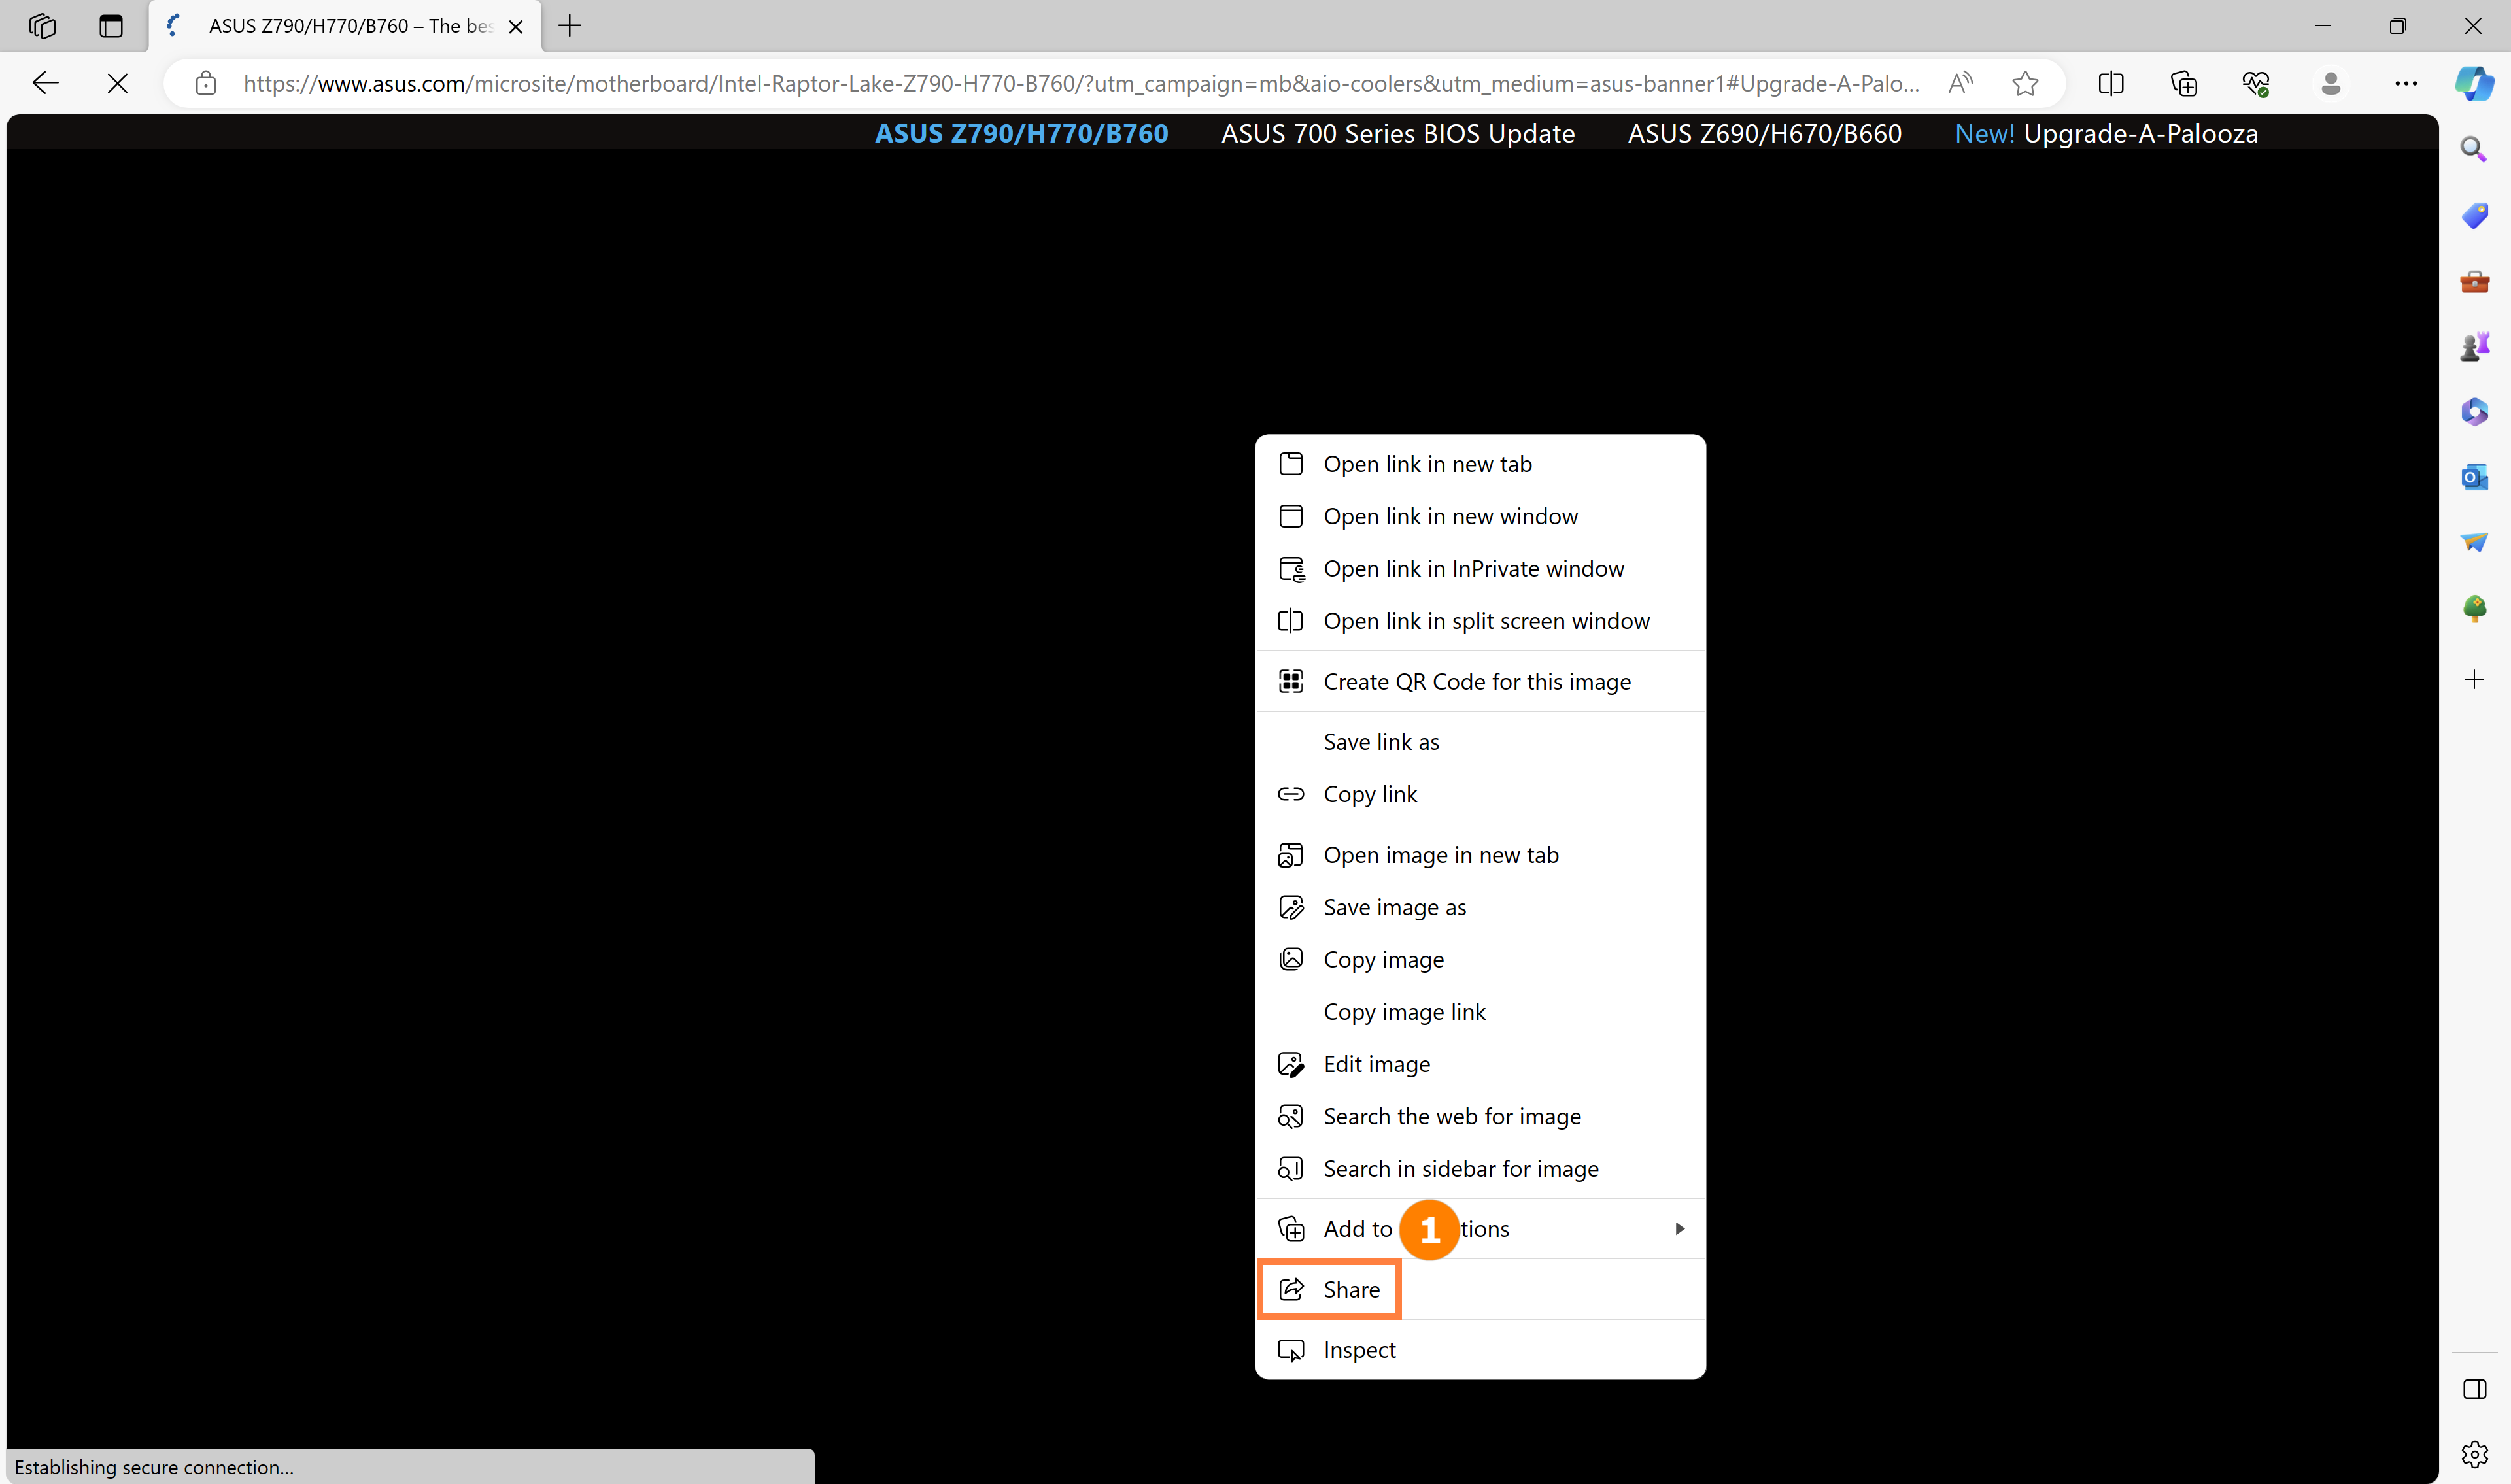
(1) Right-click on the webpage, then click ①[Share].
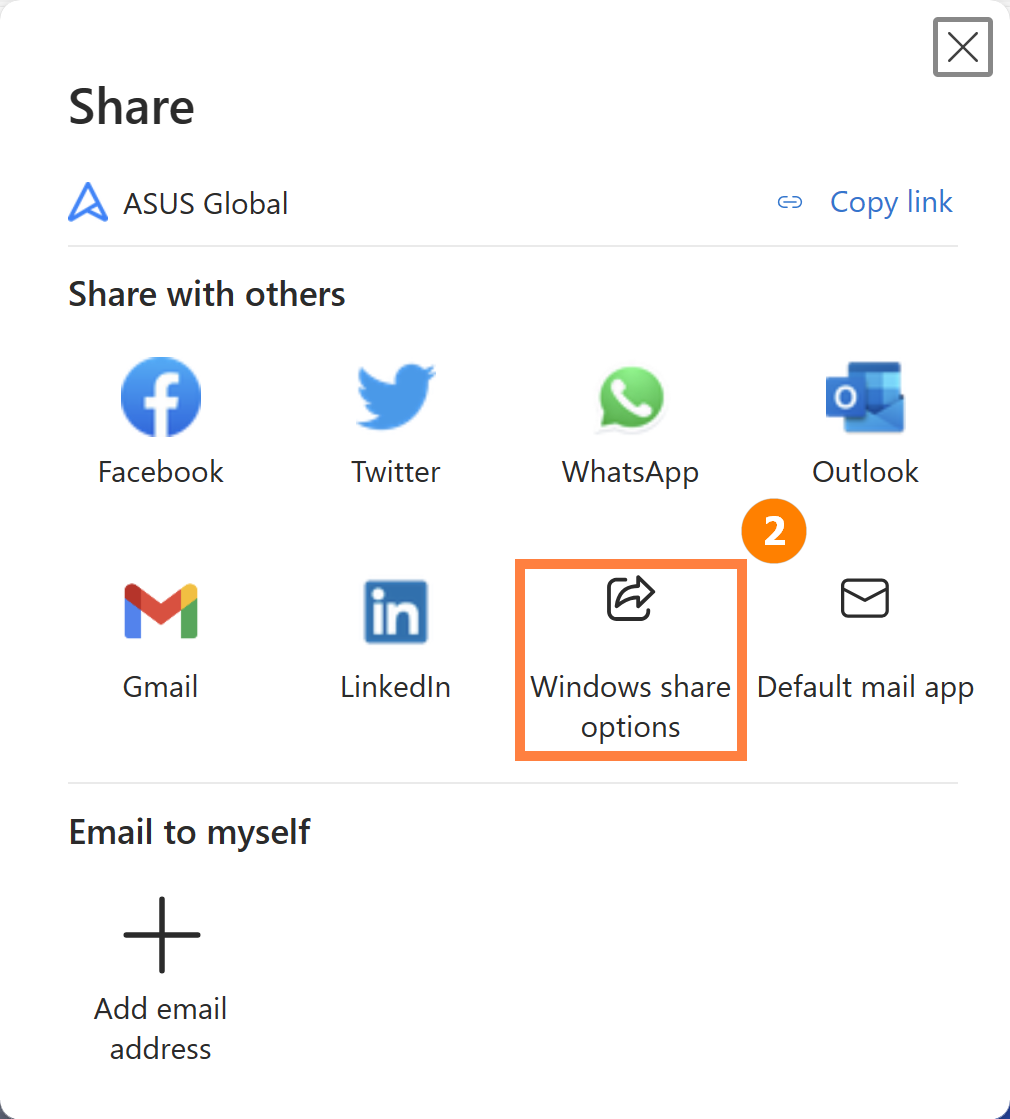
(2) A new sharing pop-up will appear, then Click ②[Windows Share Options].
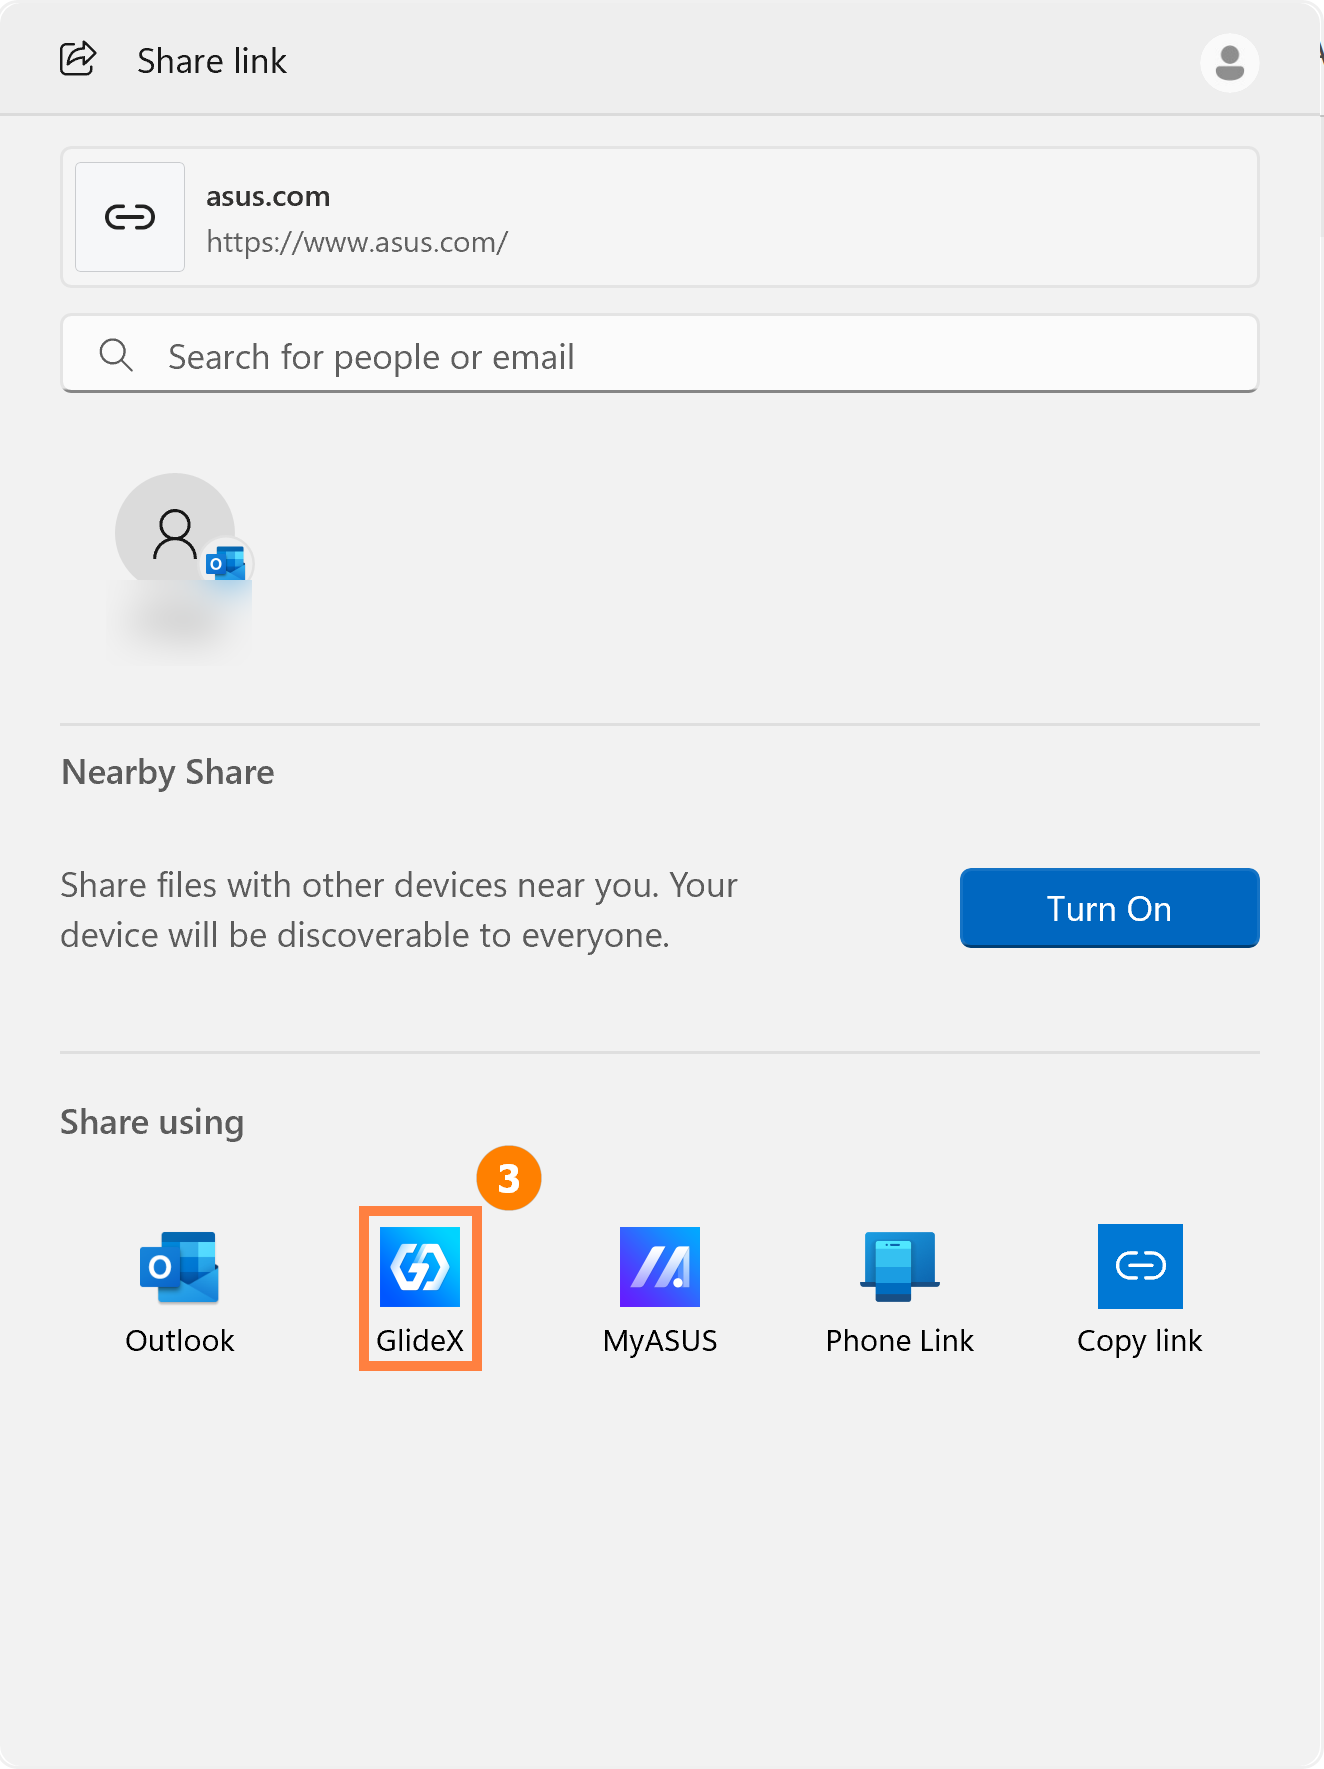
(3) A new share pop-up will appear, then click ③[GlideX].
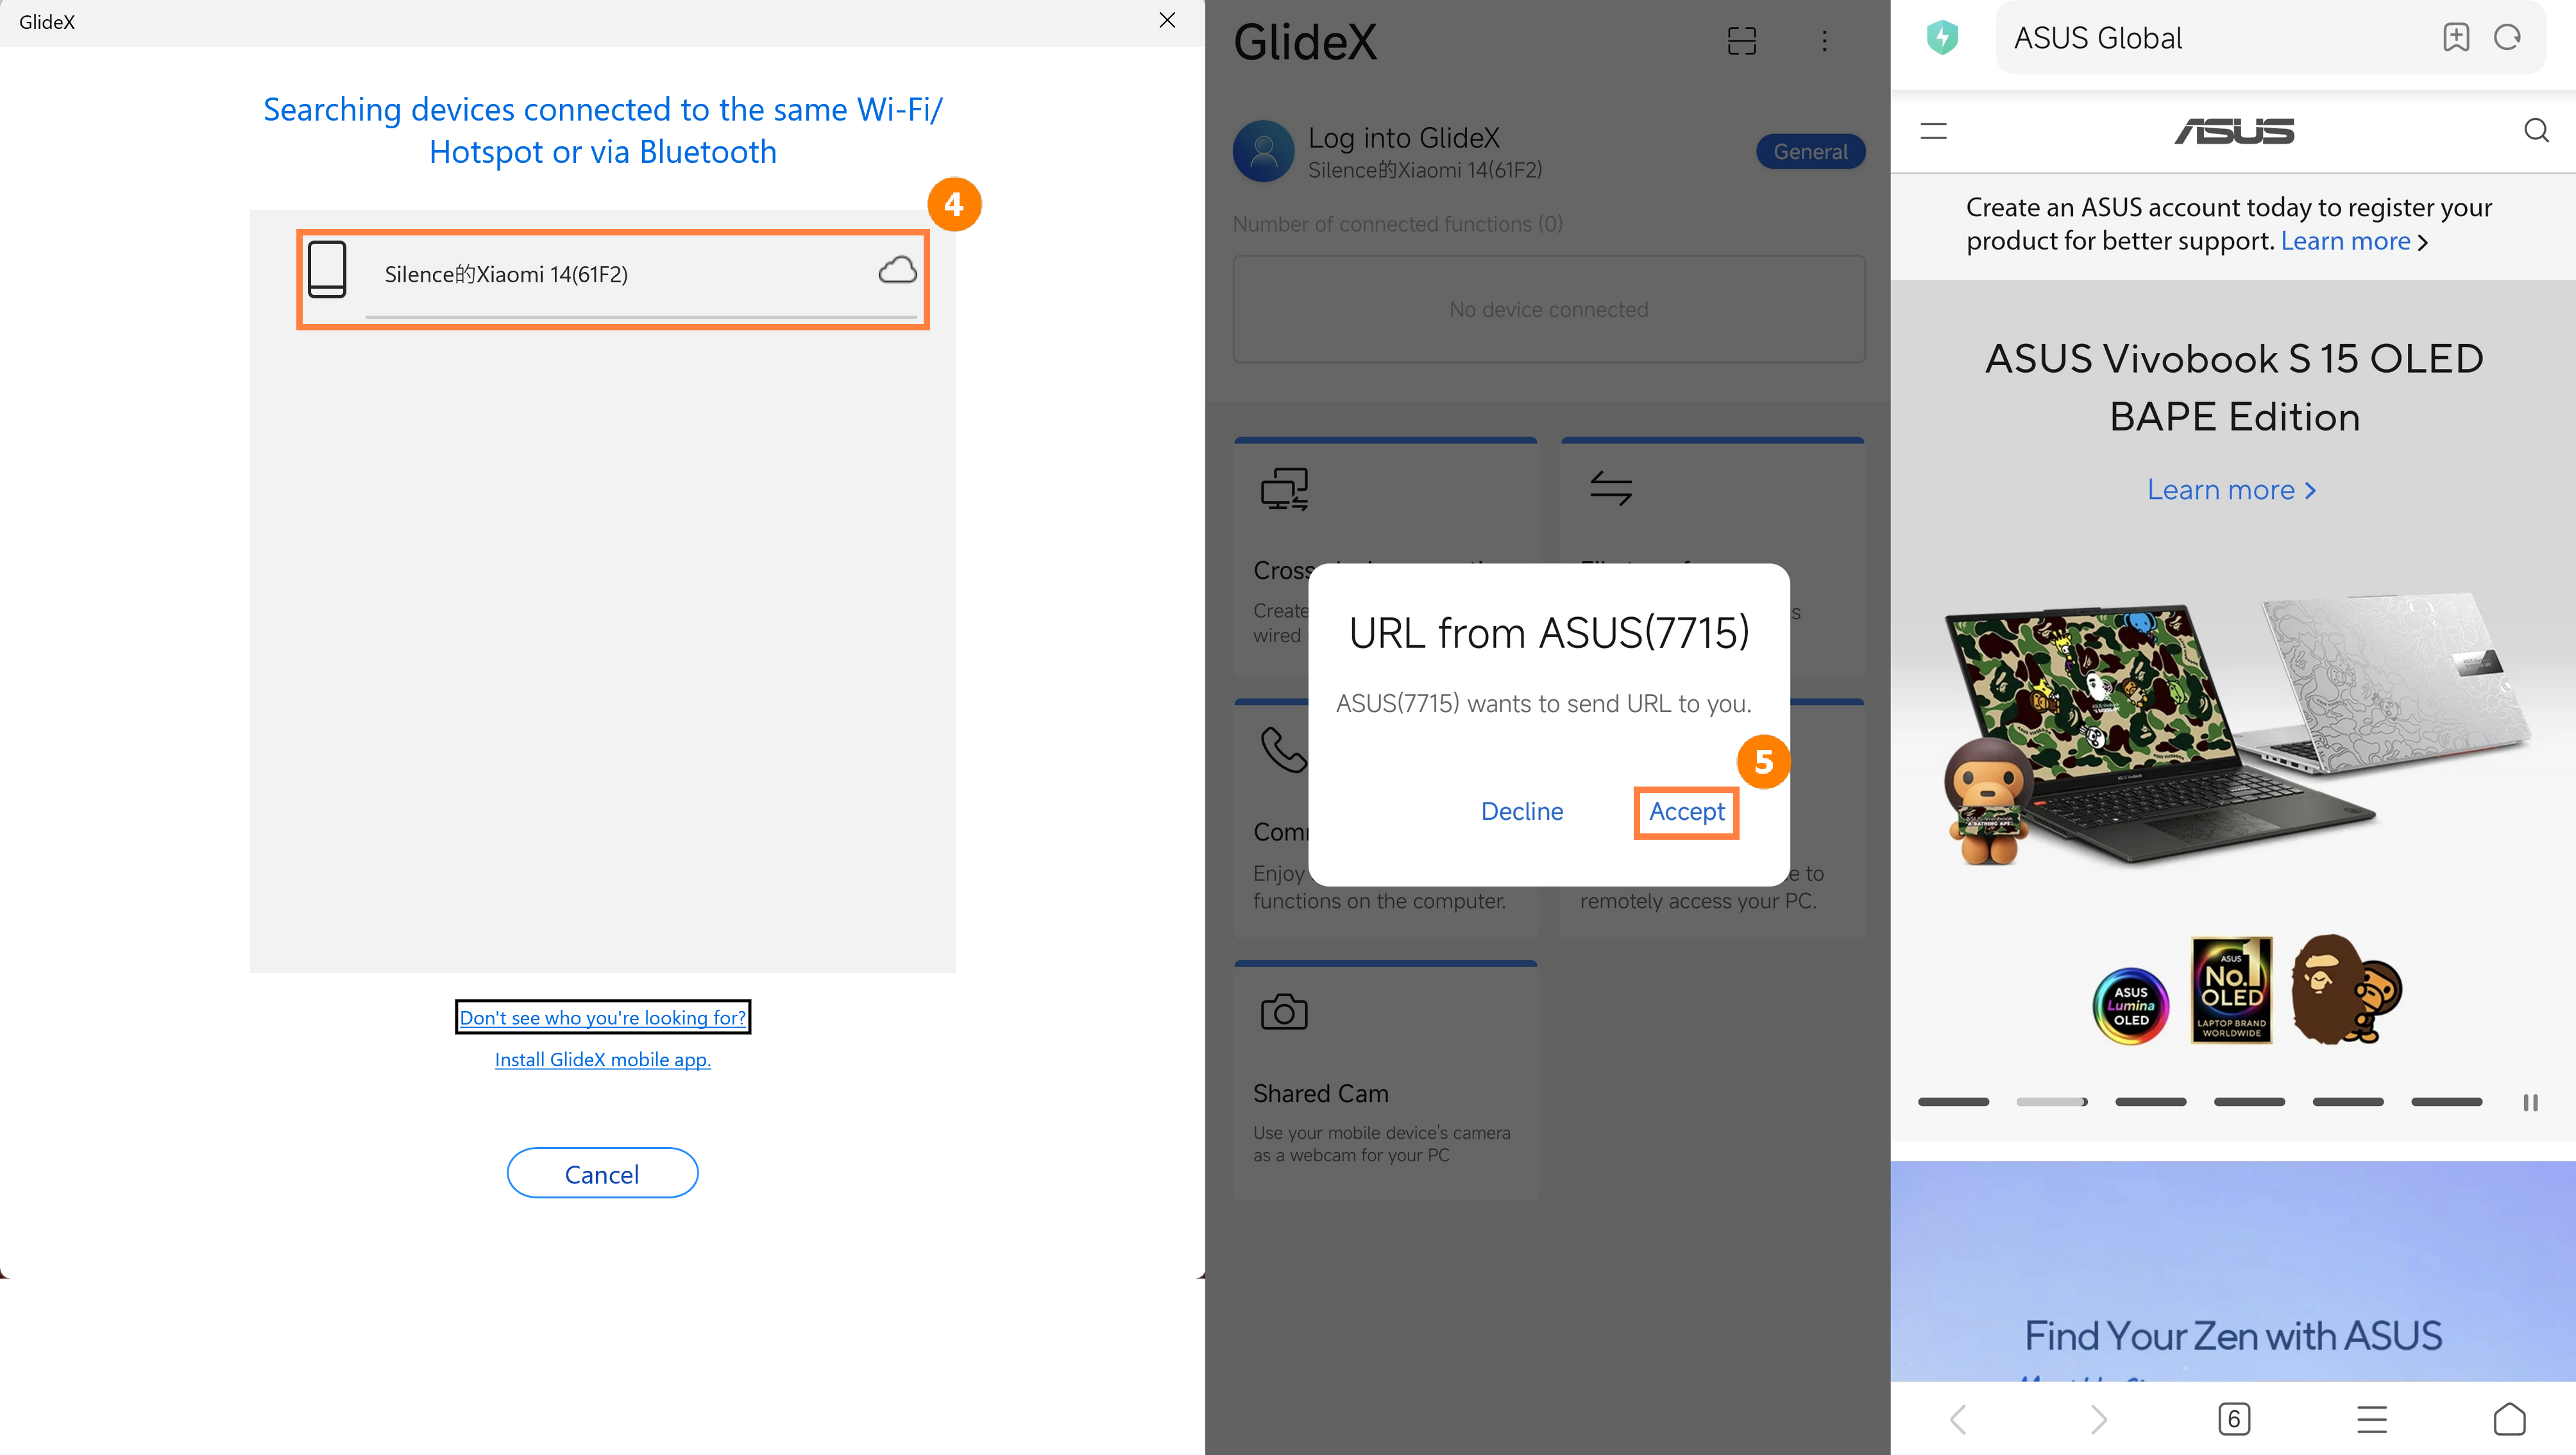
(4) GlideX will pop up, click ④[Device] to share, click ⑤[Accept] on mobile device, and the browser on mobile device will open shared URL.
7.4 URL Sharing - Share from Mobile to Computer
(1) In a browser on a mobile device, tap ①[Share], tap ②[More], tap ③[GlideX], tap ④[Device] to share.
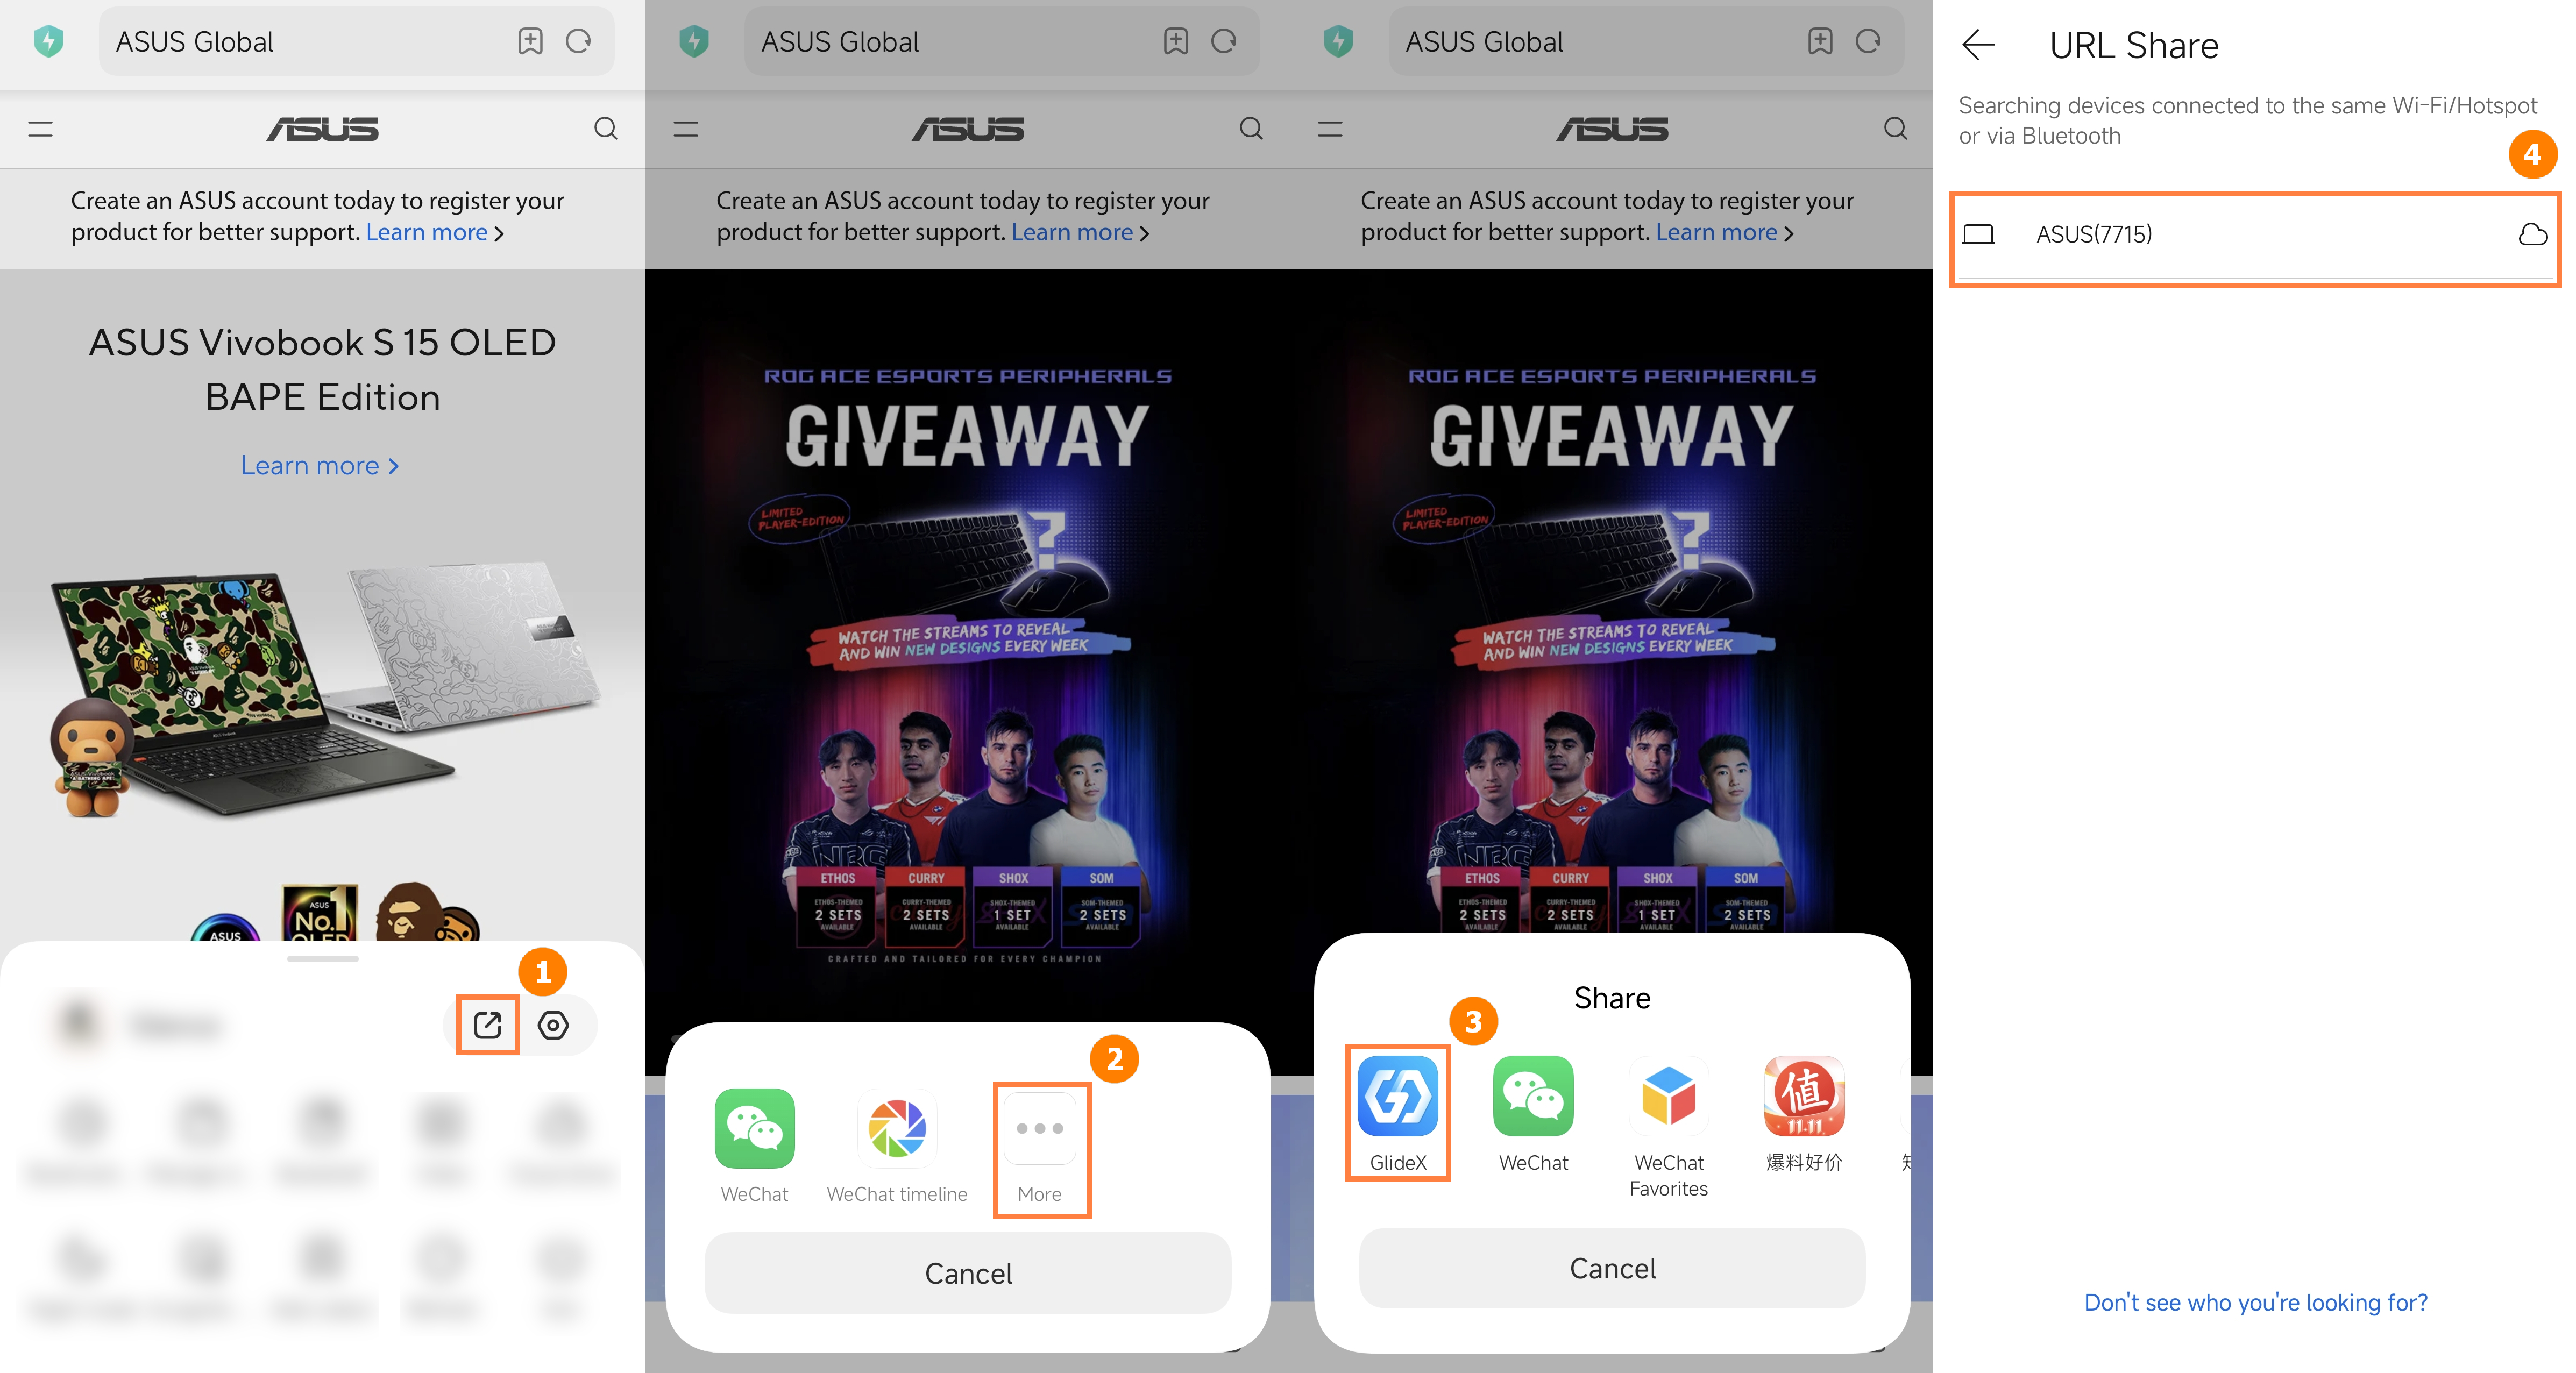
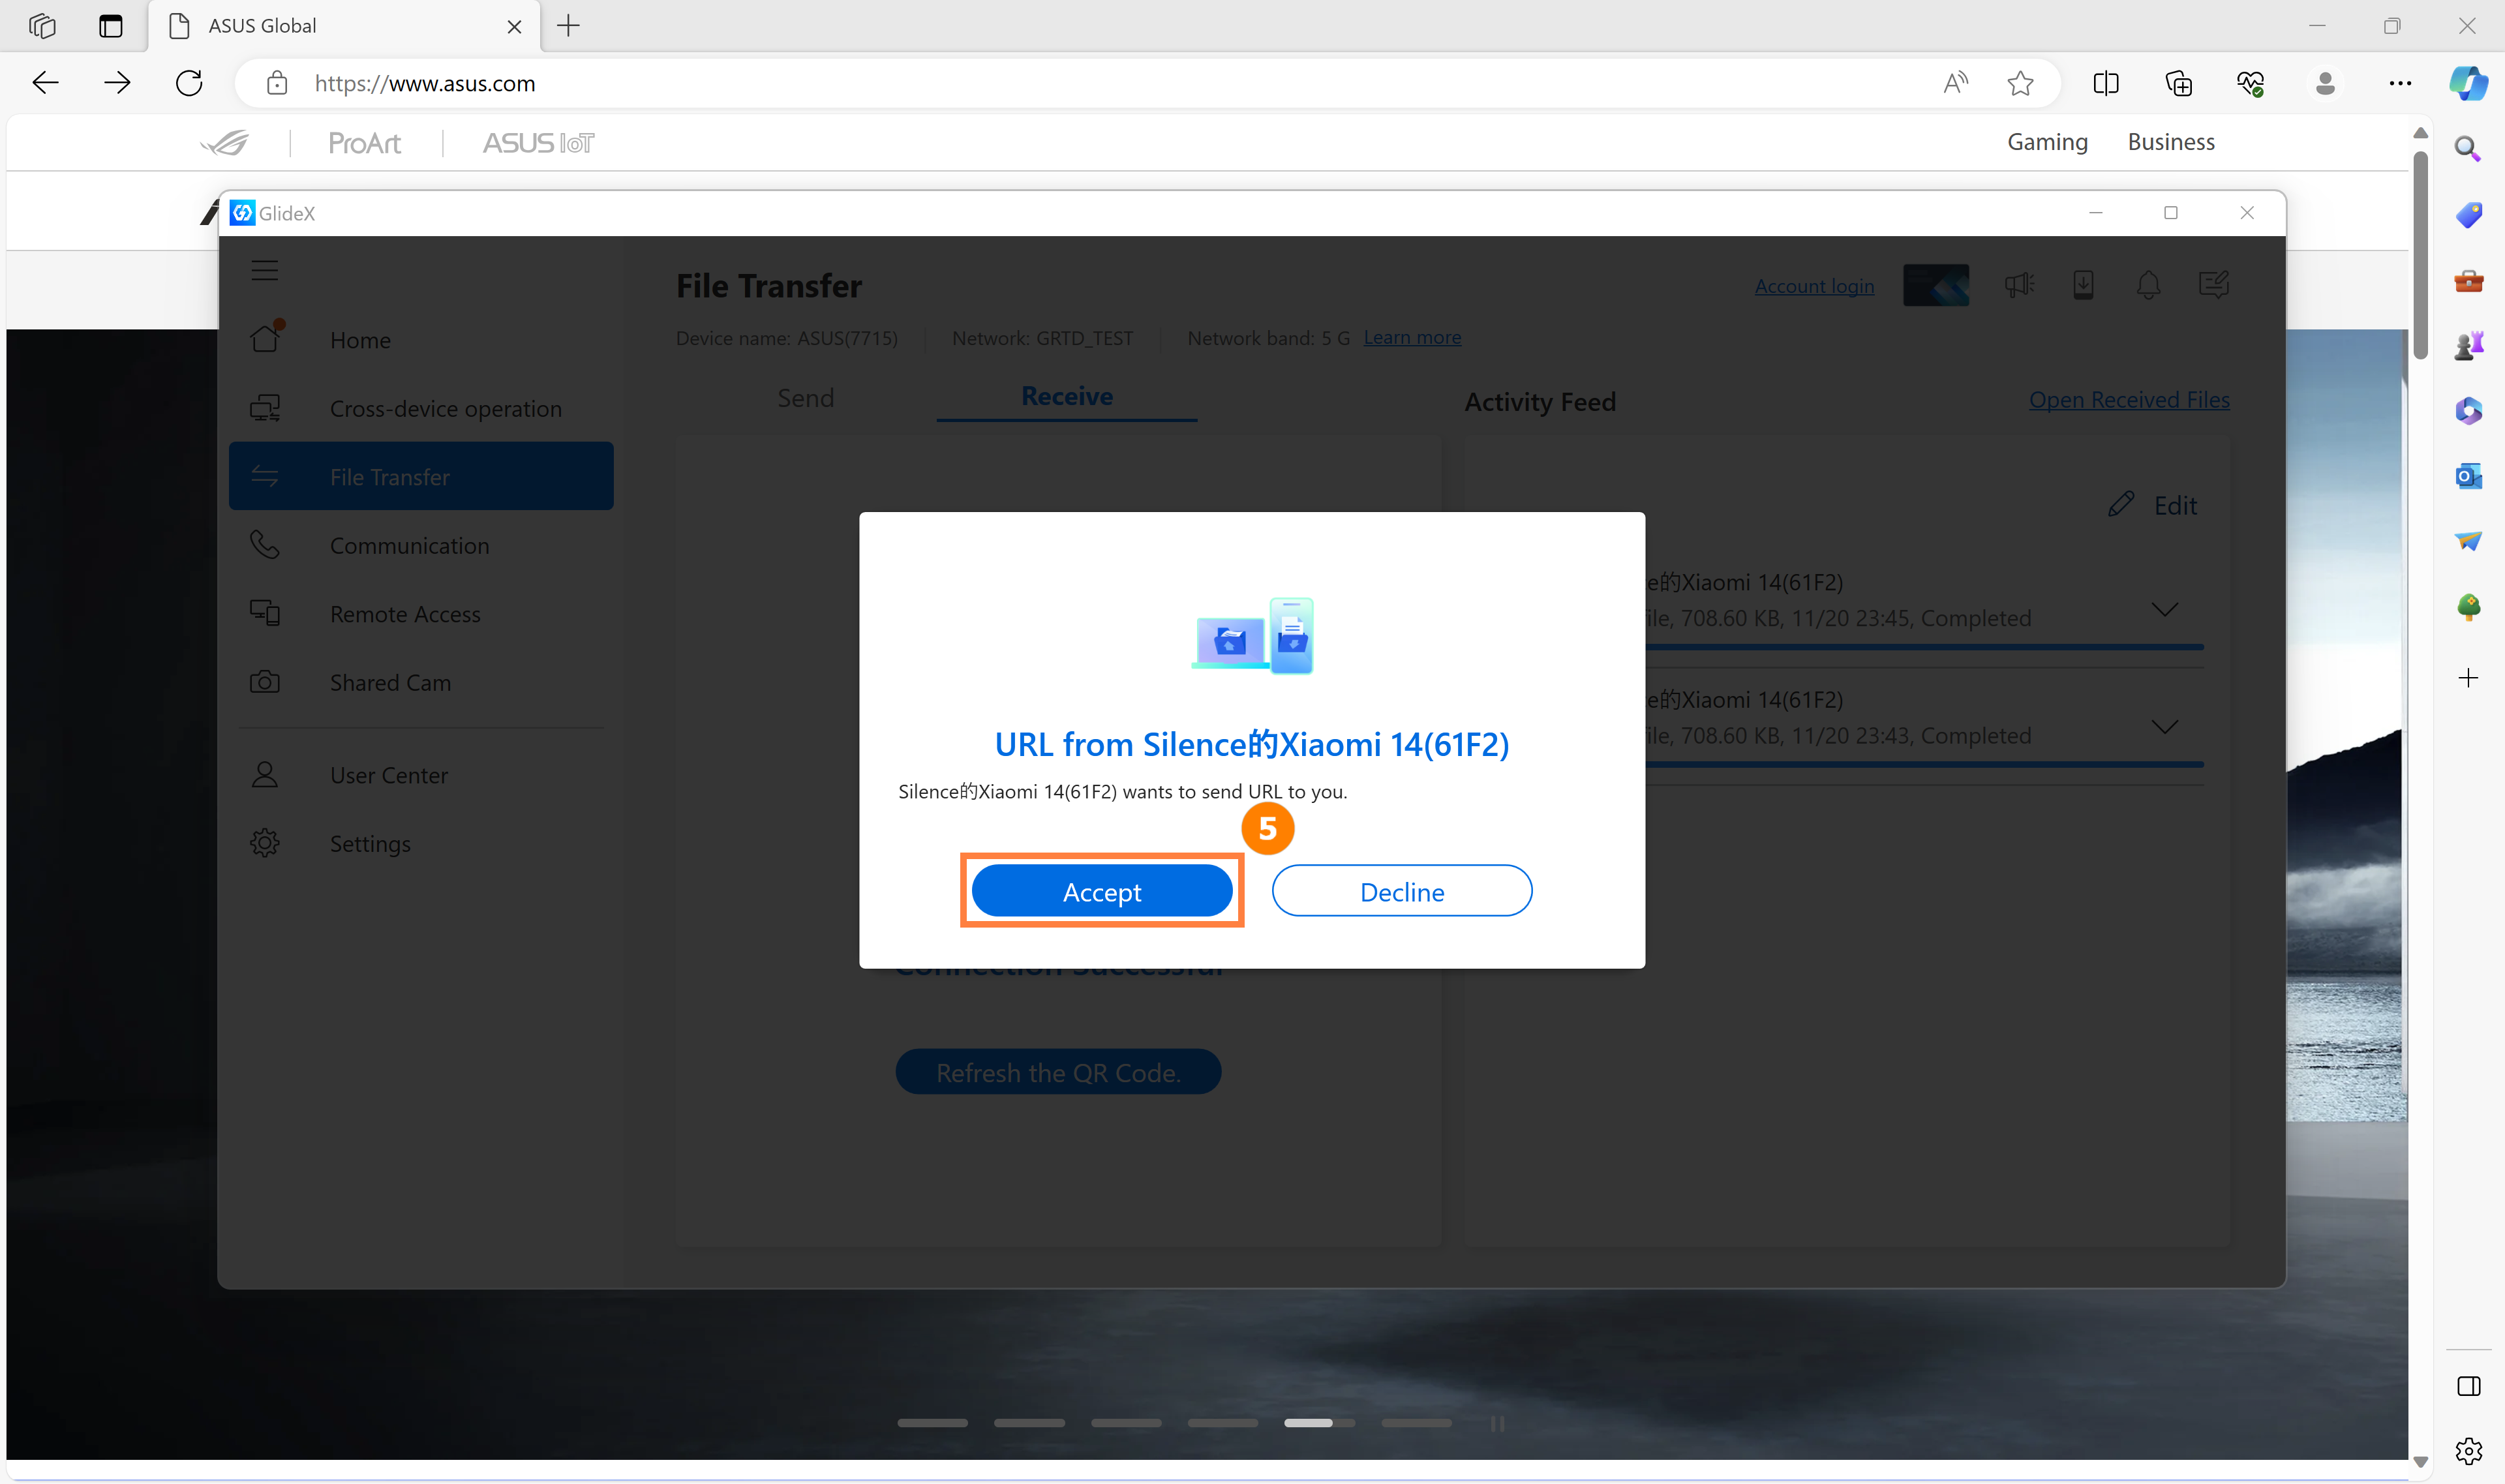
(2) A pop-up window will appear on your computer, click ⑤[Accept]. The Computer will use the system's default browser to open the shared web page.
If you encounter problems using this function, please refer to: [GlideX] Cannot connect your Devices via Bluetooth to use Communication? | Official Support | ASUS G...
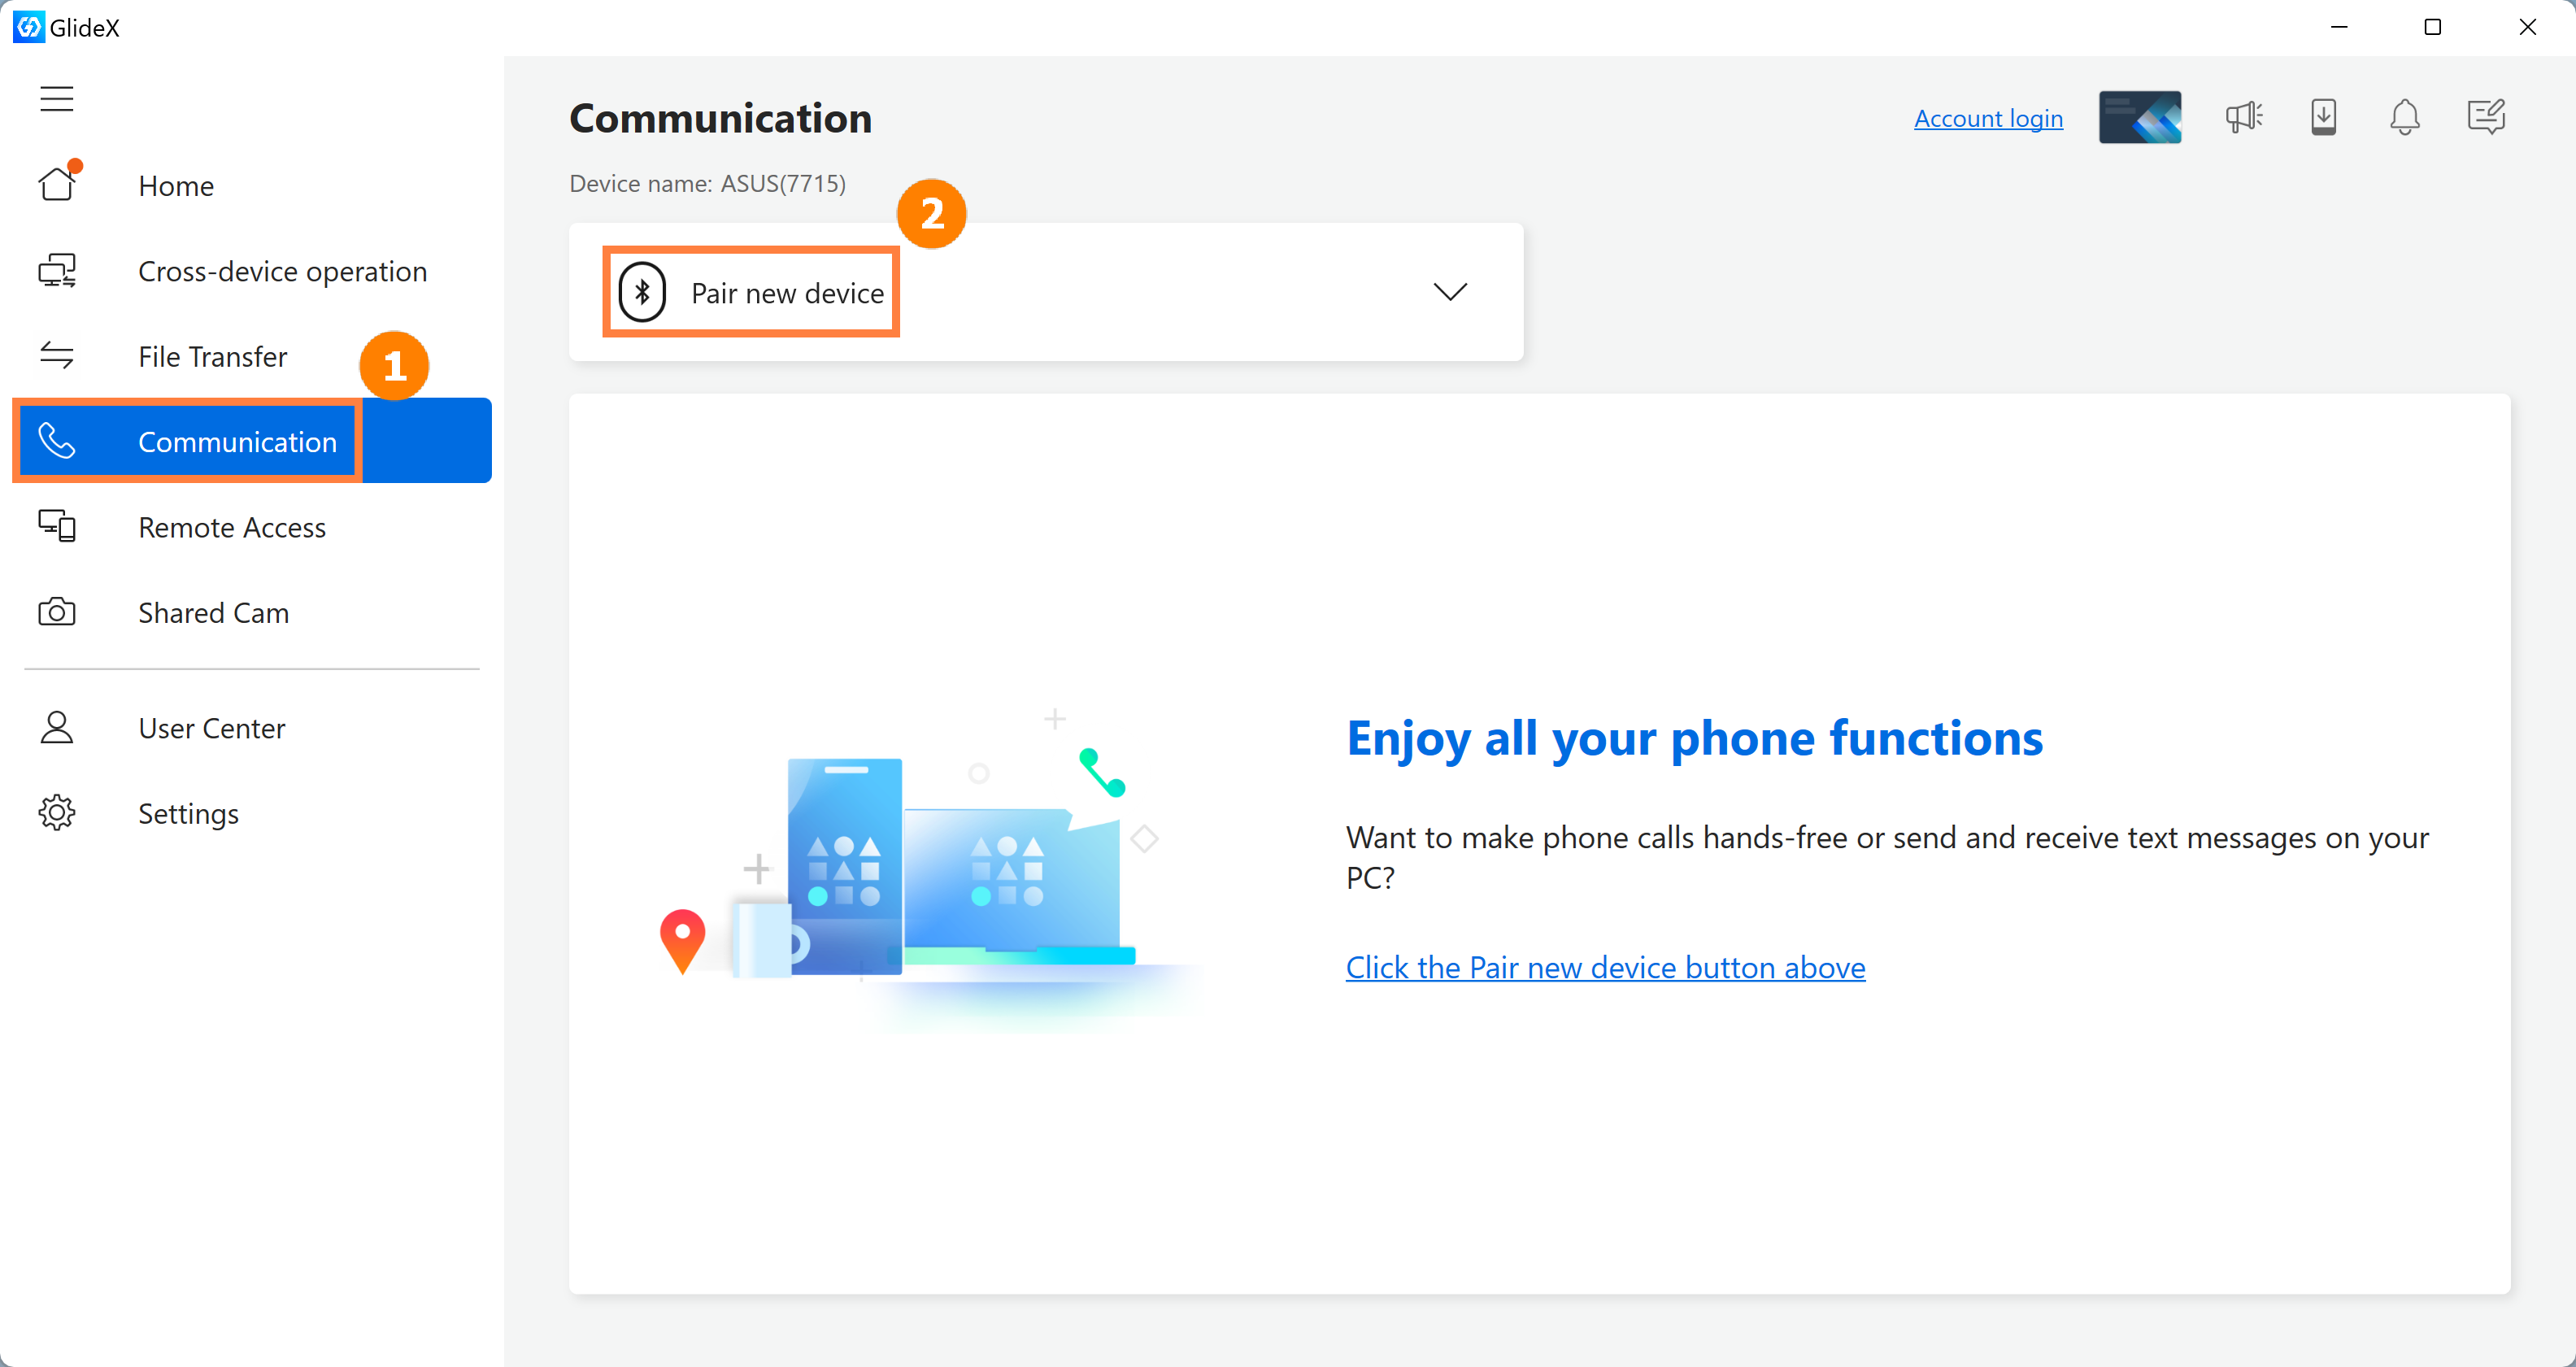
8.1 Pairing between PC and mobile devices
(1) Click ①[Communication], click ②[Pair new device].
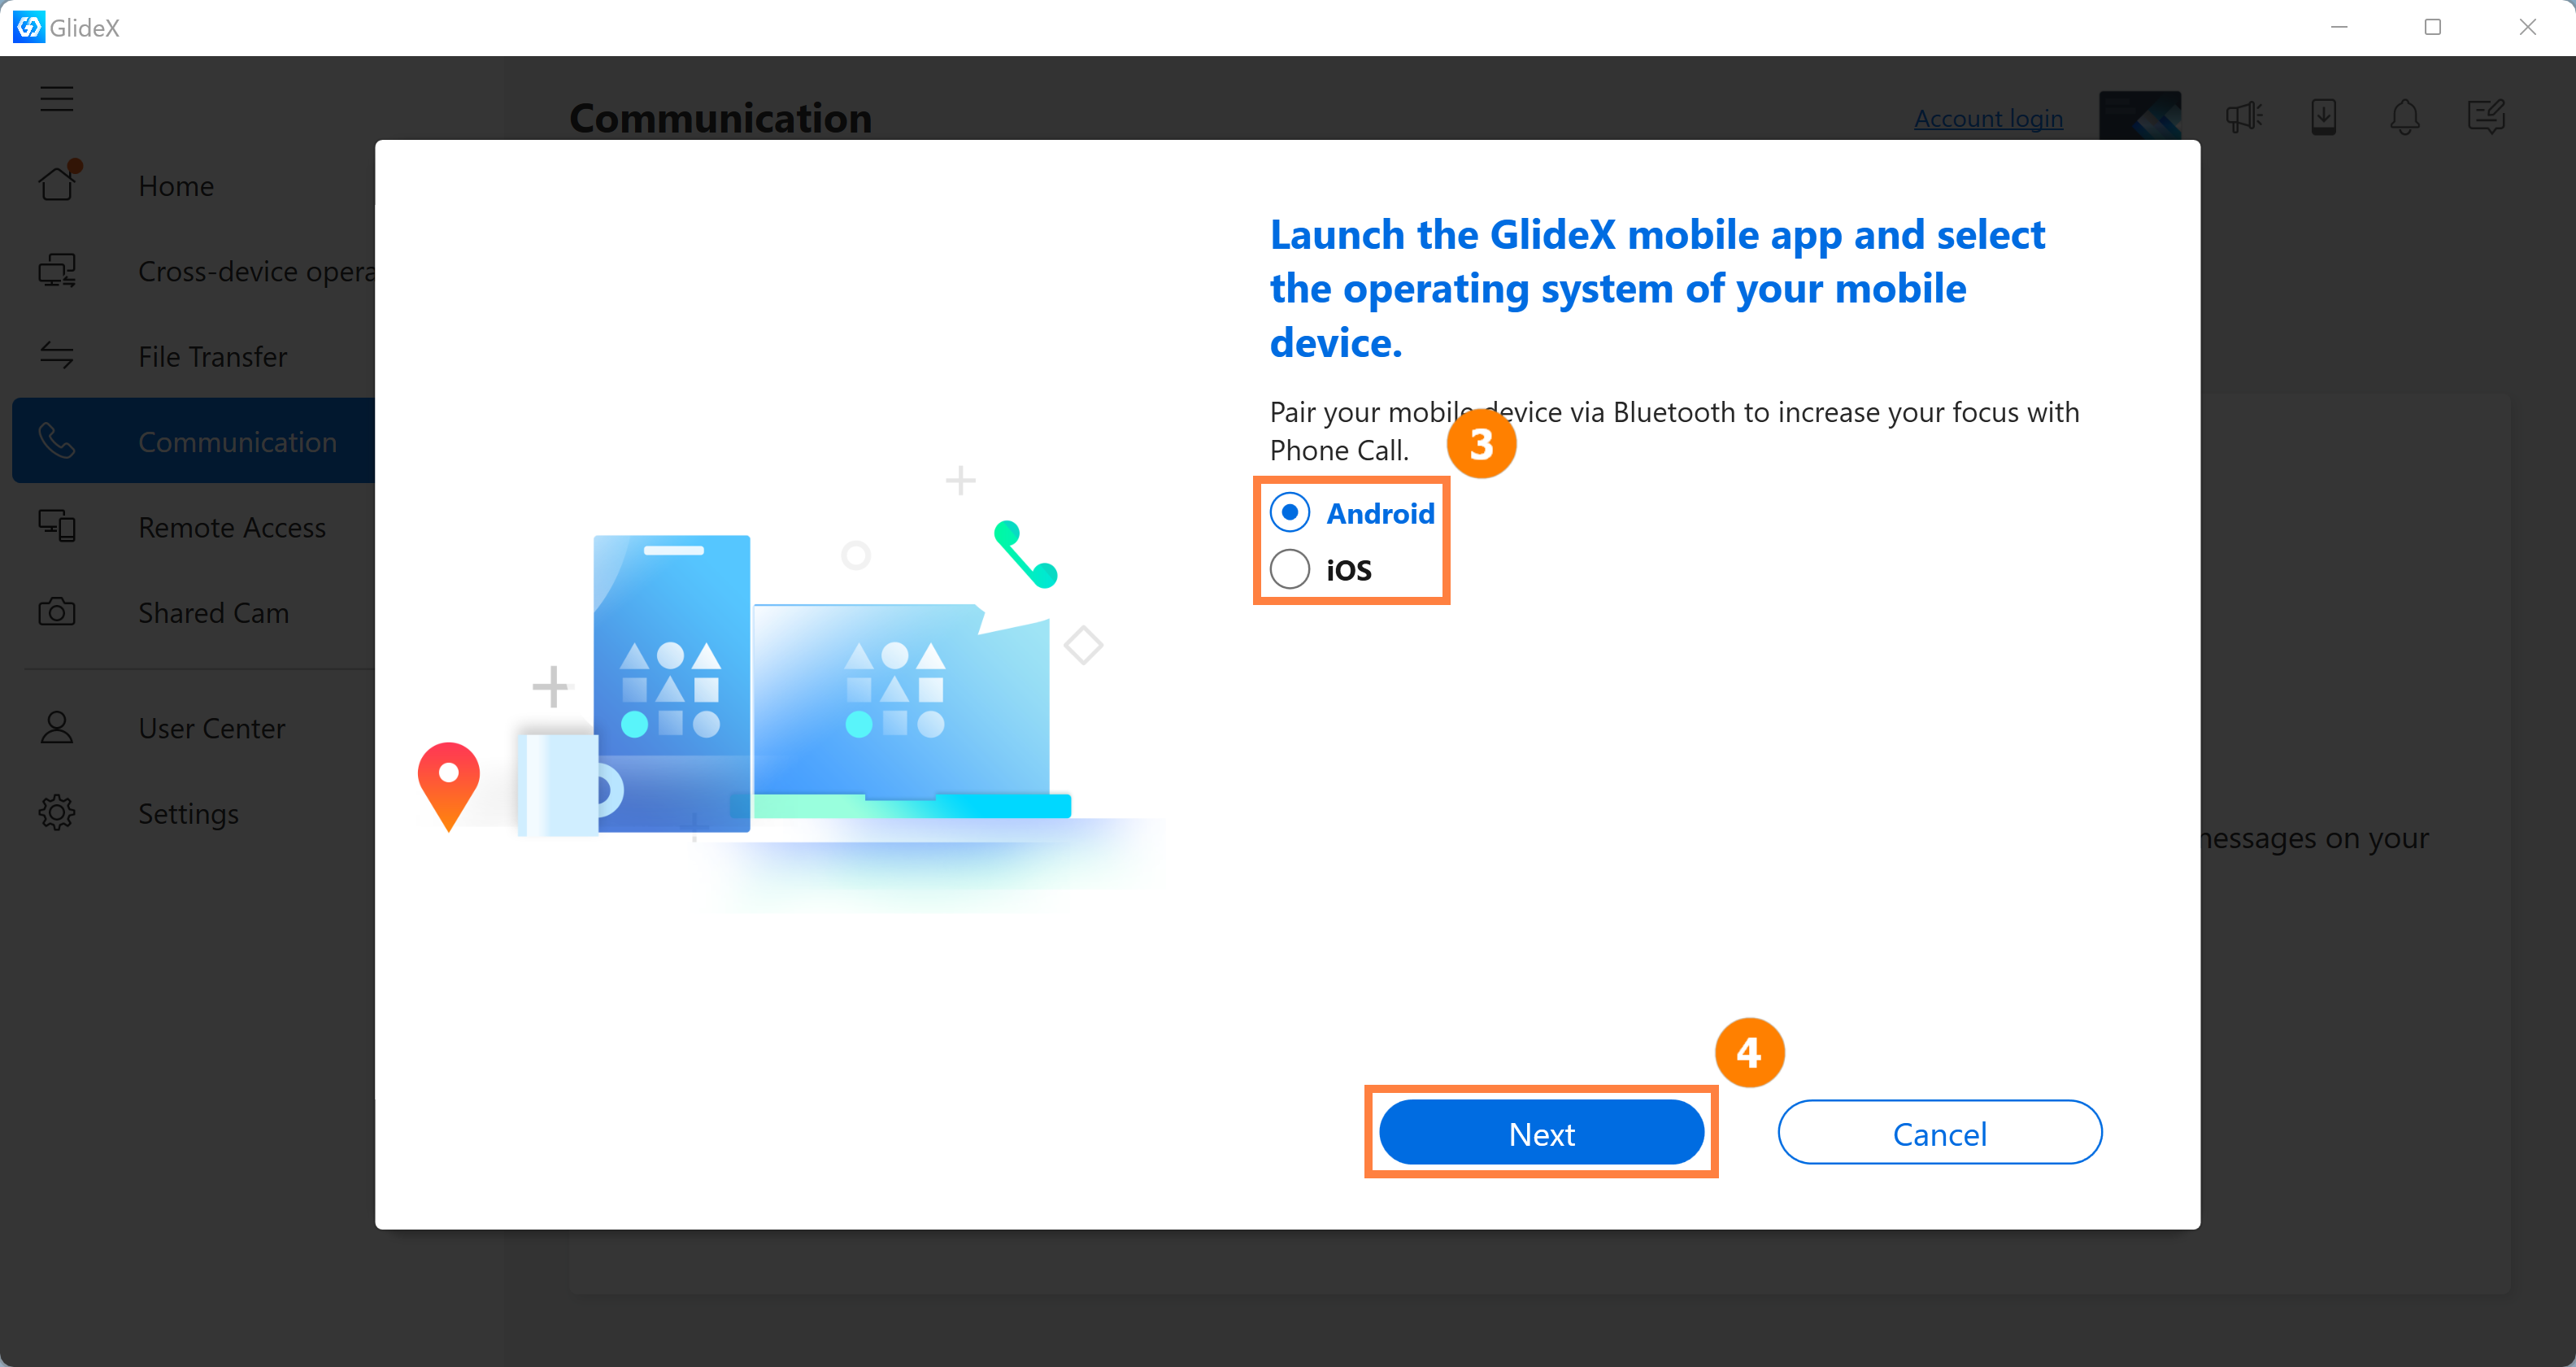
(2) Select your ③[Device Type] and click ④[Next].
(3) Click your ⑤[Mobile device].
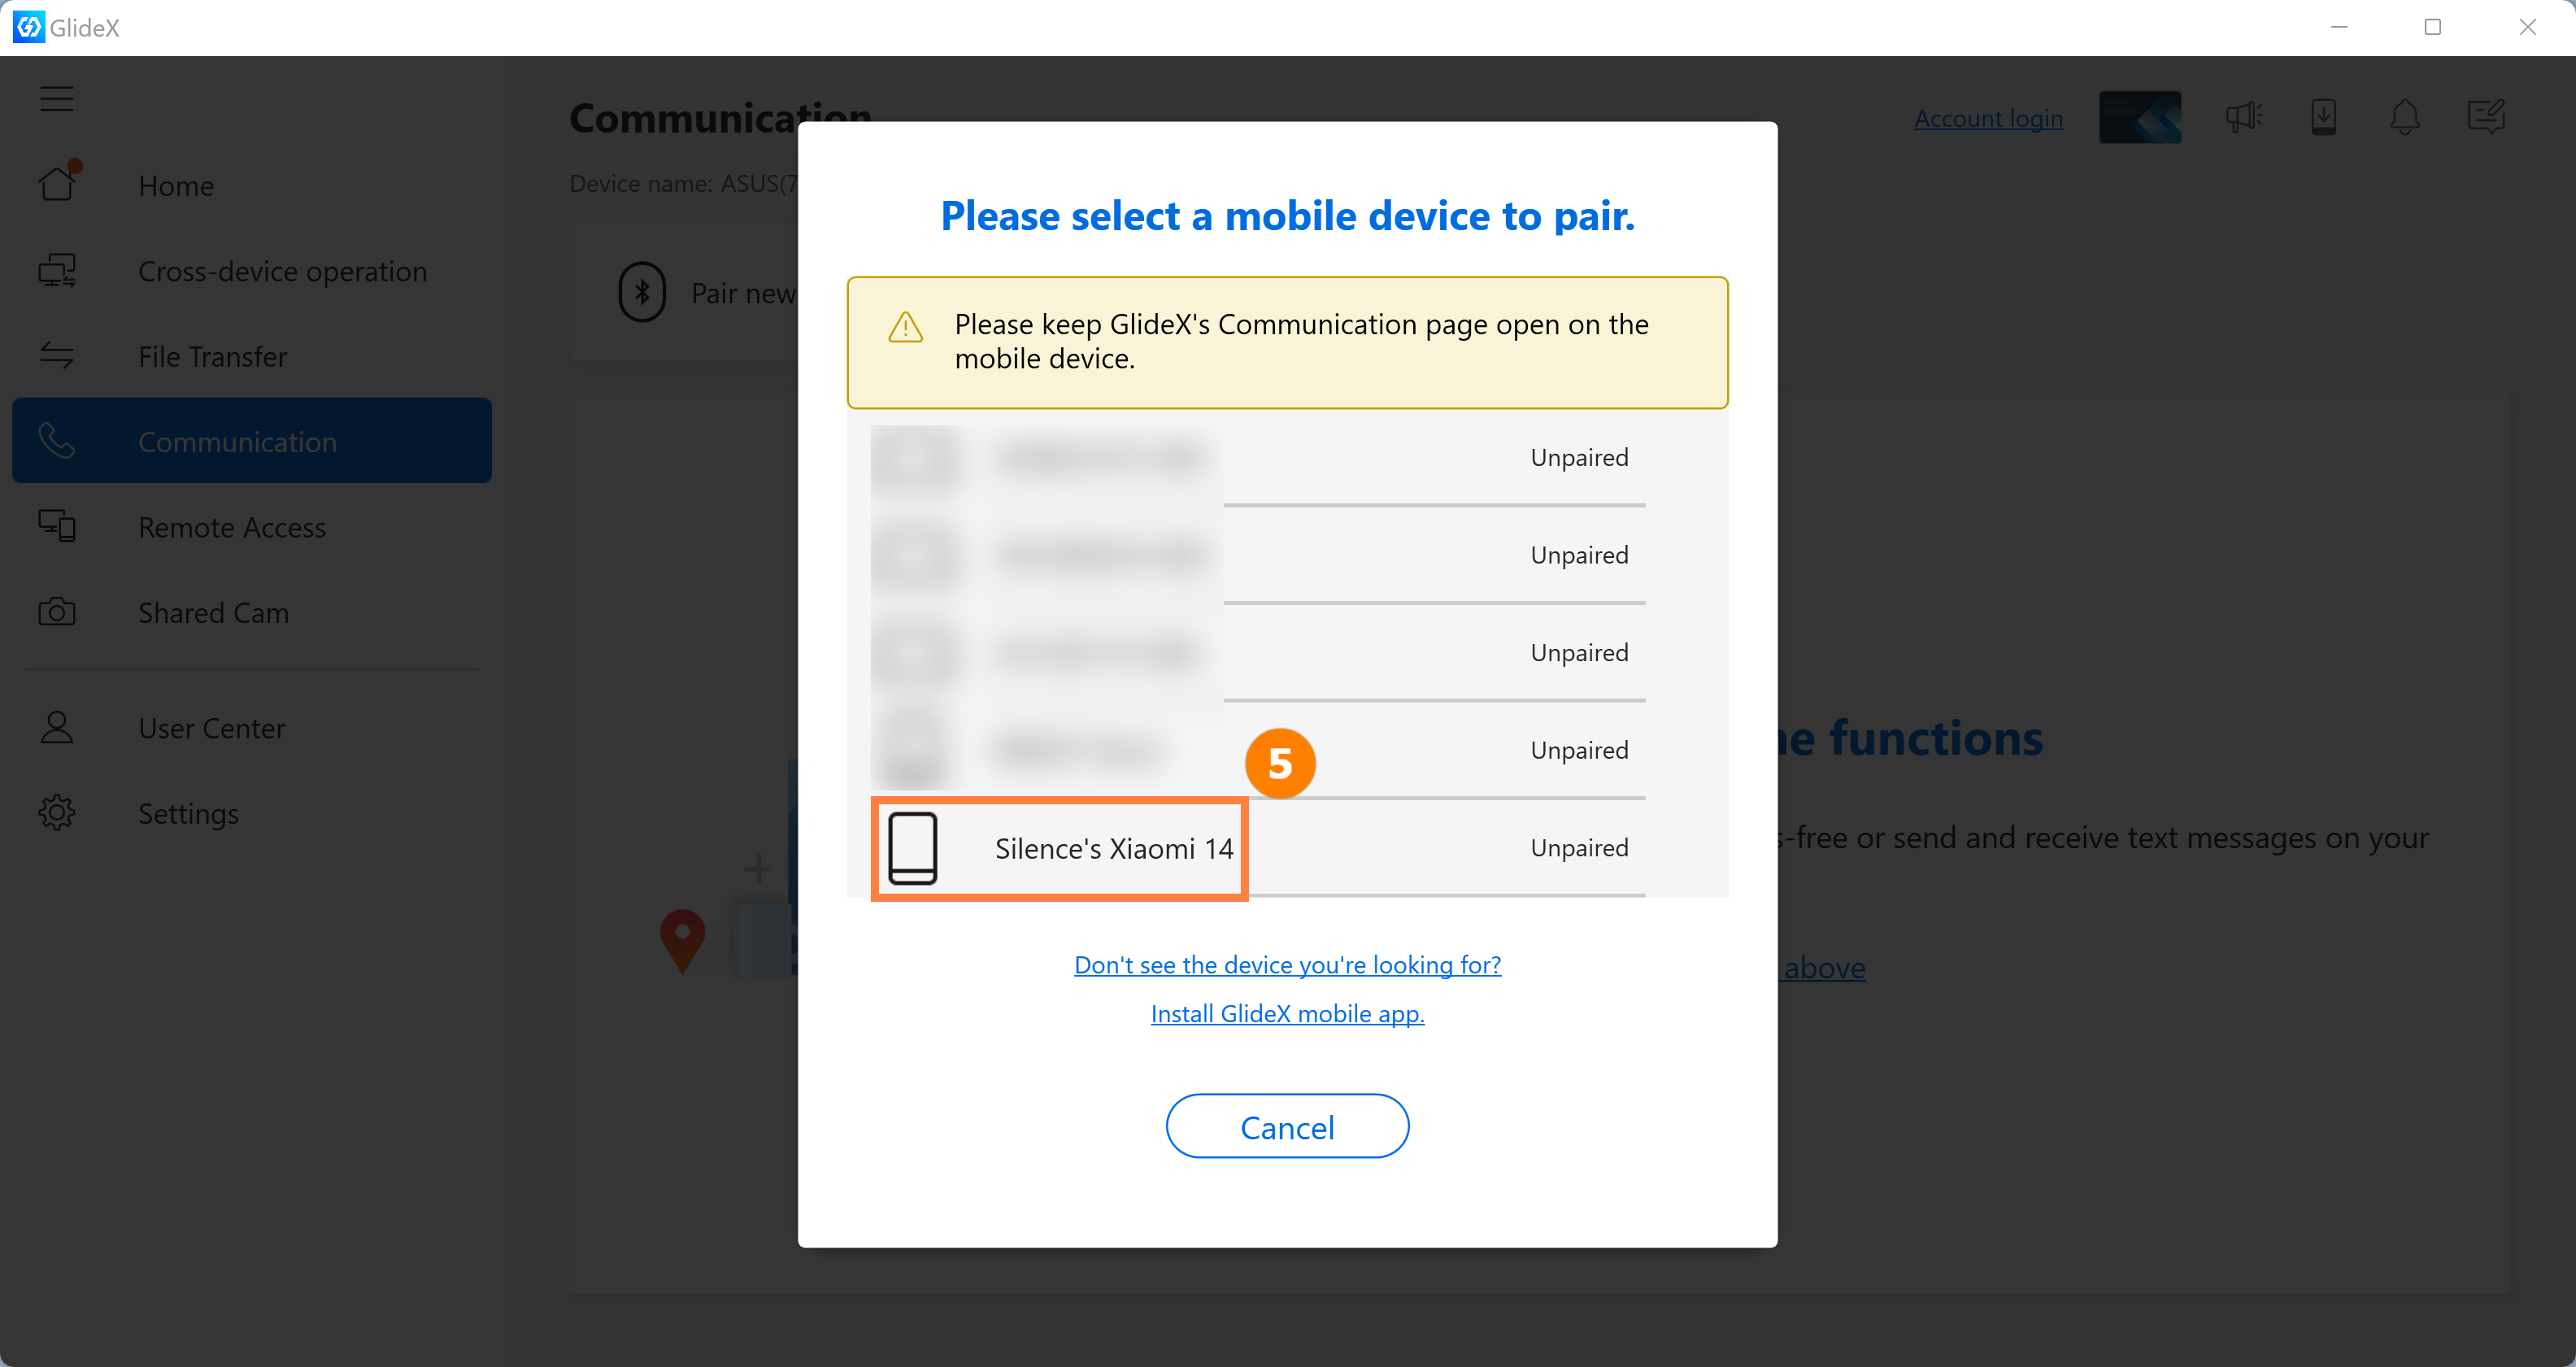
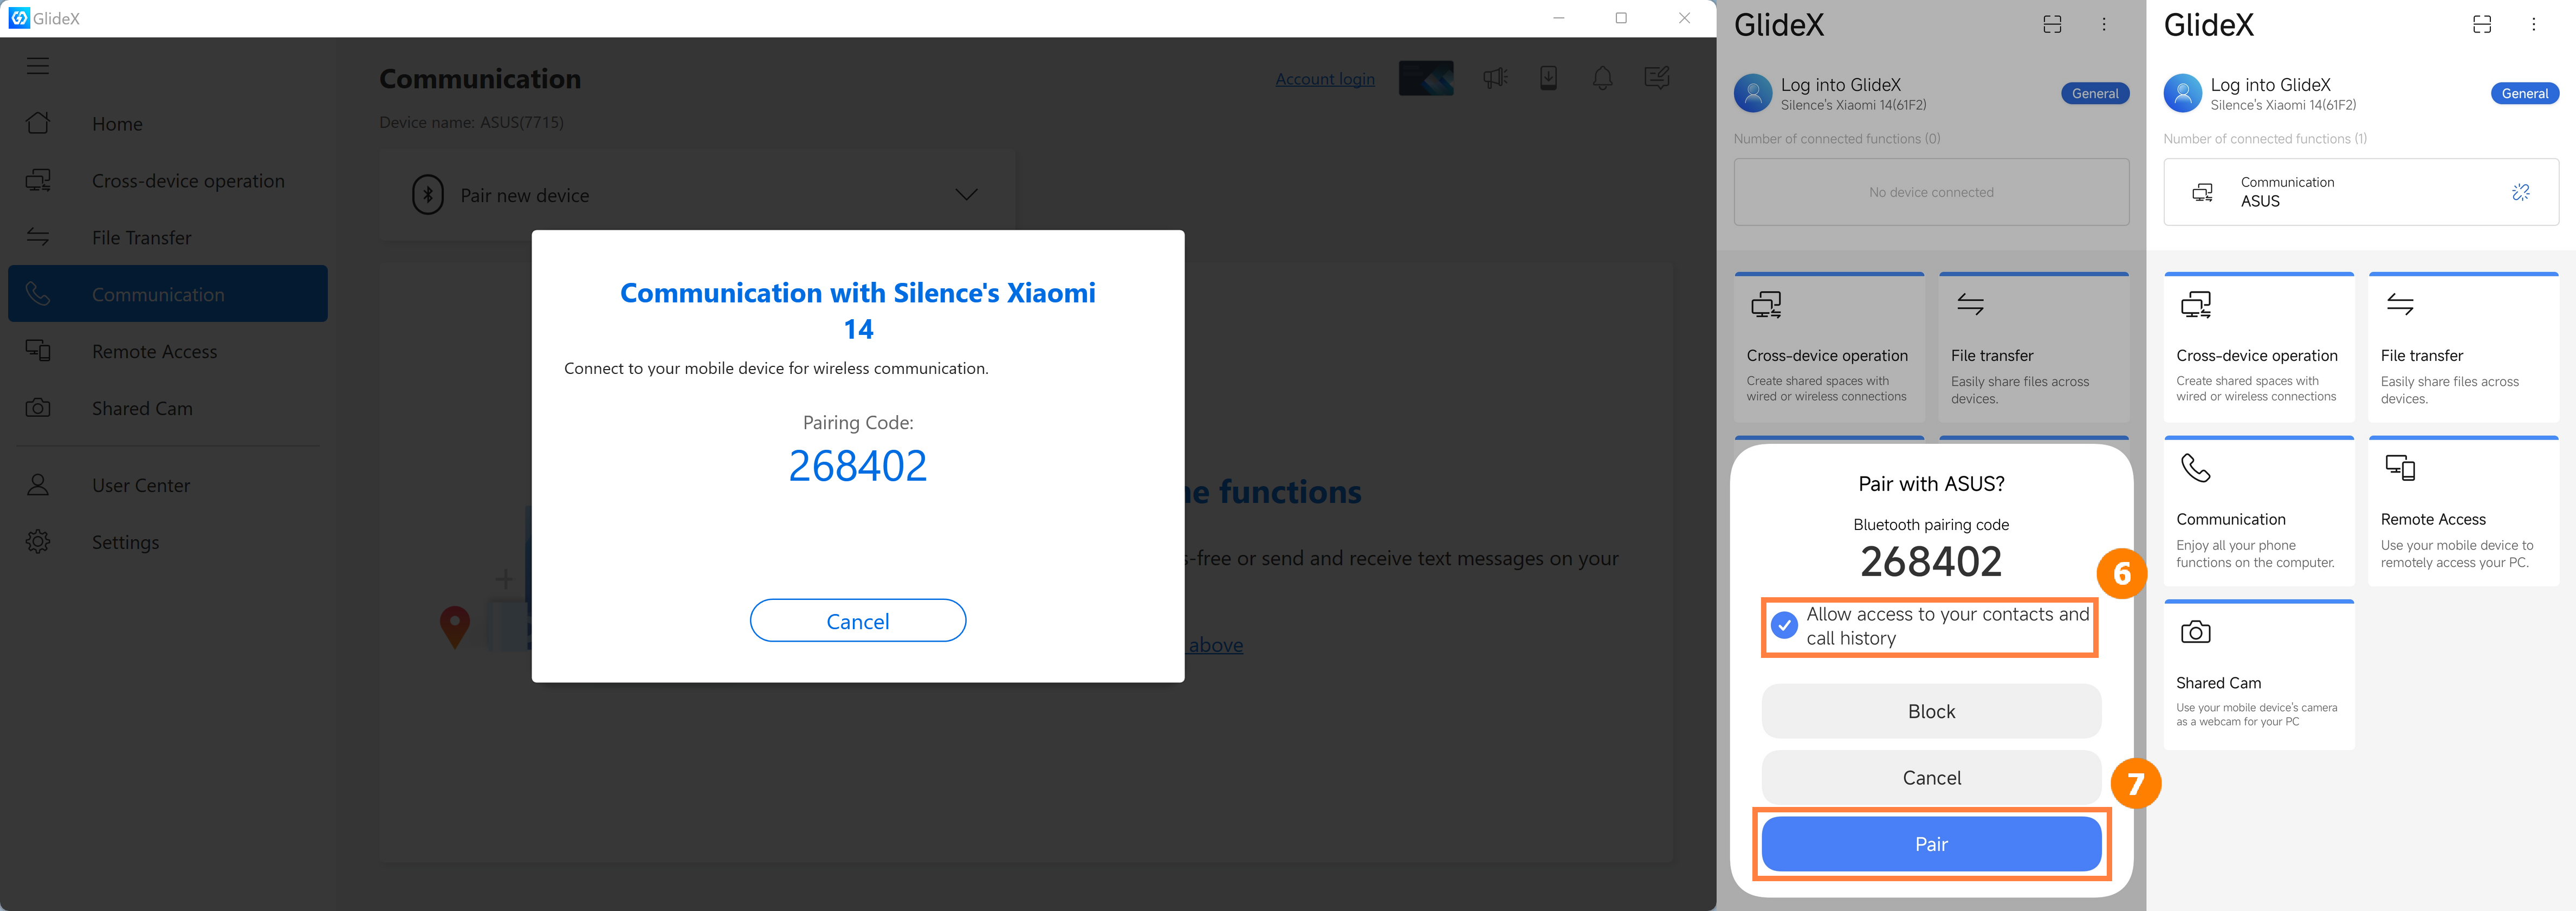
(4) A pairing pop-up window will appear on the mobile device, tap ⑥[Allow access to your contacts and call history], click ⑦[Pair], and the pairing is successful.
(1) Click the ①[Hands-free] icon to turn on history, contacts and other functions.
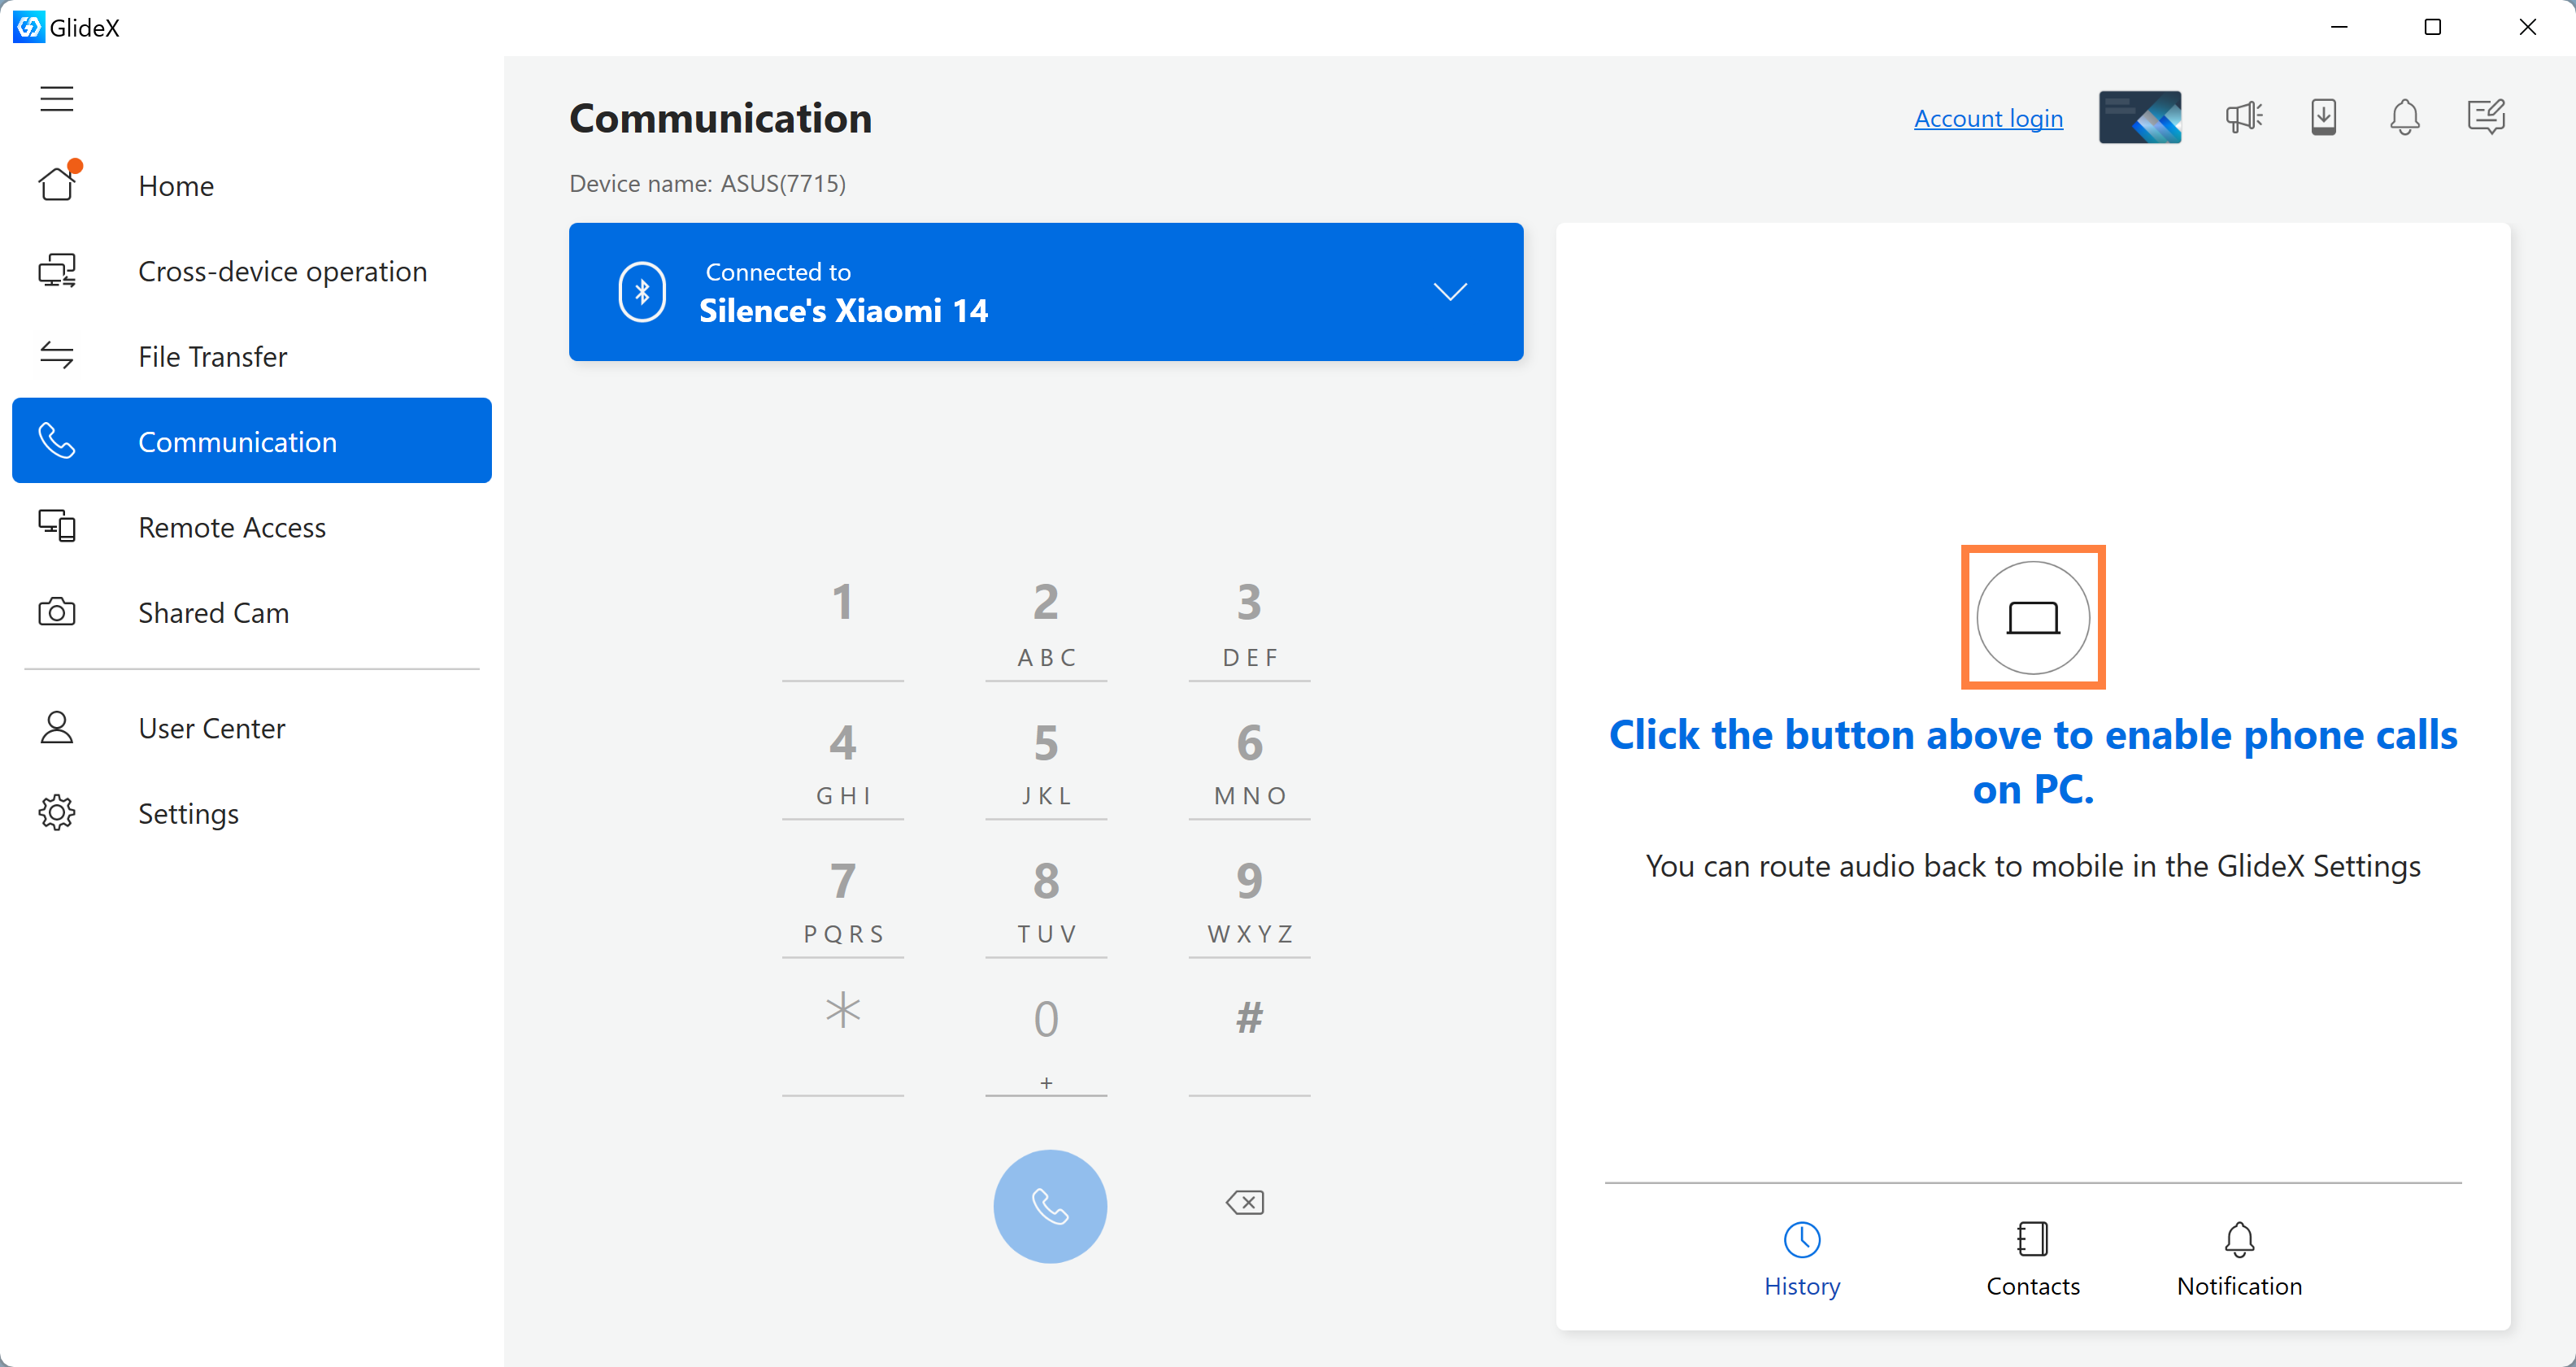
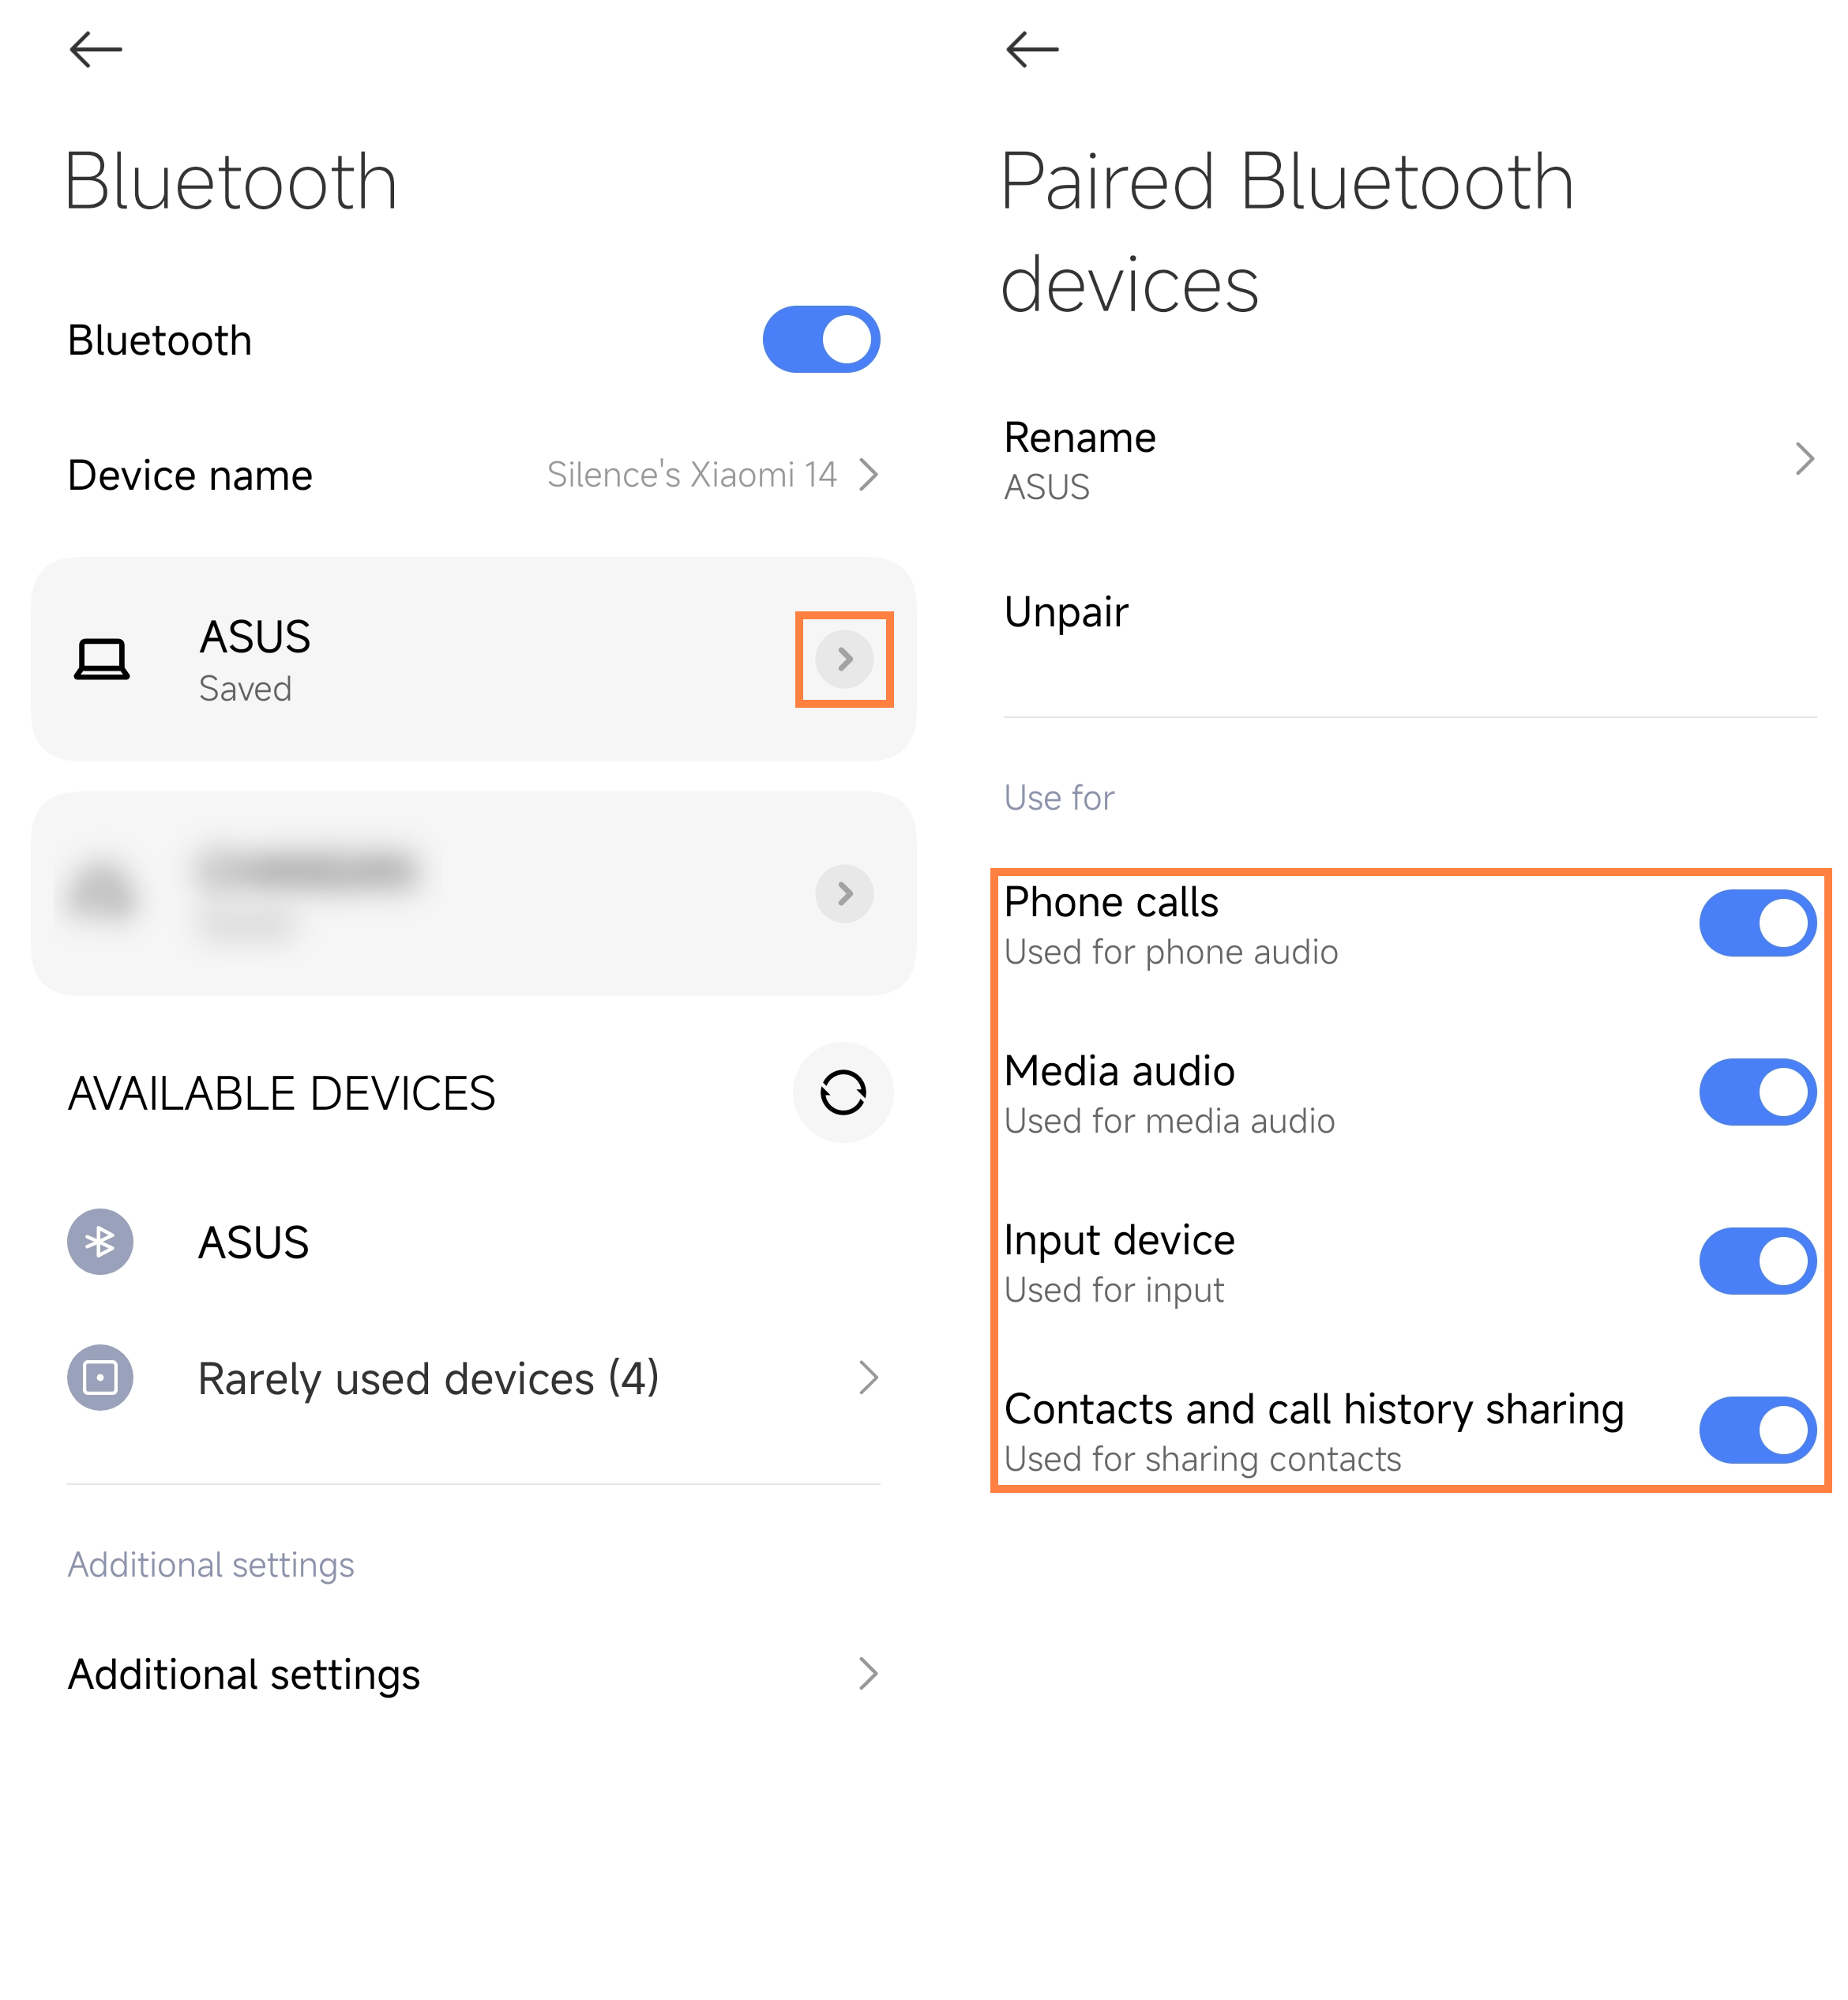
(2) If you still can't use this function after tapping [Hands-free], go to the Bluetooth settings screen on your mobile device, tap ①[Connected Computer Devices], and then turn on ②[Mobile phone calls and Other Functions].
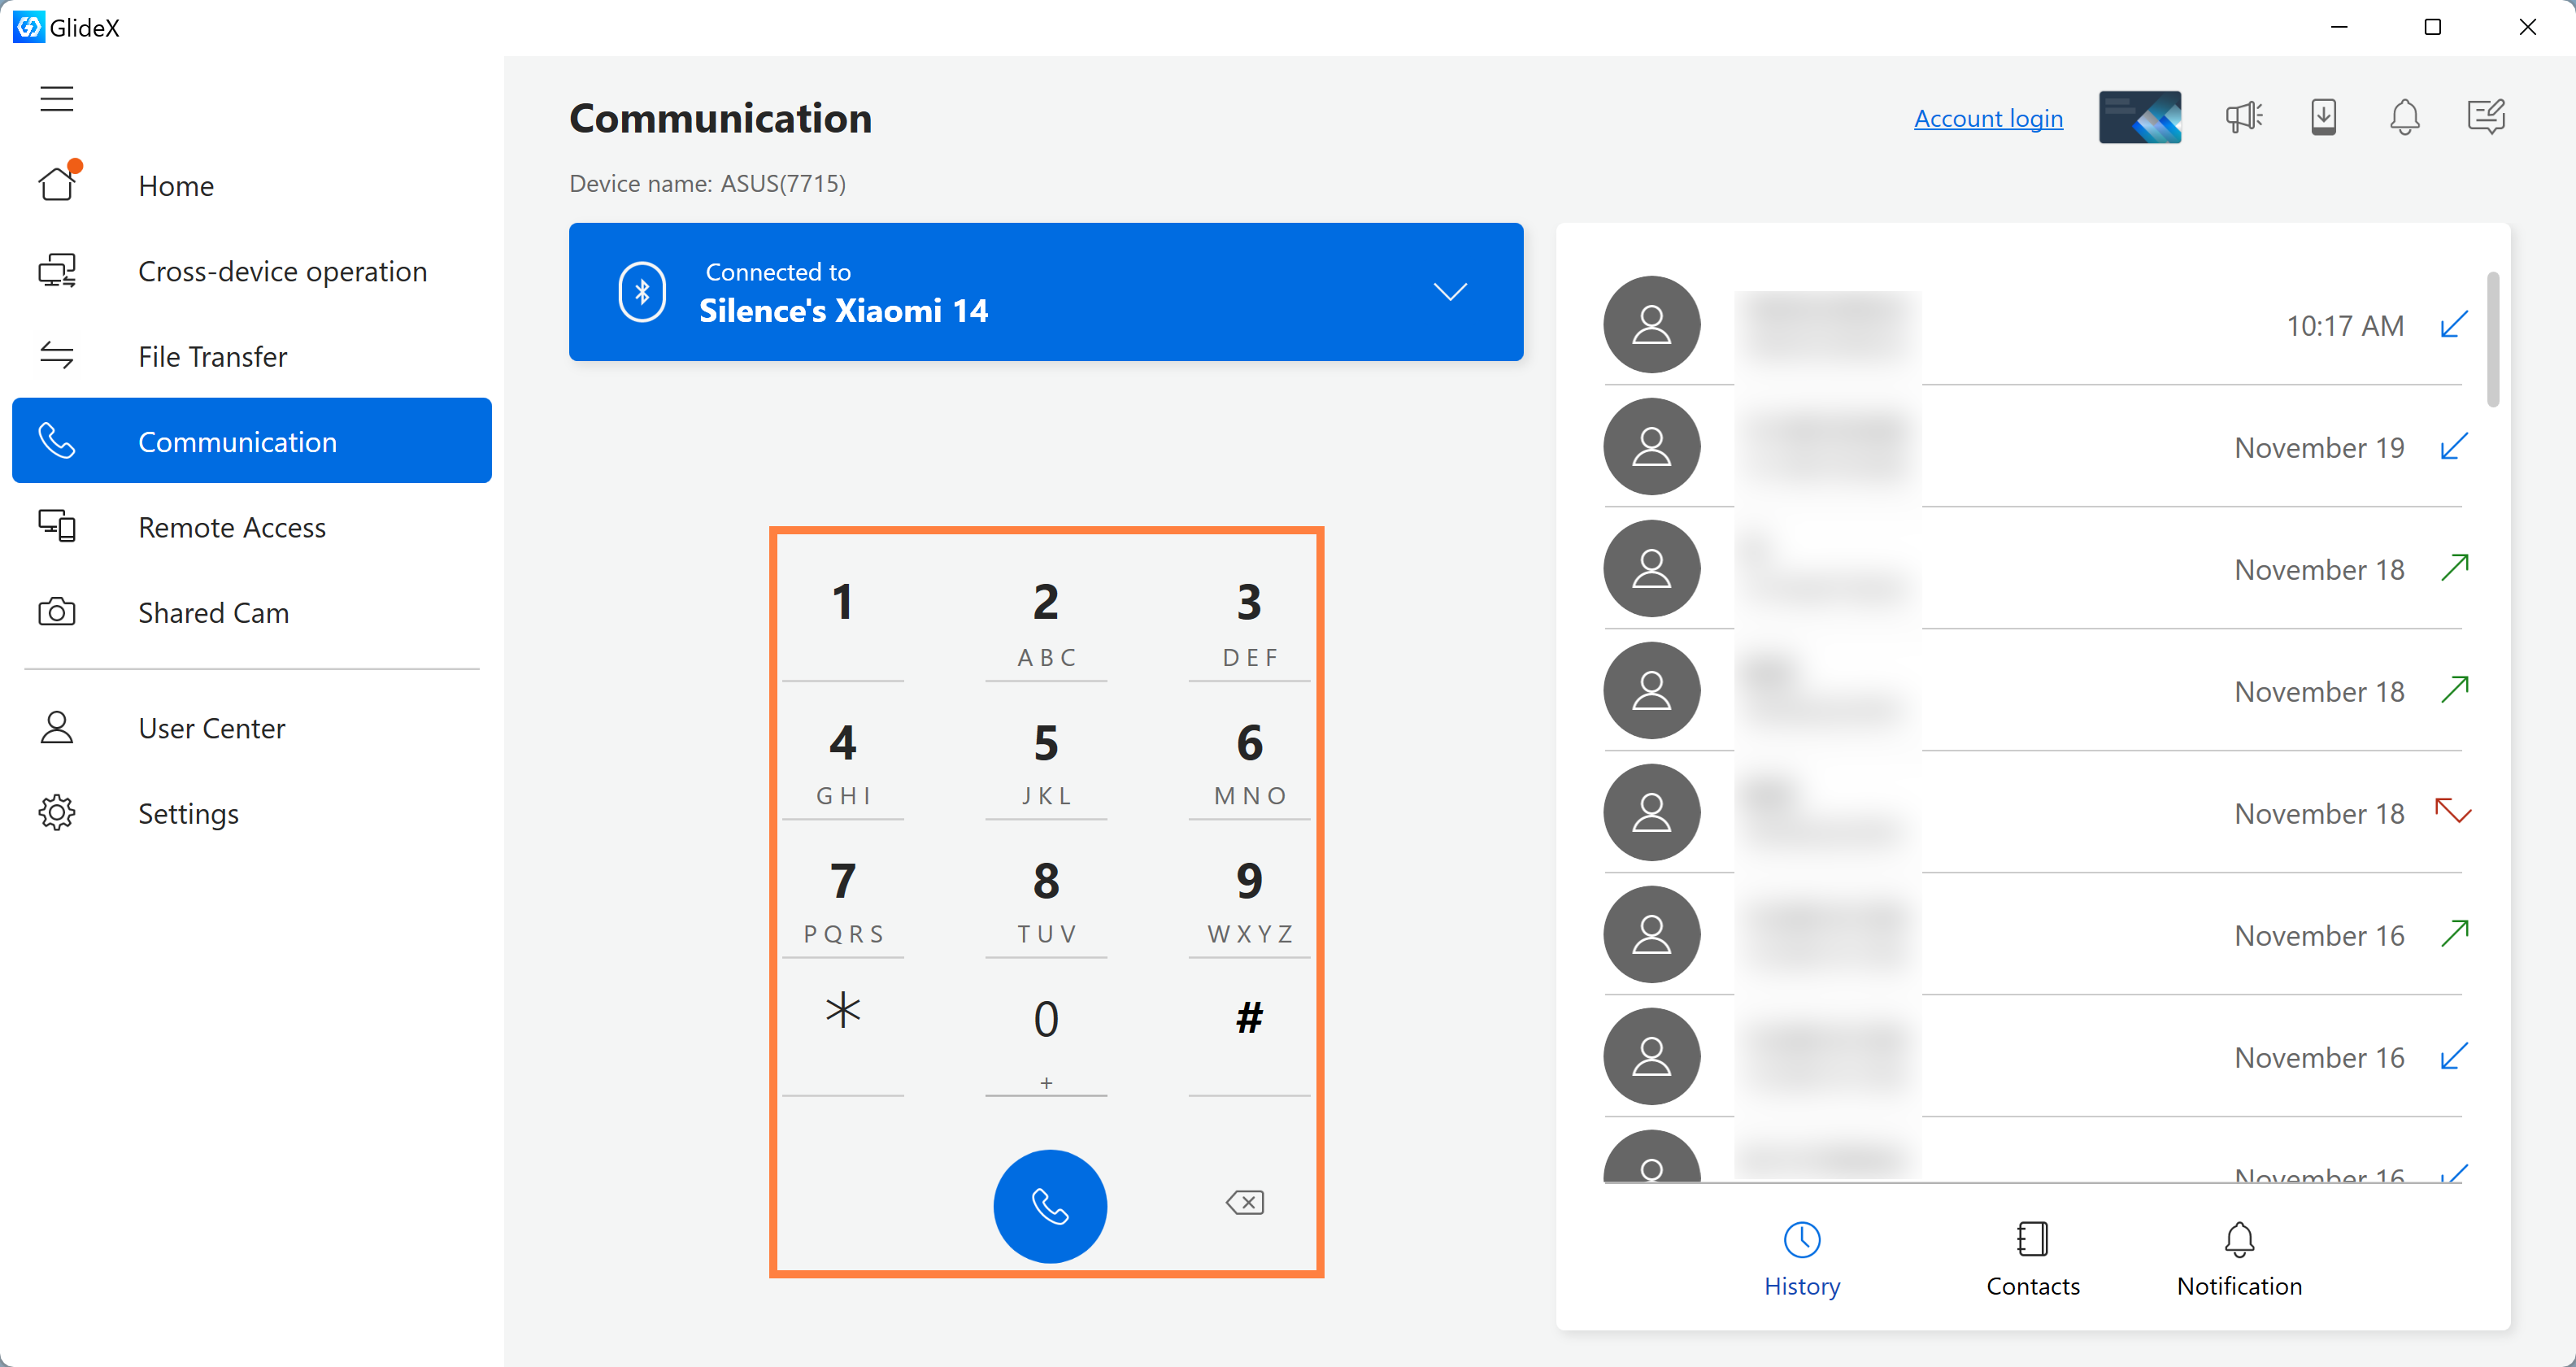
(3) Back to the communication page, you can use the GlideX App on the computer to dial up the call.
※ Because when calling, the system will use Bluetooth to transmit sound by default, that is, use the microphone and speaker on the computer to make a call. If you want to make a call using a device on your mobile device, go to [Bluetooth] -> [Select Answering Method] -> [Handset] on the mobile device call page.
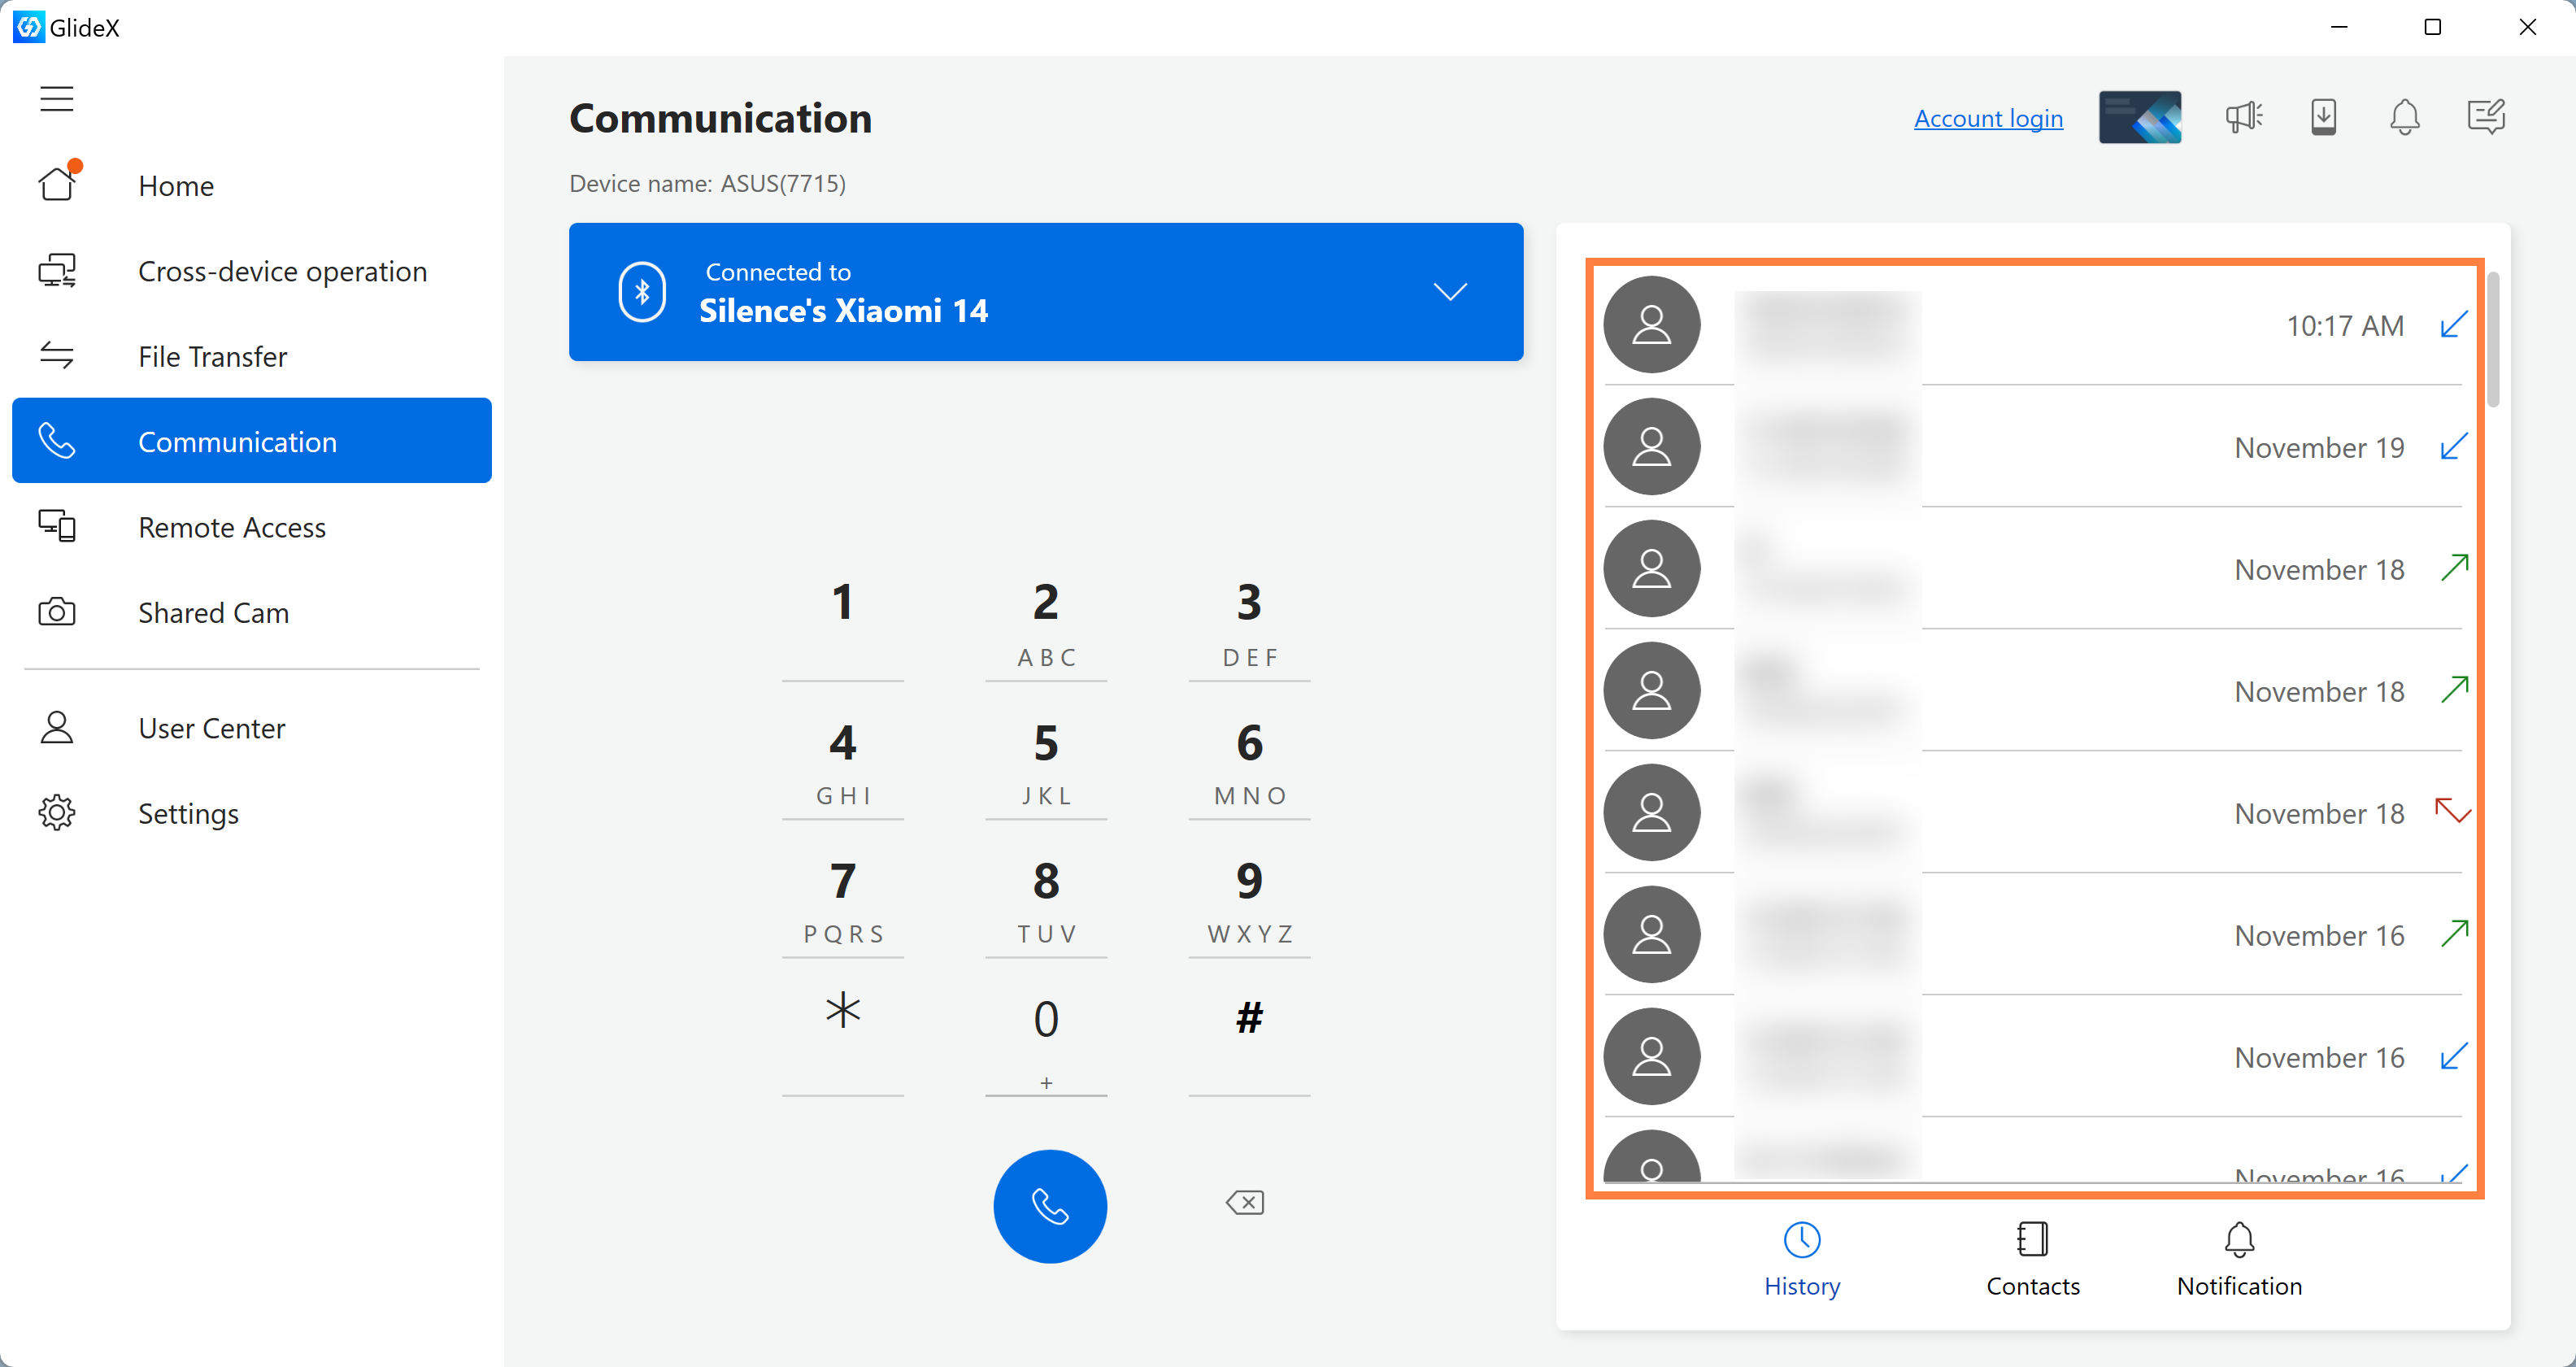
You can query the call history, and double-click any of them to call the other party.
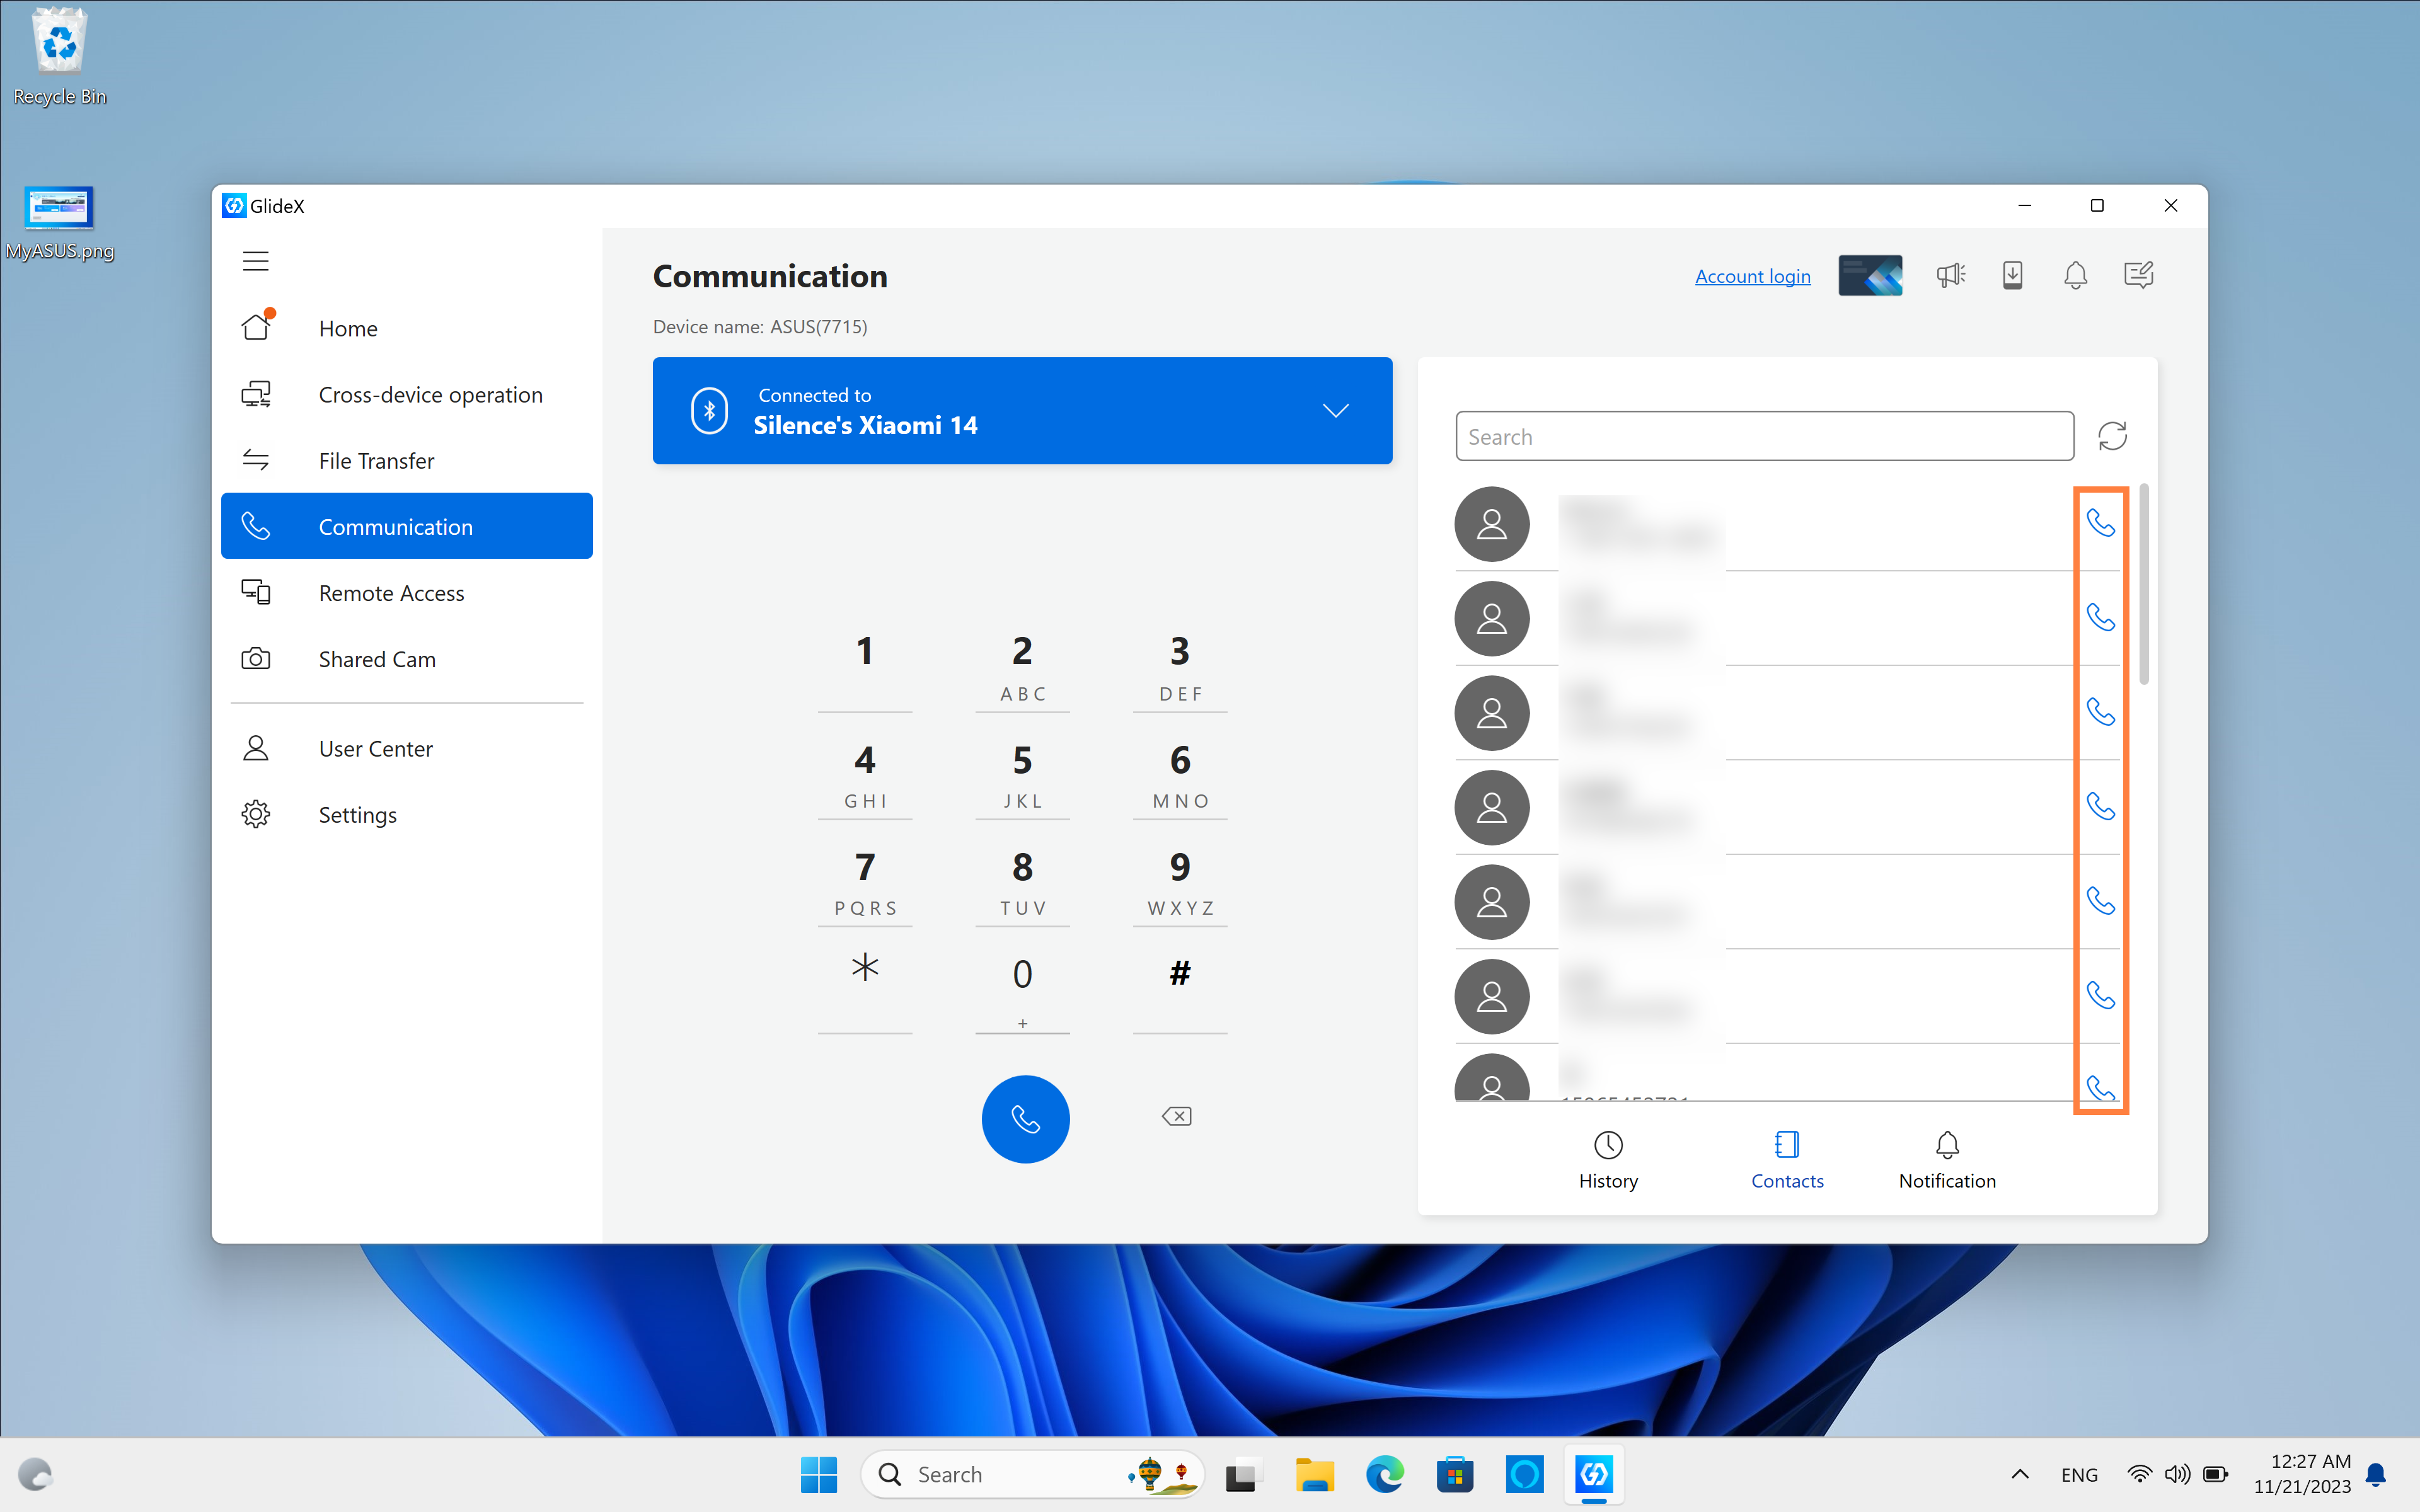
In Contacts, you can browse all the contact messages stored on your mobile device, click the [Phone] button on the right to make a call, or you can quickly search for the contact you need in the search bar above.
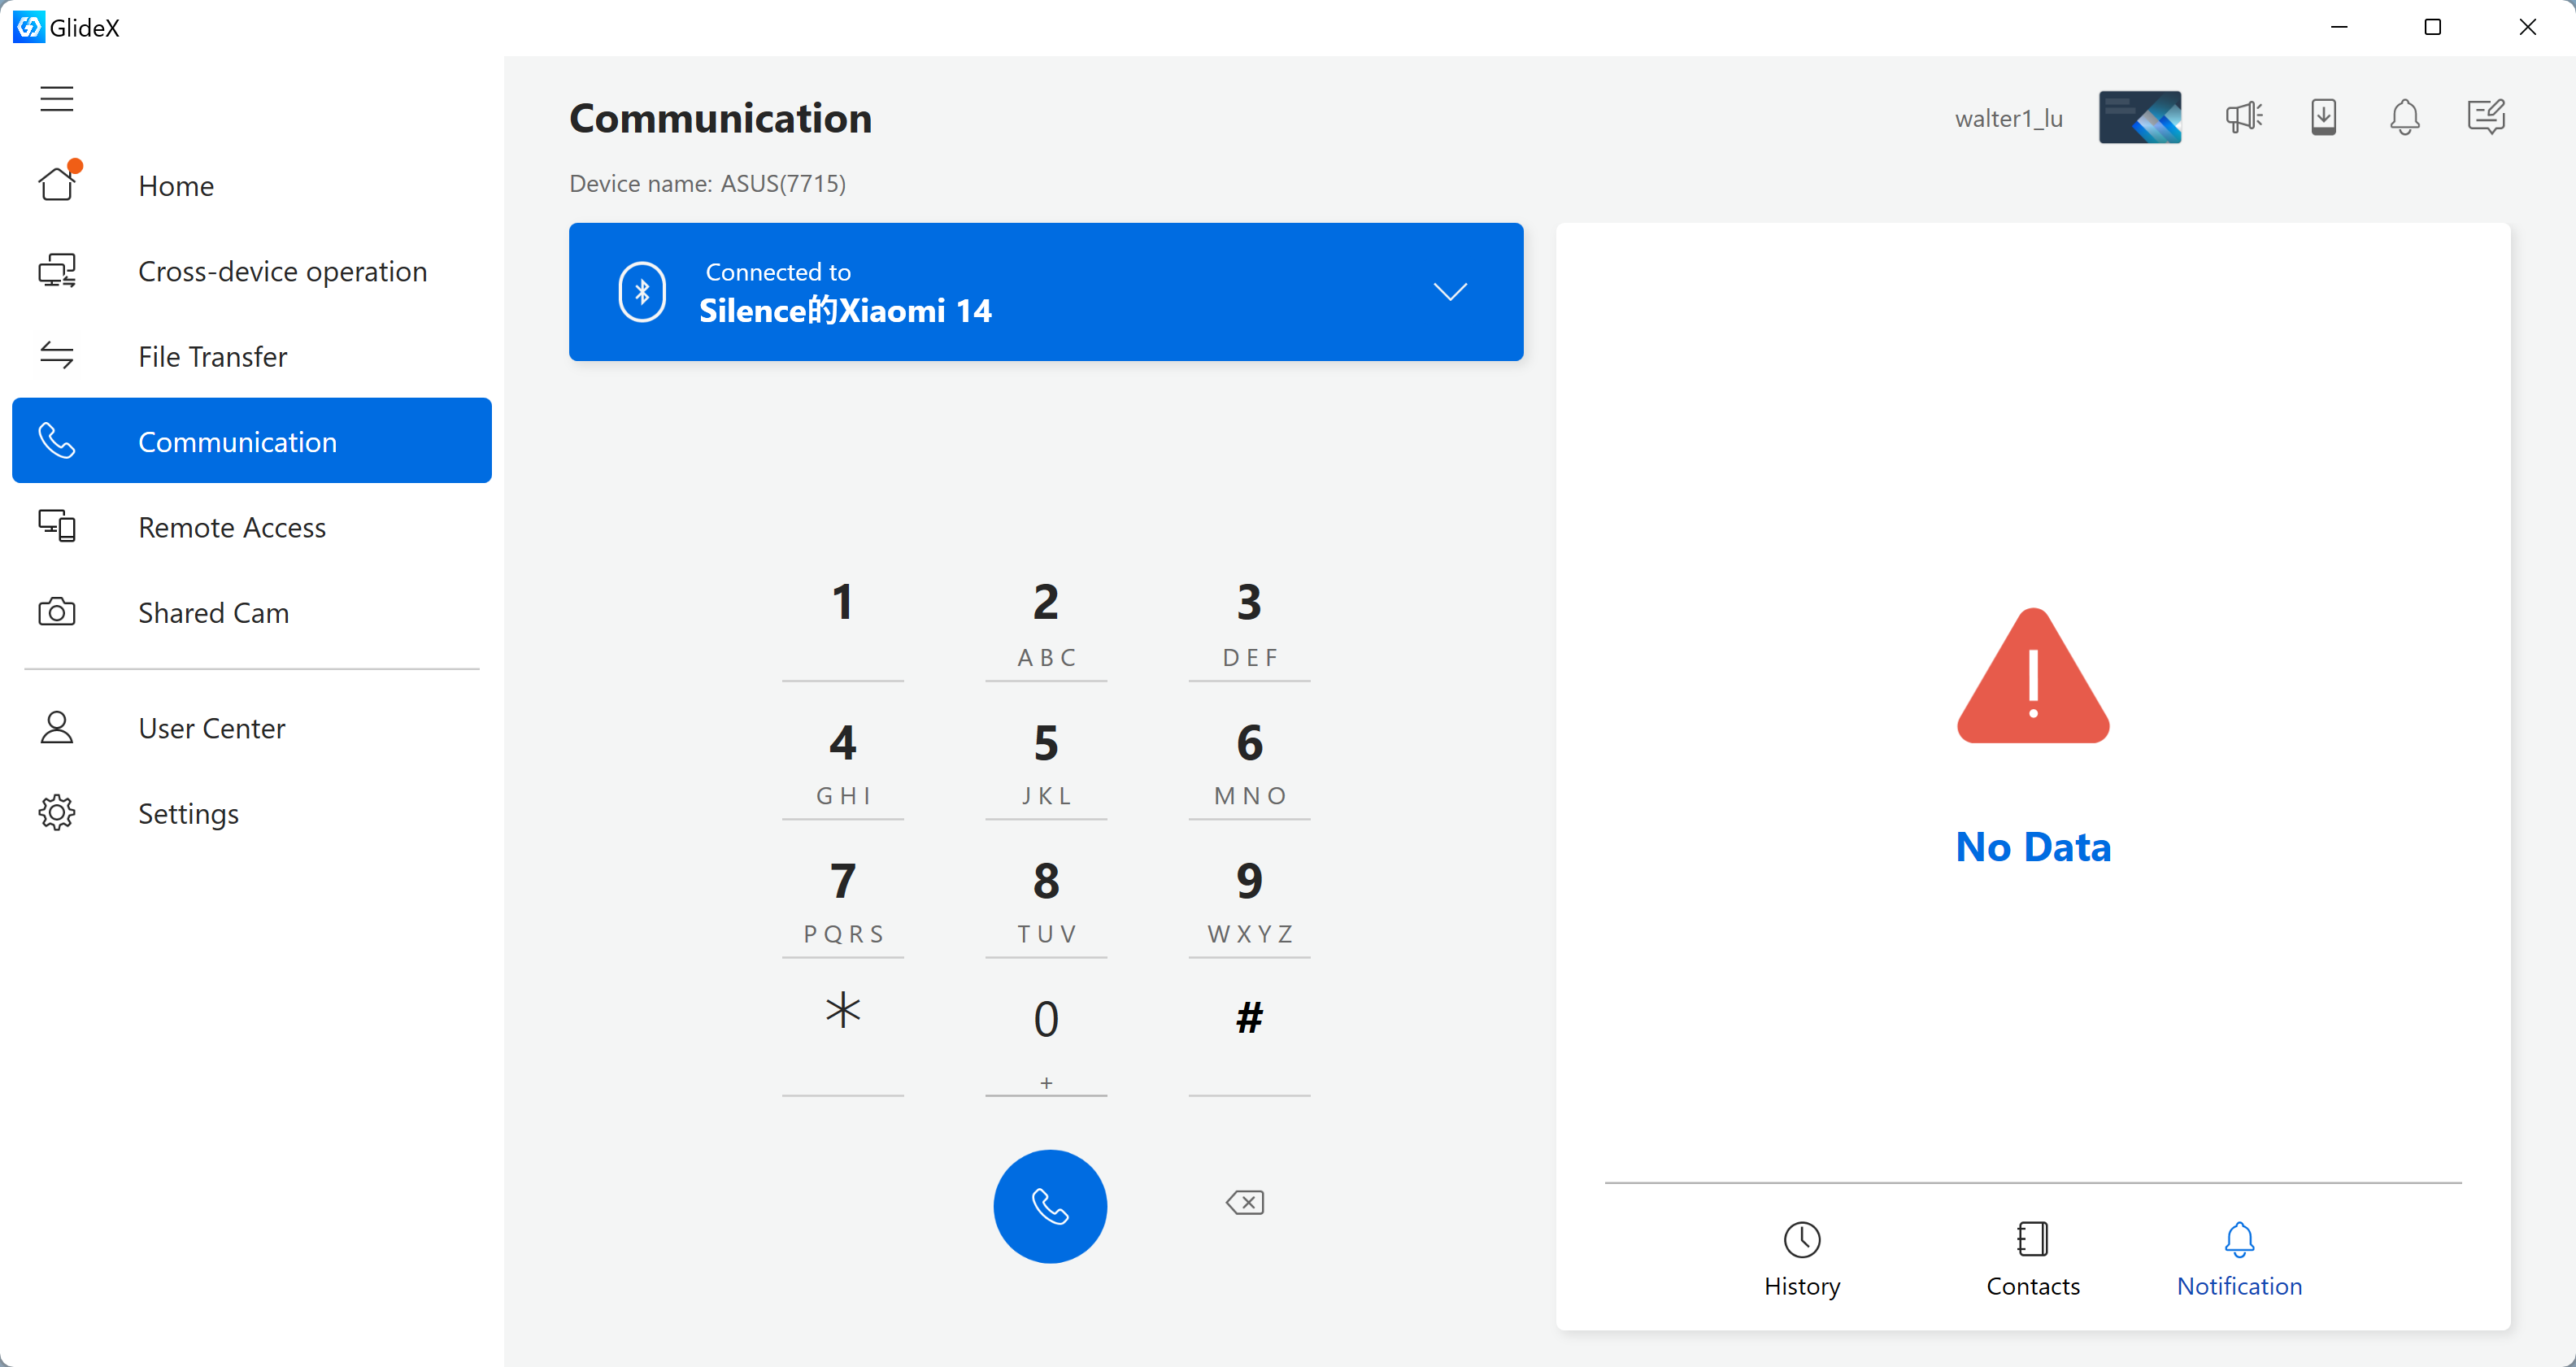
(1) If you enable the notification function for the first time, you may not be able to use the function, such as [No data]. 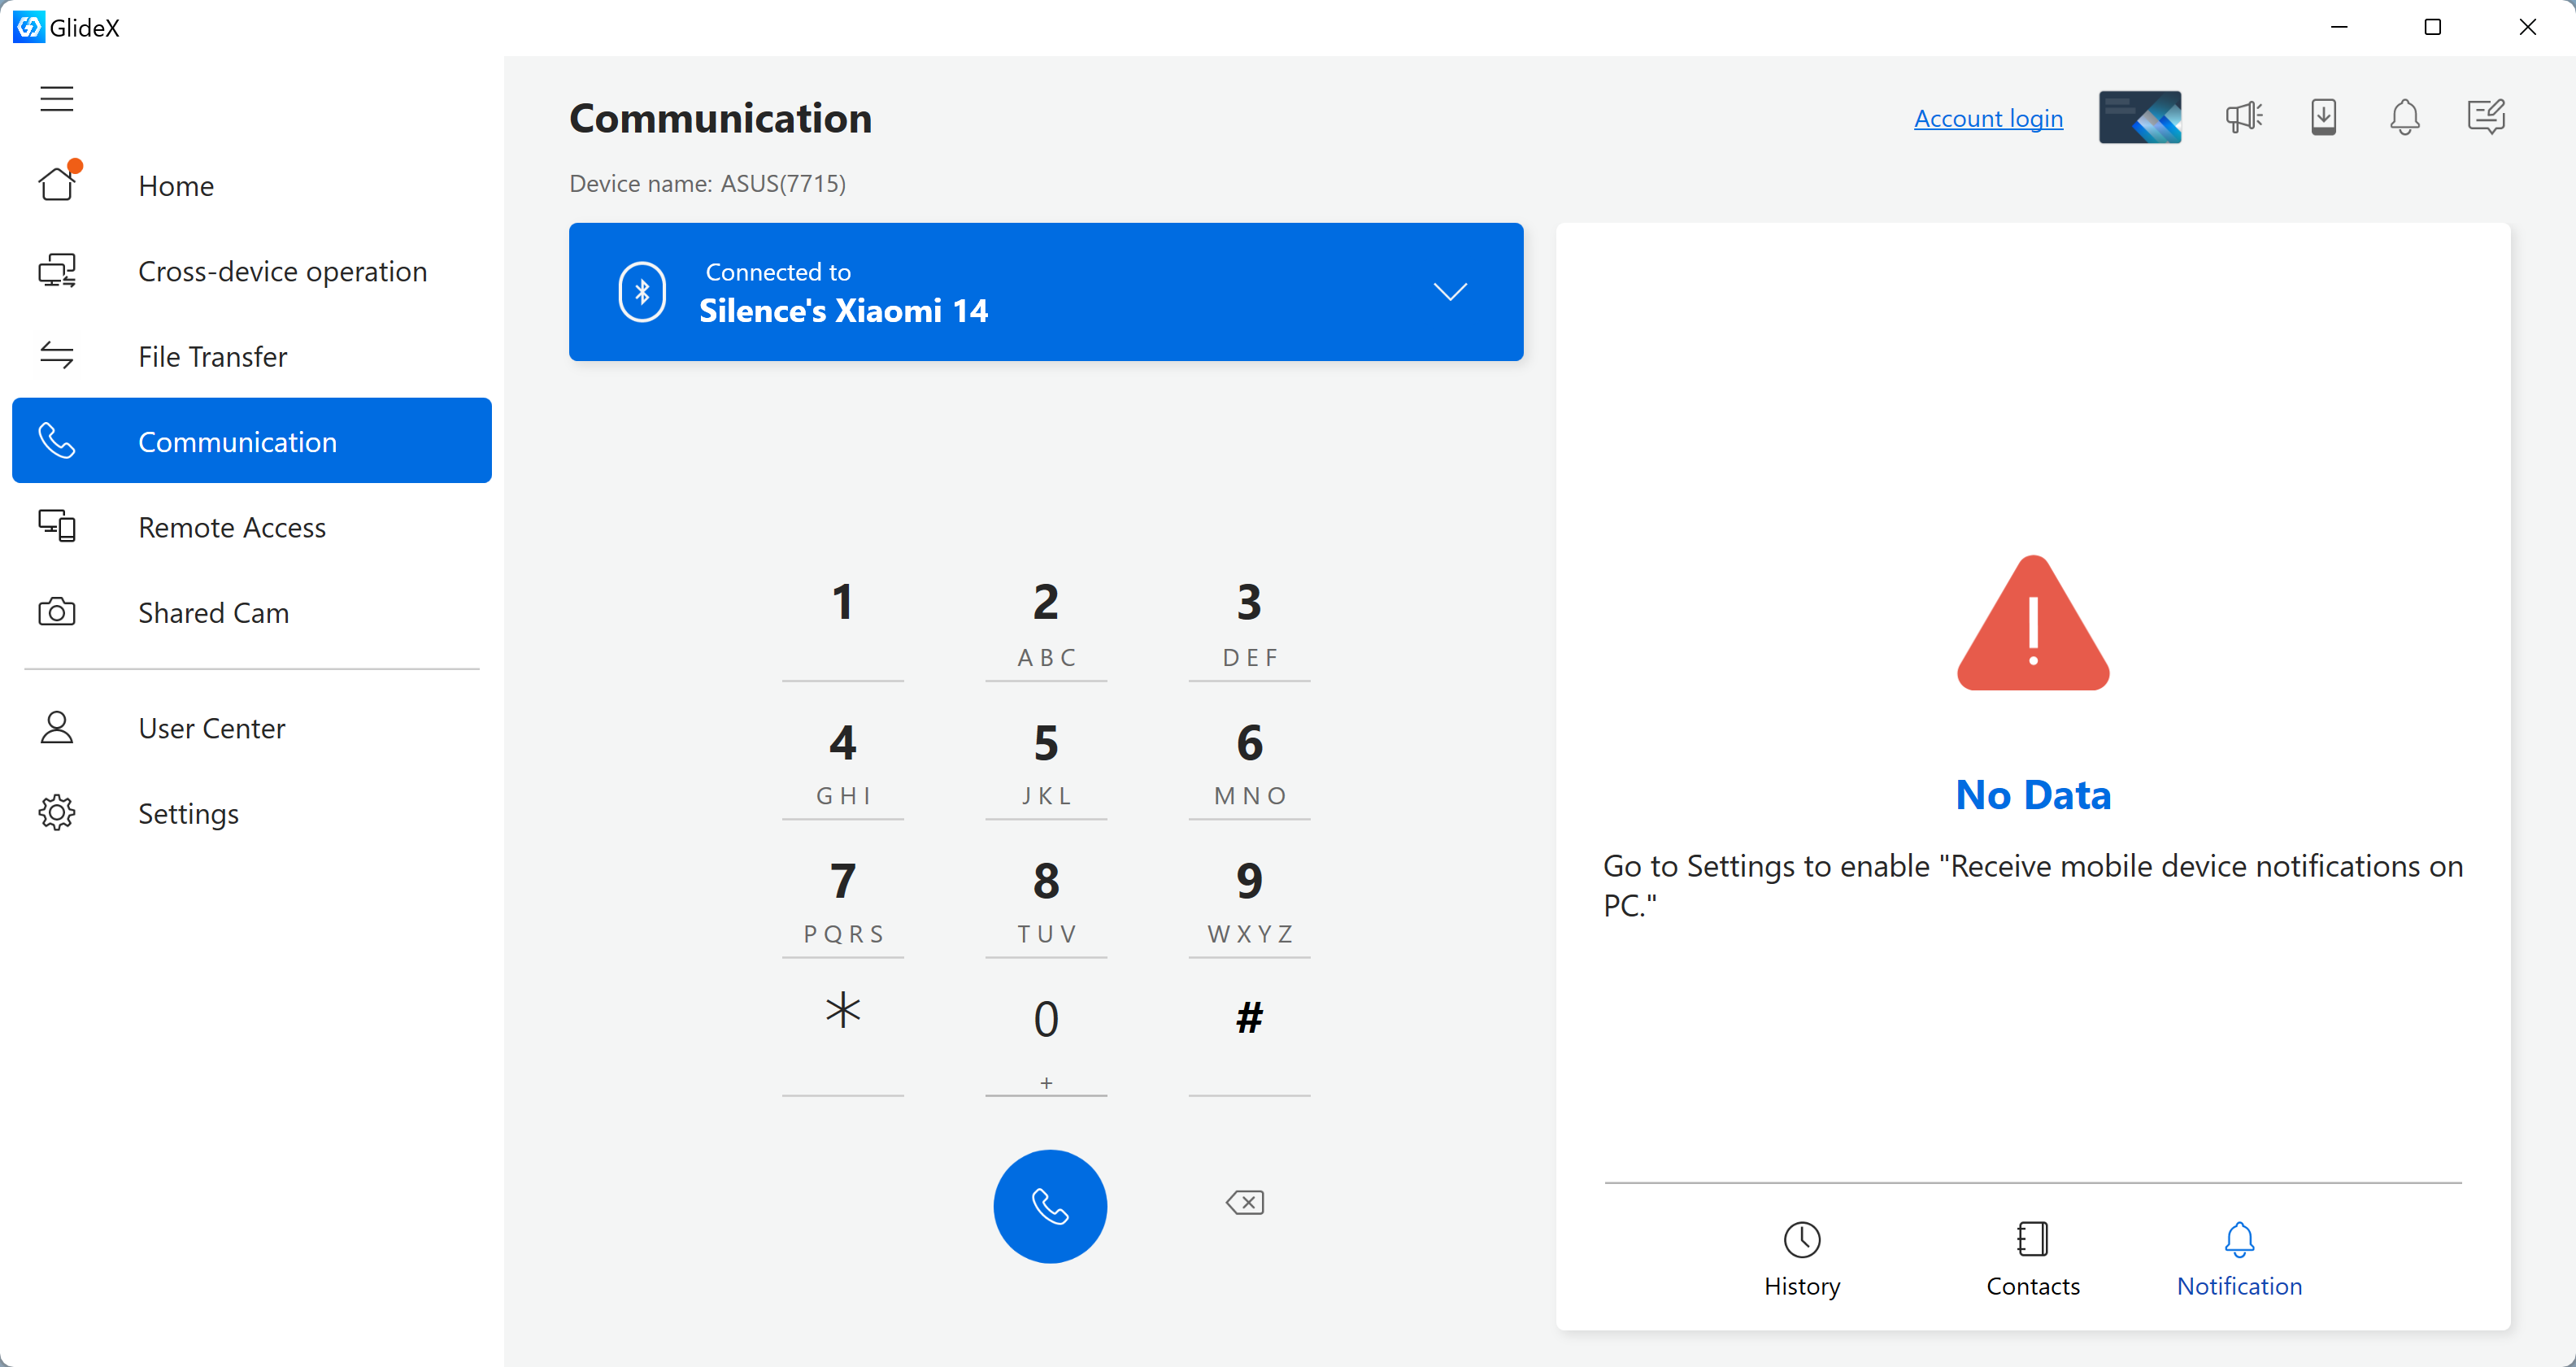
(2) Click [Settings] in the PC GlideX app, Click [General], and Click to enable [Receive mobile device notifications on PC].
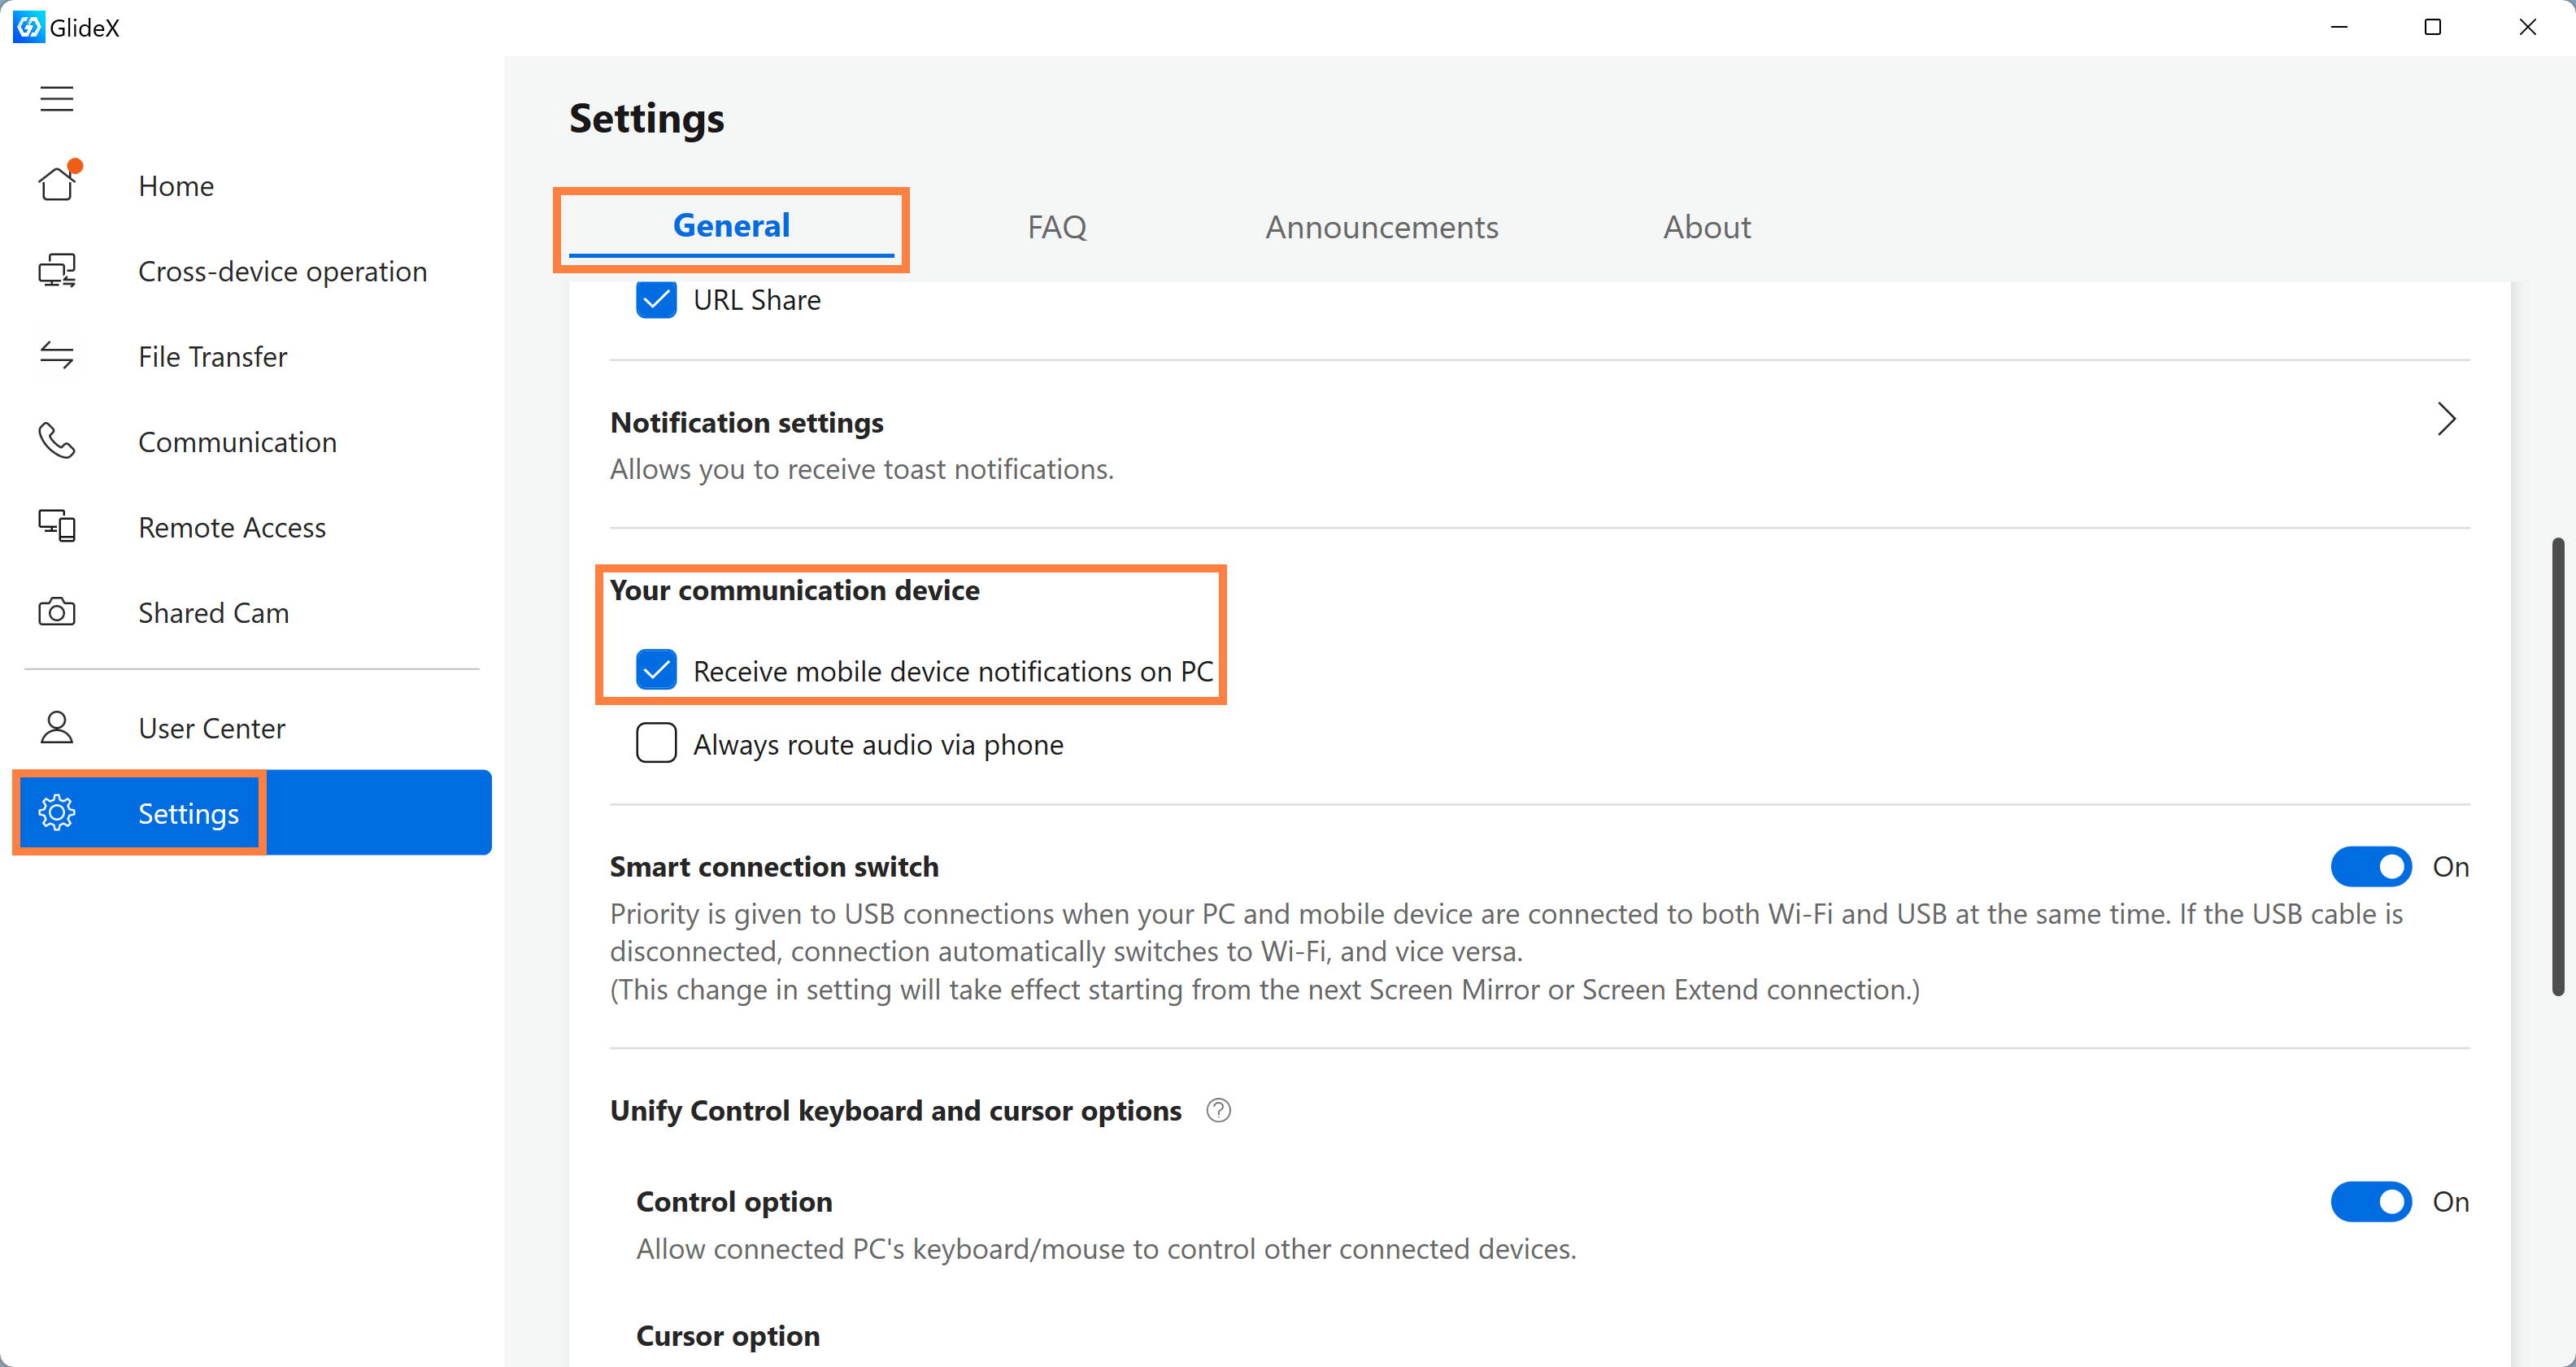
(3) The notification function is enabled, the notification message on the mobile device will be displayed here, and the new notification in the App will also be displayed in the lower right corner of the desktop. With the Mirror function, you can quickly process the notification messages on the mobile device.
Remote Access requires both the computer and the mobile device to log in to the same ASUS member account, and the remote access function on the computer has been enabled.
When you use the remote access function for the first time, the system will send an email to your mailbox, and you need to manually click on the mailbox to turn on the remote access function (because it will access your computer data, so confirm that it is you who operate, to prevent privacy leakage).
Every time you use the remote access function on the mobile device, the system will send a notification email to your mailbox to ensure your privacy and security.
If you encounter problems using this function, please refer to: [GlideX] Cannot use Remote Desktop? | Official Support | ASUS Global
(1) Click ①[User Center] on PC GliedX App, ①[Login] on mobile device, enter your ASUS ②[Member ID and password], and then click ③[Login].

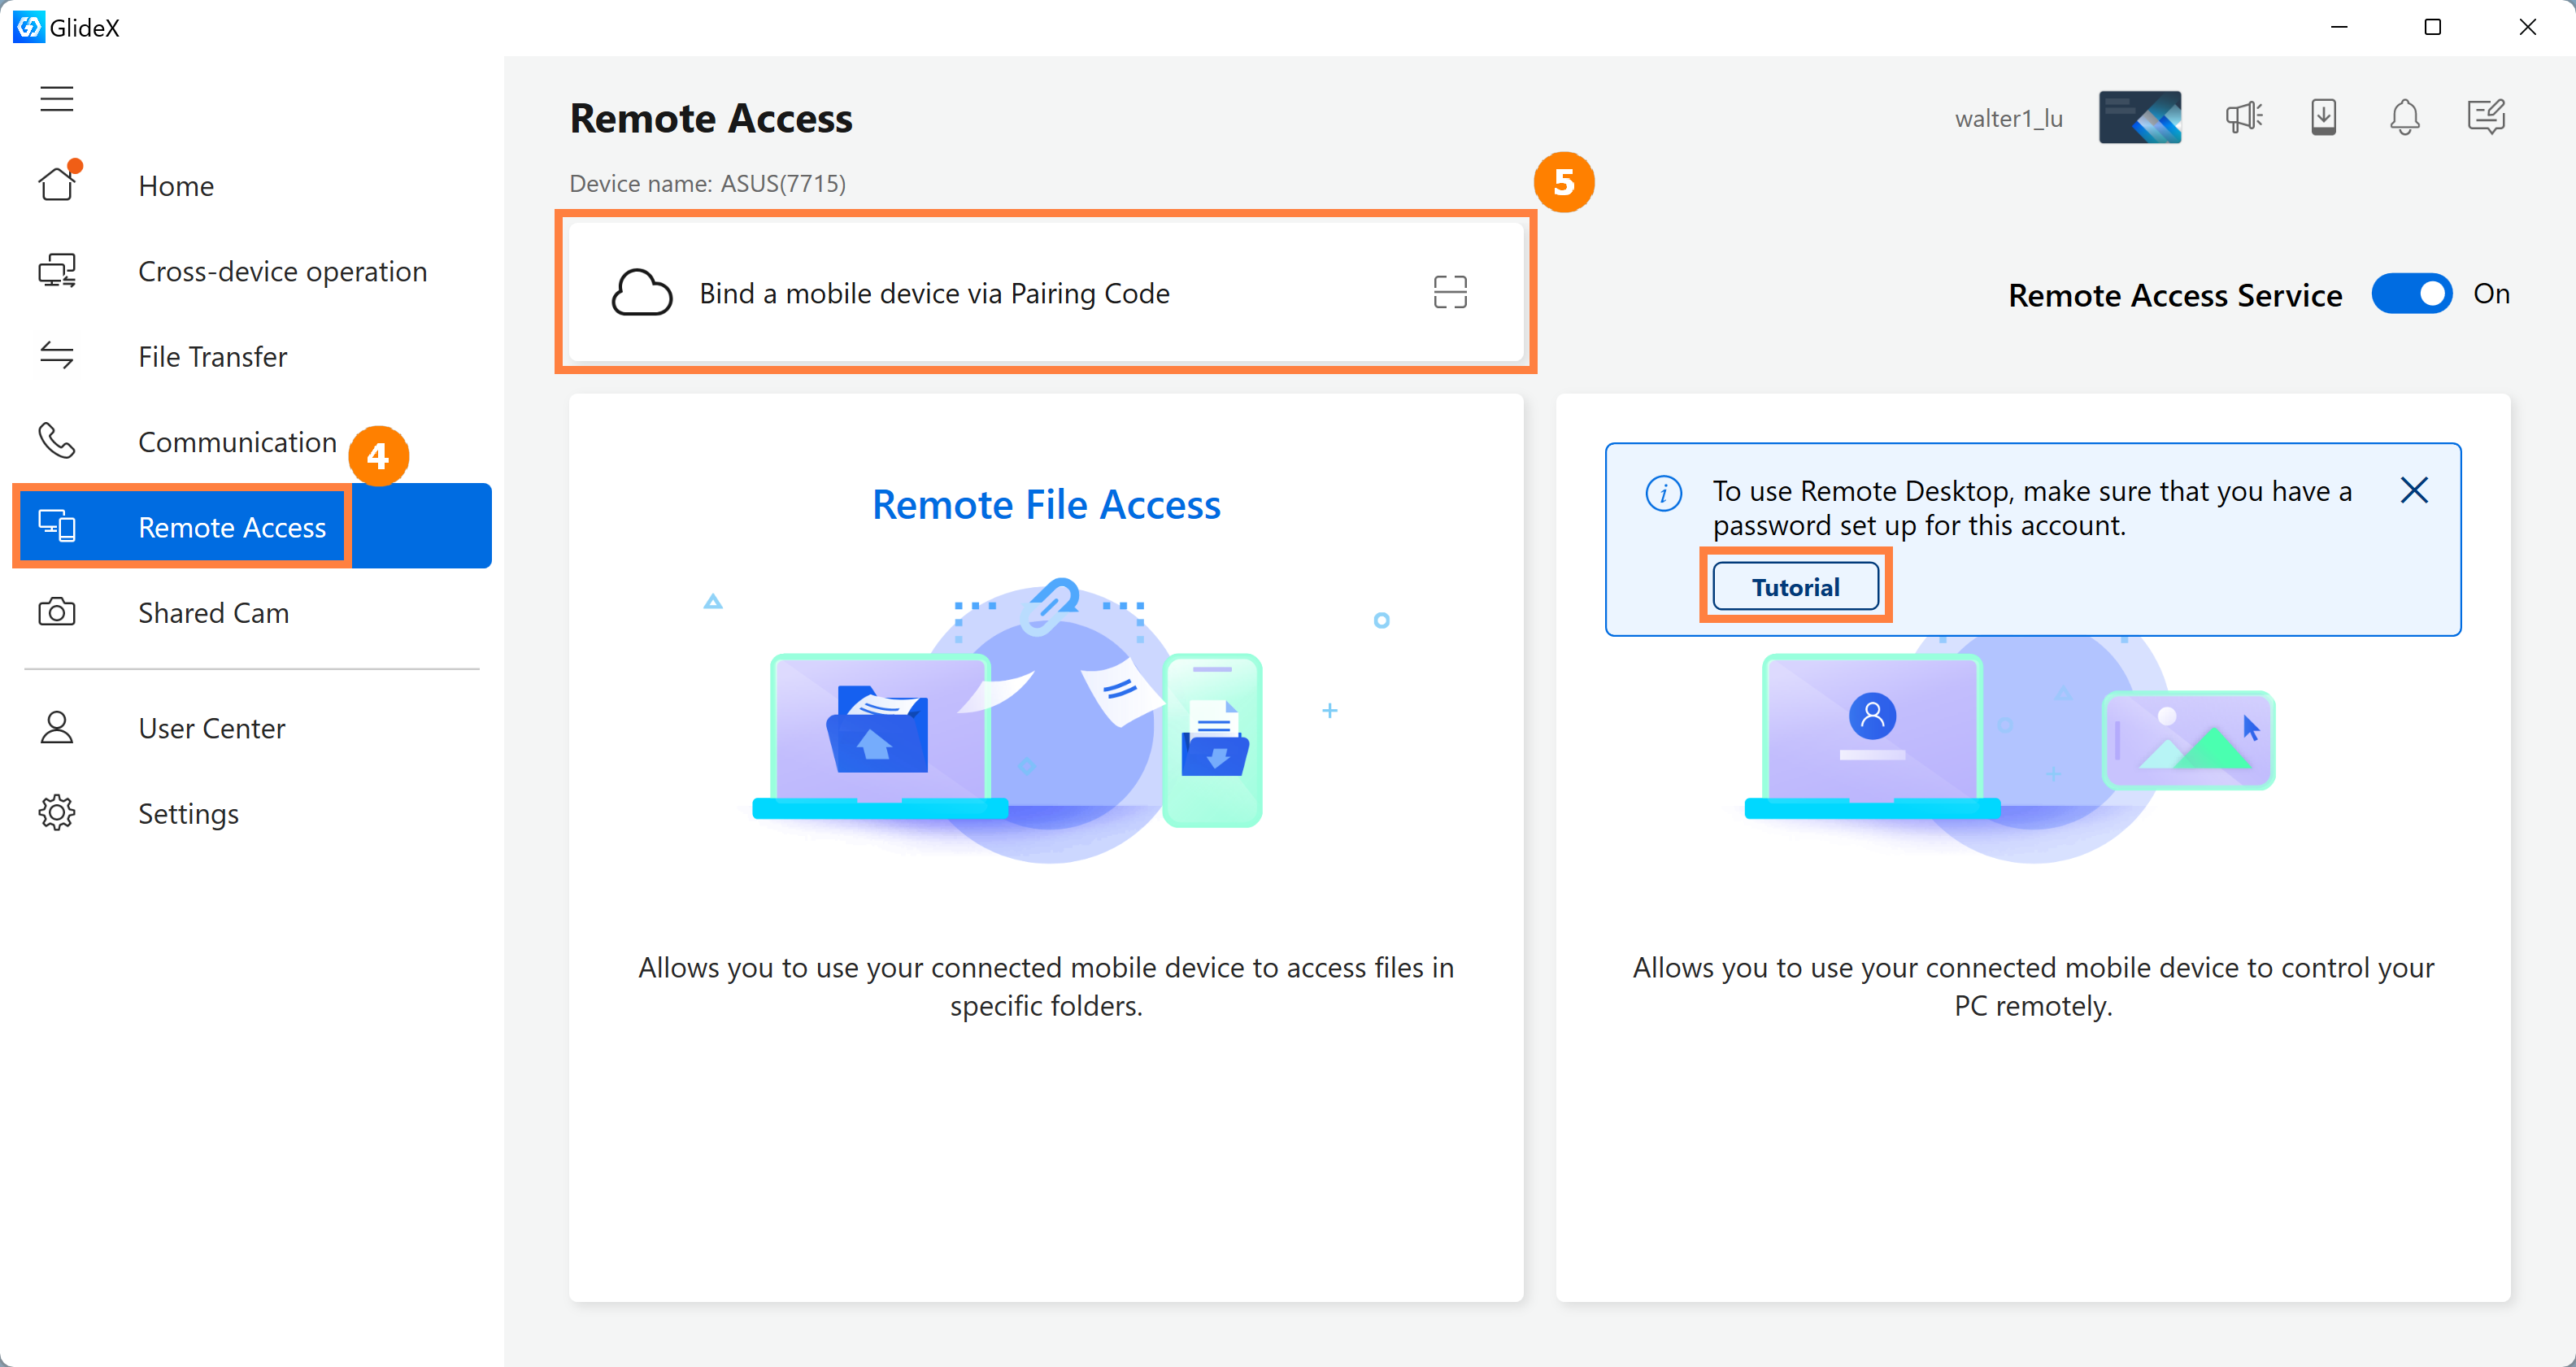
(2) Click ④[Remote Access] function, Click ⑤[Bind a mobile device via pairing code].
※ The use of the remote desktop function requires your computer to open the account password setting, if your computer does not open the account password setting, please click [Tutorial] to open the account password setting.
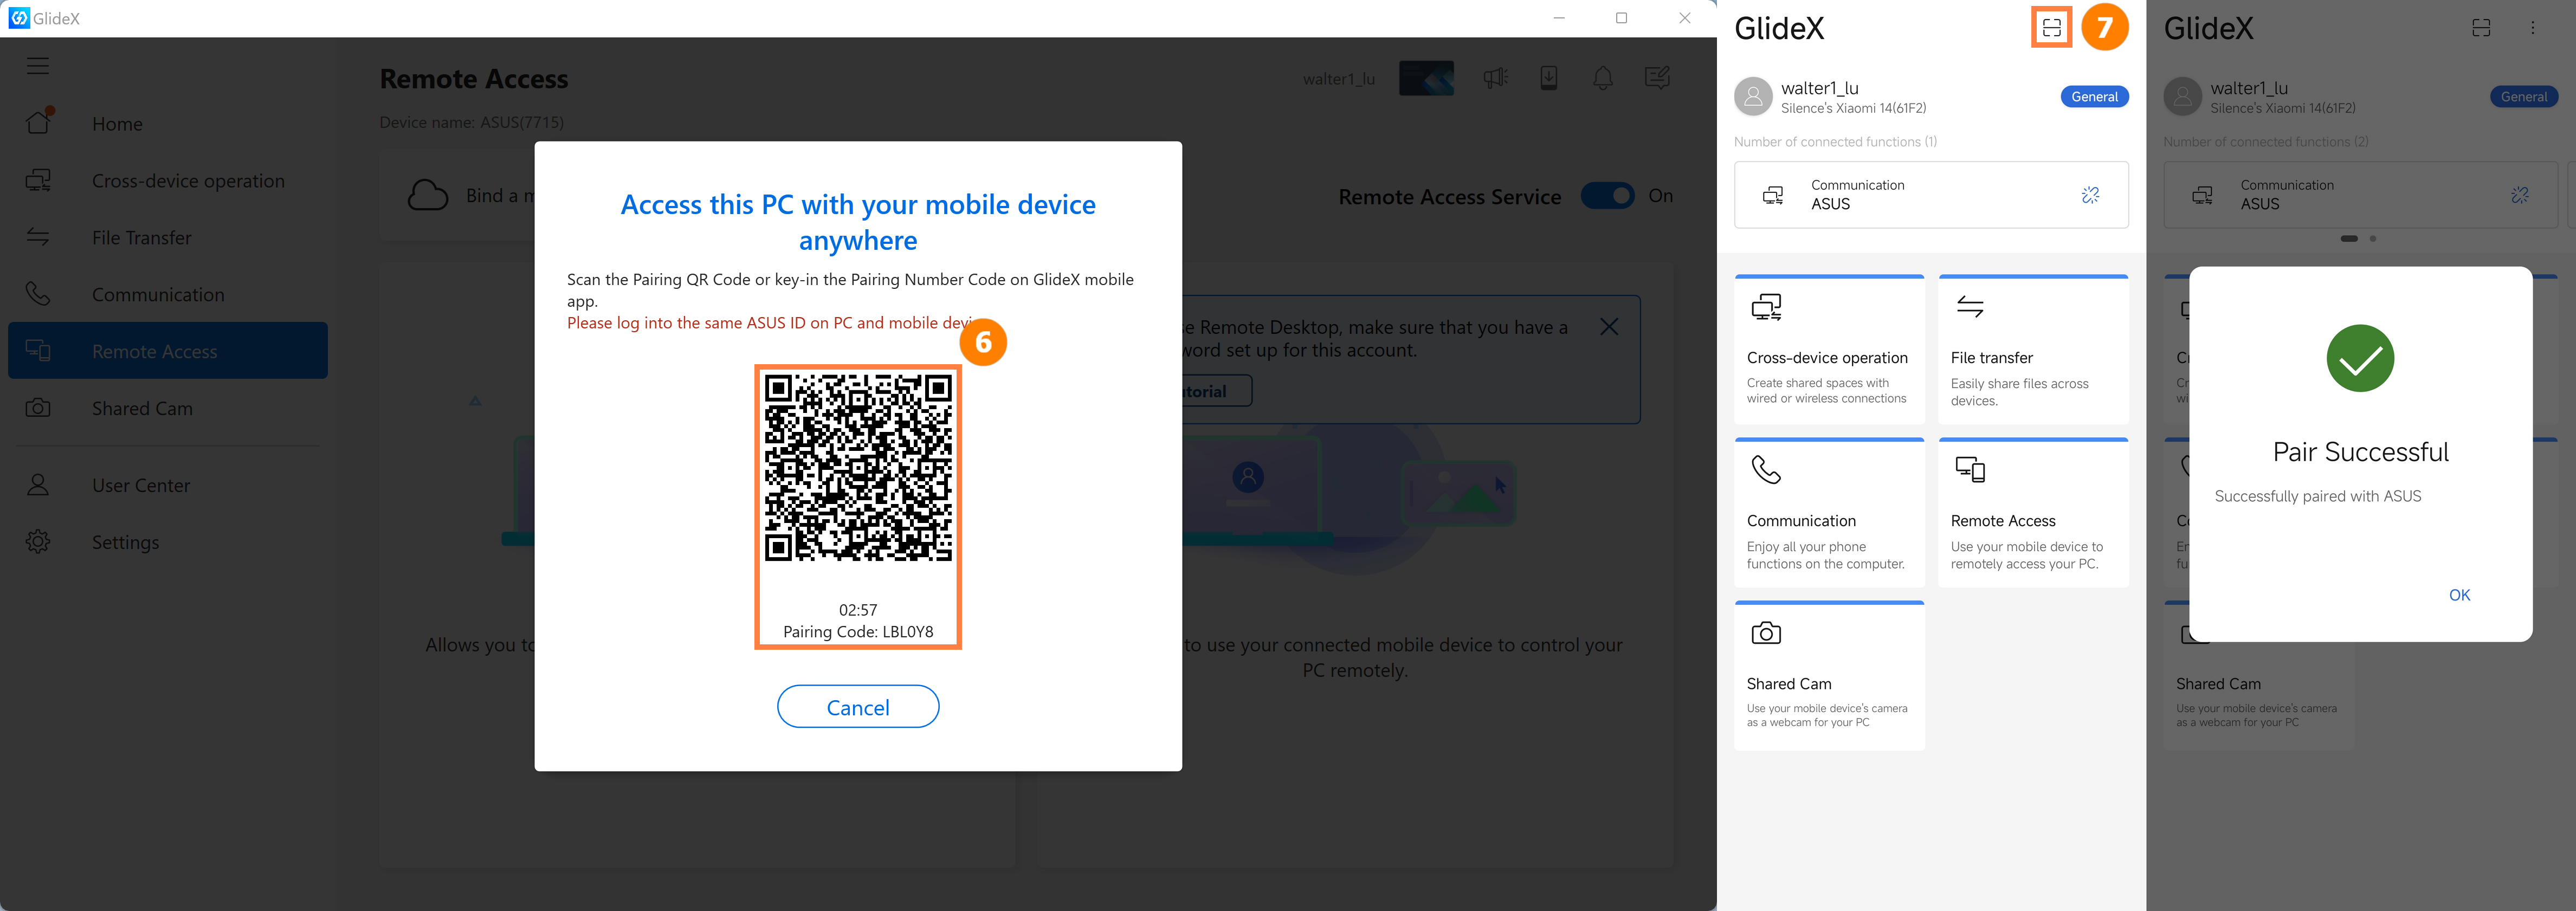
(3) The computer will generate ⑥[QR Code]. On the mobile device, tap ⑦[Camera] to scan the QR Code displayed on the computer, and the pairing is successful.
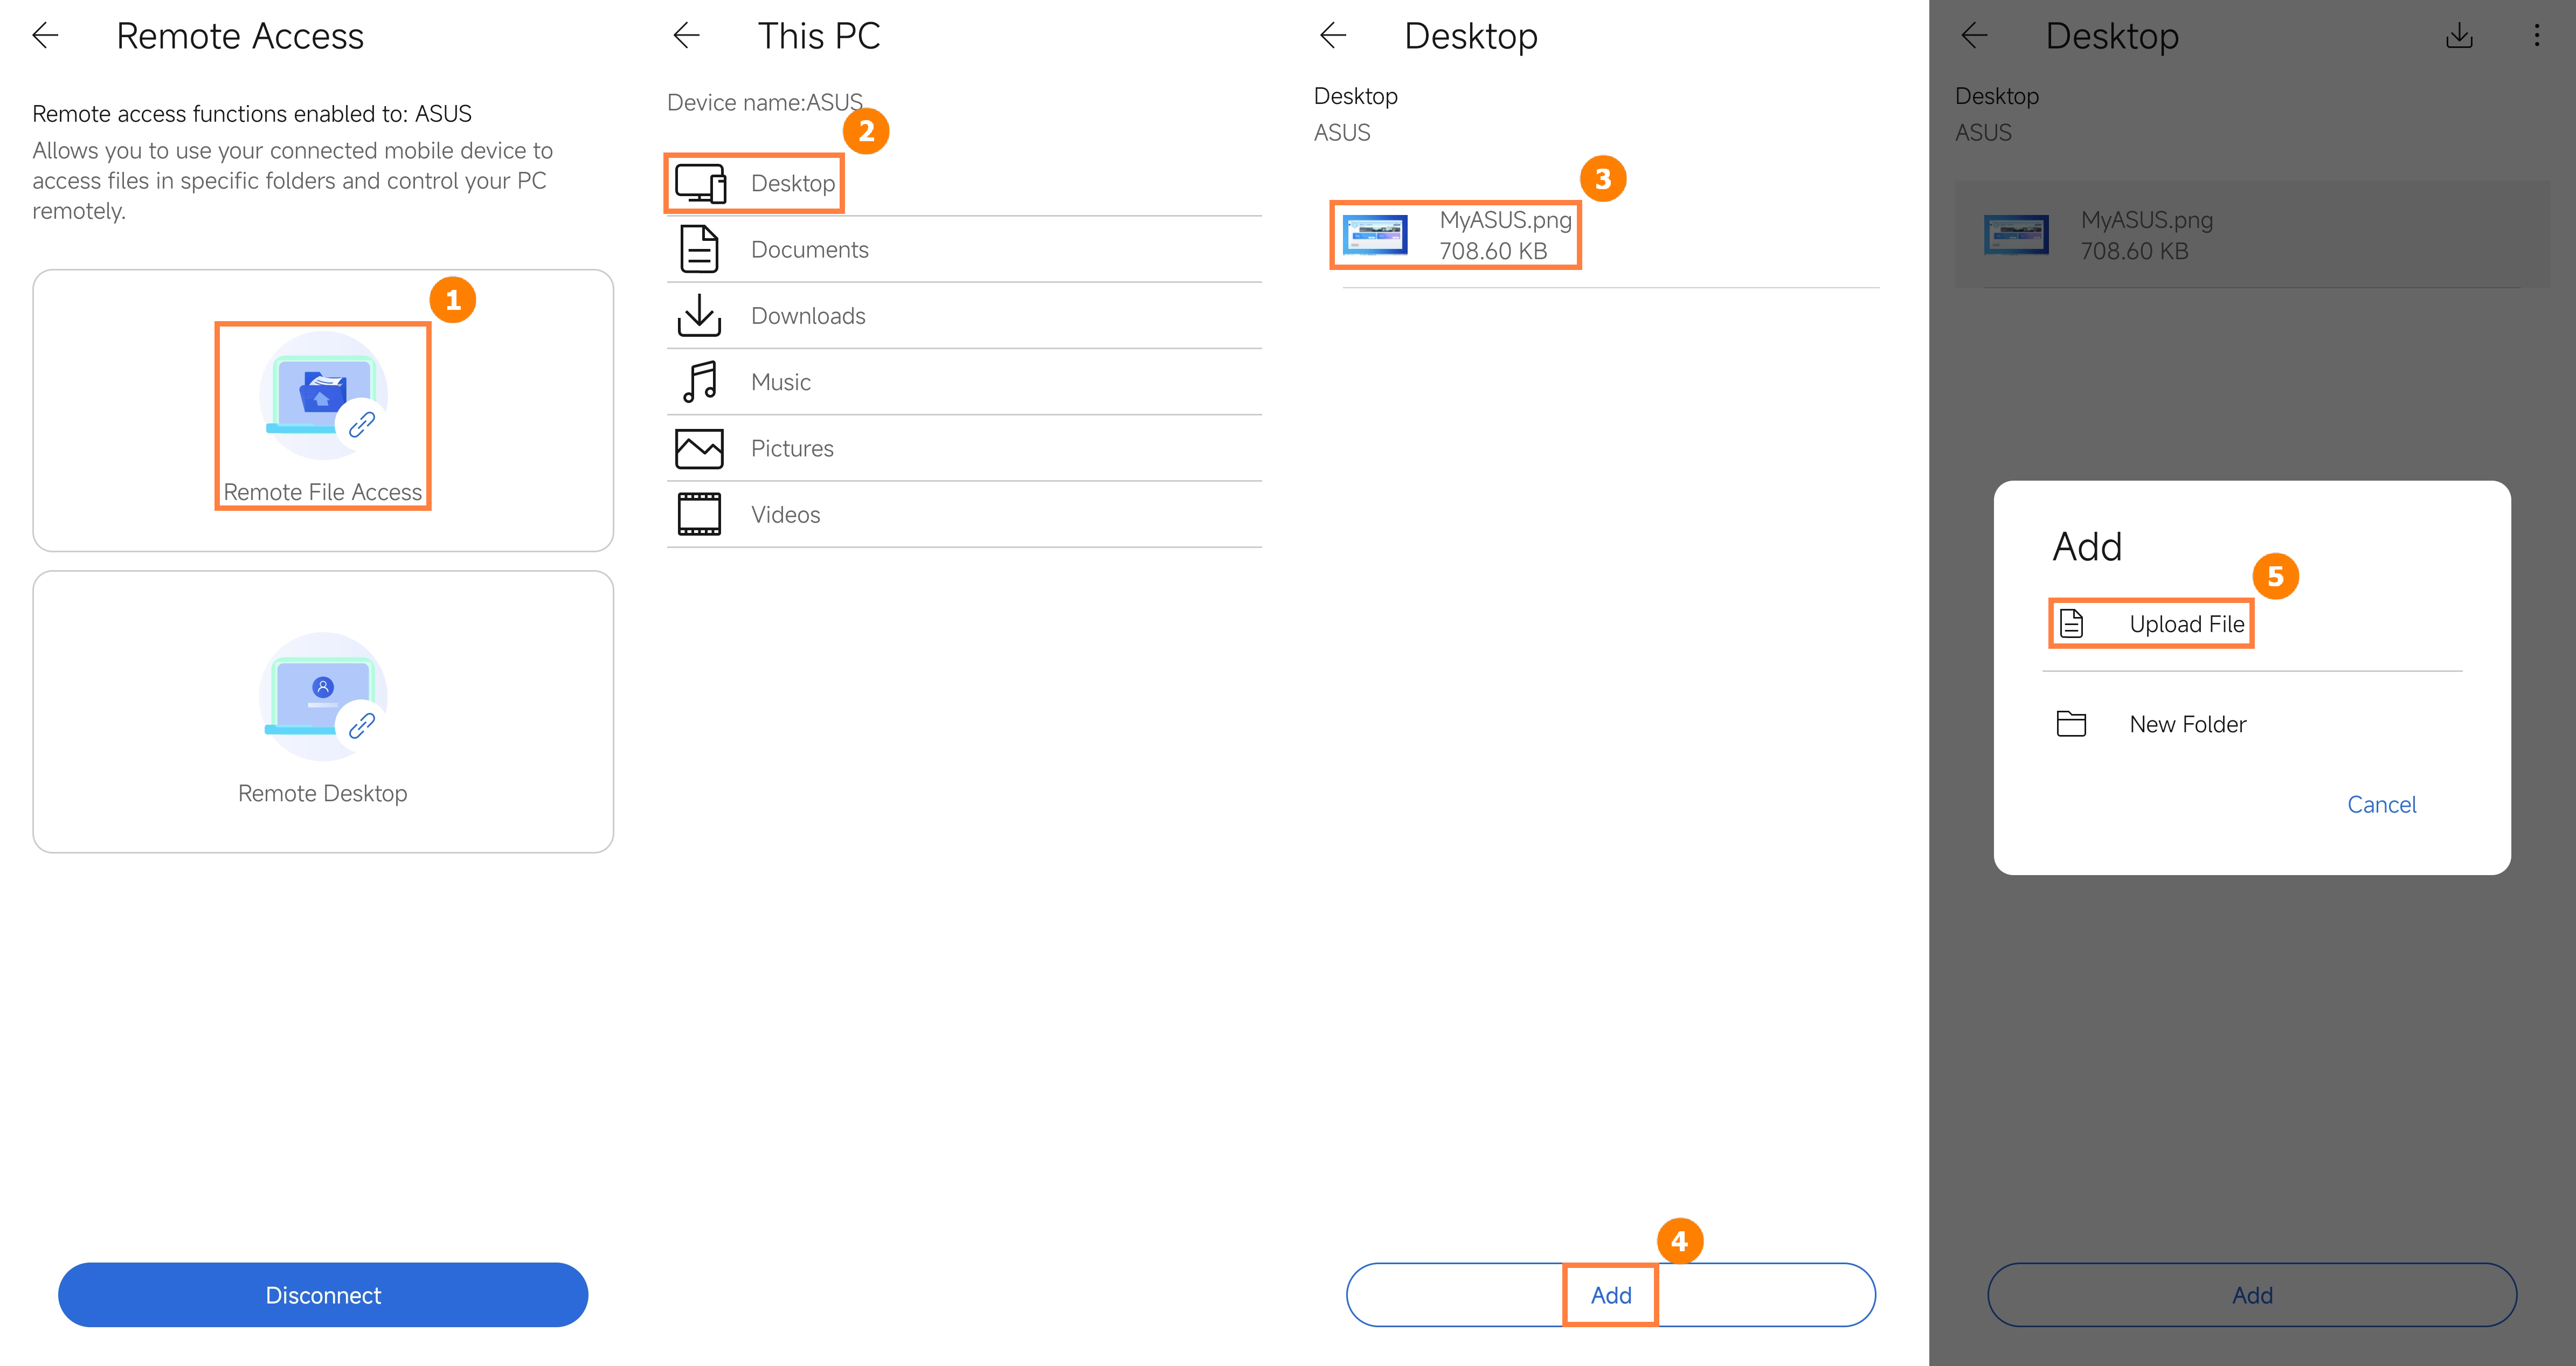
Click ①[Remote File Access], click ②[Folder], you can download ⑤[File] from your computer to your mobile device, or tap ④[New] in this folder, click ⑤[Upload File] to upload the files from your mobile device to your computer.
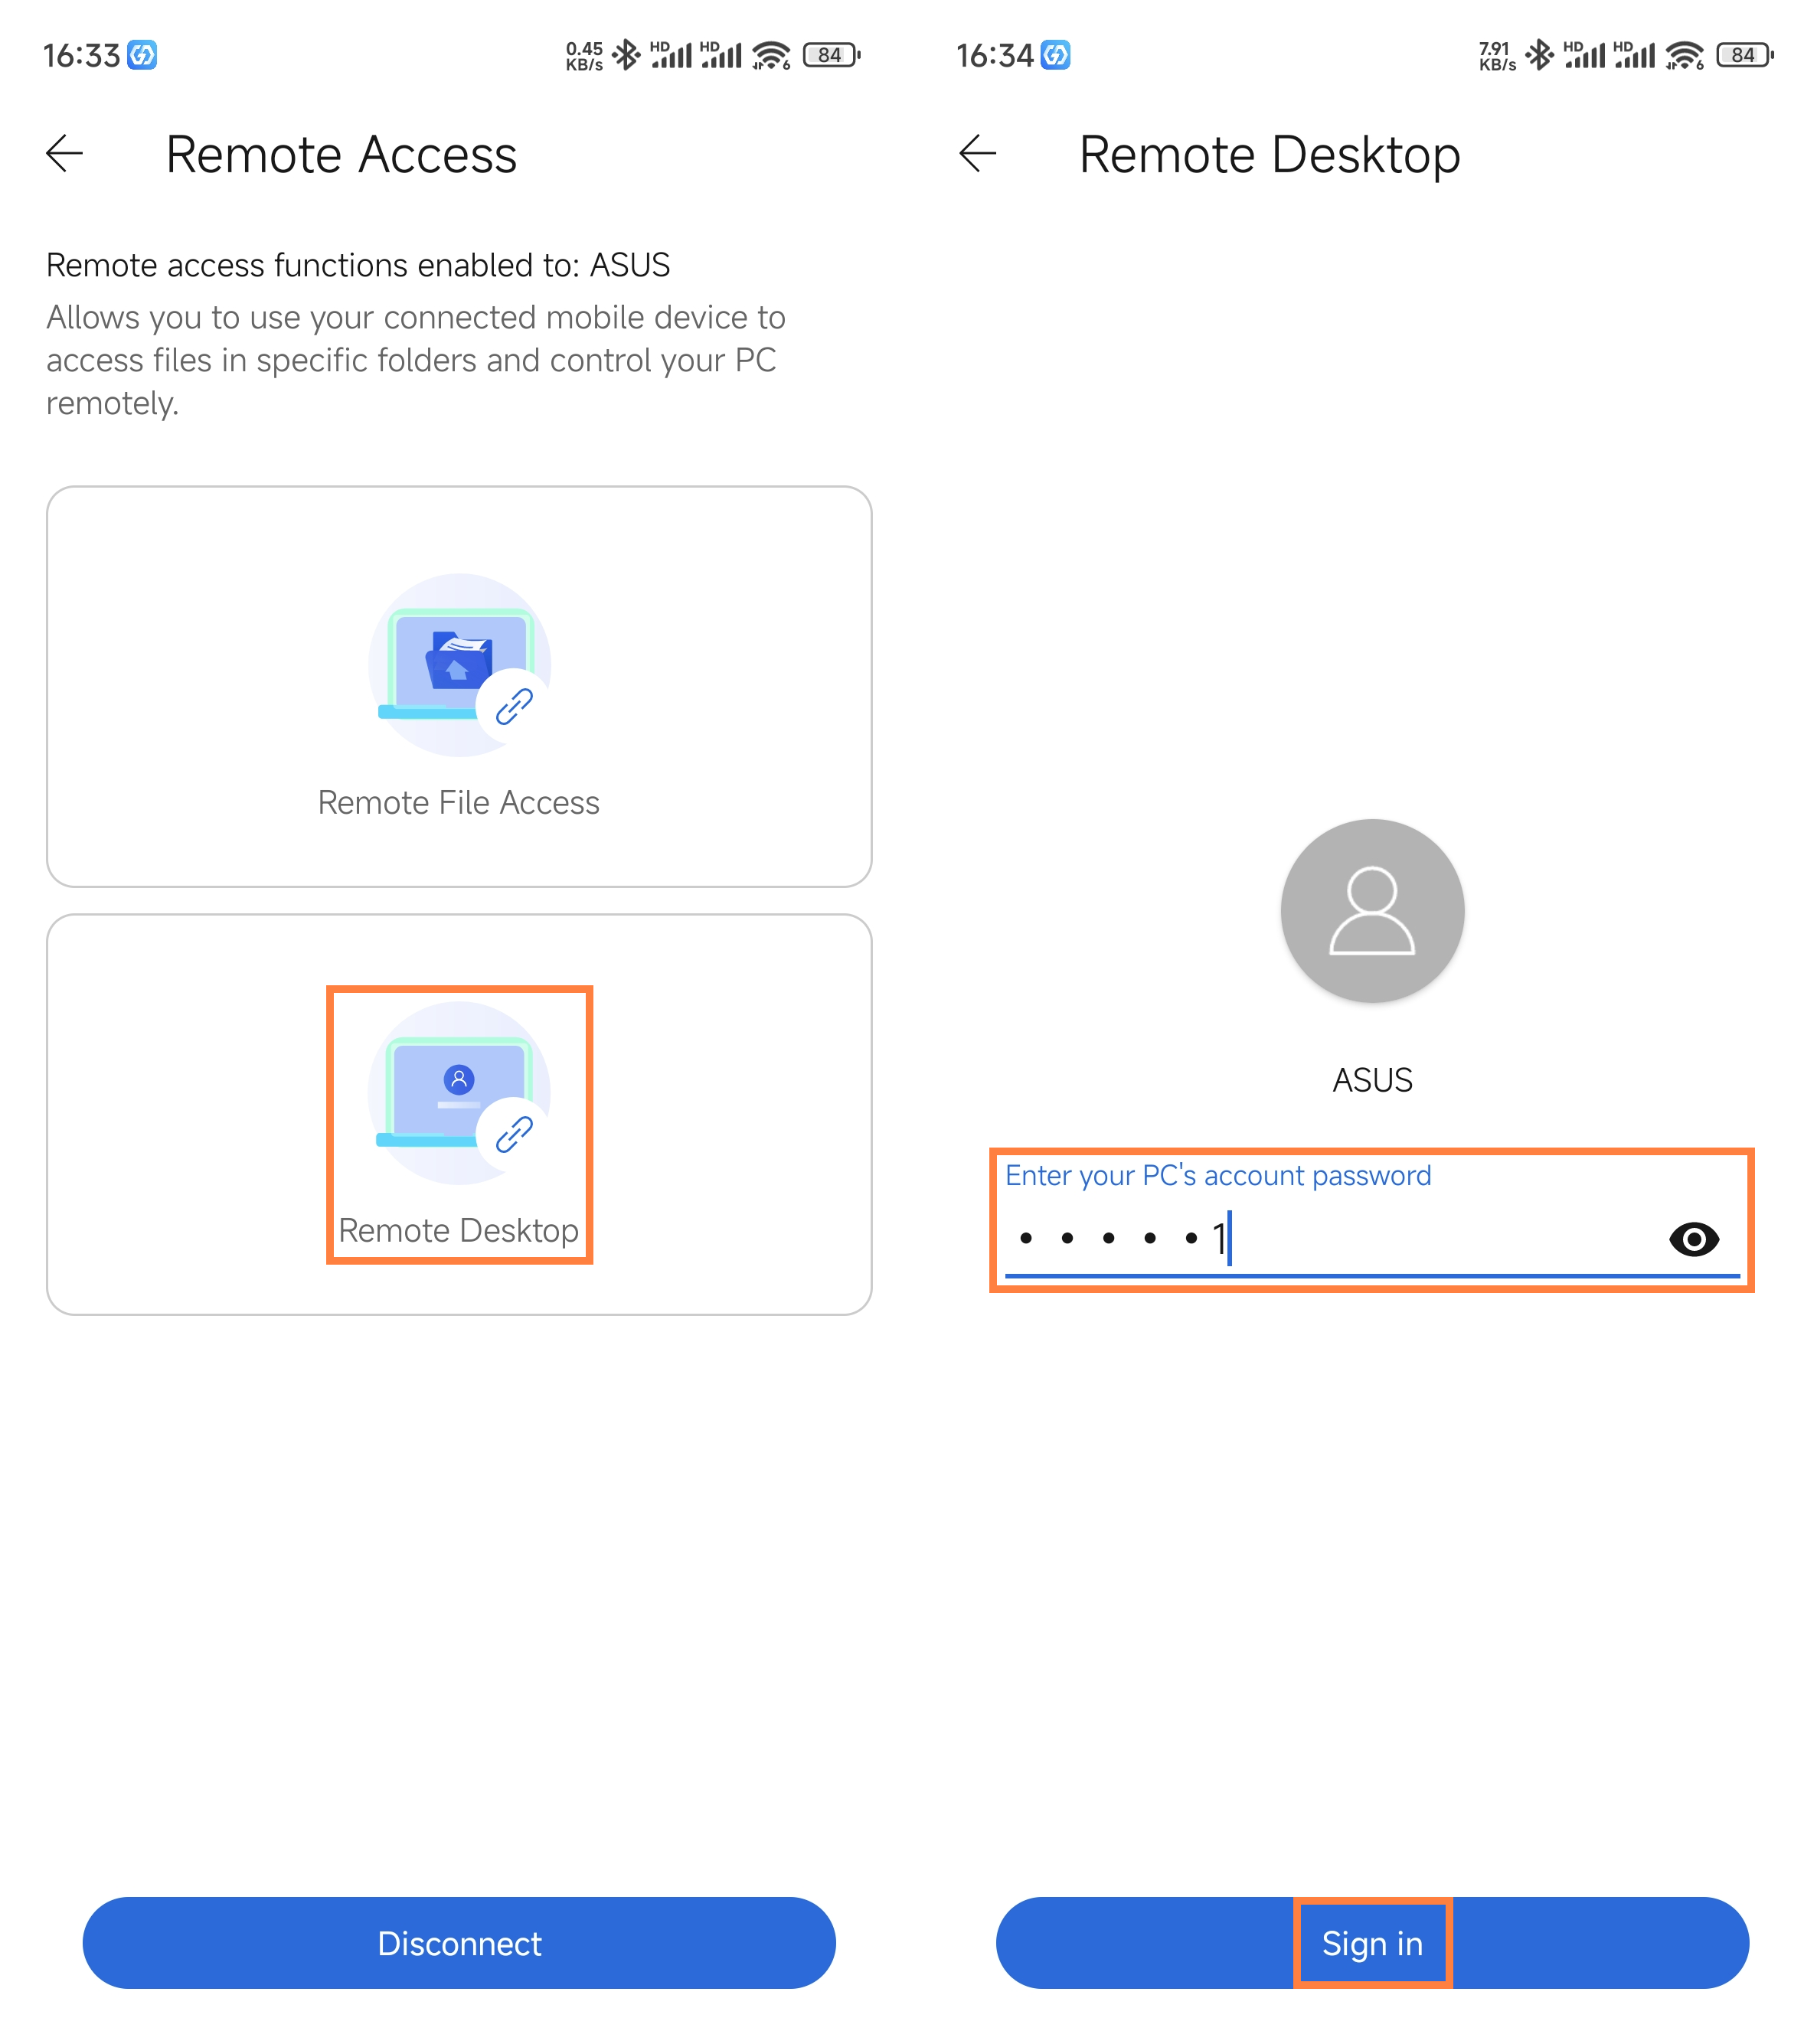
(1) Click [Remote Desktop], enter the [Login Password] of the computer, and click [Login].
※ When you use the remote access function for the first time, the system will send an email to your mailbox, and you need to manually click on the mailbox to turn on the remote access function (because it will access your computer data, so confirm that it is you who operate, to prevent privacy leakage).
※ Every time you use the remote access function on the mobile device, the system will send a notification email to your mailbox to ensure your privacy and security.
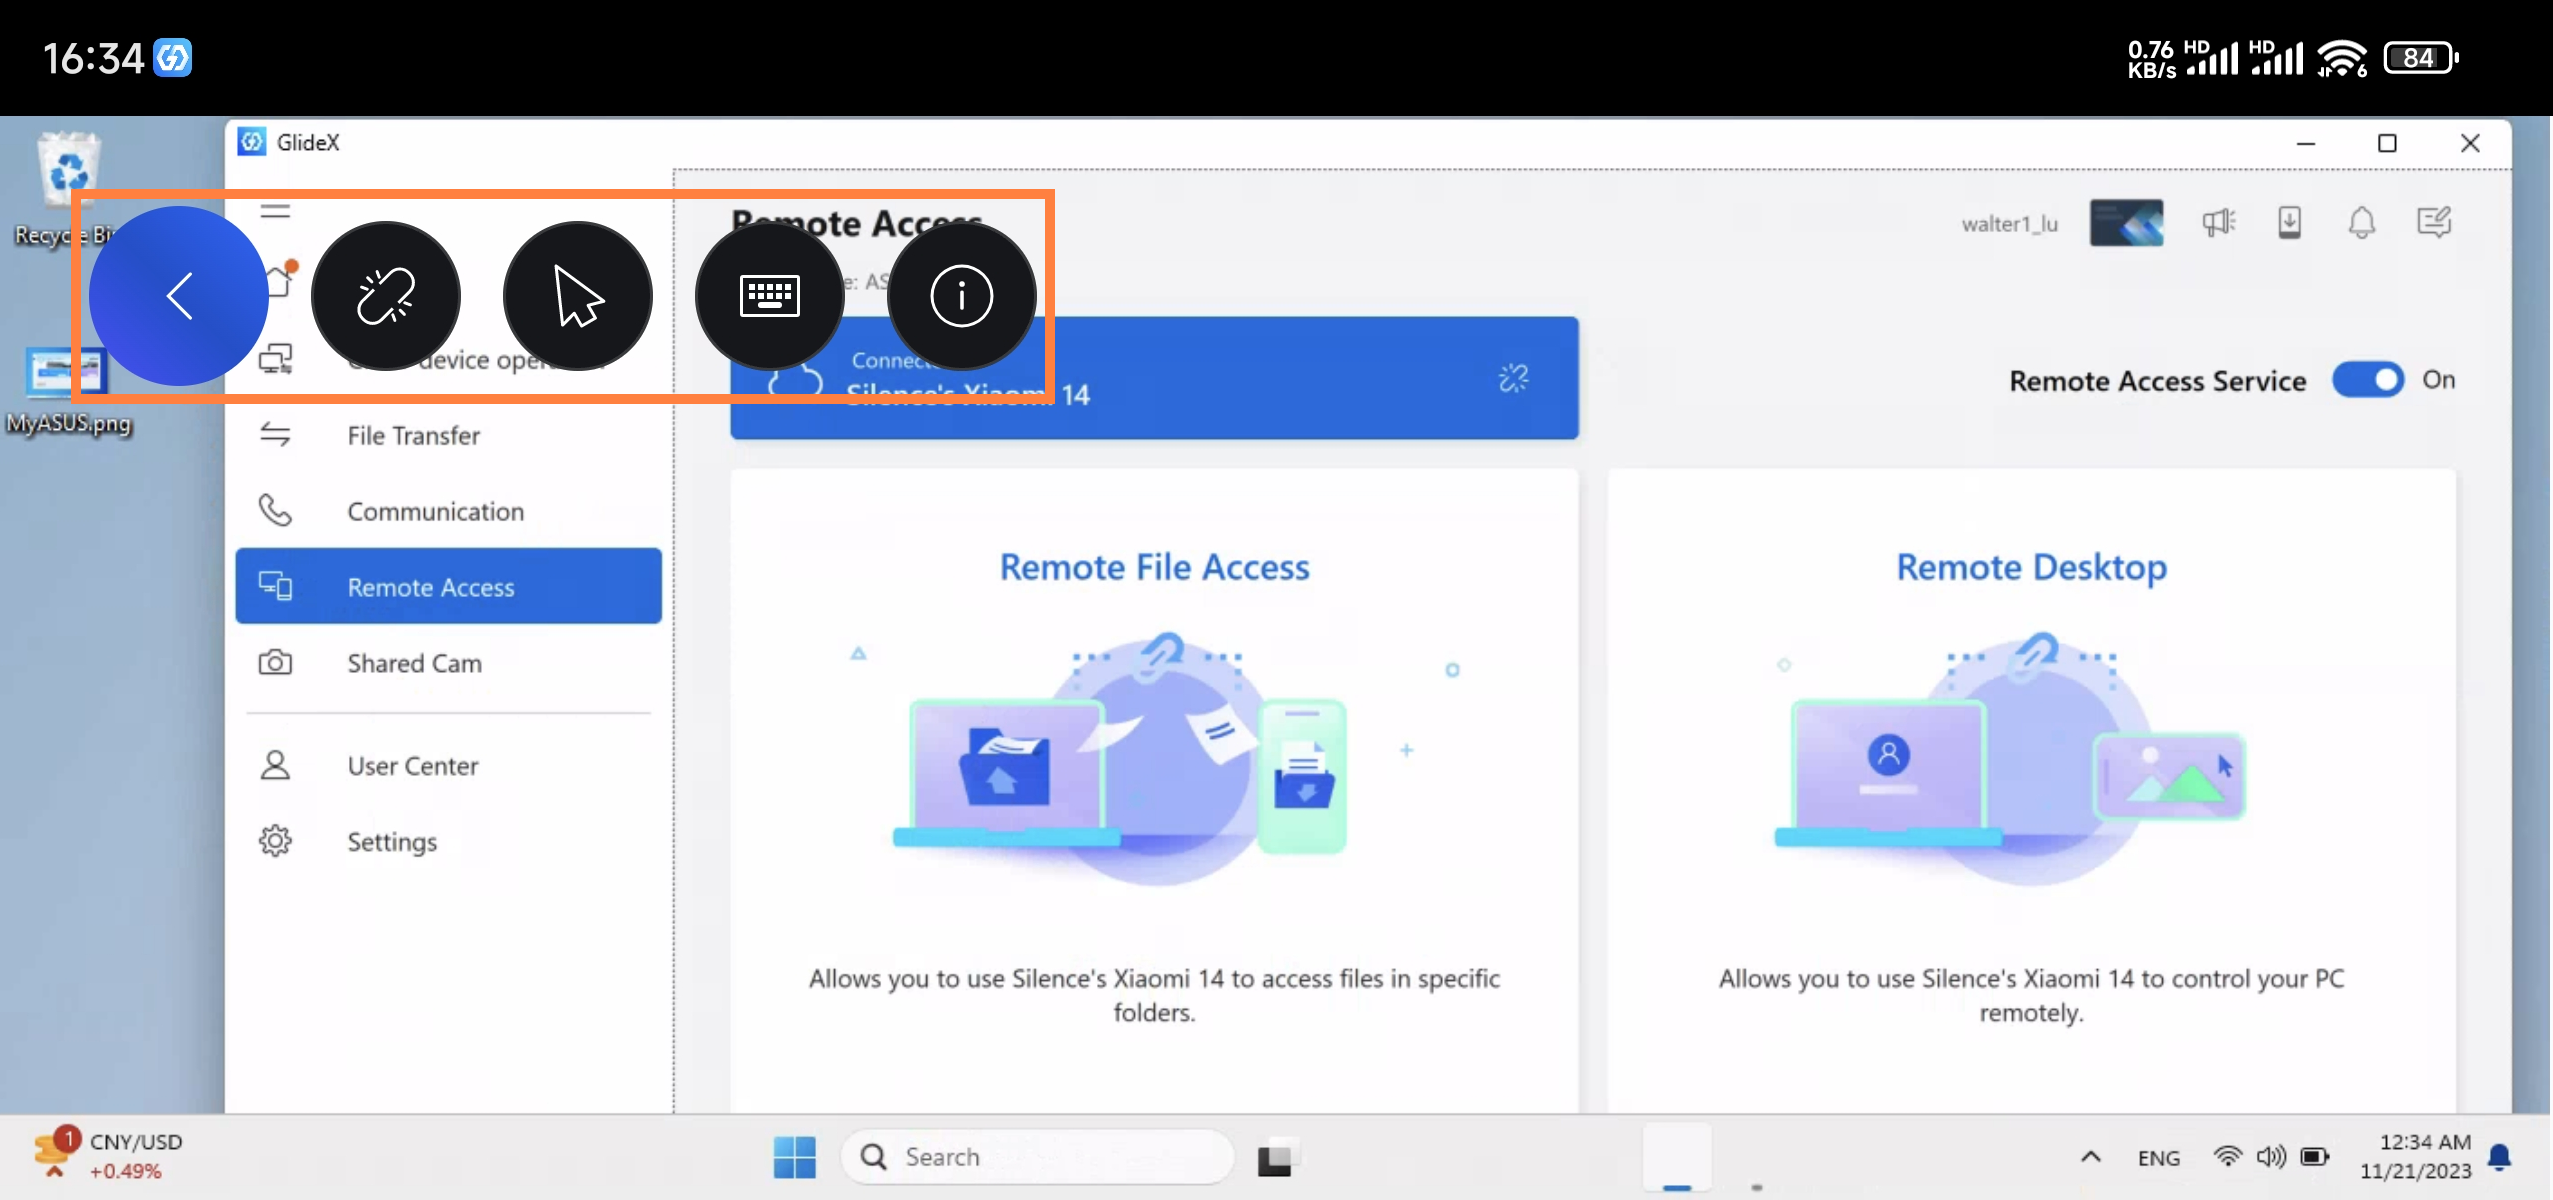
(2) The screen will be locked on the computer, and the computer screen will be displayed on the mobile device. In the menu bar from left to right: Disconnect, Enable Mouse, Enable Keyboard, and Operate Boot.
※ Remote access requires both the computer and the mobile device to log in to the same ASUS member account at the same time, and the remote access function on the computer has been enabled.
The Shared Camera feature uses your mobile device's camera as a lens for your computer through a device connection, allowing you to use this feature as a camera source on a third-party video service.
The Shared Camera feature requires the device to be connected to the same network. If you're having trouble using this feature, please refer to: [GlideX] Cannot connect your devices to use Shared Camera in third-party video-communication service...
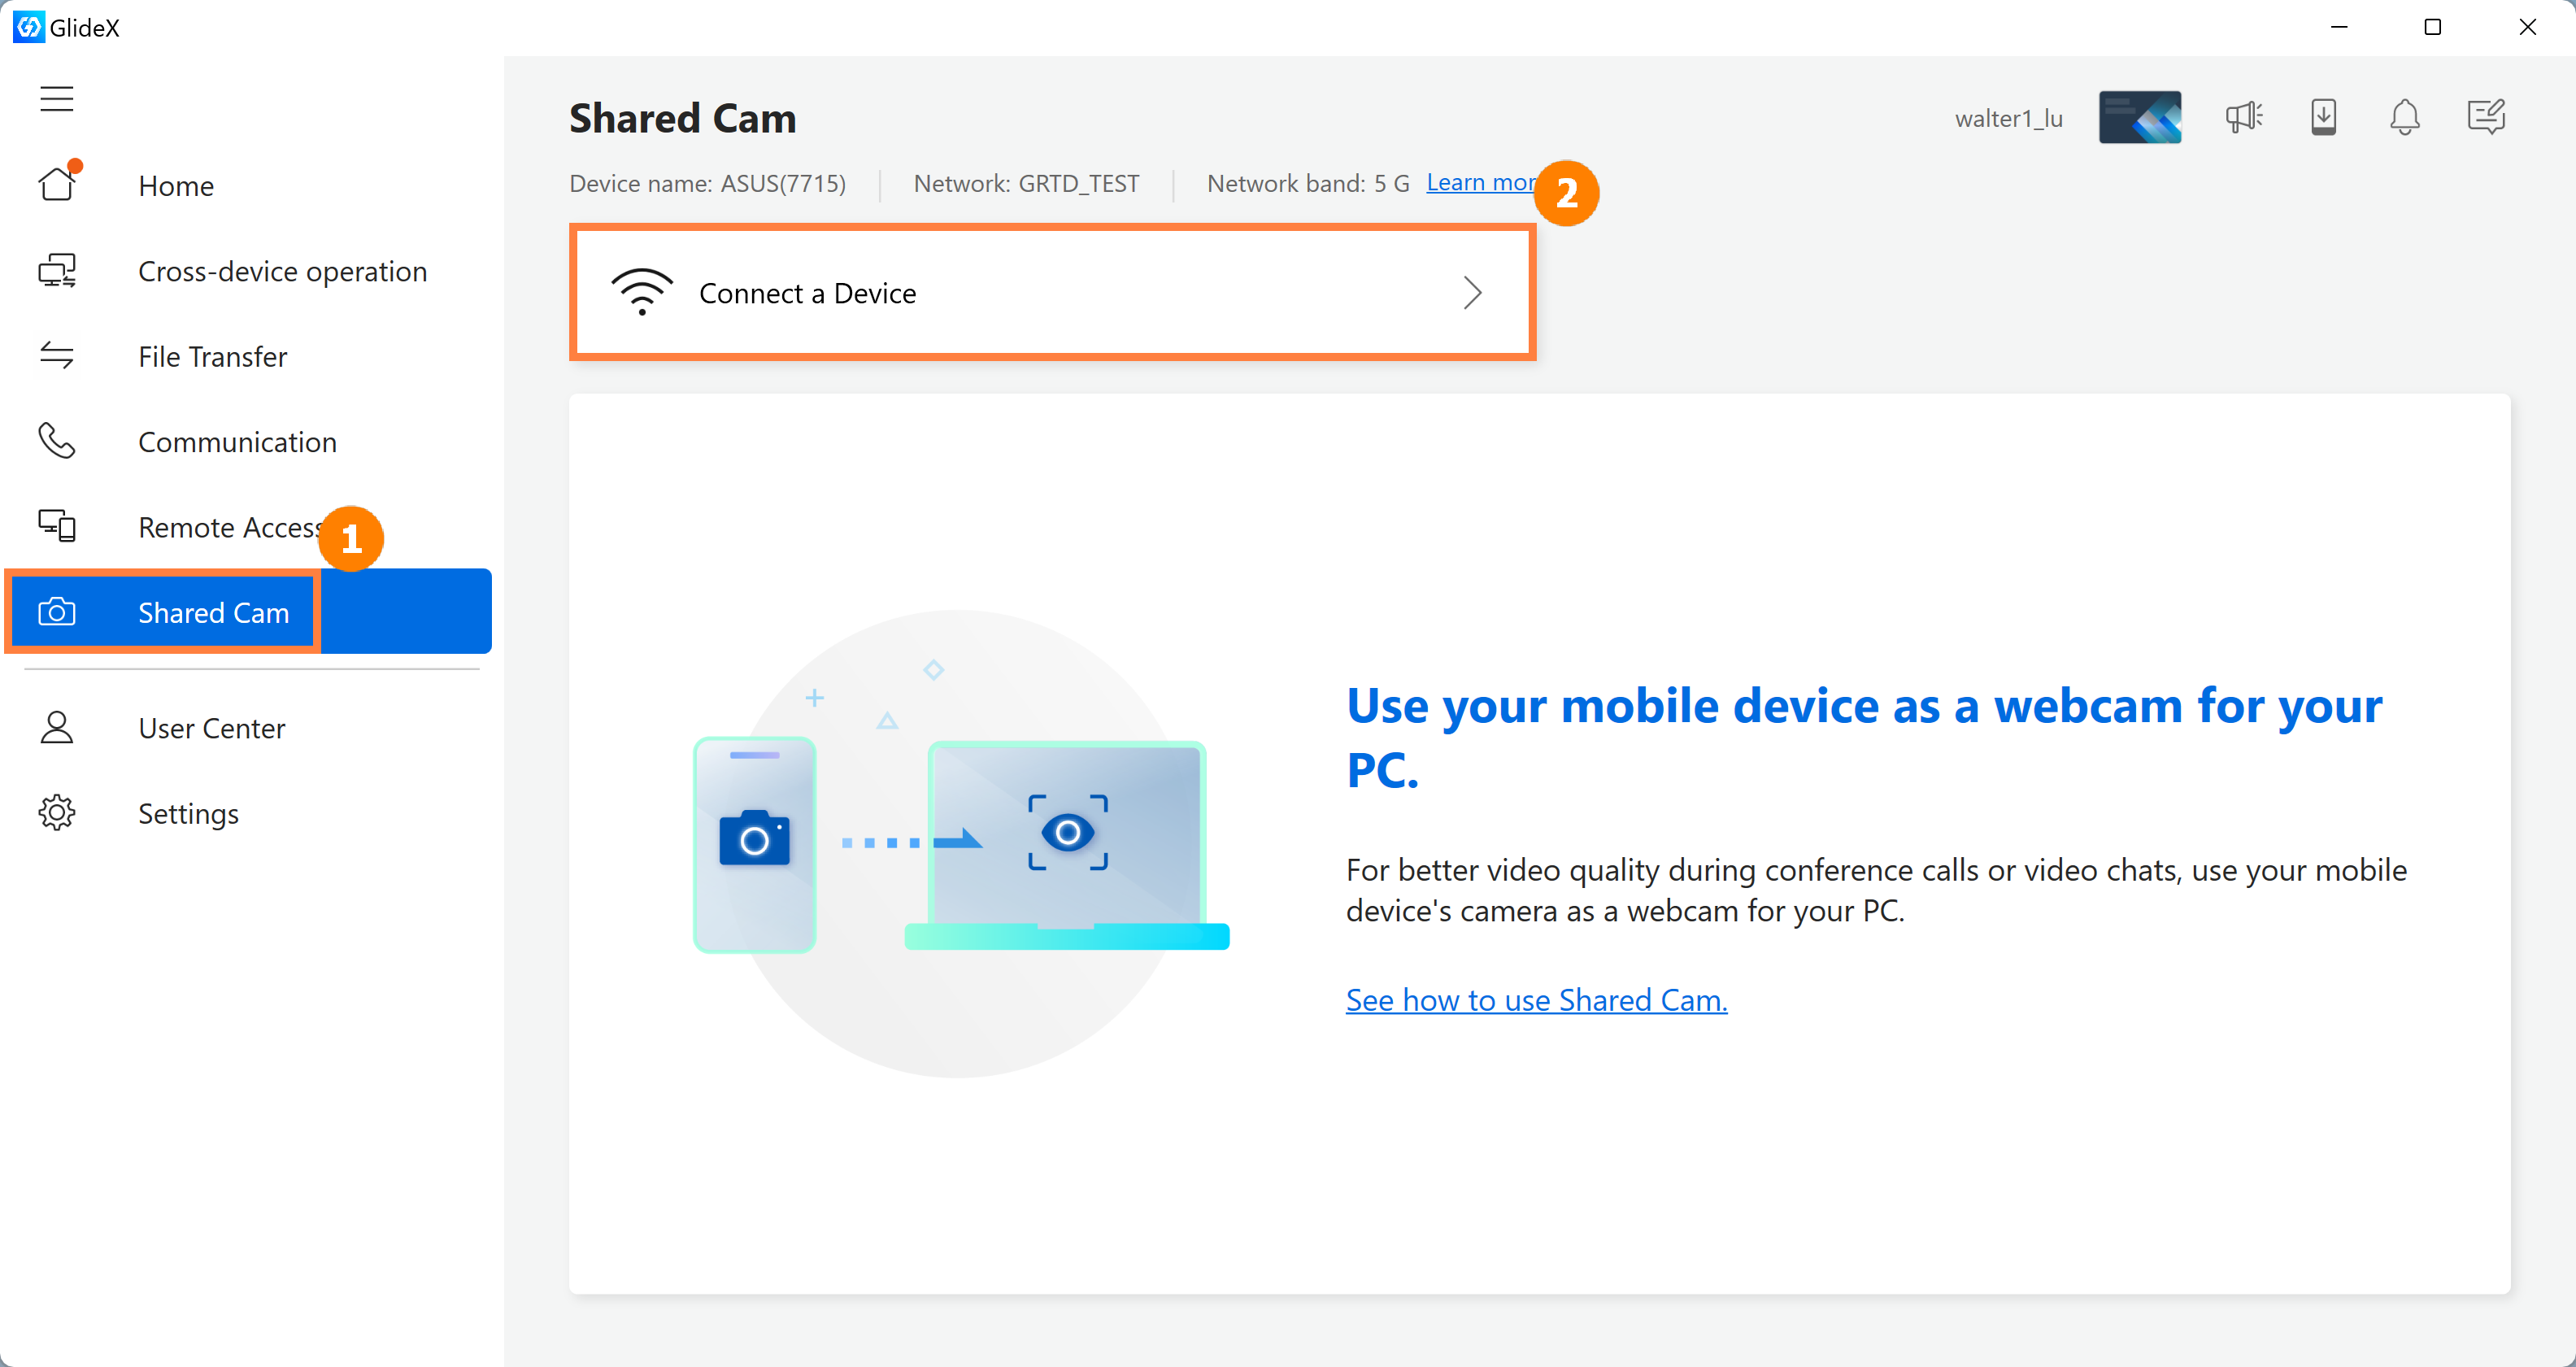
(1) Click ①[Share Camera], Click ②[Connect Device].
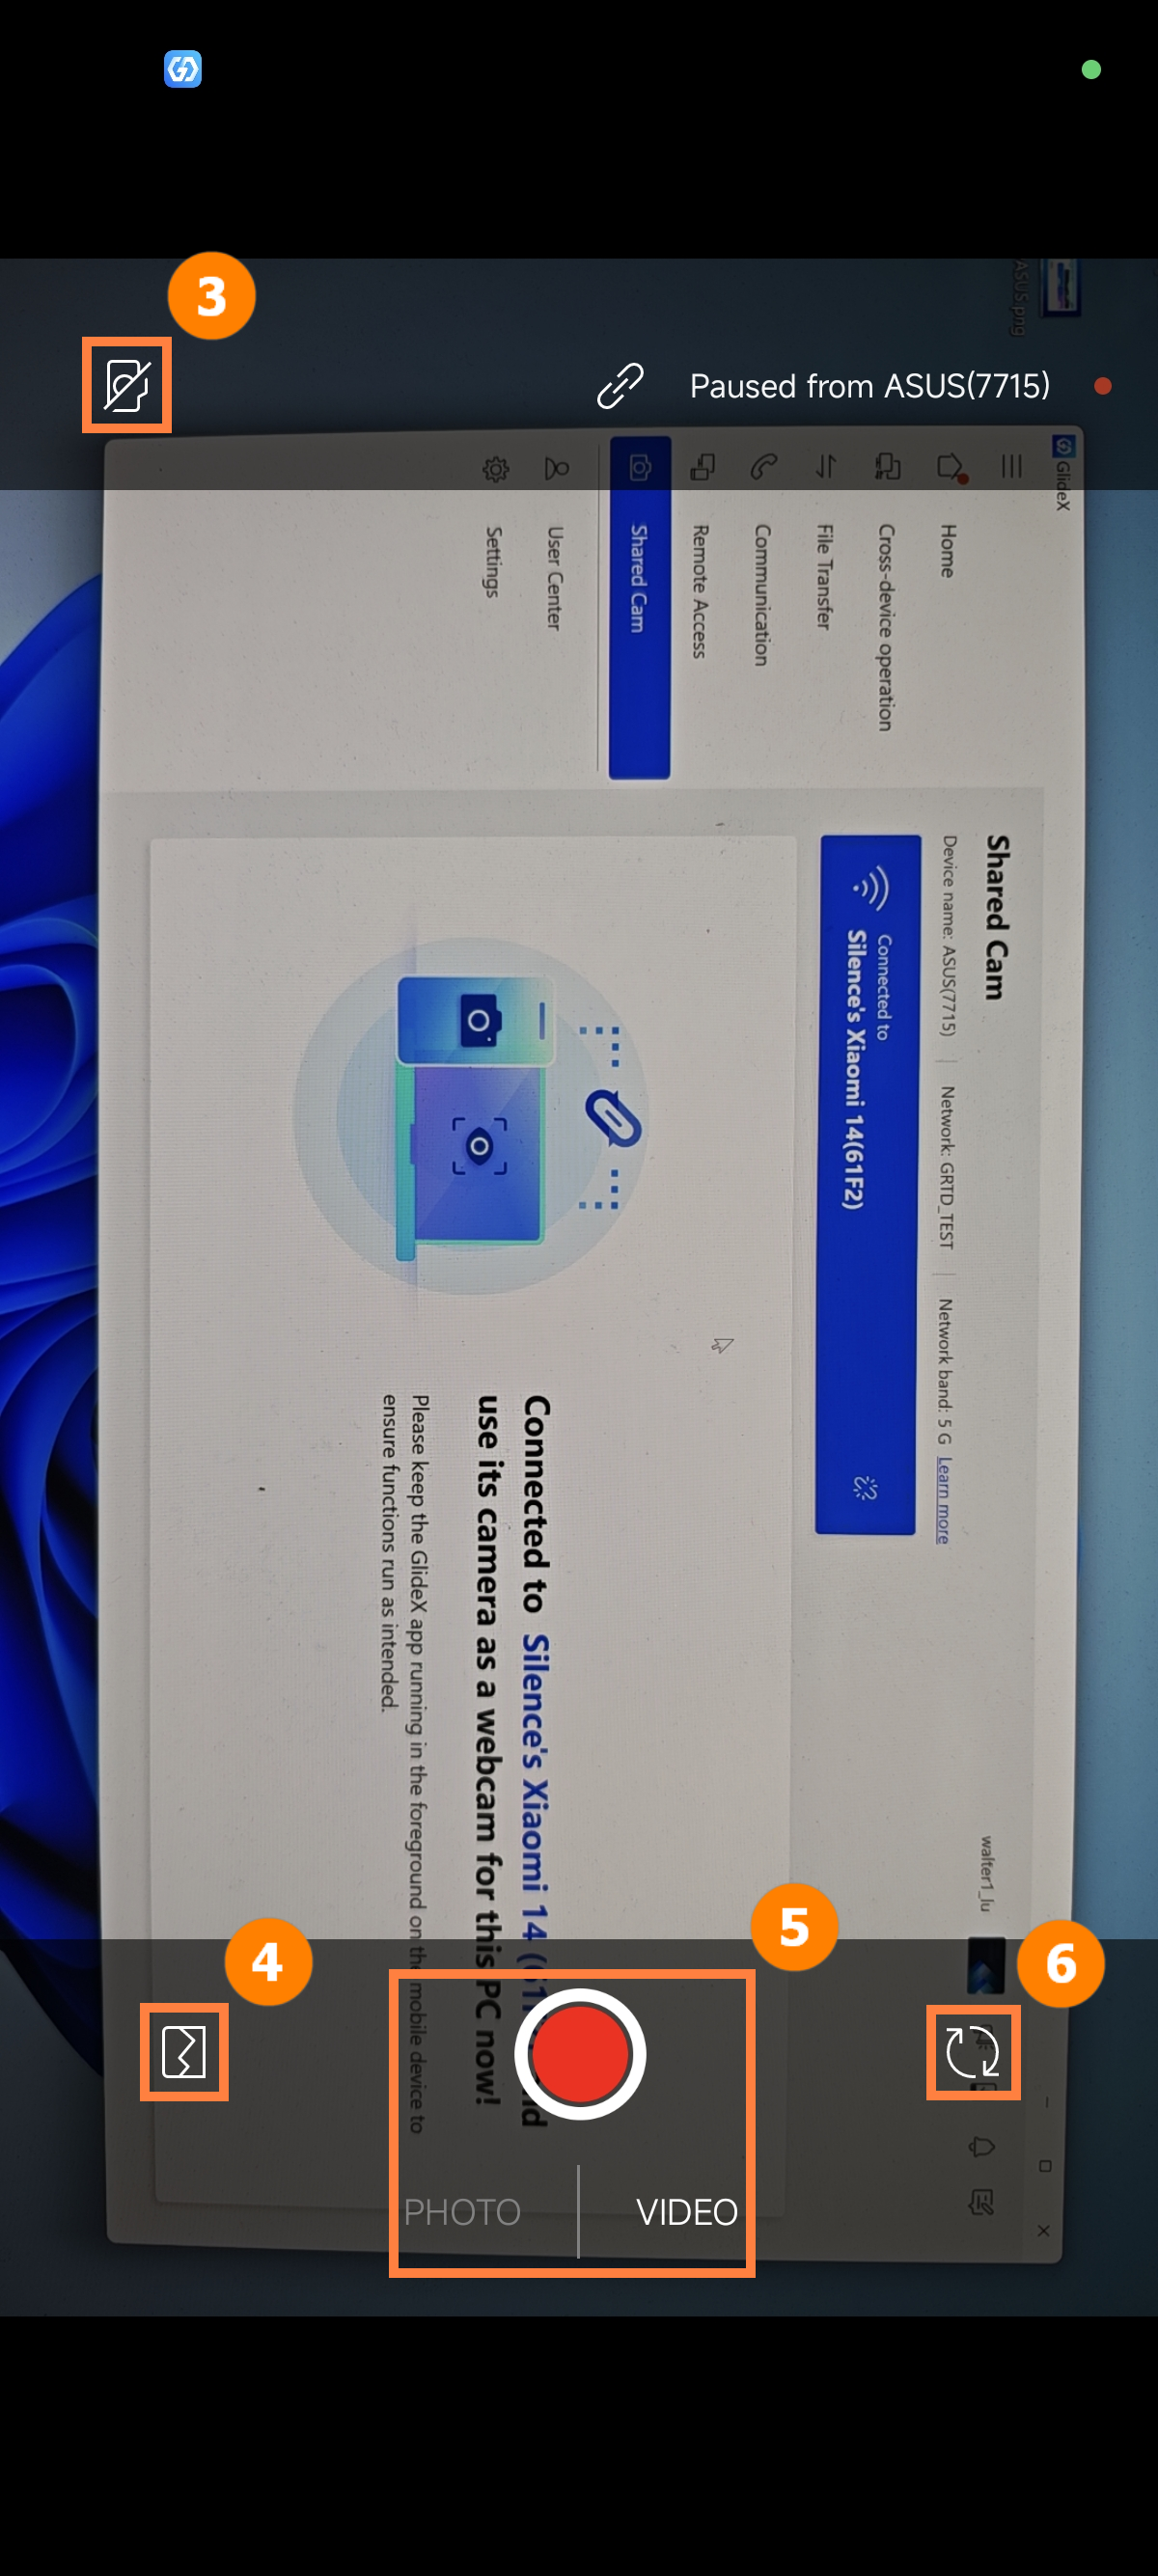
(2) The connection is successful. On the Share Camera page on the mobile device, ③[End Camera Sharing], ④[Taken Photos or Videos], ⑤[Select to take Photos or Videos], ⑥[Flip Camera].
※ When you use the mobile device to share the camera function, in order to save the power of your mobile device, when the mobile device screen timed out for more than 1 minute, it will enter idle mode, you only need to click the mobile device screen to return to the camera sharing function.
※ [Select to take a photo or video], this function allows you to take a photo or video during the use of the video service, and transfer your notes or works to your computer in real time through the file transfer function, and share it with others.
(3) Taking the system camera as an example, on the system camera preview page, we can choose the video capture source as [GlideX SharedCam], and we can add the video from the mobile device camera to the video when we use third-party software to broadcast or record the video.

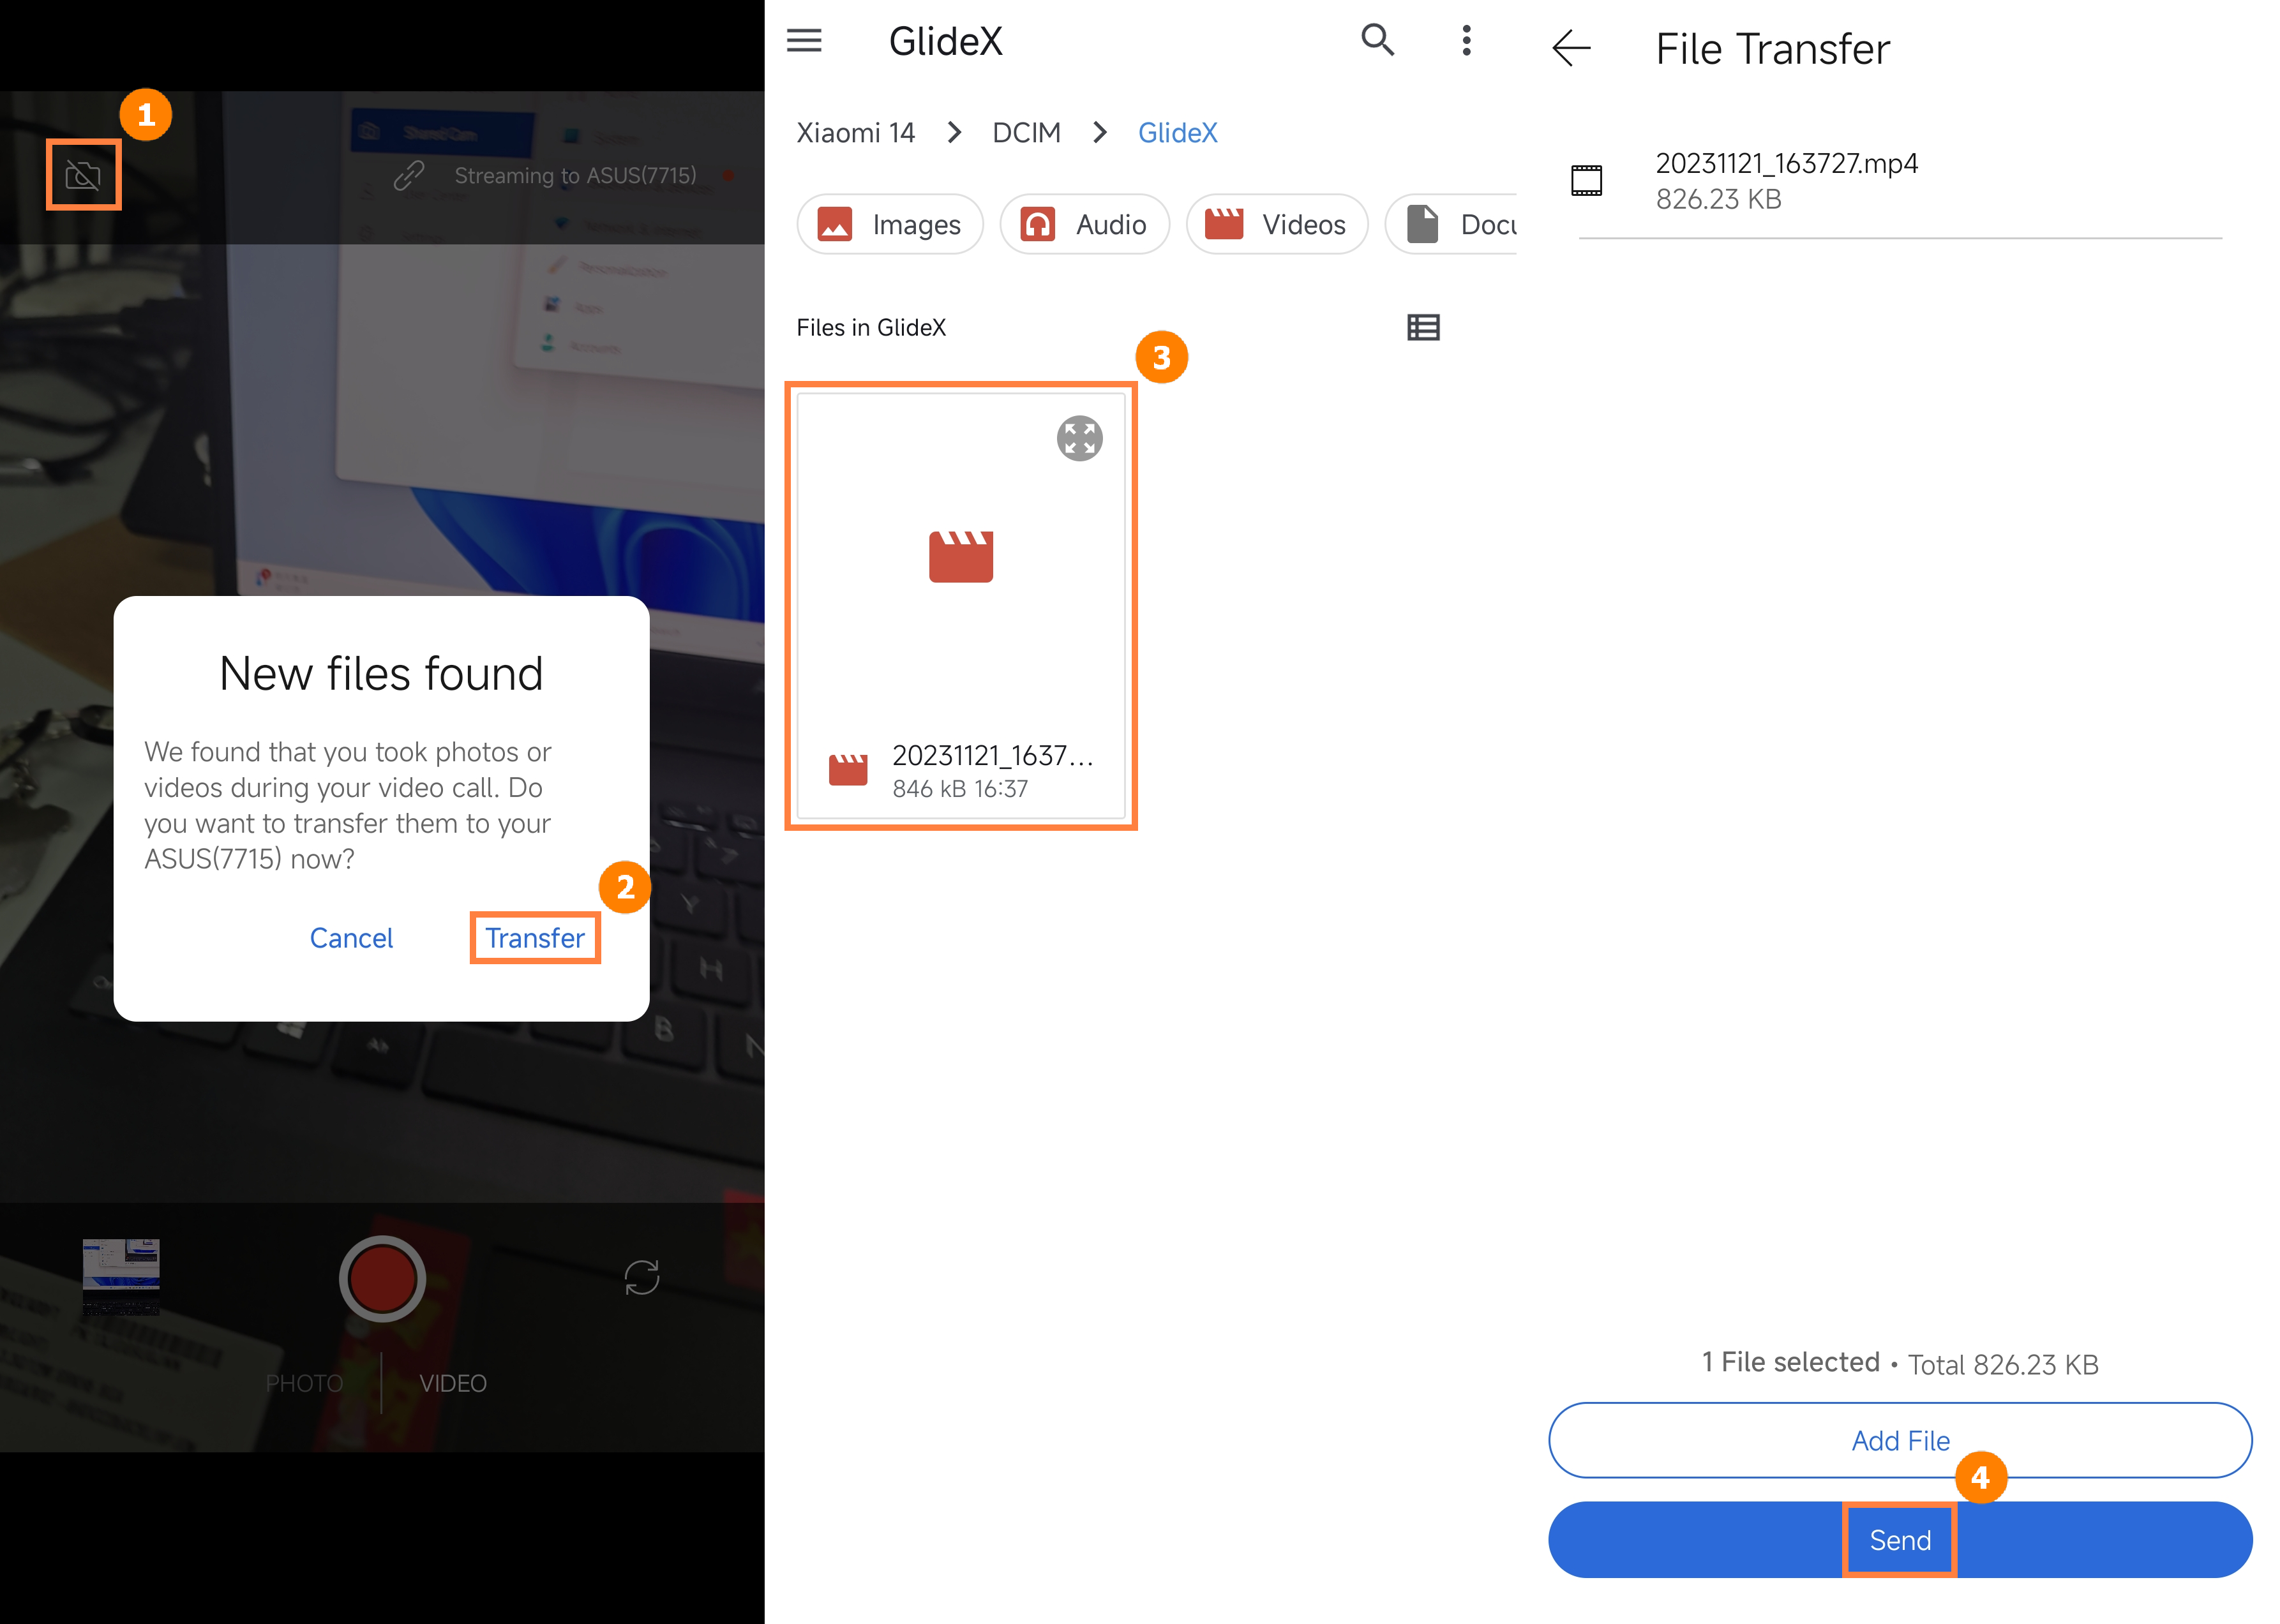
(4) When you tap ①[End Camera Sharing], if you take a photo or video while using it, you will be reminded whether to transfer the file you just shot to your computer. If you want to transfer the captured file, click ②[Transfer], ③[Photo or video to send], and ④[Send].
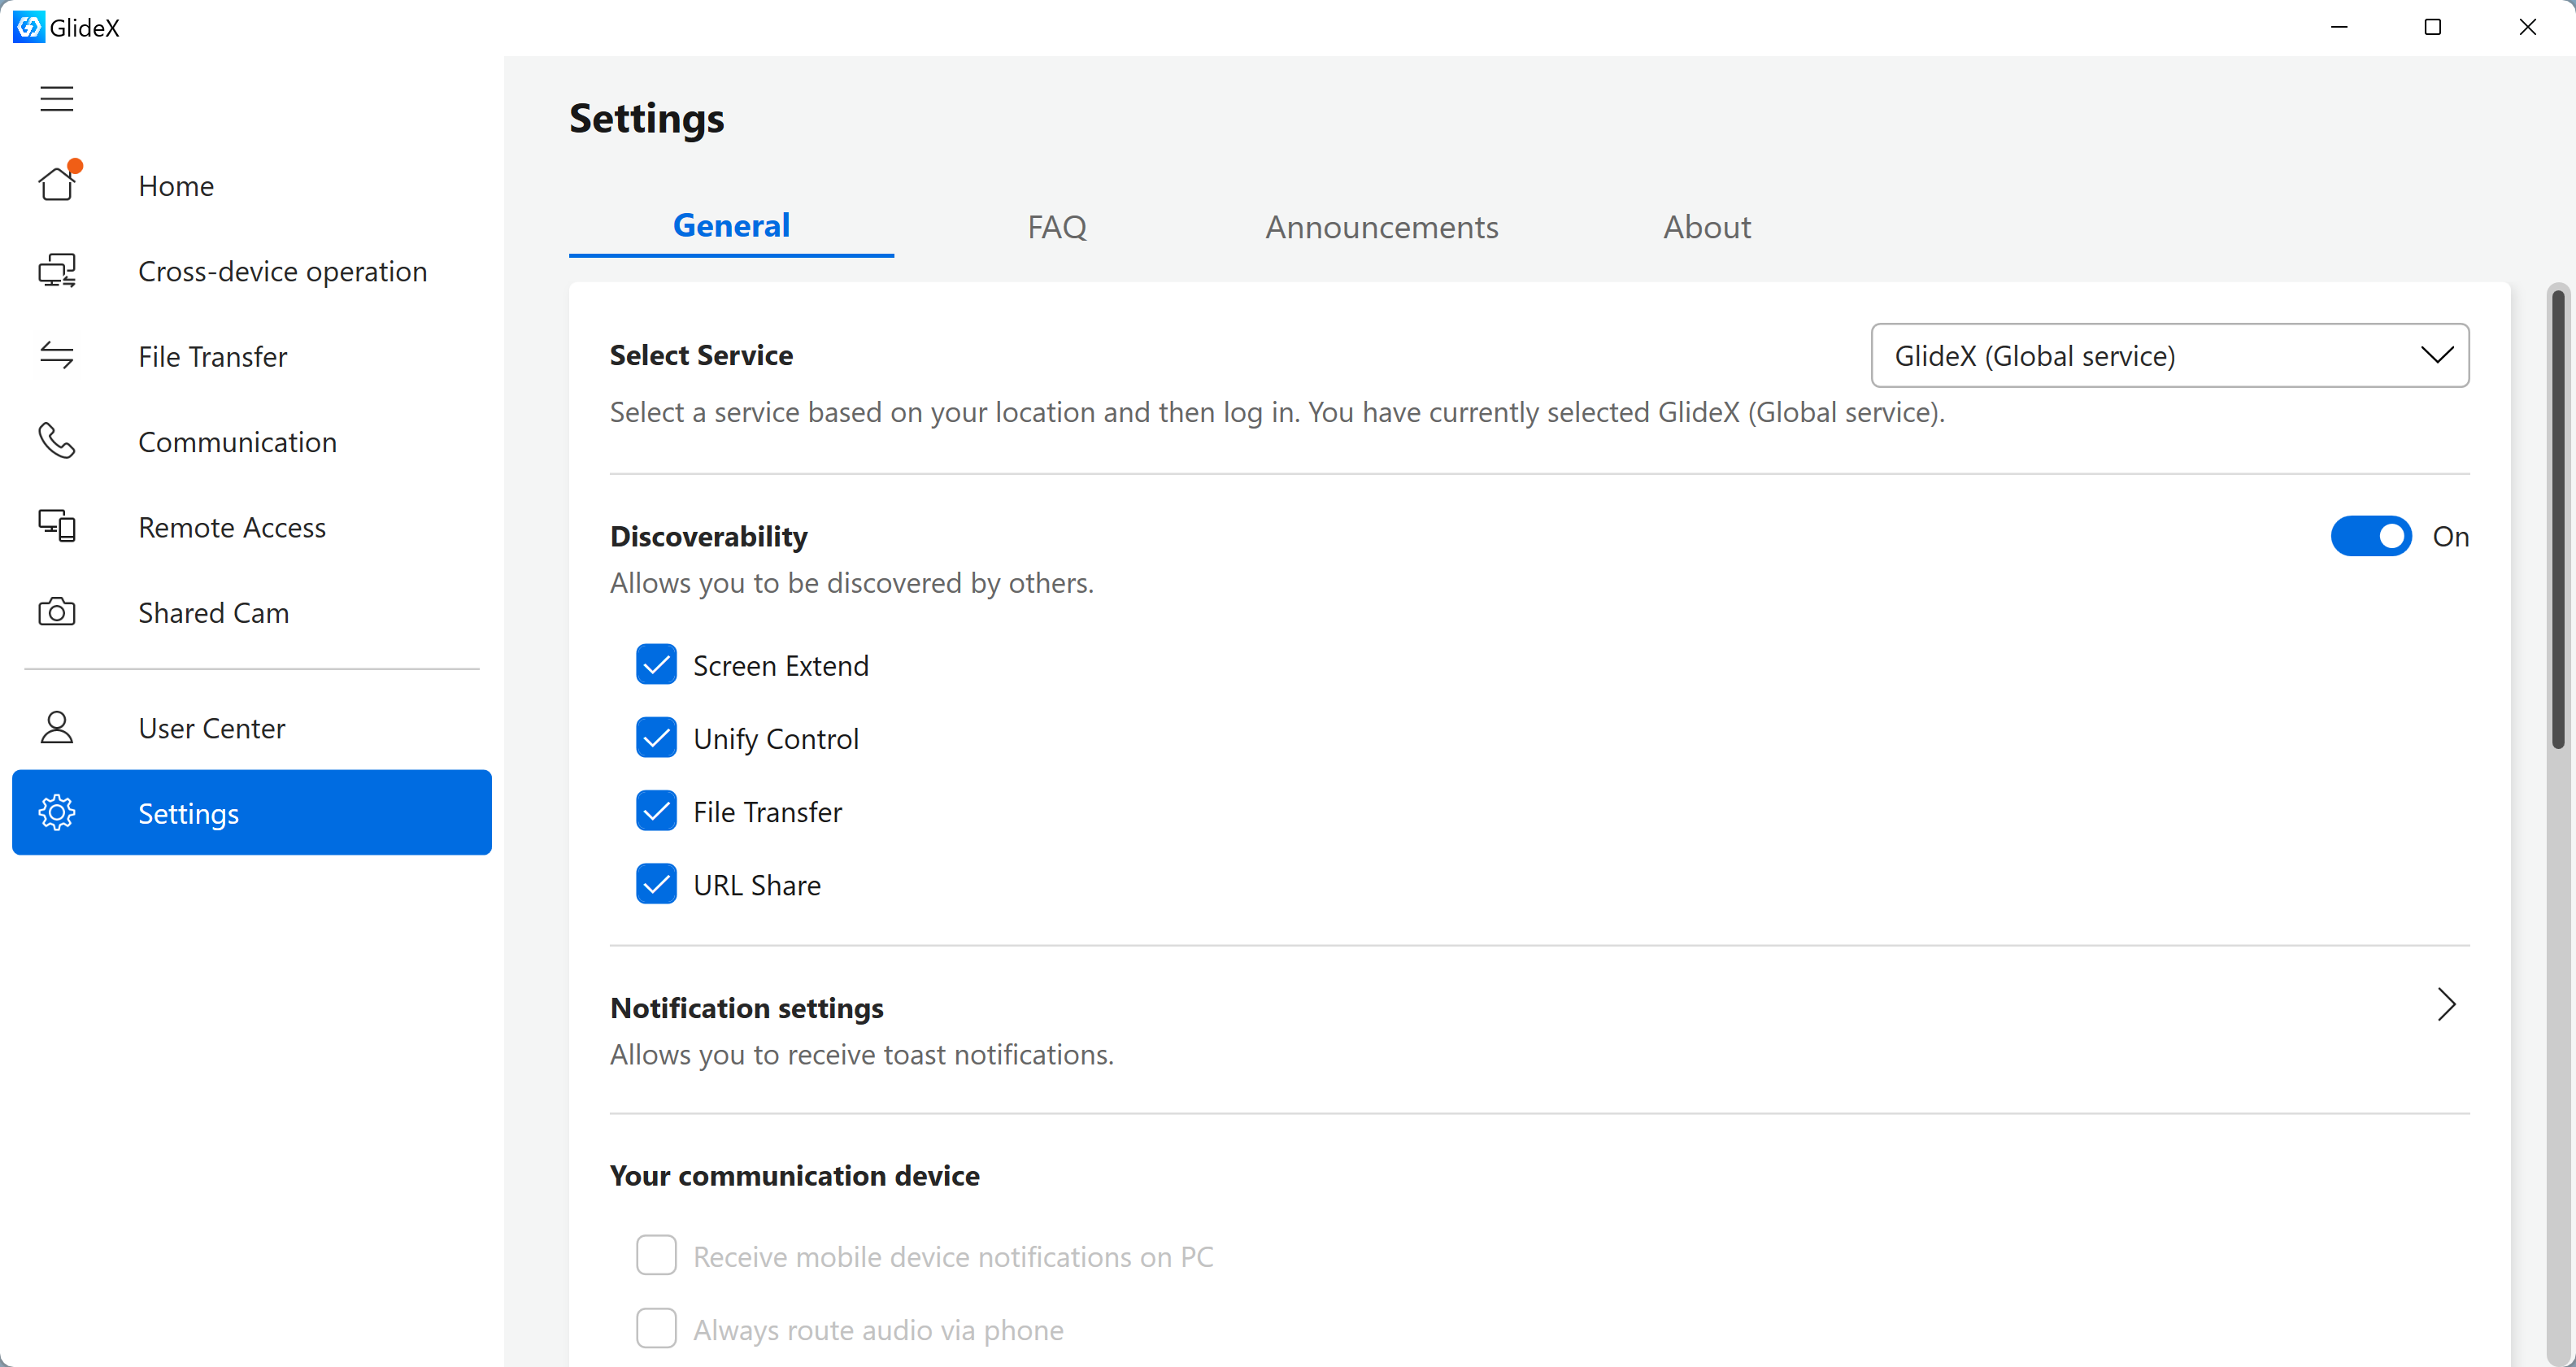
Please make sure that [Discoverability] is turned on, if it is not enabled, functions such as Screen Extend will not be available.
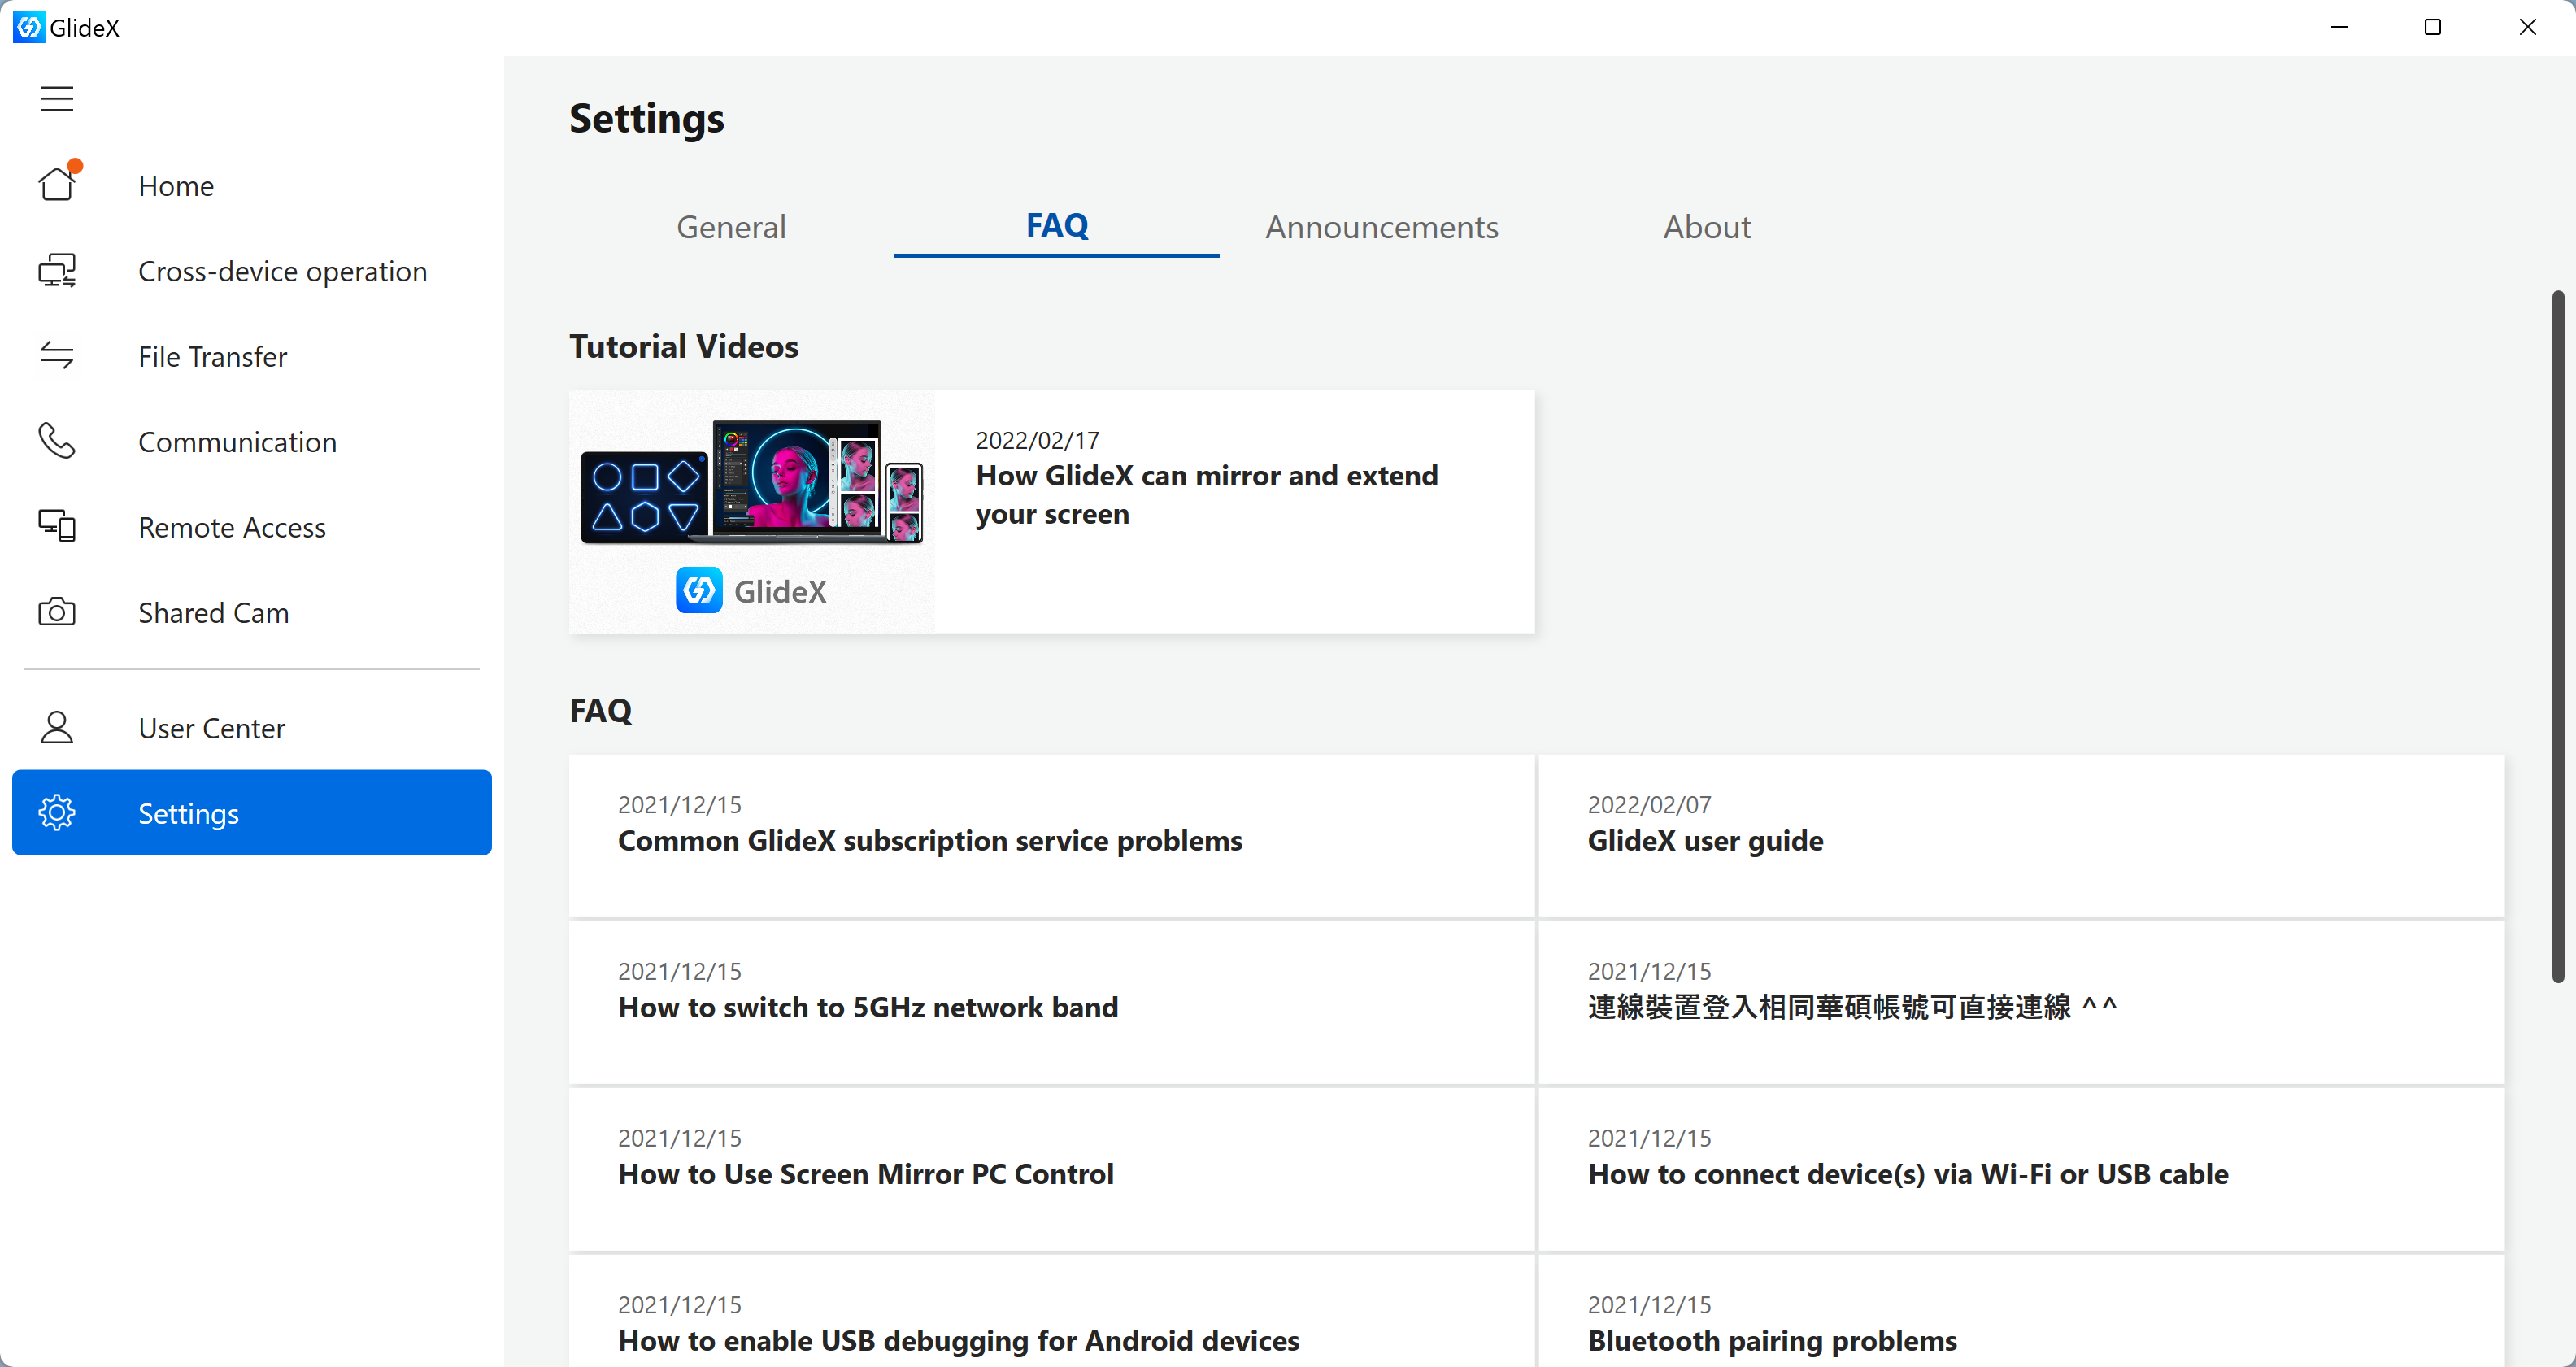
You can check the common problems and corresponding solutions when using the GlideX App.
If you find any issues or have any feedback on GlideX, please provide feedback via the desktop or mobile app, please refer to: [GlideX] Learn how to send feedback to GlideX | Official Support | ASUS Global
